warning light MERCEDES-BENZ CLA-Class 2015 C117 Owner's Guide
[x] Cancel search | Manufacturer: MERCEDES-BENZ, Model Year: 2015, Model line: CLA-Class, Model: MERCEDES-BENZ CLA-Class 2015 C117Pages: 362, PDF Size: 6.93 MB
Page 83 of 362
Problem
Possible causes/consequences and
M
MSolutions You have lost a Smart-
Key. X
Have the SmartKey deactivated at a qualified specialist work-
shop.
X Report the loss immediately to the vehicle insurers.
X If necessary, have the locks changed as well. You have lost the
mechanical key. X
Report the loss immediately to the vehicle insurers.
X If necessary, have the locks changed as well. Doors
Important safety notes
G
WARNING
If children are left unsupervised in the vehicle, they could:
R open the doors, thus endangering other
people or road users.
R get out and disrupt traffic.
R operate the vehicle's equipment.
Additionally, children could set the vehicle in
motion if, for example, they:
R release the parking brake.
R shifting the automatic transmission out of
park position P
R Start the engine.
There is a risk of an accident and injury.
When leaving the vehicle, always take the
SmartKey with you and lock the vehicle. Never
leave children or animals unattended in the
vehicle. Always keep the SmartKey out of
reach of children.
You should preferably place luggage or loads in the cargo compartment. Observe the load-
ing guidelines (Y page 262). Unlocking and opening doors from
the inside
! The side windows will not open/close if
the battery is discharged or if the side win- dows have iced up. It will then not be pos- sible to close the door. Do not attempt to
force the door closed. You could otherwise
damage the door or the side window.
i When a door is opened, the side window
on that side opens slightly. When the door
is closed, the side window closes again. X
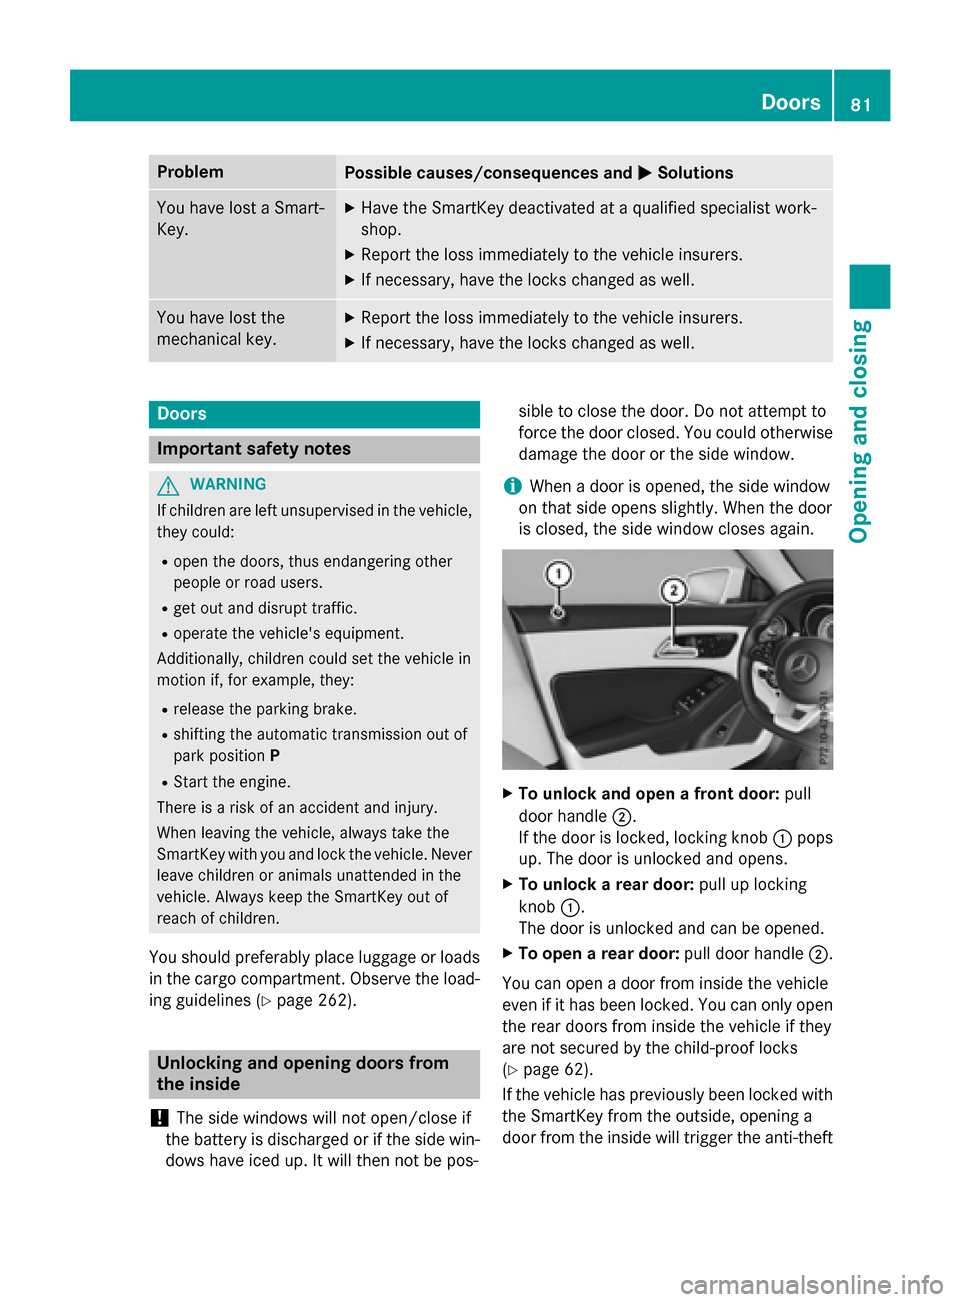
To unlock and open a front door: pull
door handle ;.
If the door is locked, locking knob :pops
up. The door is unlocked and opens.
X To unlock a rear door: pull up locking
knob :.
The door is unlocked and can be opened.
X To open a rear door: pull door handle;.
You can open a door from inside the vehicle
even if it has been locked. You can only open the rear doors from inside the vehicle if they
are not secured by the child-proof locks
(Y page 62).
If the vehicle has previously been locked with
the SmartKey from the outside, opening a
door from the inside will trigger the anti-theft Doors
81Opening and closing Z
Page 88 of 362
Emergency release button
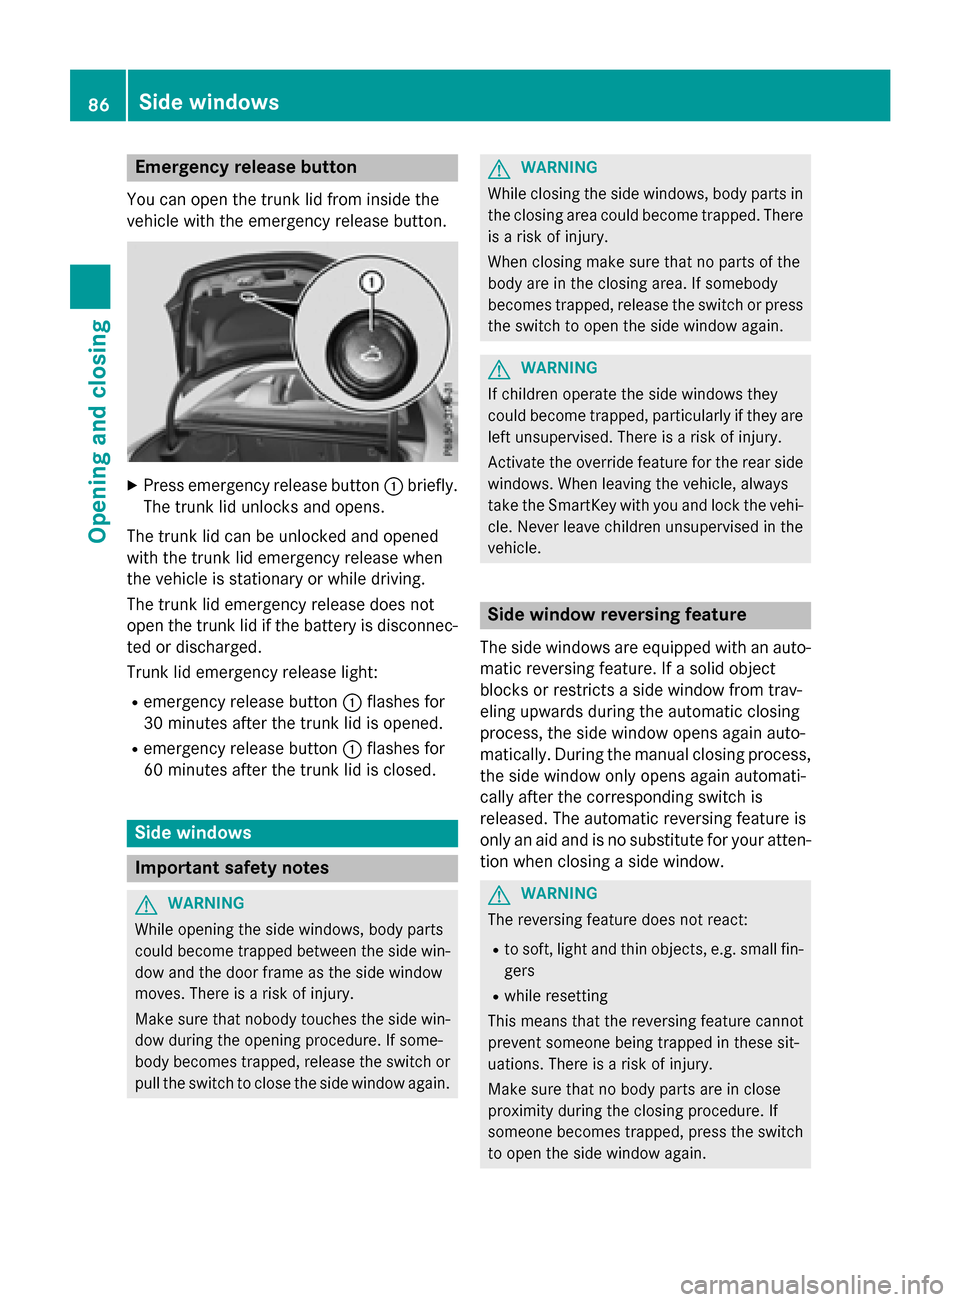
You can open the trunk lid from inside the
vehicle with the emergency release button. X
Press emergency release button :briefly.
The trunk lid unlocks and opens.
The trunk lid can be unlocked and opened
with the trunk lid emergency release when
the vehicle is stationary or while driving.
The trunk lid emergency release does not
open the trunk lid if the battery is disconnec- ted or discharged.
Trunk lid emergency release light:
R emergency release button :flashes for
30 minutes after the trunk lid is opened.
R emergency release button :flashes for
60 minutes after the trunk lid is closed. Side windows
Important safety notes
G
WARNING
While opening the side windows, body parts
could become trapped between the side win- dow and the door frame as the side window
moves. There is a risk of injury.
Make sure that nobody touches the side win-
dow during the opening procedure. If some-
body becomes trapped, release the switch or pull the switch to close the side window again. G
WARNING
While closing the side windows, body parts in the closing area could become trapped. There is a risk of injury.
When closing make sure that no parts of the
body are in the closing area. If somebody
becomes trapped, release the switch or press
the switch to open the side window again. G
WARNING
If children operate the side windows they
could become trapped, particularly if they are left unsupervised. There is a risk of injury.
Activate the override feature for the rear side
windows. When leaving the vehicle, always
take the SmartKey with you and lock the vehi-
cle. Never leave children unsupervised in the
vehicle. Side window reversing feature
The side windows are equipped with an auto- matic reversing feature. If a solid object
blocks or restricts a side window from trav-
eling upwards during the automatic closing
process, the side window opens again auto-
matically. During the manual closing process,
the side window only opens again automati-
cally after the corresponding switch is
released. The automatic reversing feature is
only an aid and is no substitute for your atten- tion when closing a side window. G
WARNING
The reversing feature does not react:
R to soft, light and thin objects, e.g. small fin-
gers
R while resetting
This means that the reversing feature cannot
prevent someone being trapped in these sit-
uations. There is a risk of injury.
Make sure that no body parts are in close
proximity during the closing procedure. If
someone becomes trapped, press the switch
to open the side window again. 86
Side windowsOpening and closing
Page 92 of 362
Problems with the side windows
G
WARNING
If you close a side window again immediately after it has been blocked or reset, the side window
closes with increased or maximum force. The reversing feature is then not active. Parts of the
body could be trapped in the closing area in the process. This poses an increased risk of injury or even fatal injury.
Make sure that no parts of the body are in the closing area. To stop the closing process, releasethe switch or push the switch again to reopen the side window. Problem
Possible causes/consequences and
M MSolutions A side window cannot
be closed because it is
blocked by objects, e.g.
leaves in the window
guide. X
Remove the objects.
X Close the side window. A side window cannot
be closed and you can-
not see the cause. If a side window is obstructed during closing and reopens again
slightly:
X Immediately after the window blocks, pull the corresponding
switch again until the side window has closed.
The side window is closed with increased force.
If a side window is obstructed again during closing and reopens
again slightly: X Immediately after the window blocks, pull the corresponding
switch again until the side window has closed.
The side window is closed without the anti-entrapment feature. Panorama roof with power tilt/sliding
panel Important safety notes
In the following section, the term "sliding sun- roof" refers to the panorama roof with powertilt/sliding panel. G
WARNING
While opening and closing the sliding sunroof, body parts in close proximity could become
trapped. There is a risk of injury.
Make sure that no body parts are in close
proximity during the opening and closing pro- cedures. If somebody becomes trapped:
R release the switch immediately, or
R during automatic operation, push the
switch briefly in any direction
The opening or closing procedure will be stop-
ped. G
WARNING
If children operate the sliding sunroof they
could become trapped, particularly if they are left unsupervised. There is a risk of injury.
When leaving the vehicle, always take the
SmartKey with you and lock the vehicle. Never
leave children unsupervised in the vehicle. 90
Panorama roof with power tilt/sliding panelOpening and closing
Page 93 of 362
G
WARNING
At high speeds the raised sliding sunroof auto- matically lowers slightly at the rear. This could
trap you or other persons. There is a risk of
injury. Make sure that nobody reaches into
the sweep of the sliding sunroof whilst the
vehicle is in motion.
If somebody becomes trapped, immediately
pull back the sliding sunroof switch. The slid- ing sunroof lifts during opening.
! Only open the sliding sunroof if it is free of
snow and ice. Otherwise, malfunctions may
occur.
Do not allow anything to protrude from the
sliding sunroof. Otherwise, the seals could
be damaged.
! The weather can change abruptly. It could
start to rain or snow. Make sure that the
sliding sunroof is closed when you leave the
vehicle. The vehicle electronics can be
damaged if water enters the vehicle inte-
rior.
i Resonance noises can occur in addition to
the usual airflow noises when the sliding
sunroof is open. They are caused by minor
pressure fluctuations in the vehicle interior.
Change the position of the sliding sunroof
or open a side window slightly to reduce or
eliminate these noises. Sliding sunroof reversing feature
The sliding sunroof is equipped with an auto- matic reversing feature. If a solid object
blocks or restricts the sliding sunroof during
the closing process, the sliding sunroof opens
again automatically. However, the automatic
reversing feature is only an aid and does not
relieve you of the responsibility of paying
attention when closing the sliding sunroof. G
WARNING
The reversing feature does not react:
R to soft, light and thin objects, e.g. small fin-
gers
R over the last 1/6 in(4 mm) of the closing
movement
R during resetting
R when closing the sliding sunroof again man-
ually immediately after automatic reversing
This means that the reversing feature cannot
prevent someone being trapped in these sit-
uations. There is a risk of injury.
Make sure that no body parts are in close
proximity during the closing procedure.
If somebody becomes trapped:
R release the switch immediately, or
R during automatic operation, push the
switch briefly in any direction
The closing process is stopped. Operating the sliding sunroof
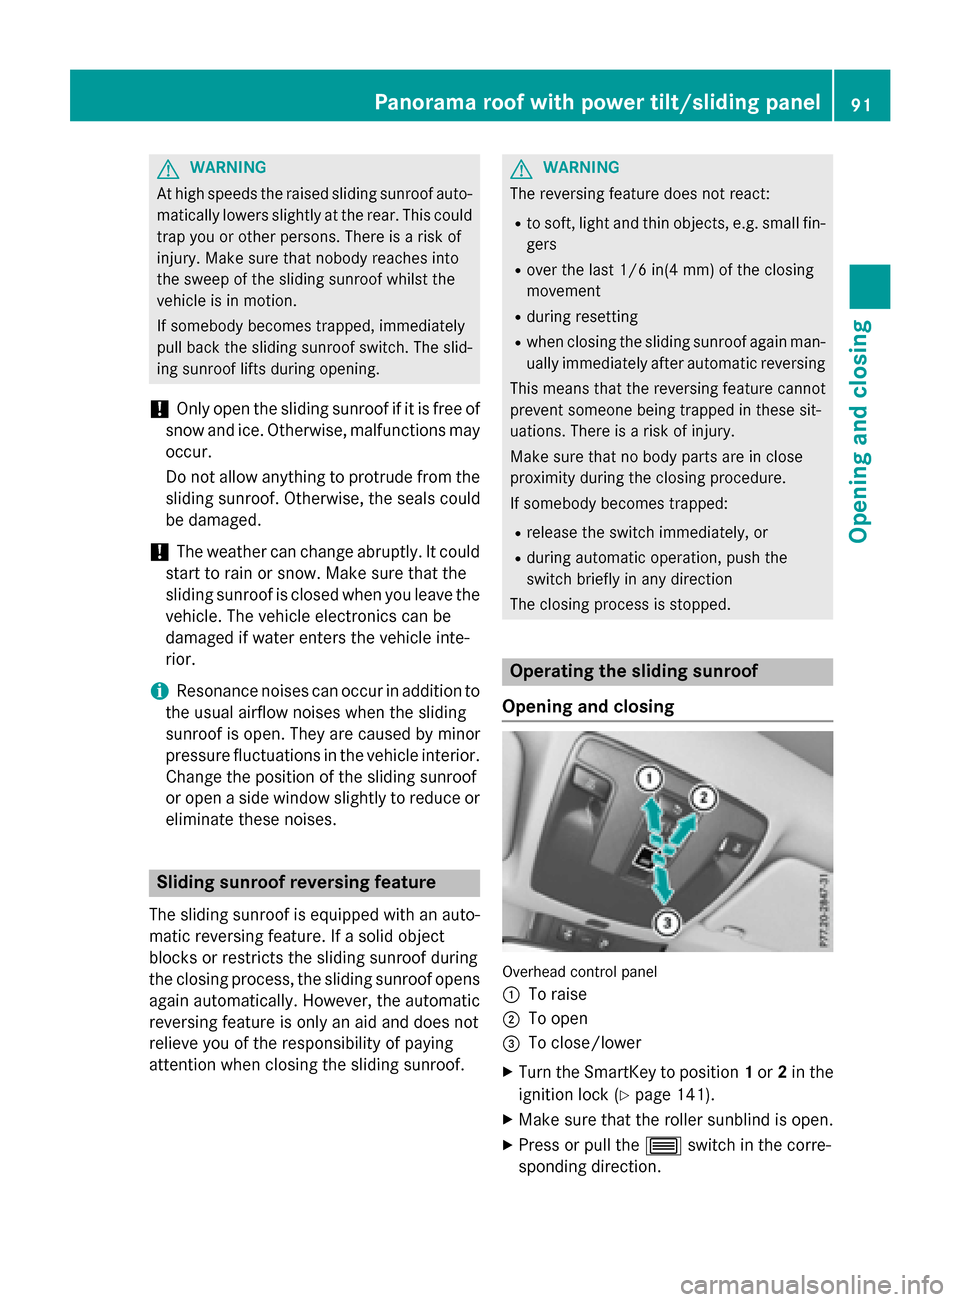
Opening and closing Overhead control panel
:
To raise
; To open
= To close/lower
X Turn the SmartKey to position 1or 2in the
ignition lock (Y page 141).
X Make sure that the roller sunblind is open.
X Press or pull the 3switch in the corre-
sponding direction. Panorama roof with power tilt/sliding panel
91Opening and closing Z
Page 94 of 362

i
If you press/pull the
3switch beyond
the point of resistance, automatic opera-
tion is started in the corresponding direc-
tion. You can stop automatic operation by
pressing/pulling the switch again.
i After opening the sliding sunroof, the
roller sunblind closes slightly automati-
cally. This reduces drafts in the vehicle inte- rior.
i If the sliding sunroof is raised at the rear,
it lowers slightly automatically at higher
speeds. The noise level in the vehicle inte-
rior is reduced as a result.
At low speeds it raises again automatically.
i You can continue to operate the sliding
sunroof after switching off the engine or
removing the SmartKey from the ignition
lock. This function remains active for five
minutes or until you open a front door.
i The sliding sunroof cannot be opened if a
roof carrier is installed. In order to allow
ventilation of the vehicle interior, you can
raise the sliding sunroof.
If contact is made with a roof carrier
approved by Mercedes-Benz, the sliding
sunroof lowers slightly but remains raised
at the rear.
Rain-closing feature The rain-closing feature is only available for
vehicles with a rain sensor.
When the SmartKey is in position 0in the
ignition lock or is removed, the sliding sunroof
closes automatically:
R if it starts to rain
R at extreme outside temperatures
R after six hours
R if there is a malfunction in the power supply
The sliding sunroof remains raised at the rear
in order to allow ventilation of the vehicle
interior.
i If the sliding sunroof is obstructed while
being closed by the rain-closing feature, it opens again slightly. The rain-closing fea-
ture is then deactivated.
The sliding sunroof does not close if: R it is raised at the rear.
R it is blocked.
R no rain is falling on the area of the wind-
shield being monitored by the rain sensor,
e.g. because the vehicle is under a bridge. Operating the roller sunblind for the
sliding sunroof
Important safety notes G
WARNING
When opening or closing the roller sunblind,
parts of the body could be trapped between
the roller sunblind and the frame or sliding
sunroof. There is a risk of injury.
When opening or closing make sure that no
parts of the body are in the sweep of the roller sunblind.
If somebody becomes trapped:
R release the switch immediately, or
R during automatic operation, push the
switch briefly in any direction
The opening or closing procedure will be stop-
ped.
The roller sunblind shields the vehicle interior from sunlight. The roller sunblind can only be
opened and closed when the sliding sunroof
is closed.
Roller sunblind reversing feature The roller sunblind is equipped with an auto-
matic reversing feature. If a solid object
blocks or restricts the roller sunblind during
the closing process, the roller sunblind opens
again automatically. The automatic reversing
feature is only an aid and is not a substitute
for your attentiveness to the roller sunblind
while it is closing. 92
Panorama roof with power tilt/sliding panelOpening and closing
Page 95 of 362

G
WARNING
The reversing feature does not react:
R to soft, light and thin objects, e.g. small fin-
gers
R when closing the roller sunblind again man-
ually immediately after automatic reversing
This means that the reversing feature cannot
prevent someone being trapped in these sit-
uations. There is a risk of injury.
When closing make sure that no parts of the
body are in the sweep of the roller sunblind.
If somebody becomes trapped:
R release the switch immediately, or
R during automatic operation, push the
switch briefly in any direction
The closing process is stopped.
Opening and closing Overhead control panel
:
To open
; To open
= To close
X Turn the SmartKey to position 1or 2in the
ignition lock (Y page 141).
X Press or pull the 3switch in the corre-
sponding direction.
i If you press/pull the
3switch beyond
the point of resistance, automatic opera-
tion is started in the corresponding direc-
tion. You can stop automatic operation by
pressing/pulling the switch again. i
After opening the sliding sunroof, the
roller sunblind closes slightly automati-
cally. This reduces drafts in the vehicle inte- rior.
Resetting the sliding sunroof and the
roller sunblind Reset the sliding sunroof and the roller sun-
blind if the sliding sunroof or the roller sun-
blind does not move smoothly:
X Turn the SmartKey to position 1or 2in the
ignition lock (Y page 141).
X Pull the 3switch repeatedly to the point
of resistance in the direction of arrow =
until the sliding sunroof is fully closed.
X Keep the 3switch pulled for an addi-
tional second.
X Pull the 3switch repeatedly to the point
of resistance in the direction of arrow =
until the roller sunblind is fully closed.
X Keep the 3switch pulled for an addi-
tional second.
X Make sure that the sliding sunroof
(Y page 91) and the roller sunblind
(Y page 93) can be fully opened and closed
again.
X If this is not the case, repeat the steps
above again. Panorama roof with power tilt/sliding panel
93Opening and closing Z
Page 96 of 362

Problems with the sliding sunroof
G
WARNING
If you do not reset the sliding sunroof after a malfunction or voltage supply interruption, then the
backing up function will malfunction or not work. The sliding sunroof closes with increased or
maximum force. Parts of the body could be trapped in the closing area in the process. This poses an increased risk of injury or even fatal injury.
In such or similar situations always make sure that no parts of the body are in the closing area.
Always reset the sliding sunroof after a malfunction or voltage supply interruption.
! If the sliding sunroof still cannot be opened or closed as a result of a malfunction, contact
a qualified specialist workshop. Problem
Possible causes/consequences and
M MSolutions The sliding sunroof can-
not be closed and you
cannot see the cause. If the sliding sunroof is obstructed during closing and reopens
again slightly:
X Immediately after it blocks, pull the 3switch down again to
the point of resistance until the sliding sunroof is closed.
The sliding sunroof is closed with increased force.
If the sliding sunroof is obstructed again during closing and then
reopens slightly:
X Immediately after it blocks, pull the 3switch down again to
the point of resistance until the sliding sunroof is closed.
The sliding sunroof is closed without the anti-entrapment fea-
ture. 94
Panorama roof with power tilt/sliding panelOpening and closing
Page 98 of 362
Useful information
i This Operator's Manual describes all
models and all standard and optional equip- ment of your vehicle available at the time of
publication of the Operator's Manual.
Country-specific differences are possible.
Please note that your vehicle may not be
equipped with all features described. This
also applies to safety-related systems and
functions.
i Read the information on qualified special-
ist workshops (Y page 24). Correct driver's seat position
G
WARNING
You could lose control of your vehicle if you do the following while driving:
R adjust the driver's seat, head restraint,
steering wheel or mirrors
R fasten the seat belt
There is a risk of an accident.
Adjust the driver's seat, head restraint, steer-
ing wheel and mirror and fasten your seat belt before starting the engine. X
Observe the safety guidelines on seat
adjustment (Y page 97).
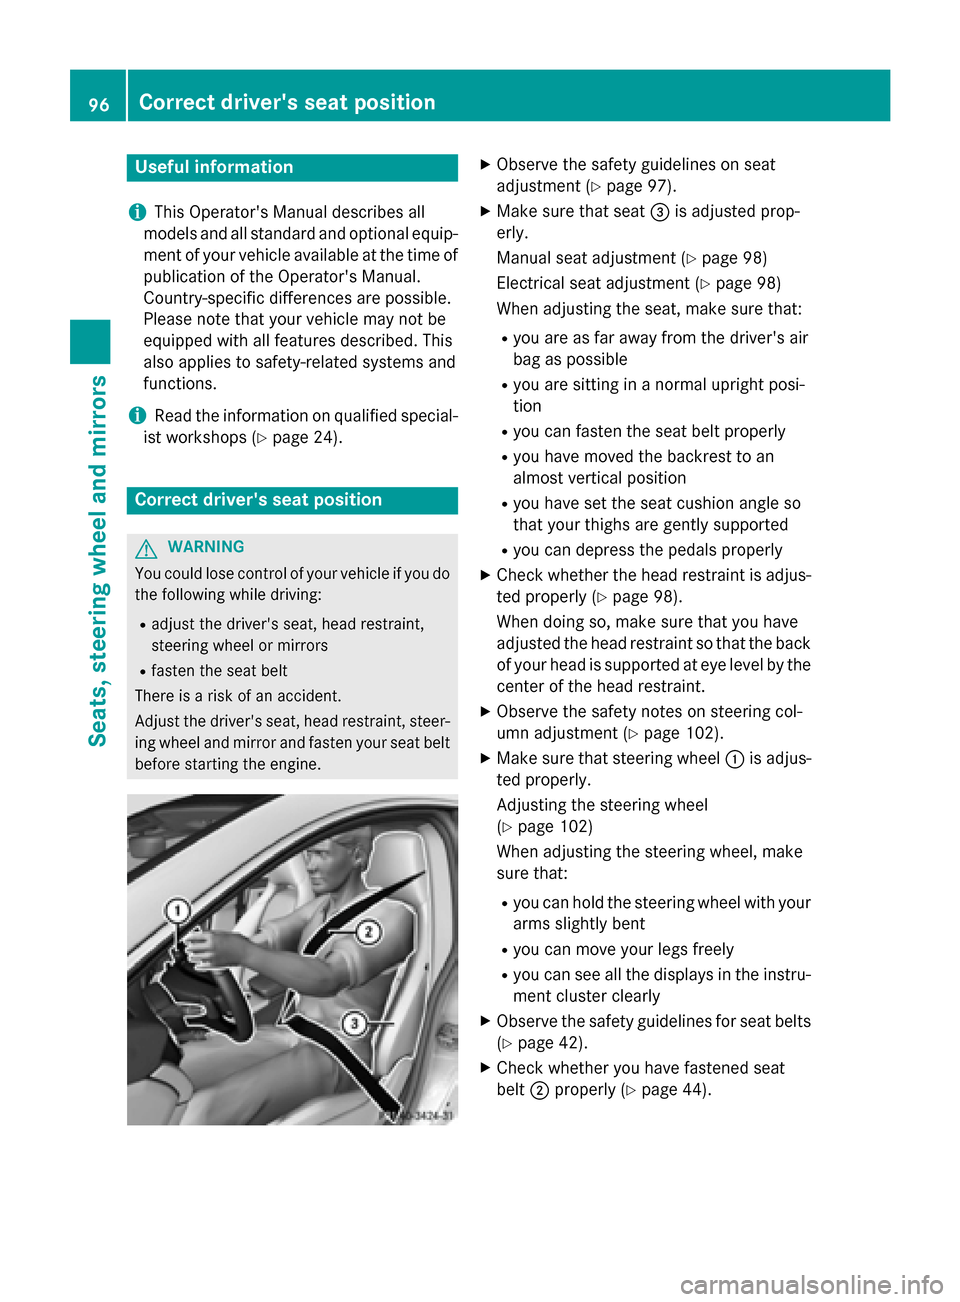
X Make sure that seat =is adjusted prop-
erly.
Manual seat adjustment (Y page 98)
Electrical seat adjustment (Y page 98)
When adjusting the seat, make sure that:
R you are as far away from the driver's air
bag as possible
R you are sitting in a normal upright posi-
tion
R you can fasten the seat belt properly
R you have moved the backrest to an
almost vertical position
R you have set the seat cushion angle so
that your thighs are gently supported
R you can depress the pedals properly
X Check whether the head restraint is adjus-
ted properly (Y page 98).
When doing so, make sure that you have
adjusted the head restraint so that the back of your head is supported at eye level by the
center of the head restraint.
X Observe the safety notes on steering col-
umn adjustment (Y page 102).
X Make sure that steering wheel :is adjus-
ted properly.
Adjusting the steering wheel
(Y page 102)
When adjusting the steering wheel, make
sure that:
R you can hold the steering wheel with your
arms slightly bent
R you can move your legs freely
R you can see all the displays in the instru-
ment cluster clearly
X Observe the safety guidelines for seat belts
(Y page 42).
X Check whether you have fastened seat
belt ;properly (Y page 44). 96
Correct driver's seat positionSeats, steering wheel and mirrors
Page 100 of 362
rials, e.g. blankets, coats, bags, seat cov-
ers, child seats or booster seats.
! Make sure that there are no objects in the
footwell under or behind the seats when
moving the seats back. There is a risk that
the seats and/or the objects could be dam-
aged.
i Further related subjects:
R cargo compartment enlargement (fold-
ing down the rear seats) (Y page 265)Adjusting the seats manually
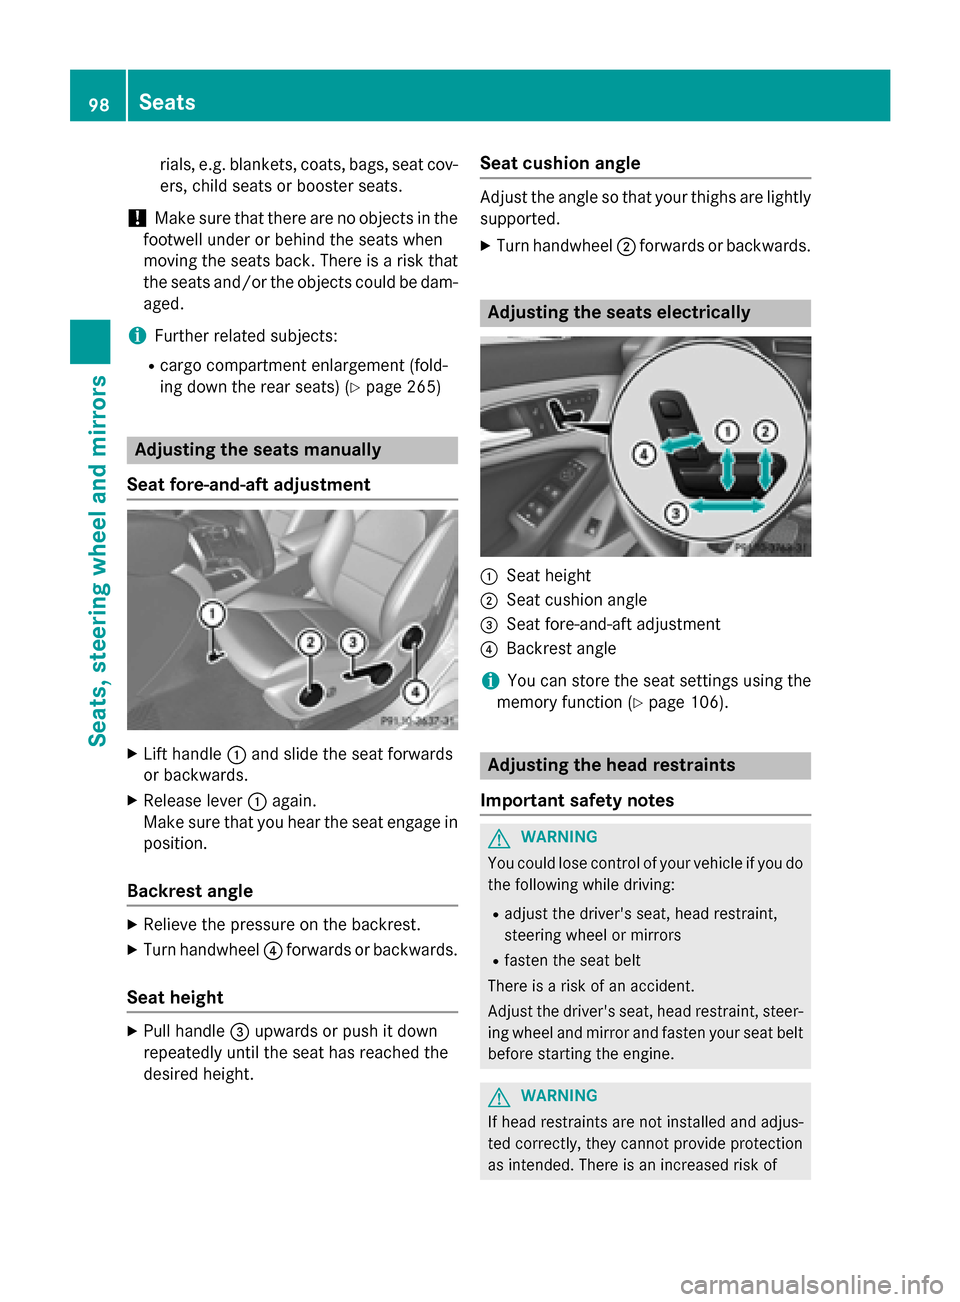
Seat fore-and-aft adjustment X
Lift handle :and slide the seat forwards
or backwards.
X Release lever :again.
Make sure that you hear the seat engage in
position.
Backrest angle X
Relieve the pressure on the backrest.
X Turn handwheel ?forwards or backwards.
Seat height X
Pull handle =upwards or push it down
repeatedly until the seat has reached the
desired height. Seat cushion angle Adjust the angle so that your thighs are lightly
supported.
X Turn handwheel ;forwards or backwards. Adjusting the seats electrically
:
Seat height
; Seat cushion angle
= Seat fore-and-aft adjustment
? Backrest angle
i You can store the seat settings using the
memory function (Y page 106). Adjusting the head restraints
Important safety notes G
WARNING
You could lose control of your vehicle if you do the following while driving:
R adjust the driver's seat, head restraint,
steering wheel or mirrors
R fasten the seat belt
There is a risk of an accident.
Adjust the driver's seat, head restraint, steer-
ing wheel and mirror and fasten your seat belt before starting the engine. G
WARNING
If head restraints are not installed and adjus-
ted correctly, they cannot provide protection
as intended. There is an increased risk of 98
SeatsSeats, steering wheel and mirrors
Page 104 of 362
Problems with the seat heating
Problem
Possible causes/consequences and
M
MSolutions The seat heating has
switched off prema-
turely or cannot be
switched on. The on-board voltage is too low because too many electrical con-
sumers are switched on.
X Switch off electrical consumers that you do not need, such as
the rear window defroster or interior lighting.
Once the battery is sufficiently charged, the seat heating will
switch back on automatically. Steering wheel
Important safety notes
G
WARNING
You could lose control of your vehicle if you do the following while driving:
R adjust the driver's seat, head restraint,
steering wheel or mirrors
R fasten the seat belt
There is a risk of an accident.
Adjust the driver's seat, head restraint, steer-
ing wheel and mirror and fasten your seat belt before starting the engine. G
WARNING
Children could injure themselves if they
adjust the steering wheel. There is a risk of
injury.
When leaving the vehicle, always take the
SmartKey with you and lock the vehicle. Never leave children unsupervised in the vehicle. Adjusting the steering wheel
G
WARNING
If the steering wheel is unlocked while the
vehicle is in motion, it could change position
unexpectedly. This could cause you to lose
control of the vehicle. There is a risk of an
accident. Before starting off, make sure the steering
wheel is locked. Never unlock the steering
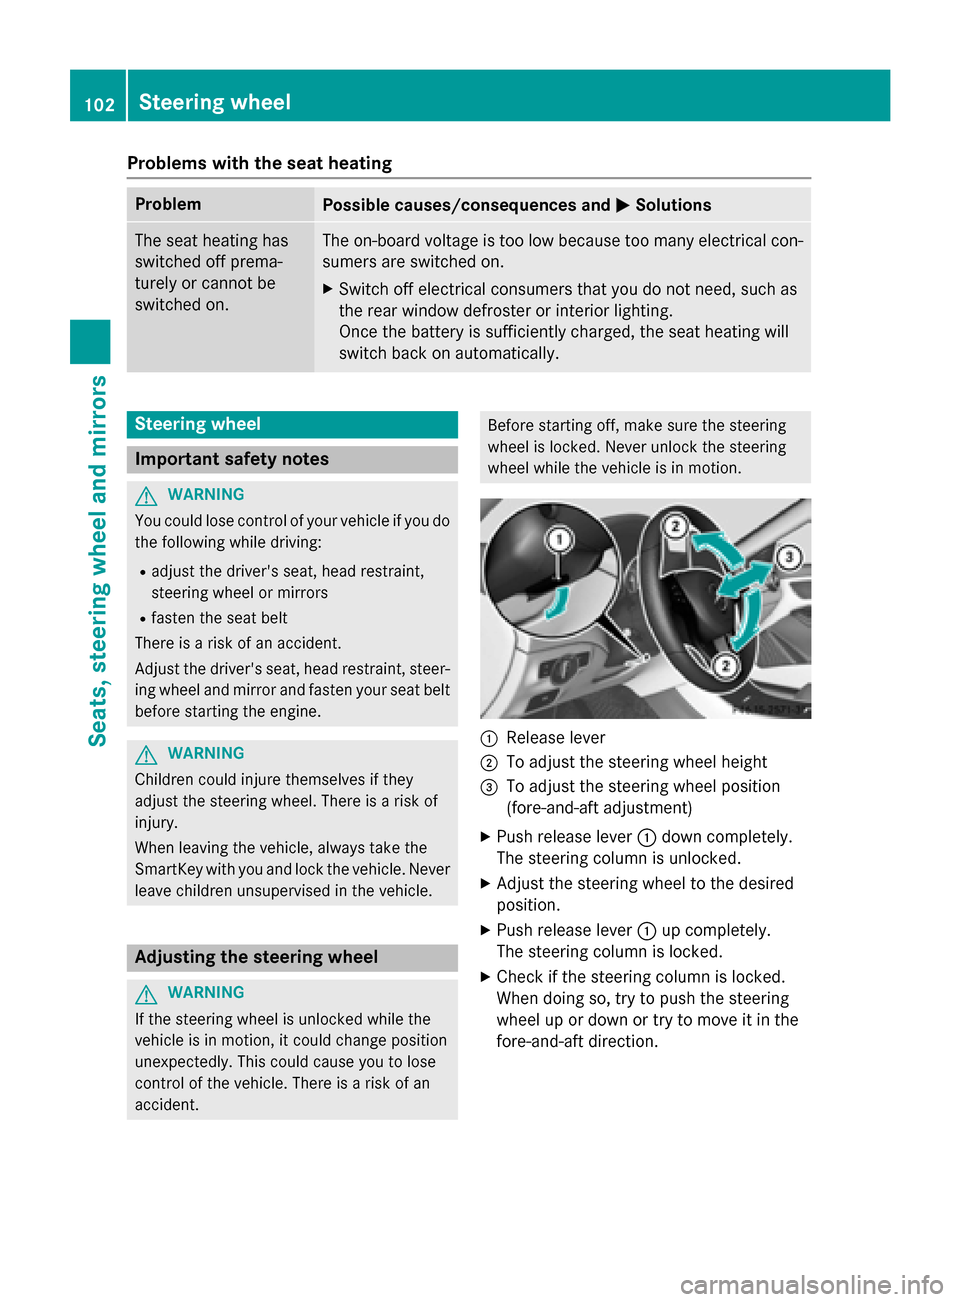
wheel while the vehicle is in motion. :
Release lever
; To adjust the steering wheel height
= To adjust the steering wheel position
(fore-and-aft adjustment)
X Push release lever :down completely.
The steering column is unlocked.
X Adjust the steering wheel to the desired
position.
X Push release lever :up completely.
The steering column is locked.
X Check if the steering column is locked.
When doing so, try to push the steering
wheel up or down or try to move it in the
fore-and-aft direction. 102
Steering wheelSeats, steering wheel and mirrors