display MERCEDES-BENZ CLA-Class 2015 C117 Service Manual
[x] Cancel search | Manufacturer: MERCEDES-BENZ, Model Year: 2015, Model line: CLA-Class, Model: MERCEDES-BENZ CLA-Class 2015 C117Pages: 362, PDF Size: 6.93 MB
Page 158 of 362
Upshifting
X
Pull the right-hand steering wheel paddle
shifter (Y page 154).
The automatic transmission shifts up to the
next gear.
All vehicles (except AMG vehicles): in
order to prevent engine damage the auto-
matic transmission automatically shifts up:
R if the maximum engine speed on the cur-
rently engaged gear is reached and
R you continue to accelerate.
AMG vehicles:
! In manual drive program
M, the automatic
transmission does not shift up automati-
cally even when the engine limiting speed
for the current gear is reached. When the
engine limiting speed is reached, the fuel
supply is cut to prevent the engine from
overrevving. Always make sure that the
engine speed does not reach the red area of
the tachometer. There is otherwise a risk of
engine damage.
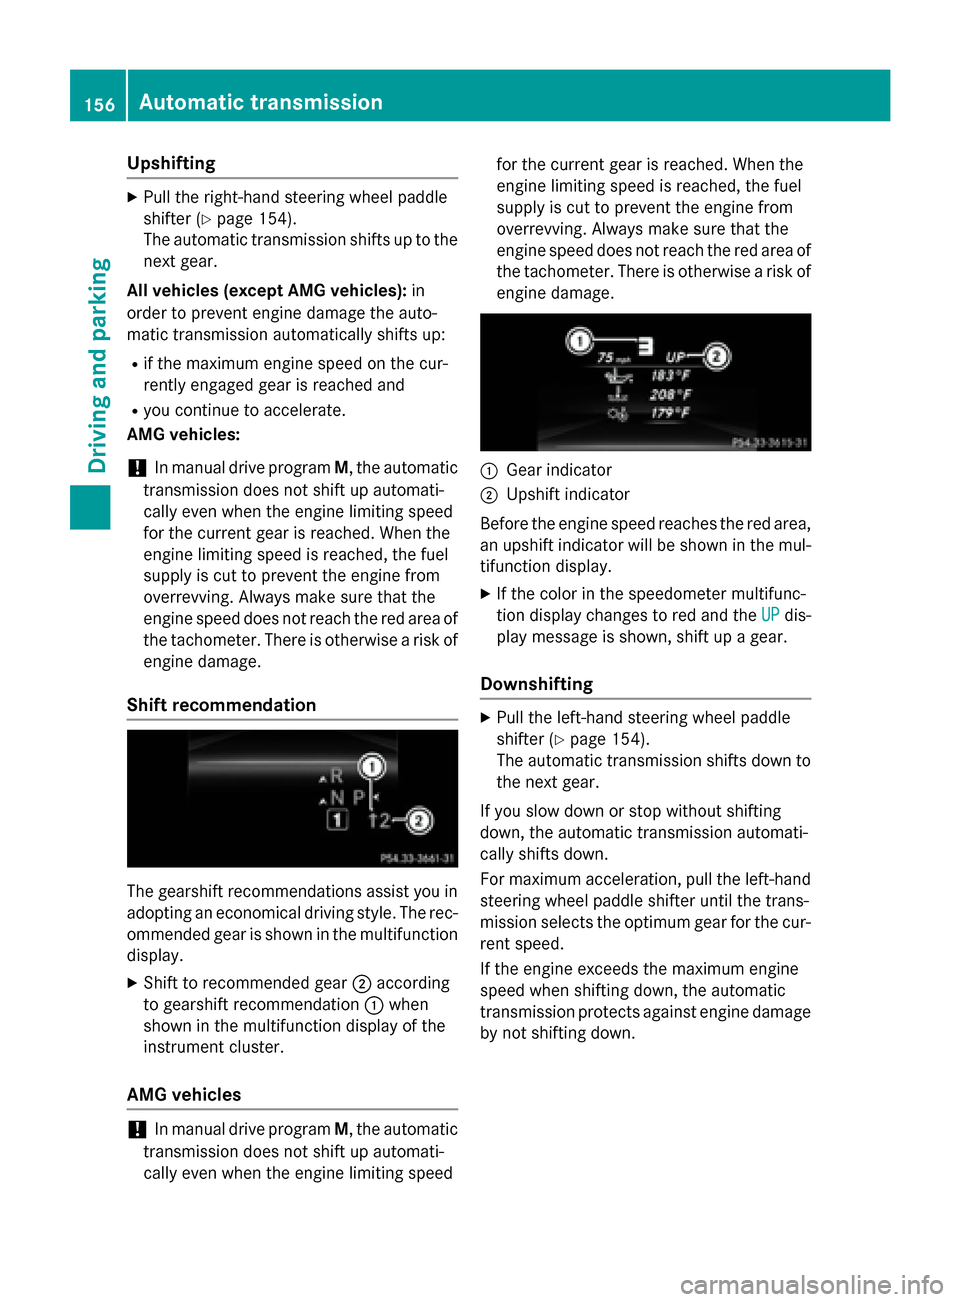
Shift recommendation The gearshift recommendations assist you in
adopting an economical driving style. The rec- ommended gear is shown in the multifunctiondisplay.
X Shift to recommended gear ;according
to gearshift recommendation :when
shown in the multifunction display of the
instrument cluster.
AMG vehicles !
In manual drive program
M, the automatic
transmission does not shift up automati-
cally even when the engine limiting speed for the current gear is reached. When the
engine limiting speed is reached, the fuel
supply is cut to prevent the engine from
overrevving. Always make sure that the
engine speed does not reach the red area of
the tachometer. There is otherwise a risk of
engine damage. :
Gear indicator
; Upshift indicator
Before the engine speed reaches the red area, an upshift indicator will be shown in the mul-
tifunction display.
X If the color in the speedometer multifunc-
tion display changes to red and the UP UPdis-
play message is shown, shift up a gear.
Downshifting X
Pull the left-hand steering wheel paddle
shifter (Y page 154).
The automatic transmission shifts down to
the next gear.
If you slow down or stop without shifting
down, the automatic transmission automati-
cally shifts down.
For maximum acceleration, pull the left-hand
steering wheel paddle shifter until the trans-
mission selects the optimum gear for the cur- rent speed.
If the engine exceeds the maximum engine
speed when shifting down, the automatic
transmission protects against engine damage
by not shifting down. 156
Automatic transmissionDriving and parking
Page 159 of 362
Kickdown
You can also use kickdown for maximum
acceleration in manual drive program M.
X Depress the accelerator pedal beyond the
pressure point.
The automatic transmission shifts to a
lower gear depending on the engine speed.
X Shift back up once the desired speed is
reached.
During kickdown, you cannot shift gears
using the steering wheel paddle shifters.
If you apply full throttle, the automatic trans-
mission shifts up to the next gear when the
maximum engine speed is reached. This pre-
vents the engine from overrevving.
AMG vehicles: it is only possible to use kick-
down in temporary manual drive program M.
When manual drive program Mis perma-
nently activated, kickdown is not possible.
Switching off the manual drive program X
Press the program selector button
(Y page 153) repeatedly until E(drive pro-
gram Cin AMG vehicles) or Sappears in the
multifunction display.
Deactivating the temporary manual drive program
X Pull and hold the right steering wheel pad-
dle shifter until the automatic transmission
shifts into the last active automatic drive
program E(drive program Con AMG vehi-
cles) or S.
When manual drive program Mis deactivated,
the automatic transmission in automatic
drive program E(drive program Con AMG
vehicles) or Smay shift from the current gear
into a higher or lower gear. This is dependent
on the position of the accelerator pedal,
speed and load. Automatic trans
mission
157Driving an d parking Z
Page 161 of 362
!
Overfilling the fuel tank could damage the
fuel system.
! Take care not to spill any fuel on painted
surfaces. You could otherwise damage the
paintwork.
! Use a filter when refueling from a fuel can.
Otherwise, the fuel lines and/or injection
system could be blocked by particles from
the fuel can.
Do not get into the vehicle again during the
refueling process. Otherwise, electrostatic
charge could build up again.
If you overfill the fuel tank, fuel could spray
out when the fuel pump nozzle is removed.
For further information on fuel and fuel quality (Y page 353). Refueling
General information The fuel filler flap is unlocked or locked auto-
matically when you unlock or lock the vehicle
with the key.
The position of the fuel filler cap is displayed
æ in the instrument cluster. The arrow on
the filling pump indicates the side of the vehi-
cle.
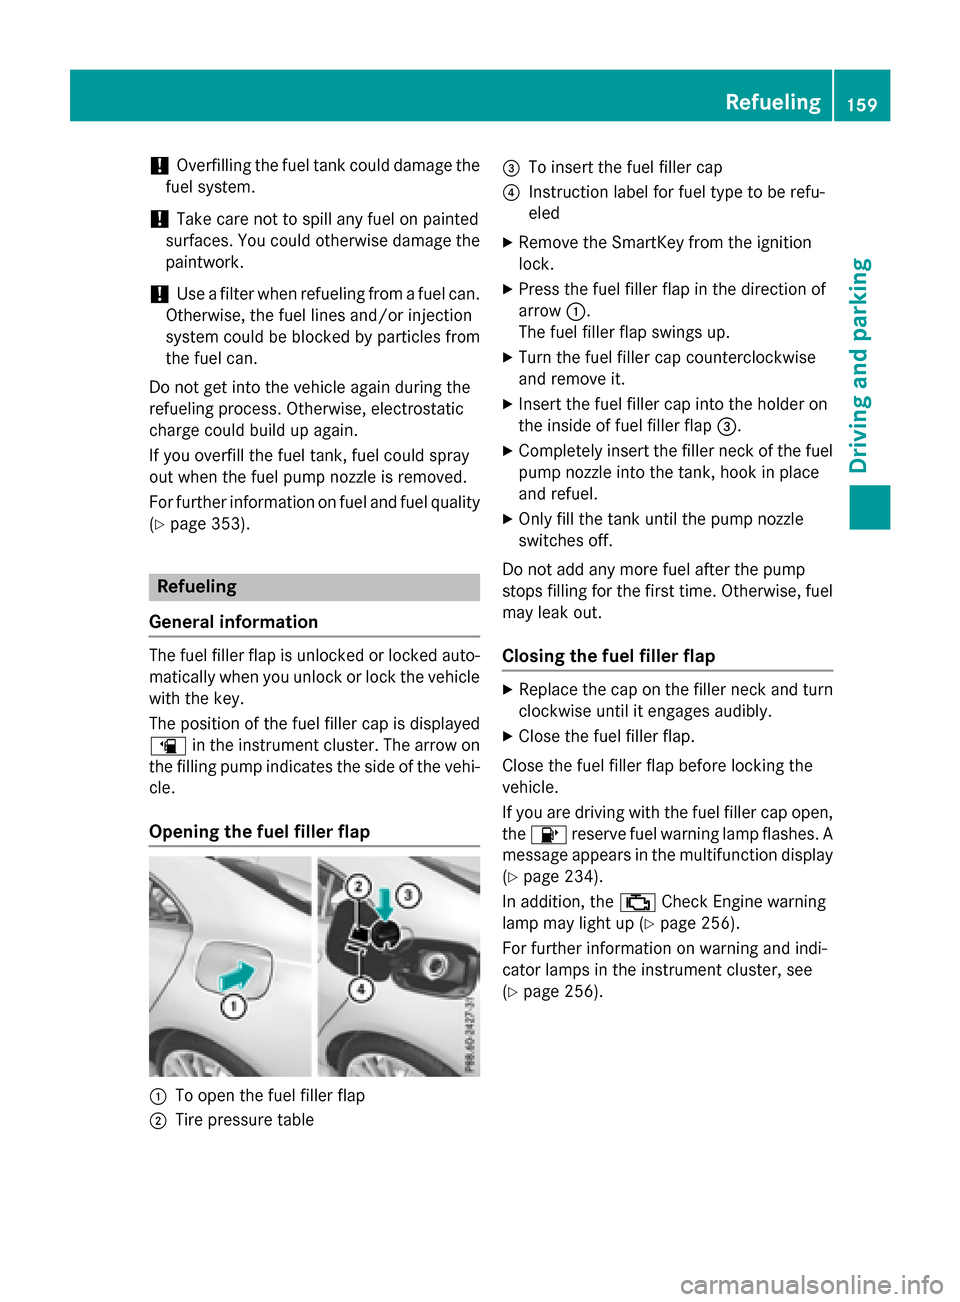
Opening the fuel filler flap :
To open the fuel filler flap
; Tire pressure table =
To insert the fuel filler cap
? Instruction label for fuel type to be refu-
eled
X Remove the SmartKey from the ignition
lock.
X Press the fuel filler flap in the direction of
arrow :.
The fuel filler flap swings up.
X Turn the fuel filler cap counterclockwise
and remove it.
X Insert the fuel filler cap into the holder on
the inside of fuel filler flap =.
X Completely insert the filler neck of the fuel
pump nozzle into the tank, hook in place
and refuel.
X Only fill the tank until the pump nozzle
switches off.
Do not add any more fuel after the pump
stops filling for the first time. Otherwise, fuel may leak out.
Closing the fuel filler flap X
Replace the cap on the filler neck and turn
clockwise until it engages audibly.
X Close the fuel filler flap.
Close the fuel filler flap before locking the
vehicle.
If you are driving with the fuel filler cap open,
the 8 reserve fuel warning lamp flashes. A
message appears in the multifunction display
(Y page 234).
In addition, the ;Check Engine warning
lamp may light up (Y page 256).
For further information on warning and indi-
cator lamps in the instrument cluster, see
(Y page 256). Refueling
159Driving and parking Z
Page 162 of 362
Problems with fuel and the fuel tank
Problem
Possible causes/consequences and
M
MSolutions Fuel is leaking from the
vehicle. The fuel line or the fuel tank is faulty.
G WARNING
Risk of explosion or fire. X Turn the SmartKey to position 0immediately and remove it
(Y page 141).
X Do not restart the engine under any circumstances.
X Consult a qualified specialist workshop. The fuel filler flap can-
not be opened. The fuel filler flap is not unlocked.
X Unlock the vehicle (Y page 74). The SmartKey battery is discharged or nearly discharged.
X Unlock the vehicle using the mechanical key (Y page 76).The fuel filler flap is unlocked, but the opening mechanism is jam-
med.
X Consult a qualified specialist workshop. Parking
Important safety notes
G
WARNING
Flammable material such as leaves, grass or
twigs may ignite if they come into contact with hot parts of the exhaust system or exhaust
gas flow. There is a risk of fire.
Park the vehicle so that no flammable mate-
rials come into contact with parts of the vehi- cle which are hot. Take particular care not to
park on dry grassland or harvested grain
fields. G
WARNING
If you leave children unsupervised in the vehi- cle, they could set it in motion by, for example:
R release the parking brake.
R shift the automatic transmission out of the
parking position P.
R start the engine. In addition, they may operate vehicle equip-
ment and become trapped. There is a risk of
an accident and injury.
When leaving the vehicle, always take the
SmartKey with you and lock the vehicle. Never leave children unsupervised in the vehicle.
! Always secure the vehicle correctly
against rolling away. Otherwise, the vehicle
or its drivetrain could be damaged.
To ensure that the vehicle is secured against
rolling away unintentionally:
R the electric parking brake must be applied.
R the transmission must be in position Pand
the transmission position display must
show P.
R the SmartKey must be removed from the
ignition lock.
R on uphill or downhill gradients, the front
wheels must be turned towards the curb. 160
ParkingDriving and parking
Page 166 of 362
with limitations, or not at all. This could affect,
for example, the power steering and the brake
boosting effect. You will require considerably
more effort to steer and brake. There is a risk of an accident.
Do not switch off the ignition while driving. G
WARNING
If you operate mobile communication equip-
ment while driving, you will be distracted from traffic conditions. You could also lose controlof the vehicle. There is a risk of an accident.
Only operate this equipment when the vehicleis stationary.
Observe the legal requirements for the coun- try in which you are driving. Some jurisdic-
tions prohibit the driver from using a mobile
phone while driving a vehicle.
If you make a call while driving, always use
hands-free mode. Only operate the telephone
when the traffic situation permits. If you are
unsure, pull over to a safe location and stop
before operating the telephone.
Bear in mind that at a speed of only 30 mph
(approximately 50 km/h), the vehicle covers
a distance of 44 ft (approximately 14 m) per
second.
Drive sensibly – save fuel Observe the following tips to save fuel:
R The tires should always be inflated to the
recommended tire pressure.
R Remove unnecessary loads.
R Remove roof racks when they are not nee-
ded.
R Warm up the engine at low engine speeds.
R Avoid frequent acceleration or braking.
R Have all maintenance work carried out as
indicated by the service intervals in the
Maintenance Booklet or by the service
interval display.
Fuel consumption also increases when driv-
ing in cold weather, in stop-start traffic and in
hilly terrain. Drinking and driving G
WARNING
Drinking and driving and/or taking drugs and driving are very dangerous combinations.
Even a small amount of alcohol or drugs can
affect your reflexes, perceptions and judg-
ment.
The possibility of a serious or even fatal acci-
dent is greatly increased when you drink or
take drugs and drive.
Do not drink or take drugs and drive or allow
anyone to drive who has been drinking or tak-
ing drugs.
Emission control G
WARNING
Combustion engines emit poisonous exhaust
gases such as carbon monoxide. Inhaling
these exhaust gases leads to poisoning. There is a risk of fatal injury. Therefore never leave
the engine running in enclosed spaces with-
out sufficient ventilation.
Certain engine systems are designed to keep
the level of poisonous components in exhaust fumes within legal limits.
These systems only work at peak efficiency if they are serviced exactly in accordance with
the manufacturer's specifications. For this
reason, only have work on the engine carried
out by qualified and authorized Mercedes-
Benz technicians.
The engine settings must not be changed
under any circumstances. Furthermore, all
specific service work must be carried out at
regular intervals and in accordance with the
Mercedes-Benz service requirements. Details
can be found in the Maintenance Booklet. 164
Driving tipsDriving and parking
Page 167 of 362
ECO display
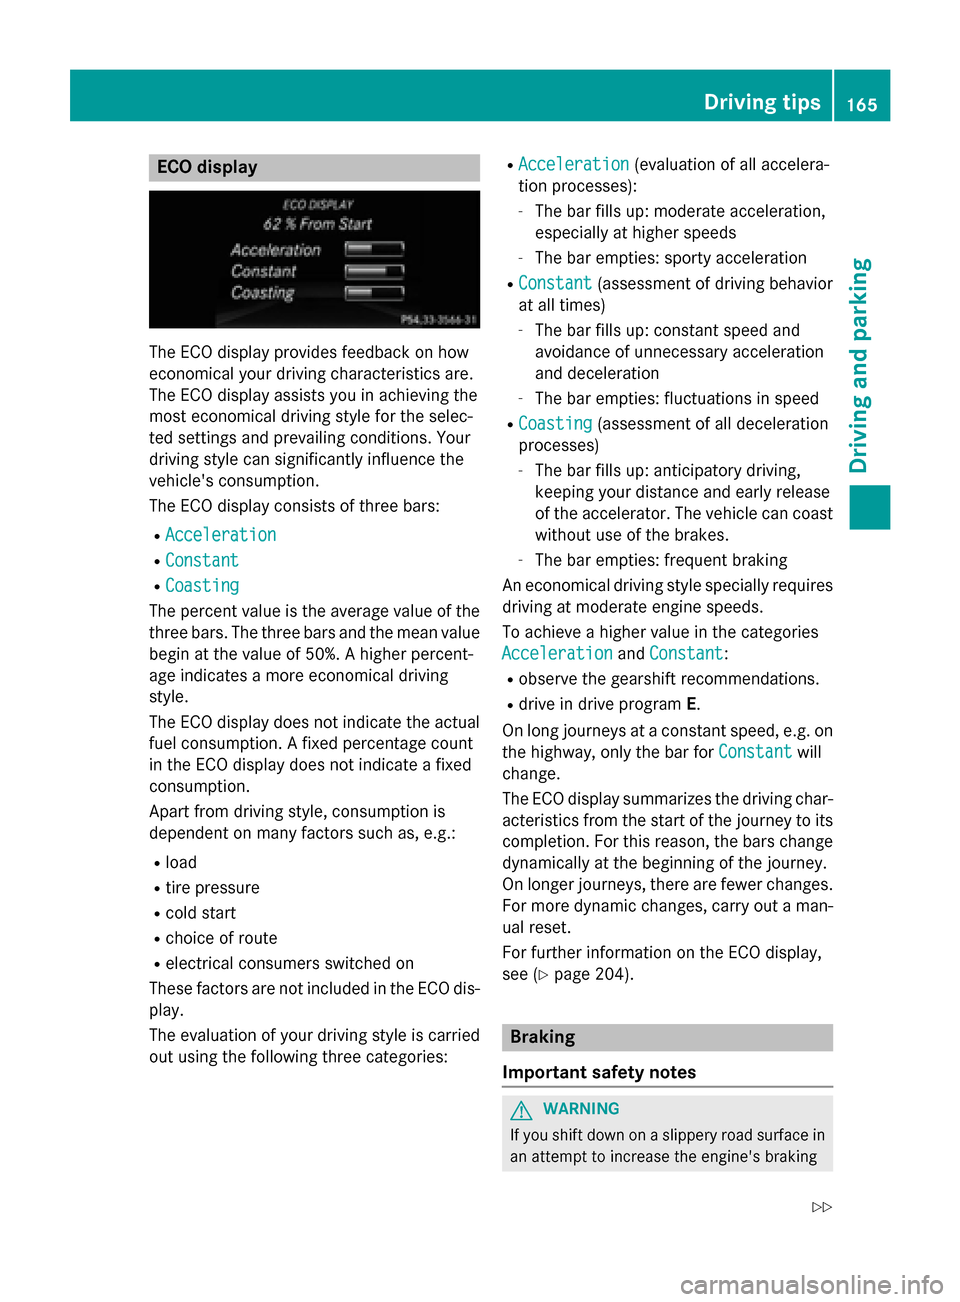
The ECO display provides feedback on how
economical your driving characteristics are.
The ECO display assists you in achieving the
most economical driving style for the selec-
ted settings and prevailing conditions. Your
driving style can significantly influence the
vehicle's consumption.
The ECO display consists of three bars:
R Acceleration
Acceleration
R Constant Constant
R Coasting
Coasting
The percent value is the average value of the three bars. The three bars and the mean value
begin at the value of 50%. A higher percent-
age indicates a more economical driving
style.
The ECO display does not indicate the actual fuel consumption. A fixed percentage count
in the ECO display does not indicate a fixed
consumption.
Apart from driving style, consumption is
dependent on many factors such as, e.g.:
R load
R tire pressure
R cold start
R choice of route
R electrical consumers switched on
These factors are not included in the ECO dis-
play.
The evaluation of your driving style is carried
out using the following three categories: R
Acceleration
Acceleration (evaluation of all accelera-
tion processes):
- The bar fills up: moderate acceleration,
especially at higher speeds
- The bar empties: sporty acceleration
R Constant
Constant (assessment of driving behavior
at all times)
- The bar fills up: constant speed and
avoidance of unnecessary acceleration
and deceleration
- The bar empties: fluctuations in speed
R Coasting Coasting (assessment of all deceleration
processes)
- The bar fills up: anticipatory driving,
keeping your distance and early release
of the accelerator. The vehicle can coast without use of the brakes.
- The bar empties: frequent braking
An economical driving style specially requires driving at moderate engine speeds.
To achieve a higher value in the categories
Acceleration Acceleration andConstant Constant:
R observe the gearshift recommendations.
R drive in drive program E.
On long journeys at a constant speed, e.g. on
the highway, only the bar for Constant
Constantwill
change.
The ECO display summarizes the driving char- acteristics from the start of the journey to its completion. For this reason, the bars change
dynamically at the beginning of the journey.
On longer journeys, there are fewer changes. For more dynamic changes, carry out a man- ual reset.
For further information on the ECO display,
see (Y page 204). Braking
Important safety notes G
WARNING
If you shift down on a slippery road surface in an attempt to increase the engine's braking Driving tips
165Driving and parking
Z
Page 168 of 362
effect, the drive wheels could lose their grip.
There is an increased danger of skidding and
accidents.
Do not shift down for additional engine brak-
ing on a slippery road surface.
Downhill gradients !
On long and steep gradients, you must
reduce the load on the brakes by shifting to
a lower gear in good time. This allows you to
take advantage of the engine's braking
effect. For this, you need to have selected
manual drive program M. This helps you to
avoid overheating the brakes and wearing
them out excessively.
When you take advantage of the engine's
braking effect, a drive wheel may not turn
for some time, e.g. on a slippery road sur-
face. This could cause damage to the drive train. This type of damage is not covered bythe Mercedes-Benz warranty.
Briefly depressing the accelerator pedal on
downhill gradients while the manual drive
program Mis temporarily activated: the auto-
matic transmission may switch to the last
active automatic drive program Eor S. The
automatic transmission may shift to a higher
gear. This can reduce the engine's braking
effect.
Heavy and light loads G
WARNING
If you rest your foot on the brake pedal while
driving, the braking system can overheat. This increases the stopping distance and can even
cause the braking system to fail. There is a
risk of an accident.
Never use the brake pedal as a footrest. Never
depress the brake pedal and the accelerator
pedal at the same time.
! Depressing the brake pedal constantly
results in excessive and premature wear to
the brake pads. If the brakes have been subjected to a heavy
load, do not stop the vehicle immediately.
Drive on for a short while. This allows the air-
flow to cool the brakes more quickly.
Wet roads If you have driven for a long time in heavy rain
without braking, there may be a delayed reac- tion from the brakes when braking for the firsttime. This may also occur after the vehicle has
been washed or driven through deep water.
You have to depress the brake pedal more
firmly. Maintain a greater distance from the
vehicle in front.
After driving on a wet road or having the vehi-
cle washed, brake firmly while paying atten-
tion to the traffic conditions. This will warm up the brake discs, thereby drying them more
quickly and protecting them against corro-
sion.
Limited braking performance on salt-
treated roads If you drive on salted roads, a layer of salt
residue may form on the brake discs and
brake pads. This can result in a significantly
longer braking distance.
R In order to prevent any salt build-up, apply
the brakes occasionally while paying atten-
tion to the traffic conditions.
R Carefully depress the brake pedal and the
beginning and end of a journey.
R Maintain a greater distance to the vehicle
ahead.
Servicing the brakes !
If the red brake warning lamp lights up in
the instrument cluster and you hear a warn- ing tone while the engine is running, the
brake fluid level may be too low. Observe
additional warning messages in the multi-
function display.
The brake fluid level may be too low due to brake pad wear or leaking brake lines. 166
Driving tipsDriving and parking
Page 172 of 362
Cruise control lever
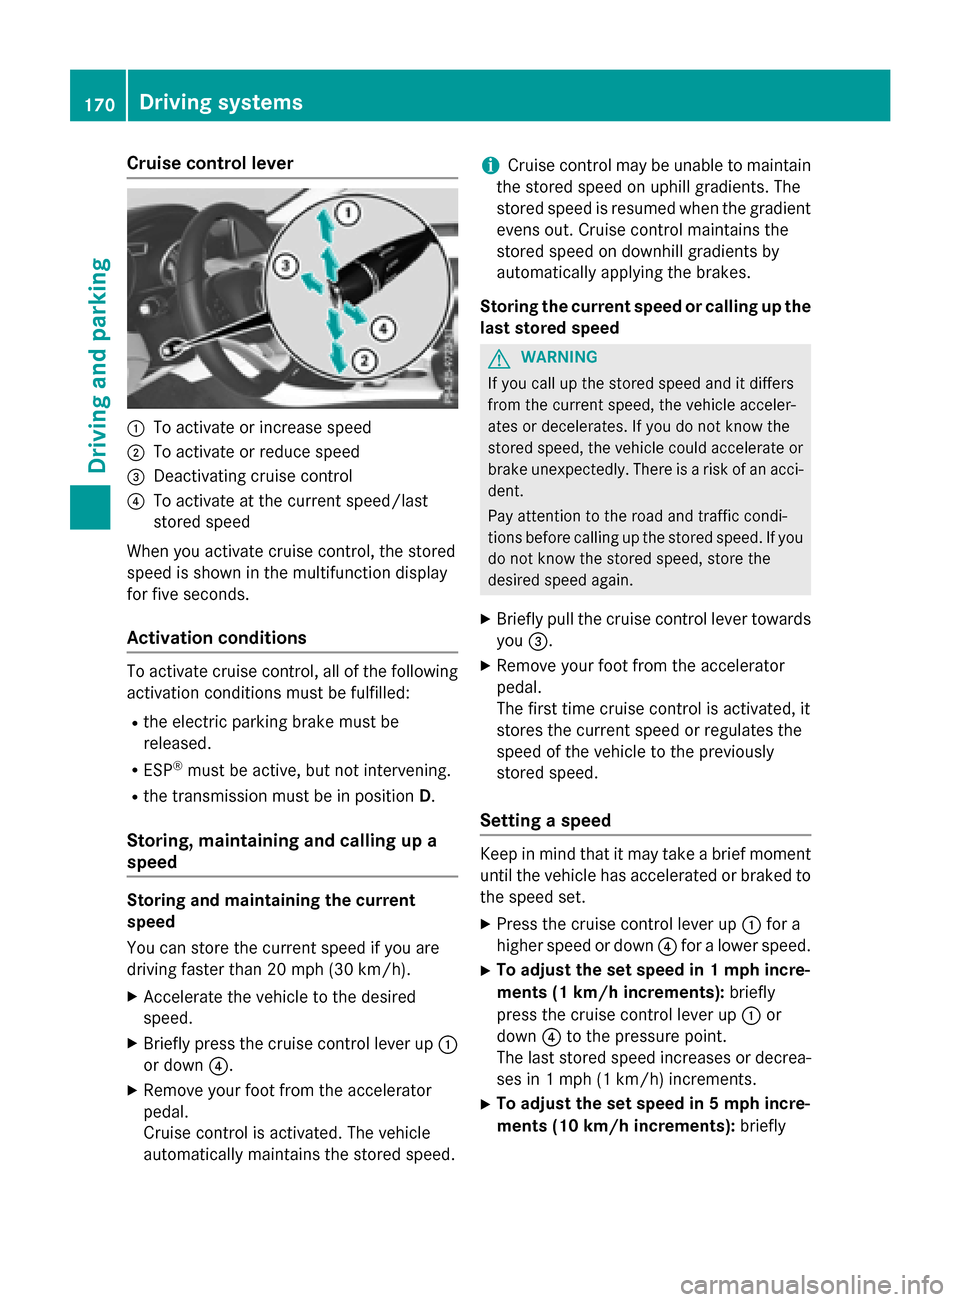
:
To activate or increase speed
; To activate or reduce speed
= Deactivating cruise control
? To activate at the current speed/last
stored speed
When you activate cruise control, the stored
speed is shown in the multifunction display
for five seconds.
Activation conditions To activate cruise control, all of the following
activation conditions must be fulfilled:
R the electric parking brake must be
released.
R ESP ®
must be active, but not intervening.
R the transmission must be in position D.
Storing, maintaining and calling up a
speed Storing and maintaining the current
speed
You can store the current speed if you are
driving faster than 20 mph (30 km/h).
X Accelerate the vehicle to the desired
speed.
X Briefly press the cruise control lever up :
or down ?.
X Remove your foot from the accelerator
pedal.
Cruise control is activated. The vehicle
automatically maintains the stored speed. i
Cruise control may be unable to maintain
the stored speed on uphill gradients. The
stored speed is resumed when the gradient evens out. Cruise control maintains the
stored speed on downhill gradients by
automatically applying the brakes.
Storing the current speed or calling up the
last stored speed G
WARNING
If you call up the stored speed and it differs
from the current speed, the vehicle acceler-
ates or decelerates. If you do not know the
stored speed, the vehicle could accelerate or brake unexpectedly. There is a risk of an acci-
dent.
Pay attention to the road and traffic condi-
tions before calling up the stored speed. If you do not know the stored speed, store the
desired speed again.
X Briefly pull the cruise control lever towards
you =.
X Remove your foot from the accelerator
pedal.
The first time cruise control is activated, it
stores the current speed or regulates the
speed of the vehicle to the previously
stored speed.
Setting a speed Keep in mind that it may take a brief moment
until the vehicle has accelerated or braked to the speed set.
X Press the cruise control lever up :for a
higher speed or down ?for a lower speed.
X To adjust the set speed in 1 mph incre-
ments (1 km/h increments): briefly
press the cruise control lever up :or
down ?to the pressure point.
The last stored speed increases or decrea- ses in 1 mph (1 km/h) increments.
X To adjust the set speed in 5 mph incre-
ments (10 km/h increments): briefly170
Driving systemsDriving and parking
Page 175 of 362
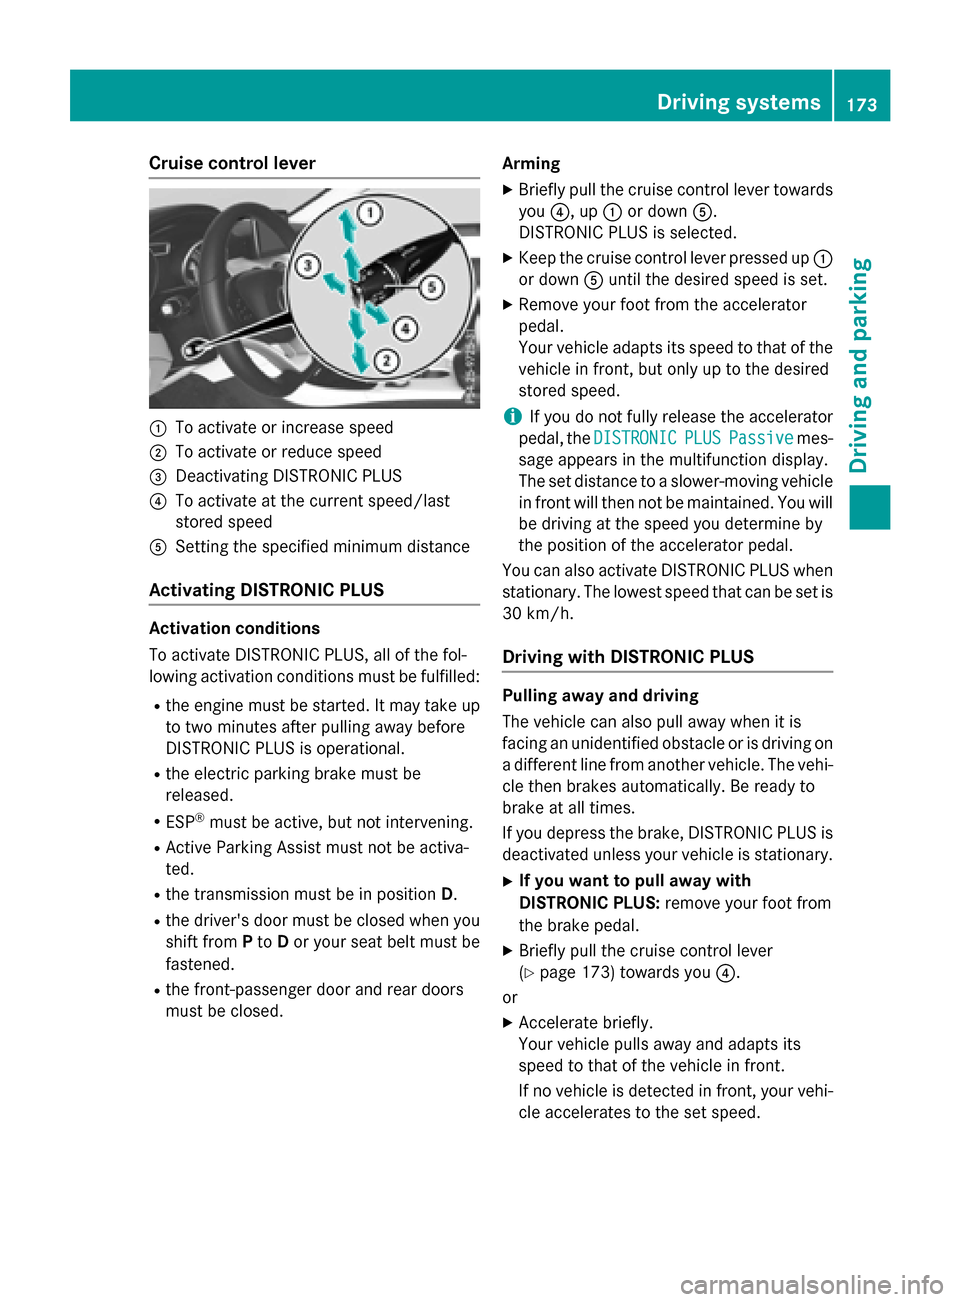
Cruise control lever
:
To activate or increase speed
; To activate or reduce speed
= Deactivating DISTRONIC PLUS
? To activate at the current speed/last
stored speed
A Setting the specified minimum distance
Activating DISTRONIC PLUS Activation conditions
To activate DISTRONIC PLUS, all of the fol-
lowing activation conditions must be fulfilled:
R the engine must be started. It may take up
to two minutes after pulling away before
DISTRONIC PLUS is operational.
R the electric parking brake must be
released.
R ESP ®
must be active, but not intervening.
R Active Parking Assist must not be activa-
ted.
R the transmission must be in position D.
R the driver's door must be closed when you
shift from Pto Dor your seat belt must be
fastened.
R the front-passenger door and rear doors
must be closed. Arming
X Briefly pull the cruise control lever towards
you ?, up :or down A.
DISTRONIC PLUS is selected.
X Keep the cruise control lever pressed up :
or down Auntil the desired speed is set.
X Remove your foot from the accelerator
pedal.
Your vehicle adapts its speed to that of the
vehicle in front, but only up to the desired
stored speed.
i If you do not fully release the accelerator
pedal, the DISTRONIC
DISTRONIC PLUS PLUSPassive
Passive mes-
sage appears in the multifunction display.
The set distance to a slower-moving vehicle in front will then not be maintained. You will
be driving at the speed you determine by
the position of the accelerator pedal.
You can also activate DISTRONIC PLUS when
stationary. The lowest speed that can be set is
30 km/h.
Driving with DISTRONIC PLUS Pulling away and driving
The vehicle can also pull away when it is
facing an unidentified obstacle or is driving on
a different line from another vehicle. The vehi- cle then brakes automatically. Be ready to
brake at all times.
If you depress the brake, DISTRONIC PLUS is
deactivated unless your vehicle is stationary.
X If you want to pull away with
DISTRONIC PLUS: remove your foot from
the brake pedal.
X Briefly pull the cruise control lever
(Y page 173) towards you ?.
or
X Accelerate briefly.
Your vehicle pulls away and adapts its
speed to that of the vehicle in front.
If no vehicle is detected in front, your vehi- cle accelerates to the set speed. Driving systems
173Driving and parking Z
Page 177 of 362
When the HOLD function is activated, the
transmission is shifted automatically to posi- tion Pif:
R the driver's seat belt is not fastened and the
driver's door is open.
R the engine is switched off, unless it is auto-
matically switched off by the ECO start/
stop function.
The electric parking brake secures the vehicle automatically if DISTRONIC PLUS is activated
when the vehicle is stationary and:
R a system malfunction occurs.
R the power supply is not sufficient.
If a malfunction in the electric parking brake
occurs, then the transmission may also be
shifted into position Pautomatically.
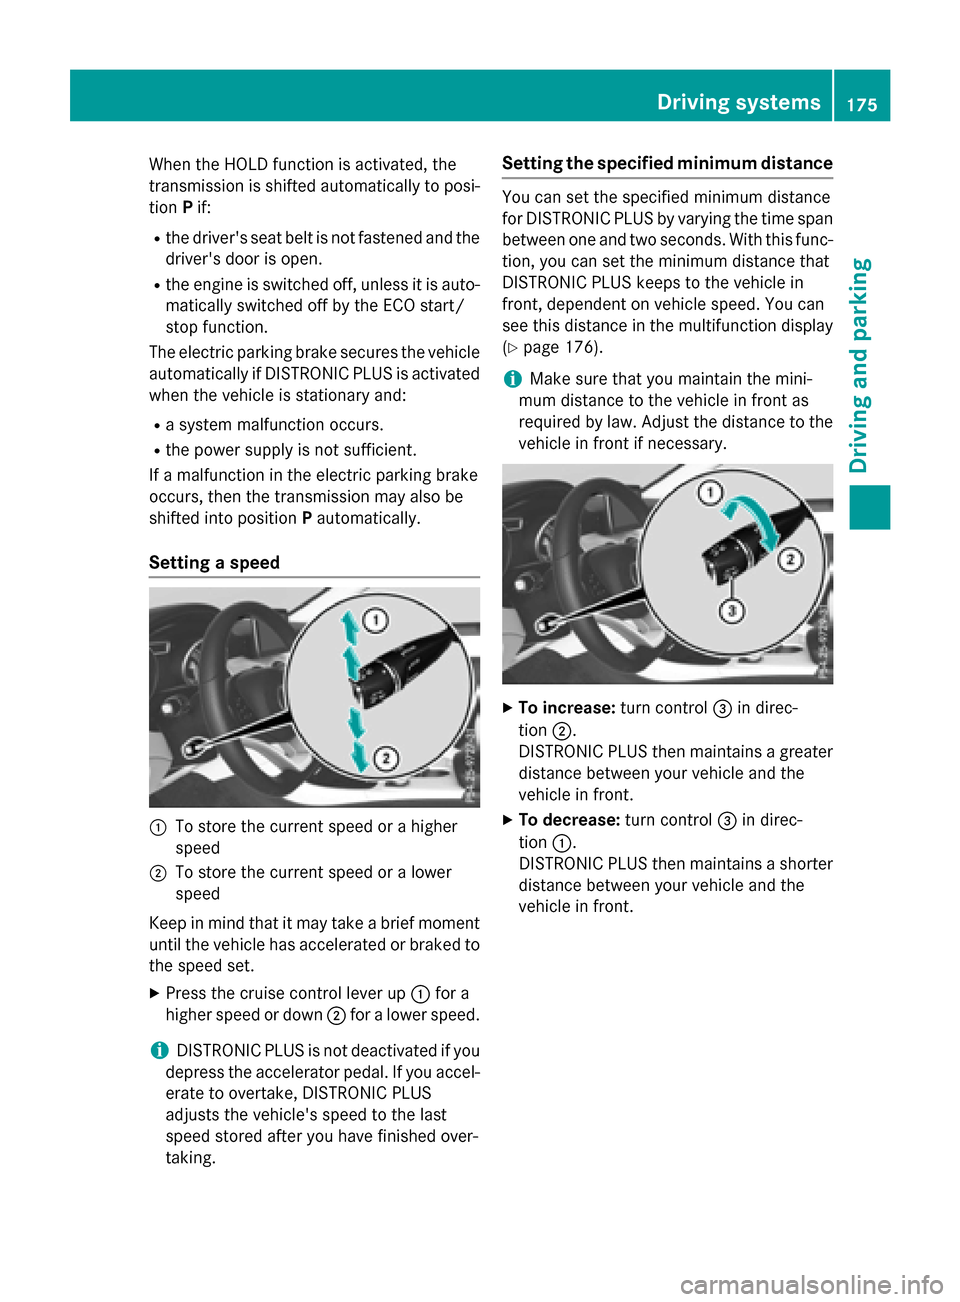
Setting a speed :
To store the current speed or a higher
speed
; To store the current speed or a lower
speed
Keep in mind that it may take a brief moment
until the vehicle has accelerated or braked to
the speed set.
X Press the cruise control lever up :for a
higher speed or down ;for a lower speed.
i DISTRONIC PLUS is not deactivated if you
depress the accelerator pedal. If you accel-
erate to overtake, DISTRONIC PLUS
adjusts the vehicle's speed to the last
speed stored after you have finished over-
taking. Setting the specified minimum distance You can set the specified minimum distance
for DISTRONIC PLUS by varying the time span between one and two seconds. With this func-
tion, you can set the minimum distance that
DISTRONIC PLUS keeps to the vehicle in
front, dependent on vehicle speed. You can
see this distance in the multifunction display
(Y page 176).
i Make sure that you maintain the mini-
mum distance to the vehicle in front as
required by law. Adjust the distance to the
vehicle in front if necessary. X
To increase: turn control=in direc-
tion ;.
DISTRONIC PLUS then maintains a greater distance between your vehicle and the
vehicle in front.
X To decrease: turn control=in direc-
tion :.
DISTRONIC PLUS then maintains a shorter
distance between your vehicle and the
vehicle in front. Driving systems
175Driving and parking Z