check engine MERCEDES-BENZ CLA-Class 2016 C117 User Guide
[x] Cancel search | Manufacturer: MERCEDES-BENZ, Model Year: 2016, Model line: CLA-Class, Model: MERCEDES-BENZ CLA-Class 2016 C117Pages: 374, PDF Size: 8.19 MB
Page 34 of 374
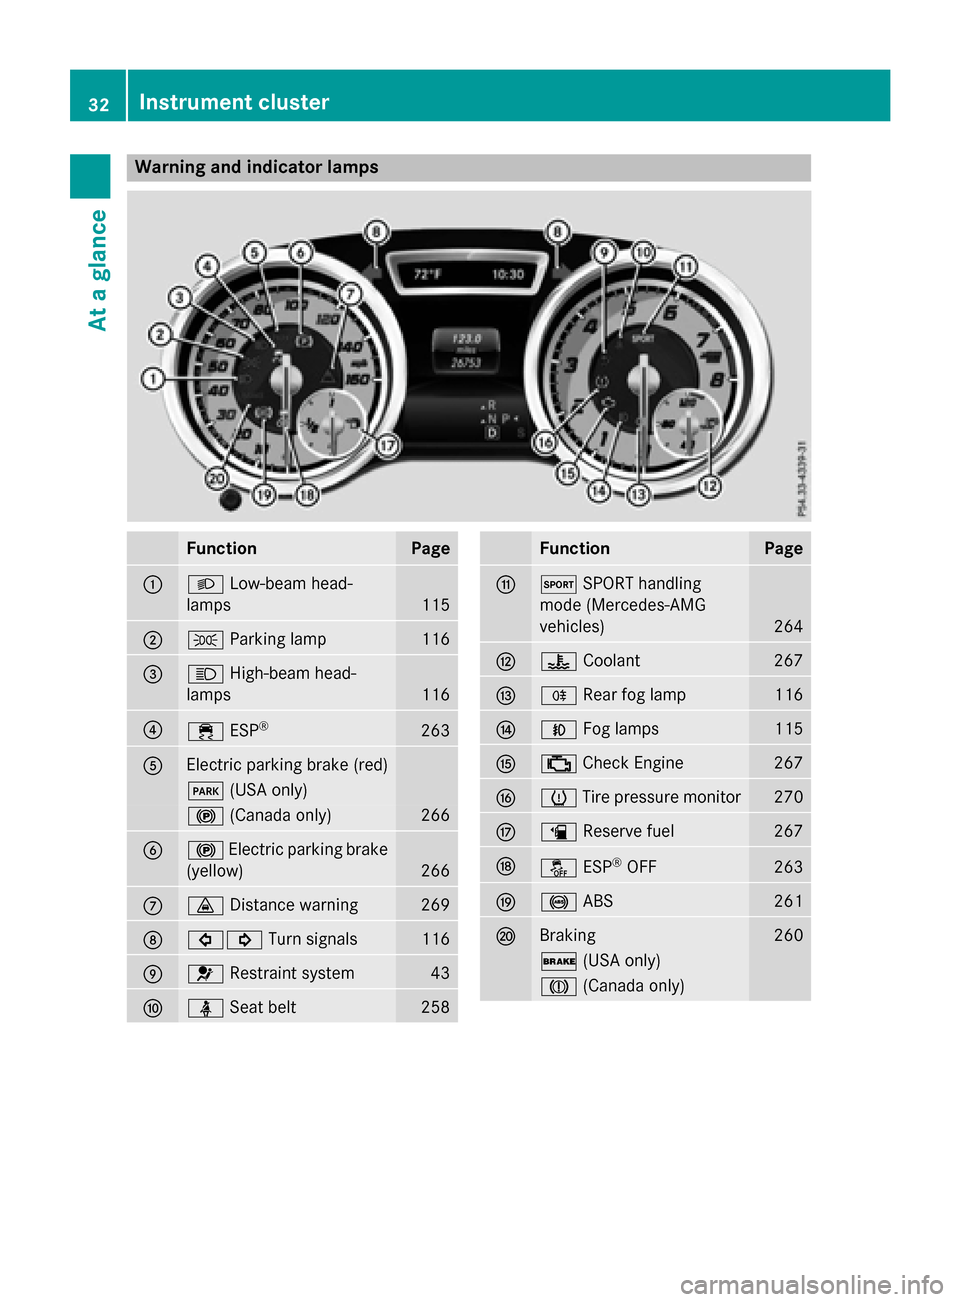
Warning and indicator lamps
FunctionPage
:LLow-beam head-
lamps
115
;T Parking lamp116
=KHigh-beam head-
lamps
116
?÷ ESP®263
AElectric parking brake (red)
F(USA only)
!(Canada only)266
B!Electric parking brake
(yellow)
266
C· Distance warning269
D#! Turn signals116
E6Restraint system43
FüSeat belt258
FunctionPage
GMSPORT handling
mode (Mercedes-AMG
vehicles)
264
H? Coolant267
IRRear fog lamp116
JNFog lamps115
K;Check Engine267
Lh Tire pressure monitor270
Mæ Reserve fuel267
NåESP®OFF263
O!ABS261
PBraking260
$(USA only)
J(Canada only)
32Instrument cluster
At a glance
Page 45 of 374
See "Children in the vehicle" for information
on infants and children traveling with you in
the vehicle restraint systems for infants and
children (
Ypage 58).
Important safety notes
GWARNING
Modifications to the restraint system may
cause it to no longer work as intended. The
restraint system may then not perform its
intended protective function and may fail in an
accident or trigger unexpectedly, for example.
This poses an increased risk of injury or even fatal injury.
Never modify parts of the restraint system.
Never tamper with the wiring, the electronic
components or their software.
If it is necessary to modify an air bag system to
accommodate a person with disabilities, con-
tact an authorized Mercedes-Benz Center for
details. USA only: for further information con-
tact our Customer Assistance Center at
1-800-FOR-MERCedes (1‑800‑ 367‑6372).
Restraint system warning lamp
The functions of the restraint system are
checked after the ignition is switched on and
at regular intervals while the engine is run-
ning. Therefore, malfunctions can be detec-
ted in good time.
The 6 restraint system warning lamp in
the instrument cluster lights up when the igni-
tion is switched on. It goes out no later than a
few seconds after the vehicle is started. The
components of the restraint system are in
operational readiness.
A malfunction has occurred if the 6
restraint system warning lamp:
Rdoes not light up after the ignition is
switched on
Rdoes not go out after a few seconds with
the engine running
Rlights up again while the engine is running
GWARNING
If restraint system is malfunctioning, restraint
system components may be triggered unin-
tentionally or might not be triggered at all in
the event of an accident with a high rate of
vehicle deceleration. This can affect the Emer- gency Tensioning Device or air bag, for exam-
ple. This poses an increased risk of injury or
even fatal injury.
Have the restraint system checked and
repaired in a qualified specialist workshop as
soon as possible.
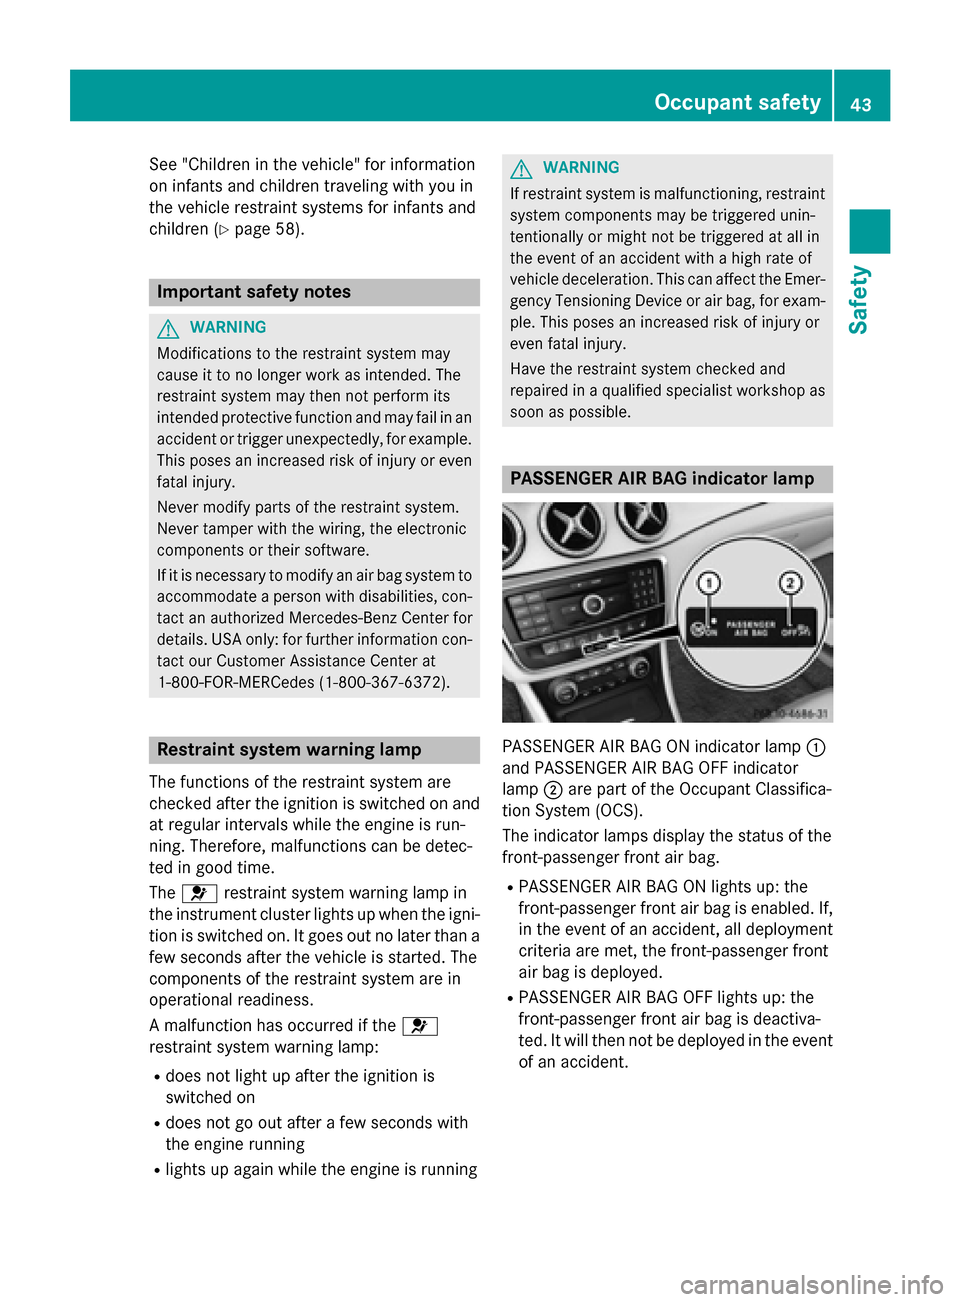
PASSENGER AIR BAG indicator lamp
PASSENGER AIR BAG ON indicator lamp :
and PASSENGER AIR BAG OFF indicator
lamp ;are part of the Occupant Classifica-
tion System (OCS).
The indicator lamps display the status of the
front-passenger front air bag.
RPASSENGER AIR BAG ON lights up: the
front-passenger front air bag is enabled. If,
in the event of an accident, all deployment
criteria are met, the front-passenger front
air bag is deployed.
RPASSENGER AIR BAG OFF lights up: the
front-passenger front air bag is deactiva-
ted. It will then not be deployed in the event of an accident.
Occupant safety43
Safety
Z
Page 71 of 374
ESP®(Electronic Stability Program)
General notes
iObserve the "Important safety notes" sec-
tion (
Ypage 65).
ESP
®monitors driving stability and traction,
i.e. power transmission between the tires and the road surface.
If ESP
®detects that the vehicle is deviating
from the direction desired by the driver, one
or more wheels are braked to stabilize the
vehicle. The engine output is also modified to
keep the vehicle on the desired course within
physical limits. ESP
®assists the driver when
pulling away on wet or slippery roads. ESP®
can also stabilize the vehicle during braking.
ETS/4ETS (Electronic Traction System)
iObserve the "Important safety notes" sec-
tion (
Ypage 65).
ETS traction control is part of ESP
®. On vehi-
cles with 4MATIC, 4ETS is part of ESP®.
Traction control brakes the drive wheels indi-
vidually if they spin. This enables you to pull
away and accelerate on slippery surfaces, for example if the road surface is slippery on one
side. In addition, more drive torque is trans-
ferred to the wheel or wheels with traction.
Traction control remains active, even if you
deactivate ESP
®.
Important safety notes
iObserve the "Important safety notes" sec-
tion (
Ypage 65).
GWARNING
If ESP
®is malfunctioning, ESP®is unable to
stabilize the vehicle. Additionally, further driv-
ing safety systems are deactivated. This
increases the risk of skidding and an accident.
Drive on carefully. Have ESP
®checked at a
qualified specialist workshop.
Vehicles without 4MATIC: when towing
your vehicle with the front axle raised, it is
important that you observe the notes on ESP
®
(Ypage 323).
If the å ESP
®OFF warning lamp lights up
continuously, ESP®is deactivated.
If the ÷ ESP
®warning lamp and the å
warning lamp are lit continuously, ESP®is not
available due to a malfunction.
Observe the information on warning lamps
(
Ypage 263) and display messages which
may be shown in the instrument cluster
(
Ypage 228).
Only use wheels with the recommended tire
sizes. Only then will ESP
®function properly.
Characteristics of ESP®
General information
If the ÷ ESP
®warning lamp goes out
before beginning the journey, ESP®is auto-
matically active.
If ESP
®intervenes, the ÷ESP®warning
lamp flashes in the instrument cluster.
If ESP
®intervenes:
XDo not deactivate ESP®under any circum-
stances.
XOnly depress the accelerator pedal as far as
necessary when pulling away.
XAdapt your driving style to suit the prevail-
ing road and weather conditions.
ECO start/stop function
The ECO start/stop function switches the
engine off automatically when the vehicle
stops moving. The engine starts automati-
cally when the driver wants to pull away again.
ESP
®remains in its previously selected sta-
tus. Example: if ESP®was deactivated before
the engine was switched off, ESP®remains
deactivated when the engine is switched on
again.
Driving safety systems69
Safety
Z
Page 74 of 374
RCOLLISION PREVENTION AS SIST isno lon-
ger available; nor is itactivated ifyou brake
firmly with assistance from ESP
®.
RESP®still provides support when you brake
firmly.
ESP®trailer stabilization
General info rmation
If your veh icle/trailer combination begins to
swerve, ESP
®assists you inthis situation.
ESP®slows the vehicle down bybraking and
limit ing the engine output unt ilthe vehicle/
trailer co mbination has stabilized.
Import ant safety notes
GWARNIN G
If road and weather condition sare poor ,
trailer stabilization will no tbe able to preven t
th evehicle/traile rcombination from swerv-
ing .Trailers wit h ahigh cente rof gravity can
tip ove rbefore ES P
®can detect this. Ther eis
a ris kof an accident.
Always adapt your driving style to th eprevail-
ing road and weather conditions.
If your veh icle with trailer (vehicle/trailer
co mbin ation) begins to lurch, you can only
stabiliz e the vehicle /trailer combination by
depr essing the brake firmly.
ESP
®trailer stabiliz ation is active above
speeds of about 65 km/h.
ESP
®trailer stabilization does not work if
ESP®is deactivated or disabled because of a
malfunction.
EBD (electronic brake force distribu-
tion)
General information
EBD mon itors and controls the brake pres-
sure on the rear wheels to improve driving
stabilit ywhile braking.
Important safety notes
iObserve the "Important safety notes" sec-
tion (
Ypage 65).
GWARNIN G
If EB Dis malfunctioning, th erear wheels can
lock, e.g. under full braking .This increases th e
ris kof skiddin gand an accident.
You should therefor eadapt your driving style
to th edifferent handlin gcharacteristics. Hav e
th ebrak esystem checked at aqualified spe-
cialist workshop.
Observe information regarding indicator and
warning lamps (
Ypage 261) as wellas dis-
play messages (
Ypage 230).
ADAPTIVE BRAKE
ADAPTIVE BRAKE enhances braking safety
and offers increased braking comfort. Inaddi-
tion to the braking function, ADAPTIVE BRAKE
also has the HOLD function (
Ypage 187) and
hill start assist (
Ypage 151).
STEER CONTROL
General information
ST EER CONTROL helps you bytransmitting a
noticea blesteering force to the steering
wheel inthe direction required for vehicle
stabiliz ation.
This steering assistance ispro vide din partic-
ular if:
Rboth right wheels or both left wheels are on
a wet or slippery road surface when you
brake.
Rthe veh iclestarts to skid.
Important safety notes
iObserve the "Important safety notes" sec-
tion (
Ypage 65).
72Driving safety systems
Safety
Page 79 of 374
The SmartKey centrally locks/unlocks:
Rthe doors
Rthe trunk lid
Rthe fuel filler flap
The turn signals flash once when unlocking
and three times when locking.
When the locator lighting is activated in Audio
20/COMAND, it lights up when it is dark after the vehicle is unlocked with the remote con-
trol (see separate operating instructions).
You can also set an audible signal to confirm
that the vehicle has been locked. The audible
signal can be activated and deactivated using
the on-board computer (
Ypage 222).
XTo open the trunk lid automatically:
press and hold the Fbutton until the
trunk lid opens (
Ypage 86).
KEYLESS-GO
General notes
Bear in mind that the engine can be started by
any of the vehicle occupants if there is a
SmartKey in the vehicle.
Locking and unlocking
You can start, lock or unlock the vehicle using
KEYLESS-GO. To do this, you only need carry the SmartKey with you. You can combine the
functions of KEYLESS-GO with those of a con-ventional SmartKey. Unlock the vehicle by
using KEYLESS-GO, for instance, and lock it
using the &button on the SmartKey.
The driver's door and the door at which the
handle is used, must both be closed. The
SmartKey must be outside the vehicle. When
locking or unlocking with KEYLESS-GO, the
distance between the SmartKey and the cor-
responding door handle must not be greater
than 3 ft (1 m). A check which periodically establishes a radio
connection between the vehicle and the
SmartKey determines whether a valid Smart-
Key is in the vehicle. This occurs, for example:
Rwhen starting the engine
Rwhilst driving
Rwhen the external door handles are
touched
Rduring convenience closing
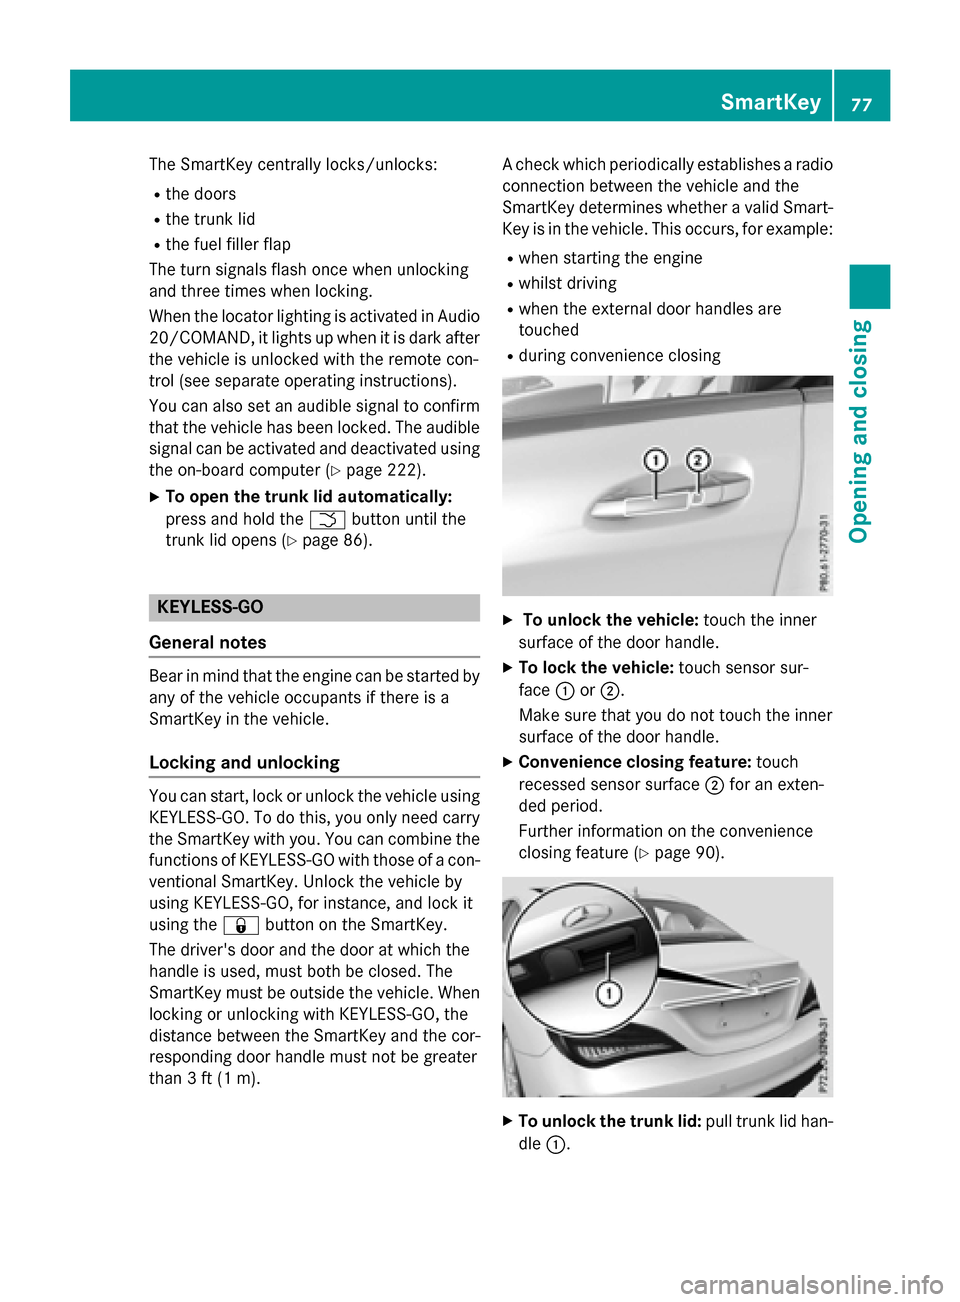
XTo unlock the vehicle:
touch the inner
surface of the door handle.
XTo lock the vehicle: touch sensor sur-
face :or;.
Make sure that you do not touch the inner
surface of the door handle.
XConvenience closing feature: touch
recessed sensor surface ;for an exten-
ded period.
Further information on the convenience
closing feature (
Ypage 90).
XTo unlock the trunk lid: pull trunk lid han-
dle :.
SmartKey77
Opening and closing
Z
Page 84 of 374
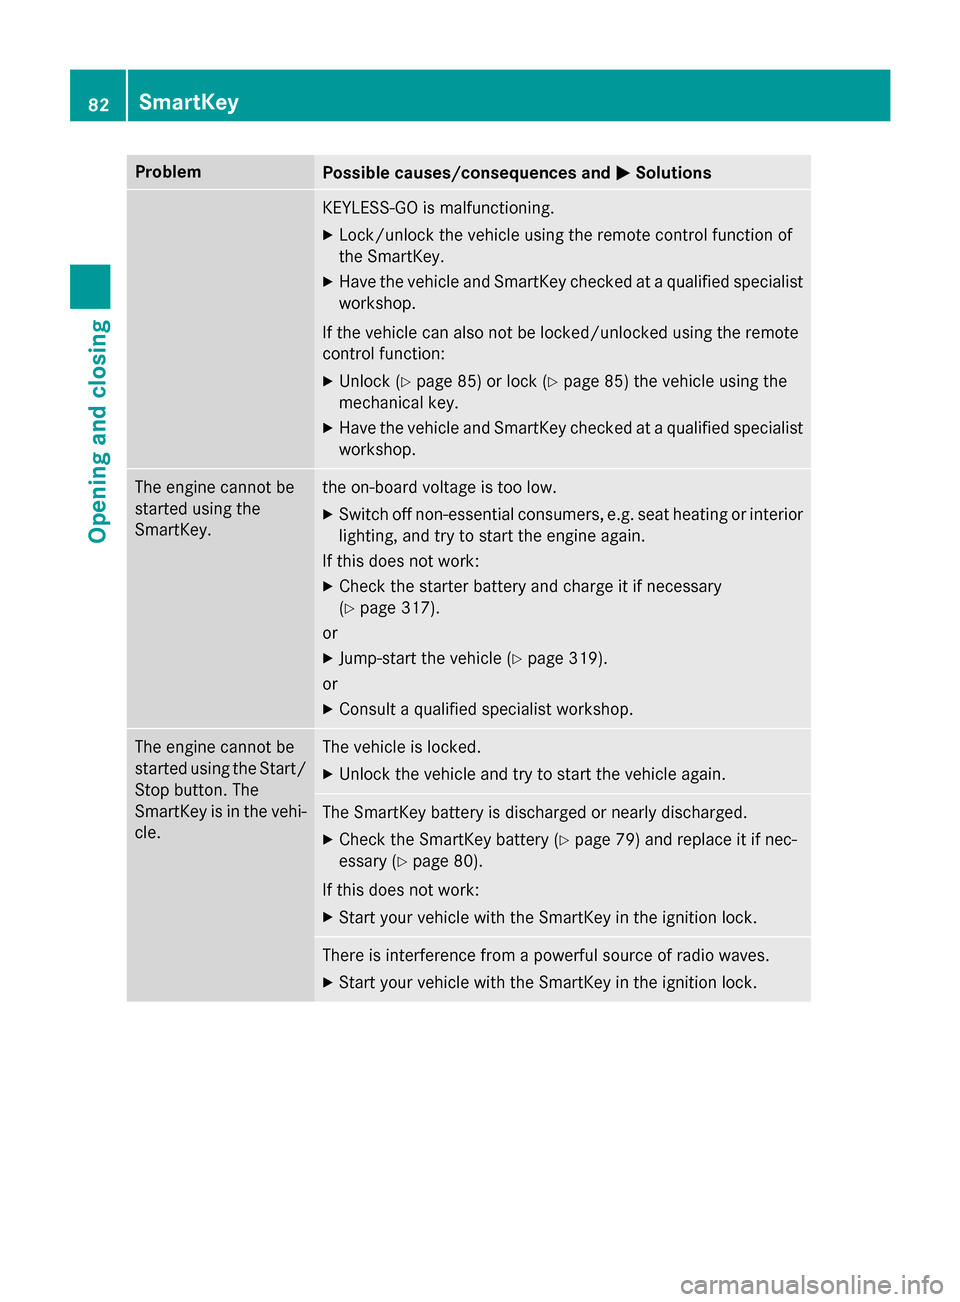
ProblemPossible causes/consequences andMSolutions
KEYLESS-GO is malfunctioning.
XLock/unlock the vehicle using the remote control function of
the SmartKey.
XHave the vehicle and SmartKey checked at a qualified specialist
workshop.
If the vehicle can also not be locked/unlocked using the remote
control function:
XUnlock (Ypage 85) or lock (Ypage 85) the vehicle using the
mechanical key.
XHave the vehicle and SmartKey checked at a qualified specialist
workshop.
The engine cannot be
started using the
SmartKey.the on-board voltage is too low.
XSwitch off non-essential consumers, e.g. seat heating or interior
lighting, and try to start the engine again.
If this does not work:
XCheck the starter battery and charge it if necessary
(
Ypage 317).
or
XJump-start the vehicle (Ypage 319).
or
XConsult a qualified specialist workshop.
The engine cannot be
started using the Start/
Stop button. The
SmartKey is in the vehi-
cle.The vehicle is locked.
XUnlock the vehicle and try to start the vehicle again.
The SmartKey battery is discharged or nearly discharged.
XCheck the SmartKey battery (Ypage 79) and replace it if nec-
essary (
Ypage 80).
If this does not work:
XStart your vehicle with the SmartKey in the ignition lock.
There is interference from a powerful source of radio waves.
XStart your vehicle with the SmartKey in the ignition lock.
82SmartKey
Opening and closing
Page 87 of 374
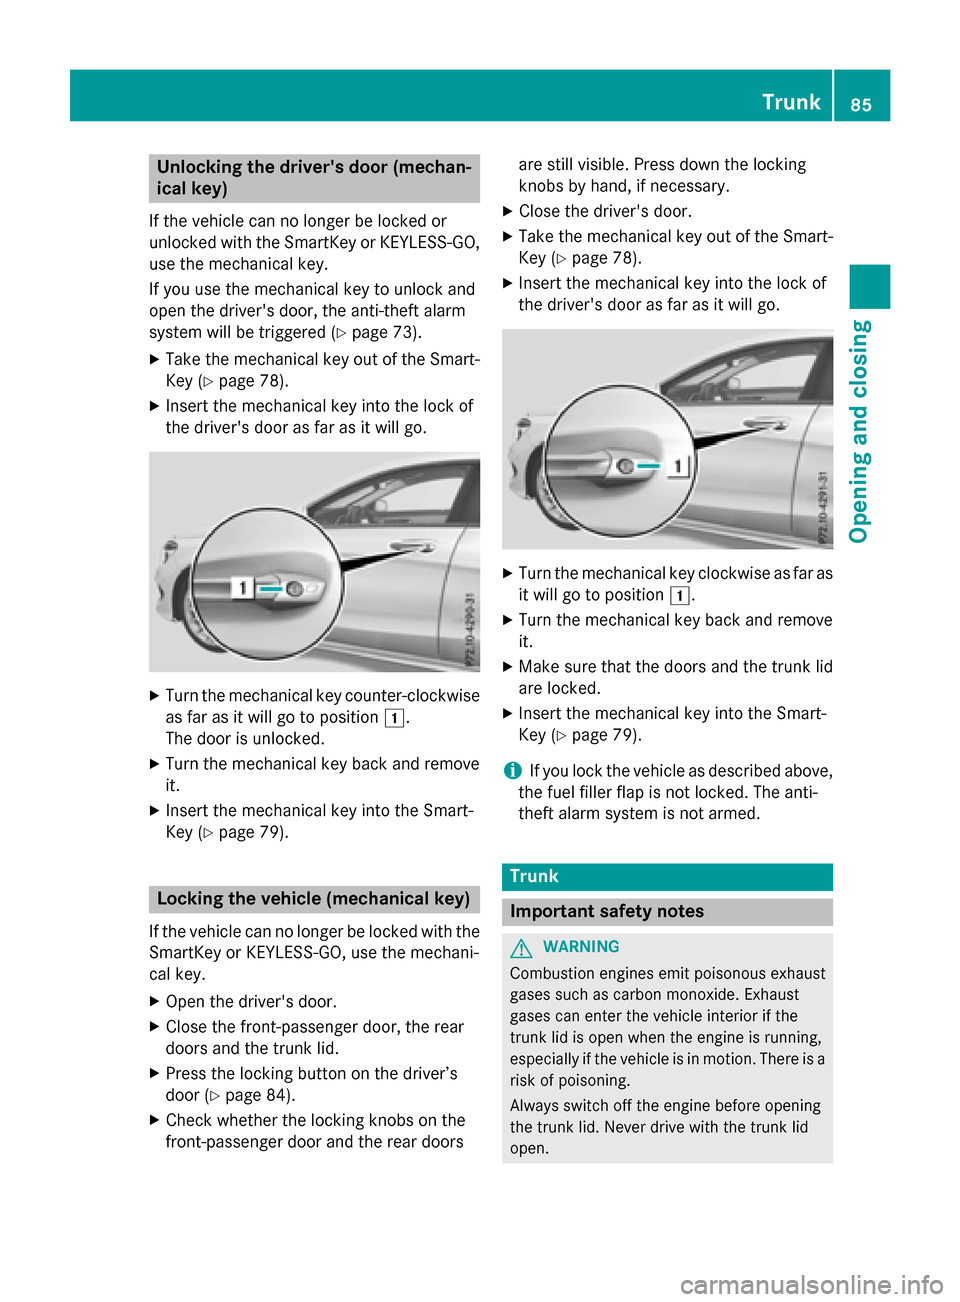
Unlocking the driver's door (mechan-
ical key)
If the vehicle can no longer be locked or
unlocked with the SmartKey or KEYLESS-GO,
use the mechanical key.
If you use the mechanical key to unlock and
open the driver's door, the anti-theft alarm
system will be triggered (
Ypage 73).
XTake the mechanical key out of the Smart-
Key (
Ypage 78).
XInsert the mechanical key into the lock of
the driver's door as far as it will go.
XTurn the mechanical key counter-clockwise
as far as it will go to position 1.
The door is unlocked.
XTurn the mechanical key back and remove
it.
XInsert the mechanical key into the Smart-
Key (
Ypage 79).
Locking the vehicle (mechanical key)
If the vehicle can no longer be locked with the
SmartKey or KEYLESS-GO, use the mechani-
cal key.
XOpen the driver's door.
XClose the front-passenger door, the rear
doors and the trunk lid.
XPress the locking button on the driver’s
door (
Ypage 84).
XCheck whether the locking knobs on the
front-passenger door and the rear doors are still visible. Press down the locking
knobs by hand, if necessary.
XClose the driver's door.
XTake the mechanical key out of the Smart-
Key (
Ypage 78).
XInsert the mechanical key into the lock of
the driver's door as far as it will go.
XTurn the mechanical key clockwise as far as
it will go to position
1.
XTurn the mechanical key back and remove
it.
XMake sure that the doors and the trunk lid
are locked.
XInsert the mechanical key into the Smart-
Key (
Ypage 79).
iIf you lock the vehicle as described above,
the fuel filler flap is not locked. The anti-
theft alarm system is not armed.
Trunk
Important safety notes
GWARNING
Combustion engines emit poisonous exhaust
gases such as carbon monoxide. Exhaust
gases can enter the vehicle interior if the
trunk lid is open when the engine is running,
especially if the vehicle is in motion. There is a
risk of poisoning.
Always switch off the engine before opening
the trunk lid. Never drive with the trunk lid
open.
Trunk85
Opening and closing
Z
Page 102 of 374
Useful information
i
This Operator's Manual describes all
models and all standard and optional equip-
ment of your vehicle available at the time of
publication of the Operator's Manual.
Country-specific differences are possible.
Please note that your vehicle may not be
equipped with all features described. This
also applies to safety-related systems and
functions.
iRead the information on qualified special-
ist workshops (
Ypage 25).
Correct driver's seat position
GWARNING
You could lose control of your vehicle if you do the following while driving:
Radjust the driver's seat, head restraint,
steering wheel or mirrors
Rfasten the seat belt
There is a risk of an accident.
Adjust the driver's seat, head restraint, steer-
ing wheel and mirror and fasten your seat belt before starting the engine.
XObserve the safety guidelines on seat
adjustment (
Ypage 101).
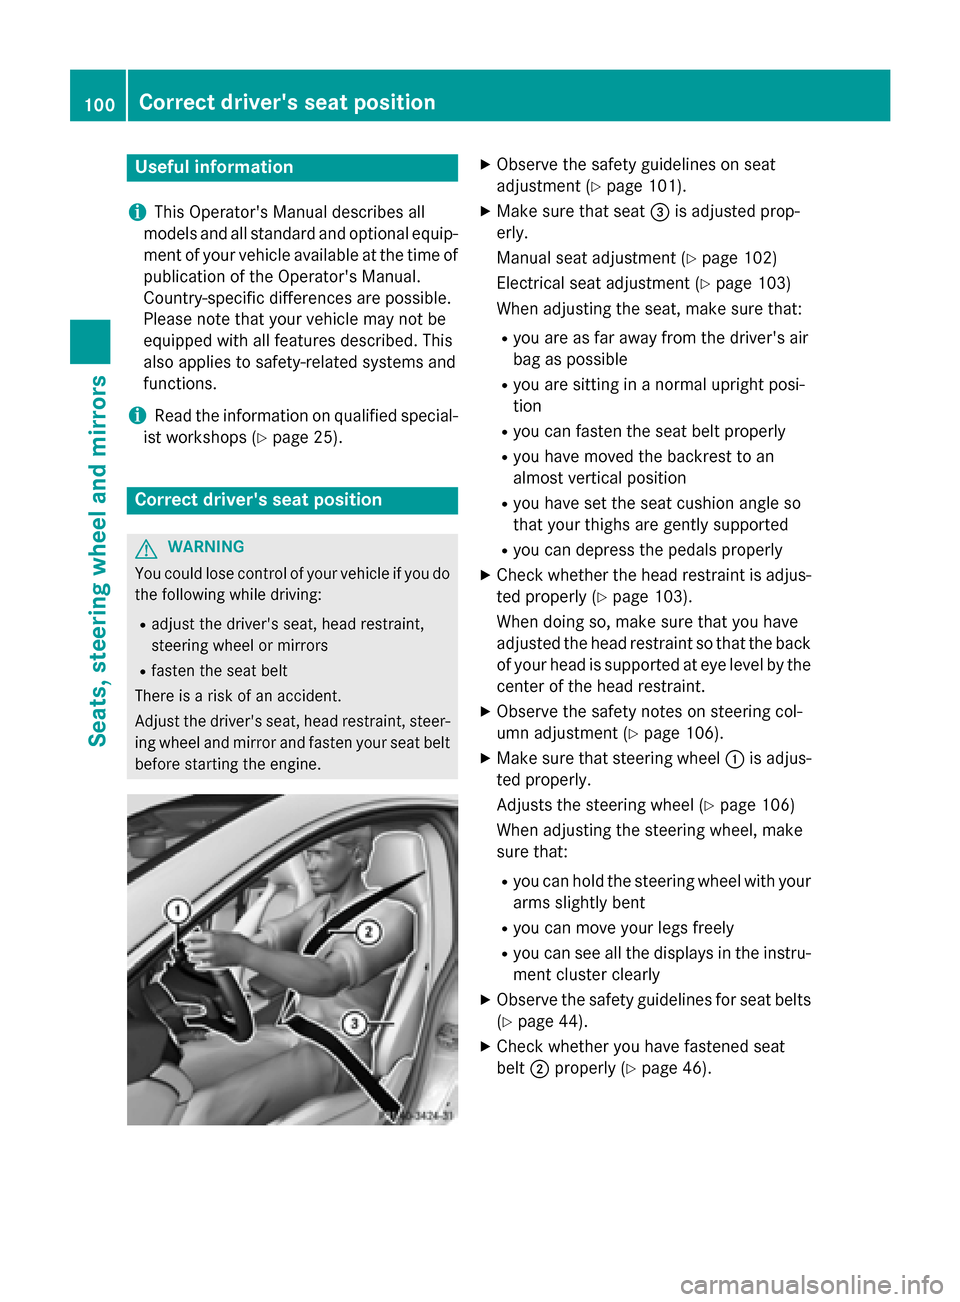
XMake sure that seat =is adjusted prop-
erly.
Manual seat adjustment (
Ypage 102)
Electrical seat adjustment (
Ypage 103)
When adjusting the seat, make sure that:
Ryou are as far away from the driver's air
bag as possible
Ryou are sitting in a normal upright posi-
tion
Ryou can fasten the seat belt properly
Ryou have moved the backrest to an
almost vertical position
Ryou have set the seat cushion angle so
that your thighs are gently supported
Ryou can depress the pedals properly
XCheck whether the head restraint is adjus-
ted properly (
Ypage 103).
When doing so, make sure that you have
adjusted the head restraint so that the back
of your head is supported at eye level by the
center of the head restraint.
XObserve the safety notes on steering col-
umn adjustment (
Ypage 106).
XMake sure that steering wheel :is adjus-
ted properly.
Adjusts the steering wheel (
Ypage 106)
When adjusting the steering wheel, make
sure that:
Ryou can hold the steering wheel with your
arms slightly bent
Ryou can move your legs freely
Ryou can see all the displays in the instru-
ment cluster clearly
XObserve the safety guidelines for seat belts
(
Ypage 44).
XCheck whether you have fastened seat
belt ;properly (
Ypage 46).
100Correct driver's seat position
Seats, steering wheel and mirrors
Page 108 of 374

Problems with the seat heating
ProblemPossible causes/consequences andMSolutions
The seat heating has
switched off prema-
turely or cannot be
switched on.The on-board voltage is too low because too many electrical con-
sumers are switched on.
XSwitch off electrical consumers that you do not need, such as
the rear window defroster or interior lighting.
Once the battery is sufficiently charged, the seat heating will
switch back on automatically.
Steering wheel
Important safety notes
GWARNING
You could lose control of your vehicle if you do the following while driving:
Radjust the driver's seat, head restraint,
steering wheel or mirrors
Rfasten the seat belt
There is a risk of an accident.
Adjust the driver's seat, head restraint, steer-
ing wheel and mirror and fasten your seat belt before starting the engine.
GWARNING
Children could injure themselves if they
adjust the steering wheel. There is a risk of
injury.
When leaving the vehicle, always take the
SmartKey with you and lock the vehicle. Never
leave children unsupervised in the vehicle.
Adjusting the steering wheel
GWARNING
If the steering wheel is unlocked while the
vehicle is in motion, it could change position
unexpectedly. This could cause you to lose
control of the vehicle. There is a risk of an
accident.
Before starting off, make sure the steering
wheel is locked. Never unlock the steering
wheel while the vehicle is in motion.
:Release lever
;Adjusts the steering wheel height
=Adjusts the steering wheel position (fore-
and-aft adjustment)
XPush release lever :down completely.
The steering column is unlocked.
XAdjust the steering wheel to the desired
position.
XPush release lever :up completely.
The steering column is locked.
XCheck if the steering column is locked.
When doing so, try to push the steering
wheel up or down or try to move it in the
fore-and-aft direction.
106Steering wheel
Seats, steering wheel and mirrors
Page 122 of 374
Interior lighting control
General notes
In order to prevent the vehicle's battery from
disc harging, the interior lighting functions are
automatical lydeactivated after some time
exce ptwhen the key is inposition 2in the
ignit ion lock.
The color and brightness for the ambient
ligh ting may beset using COMAND or Aud io
20 (see the separate operating instructions).
Automatic interior lighting control
XTo switch on: set the switch to center
position B.
XTo switch off: set theswitch to the |
position.
The interior lighting automatical ly switches
on ifyou:
Runlock the vehicle
Ropen a door
RRemove the SmartKey from the ignit ion
lock.
The interior lightis activated for a short while
when the SmartKey isremoved from the igni-
tion lock. This delayed switch-off can be
adjusted using COMAND or Aud io20 (see the
separate Operator's Manual).
Manual interior lighting control
XTo switch the front interi orlighting on:
set the switch to the cposition.
XTo switch the front interi orlighting off:
set the switch to the |position or (if the
door isclosed) to the center position.
XTo switch the rear interi orlighti ngon or
off: press the ubutton.
XTo switch the reading lamp on oroff:
press the pbutton.
Crash-responsive emergency lighting
The interior lighting isact ivat ed automatical ly
if the vehicle isinvolved inan acc ident.
XTo switch off the crash-responsive
eme rgency lighti ng:press the hazard
warning lamp button.
or
XLock and then unlock the vehicle using the Sm artKey.
Replacing bulbs
Important safety notes
Xenon bulbs
GDANGER
Xenon bulbs carry ahigh voltage. You can get
an electric shock if you remove th ecover of
th eXenon bulb and touch th eelectrical con-
tacts .Ther eis aris kof fatal injury.
Never touch th epart sor th eelectrical con-
tacts of th eXenon bulb. Always hav ewor kon
th eXenon bulbs carrie dout at aqualified spe-
cialist workshop.
If your vehicle isequipped with Xenon bulbs,
you can recogniz e this by the following: the
cone of light from the Xenon bulbsmoves
from the top to the bottom and back again
when you start the engine. For th isto be
observed, the lights must beswitched on
before starting the engine.
Bulbs and lamps are an important aspect of
vehicle safety. You must therefore make sure
that these function correctly at all times.
Have the headlamp setting checked regularly.
Other bulbs
GWARNIN G
Bulbs, lamp sand connectors can get ver yhot
when operating .If you chang e abulb, you
could burn yourself on these components.
Ther eis aris kof injury.
Allow these component sto cool down before
changing abulb.
120Replacing bulbs
Lights and windshield wipers