headlamp MERCEDES-BENZ CLA-Class 2016 C117 User Guide
[x] Cancel search | Manufacturer: MERCEDES-BENZ, Model Year: 2016, Model line: CLA-Class, Model: MERCEDES-BENZ CLA-Class 2016 C117Pages: 374, PDF Size: 8.19 MB
Page 121 of 374
The headlamp range is set automatically
depending on the distance between the
vehicle and other road users.
If you are driving at speeds above approx-
imately 35 mph (55 km/h) and no other
road users have been detected:
The high-beam headlamps are switched on
automatically. TheKindicator lamp in
the instrument cluster also lights up.
If you are driving at speeds below approx-
imately 30 mph (45 km/h) or other road
users have been detected or the roads are
adequately lit:
The high-beam headlamps are switched off
automatically. The Kindicator lamp in
the instrument cluster goes out. The _
indicator lamp in the multifunction display
remains lit.
XTo deactivate: move the combination
switch back to its normal position.
The _ indicator lamp in the multifunc-
tion display goes out.
Headlamps fogged up on the inside
Certain climatic and physical conditions may
cause moisture to form in the headlamp. This
moisture does not affect the functionality of
the headlamp.
Interior lighting
Overview of interior lighting
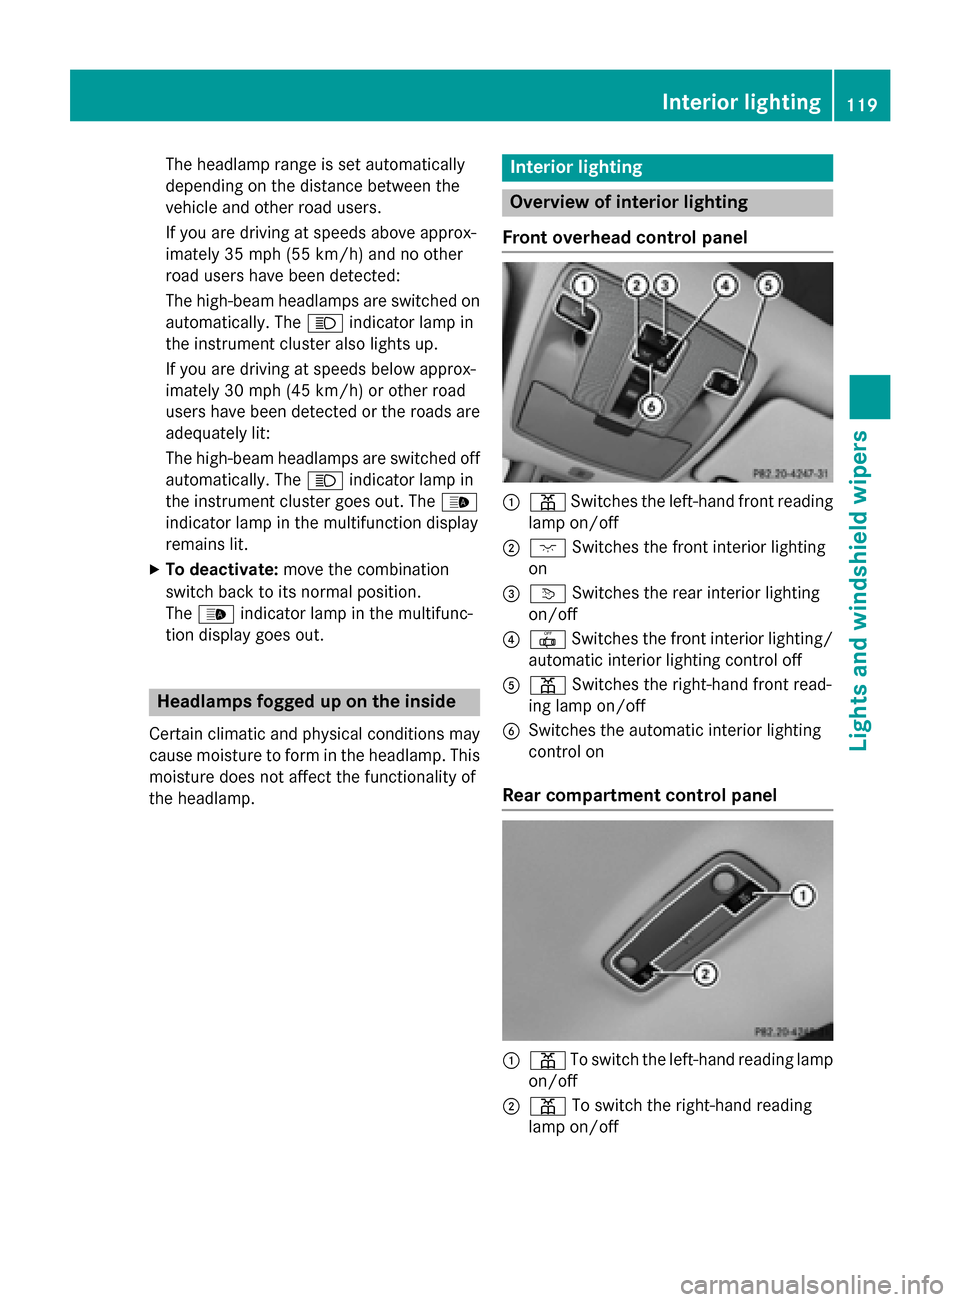
Front overhead control panel
:p Switches the left-hand front reading
lamp on/off
;c Switches the front interior lighting
on
=v Switches the rear interior lighting
on/off
?| Switches the front interior lighting/
automatic interior lighting control off
Ap Switches the right-hand front read-
ing lamp on/off
BSwitches the automatic interior lighting
control on
Rear compartment control panel
:p To switch the left-hand reading lamp
on/off
;p To switch the right-hand reading
lamp on/off
Interior lighting119
Lights and windshield wipers
Z
Page 122 of 374
Interior lighting control
General notes
In order to prevent the vehicle's battery from
disc harging, the interior lighting functions are
automatical lydeactivated after some time
exce ptwhen the key is inposition 2in the
ignit ion lock.
The color and brightness for the ambient
ligh ting may beset using COMAND or Aud io
20 (see the separate operating instructions).
Automatic interior lighting control
XTo switch on: set the switch to center
position B.
XTo switch off: set theswitch to the |
position.
The interior lighting automatical ly switches
on ifyou:
Runlock the vehicle
Ropen a door
RRemove the SmartKey from the ignit ion
lock.
The interior lightis activated for a short while
when the SmartKey isremoved from the igni-
tion lock. This delayed switch-off can be
adjusted using COMAND or Aud io20 (see the
separate Operator's Manual).
Manual interior lighting control
XTo switch the front interi orlighting on:
set the switch to the cposition.
XTo switch the front interi orlighting off:
set the switch to the |position or (if the
door isclosed) to the center position.
XTo switch the rear interi orlighti ngon or
off: press the ubutton.
XTo switch the reading lamp on oroff:
press the pbutton.
Crash-responsive emergency lighting
The interior lighting isact ivat ed automatical ly
if the vehicle isinvolved inan acc ident.
XTo switch off the crash-responsive
eme rgency lighti ng:press the hazard
warning lamp button.
or
XLock and then unlock the vehicle using the Sm artKey.
Replacing bulbs
Important safety notes
Xenon bulbs
GDANGER
Xenon bulbs carry ahigh voltage. You can get
an electric shock if you remove th ecover of
th eXenon bulb and touch th eelectrical con-
tacts .Ther eis aris kof fatal injury.
Never touch th epart sor th eelectrical con-
tacts of th eXenon bulb. Always hav ewor kon
th eXenon bulbs carrie dout at aqualified spe-
cialist workshop.
If your vehicle isequipped with Xenon bulbs,
you can recogniz e this by the following: the
cone of light from the Xenon bulbsmoves
from the top to the bottom and back again
when you start the engine. For th isto be
observed, the lights must beswitched on
before starting the engine.
Bulbs and lamps are an important aspect of
vehicle safety. You must therefore make sure
that these function correctly at all times.
Have the headlamp setting checked regularly.
Other bulbs
GWARNIN G
Bulbs, lamp sand connectors can get ver yhot
when operating .If you chang e abulb, you
could burn yourself on these components.
Ther eis aris kof injury.
Allow these component sto cool down before
changing abulb.
120Replacing bulbs
Lights and windshield wipers
Page 123 of 374
Do not use a bulb that has been dropped or if
its glass tube has been scratched.
The bulb may explode if:
Ryou touch it
Rit is hot
Ryou drop it
Ryou scratch it
Only operate bulbs in enclosed lamps
designed for that purpose. Only install spare
bulbs of the same type and the specified volt- age.
Marks on the glass tube reduce the service
life of the bulbs. Do not touch the glass tube
with your bare hands. If necessary, clean the
glass tube when cold with alcohol or spirit and
rub it off with a lint-free cloth.
Protect bulbs from moisture during opera-
tion. Do not allow bulbs to come into contact
with liquids.
There are bulbs other than the Xenon bulbs
that you cannot replace. Only replace the
bulbs listed (
Ypage 121). Have the bulbs that
you cannot replace yourself changed at a
qualified specialist workshop.
If you require assistance replacing bulbs, con-
sult a qualified specialist workshop.
If the new bulb still does not light up, consult
a qualified specialist workshop.
Bulbs and lamps are an important aspect of
vehicle sa fety. Y
ou must therefore make sure
that these function correctly at all times.
Have the headlamp setting checked regularly.
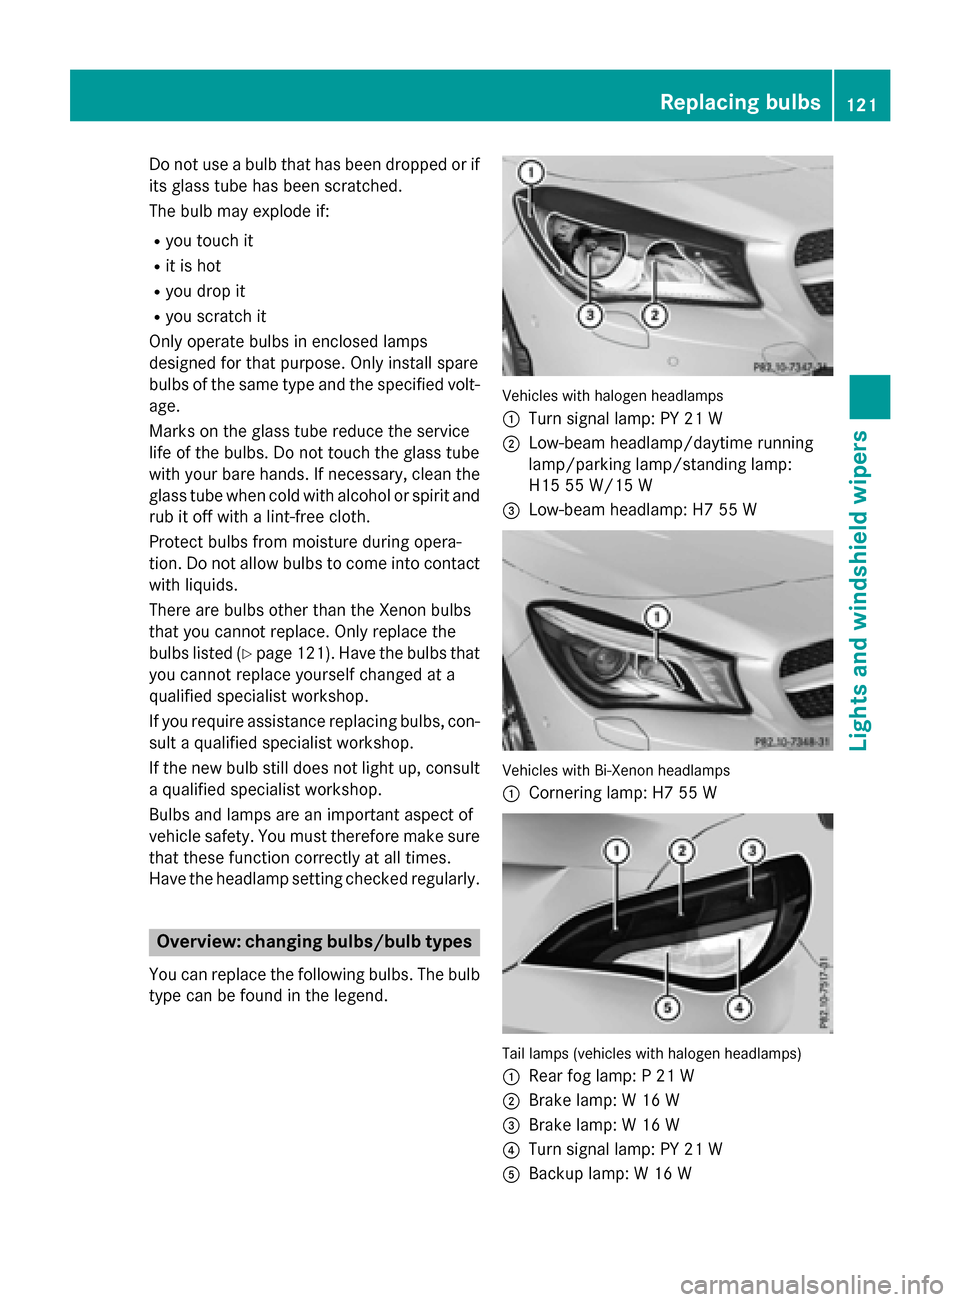
Overview: changing bulbs/bulb types
You can replace the following bulbs. The bulb
type can be found in the legend.
Vehicles with halogen headlamps
:
Turn signal lamp: PY 21 W
;Low-beam headlamp/daytime running
lamp/parking lamp/standing lamp:
H15 55 W/15 W
=Low-beam headlamp: H7 55 W
Vehicles with Bi-Xenon headlamps
:
Cornering lamp: H7 55 W
Tail lamps (vehicles with halogen headlamps)
:
Rear fog lamp: P 21 W
;Brake lamp: W 16 W
=Brake lamp: W 16 W
?Turn signal lamp: PY 21 W
ABackup lamp: W 16 W
Replacing bulbs121
Lights and windshield wiper s
Z
Page 124 of 374
Changing the front bulbs
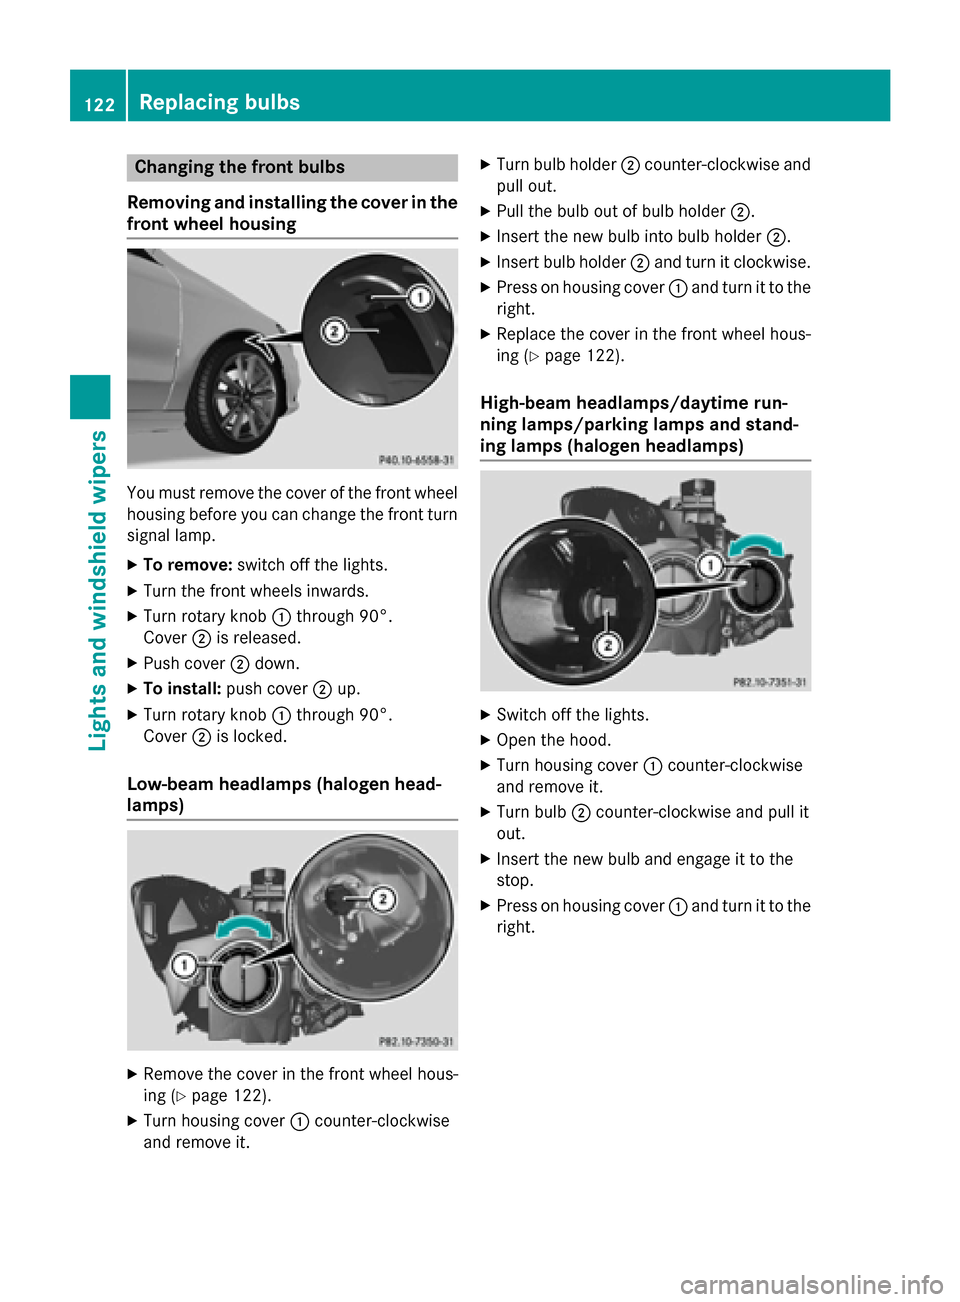
Removing and installing the cover in the
front wheel housing
You must remove the cover of the front wheel
housing before you can change the front turn signal lamp.
XTo remove: switch off the lights.
XTurn the front wheels inwards.
XTurn rotary knob :through 90°.
Cover ;is released.
XPush cover ;down.
XTo install: push cover ;up.
XTurn rotary knob :through 90°.
Cover ;is locked.
Low-beam headlamps (halogen head-
lamps)
XRemove the cover in the front wheel hous-
ing (
Ypage 122).
XTurn housing cover :counter-clockwise
and remove it.
XTurn bulb holder ;counter-clockwise and
pull out.
XPull the bulb out of bulb holder ;.
XInsert the new bulb into bulb holder ;.
XInsert bulb holder;and turn it clockwise.
XPress on housing cover :and turn it to the
right.
XReplace the cover in the front wheel hous-
ing (
Ypage 122).
High-beam headlamps/daytime run-
ning lamps/parking lamps and stand-
ing lamps (halogen headlamps)
XSwitch off the lights.
XOpen the hood.
XTurn housing cover :counter-clockwise
and remove it.
XTurn bulb ;counter-clockwise and pull it
out.
XInsert the new bulb and engage it to the
stop.
XPress on housing cover :and turn it to the
right.
122Replacing bulbs
Lights and windshield wipers
Page 125 of 374
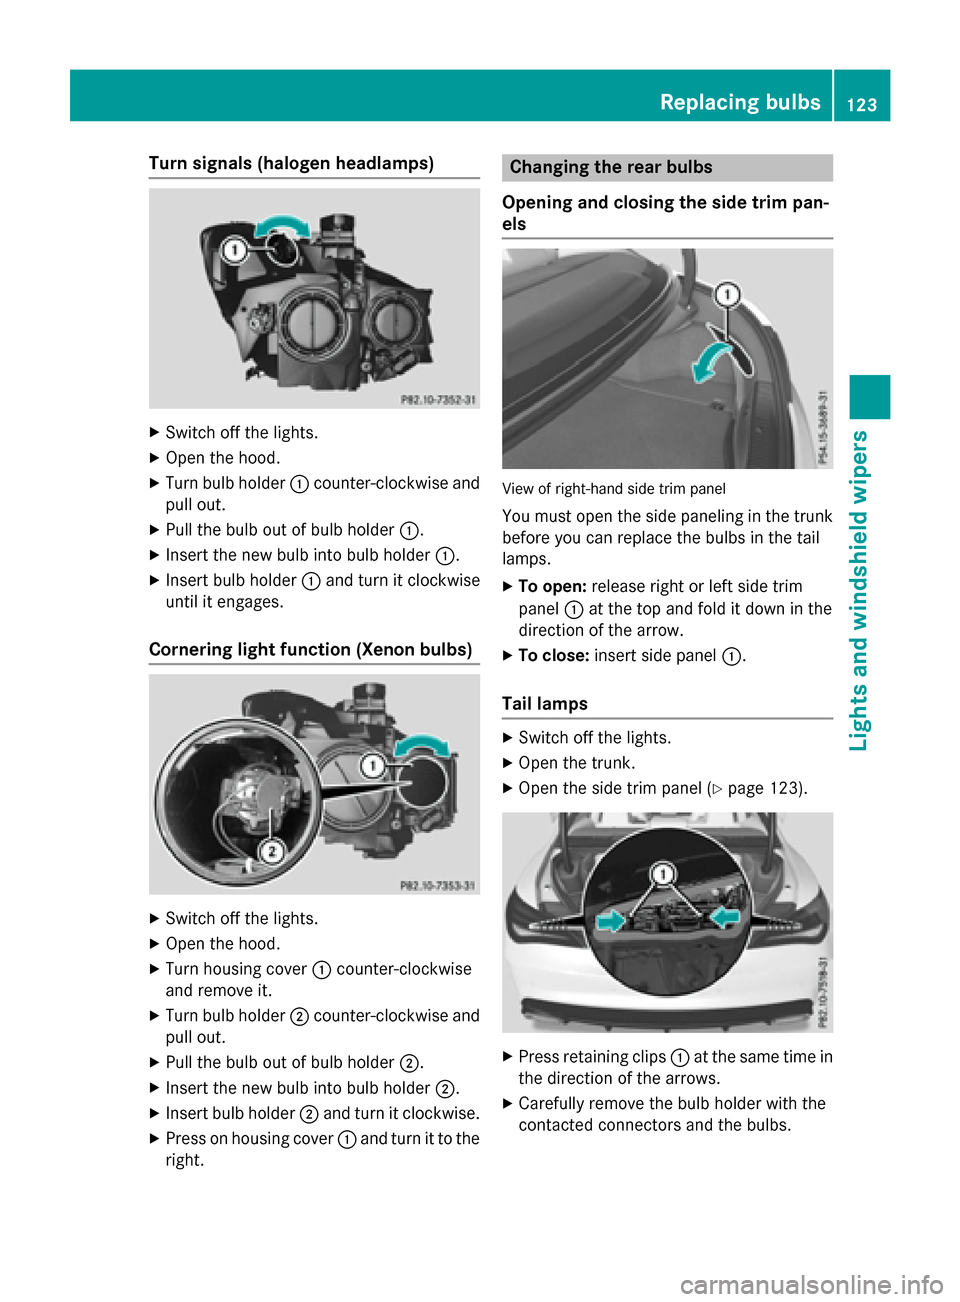
Turn signals (halogen headlamps)
XSwitch off the lights.
XOpen the hood.
XTurn bulb holder:counter-clockwise and
pull out.
XPull the bulb out of bulb holder :.
XInsert the new bulb into bulb holder :.
XInsert bulb holder:and turn it clockwise
until it engages.
Cornering light function (Xenon bulbs)
XSwitch off the lights.
XOpen the hood.
XTurn housing cover :counter-clockwise
and remove it.
XTurn bulb holder ;counter-clockwise and
pull out.
XPull the bulb out of bulb holder ;.
XInsert the new bulb into bulb holder ;.
XInsert bulb holder;and turn it clockwise.
XPress on housing cover :and turn it to the
right.
Changing the rear bulbs
Opening and closing the side trim pan-
els
View of right-hand side trim panel
You must open the side paneling in the trunk
before you can replace the bulbs in the tail
lamps.
XTo open: release right or left side trim
panel :at the top and fold it down in the
direction of the arrow.
XTo close: insert side panel :.
Tail lamps
XSwitch off the lights.
XOpen the trunk.
XOpen the side trim panel (Ypage 123).
XPress retaining clips :at the same time in
the direction of the arrows.
XCarefully remove the bulb holder with the
contacted connectors and the bulbs.
Replacing bulbs123
Lights and windshield wiper s
Z
Page 242 of 374
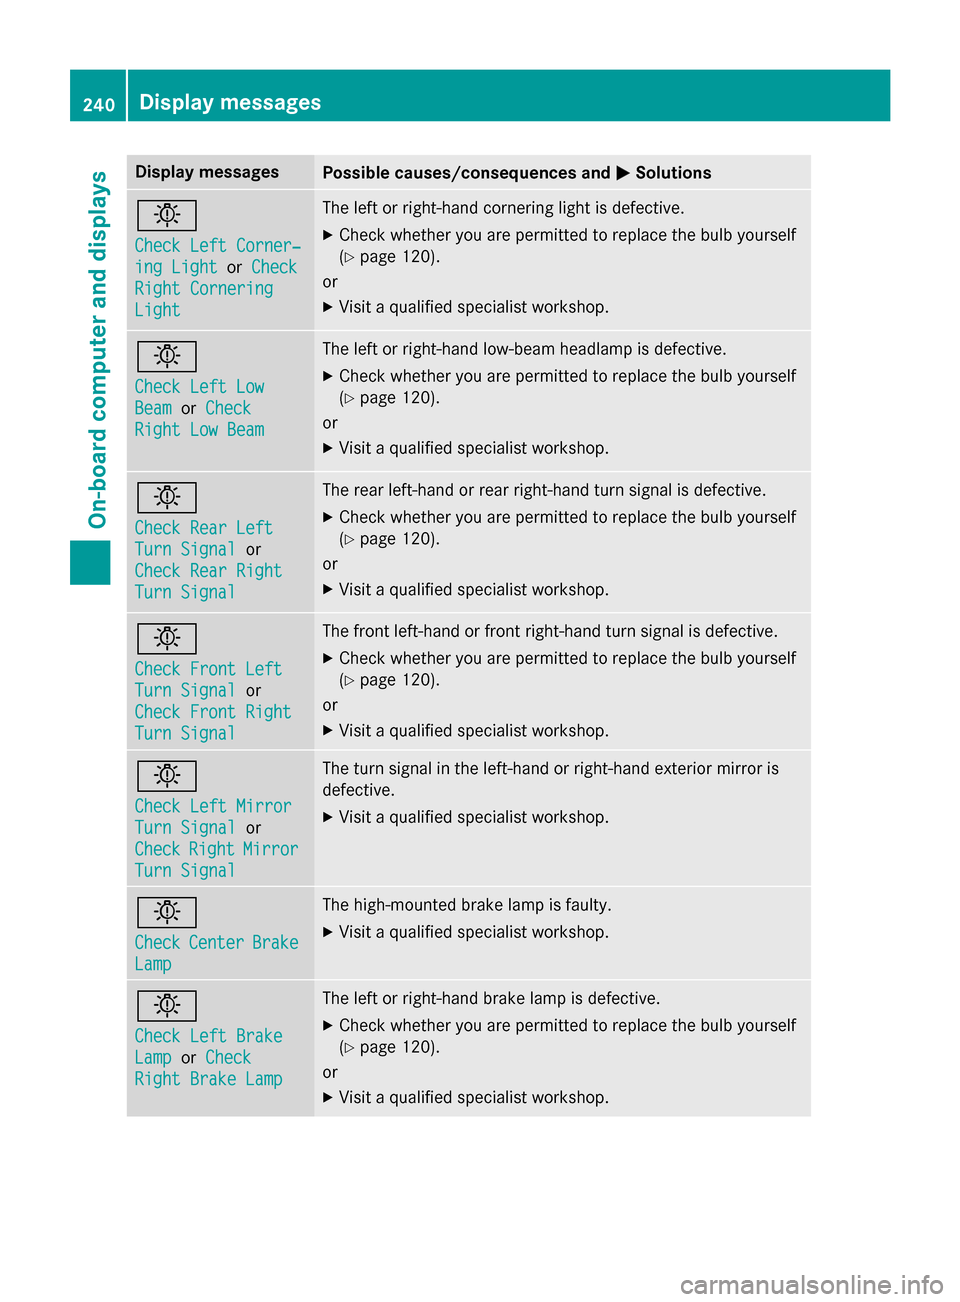
Display messagesPossible causes/consequences andMSolutions
b
Check LeftCorner ‐
ing LightorCheck
Right Cornering
Light
The lef tor right-hand cornering ligh tis defective.
XChec kwhether you are permitte dto replac eth ebulb yourself
(
Ypage 120).
or
XVisit aqualified specialist workshop .
b
Check LeftLow
Bea morCheck
Right Low Bea m
The leftor right-hand low-beam headlamp is defective.
XChec kwhether you are permitte dto replac eth ebulb yourself
(
Ypage 120).
or
XVisit aqualified specialist workshop .
b
Check RearLef t
TurnSignalor
Check Rea rRight
Tur nSignal
The rear left-han dor rear right-hand tur nsignal is defective.
XChec kwhether you are permitte dto replac eth ebulb yourself
(
Ypage 120).
or
XVisit aqualified specialist workshop .
b
Check Front Left
TurnSignalor
Check Front Right
Tur nSignal
The fron tleft-han dor fron tright-hand tur nsignal is defective.
XChec kwhether you are permitte dto replac eth ebulb yourself
(
Ypage 120).
or
XVisit aqualified specialist workshop .
b
Check LeftMirror
Tur nSignalor
Check
RightMirror
Tur nSignal
The tur nsignal in th eleft-han dor right-hand exterio rmirror is
defective.
XVisit aqualified specialist workshop .
b
CheckCenterBrake
Lamp
The high-mounte dbrak elamp is faulty.
XVisit aqualified specialist workshop .
b
Check LeftBrake
Lam porCheck
Right Brake Lam p
The leftor right-hand brak elamp is defective.
XChec kwhether you are permitte dto replac eth ebulb yourself
(
Ypage 120).
or
XVisit aqualified specialist workshop .
240Display messages
On-board computer and displays
Page 244 of 374
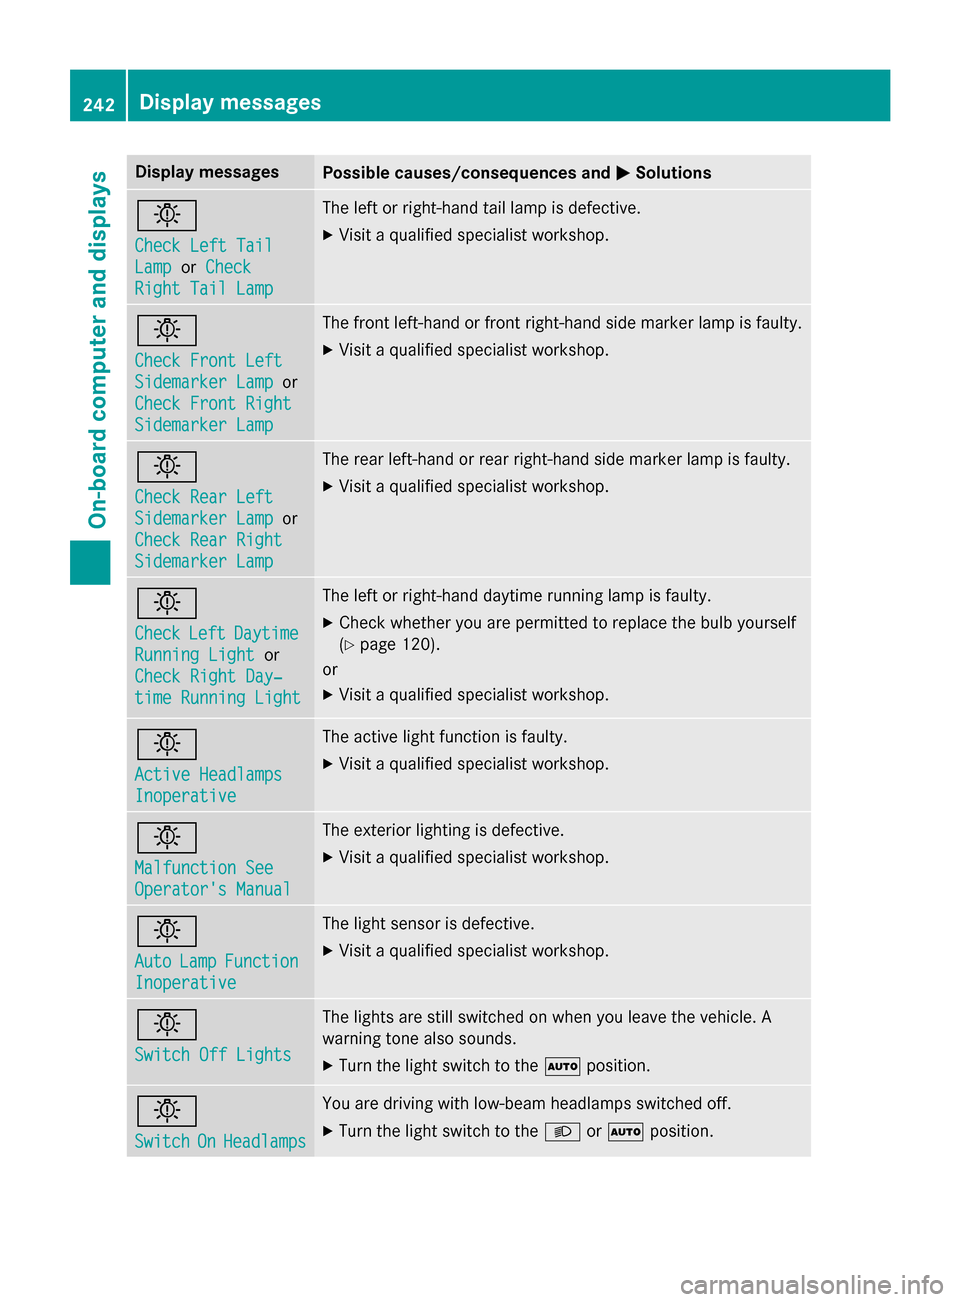
Display messagesPossible causes/consequences andMSolutions
b
Check LeftTai l
LamporCheck
Right Tai lLam p
The lef tor right-hand tai llamp is defective.
XVisit aqualified specialist workshop .
b
Check Front Left
SidemarkerLam por
Check Front Right
Sidemarke rLam p
The fron tleft-han dor fron tright-hand side marke rlamp is faulty.
XVisit aqualified specialist workshop .
b
Check RearLef t
Sidemarke rLam por
Check Rea rRight
Sidemarke rLam p
The rear left-han dor rear right-hand side marke rlamp is faulty.
XVisit aqualified specialist workshop .
b
CheckLeftDaytim e
RunningLightor
Check Right Day ‐
timeRunnin gLight
The lef tor right-hand daytime running lamp is faulty.
XChec kwhether you are permitte dto replac eth ebulb yourself
(
Ypage 120).
or
XVisit aqualified specialist workshop .
b
Active Headlamps
Inoperative
The active lightfunction is faulty.
XVisit aqualified specialist workshop .
b
Malfunction See
Operator'sManual
The exterio rlighting is defective.
XVisit aqualified specialist workshop .
b
AutoLampFunction
Inoperative
The ligh tsensor is defective.
XVisit aqualified specialist workshop .
b
Switch Off Lights
The lights are still switched on when you leav eth evehicle. A
warnin gtone also sounds.
XTur nth eligh tswitch to th eà position .
b
SwitchOnHeadlamps
You are drivin gwit hlow-beam headlamp sswitched off.
XTur nth eligh tswitch to th eL orà position .
242Display messages
On-board computer and displays