headlamp MERCEDES-BENZ CLA-Class 2016 C117 Owner's Manual
[x] Cancel search | Manufacturer: MERCEDES-BENZ, Model Year: 2016, Model line: CLA-Class, Model: MERCEDES-BENZ CLA-Class 2016 C117Pages: 374, PDF Size: 8.19 MB
Page 7 of 374
ATA (Anti-Theft Alarm system)Activating/deactivating .................. .73
Function ........................................... 73
Switching off the alarm .................... 73
ATTENTION ASSIST
Activating/deactivating .................2 20
Display message ............................ 246
Function/notes .............................2 03
Audio menu (on-board computer) .... 217
Audio system
see separate operating instructions
Authorized Mercedes-Benz Center
see Qualified specialist workshop
Authorized workshop
see Qualified specialist workshop
AUTO lights
Display message ............................ 242
see Lights
Automatic car wash (care) ...............302
Automatic engine start (ECO start/
stop function) ....................................1 52
Automatic engine switch-off (ECO
start/stop function) .......................... 152
Automatic headlamp mode .............. 114
Automatic transmission
Accelerator pedal position ............. 161
Changing gear ............................... 161
DIRECT SELECT lever ..................... 157
Drive program ................................ 162
Drive program display .................... 157
Driving tips .................................... 161
DYNAMIC SELECT button (all vehi-
cles except Mercedes-AMG vehi-
cles) ............................................... 155
DYNAMIC SELECT controller
(Mercedes-AMG vehicles) .............. 156
Emergency running mode .............. 167
Engaging drive position .................. 159
Engaging neutral ............................ 158
Engaging park position
(Mercedes-AMG vehicles) .............. 160
Engaging park position automati-
cally ............................................... 158
Engaging reverse gear ................... 158
Engaging the park position ............ 157
Holding the vehicle stationary on
uphill gradients .............................. 161 Kickdown ....................................... 161
Manual shifting .............................. 164
Oil temperature (on-board com-
puter, Mercedes-AMG vehicl
es) ..... 223
Overvi
ew ........................................ 157
Problem (malfunction) ................... 167
Pulling away ................................... 150
Selector lever ................................ 159
Starting the engine ........................ 149
Steering wheel paddle shifters ...... 164
Transmission position display ........ 159
Transmission position display
(DIRECT SELECT lever) ................... 157
Transmission positions .................. 160
Automatic transmission emer-
gency mode ....................................... 167
B
Backup lamp
Display message ............................ 241
BAS (Brake Assist System) ................. 66
Battery (SmartKey)
Checking .......................................... 79
Important safety notes .................... 79
Replacing ......................................... 80
Battery (vehicle)
Charging ........................................ 317
Display message ............................ 244
Important safety notes .................. 315
Jump starting ................................. 319
Belt
see Seat belts
Blind Spot Assist
Activating/deactivating (on-
board computer) ............................ 220
Display message ............................ 247
Notes/function .............................. 205
Brake Assist
see BAS (Brake Assist System)
Brake fluid
Display message ............................ 234
Notes ............................................. 369
Brake force distribution
see EBD (electronic brake force
distribution)
Brake lamps
Changing bulbs .............................. 123
Index5
Page 8 of 374
Display message ............................ 240
Brakes
ABS .................................................. 65
Adaptive Brake Assist ...................... 68
BAS .................................................. 66
Brake fluid (notes) .........................3 69
Display message ............................ 228
EBD ..................................................7 2
Hill start assist ............................... 151
HOLD function ............................... 187
Important safety notes .................. 175
Maintenance .................................. 176
Parking brake ................................ 171
Riding tips ...................................... 175
Warning lamp ................................. 260
Breakdown
Where will I find...? ........................ 310
see Flat tire
see Tow-starting
see Towing away
Brightness control (instrument
cluster lighting) ................................... 31
Buttons on the steering wheel ......... 211
C
California
Important notice for retail cus-
tomers and lessees .......................... 23
Calling up a malfunction
see Display messages
Car
see Vehicle
Care
Car wash ........................................ 302
Carpets .......................................... 308
Display ........................................... 306
Exhaust pipe .................................. 306
Exterior lights ................................ 305
Gear or selector lever .................... 307
Interior ........................................... 306
Matte finish ................................... 304
Notes ............................................. 301
Paint .............................................. 303
Plastic trim .................................... 306
Power washer ................................ 303
Rear view camera .......................... 306
Roof lining ...................................... 308 Seat belt ........................................ 308
Seat cover ..................................... 307
Sensors ......................................... 305
Steering wheel ............................... 307
Trim pieces .................................... 307
Washing by hand ........................... 302
Wheels ........................................... 304
Windows ........................................ 304
Wiper blades .................................. 305
Wooden trim .................................. 307
Cargo compartment enlargement ... 275
Cargo tie down rings ......................... 276
CD player (on-board computer) ........ 217
Center console
Lower section .................................. 36
Upper section .................................. 35
Central locking
Automatic locking (on-board com-puter) ............................................. 222
Locking/unlocking (SmartKey) ........ 76
Changing bulbs
Brake lamps ................................... 123
Cornering light function ................. 123
High-beam headlamps ................... 122
Low-beam headlamps .................... 122
Rear fog lamp ................................ 123
Turn signals (front) ......................... 123
Turn signals (rear) .......................... 123
Child
Restraint system .............................. 59
Child seat
Forward-facing restraint system ...... 63
LATCH-type (ISOFIX) child seat
anchors ............................................ 60
On the front-passenger seat ............ 62
Rearward-facing restraint system .... 63
Top Tether ....................................... 61
Child-proof locks
Important safety no
tes .................... 63
Rear doors ....................................... 64
Children
Special seat belt retractor ............... 59
Cigarette lighter ................................ 280
Cleaning
Mirror turn signal ........................... 305
Climate control
Air-conditioning system ................. 131
6Index
Page 13 of 374
Important safety notes .................. 290
Opening/closing the garage door .. 292
Programming (button in the rear-
view mirror) ................................... 290
Synchronizing the rolling code ....... 291
Gasoline .............................................3 66
Gear indicator (on-board com-
puter, Mercedes-AMG vehicles) ....... 223
Genuine parts ...................................... 21
Glove box ...........................................2 73
H
Handbrake
see Parking brake
Hazard warning lamps
Display message ............................ 256
Switching on/off ........................... 117
Head restraints
Adjusting ....................................... 103
Adjusting (manually) ......................1 03
Adjusting (rear) .............................. 104
Headlamps
Fogging up ..................................... 119
see Automatic headlamp mode
Heating
see Climate control
High beam flasher .............................1 17
High-beam headlamps
Adaptive Highbeam Assist ............. 118
Changing bulbs .............................. 122
Display message ............................ 241
Switching on/off ........................... 116
Hill start assist .................................. 151
HOLD function
Activating ....................................... 188
Deactivating ................................... 188
Display message ............................ 246
Function/notes .............................1 87
Hood
Closing ...........................................2 97
Display message ............................ 255
Important safety notes .................. 296
Opening ......................................... 296
Horn ...................................................... 30
Hydroplaning ..................................... 177
I
Ignition lock
see Key positions
Immobilizer .......................................... 73
Indicator and warning lamps
COLLISION PREVENTION ASSIST
PLUS .............................................. 269
Indicator lamps
see Warning and indicator lamps
Indicators
see Turn signals
Instrument cluster
Overview .......................................... 31
Settings ......................................... 221
Warning and indicator lamps ........... 32
Instrument cluster lighting .............. 210
Interior lighting
Control ...........................................1 20
Emergency lighting ........................ 120
Overview ........................................ 119
Reading lamp ................................. 119
J
Jack
Storage location ............................ 310
Using ............................................. 352
Jump starting (engine) ......................319
K
Key positions
Start/Stop button .......................... 147
KEYLESS-GO
Convenience closing feature ............ 90
Deactivation ..................................... 77
Locking ............................................ 77
Unlocking ......................................... 77
Kickdown
Driving tips ....................................1 61
Manual gearshifting ....................... 166
Knee bag .............................................. 50
L
Lamps
see Warning and indicator lamps
Index11
Page 14 of 374
Lane Keeping AssistActivating/deactivating (on-
board computer) ............................ 220
Display message ............................ 246
Function/information .................... 207
Lane Tracking package .....................205
Lap time (RACETIMER) ......................224
LATCH-type (ISOFIX) child seat
anchors ................................................ 60
License plate lamp (display mes-
sage) ................................................... 241
Light function, active
Display message ............................ 242
Light sensor (display message) ....... 242
Lights
Adaptive Highbeam Assist ............. 118
Automatic headlamp mode ............ 114
Cornering light function ................. 117
Fog lamps ...................................... 115
Fogged up headlamps .................... 119
Hazard warning lamps ................... 117
High beam flasher .......................... 117
High-beam headlamps ................... 116
Light switch ................................... 114
Low-beam headlamps .................... 115
Parking lamps ................................ 116
Rear fog lamp ................................ 116
Setting exterior lighting ................. 114
Standing lamps .............................. 116
Switching the daytime running
lamps on/off (on-board com-
puter) ............................................. 222
Turn signals ................................... 116
LIM indicator lamp
DISTRONIC PLUS ........................... 182
Loading guidelines ............................ 272
Locking
see Central locking
Locking (doors)
Automatic ........................................ 84
Emergency locking ........................... 85
From inside (central locking but-
ton) ..................................................8 4
Locking centrally
see Cent ral loc
king
Locking verification signal (on-
board computer) .............................. .222 Low-beam headlamps
Changing bulbs .............................. 122
Display message ............................ 240
Switching on/off ........................... 115
Lumbar support
Adjusting the 4-way lumbar sup-
port ................................................ 104
M
M+S tires ............................................ 330
Malfunction message
see Display messages
Matte finish (cleaning instruc-
tions) ..................................................3 04
mbrace
Call priority ....................................2 85
Display message ............................ 234
Downloading destinations
(COMAND) ..................................... 286
Downloading routes ....................... 289
Emergency call .............................. 283
General notes ................................ 282
Geo fencing ................................... 289
Locating a stolen vehicle ...............2 88
MB info call button ........................ 285
Remote fault diagnosis .................. 288
Remote vehicle locking .................. 287
Roadside Assistance button .......... 284
Search & Send ............................... 286
Self-test ......................................... 282
Speed alert .................................... 289
System .......................................... 282
Triggering the vehicle alarm ........... 289
Vehicle remote unlocking .............. 287
Mechanical key
Function/notes ................................ 78
Inserting .......................................... 79
Locking vehicle ................................ 85
Removing ......................................... 79
Unlocking the driver's door .............. 85
Memory card (audio) ......................... 217
Memory function ............................... 110
Message memory (on-board com-
puter) .................................................. 227
Messages
see Display messages
12Index
Page 111 of 374
RIf electrolyte comes into contact with your
skin or hair or is swallowed, seek medical
attention immediately.
RImmediately change out of clothing which
has come into contact with electrolyte.
RIf an allergic reaction occurs, seek medical
attention immediately.
The "Automatic anti-glare mirrors" function is
only available if the vehicle is equipped with
the "Mirrors package".
The rear-view mirror and the exterior mirror
on the driver's side automatically go into anti-
glare mode if:
Rthe ignition is switched on and
Rincident light from headlamps strikes the
sensor in the rear-view mirror
The mirrors do not go into anti-glare mode if
reverse gear is engaged or the interior lighting
is switched on.
Parking position for the exterior mir-
ror on the front-passenger side
General notes
The "Parking position of the exterior mirror on
the front-passenger side" function is only
available if the vehicle is equipped with the
"Mirrors package".
Setting and storing the parking position
You can position the front-passenger side
exterior mirror in such a way that you can see the rear wheel on that side as soon as you
engage reverse gear. You can store this posi-
tion.
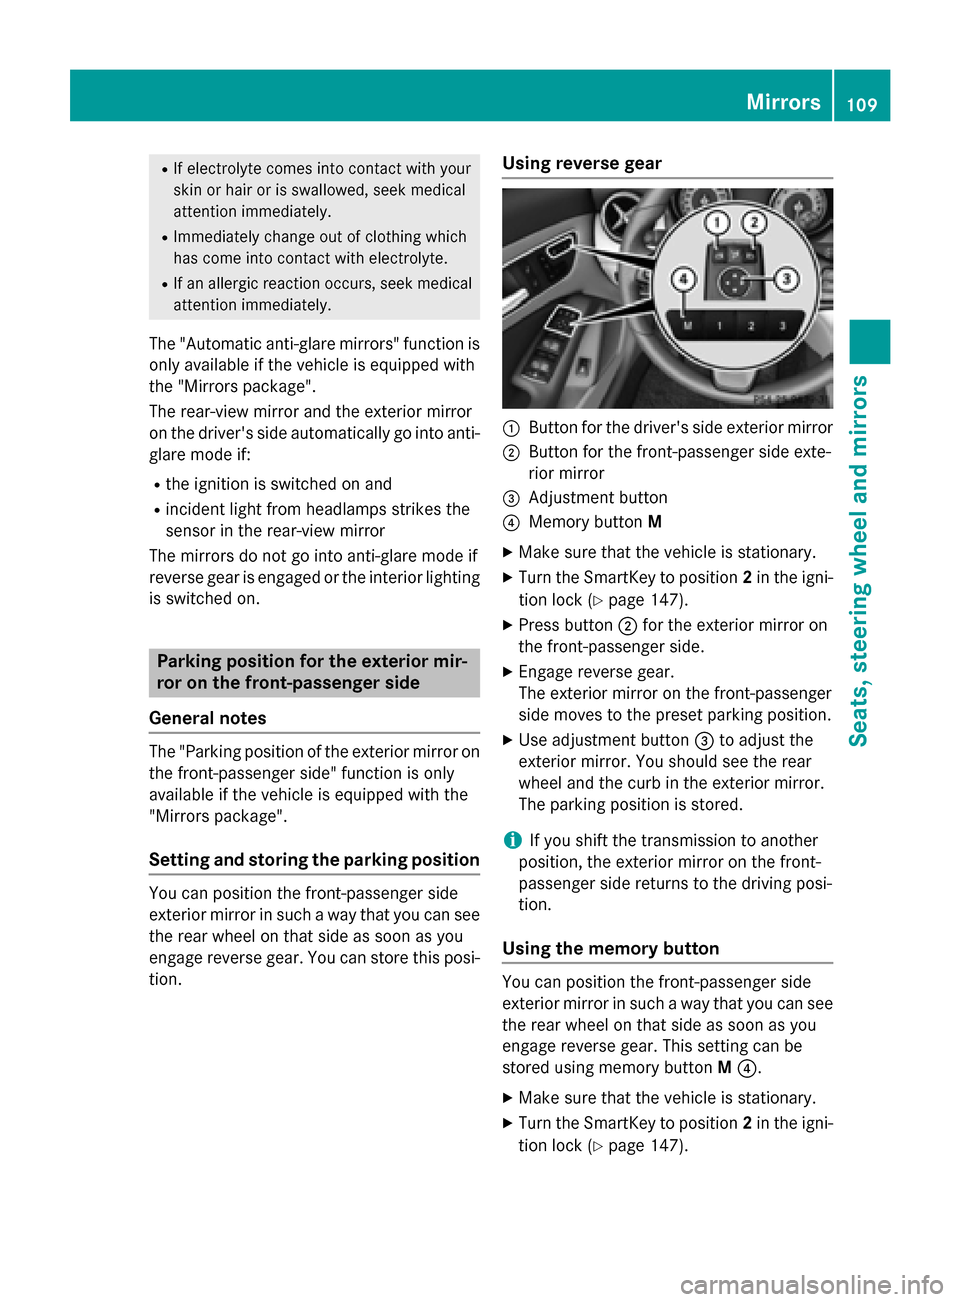
Using reverse gear
:Button for the driver's side exterior mirror
;Button for the front-passenger side exte-
rior mirror
=Adjustment button
?Memory button M
XMake sure that the vehicle is stationary.
XTurn the SmartKey to position 2in the igni-
tion lock (
Ypage 147).
XPress button ;for the exterior mirror on
the front-passenger side.
XEngage reverse gear.
The exterior mirror on the front-passenger
side moves to the preset parking position.
XUse adjustment button =to adjust the
exterior mirror. You should see the rear
wheel and the curb in the exterior mirror.
The parking position is stored.
iIf you shift the transmission to another
position, the exterior mirror on the front-
passenger side returns to the driving posi-
tion.
Using the memory button
You can position the front-passenger side
exterior mirror in such a way that you can see
the rear wheel on that side as soon as you
engage reverse gear. This setting can be
stored using memory button M?.
XMake sure that the vehicle is stationary.
XTurn the SmartKey to position 2in the igni-
tion lock (
Ypage 147).
Mirrors109
Seats, steering wheel and mirrors
Z
Page 116 of 374
Useful information
i
This Operator's Manual describes all
models and all standard and optional equip-
ment of your vehicle available at the time of
publication of the Operator's Manual.
Country-specific differences are possible.
Please note that your vehicle may not be
equipped with all features described. This
also applies to safety-related systems and
functions.
iRead the information on qualified special-
ist workshops (
Ypage 25).
Exterior lighting
General notes
For reasons of safety, Mercedes-Benz recom-
mends that you drive with the lights switched
on even during the daytime. In some coun-
tries, operation of the headlamps varies due
to legal requirements and self-imposed obli-
gations.
Setting the exterior lighting
Setting options
Exterior lighting can be set using the:
Rlight switch
Rcombination switch (Ypage 116)
Ron-board computer (Ypage 222)
Light switch
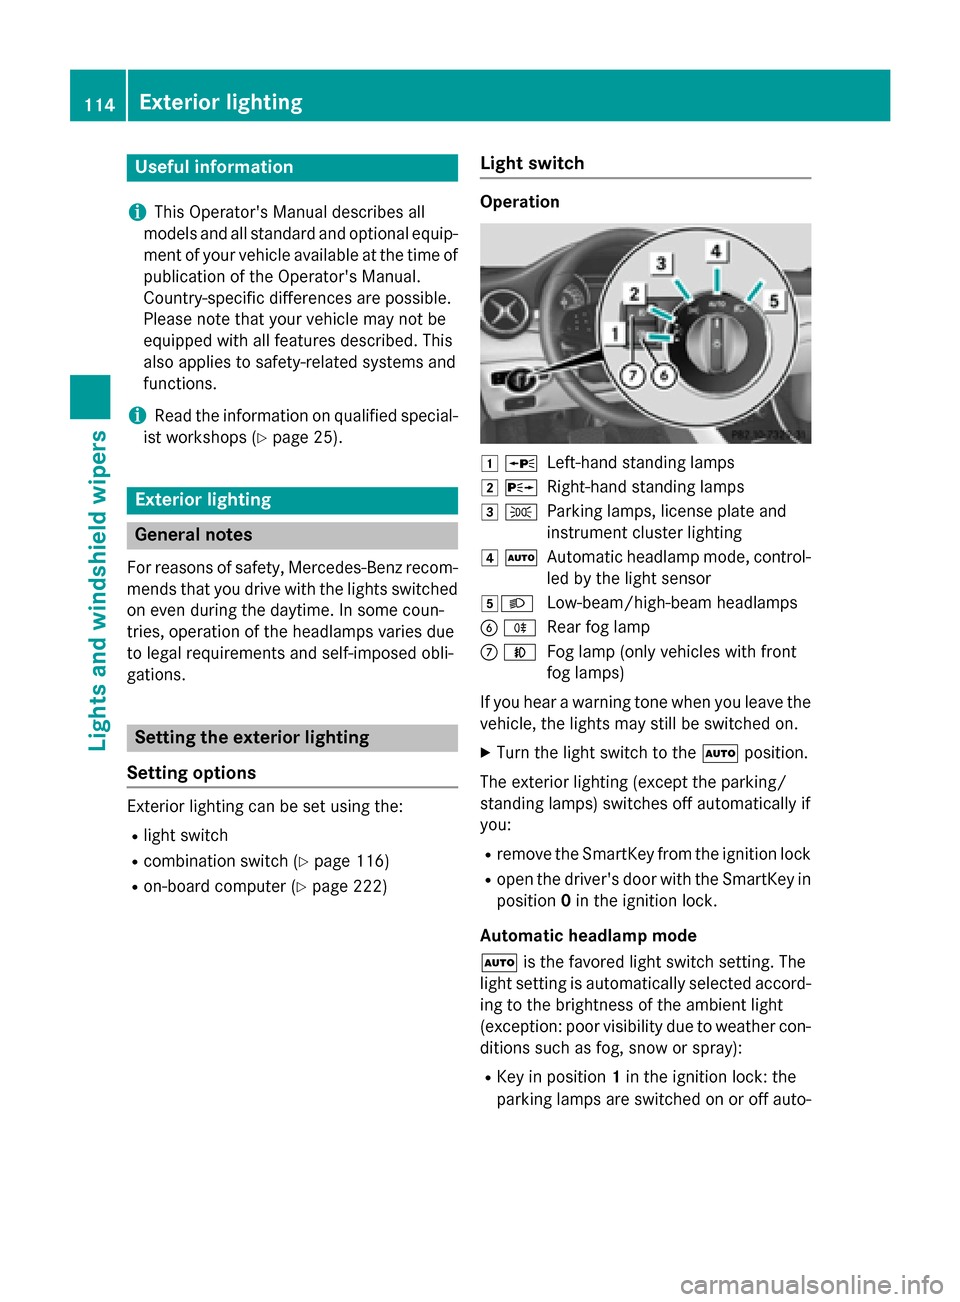
Operation
1 WLeft-hand standing lamps
2XRight-hand standing lamps
3TParking lamps, license plate and
instrument cluster lighting
4ÃAutomatic headlamp mode, control-
led by the light sensor
5LLow-beam/high-beam headlamps
BRRear fog lamp
CNFog lamp (only vehicles with front
fog lamps)
If you hear a warning tone when you leave the
vehicle, the lights may still be switched on.
XTurn the light switch to the Ãposition.
The exterior lighting (except the parking/
standing lamps) switches off automatically if
you:
Rremove the SmartKey from the ignition lock
Ropen the driver's door with the SmartKey in position 0in the ignition lock.
Automatic headlamp mode
à is the favored light switch setting. The
light setting is automatically selected accord-
ing to the brightness of the ambient light
(exception: poor visibility due to weather con-
ditions such as fog, snow or spray):
RKey in position 1in the ignition lock: the
parking lamps are switched on or off auto-
114Exterior lighting
Lights and windshield wipers
Page 117 of 374
matically depending on the brightness of
the ambient light.
RWith the engine running: if you have acti-
vated the daytime running lamps function
via the on-board computer, the daytime
running lamps or the parking lamps and the
low-beam headlamps are switched on or off
automatically depending on the brightness
of the ambient light.
XTo switch on the automatic headlamp
mode: turn the light switch to the Ã
position.
GWARNING
When the light switch is set to Ã, the low-
beam headlamps may not be switched on
automatically if there is fog, snow or other
causes of poor visibility due to the weather
conditions such as spray. There is a risk of an
accident.
In such situations, turn the light switch to
L.
The automatic headlamp feature is only an
aid. The driver is responsible for the vehicle's
lighting at all times.
Canada only:
The daytime running lamps improve the visi-
bility of your vehicle during the day. The day-
time running lamps function is required by law
in Canada. It cannot therefore be deactivated.
When the engine is running and the vehicle is
stationary: if you move the selector lever from
a drive position to P, the daytime running
lamps/low-beam headlamps go out after
three minutes.
When the engine is running, the vehicle is
stationary and in bright ambient light: if you
turn the light switch to the Tposition, the
daytime running lamps and parking lamps
turn on.
If the engine is running and you turn the light
switch to the Lposition, the manual set-
tings take precedence over the daytime run-
ning lamps.
USA only: The daytime running lamps improve the visi-
bility of your vehicle during the day. To do this,
the daytime running lamps function must be
switched on using the on-board computer
(
Ypage 222).
If the engine is running and you turn the light
switch to the TorL position, the man-
ual settings take precedence over the day-
time running lamps.
Low-beam headlamps
Even if the light sensor does not detect that it
is dark, the parking lamps and low-beam
headlamps switch on when the ignition is
switched on and the light switch is set to the
L position. This is a pa
rticularly useful
function in the event of rain and fog.
XTo switch on the low-beam headlamps:
turn the SmartKey in the ignition lock to
position 2or start the engine.
XTurn the light switch to L.
The green Lindicator lamp in the instru-
ment cluster lights up.
Front fog lamps
In conditions where visibility is poor due to
fog, snow or rain, the fog lamps improve vis-
ibility as well as making it easier for other road
users to see you. They can be operated
together with the parking lamps or together
with the parking lamps and low-beam head-
lamps.
XTo switch on the fog lamps: turn the key
in the ignition lock to position 2or start the
engine.
XTurn the light switch to LorÃ.
XPress the Nbutton.
The green Nindicator lamp in the instru-
ment cluster lights up.
XTo switch off the fog lamps: press the
N button.
The green Nindicator lamp in the instru-
ment cluster goes out.
Exterior lighting115
Lights and windshield wipers
Z
Page 118 of 374
Rear fog lamp
The rear fog lamp improves visibility of your
vehicle for the traffic behind in the event of
thick fog. Please take note of the country-
specific regulations for the use of rear fog
lamps.
XTo switch on the rear fog lamp:turn the
SmartKey in the ignition lock to position 2
or start the engine.
XTurn the light switch to LorÃ.
XPress the Rbutton.
The yellow Rindicator lamp in the
instrument cluster lights up.
XTo switch off the rear fog lamp: press the
R button.
The yellow Rindicator lamp in the
instrument cluster goes out.
iWhen the rear fog lamp is switched on,
the center brake lamp in the tail lamp
switches off due to a legal requirement.
Parking lamps
!If the battery has been excessively dis-
charged, the parking lamps or standing
lamps are automatically switched off to
enable the next engine start. Always park
your vehicle safely and sufficiently lit
according to legal standards. Avoid the
continuous use of the Tparking lamps
for several hours. If possible, switch on the
X right or the Wleft standing lamp.
XTo switch on: turn the light switch to T.
The green Tindicator lamp in the instru-
ment cluster lights up.
Standing lamps
Switching on the standing lamps ensures the
corresponding side of the vehicle is illumina-
ted.
XTo switch on the standing lamps: the
SmartKey should not be in the ignition lock
or it should be in position 0.
XTurn the light switch to W(left-hand side
of the vehicle) or X(right-hand side of
the vehicle).
Combination switch
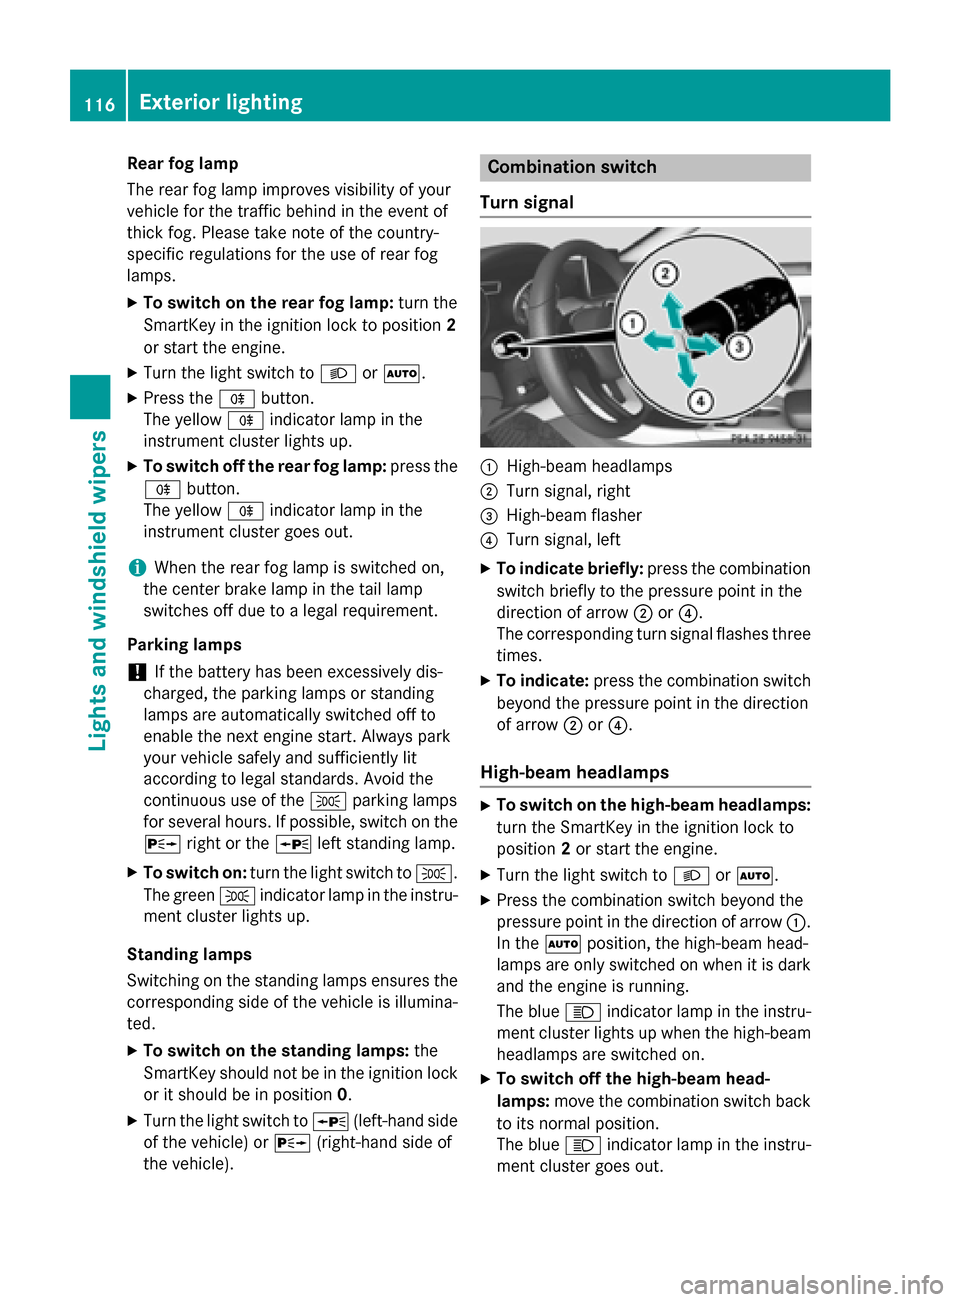
Turn signal
:High-beam headlamps
;Turn signal, right
=High-beam flasher
?Turn signal, left
XTo indicate briefly: press the combination
switch briefly to the pressure point in the
direction of arrow ;or?.
The corresponding turn signal flashes three
times.
XTo indicate: press the combination switch
beyond the pressure point in the direction
of arrow ;or?.
High-beam headlamps
XTo switch on the high-beam headlamps:
turn the SmartKey in the ignition lock to
position 2or start the engine.
XTurn the light switch to LorÃ.
XPress the combination switch beyond the
pressure point in the direction of arrow :.
In the Ãposition, the high-beam head-
lamps are only switched on when it is dark
and the engine is running.
The blue Kindicator lamp in the instru-
ment cluster lights up when the high-beam
headlamps are switched on.
XTo switch off the high-beam head-
lamps: move the combination switch back
to its normal position.
The blue Kindicator lamp in the instru-
ment cluster goes out.
116Exterior lighting
Lights and windshield wipers
Page 119 of 374
Vehicles with Adaptive Highbeam Assist:
when Adaptive Highbeam Assist is active, it
controls activation and deactivation of the
high-beam headlamps (
Ypage 118).
High-beam flasher
XTo switch on:turn the SmartKey in the
ignition lock to position 1or 2, or start the
engine.
XPull the combination switch in the direction
of arrow =.
Hazard warning lamps
XTo switch on the hazard warning lamps:
press button :.
All turn signals flash. If you now switch on a
turn signal using the combination switch,
only the turn signal lamp on the corre-
sponding side of the vehicle will flash.
XTo switch off the hazard warning lamps:
press button :.
The hazard warning lamps automatically
switch on if:
Ran air bag is deployed or
Rthe vehicle decelerates rapidly from a
speed of above 45 mph (70 km/h) and
comes to a standstill
The hazard warning lamps switch off auto-
matically if the vehicle reaches a speed of
above 6 mph (10 km/h) again after a full
brake application.
The hazard warning lamps still operate if the
ignition is switched off.
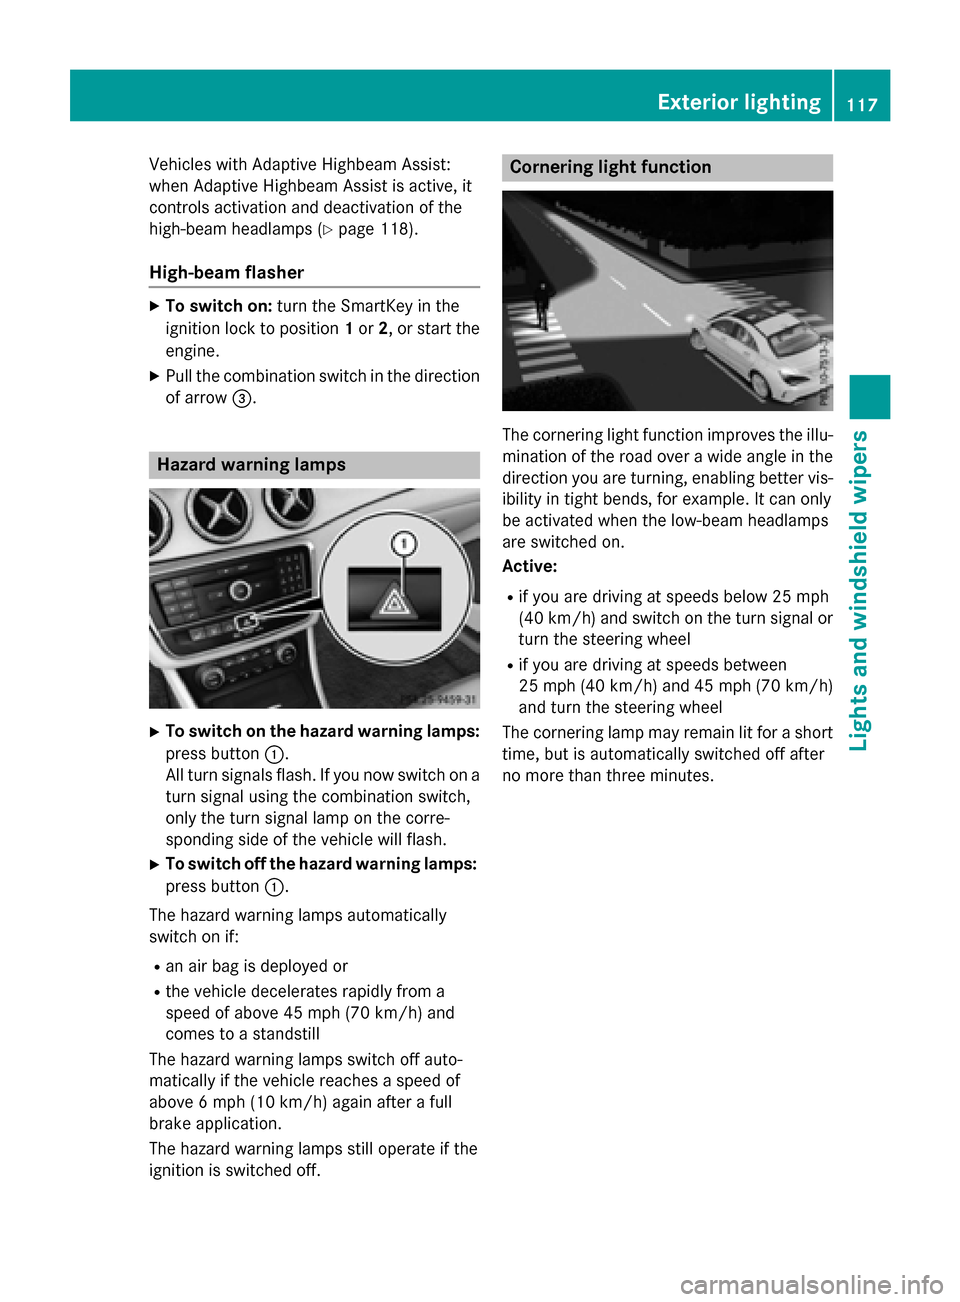
Cornering light function
The cornering light function improves the illu-
mination of the road over a wide angle in the
direction you are turning, enabling better vis-
ibility in tight bends, for example. It can only
be activated when the low-beam headlamps
are switched on.
Active:
Rif you are driving at speeds below 25 mph
(40 km/h) and switch on the turn signal or
turn the steering wheel
Rif you are driving at speeds between
25 mph (40 km/h) and 45 mph (70 km/h)
and turn the steering wheel
The cornering lamp may remain lit for a short
time, but is automatically switched off after
no more than three minutes.
Exterior lighting117
Lights and windshield wipers
Z
Page 120 of 374
Adaptive Highbeam Assist
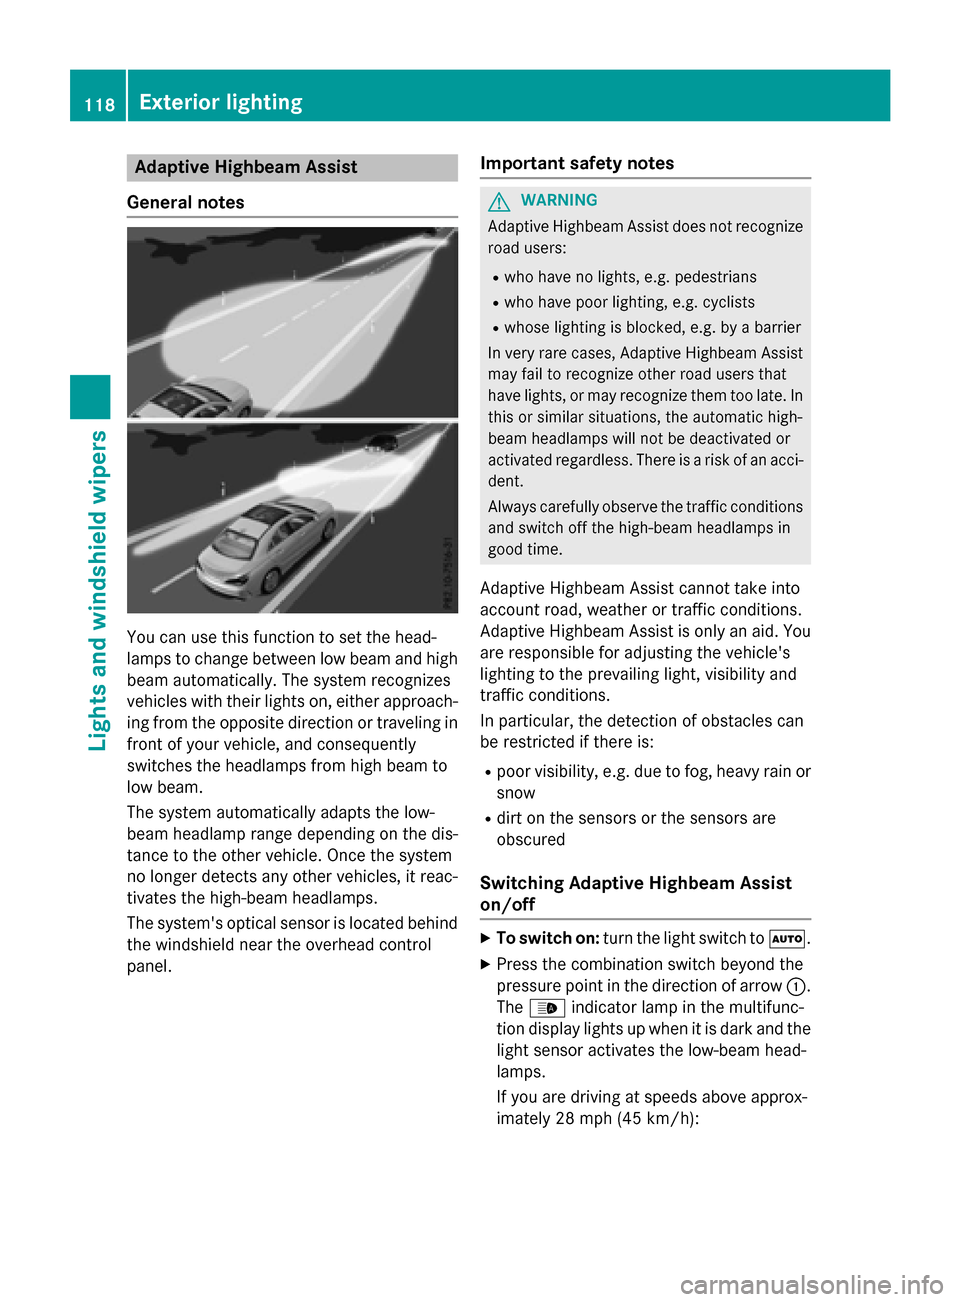
Gene ral notes
You can use this function to set th ehead-
lamp sto chang ebetween low beam and high
beam automatically. The system recognizes
vehicles wit htheir lights on ,either approach-
ing from th eopposit edirection or traveling in
fron tof your vehicle, and consequentl y
switches th eheadlamps from high beam to
low beam .
The system automatically adapt sth elow-
beam headlamp range depending on th edis-
tance to th eother vehicle. Once thesystem
no longer detects any other vehicles, it reac -
tivates th ehigh-beam headlamps .
The system' soptical sensor is locate dbehind
th ewindshield near th eoverhead control
panel.
Import ant safety notes
GWARNIN G
Adaptive Highbea mAssis tdoes no trecogniz e
road users:
Rwho hav eno lights ,e.g. pedestrian s
Rwho havepoor lighting ,e.g. cyclist s
Rwhoselighting is blocked, e.g. by abarrier
In ver yrar ecases, Adaptive Highbea mAssis t
may fail to recogniz eother road user sthat
hav elights ,or may recogniz ethem to olate. In
this or similar situations, th eautomatic high -
beam headlamp swill no tbe deactivated or
activated regardless .There is aris kof an acci-
dent.
Always carefully observ eth etraffic condition s
and switch off th ehigh-beam headlamp sin
goo dtime.
Adaptive Highbeam As sistcanno ttak eint o
accoun troad ,weather or traffic conditions.
Adaptive Highbeam As sistis only an aid. You
are responsible for adj usting thevehicle's
lighting to th eprevailing light, visibilit yand
traffic condition s.
In particular, th edetection of obstacles can
be restricted if there is:
Rpoor visibility, e.g. due to fog ,heav yrain or
snow
Rdirt on th e sensors or the sensors are
obscured
Switching Adaptive Highbeam Assist
on/off
XTo switch on: turnth eligh tswitch to Ã.
XPressthecombination switch beyon dth e
pressur epoin tin th edirection of arrow :.
The _ indicator lamp in th emultifunc-
tion display lights up when it is dark and th e
ligh tsensor activates th elow-beam head-
lamp s.
If you are driving at speeds abov eapprox -
imately 28 mph (45 km/h):
118Exterior lighting
Lights and windshield wipers