Windows MERCEDES-BENZ CLA-Class 2017 C117 User Guide
[x] Cancel search | Manufacturer: MERCEDES-BENZ, Model Year: 2017, Model line: CLA-Class, Model: MERCEDES-BENZ CLA-Class 2017 C117Pages: 318, PDF Size: 8.02 MB
Page 46 of 318
Air bags
Introd uction
The installation poin tof an air bag can be rec -
ognized by th eAI R BA Gsymbol.
An air bag complements th ecorrectl yfastene d
seat belt .It is no substitut efor th eseat belt .The
air bag provides additional protection in appli-
cable acciden tsituations.
Not all air bags are deployed in an accident. The
differen tair bag systems function independ-
entl yfrom on eanother (
Ypage 51).
However, no system available today can com-
pletely eliminate injurie sand fatalities.
It is also no tpossibl eto rule out aris kof injury
caused by an air bag due to th ehigh spee dat
whic hth eair bag mus tbe deployed.
Import ant safety notes
GWARNIN G
If you do no tsit in th ecorrec tseat position ,
th eair bag canno tprotect as intended and
could eve ncaus eadditional injury when
deployed. This poses an increased ris kof
injury or eve nfatal injury.
To avoi dhazardous situations, always mak e
sur ethat all of th evehicle's occupants:
Rhav efastene dtheir seat belt scorrectly,
includin gpregnant women
Rare sitting correctl yand maintai nth egreat-
est possibl edistanc eto th eair bags
Rfollow th efollowin ginstruction s
Always mak esur ethat there are no objects
between th eair bag and th evehicle's occu-
pants .
RAdjus tth eseat sproperly before beginning
your journey. Always mak esur ethat th eseat
is in an almost upright position .The center of
th ehead restrain tmus tsupport th ehead at
about eye level.
RMov eth edriver's and front-passenger seat s
as far bac kas possible. The driver's seat posi-
tion mus tallow th evehicl eto be driven safely.
ROnly hold th esteering whee lon th eoutside .
This allows th eair bag to be fully deployed.
RAlways lean against th ebackrest while driv-
ing .Do no tlean forward sor lean against th edoor or side window. You may otherwise be in
th
edeploymen tarea of th eair bags .
RAlways keep your fee tin th efootwell in fron t
of th eseat .Do no tput your fee ton th edash -
board, for example. Your fee tmay otherwise
be in th edeployment area of th eair bag.
RFo rthis reason ,always secure person sless
than 5ft (1.5 0m) tall in suitable restraint sys-
tems. Up to this height, the seat belt cannot
be worn correctly.
If a child is traveling in your vehicle, also
observe the following notes:
RAlways secure children under twelve years of
age and less than 5 ft (1.50 m)tall in suitable
child restraint systems.
RChild restraint systems should be installed on
the rear seats.
ROnly secure a child in a rearward-facing child
restraint system on the front-passenger seat
when the front-passenger front air bag is
deactivated. If the PASSENGER AIR BAG OFF
indicator lamp is permanently lit, the front-
passenger front air bag is deactivated
(
Ypage 40).
RAlways observe the instructions and safety
notes on the "Occupant Classification System
(OCS)" (
Ypage 46) and on "Children in the
vehicle" (Ypage 53 )in addition to the child
restraint system manufacturer's installation
and operating instructions.
Objects in the ve hicl
e interior may prevent
an air bag from functioning correctly. Before
starting your journey and to avoid risks resulting from the speed of the air bag as it deploys, make
sure that:
Rthere are no people, animals or objects
between the vehicle occupants and an air
bag.
Rthere are no objects between the seat, door
and B-pillar.
Rno hard objects, e.g. coat hangers, hang on
the grab handles or coat hooks.
Rno accessories, such as cup holders, are
attached to the vehicle within the deployment
area of an air bag, e.g. to doors, side windows,
rear side trim or side walls.
Rno heavy, sharp-edged or fragile objects are in
the pockets of your clothing. Store such
objects in a suitable place.
44Occupant safety
Safety
Page 55 of 318
Factors which can only be seen and measured
after a collision has occurred do not play a deci-
sive role in the deployment of an air bag. Nor do
they provide an indication of air bag deploy-
ment.
The vehicle can be deformed considerably, with-
out an air bag being deployed. This is the case if only parts which are relatively easily deformed
are affected and the rate of deceleration is not
high. Conversely, air bags may be deployed even
though the vehicle suffers only minor deforma-
tion. This is the case if, for example, very rigid
vehicle parts such as longitudinal body mem-
bers are hit, and sufficient deceleration occurs
as a result.
If the restraint system control unit detects a side
impact or if the vehicle rolls over, the applicable
components of the restraint system are activa-
ted independently of each other depending on
the apparent type of accident.
RSide impact air bags on the side where the
impact takes place, independently of the
Emergency Tensioning Device and the use of
the seat belt on the driver's seat and outer
seats in the second row
The side impact air bag on the front-
passenger side deploys under the following
conditions:
-the OCS system detects that the front-
passenger seat is occupied or
-the seat belt buckle tongue is engaged in
the belt buckle of the front-passenger seat
RWindow curtain air bag on the side of impact, independ ently of the u se of the seat belt and
independently of whether the front-
passenger seat is occupied
REmergency Tensioning Devices, if the system
determines that deployment can offer addi-
tional protection in this situation
RWindow curtain air bags on the driver's and
front-passenger side in certain situations
when the vehicle rolls over, if the system
determines that deployment can offer addi-
tional protection to that provided by the seat
belt
iNot all air bags are deployed in an accident.
The different air bag systems work independ- ently of each other. How the air bag system works is determined
by the severity of the accident detected,
especially the vehicle deceleration or accel-
eration and the apparent type of accident:
RFrontal collision
RSide impact
RRollover
Automatic measures after an acci-
dent
Immediately after an accident, the following
measures are implemented, depending on the
type and severity of the impact:
Rthe hazard warning lamps are activated
Rthe emergency lighting is activated
Rthe vehicle doors are unlocked
Rthe front side windows are lowered
Rthe engine is switched off and the fuel supply
is cut off
Rvehicles with mbrace: automatic emergency
call
Children in the vehicle
Important safety notes
Accident statistics show that children secured
in the rear seats are safer than children secured
in the front-passenger seat. For this reason,
Mercedes-Benz strongly advises that you install
a child restraint system on a rear seat. Children are generally better protected there.
If a child younger than twelve years old and
under 5 ft (1.50 m) in height istraveling in the
vehicle:
Ralways secure the child in a child restraint
system suitable for Mercedes-Benz vehicles.
The child restraint system must be appropri-
ate to the age, weight and size of the child
Rbe sure to observe the instructions and safety
notes in this section in addition to the child
restraint system manufacturer's installation
instructions
Rbe sure to observe the instructions and safety notes on the "Occupant classification system
(OCS)" (
Ypage 46)
Children in the vehicle53
Safety
Z
Page 60 of 318
Rearward-facing child restraint system
If it is absolutely necessary to install a rearward-
facing child restraint system on the front-
passenger seat, always make sure that the
front-passenger front air bag is deactivated.
Only if the PASSENGER AIR BAG OFF indicator
lamp is permanently lit (
Ypage 40) is the front-
passenger front air bag deactivated.
Always observe the child restraint system man-
ufacturer's installation and operating instruc-
tions.
Forward-facing child restraint system
If it is absolutely necessary to install a forward-
facing child restraint system on the front-
passenger seat, always move the front-
passenger seat as far back as possible. Fully
retract the seat cushion length. The entire base
of the child restraint system must always rest on
the seat cushion of the front-passenger seat.
The backrest of the child restraint system must
lie as flat as possible against the backrest of the front-passenger seat. The child restraint system
must not touch the roof or be subjected to a load
by the head restraint. Adjust the angle of the
seat backrest and the head restraint position
accordingly. Always make sure that the shoul-
der belt strap is correctly routed from the vehi-
cle belt outlet to the shoulder belt guide on the
child restraint system. The shoulder belt strap
must be routed forwards and downwards from
the vehicle belt outlet. If necessary, adjust the
vehicle belt outlet and the front-passenger seat
accordingly.
Always observe the child restraint system man-
ufacturer's installation and operating instruc-
tions.
Child-proof locks
Important safety notes
GWARNING
If children are traveling in the vehicle, they
could:
Ropen doors, thus endangering other people
or road users
Rexit the vehicle and be caught by oncoming
traffic
Roperate vehicle equipment and become
trapped
There is a risk of an accident and injury.
Always activate the child-proof locks and
override feature if children are traveling in the vehicle. When leaving the vehicle, always take
the key with you and lock the vehicle. Never
leave children unattended in the vehicle.
Override feature for:
Rthe rear doors (Ypage 59)
Rthe rear side windows (Ypage 59)
GWARNING
If you leave children unsupervised in the vehi-
cle, they could set it in motion by, for example:
Rrelease the parking brake.
Rshift the automatic transmission out of the
parking position P.
Rstart the engine.
In addition, they may operate vehicle equip-
ment and become trapped. There is a risk of
an accident and injury.
When leaving the vehicle, always take the
SmartKey with you and lock the vehicle. Never
leave children unsupervised in the vehicle.
GWARNING
If persons, particularly children are subjected to prolonged exposure to extreme heat or
cold, there is a risk of injury, possibly even
fatal. Never leave children unattended in the
vehicle.
58Children in the vehicle
Safety
Page 61 of 318
GWARNING
If the child restraint system is subjected to
direct sunlight, parts may get very hot. Chil-
dren may burn themselves on these parts,
particularly on the metal parts of the child
restraint system. There is a risk of injury.
If you leave the vehicle, taking the child with
you, always ensure that the child restraint
system is not exposed to direct sunlight. Pro- tect it with a blanket, for example. If the child
restraint system has been exposed to direct
sunlight, let it cool down before securing the
child in it. Never leave children unattended in
the vehicle.
Child-proof locks for the rear doors
You secure each door individually with the child-
proof locks on the rear doors. A door secured
with a child-proof lock cannot be opened from
inside the vehicle. When the vehicle is unlocked,the door can be opened from the outside.
XTo activate: press the child-proof lock lever
up in the direction of arrow :.
XMake sure that the child-proof locks are work-
ing properly.
XTo deactivate: press the child-proof lock
lever down in the direction of arrow ;.
Override feature for the rear side win-
dows
XTo activate/deactivate:press button:.
If indicator lamp ;is lit, operation of the rear
side windows is disabled. Operation is only
possible using the switches in the driver's
door. If indicator lamp ;is off, operation is
possible using the switches in the rear com-
partment.
Pets in the vehicle
GWARNING
If you leave animals unattended or unsecured
in the vehicle, they could press buttons or
switches, for example.
As a result, they could:
Ractivate vehicle equipment and become
trapped, for example
Ractivate or deactivate systems, thereby
endangering other road users
Unsecured animals could also be flung around
the vehicle in the event of an accident or sud-
den steering or braking, thereby injuring vehi-
cle occupants. There is a risk of an accident
and injury.
Never leave animals unattended in the vehi-
cle. Always secure animals properly during
the journey, e.g. use a suitable animal trans-
port box.
Pets in the vehicle59
Safety
Z
Page 77 of 318
Doors
Important safet ynotes
GWARNING
If children are lef tunsupervised in th evehicle,
they could:
Rope nth edoors ,thus endangerin gother
people or road users.
Rget out and disrup ttraffic .
Roperat eth evehicle' sequipment.
Additionally, children could set th evehicle in
motion if, fo rexample, they:
Rrelease th eparking brake .
Rshiftingth eautomatic transmissio nout of
par kposition P
RStart theengine.
There is aris kof an acciden tand injury.
Whe nleavin gth evehicle, always take th e
SmartKey wit hyou and loc kth evehicle. Never
leav echildren or animals unattended in th e
vehicle. Always keep th eSmartKey out of
reach of children .
You should preferably plac eluggage or load sin
th ecargo compartment. Observ eth eloadin g
guidelines (
Ypage 233).
Unlockingan dopening doors from
th einside
!
The sid ewindows will no topen/close if th e
battery is discharged or if th esid ewindows
hav eiced up. It will then no tbe possible to
close th edoor. Do no tattempt to forc eth e
doo rclosed. You could otherwise damage th e
doo ror th esid ewindow.
Whe n adoo ris opened, th esid ewindow on that
sid eopens slightly. Whe nth edoo ris closed, th e
sid ewindow close sagain .
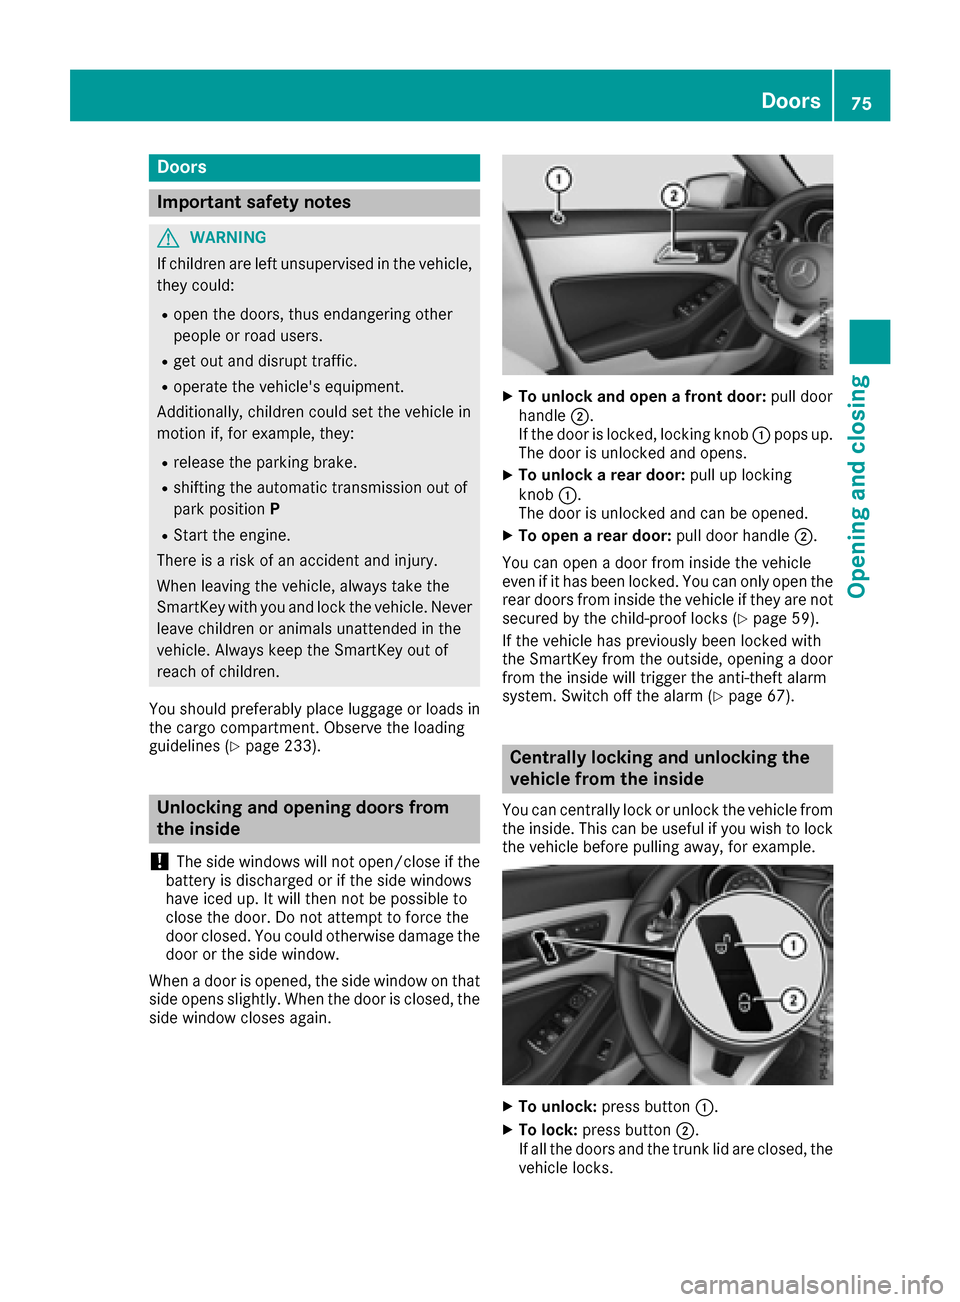
XTo unlock an dope n afront door: pull door
handle ;.
If th edoo ris locked, locking knob :pop sup.
The doo ris unlocke dand opens .
XTo unlock arear door: pull up locking
knob :.
The doo ris unlocke dand can be opened.
XTo ope n arear door: pull doorhandle ;.
You can ope n adoo rfrom insid eth evehicle
eve nif it has bee nlocked. You can only ope nth e
rea rdoors from insid eth evehicle if they are no t
secure dby th echild-proof locks (
Ypage 59).
If th evehicle has previously bee nlocke dwit h
th eSmartKey from th eoutside, opening adoo r
from th einsid ewill trigger th eanti-thef talar m
system. Switc hof fth ealar m (
Ypage 67).
Centrally locking an dunlocking th e
vehicle from th einside
You can centrall yloc kor unloc kth evehicle from
th einside. Thi scan be useful if you wish to loc k
th evehicle befor epulling away, fo rexample.
XTo unlock :press butto n:.
XTo lock :press butto n;.
If all th edoors and th etrunk lid are closed, th e
vehicle locks .
Doors75
Opening and closing
Z
Page 82 of 318
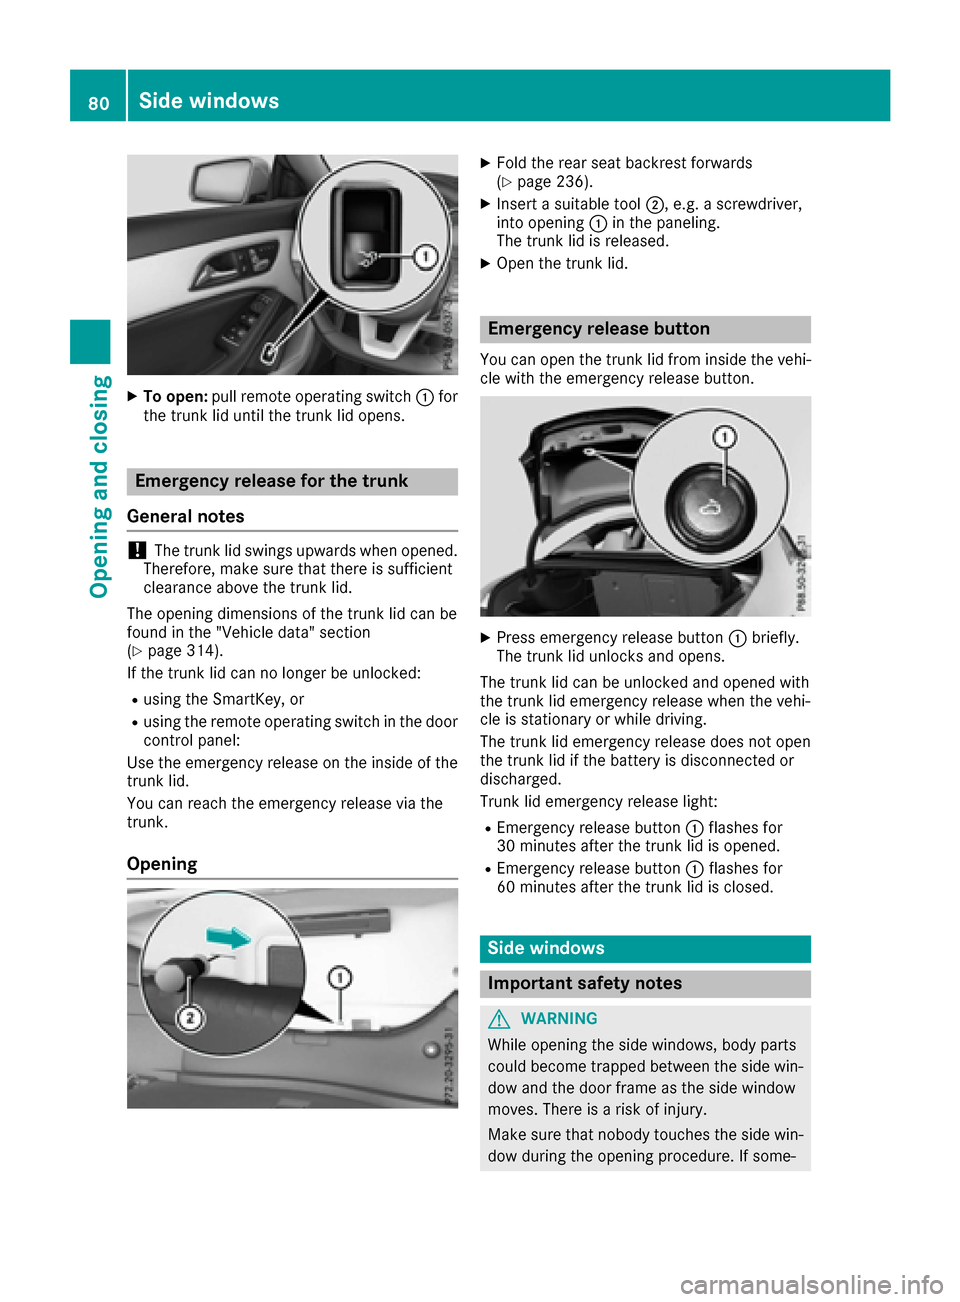
XTo open:pull remote operating switch :for
the trunk lid until the trunk lid opens.
Emergency release for the trunk
General notes
!The trunk lid swings upwards when opened.
Therefore, make sure that there is sufficient
clearance above the trunk lid.
The opening dimensions of the trunk lid can be
found in the "Vehicle data" section
(
Ypage 314).
If the trunk lid can no longer be unlocked:
Rusing the SmartKey, or
Rusing the remote operating switch in the door
control panel:
Use the emergency release on the inside of the
trunk lid.
You can reach the emergency release via the
trunk.
Opening
XFold the rear seat backrest forwards
(Ypage 236).
XInsert a suitable tool ;, e.g. a screwdriver,
into opening :in the paneling.
The trunk lid is released.
XOpen the trunk lid.
Emergency release button
You can open the trunk lid from inside the vehi-
cle with the emergency release button.
XPress emergency release button :briefly.
The trunk lid unlocks and opens.
The trunk lid can be unlocked and opened with
the trunk lid emergency release when the vehi-
cle is stationary or while driving.
The trunk lid emergency release does not open
the trunk lid if the battery is disconnected or
discharged.
Trunk lid emergency release light:
REmergency release button :flashes for
30 minutes after the trunk lid is opened.
REmergency release button :flashes for
60 minutes after the trunk lid is closed.
Side windows
Important safety notes
GWARNING
While opening the side windows, body parts
could become trapped between the side win-
dow and the door frame as the side window
moves. There is a risk of injury.
Make sure that nobody touches the side win-
dow during the opening procedure. If some-
80Side windows
Opening and closing
Page 83 of 318
body becomes trapped, release the switch or
pull the switch to close the side window again.
GWARNING
While closing the side windows, body parts in
the closing area could become trapped. There is a risk of injury.
When closing make sure that no parts of the
body are in the closing area. If somebody
becomes trapped, release the switch or press
the switch to open the side window again.
GWARNING
If children operate the side windows they
could become trapped, particularly if they are left unsupervised. There is a risk of injury.
Activate the override feature for the rear side
windows. When leaving the vehicle, always
take the SmartKey with you and lock the vehi-
cle. Never leave children unsupervised in the
vehicle.
Side window reversing feature
The side windows are equipped with an auto-
matic reversing feature. If a solid object blocks
or restricts a side window from traveling
upwards during the automatic closing process,
the side window opens again automatically. Dur-
ing the manual closing process, the side windowonly opens again automatically after the corre-
sponding switch is released. The automatic
reversing feature is only an aid and is no substi-
tute for your attention when closing a side win-
dow.
GWARNING
The reversing feature does not react:
Rto soft, light and thin objects, e.g. small fin-
gers
Rwhile resetting
This means that the reversing feature cannot
prevent someone being trapped in these sit-
uations. There is a risk of injury.
Make sure that no body parts are in close
proximity during the closing procedure. If
someone becomes trapped, press the switch
to open the side window again.
Opening and closing the side win-
dows
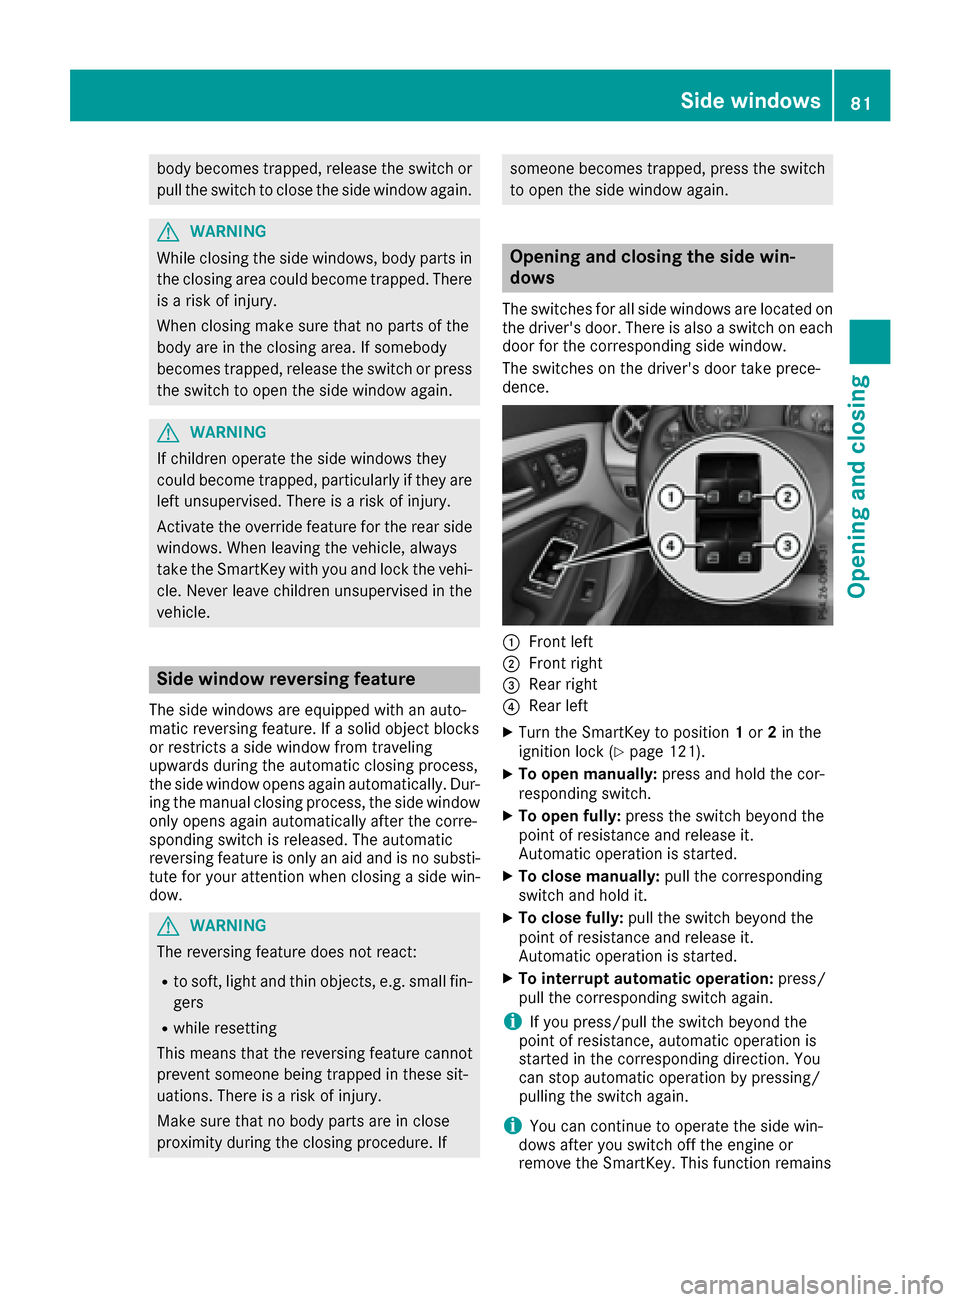
The switches for all side windows are located on the driver's door. There is also a switch on each
door for the corresponding side window.
The switches on the driver's door take prece-
dence.
:Front left
;Front right
=Rear right
?Rear left
XTurn the SmartKey to position 1or 2in the
ignition lock (Ypage 121).
XTo open manually: press and hold the cor-
responding switch.
XTo open fully: press the switch beyond the
point of resistance and release it.
Automatic operation is started.
XTo close manually: pull the corresponding
switch and hold it.
XTo close fully: pull the switch beyond the
point of resistance and release it.
Automatic operation is started.
XTo interrupt automatic operation: press/
pull the corresponding switch again.
iIf you press/pull the switch beyond the
point of resistance, automatic operation is
started in the corresponding direction. You
can stop automatic operation by pressing/
pulling the switch again.
iYou can continue to operate the side win-
dows after you switch off the engine or
remove the SmartKey. This function remains
Side windows81
Opening and closing
Z
Page 84 of 318
active for five minutes or until the driver's or
front-passenger door is opened.
iWhen the override feature for the side win-
dows is activated (Ypage 59), the side win-
dows cannot be operated from the rear.
Convenience opening
Vehicles with KEYLESS-GO, the KEYLESS-
GO start function, Exclusive package or
AMG Exclusive package: you can ventilate the
vehicle before you start driving.
The SmartKey can also be used to carry out the
following functions simultaneously:
Runlock the vehicle
Ropen the side windows
Ropen the panorama roof with power tilt/slid-
ing panel and the roller sunblind
The convenience opening feature can only be
operated using the SmartKey.
The "convenience opening" feature is also avail-
able when the vehicle is unlocked.
XVehicles with Exclusive package or AMG
Exclusive package but without KEYLESS-
GO and the KEYLESS-GO start function: for
the following operations, point the tip of the
SmartKey at the door handle on the driver's
door. The SmartKey must be close to the driv-
er's door handle.
iVehicles with KEYLESS-GO or the KEY-
LESS-GO start function: the SmartKey must
be in close proximity to the vehicle.
XPress and hold the %button until the side
windows and the panorama sunroof are in the
desired position.
If the roller sunblind of the panorama roof
with power tilt/sliding panel is closed, the
roller sunblind is opened first.
XPress and hold the %button once more
until the panorama roof with power tilt/slid-
ing panel reaches the desired position.
XTo interrupt convenience op ening:release
the % button.
Convenience closing feature
Important safety notes
GWARNING
When the convenience closing feature is oper- ating, parts of the body could become trapped
in the closing area of the side window and the
sliding sunroof. There is a risk of injury.
Observe the complete closing procedure
when the convenience closing feature is oper-
ating. Make sure that no body parts are in
close proximity during the closing procedure.
Vehicles with KEYLESS-GO, the KEYLESS-
GO start function, Exclusive Package or
AMG Exclusive Package: at the same time you
can:
Rlock the vehicle
Rclose the side windows
Rclose the panorama roof with power tilt/slid-
ing panel
On vehicles with a panorama roof with power
tilt/sliding panel, you can then close the roller
sunblind.
iNotes on the automatic reversing feature
for:
Rthe side window (Ypage 81)
Rthe panorama roof with power tilt/sliding
panel (Ypage 85)
Rthe roller sunblind (Ypage 86)
Using the SmartKey
XVehicles with Exclusive package or AMG
Exclusive package but without KEYLESS-
GO and the KEYLESS-GO start function: for
the following operations, point the tip of the
SmartKey at the door handle on the driver's
door. The SmartKey must be close to the driv-
er's door handle.
iVehicles with KEYLESS-GO or the KEY-
LESS-GO start function: the SmartKey must
be in close proximity to the vehicle.
XPress and hold the &button until the side
windows and the panorama roof with power
tilt/sliding panel are fully closed.
XMake sure that all the side windows and the
panorama roof with power tilt/sliding panel
are closed.
82Side windows
Opening and closing
Page 85 of 318
On vehicles with a panorama roof with power
tilt/sliding panel:
XPress and hold the&button again until the
roller sunblind of the panorama roof with
power tilt/sliding panel closes.
XTo interrupt convenience closing: release
the & button.
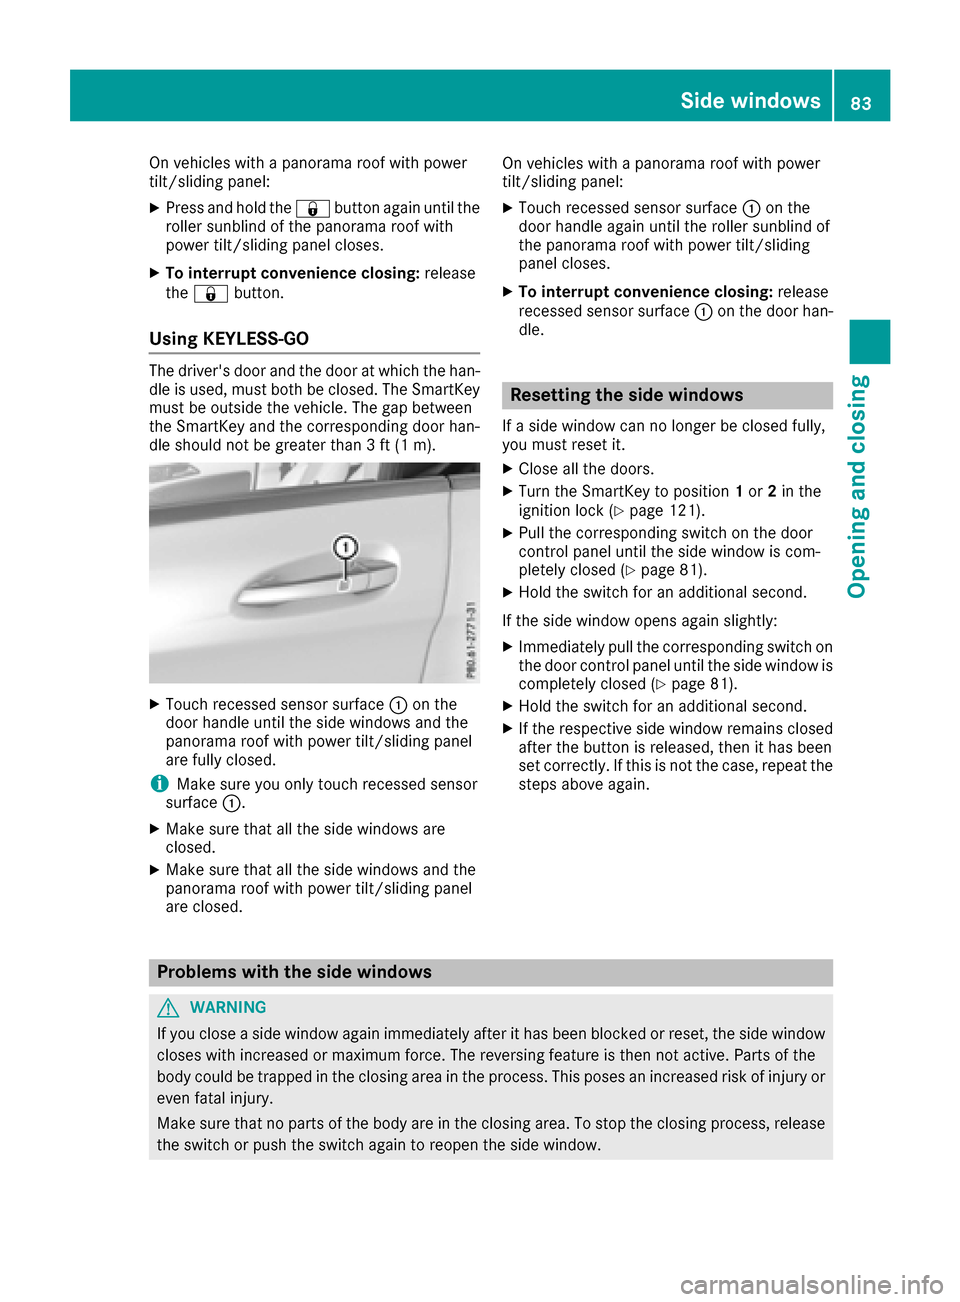
Using KEYLESS-GO
The driver's door and the door at which the han-
dle is used, must both be closed. The SmartKey
must be outside the vehicle. The gap between
the SmartKey and the corresponding door han-
dle should not be greater than 3 ft (1 m).
XTouch recessed sensor surface :on the
door handle until the side windows and the
panorama roof with power tilt/sliding panel
are fully closed.
iMake sure you only touch recessed sensor
surface :.
XMake sure that all the side windows are
closed.
XMake sure that all the side windows and the
panorama roof with power tilt/sliding panel
are closed. On vehicles with a panorama roof with power
tilt/sliding panel:
XTouch recessed sensor surface
:on the
door handle again until the roller sunblind of
the panorama roof with power tilt/sliding
panel closes.
XTo interrupt convenience closing: release
recessed sensor surface :on the door han-
dle.
Resetting the side windows
If a side window can no longer be closed fully,
you must reset it.
XClose all the doors.
XTurn the SmartKey to position 1or 2in the
ignition lock (Ypage 121).
XPull the corresponding switch on the door
control panel until the side window is com-
pletely closed (
Ypage 81).
XHold the switch for an additional second.
If the side window opens again slightly:
XImmediately pull the corresponding switch on
the door control panel until the side window is
completely closed (
Ypage 81).
XHold the switch for an additional second.
XIf the respective side window remains closed
after the button is released, then it has been
set correctly. If this is not the case, repeat the
steps above again.
Problems with the side windows
GWARNING
If you close a side window again immediately after it has been blocked or reset, the side window
closes with increased or maximum force. The reversing feature is then not active. Parts of the
body could be trapped in the closing area in the process. This poses an increased risk of injury or
even fatal injury.
Make sure that no parts of the body are in the closing area. To stop the closing process, release
the switch or push the switch again to reopen the side window.
Side windows83
Opening and closing
Z
Page 111 of 318
Overview of climate control systems
General notes
Observe the settings recommended on the fol-
lowing pages. The windows could otherwise fog
up.
To prevent the windows from fogging up:
Rswitch off climate control only briefly
Rswitch on air-recirculation mode only briefly
Rswitch on the cooling with air dehumidifica-
tion function
Rswitch on the defrost windshield function
briefly, if required
The air-conditioning system or dual-zone auto-
matic climate control regulates the temperature and the humidity of the vehicle interior and fil-
ters undesirable substances from the air.
The air-conditioning system or dual-zone auto-
matic climate control can only be operated
when the engine is running. Optimum operation
is only achieved with the side windows and pan- orama roof with power tilt/sliding panel closed.
If you start the engine using your smartphone,
the last selected climate control setting is reac-
tivated (
Ypage 122).
The residual heat function can only be activated
or deactivated with the ignition switched off
(
Ypage 118). Always keep the ventilation flaps behind the
side trim panel in the cargo compartment clear
(
Ypage 105). Otherwise the vehicle will not be
ventilated correctly.
iVentilate the vehicle for a brief period during
warm weather, e.g. using the convenience
opening feature (
Ypage 82). This will speed
up the cooling process and the desired inte-
rior temperature will be reached more
quickly.
iThe integrated filter filters out most parti-
cles of dust and soot and completely filters
out pollen. It also reduces gaseous pollutants
and odors. A clogged filter reduces the
amount of air supplied to the vehicle interior.
For this reason, you should always observe
the interval for replacing the filter, which is
specified in the Maintenance Booklet. As it
depends on environmental conditions, e.g.
heavy air pollution, the interval may be
shorter than stated in the Maintenance Book-
let.
iIt is possible that under certain circumstan-
ces the residual heat function may be activa-
ted automatically an hour after the SmartKey
has been removed in order to dry the aut
o-
matic climate control. The vehicle is then ven-
tilated for 30 minutes.
Overview of climate control systems109
Climate control