steering MERCEDES-BENZ CLA-Class 2017 C117 User Guide
[x] Cancel search | Manufacturer: MERCEDES-BENZ, Model Year: 2017, Model line: CLA-Class, Model: MERCEDES-BENZ CLA-Class 2017 C117Pages: 318, PDF Size: 8.02 MB
Page 47 of 318

GWARNING
If you modify the air bag cover or affix objects
such as stickers to it, the air bag can no longer
function correctly. There is an increased risk
of injury.
Never modify an air bag cover or affix objects
to it.
GWARNING
Sensors to control the air bags are located in
the doors. Modifications or work not per-
formed correctly to the doors or door panel-
ing, as well as damaged doors, can lead to the
function of the sensors being impaired. The air
bags might therefore not function properly
anymore. Consequently, the air bags cannot
protect vehicle occupants as they are
designed to do. There is an increased risk of
injury.
Never modify the doors or parts of the doors.
Always have work on the doors or door pan-
eling carried out at a qualified specialist work-
shop.
Front air bags
!Do not place heavy objects on the front-
passenger seat. This could cause the system
to identify the seat as being occupied. In the
event of an accident, the restraint systems on
the front-passenger side may be triggered
and have to be replaced.
Driver's air bag :deploys in front of the steer-
ing wheel. Front-passenger front air bag ;
deploys in front of and above the glove box. When deployed, the front air bags offer addi-
tional head and thorax protection for the occu-
pants in the front seats.
The PASSENGER AIR BAG OFF indicator lamp
informs you about the status of the front-
passenger front air bag (
Ypage 40).
The front-passenger front air bag will only
deploy if:
Rthe system, based on the OCS weight sensor
readings, detects that the front-passenger
seat is occupied (
Ypage 46). The
PASSENGER AIR BAG OFF indicator lamp is
not lit (
Ypage 47)
Rthe restraint system control unit predicts a
high accident severity
Knee bags
Driver's knee bag :deploys under the steering
column and front-passenger knee bag ;under
the glove box. The driver's and front-passenger
knee bags are triggered together with the front
air bags.
The driver's and front-passenger knee bags
offer additional thigh, knee and lower leg pro-
tection for the occupants in the front seats.
Side impact air bags
GWARNING
Unsuitable seat covers can obstruct or pre-
vent deployment of the air bags integrated
into the seats. Consequently, the air bags
cannot protect vehicle occupants as they are designed to do. In addition, the operation of
the occupant classification system (OCS)
could be adversely affected. This poses an
increased risk of injury or even fatal injury.
Occupant safety45
Safety
Z
Page 61 of 318
GWARNING
If the child restraint system is subjected to
direct sunlight, parts may get very hot. Chil-
dren may burn themselves on these parts,
particularly on the metal parts of the child
restraint system. There is a risk of injury.
If you leave the vehicle, taking the child with
you, always ensure that the child restraint
system is not exposed to direct sunlight. Pro- tect it with a blanket, for example. If the child
restraint system has been exposed to direct
sunlight, let it cool down before securing the
child in it. Never leave children unattended in
the vehicle.
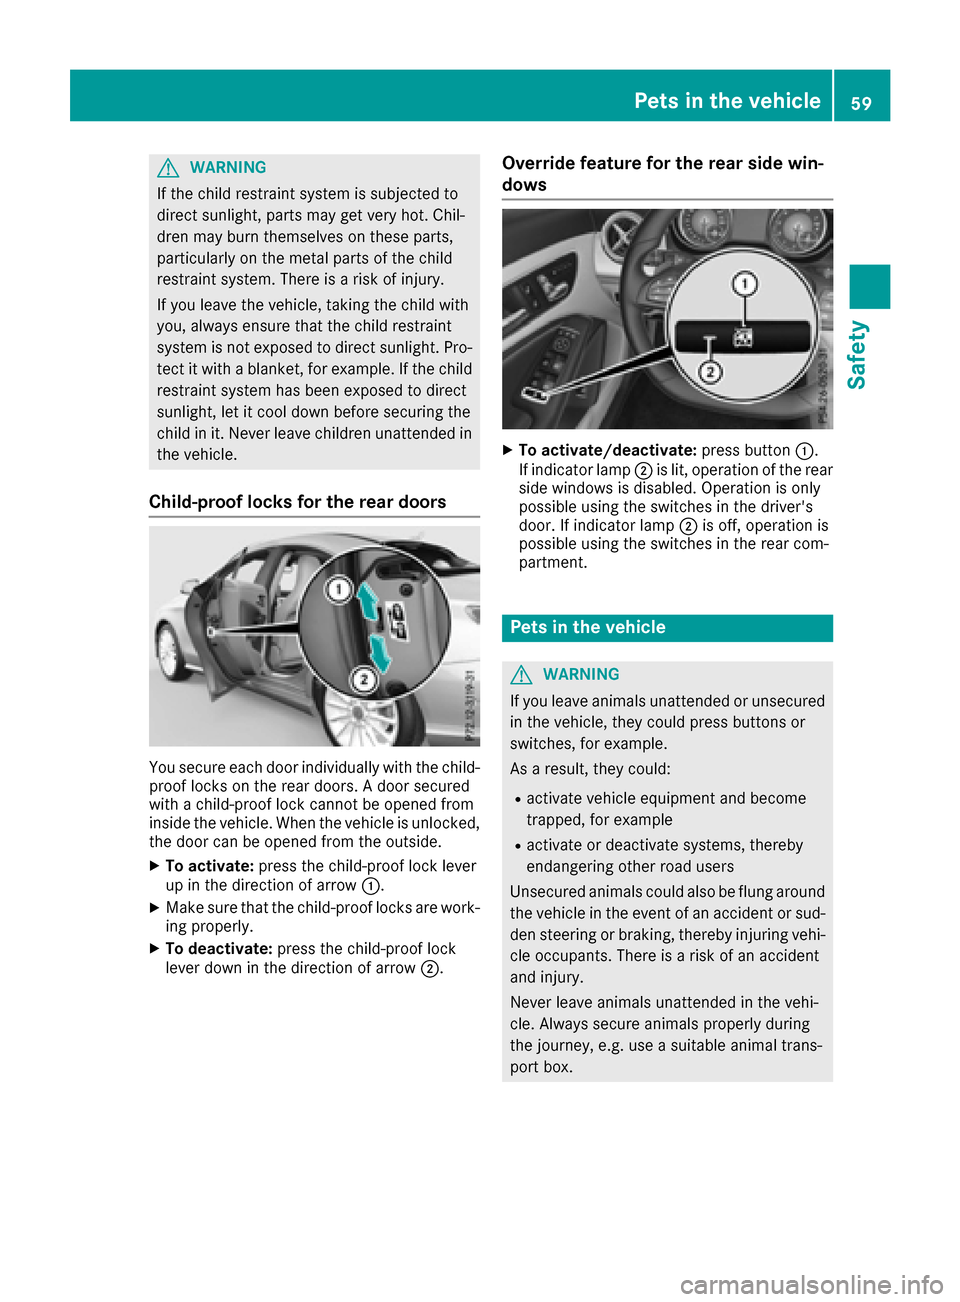
Child-proof locks for the rear doors
You secure each door individually with the child-
proof locks on the rear doors. A door secured
with a child-proof lock cannot be opened from
inside the vehicle. When the vehicle is unlocked,the door can be opened from the outside.
XTo activate: press the child-proof lock lever
up in the direction of arrow :.
XMake sure that the child-proof locks are work-
ing properly.
XTo deactivate: press the child-proof lock
lever down in the direction of arrow ;.
Override feature for the rear side win-
dows
XTo activate/deactivate:press button:.
If indicator lamp ;is lit, operation of the rear
side windows is disabled. Operation is only
possible using the switches in the driver's
door. If indicator lamp ;is off, operation is
possible using the switches in the rear com-
partment.
Pets in the vehicle
GWARNING
If you leave animals unattended or unsecured
in the vehicle, they could press buttons or
switches, for example.
As a result, they could:
Ractivate vehicle equipment and become
trapped, for example
Ractivate or deactivate systems, thereby
endangering other road users
Unsecured animals could also be flung around
the vehicle in the event of an accident or sud-
den steering or braking, thereby injuring vehi-
cle occupants. There is a risk of an accident
and injury.
Never leave animals unattended in the vehi-
cle. Always secure animals properly during
the journey, e.g. use a suitable animal trans-
port box.
Pets in the vehicle59
Safety
Z
Page 62 of 318
Drivingsafet ysystems
Overview of drivin gsafet ysystems
In this section ,you will fin dinformation about
th efollowin gdrivin gsafet ysystems :
RABS (Anti-loc kBrakin gSystem)
(Ypage 60)
RBA S (B rakeAssist System) (Ypage 60)
RActive Brak eAssis t (Ypage 61 )
RESP®(Electronic StabilityProgram)
(Ypage 63)
REB D (Electroni cBrak eforc eDistribution )
(Ypage 66 )
RADAPTIV EBRAKE (Ypage 66 )
RSTEERCONTROL (Ypage 66)
Important safet ynotes
If you fail to adapt your drivin gstyle or if you are
inattentive ,th edrivin gsafet ysystems can nei-
ther reduce th eris kof an acciden tno roverride
th elaws of physics. Driving safet ysystems are
merely aids designed to assist driving. You are
responsible fo rmaintainin gth edistanc eto th e
vehicle in front, fo rvehicle speed, fo rbraking in
goo dtime, and fo rstayin gin lane. Always adapt
your drivin gstyle to suit th eprevailin groad and
weather condition sand maintain asaf edistanc e
from th evehicle in front. Drive carefully.
The drivin gsafet ysystems described only wor k
as effectively as possible when there is ade-
quat econtact between th etires and th eroad
surface. Please pay special attention to th e
note son tires ,recommended minimum tire
tread depths, etc. (
Ypage 282).
In wintr ydrivin gconditions, always use winte r
tires (M+ Stires )and if necessary, snow chains.
Only in this way will the driving safety systems
described in this section work as effectively as
possible.
ABS (Anti-lock Braking System)
General information
ABS regulates brake pressure in such a way that
the wheels do not lock when you brake. This
allows you to continue steering the vehicle when
braking. The
! ABS warning lamp in the instrument
cluster lights up when the ignition is switched
on. It goes out when the engine is running.
ABS works from a speed of about 5 mph
(8 km/h), regardless of road-surface conditions.
ABS works on slippery surfaces, even when you
only brake gently.
Important safety notes
iObserve the "Important safety notes" sec-
tion (Ypage 60).
GWARNING
If ABS is faulty, the wheels could lock when
braking. The steerability and braking charac-
teristics may be severely impaired. Addition-
ally, further driving safety systems are deac-
tivated. There is an increased danger of skid-
ding and accidents.
Drive on carefully. Have ABS checked imme-
diately at a qualified specialist workshop.
When ABS is malfunctioning, other systems,
including driving safety systems, will also
become inoperative. Observe the information
on the ABS warning lamp (
Ypage 218) and dis-
play messages which may be shown in the
instrument cluster (
Ypage 189).
Braking
XIf ABS intervenes: continue to depress the
brake pedal vigorously until the braking sit-
uation is over.
XTo make a full brake application: depress
the brake pedal with full force.
If ABS intervenes when braking, you will feel a
pulsing in the brake pedal.
The pulsating brake pedal can be an indication
of hazardous road conditions, and functions as a reminder to take extra care while driving.
BAS (Brake Assist System)
General information
BAS operates in emergency braking situations.
If you depress the brake pedal quickly, BAS
automatically boosts the braking force, thus
shortening the stopping distance.
60Driving safety systems
Safety
Page 67 of 318
RTraction control is still activated.
RSTEER CONTROL is no longer active
RESP®still provides support when you brake
firmly.
Deactivating/activating ESP®
(Mercedes‑ AMG vehicles)
Important safety notes
iObserve the "Important safety notes" sec-
tion (Ypage 60).
You can select between the following states of
ESP
®:
RESP®is activated.
RSPORT handling mode is activated.
RESP®is deactivated.
GWARNING
When SPORT handling mode is activated,
there is a greater risk of skidding and acci-
dents.
Only activate SPORT handling mode in the sit-
uations described in the following.
GWARNING
If you deactivate ESP
®, ESP®no longer sta-
bilizes the vehicle. There is an increased risk
of skidding and an accident.
Only deactivate ESP
®in the situations descri-
bed in the following.
In the following situations, it may be better to
activate SPORT handling mode or deactivate
ESP
®:
Rwhen using snow chains
Rin deep snow
Ron sand or gravel
Ron specially designated roads when the vehi-
cle's own oversteering and understeering
characteristics are desired
Driving in SPORT handling mode or without
ESP
®requires an extremely qualified and expe-
rienced driver.
iActivate ESP®as soon as the situations
described above no longer apply. ESP®will
otherwise not be able to stabilize the vehicle if the vehicle starts to skid or a wheel starts to
spin.
!Avoid spinning the driven wheels for an
extended period with ESP®deactivated. You
could otherwise damage the drivetrain.
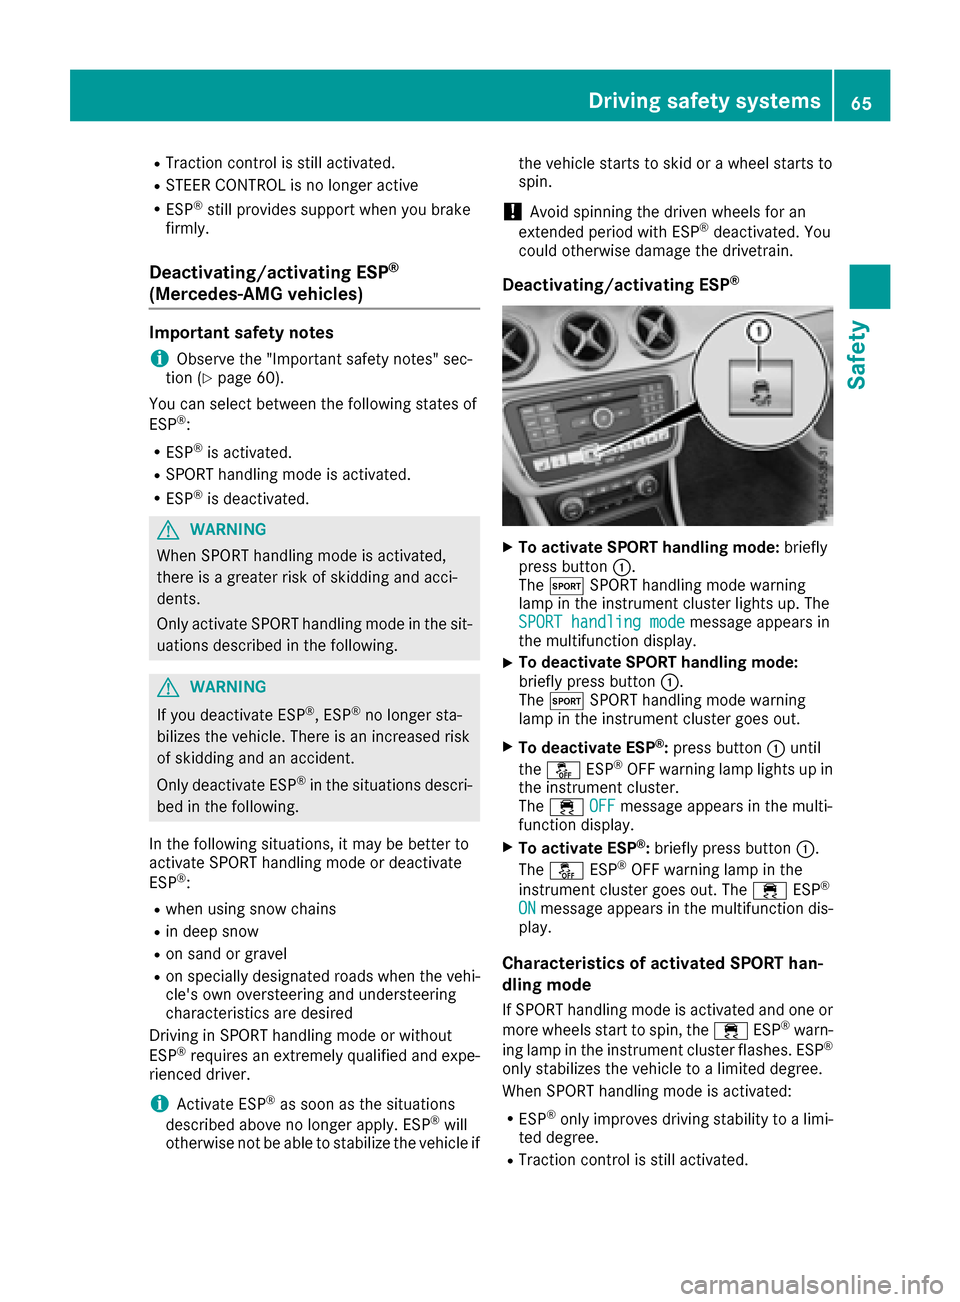
Deactivating/activating ESP®
XTo activate SPORT handling mode: briefly
press button :.
The M SPORT handling mode warning
lamp in the instrument cluster lights up. The
SPORT handling mode
message appears in
the multifunction display.
XTo deactivate SPORT handling mode:
briefly press button :.
The M SPORT handling mode warning
lamp in the instrument cluster goes out.
XTo deactivate ESP®: press button :until
the å ESP®OFF warning lamp lights up in
the instrument cluster.
The ÷ OFF
message appears in the multi-
function display.
XTo activate ESP®: briefly press button :.
The å ESP®OFF warning lamp in the
instrument cluster goes out. The ÷ESP®
ONmessage appears in the multifunction dis-
play.
Characteristics of activated SPORT han-
dling mode
If SPORT handling mode is activated and one or
more wheels start to spin, the ÷ESP®warn-
ing lamp in the instrument cluster flashes. ESP®
only stabilizes the vehicle to a limited degree.
When SPORT handling mode is activated:
RESP®only improves driving stability to a limi-
ted degree.
RTraction control is still activated.
Driving safety systems65
Safety
Z
Page 68 of 318
RThe engine's torque is only restricted to a
limited degree and the drive wheels may start
to spin.
The spinning of the wheels results in a cutting
action for better traction on loose surfaces.
RESP®still provides support when you brake
firmly.
Characteristics when ESP®is deactivated
If ESP®is deactivated and one or more wheels
start to spin, the ÷ESP®warning lamp in the
instrument cluster does not flash. In such situa-
tions, ESP
®will not stabilize the vehicle.
If you deactivate ESP®:
RESP®no longer improves driving stability.
REngine torque is no longer limited and the
drive wheels are able to spin.
The spinning of the wheels results in a cutting
action for better traction on loose surfaces.
RTraction control is still activated.
RActive Brake Assist is no longer available; nor
is it activated if you brake firmly with assis-
tance from ESP
®
RESP®still provides support when you brake
firmly.
ESP®trailer stabilization
General information
If your vehicle/trailer combination begins to
swerve, ESP®assists you in this situation. ESP®
slows the vehicle down by braking and limiting
the engine output until the vehicle/trailer com-
bination has stabilized.
Important safety notes
GWARNING
If road and weather conditions are poor,
trailer stabilization will not be able to prevent
the vehicle/trailer combination from swerv-
ing. Trailers with a high center of gravity can
tip over before ESP
®can detect this. There is
a risk of an accident.
Always adapt your driving style to the prevail-
ing road and weather conditions.
If your vehicle with trailer (vehicle/trailer com-
bination) begins to lurch, you can only stabilize the vehicle/trailer combination by depressing
the brake firmly.
ESP
®trailer stabilization is active above speeds
of about 65 km/h.
ESP
®trailer stabilization does not work if ESP®
is deactivated or disabled because of a malfunc-
tion.
EBD (electronic brake force distribu-
tion)
General information
EBD monitors and controls the brake pressure
on the rear wheels to improve driving stability
while braking.
Important safety notes
iObserve the "Important safety notes" sec-
tion (Ypage 60).
GWARNING
If EBD is malfunctioning, the rear wheels can
lock, e.g. under full braking. This increases the
risk of skidding and an accident.
You should therefore adapt your driving style
to the different handling characteristics. Have
the brake system checked at a qualified spe-
cialist workshop.
Observe information regarding indicator and
warning lamps (
Ypage 218) as well as display
messages (Ypage 191).
ADAPTIVE BRAKE
ADAPTIVE BRAKE enhances braking safety and
offers increased braking comfort. In addition to
the braking function, ADAPTIVE BRAKE also has
the HOLD function (
Ypage 156) and hill start
assist (Ypage 124).
STEER CONTROL
General information
STEER CONTROL helps you by transmitting a
noticeable steering force to the steering wheel
in the direction required for vehicle stabilization.
66Driving safety systems
Safety
Page 69 of 318
This steering assistance is provided in particular
if:
Rboth right wheels or both left wheels are on awet or slippery road surface when you brake
Rthe vehicle begins to skid
Important safety notes
iObserve the "Important safety notes" sec-
tion (Ypage 60).
No steering assistance is provided from STEER
CONTROL, if:
RESP®is malfunctioning
Rthe steering is malfunctioning
If ESP®is malfunctioning, you will be assisted
further by the electrical power steering.
Protection against theft
Immobilizer
The immobilizer prevents your vehicle from
being started without the correct SmartKey.
XTo activate with the SmartKey: remove the
SmartKey from the ignition lock.
XTo activate with KEYLESS-GO start-func-
tion or KEYLESS-GO: switch the ignition off
and open the driver's door.
XTo deactivate: switch on the ignition.
When leaving the vehicle, always take the
SmartKey with you and lock the vehicle. Anyone
can start the engine if a valid SmartKey has been
left inside the vehicle.
iThe immobilizer is always deactivated when
you start the engine.
In the event that the engine cannot be started
(yet the vehicle's battery is charged), the sys-
tem is not operational. Contact an authorized
Mercedes-Benz Center or call
1-800-FOR-MERCedes (in the USA) or
1-800-387-0100 (in Canada).
ATA (anti-theft alarm system)
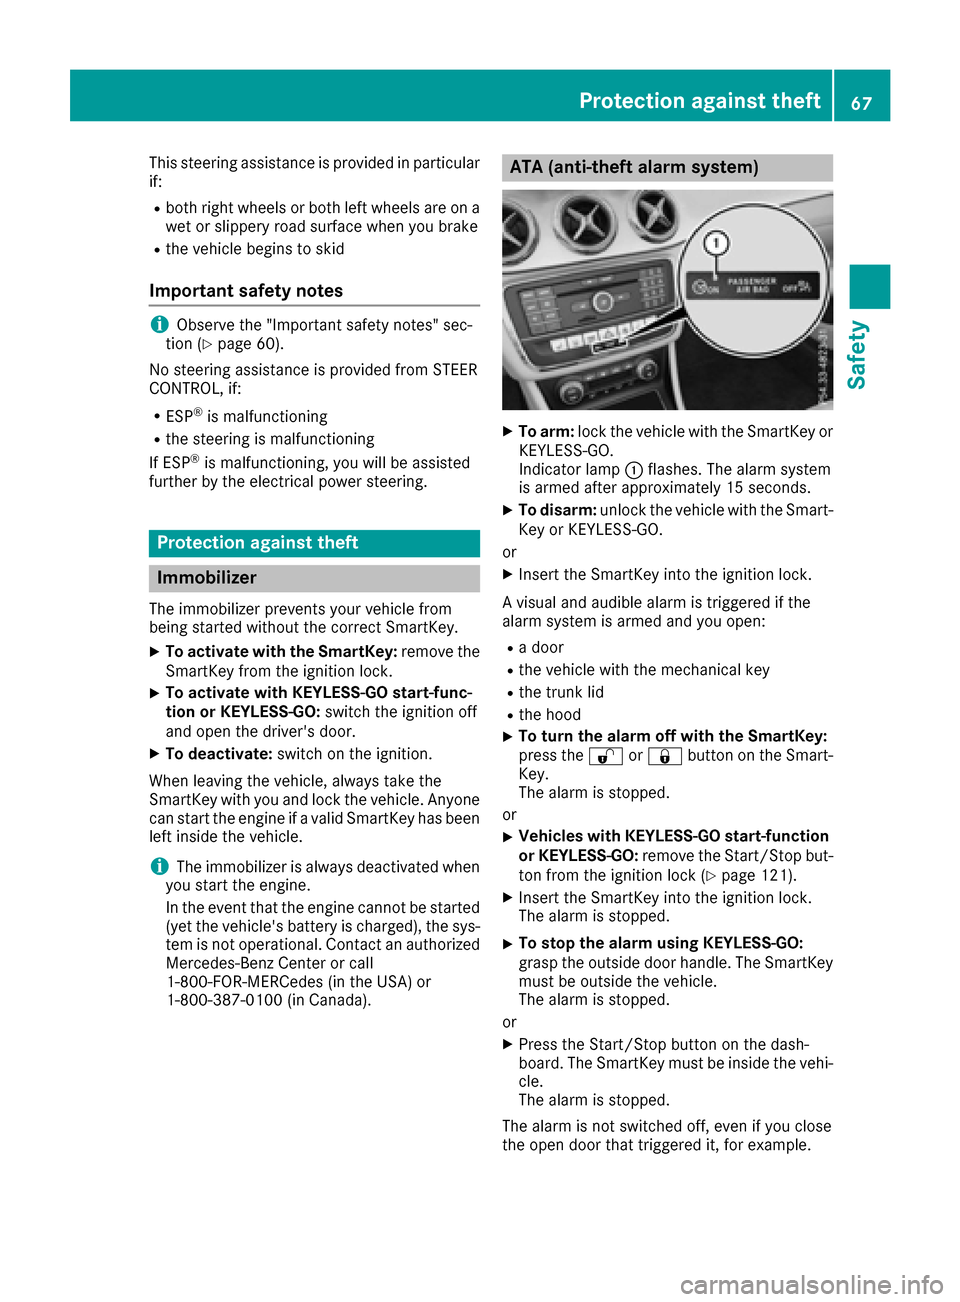
XTo arm: lock the vehicle with the SmartKey or
KEYLESS-GO.
Indicator lamp :flashes. The alarm system
is armed after approximately 15 seconds.
XTo disarm: unlock the vehicle with the Smart-
Key or KEYLESS-GO.
or
XInsert the SmartKey into the ignition lock.
A visual and audible alarm is triggered if the
alarm system is armed and you open:
Ra door
Rthe vehicle with the mechanical key
Rthe trunk lid
Rthe hood
XTo turn the alarm off with the SmartKey:
press the %or& button on the Smart-
Key.
The alarm is stopped.
or
XVehicles with KEYLESS-GO start-function
or KEYLESS-GO: remove the Start/Stop but-
ton from the ignition lock (
Ypage 121).
XInsert the SmartKey into the ignition lock.
The alarm is stopped.
XTo stop the alarm using KEYLESS-GO:
grasp the outside door handle. The SmartKey
must be outside the vehicle.
The alarm is stopped.
or
XPress the Start/Stop button on the dash-
board. The SmartKey must be inside the vehi-
cle.
The alarm is stopped.
The alarm is not switched off, even if you close
the open door that triggered it, for example.
Protection against theft67
Safety
Z
Page 91 of 318

Correct driver's seat position
GWARNING
You could lose control of your vehicle if you do the following while driving:
Radjust the driver's seat, head restraint,
steering wheel or mirrors
Rfasten the seat belt
There is a risk of an accident.
Adjust the driver's seat, head restraint, steer-
ing wheel and mirror and fasten your seat belt before starting the engine.
Observe the following when adjusting steering
wheel :, seat belt ;and driver's seat =:
Ryou are as far away from the driver's air bag as
possible
Ryou are sitting in a normal upright position
Ryour thighs are slightly supported by the seat
cushion
Ryour legs are not entirely stretched and you
can depress the pedals properly
Rthe back of your head is supported at eye level
by the center of the head restraint
Ryou can hold the steering wheel with your
arms slightly bent
Ryou can move your legs freely
Ryou can see all the displays in the instrument
cluster clearly
Ryou should have a good overview of traffic
conditions
Rthe seat belt is pulled snugly against the body and is routed across the center of your shoul-
der and across your hips in the pelvic area
Further related subjects:
RAdjusting the seats manually (Ypage 90)
RAdjusting the seats electrically
(Ypage 91)
RAdjusting the steering wheel manually
(Ypage 94)
RFastening the seat belt correctly
(Ypage 43)
RAdjusting the rear-view mirror and exterior
mirrors (Ypage 95)
RVehicles with a memory function: saving
the seat, steering wheel and exterior mirror
settings using the memory function
(
Ypage 97)
Seats
Important safety notes
GWARNING
Children could become trapped if they adjust
the seats, particularly when unattended.
There is a risk of injury.
When leaving the vehicle, always take the
SmartKey with you and lock the vehicle. Never
leave children unsupervised in the vehicle.
The seats can still be adjusted when there is no
SmartKey in the ignition lock.
GWARNING
When you adjust a seat, you or other vehicle
occupants could become trapped, e.g. on the seat guide rail. There is a risk of injury.
Make sure when adjusting a seat that no one
has any body parts in the sweep of the seat.
Observe the safety notes on "Air bags"
(
Ypage 44) and "Children in the vehicle"
(Ypage 53).
GWARNING
If the driver's seat is not engaged, it could
move unexpectedly while the vehicle is in
Seats89
Seats, steering wheel and mirrors
Z
Page 92 of 318

motion. This could cause you to lose control ofthe vehicle. There is a risk of an accident.
Always make sure that the driver's seat is
engaged before starting the vehicle.
GWARNING
You could lose control of your vehicle if you do the following while driving:
Radjust the driver's seat, head restraint,
steering wheel or mirrors
Rfasten the seat belt
There is a risk of an accident.
Adjust the driver's seat, head restraint, steer-
ing wheel and mirror and fasten your seat belt before starting the engine.
GWARNING
If you adjust the seat height carelessly, you or
other vehicle occupants could be trapped and
thereby injured. Children in particular could
accidentally press the electrical seat adjust-
ment buttons and become trapped. There is a
risk of injury.
While moving the seats, make sure that your
hands or other body parts do not get under the
lever assembly of the seat adjustment sys-
tem.
!To avoid damage to the seats and the seat
heating, observe the following information:
Rkeep liquids from spilling on the seats. If
liquid is spilled on the seats, dry them as
soon as possible.
Rif the seat covers are damp or wet, do not
switch on the seat heating. The seat heat-
ing should also not be used to dry the seats.
Rclean the seat covers as recommended;
see the "Interior care" section.
Rdo not transport heavy loads on the seats.
Do not place sharp objects on the seat
cushions, e.g. knives, nails or tools. The
seats should only be occupied by passen-
gers, if possible.
Rwhen the seat heating is in operation, do
not cover the seats with insulating materi-
als, e.g. blankets, coats, bags, seat covers,
child seats or booster seats.
!Make sure that there are no objects in the
footwell under or behind the seats when mov-
ing the seats back. There is a risk that the
seats and/or the objects could be damaged.
iFurther related subjects:
Rcargo compartment enlargement (folding
down the rear seats) (Ypage 236)
Adjusting the seats manually
Vehicles without the seating comfort
package
Seat fore-and-aft adjustment:
XLift handle :and slide the seat forwards or
backwards.
XRelease lever :again.
Make sure that you hear the seat engage in
position.
Backrest angle:
XRelieve the pressure on the backrest.
XTurn handwheel =forwards or backwards.
Seat height:
XPull handle ;upwards or push it down
repeatedly until the seat has reached the
desired height.
90Seats
Seats, steering wheel and mirrors
Page 93 of 318

Vehicles with the seating comfort pack-
age
Seat fore-and-aft adjustment:
XLift handle:and slide the seat forwards or
rearwards.
XRelease lever :again.
Make sure that you hear the seat engage in
position.
Backrest angle:
XRelieve the pressure on the backrest.
XTurn handwheel Aforwards or backwards.
Seat height:
XPull handle ?upwards or push it down
repeatedly until the seat has reached the
desired height.
Seat cushion angle:
XAdjust the angle so that your thighs are lightly
supported.
XTurn handwheel =forwards or backwards.
Seat cushion length:
XLift handle ;and slide the front part of the
seat cushion forwards or backwards.
XRelease lever ;again.
The seat cushion engages.
Adjusting the seats electrically
:Seat height
;Seat cushion angle
=Seat fore-and-aft adjustment
?Backrest angle
iYou can store the seat settings using the
memory function (Ypage 97).
Adjusting the head restraints
Important safety notes
GWARNING
You could lose control of your vehicle if you do the following while driving:
Radjust the driver's seat, head restraint,
steering wheel or mirrors
Rfasten the seat belt
There is a risk of an accident.
Adjust the driver's seat, head restraint, steer-
ing wheel and mirror and fasten your seat belt before starting the engine.
GWARNING
If the head restraints are not installed or not
adjusted correctly, they cannot provide pro-
tection as intended. There is an increased risk
of injury in the head and neck area, e.g. in the event of an accident or when braking.
Always drive with the head restraints instal-
led. Before driving off, make sure for every
vehicle occupant that the center of the head
restraint supports the back of the head at
about eye level.
Seats91
Seats, steering wheel and mirrors
Z
Page 94 of 318

Using the fore-and-aft adjustment, adjust the
head restraint so that it is as close as possible to
your head.
General notes
For vehicles with sports seats you cannot adjust
the front head restraints or the outer rear head
restraints.
Adjusting the head restraints manually
Adjusting the head restraint height
XTo raise:pull the head restraint up to the
desired position.
XTo lower: press release catch :in the direc-
tion of the arrow and push the head restraint
down to the desired position.
Adjusting the fore/aft position of the
head restraint
With this function you can adjust the distance
between the head restraint and the back of the
seat occupant's head.
XTo move forwards: pull the head restraint
forwards in the direction of the arrow until it
engages.
There are several notches.
XTo move backwards: press and hold release
button :and push the head restraint back-
wards.
XWhen the head restraint is in the desired posi-
tion, release the button and make sure that
the head restraint is engaged in position.
Rear seat head restraints
Adjusting the rear seat head restraint
height
XTo raise: pull the head restraint up to the
desired position.
XTo lower: press release catch :and push
the head restraint down until it is in the
desired position.
Adjusting the 4-way lumbar support
You can adjust the contour of the front seat
backrests individually to provide optimum sup-
port for your back.
92Seats
Seats, steering wheel and mirrors