washer fluid MERCEDES-BENZ CLA-Class 2017 C117 Owner's Manual
[x] Cancel search | Manufacturer: MERCEDES-BENZ, Model Year: 2017, Model line: CLA-Class, Model: MERCEDES-BENZ CLA-Class 2017 C117Pages: 318, PDF Size: 8.02 MB
Page 8 of 318
Blootooth®
Connecting a different mobile
phone ............................................ 232
Bluetooth
®
Searching for a mobile phone ........ 231
see also Digital Operator's Man-
ual .................................................. 227
Telephony ...................................... 230
Brake Assist
see BAS (Brake Assist System)
Brake fluid
Display message ............................ 194
Notes ............................................. 312
Brake force distribution
see EBD (electronic brake force
distribution)
Brake lamp
Replacing bulbs ............................. 105
Brake lamps
Display message ............................ 199
Brakes
ABS .................................................. 60
BAS .................................................. 60
Brake fluid (notes) ......................... 312
Braking assistance appropriate to
the situation ..................................... 62
Display message ............................ 189
EBD .................................................. 66
Hill start assist ............................... 124
HOLD function ............................... 156
Important safety notes .................. 145
Maintenance .................................. 146
Parking brake ................................ 141
Riding tips ...................................... 145
Warning lamp ................................. 217
Braking assistance appropriate to
the situation
Function/notes ................................ 62
Breakdown
Where will I find...? ........................ 266
see Flat tire
see Tow-starting
see Towing away
Buttons on the steering wheel ......... 175
C
California
Important notice for retail cus-
tomers and lessees .......................... 24
Calling up a malfunction
see Display messages
Car
see Vehicle
Care
Car wash ........................................ 259
Carpets .......................................... 265
Display ........................................... 263
Exhaust pipe .................................. 263
Exterior lights ................................ 262
Gear or selector lever .................... 264
Interior ........................................... 263
Matte finish ................................... 261
Notes ............................................. 259
Paint .............................................. 260
Plastic trim .................................... 263
Power washer ................................ 260
Rear view camera .......................... 262
Roof lining ...................................... 265
Seat belt ........................................ 264
Seat cover ..................................... 264
Sensors ......................................... 262
Steering wheel ............................... 264
Trim pieces .................................... 264
Washing by hand ........................... 260
Wheels ........................................... 261
Windows ........................................ 261
Wiper blades .................................. 262
Wooden trim .................................. 264
Cargo compartment enlargement ... 236
Cargo tie down rings ......................... 237
CD
see also Digital Operator's Man-
ual .................................................. 227
CD player (on-board computer) ........ 180
Center console
Lower section .................................. 35
Upper section .................................. 34
Central locking
Automatic locking (on-board com-puter) ............................................. 184
Locking/unlocking (SmartKey) ........ 69
Change of address .............................. 25
6Index
Page 18 of 318
Turn signals (front) .........................105
Turn signals (rear) .......................... 105
Reporting safety defects .................... 27
Rescue card ......................................... 28
Reserve (fuel tank)
see Fuel
Reserve fuel
Display message ............................ 204
Warning lamp ................................. 222
see Fuel
Residual heat (climate control) ........118
Restraint system
Display message ............................ 195
Introduction ..................................... 39
Warning lamp ................................. 222
Warning lamp (function) ................... 40
Reverse gear (selector lever) ........... 131
Reversing feature
Panorama sliding sunroof ................ 85
Roller sunblind ................................. 86
Side windows ................................... 81
Roadside Assistance (breakdown) .... 25
Roller sunblind
Panorama roof with power tilt/
sliding panel ..................................... 86
Roof carrier ........................................ 238
Roof lining and carpets (cleaning
guidelines) ......................................... 265
Roof load (maximum) ........................ 314
Route guidance
see also Digital Operator's Man-
ual ..................................................2 27
S
Safety
Children in the vehicle ..................... 53
see Occupant safety
Safety system
see Driving safety systems
SD card
Inserting ........................................ 232
Inserting/removing ........................ 232
Removing ....................................... 232
SD memory card
see also Digital Operator's Man-
ual ..................................................2 27Search & Send
see also Digital Operator's Man-
ual ..................................................2 27
Seat belts
Adjusting the height ......................... 43
Cleaning ......................................... 264
Correct usage .................................. 42
Fastening ......................................... 43
Important safety guidelines ............. 41
Introduction ..................................... 40
Releasing ......................................... 43
Warning lamp ................................. 216
Warning lamp (function) ................... 43
Seats
Adjusting (electrically) ..................... 91
Adjusting (manually) ........................ 90
Adjusting (Performance Seat) .......... 93
Adjusting the 4-way lumbar sup-
port ..................................................9 2
Adjusting the head restraint ............ 91
Cleaning the cover ......................... 264
Correct driver's seat position ........... 89
Folding the backrest (rear com-
partment) forwards/back .............. 236
Important safety notes .................... 89
Seat heating problem ...................... 94
Storing settings (memory func-
tion) ................................................. 98
Switching seat heating on/off ......... 93
Securing cargo .................................. 237
Selector lever
Cleaning ......................................... 264
Sensors (cleaning instructions) ....... 262
Service menu (on-board com-
puter) .................................................. 183
Service message
see ASSYST PLUS
Service products
Brake fluid ..................................... 312
Coolant (engine) ............................ 312
Eng
ine oil ....................................... 311
Fuel ................................................ 309
Important safety notes .................. 309
Refrigerant (air-conditioning sys-
tem) ............................................... 313
Washer fluid ................................... 313
Setting the air distribution ............... 115
16Index
Page 23 of 318
Vehicle dimensions........................... 314
Vehicle emergency locking ................ 76
Vehicle identification number
see VIN
Vehicle identification plate .............. 308
Vehicle tool kit .................................. 266
Ventilation
Setting the vents ........................... 119
Video
Operating the DVD ......................... 180
see also Digital Operator's Man-
ual .................................................. 227
VIN
Seat ............................................... 309
Type plate ...................................... 308
W
Warning and indicator lampsABS ................................................ 218
Active Brake Assist ........................ 225
Brakes ........................................... 217
Check Engine ................................. 222
Coolant .......................................... 223
Distance warning ........................... 225
ESP
®.............................................. 219
ESP®OFF ....................................... 220
Fuel tank ........................................ 222
Overview .......................................... 32
PASSENGER AIR BAG ...................... 40
Reserve fuel ................................... 222
Restraint system ............................ 222
Seat belt ........................................ 216
SPORT handling mode ................... 220
Tire pressure monitor .................... 226
Warranty .............................................. 24
Washer fluid
Display message ............................ 214
Weather display (COMAND)
see also Digital Operator's Man-
ual .................................................. 227
Wheel and tire combinations
Tires ............................................... 306
Wheel bolt tightening torque ........... 305
Wheel chock ...................................... 302
Wheels
Changing a wheel .......................... 301
Checking ........................................ 282 Cleaning ......................................... 261
Important safety notes .................. 282
Information on driving .................... 282
Interchanging/changing ................ 301
Mounting a new wheel ................... 304
Removing a wheel .......................... 304
Storing ........................................... 302
Tightening torque ........................... 305
Wheel size/tire size ....................... 306
Window curtain air bag
Display message ............................ 196
Operation ......................................... 46
Windows
see Side windows
Windshield
Defrosting ...................................... 116
Windshield washer system
Adding washer fluid ....................... 257
Important safety notes .................. 313
Windshield wipers
Display message ............................ 214
Problem (malfunction) ................... 108
Replacing the wiper blades ............ 107
Switching on/off ........................... 106
Winter driving
Slippery road surfaces ................... 147
Snow chains .................................. 285
Winter operation
General notes ................................ 284
Winter tires
M+S tires ....................................... 284
Wiper blades
Cleaning ......................................... 262
Imp
ortant safety notes .................. 107
Wooden trim (cleaning instruc-
tions) .................................................. 264
Workshop
see Qualified specialist workshop
Z
ZONE functionSwitching on/off ........................... 116
Index21
Page 108 of 318
XPress retaining clips:at the same time in
the direction of the arrows.
XCarefully remove the bulb holder together
with the connected plug and the bulbs.
Bulb holder
;
Brake lamp
=Brake lamp
?Rear fog lamp
ABackup lamp
BTurn signals
XBrake lamp and backup lamp: remove the
corresponding bulb from the bulb holder.
XInsert the new bulb into the bulb holder.
XRear fog lamp and turn signal: press the
bulb gently into the bulb holder, turn it coun-
ter-clockwise and remove it from the bulb
holder.
XInsert the new bulb into the bulb holder and
turn it clockwise.
XReinsert the bulb holder and engage on
retaining clips :.
XClose the side trim panel (Ypage 105).
Windshield wipers
Switching the windshield wipers
on/off
!
Do not operate the windshield wipers when
the windshield is dry, as this could damage
the wiper blades. Moreover, dust that has col-
lected on the windshield can scratch the glass
if wiping takes place when the windshield is
dry.
If it is necessary to switch on the windshield
wipers in dry weather conditions, always use
washer fluid when operating the windshield
wipers.
!If the windshield wipers leave smears on the
windshield after the vehicle has been washed
in an automatic car wash, wax or other resi-
dues may be the reason for this. Clean the
windshield using washer fluid after washing
the vehicle in an automatic car wash.
Combination switch
1
$ Windshield wiper off
2ÄIntermittent wipe, low (rain sensor set
to low sensitivity)
3Å Intermittent wipe, high (rain sensor
set to high sensitivity)
4° Continuous wipe, slow
5¯Continuous wipe, fast
BíSingle wipe/î Wipes the wind-
shield using washer fluid
XSwitch on the ignition.
XTurn the combination switch to the corre-
sponding position.
!Vehicles with a rain sensor: if the windshield
becomes dirty in dry weather conditions, the
windshield wipers may be activated inadver-
tently. This could then damage the windshield
wiper blades or scratch the windshield.
For this reason, you should always switch off
the windshield wipers in dry weather.
Vehicles with a rain sensor: in the ÄorÅ
position, the appropriate wiping frequency is
automatically set according to the intensity of
the rain. In the Åposition, the rain sensor is
more sensitive than in the Äposition, caus-
ing the windshield wiper to wipe more fre-
quently.
If the wiper blades are worn, the windshield will
no longer be wiped properly. This could prevent
you from observing the traffic conditions.
106Windshield wipers
Lights and windshield wipers
Page 110 of 318

XSlide catch;in the direction of arrow =
until it engages in the locking position with a
noticeable click.
XMake sure that the wiper blade is seated cor-
rectly.
XFold the wiper arm back onto the windshield.
XRemove protective film :of the service indi-
cator on the tip of the wiper blade.
If the color of the service indicator changes from
black to yellow, the wiper blades should be
replaced.
iThe duration of the color change varies
depending on the usage conditions.
Problems with the windshield wipers
ProblemPossible causes/consequences and MSolutions
The windshield wipers
are jammed.Leaves or snow, for example, may be obstructing the windshield wiper
movement. The wiper motor has been deactivated.
XFor safety reasons, you should remove the SmartKey from the igni-
tion lock.
XRemove the cause of the obstruction.
XSwitch the windshield wipers back on.
The windshield wipers
fail completely.The windshield wiper drive is malfunctioning.
XSelect another wiper speed on the combination switch.
XHave the windshield wipers checked at a qualified specialist work-
shop.
The windshield washer
fluid from the spray noz-
zles no longer hits the
center of the windshield.The spray nozzles are misaligned.
XHave the spray nozzles adjusted at a qualified specialist workshop.
108Windshield wipers
Lights and windshield wipers
Page 216 of 318
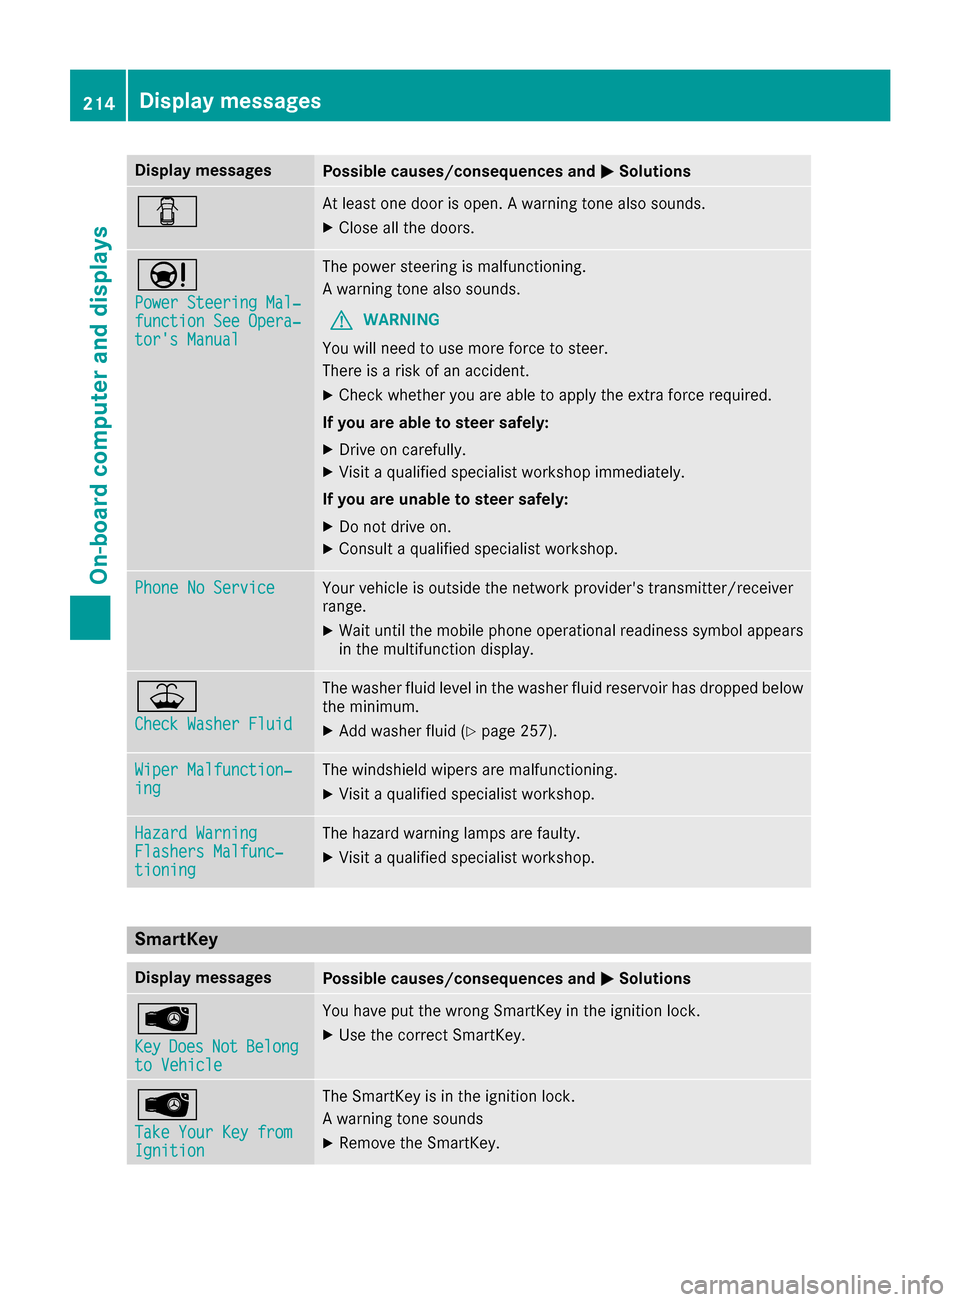
Display messagesPossible causes/consequences andMSolutions
CAt least onedoor is open . Awarning tone also sounds.
XClos eall th edoors.
Ð
Power Steering Mal ‐function See Opera‐tor's Manual
The powersteering is malfunctioning .
A warning tone also sounds.
GWARNIN G
You will need to use mor eforce to steer .
There is aris kof an accident.
XChec kwhether you are able to apply th eextr aforce required.
If you ar eabl eto steer safely:
XDrive on carefully.
XVisit aqualified specialist workshop immediately.
If you ar eunable to steer safely:
XDo no tdrive on .
XConsult aqualified specialist workshop .
Phone No ServiceYour vehicleis outside th enetwork provider' stransmitter/receiver
range.
XWait until th emobile phone operational readiness symbol appear s
in th emultifunction display.
¥
Check Washer Fluid
The washer flui dlevel in th ewasher flui dreservoir has dropped belo w
th eminimum .
XAddwasher flui d (Ypage 257).
Wiper Malfunction‐ingThe windshield wiper sare malfunctioning .
XVisitaqualified specialist workshop .
Hazard WarningFlashers Malfunc‐tioning
The hazard warning lamp sare faulty.
XVisit aqualified specialist workshop .
SmartKey
Display messagesPossible causes/consequences and MSolutions
Â
KeyDoesNotBelongto Vehicl e
You haveput th ewrong SmartKey in th eignition lock.
XUse th ecorrec tSmartKey.
Â
Tak eYou rKey fro mIgnition
The SmartKey is in th eignition lock.
A warning tone sounds
XRemove th eSmartKey.
214Display messages
On-board computer and displays
Page 259 of 318
Checking and adding other service
products
Checking coolant level
GWARNING
The cooling system is pressurized, particularly
when the motor is warm. If you open the cap,
you could be scalded if hot coolant sprays out.
There is a risk of injury.
Let the engine cool down before you open the
cap. Wear gloves and eye protection. Slowly
open the cap to relieve pressure.
!The coolant may only be checked and cor-
rected when the engine is cool (coolant tem-
perature below 104 ‡ (40 †). Checking the
coolant when the coolant temperature is
above 104 ‡ (40 †) mayresult in damage to
th eengin eor to th eengin ecoolin gsystem.
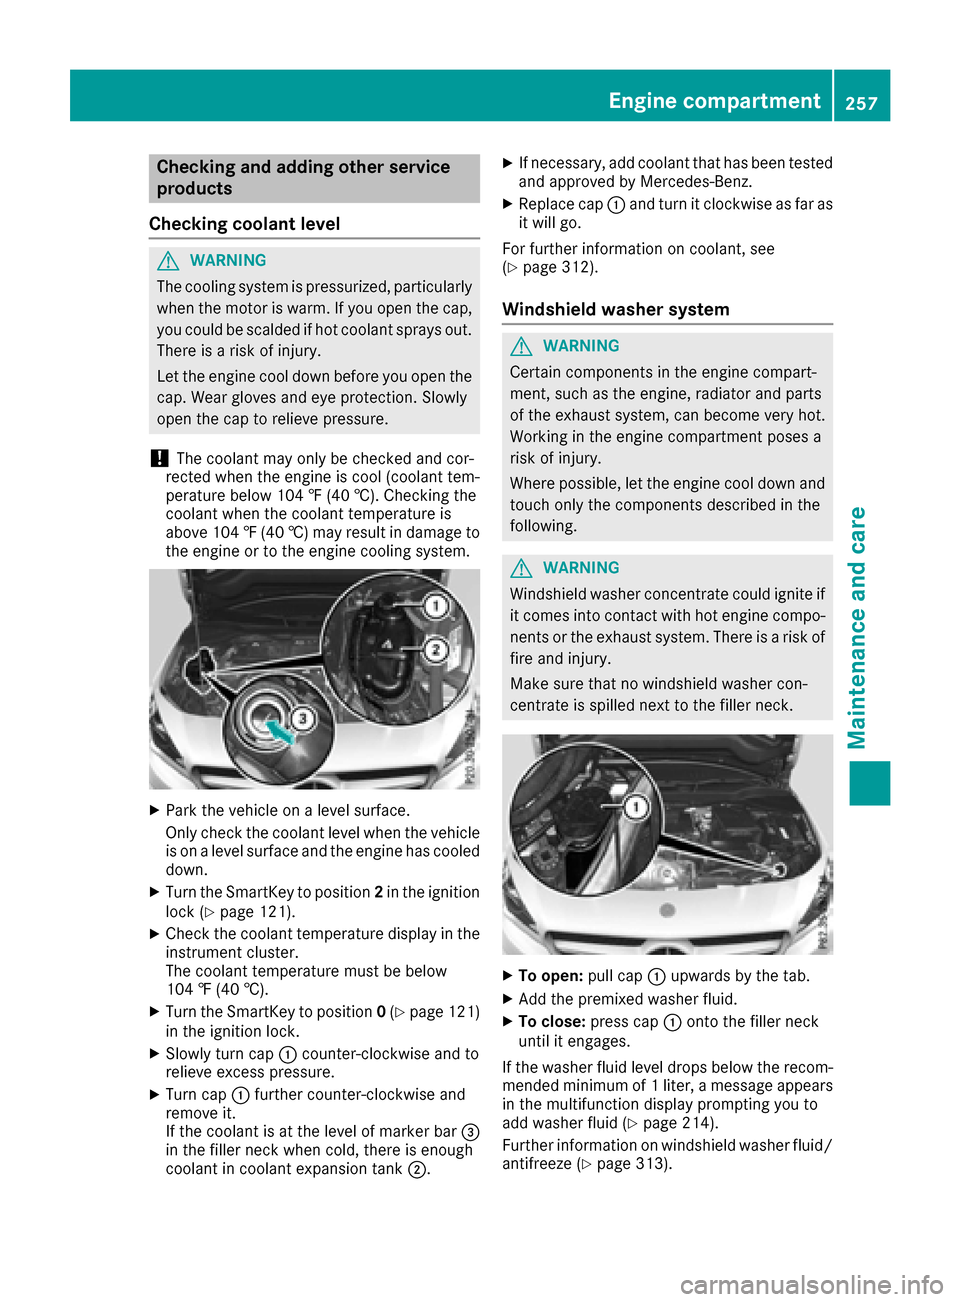
XPar kth evehicl eon alevel surface.
Only chec kth ecoolan tlevel when th evehicl e
is on alevel surfac eand th eengin ehas cooled
down .
XTurn th eSmartKey to position 2in th eignition
loc k (Ypage 121).
XChec kth ecoolan ttemperature display in th e
instrumen tcluster.
The coolan ttemperature mus tbe belo w
10 4 ‡ (40 †) .
XTurn the SmartKey to position 0(Ypage 12 1)
in the ignition lock.
XSlowly turn cap :counter-clockwise and to
relieve excess pressure.
XTurn cap :further counter-clockwise and
remove it.
If the coolant is at the level of marker bar =
in the filler neck when cold, there is enough
coolant in coolant expansion tank ;.
XIf necessary, add coolant that has been tested
and approved by Mercedes-Benz.
XReplace cap :and turn it clockwise as far as
it will go.
For further information on coolant, see
(
Ypage 312).
Windshield washer system
GWARNING
Certain components in the engine compart-
ment, such as the engine, radiator and parts
of the exhaust system, can become very hot.
Working in the engine compartment poses a
risk of injury.
Where possible, let the engine cool down and touch only the components described in the
following.
GWARNING
Windshield washer concentrate could ignite if it comes into contact with hot engine compo-
nents or the exhaust system. There is a risk of
fire and injury.
Make sure that no windshield washer con-
centrate is spilled next to the filler neck.
XTo open: pull cap:upwards by the tab.
XAdd the premixed washer fluid.
XTo close: press cap :onto the filler neck
until it engages.
If the washer fluid level drops below the recom-
mended minimum of 1 liter, a message appears
in the multifunction display prompting you to
add washer fluid (
Ypage 214).
Further information on windshield washer fluid/
antifreeze (
Ypage 313).
Engine compartment257
Maintenance and care
Z
Page 262 of 318
Washing by hand
In some countries, washing by hand is only
allowed at specially equipped washing bays.
Observe the legal requirements in each country.
XDo not use hot water and do not wash the
vehicle in direct sunlight.
XUse a soft sponge to clean.
XUse a mild cleaning agent, such as a car
shampoo approved by Mercedes-Benz.
XThoroughly hose down the vehicle with a gen-
tle jet of water.
XDo not point the water jet directly towards the
air inlet.
XUse plenty of water and rinse out the sponge
frequently.
XRinse the vehicle with clean water and dry
thoroughly with a chamois.
XDo not let the cleaning agent dry on the paint-work.
Carefully remove all deposits of road salt as
soon as possible when driving in winter.
Power washers
GWARNING
The water jet from a circular jet nozzle (dirt
blasters) can cause invisible exterior damage
to the tires or chassis components. Compo-
nents damaged in this way may fail unexpect-
edly. There is a risk of an accident.
Do not use power washers with circular jet
nozzles to clean the vehicle. Have damaged
tires or chassis components replaced imme-
diately.
!Always maintain a distance of at least
11.8 in (30 cm) between the vehicle and the
power washer nozzle. Information about the
correct distance is available from the equip-
ment manufacturer.
Move the power washer nozzle around when
cleaning your vehicle.
Do not aim directly at any of the following:
RTires
RDoor gaps, roof gaps, joints, etc.
RElectrical components
RBattery
RConnectors
RLamps
RSeals
RTrim
RVentilation slots
Damaged seals or electrical components can
lead to leaks or failures.
!Vehicles with decorative film: parts of your
vehicle are covered with a decorative film.
Maintain a distance of at least 27.5 in (70 cm)
between the parts of the vehicle covered with
the film and the nozzle of the high pressure
cleaner.
Information about the correct distance is
available from the equipment manufacturer.
Move the power washer nozzle around when
cleaning your vehicle.
Cleaning the paintwork
!Do not affix:
Rstickers
Rfilms
Rmagnetic plates or similar items
to painted surfaces. You could otherwise
damage the paintwork.
Scratches, corrosive deposits, areas affected by
corrosion and damage caused by inadequate
care cannot always be completely repaired. In
such cases, visit a qualified specialist workshop.
XRemove dirt immediately, where possible,
while avoiding rubbing too hard.
XSoak insect remains with insect remover and
rinse off the treated areas afterwards.
XSoak bird droppings with water and rinse off
the treated areas afterwards.
XRemove coolant, brake fluid, tree resin, oils,
fuels and greases by rubbing gently with a
cloth soaked in petroleum ether or lighter
fluid.
XUse tar remover to remove tar stains.
XUse silicone remover to remove wax.
If water no longer forms "beads" on the paint
surface, use the paint care products recommen-
ded and approved by Mercedes-Benz. This is the
case approximately every three to five months,
depending on the climate conditions and the
care product used.
If dirt has penetrated the paint surface or if the
paint has become dull, the paint cleaner recom-
260Care
Maintenance and care
Page 311 of 318
different for every vehicle and can deviate
from the data shown here. You can find the
data applicable to your vehicle on the vehicle
identification plate.
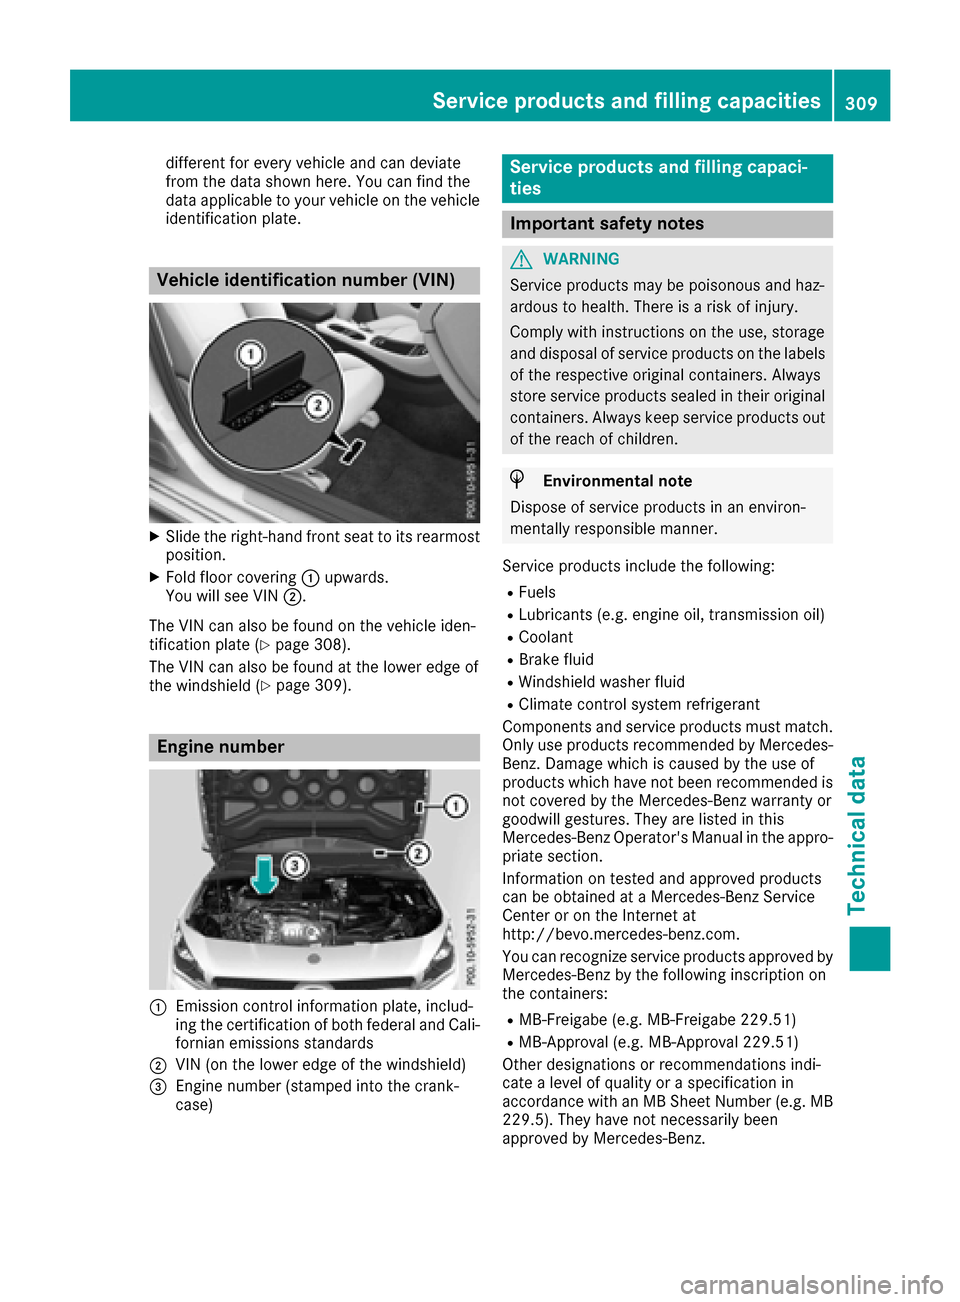
Vehicle identification number (VIN)
XSlide the right-hand front seat to its rearmost
position.
XFold floor covering:upwards.
You will see VIN ;.
The VIN can also be found on the vehicle iden-
tification plate (
Ypage 308).
The VIN can also be found at the lower edge of
the windshield (
Ypage 309).
Engine number
:Emission control information plate, includ-
ing the certification of both federal and Cali-
fornian emissions standards
;VIN (on the lower edge of the windshield)
=Engine number (stamped into the crank-
case)
Service products and filling capaci-
ties
Important safety notes
GWARNING
Service products may be poisonous and haz-
ardous to health. There is a risk of injury.
Comply with instructions on the use, storage
and disposal of service products on the labels
of the respective original containers. Always
store service products sealed in their original
containers. Always keep service products out
of the reach of children.
HEnvironmental note
Dispose of service products in an environ-
mentally responsible manner.
Service products include the following:
RFuels
RLubricants (e.g. engine oil, transmission oil)
RCoolant
RBrake fluid
RWindshield washer fluid
RClimate control system refrigerant
Components and service products must match.
Only use products recommended by Mercedes-
Benz. Damage which is caused by the use of
products which have not been recommended is
not covered by the Mercedes-Benz warranty or
goodwill gestures. They are listed in this
Mercedes-Benz Operator's Manual in the appro- priate section.
Information on tested and approved products
can be obtained at a Mercedes-Benz Service
Center or on the Internet at
http://bevo.mercedes-benz.co m.
You can recognize service products approved by
Mercedes-Benz by the following inscription on
the containers:
RMB-Freigabe (e.g. MB-Freigabe 229.51)
RMB-Approval (e.g. MB-Approval 229.51)
Other designations or recommendations indi-
cate a level of quality or a specification in
accordance with an MB Sheet Number (e.g. MB
229.5). They have not necessarily been
approved by Mercedes-Benz.
Service products and filling capacities309
Technical data
Z
Page 315 of 318
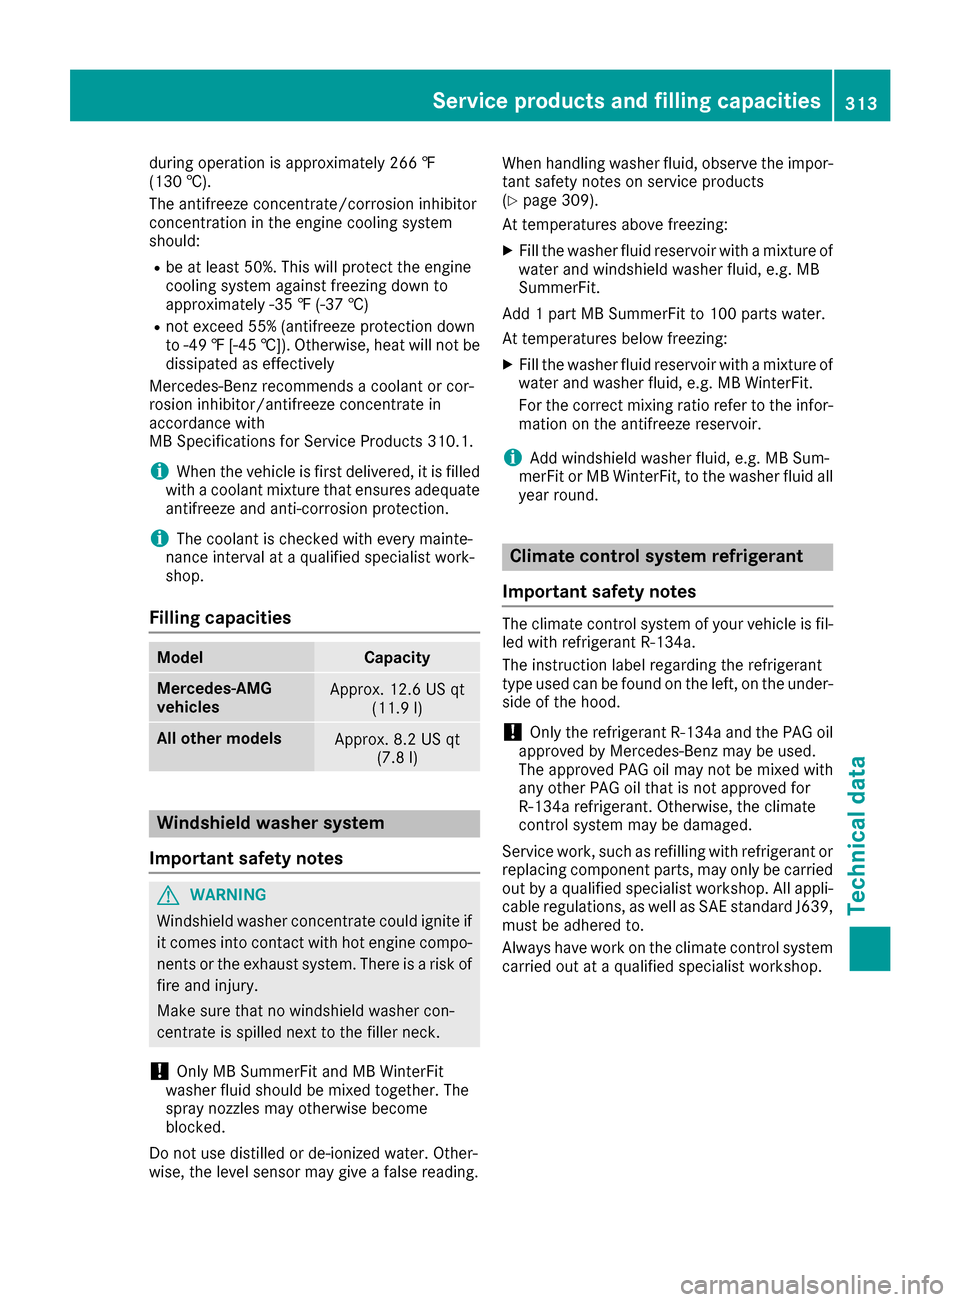
during operation is approximately 266 ‡
(130 †).
The antifreeze concentrate/corrosion inhibitor
concentration in the engine cooling system
should:
Rbe at least 50%. This will protect the engine
cooling system against freezing down to
approximately -35 ‡ (-37 †)
Rnot exceed 55% (antifreeze protection down
to -49‡[-45 †]) .Otherwise ,hea twill no tbe
dissipated as effectively
Mercedes-Ben zrecommends acoolan tor cor-
rosio ninhibitor/antifreez econcentrat ein
accordance wit h
MB Specification sfo rServic eProducts 310. 1.
iWhen the vehicle is first delivered, it is filled
with a coolant mixture that ensures adequate
antifreeze and anti-corrosion protection.
iThe coolant is checked with every mainte-
nance interval at a qualified specialist work-
shop.
Filling capacities
ModelCapacity
Mercedes ‑AMG
vehiclesApprox. 12.6 US qt (11.9l)
Allot her modelsApprox. 8.2 US qt
(7.8 l)
Windshield washer system
Important safety notes
GWARNING
Windshield washer concentrate could ignite if it comes into contact with hot engine compo-
nents or the exhaust system. There is a risk of
fire and injury.
Make sure that no windshield washer con-
centrate is spilled next to the filler neck.
!Only MB SummerFit and MB WinterFit
washer fluid should be mixed together. The
spray nozzles may otherwise become
blocked.
Do not use distilled or de-ionized water. Other-
wise, the level sensor may give a false reading. When handling washer fluid, observe the impor-
tant safety notes on service products
(
Ypage 309).
At temperatures above freezing:
XFill the washer fluid reservoir with a mixture of
water and windshield washer fluid, e.g. MB
SummerFit.
Add 1 part MB SummerFit to 100 parts water.
At temperatures below freezing:
XFill the washer fluid reservoir with a mixture of
water and washer fluid, e.g. MB WinterFit.
For the correct mixing ratio refer to the infor-
mation on the antifreeze reservoir.
iAdd windshield washer fluid, e.g. MB Sum-
merFit or MB WinterFit, to the washer fluid all
year round.
Climate control system refrigerant
Important safety notes
The climate control system of your vehicle is fil-
led with refrigerant R ‑134a.
The instruction label regarding the refrigerant
type used can be found on the left, on the under-
side of the hood.
!Only the refrigerant R ‑134a and the PAG oil
approved by Mercedes-Benz may be used.
The approved PAG oil may not be mixed with
any other PAG oil that is not approved for
R-134a refrigerant. Otherwise, the climate
control system may be damaged.
Service work, such as refilling with refrigerant or
replacing component parts, may only be carried
out by a qualified specialist workshop. All appli-
cable regulations, as well as SAE standard J639,
must be adhered to.
Always have work on the climate control system
carried out at a qualified specialist workshop.
Service products and filling capacities313
Technical data
Z