ESP MERCEDES-BENZ CLA-Class 2017 C117 Owner's Guide
[x] Cancel search | Manufacturer: MERCEDES-BENZ, Model Year: 2017, Model line: CLA-Class, Model: MERCEDES-BENZ CLA-Class 2017 C117Pages: 318, PDF Size: 8.02 MB
Page 68 of 318
RThe engine's torque is only restricted to a
limited degree and the drive wheels may start
to spin.
The spinning of the wheels results in a cutting
action for better traction on loose surfaces.
RESP®still provides support when you brake
firmly.
Characteristics when ESP®is deactivated
If ESP®is deactivated and one or more wheels
start to spin, the ÷ESP®warning lamp in the
instrument cluster does not flash. In such situa-
tions, ESP
®will not stabilize the vehicle.
If you deactivate ESP®:
RESP®no longer improves driving stability.
REngine torque is no longer limited and the
drive wheels are able to spin.
The spinning of the wheels results in a cutting
action for better traction on loose surfaces.
RTraction control is still activated.
RActive Brake Assist is no longer available; nor
is it activated if you brake firmly with assis-
tance from ESP
®
RESP®still provides support when you brake
firmly.
ESP®trailer stabilization
General information
If your vehicle/trailer combination begins to
swerve, ESP®assists you in this situation. ESP®
slows the vehicle down by braking and limiting
the engine output until the vehicle/trailer com-
bination has stabilized.
Important safety notes
GWARNING
If road and weather conditions are poor,
trailer stabilization will not be able to prevent
the vehicle/trailer combination from swerv-
ing. Trailers with a high center of gravity can
tip over before ESP
®can detect this. There is
a risk of an accident.
Always adapt your driving style to the prevail-
ing road and weather conditions.
If your vehicle with trailer (vehicle/trailer com-
bination) begins to lurch, you can only stabilize the vehicle/trailer combination by depressing
the brake firmly.
ESP
®trailer stabilization is active above speeds
of about 65 km/h.
ESP
®trailer stabilization does not work if ESP®
is deactivated or disabled because of a malfunc-
tion.
EBD (electronic brake force distribu-
tion)
General information
EBD monitors and controls the brake pressure
on the rear wheels to improve driving stability
while braking.
Important safety notes
iObserve the "Important safety notes" sec-
tion (Ypage 60).
GWARNING
If EBD is malfunctioning, the rear wheels can
lock, e.g. under full braking. This increases the
risk of skidding and an accident.
You should therefore adapt your driving style
to the different handling characteristics. Have
the brake system checked at a qualified spe-
cialist workshop.
Observe information regarding indicator and
warning lamps (
Ypage 218) as well as display
messages (Ypage 191).
ADAPTIVE BRAKE
ADAPTIVE BRAKE enhances braking safety and
offers increased braking comfort. In addition to
the braking function, ADAPTIVE BRAKE also has
the HOLD function (
Ypage 156) and hill start
assist (Ypage 124).
STEER CONTROL
General information
STEER CONTROL helps you by transmitting a
noticeable steering force to the steering wheel
in the direction required for vehicle stabilization.
66Driving safety systems
Safety
Page 69 of 318
This steering assistance is provided in particular
if:
Rboth right wheels or both left wheels are on awet or slippery road surface when you brake
Rthe vehicle begins to skid
Important safety notes
iObserve the "Important safety notes" sec-
tion (Ypage 60).
No steering assistance is provided from STEER
CONTROL, if:
RESP®is malfunctioning
Rthe steering is malfunctioning
If ESP®is malfunctioning, you will be assisted
further by the electrical power steering.
Protection against theft
Immobilizer
The immobilizer prevents your vehicle from
being started without the correct SmartKey.
XTo activate with the SmartKey: remove the
SmartKey from the ignition lock.
XTo activate with KEYLESS-GO start-func-
tion or KEYLESS-GO: switch the ignition off
and open the driver's door.
XTo deactivate: switch on the ignition.
When leaving the vehicle, always take the
SmartKey with you and lock the vehicle. Anyone
can start the engine if a valid SmartKey has been
left inside the vehicle.
iThe immobilizer is always deactivated when
you start the engine.
In the event that the engine cannot be started
(yet the vehicle's battery is charged), the sys-
tem is not operational. Contact an authorized
Mercedes-Benz Center or call
1-800-FOR-MERCedes (in the USA) or
1-800-387-0100 (in Canada).
ATA (anti-theft alarm system)
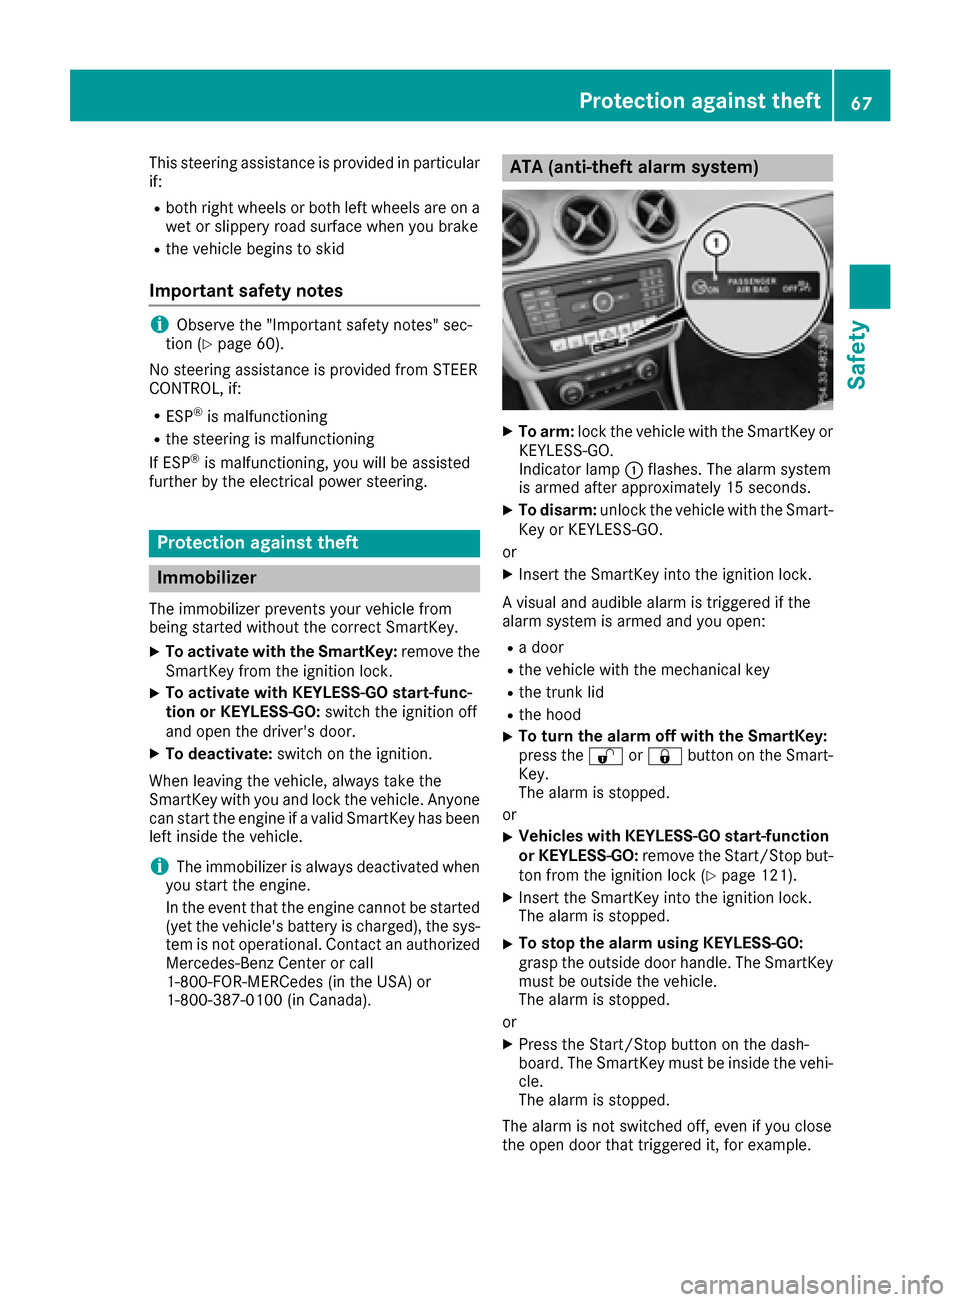
XTo arm: lock the vehicle with the SmartKey or
KEYLESS-GO.
Indicator lamp :flashes. The alarm system
is armed after approximately 15 seconds.
XTo disarm: unlock the vehicle with the Smart-
Key or KEYLESS-GO.
or
XInsert the SmartKey into the ignition lock.
A visual and audible alarm is triggered if the
alarm system is armed and you open:
Ra door
Rthe vehicle with the mechanical key
Rthe trunk lid
Rthe hood
XTo turn the alarm off with the SmartKey:
press the %or& button on the Smart-
Key.
The alarm is stopped.
or
XVehicles with KEYLESS-GO start-function
or KEYLESS-GO: remove the Start/Stop but-
ton from the ignition lock (
Ypage 121).
XInsert the SmartKey into the ignition lock.
The alarm is stopped.
XTo stop the alarm using KEYLESS-GO:
grasp the outside door handle. The SmartKey
must be outside the vehicle.
The alarm is stopped.
or
XPress the Start/Stop button on the dash-
board. The SmartKey must be inside the vehi-
cle.
The alarm is stopped.
The alarm is not switched off, even if you close
the open door that triggered it, for example.
Protection against theft67
Safety
Z
Page 72 of 318

KEYLESS-GO
Gene ral notes
Bear in min dthat th eengin ecan be started by
any of th evehicl eoccupant sif there is aSmart -
Key in th evehicle.
Locking and unlocking
You can start ,loc kor unloc kth evehicl eusin g
KEYLESS-GO .To do this, you only need carry th e
SmartKey wit hyou. You can combine th efunc-
tion sof KEYLESS-GO wit hthose of aconven -
tional SmartKey. Unloc kth evehicl eby usin g
KEYLESS-GO ,for instance ,and loc kit usin gth e
& buttonon th eSmartKey.
The driver's door and th edoor at whic hth ehan -
dle is used ,mus tbot hbe closed. The SmartKey
mus tbe outside th evehicle. Whe nlocking or
unlocking wit hKEYLESS-GO ,th edistanc e
between th eSmartKey and th ecorresponding
door handle mus tno tbe greate rthan 3ft (1 m).
A chec kwhic hperiodically establishes aradi o
connection between th evehicl eand th eSmart -
Key determine swhether avalid SmartKey is in
th evehicle. This occurs, for example:
Rwhen starting th eengin e
Rwhile drivin g
Rwhen usingHANDS-FRE EACCESS
Rwhen th eexternal door handles are touched
Rduring convenience closin g
XTo unlock thevehicle: touch theinner sur -
fac eof th edoor handle.
XTo lock th evehicle: touch sensor surfac e:
or ;. Mak
esur ethat you do no ttouch th einner
surfac eof th edoor handle.
XConvenienc eclosin gfeature: touch
recessed sensor surfac e; for an extended
period.
Further information on th econvenience clos-
ing feature (
Ypage 82).
XTo unlock th etrunk lid :pull trunk lid han -
dle :.
Deactivating and activating
If you do no tinten dto use th evehicl efor alon -
ger period of time, you can deactivat eKEYLESS -
GO. The SmartKey will then use ver ylittl epower,
thereby conserving battery power. Fo rth epur-
poses of activation/deactivation ,th evehicl e
mus tno tbe nearby.
XTo deactivate: press the& buttonon th e
SmartKey twice in rapi dsuccession .
The battery chec klamp of th eSmartKey
flashes twice briefl yand lights up once ,then
KEYLESS-GO is deactivated (
Ypage 72).
XTo activate:press any butto non th eSmart -
Key.
or
XInser tth eSmartKey int oth eignition lock.
KEYLESS-GO and all of it sassociated features
are available again .
KEYLESS-GOstart function
Gene ral notes
Bear in min dthat th eengin ecan be started by
any of th evehicl eoccupant sif there is aSmart -
Key in th evehicle.
70SmartKey
Opening and closing
Page 79 of 318
XPress the locking button on the driver’s door
(Ypage 75).
XCheck whether the locking knobs on the
front-passenger door and the rear doors are
still visible. Press down the locking knobs by
hand, if necessary.
XClose the driver's door.
XTake the mechanical key out of the SmartKey
(Ypage 71).
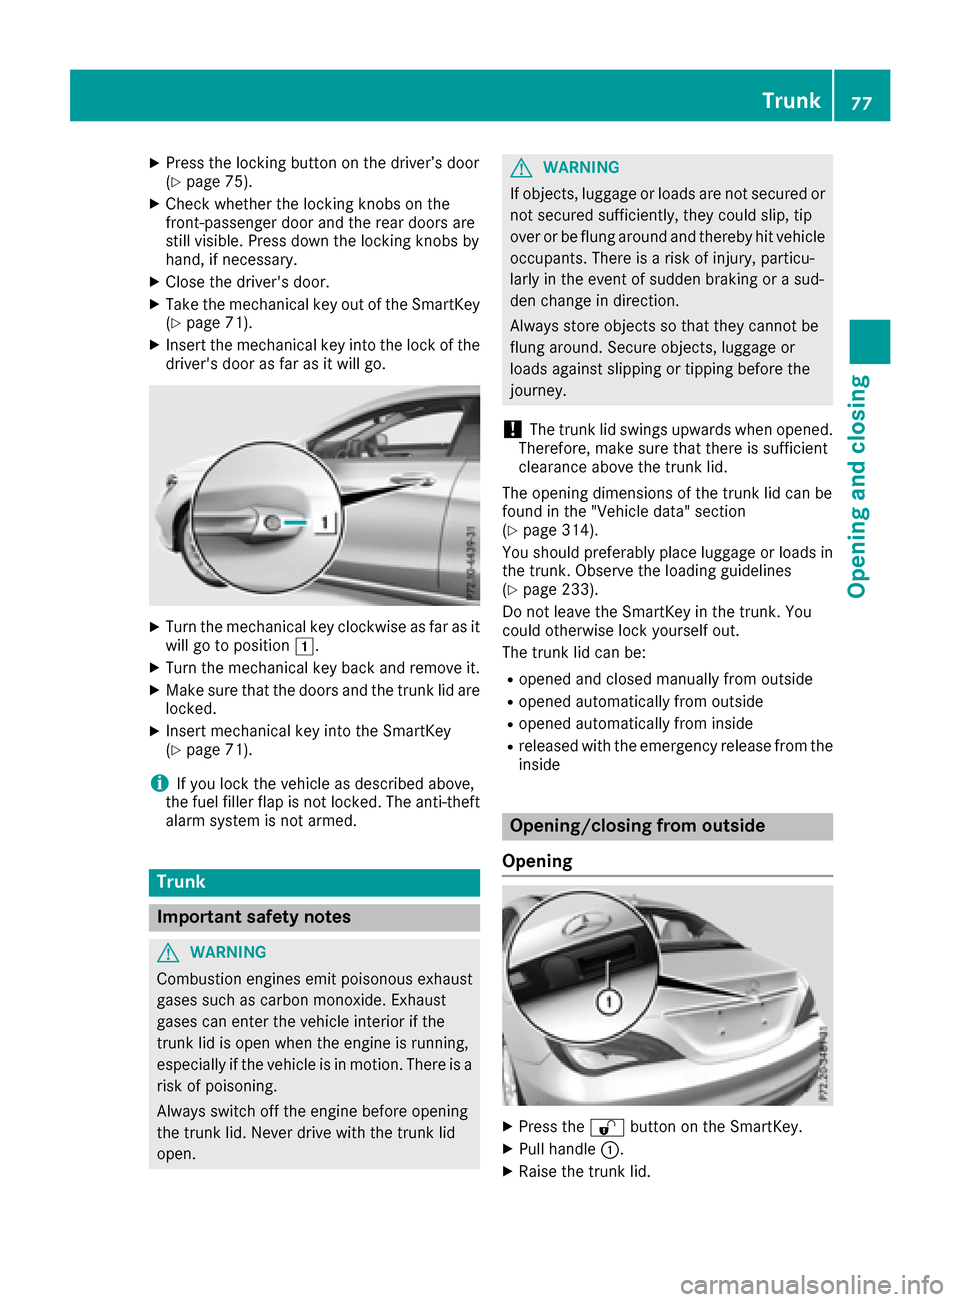
XInsert the mechanical key into the lock of the
driver's door as far as it will go.
XTurn the mechanical key clockwise as far as it
will go to position1.
XTurn the mechanical key back and remove it.
XMake sure that the doors and the trunk lid are
locked.
XInsert mechanical key into the SmartKey
(Ypage 71).
iIf you lock the vehicle as described above,
the fuel filler flap is not locked. The anti-theft
alarm system is not armed.
Trunk
Important safety notes
GWARNING
Combustion engines emit poisonous exhaust
gases such as carbon monoxide. Exhaust
gases can enter the vehicle interior if the
trunk lid is open when the engine is running,
especially if the vehicle is in motion. There is a
risk of poisoning.
Always switch off the engine before opening
the trunk lid. Never drive with the trunk lid
open.
GWARNING
If objects, luggage or loads are not secured or
not secured sufficiently, they could slip, tip
over or be flung around and thereby hit vehicle
occupants. There is a risk of injury, particu-
larly in the event of sudden braking or a sud-
den change in direction.
Always store objects so that they cannot be
flung around. Secure objects, luggage or
loads against slipping or tipping before the
journey.
!The trunk lid swings upwards when opened.
Therefore, make sure that there is sufficient
clearance above the trunk lid.
The opening dimensions of the trunk lid can be
found in the "Vehicle data" section
(
Ypage 314).
You should preferably place luggage or loads in
the trunk. Observe the loading guidelines
(
Ypage 233).
Do not leave the SmartKey in the trunk. You
could otherwise lock yourself out.
The trunk lid can be:
Ropened and closed manually from outside
Ropened automatically from outside
Ropened automatically from inside
Rreleased with the emergency release from the
inside
Opening/closing from outside
Opening
XPress the %button on the SmartKey.
XPull handle :.
XRaise the trunk lid.
Trunk77
Opening and closing
Z
Page 80 of 318

Closing
XPull down the trunk lid using handle:.
XLet the trunk lid drop into the lock.
XIf necessary, lock the vehicle with the &
button on the SmartKey or with KEYLESS-GO.
Opening automatically from outside
Important safety notes
GWARNING
Combustion engines emit poisonous exhaust
gases such as carbon monoxide. Exhaust
gases can enter the vehicle interior if the
trunk lid is open when the engine is running,
especially if the vehicle is in motion. There is a
risk of poisoning.
Always switch off the engine before opening
the trunk lid. Never drive with the trunk lid
open.
!The trunk lid swings upwards when opened.
Therefore, make sure that there is sufficient
clearance above the trunk lid.
iThe opening dimensions of the trunk lid can
be found under "Vehicle data" (Ypage 314).
Opening automatically
You can open the trunk lid automatically using
the SmartKey or the handle in the trunk lid.
XPress and hold the Fbutton on the Smart-
Key until the trunk lid opens.
or
XIf the trunk lid is unlocked, pull the trunk lid
handle and let it go again immediately.
HANDS-FREE ACCESS
Important safety notes
GWARNING
The vehicle's exhaust system may be very hot. You could burn yourself by touching the
exhaust system if you use HANDS-FREE
ACCESS. There is a risk of injury. Always
ensure that you only make the kicking move-
ment within the detection range of sensors.
!If the SmartKey is within the rear detection
range of KEYLESS-GO, the following situa-
tions, for example, could lead to the uninten-
tional opening of the trunk:
Rusing a car wash
Rusing a power washer
Make sure that the SmartKey is at least 10 ft
(3 m) away from the vehicle.
iYou can also deactivate KEYLESS-GO. Fur-
ther information on deactivating and activat-
ing KEYLESS-GO (
Ypage 70).
General notes
With KEYLESS-GO and HANDS-FREE ACCESS,
you can open the trunk lid without using your
hands. This is useful if you have your hands full. To do this, make a kicking movement under the
bumper with your foot.
Observe the following points:
RCarry your KEYLESS-GO key about your per-
son. The KEYLESS-GO key must be in the rear
detection range of the vehicle.
RWhen making the kicking movement, make
sure that you are standing firmly on the
ground and that there is sufficient clearance
to the rear of the vehicle. You could otherwise
lose your balance, for example on ice.
78Trunk
Opening and closing
Page 81 of 318

RAlways ensure that you only make the kicking
movement within the detection range of sen-
sors:.
RStand at least 12 in (30 cm) away from the
rear area while doing so.
RDo not come into contact with the bumper
while making the kicking movement. Other-
wise, the sensors may not function correctly.
RHANDS-FREE ACCESS does not function
when the engine is started.
RDirt caused by road salt around sensors :
may restrict functionality.
Using the HANDS-FREE ACCESS with a pros-
thetic leg may restrict functionality.
RIf a KEYLESS-GO key is within the rear detec-
tion range of KEYLESS-GO, HANDS-FREE
ACCESS could be triggered. The trunk lid
could thus be opened unintentionally, for
example, when you:
-set something down or lift something up
behind the vehicle.
-polish the rear of the vehicle.
Do not carry the KEYLESS-GO key about your
person in these situations or in situations sim-
ilar to these. This will prevent the uninten-
tional opening of the trunk lid.
Operation
XTo open: kick into sensor detection range :
below the bumper with your foot.
XIf the trunk lid does not open after several
attempts: wait at least ten seconds then
move your leg under the bumper once again.
If you hold your foot under the bumper for too
long, the trunk lid does not open. Repeat the leg
movement more quickly if this occurs.
Opening automatically from inside
Important safety notes
GWARNING
Combustion engines emit poisonous exhaust
gases such as carbon monoxide. Exhaust
gases can enter the vehicle interior if the
trunk lid is open when the engine is running,
especially if the vehicle is in motion. There is a
risk of poisoning.
Always switch off the engine before opening
the trunk lid. Never drive with the trunk lid
open.
!The trunk lid swings upwards when opened.
Therefore, make sure that there is sufficient
clearance above the trunk lid.
The opening dimensions of the trunk lid can be
found under "Vehicle data" (
Ypage 314).
Opening
You can open the trunk lid from the driver's seat
when the vehicle is stationary and unlocked.
Trunk79
Opening and closing
Z
Page 83 of 318
body becomes trapped, release the switch or
pull the switch to close the side window again.
GWARNING
While closing the side windows, body parts in
the closing area could become trapped. There is a risk of injury.
When closing make sure that no parts of the
body are in the closing area. If somebody
becomes trapped, release the switch or press
the switch to open the side window again.
GWARNING
If children operate the side windows they
could become trapped, particularly if they are left unsupervised. There is a risk of injury.
Activate the override feature for the rear side
windows. When leaving the vehicle, always
take the SmartKey with you and lock the vehi-
cle. Never leave children unsupervised in the
vehicle.
Side window reversing feature
The side windows are equipped with an auto-
matic reversing feature. If a solid object blocks
or restricts a side window from traveling
upwards during the automatic closing process,
the side window opens again automatically. Dur-
ing the manual closing process, the side windowonly opens again automatically after the corre-
sponding switch is released. The automatic
reversing feature is only an aid and is no substi-
tute for your attention when closing a side win-
dow.
GWARNING
The reversing feature does not react:
Rto soft, light and thin objects, e.g. small fin-
gers
Rwhile resetting
This means that the reversing feature cannot
prevent someone being trapped in these sit-
uations. There is a risk of injury.
Make sure that no body parts are in close
proximity during the closing procedure. If
someone becomes trapped, press the switch
to open the side window again.
Opening and closing the side win-
dows
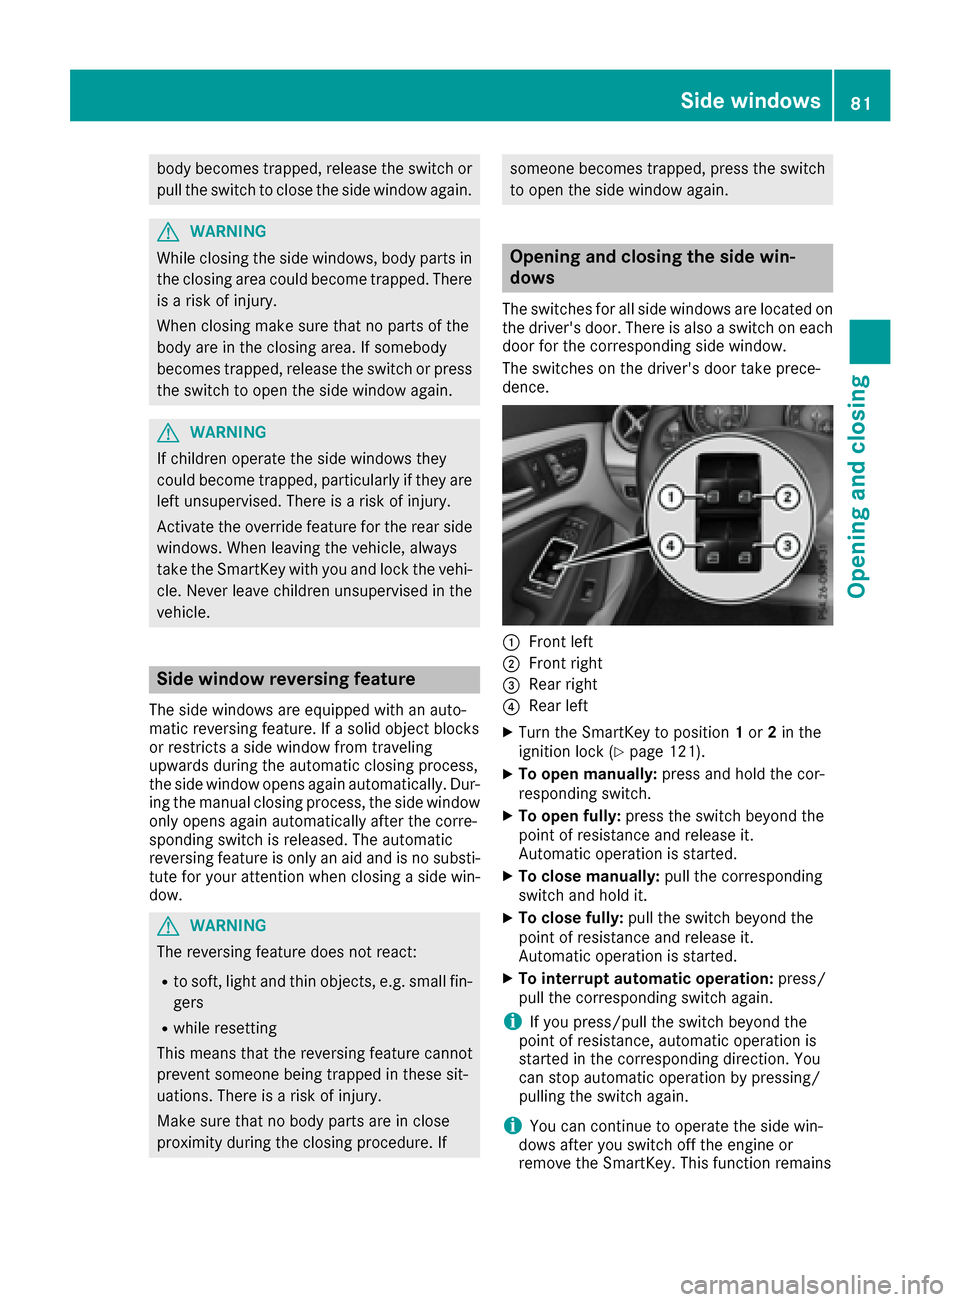
The switches for all side windows are located on the driver's door. There is also a switch on each
door for the corresponding side window.
The switches on the driver's door take prece-
dence.
:Front left
;Front right
=Rear right
?Rear left
XTurn the SmartKey to position 1or 2in the
ignition lock (Ypage 121).
XTo open manually: press and hold the cor-
responding switch.
XTo open fully: press the switch beyond the
point of resistance and release it.
Automatic operation is started.
XTo close manually: pull the corresponding
switch and hold it.
XTo close fully: pull the switch beyond the
point of resistance and release it.
Automatic operation is started.
XTo interrupt automatic operation: press/
pull the corresponding switch again.
iIf you press/pull the switch beyond the
point of resistance, automatic operation is
started in the corresponding direction. You
can stop automatic operation by pressing/
pulling the switch again.
iYou can continue to operate the side win-
dows after you switch off the engine or
remove the SmartKey. This function remains
Side windows81
Opening and closing
Z
Page 85 of 318
On vehicles with a panorama roof with power
tilt/sliding panel:
XPress and hold the&button again until the
roller sunblind of the panorama roof with
power tilt/sliding panel closes.
XTo interrupt convenience closing: release
the & button.
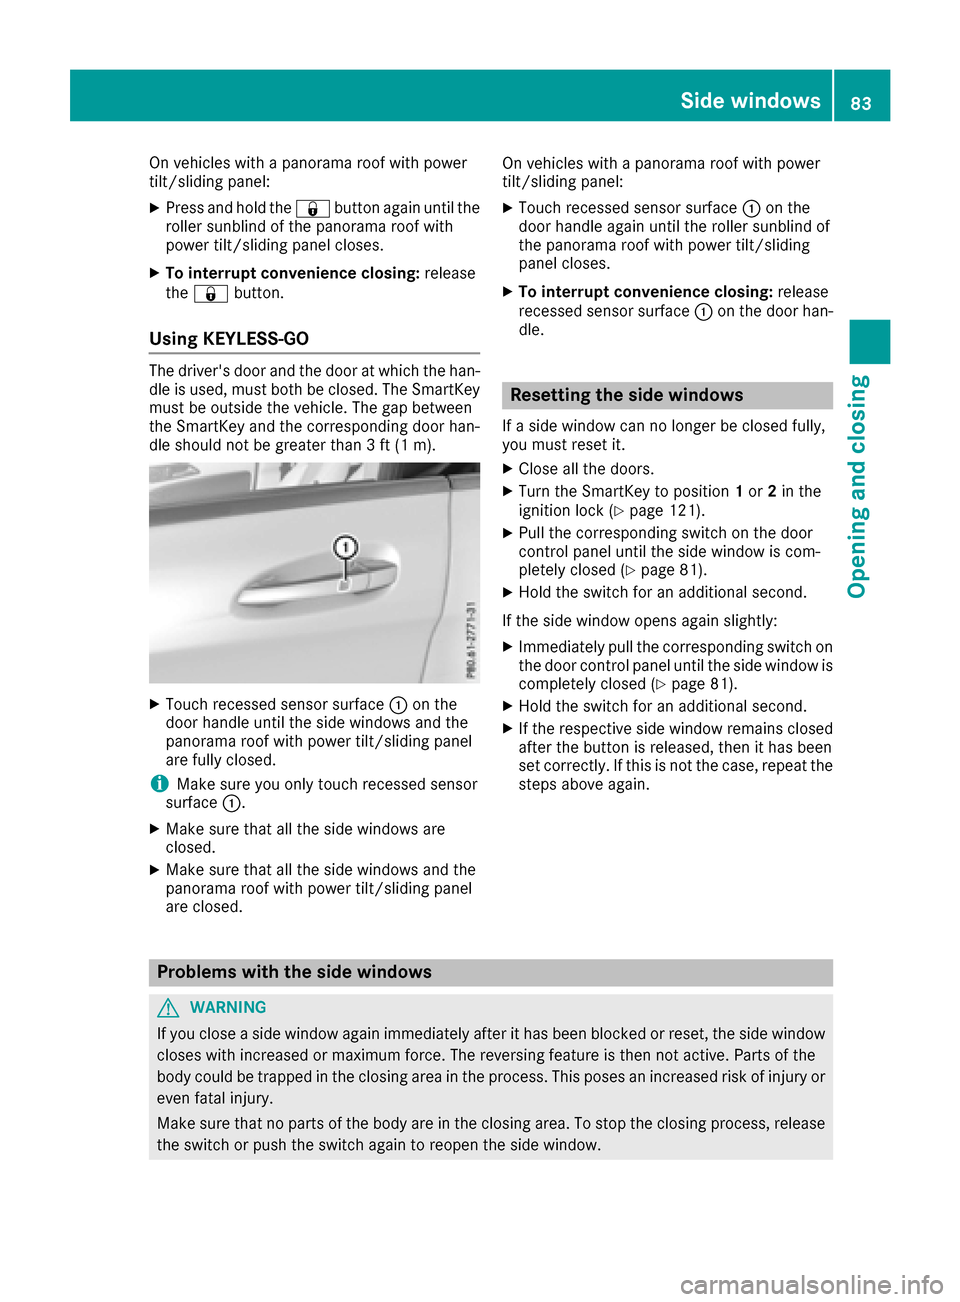
Using KEYLESS-GO
The driver's door and the door at which the han-
dle is used, must both be closed. The SmartKey
must be outside the vehicle. The gap between
the SmartKey and the corresponding door han-
dle should not be greater than 3 ft (1 m).
XTouch recessed sensor surface :on the
door handle until the side windows and the
panorama roof with power tilt/sliding panel
are fully closed.
iMake sure you only touch recessed sensor
surface :.
XMake sure that all the side windows are
closed.
XMake sure that all the side windows and the
panorama roof with power tilt/sliding panel
are closed. On vehicles with a panorama roof with power
tilt/sliding panel:
XTouch recessed sensor surface
:on the
door handle again until the roller sunblind of
the panorama roof with power tilt/sliding
panel closes.
XTo interrupt convenience closing: release
recessed sensor surface :on the door han-
dle.
Resetting the side windows
If a side window can no longer be closed fully,
you must reset it.
XClose all the doors.
XTurn the SmartKey to position 1or 2in the
ignition lock (Ypage 121).
XPull the corresponding switch on the door
control panel until the side window is com-
pletely closed (
Ypage 81).
XHold the switch for an additional second.
If the side window opens again slightly:
XImmediately pull the corresponding switch on
the door control panel until the side window is
completely closed (
Ypage 81).
XHold the switch for an additional second.
XIf the respective side window remains closed
after the button is released, then it has been
set correctly. If this is not the case, repeat the
steps above again.
Problems with the side windows
GWARNING
If you close a side window again immediately after it has been blocked or reset, the side window
closes with increased or maximum force. The reversing feature is then not active. Parts of the
body could be trapped in the closing area in the process. This poses an increased risk of injury or
even fatal injury.
Make sure that no parts of the body are in the closing area. To stop the closing process, release
the switch or push the switch again to reopen the side window.
Side windows83
Opening and closing
Z
Page 86 of 318
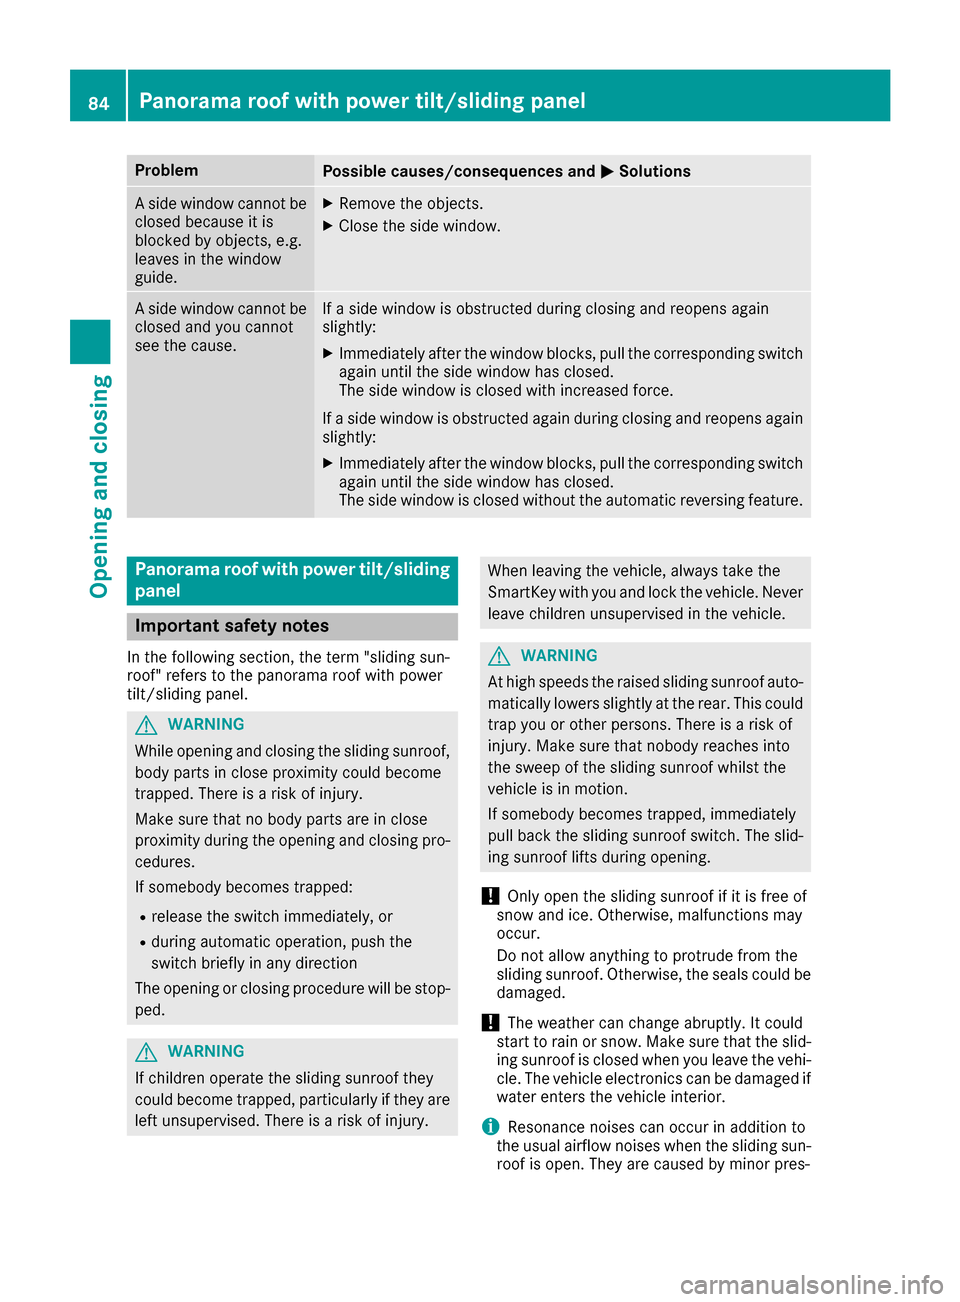
ProblemPossible causes/consequences andMSolutions
A side window cannot be
closed because it is
blocked by objects, e.g.
leaves in the window
guide.XRemove the objects.
XClose the side window.
A side window cannot be
closed and you cannot
see the cause.If a side window is obstructed during closing and reopens again
slightly:
XImmediately after the window blocks, pull the corresponding switch
again until the side window has closed.
The side window is closed with increased force.
If a side window is obstructed again during closing and reopens again slightly:
XImmediately after the window blocks, pull the corresponding switchagain until the side window has closed.
The side window is closed without the automatic reversing feature.
Panorama roof with power tilt/sliding
panel
Important safety notes
In the following section, the term "sliding sun-
roof" refers to the panorama roof with power
tilt/sliding panel.
GWARNING
While opening and closing the sliding sunroof, body parts in close proximity could become
trapped. There is a risk of injury.
Make sure that no body parts are in close
proximity during the opening and closing pro-
cedures.
If somebody becomes trapped:
Rrelease the switch immediately, or
Rduring automatic operation, push the
switch briefly in any direction
The opening or closing procedure will be stop- ped.
GWARNING
If children operate the sliding sunroof they
could become trapped, particularly if they are left unsupervised. There is a risk of injury.
When leaving the vehicle, always take the
SmartKey with you and lock the vehicle. Never
leave children unsupervised in the vehicle.
GWARNING
At high speeds the raised sliding sunroof auto-
matically lowers slightly at the rear. This could
trap you or other persons. There is a risk of
injury. Make sure that nobody reaches into
the sweep of the sliding sunroof whilst the
vehicle is in motion.
If somebody becomes trapped, immediately
pull back the sliding sunroof switch. The slid-
ing sunroof lifts during opening.
!Only open the sliding sunroof if it is free of
snow and ice. Otherwise, malfunctions may
occur.
Do not allow anything to protrude from the
sliding sunroof. Otherwise, the seals could be
damaged.
!The weather can change abruptly. It could
start to rain or snow. Make sure that the slid- ing sunroof is closed when you leave the vehi-
cle. The vehicle electronics can be damaged if
water enters the vehicle interior.
iResonance noises can occur in addition to
the usual airflow noises when the sliding sun- roof is open. They are caused by minor pres-
84Panorama roof with power tilt/sliding panel
Opening and closing
Page 87 of 318
sure fluctuations in the vehicle interior.
Change the position of the sliding sunroof or
open a side window slightly to reduce or elim-
inate these noises.
Sliding sunroof reversing feature
In the following section, the term "sliding sun-
roof" refers to the panorama roof with power
tilt/sliding panel.
The sliding sunroof is equipped with an auto-
matic reversing feature. If a solid object blocks
or restricts the sliding sunroof during the closing
process, the sliding sunroof opens again auto-
matically. However, the automatic reversing
feature is only an aid and does not relieve you of
the responsibility of paying attention when clos-
ing the sliding sunroof.
GWARNING
The reversing feature does not react:
Rto soft, light and thin objects, e.g. small fin-
gers
Rover the last 1/6 in (4 mm) of the closing
movement
Rduring resetting
Rwhen closing the sliding sunroof again man- ually immediately after automatic reversing
This means that the reversing feature cannot
prevent someone being trapped in these sit-
uations. There is a risk of injury.
Make sure that no body parts are in close
proximity during the closing procedure.
If somebody becomes trapped:
Rrelease the switch immediately, or
Rpress the switch in any direction during the
automatic closing process
The closing process is stopped.
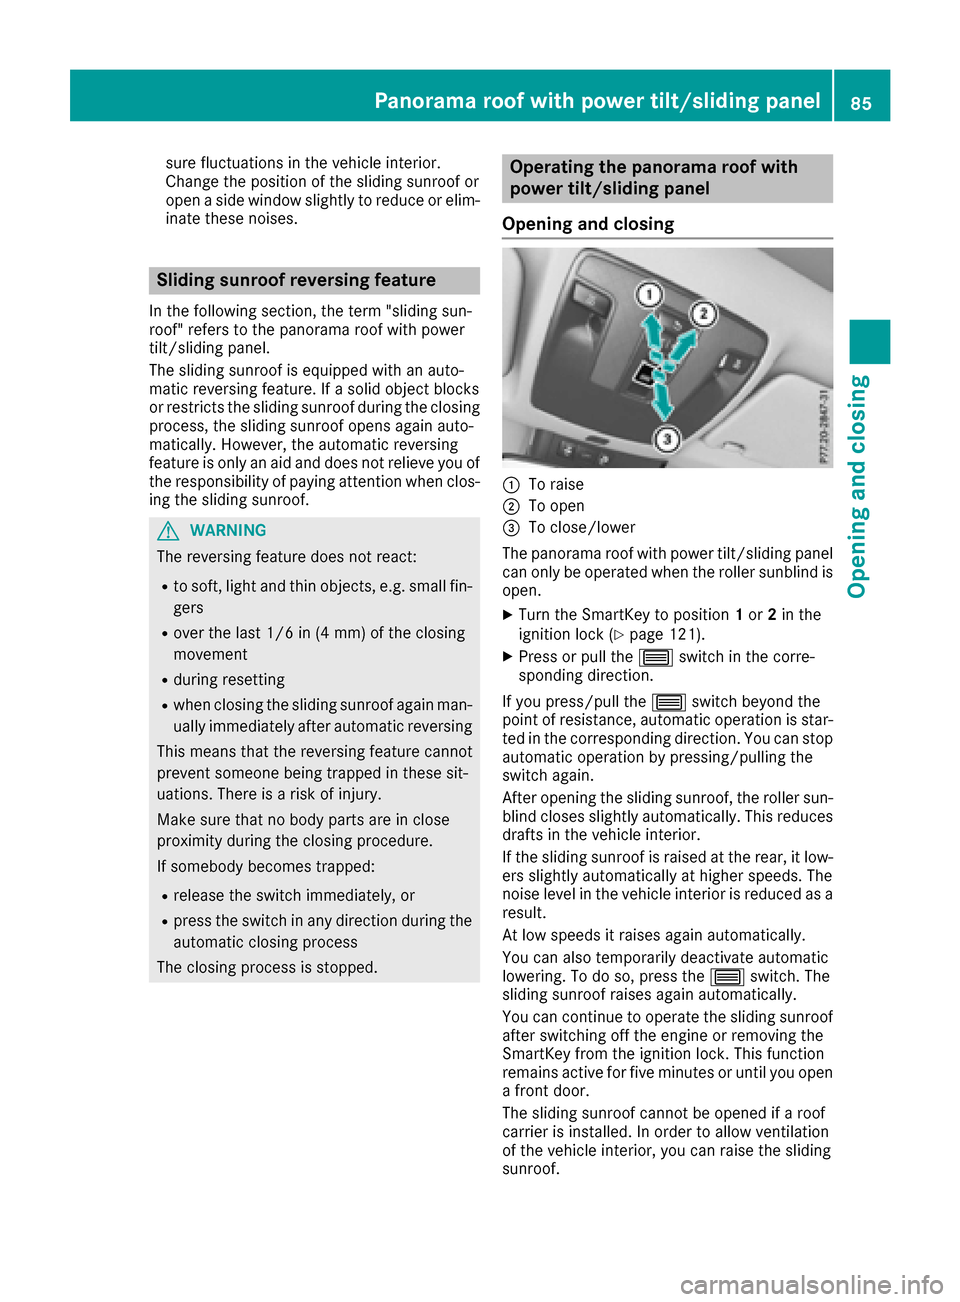
Operating the panorama roof with
power tilt/sliding panel
Opening and closing
:To raise
;To open
=To close/lower
The panorama roof with power tilt/sliding panel
can only be operated when the roller sunblind is
open.
XTurn the SmartKey to position 1or 2in the
ignition lock (Ypage 121).
XPress or pull the 3switch in the corre-
sponding direction.
If you press/pull the 3switch beyond the
point of resistance, automatic operation is star-
ted in the corresponding direction. You can stop
automatic operation by pressing/pulling the
switch again.
After opening the sliding sunroof, the roller sun-
blind closes slightly automatically. This reduces
drafts in the vehicle interior.
If the sliding sunroof is raised at the rear, it low-
ers slightly automatically at higher speeds. The
noise level in the vehicle interior is reduced as a
result.
At low speeds it raises again automatically.
You can also temporarily deactivate automatic
lowering. To do so, press the 3switch. The
sliding sunroof raises again automatically.
You can continue to operate the sliding sunroof
after switching off the engine or removing the
SmartKey from the ignition lock. This function
remains active for five minutes or until you open a front door.
The sliding sunroof cannot be opened if a roof
carrier is installed. In order to allow ventilation
of the vehicle interior, you can raise the sliding
sunroof.
Panorama roof with power tilt/sliding panel85
Opening and closing
Z