Warning light MERCEDES-BENZ CLA-Class 2017 C117 Owner's Guide
[x] Cancel search | Manufacturer: MERCEDES-BENZ, Model Year: 2017, Model line: CLA-Class, Model: MERCEDES-BENZ CLA-Class 2017 C117Pages: 318, PDF Size: 8.02 MB
Page 62 of 318
Drivingsafet ysystems
Overview of drivin gsafet ysystems
In this section ,you will fin dinformation about
th efollowin gdrivin gsafet ysystems :
RABS (Anti-loc kBrakin gSystem)
(Ypage 60)
RBA S (B rakeAssist System) (Ypage 60)
RActive Brak eAssis t (Ypage 61 )
RESP®(Electronic StabilityProgram)
(Ypage 63)
REB D (Electroni cBrak eforc eDistribution )
(Ypage 66 )
RADAPTIV EBRAKE (Ypage 66 )
RSTEERCONTROL (Ypage 66)
Important safet ynotes
If you fail to adapt your drivin gstyle or if you are
inattentive ,th edrivin gsafet ysystems can nei-
ther reduce th eris kof an acciden tno roverride
th elaws of physics. Driving safet ysystems are
merely aids designed to assist driving. You are
responsible fo rmaintainin gth edistanc eto th e
vehicle in front, fo rvehicle speed, fo rbraking in
goo dtime, and fo rstayin gin lane. Always adapt
your drivin gstyle to suit th eprevailin groad and
weather condition sand maintain asaf edistanc e
from th evehicle in front. Drive carefully.
The drivin gsafet ysystems described only wor k
as effectively as possible when there is ade-
quat econtact between th etires and th eroad
surface. Please pay special attention to th e
note son tires ,recommended minimum tire
tread depths, etc. (
Ypage 282).
In wintr ydrivin gconditions, always use winte r
tires (M+ Stires )and if necessary, snow chains.
Only in this way will the driving safety systems
described in this section work as effectively as
possible.
ABS (Anti-lock Braking System)
General information
ABS regulates brake pressure in such a way that
the wheels do not lock when you brake. This
allows you to continue steering the vehicle when
braking. The
! ABS warning lamp in the instrument
cluster lights up when the ignition is switched
on. It goes out when the engine is running.
ABS works from a speed of about 5 mph
(8 km/h), regardless of road-surface conditions.
ABS works on slippery surfaces, even when you
only brake gently.
Important safety notes
iObserve the "Important safety notes" sec-
tion (Ypage 60).
GWARNING
If ABS is faulty, the wheels could lock when
braking. The steerability and braking charac-
teristics may be severely impaired. Addition-
ally, further driving safety systems are deac-
tivated. There is an increased danger of skid-
ding and accidents.
Drive on carefully. Have ABS checked imme-
diately at a qualified specialist workshop.
When ABS is malfunctioning, other systems,
including driving safety systems, will also
become inoperative. Observe the information
on the ABS warning lamp (
Ypage 218) and dis-
play messages which may be shown in the
instrument cluster (
Ypage 189).
Braking
XIf ABS intervenes: continue to depress the
brake pedal vigorously until the braking sit-
uation is over.
XTo make a full brake application: depress
the brake pedal with full force.
If ABS intervenes when braking, you will feel a
pulsing in the brake pedal.
The pulsating brake pedal can be an indication
of hazardous road conditions, and functions as a reminder to take extra care while driving.
BAS (Brake Assist System)
General information
BAS operates in emergency braking situations.
If you depress the brake pedal quickly, BAS
automatically boosts the braking force, thus
shortening the stopping distance.
60Driving safety systems
Safety
Page 64 of 318
Thus, the distance warning function cannot
provide a warning in all critical situations.
There is a risk of an accident.
Always pay careful attention to the traffic sit-uation and be ready to brake.
GWARNING
The distance warning function cannot always
clearly identify objects and complex traffic
situations.
In such cases, the distance warning function
may:
Rgive an unnecessary warning
Rnot give a warning
There is a risk of an accident.
Always pay careful attention to the traffic sit-
uation and do not rely solely on the distance
warning function.
Function
Starting at a speed of approximately 4 mph
(7 km/h), the distance warning function warns
you if you rapidly approach a vehicle in front. An
intermittent warning tone will then sound, and
the · distance warning lamp will light up in
the instrument cluster.
XBrake immediately in order to increase the
distance from the vehicle in front.
or
XTake evasive action, provided it is safe to do
so.
Due to the nature of the system, particularly
complicated but non-critical driving conditions
may also cause the system to display a warning.
With the help of the radar sensor system, the
distance warning function can detect obstacles
that are in the path of your vehicle for an exten-
ded period of time.
Up to a speed of approximately 44 mph
(70 km/h), the distance warning function can
also react to stationary obstacles, such as stop-
ped or parked vehicles.
Autonomous braking function
If the driver does not react to the distance warn-
ing signal in a critical situation, Active Brake
Assist can assist the driver with the autonomous
braking function. The autonomous braking function:
Rgives the driver more time to react to critical
driving situations
Rcan help the driver to avoid an accident or
Rreduces the effects of an accident
Vehicles without Distance Pilot DISTRONIC:
the autonomous braking function is available in
the following speed ranges:
R4 - 65 mph (7 - 105 km/h) for moving objects
R4 - 31 mph (7 - 50 km/h) for stationary
objects
Vehicles with Distance Pilot DISTRONIC: the
autonomous braking function is available in the
following speed ranges:
R4 - 124 mph (7 - 200 km/h) for moving
objects
R4 - 31 mph (7 - 50 km/h) for stationary
objects
Due to the nature of the system, particularly
complicated but non-critical driving conditions
may also cause the Autonomous Braking Func-
tion to intervene.
Braking assistance appropriate to the
situation
General information
iObserve the "Important safety notes" sec-
tion (Ypage 60).
With the help of the radar sensor system, Adap-
tive Brake Assist can detect obstacles that are in
the path of your vehicle for an extended period
of time.
If Adaptive Brake Assist detects a risk of colli-
sion with the vehicle in front, it calculates the
brake pressure necessary to avoid a collision. If
you apply the brakes forcefully, the braking
assistance adapts to the situation and automat-
ically increases the brake pressure to a degree
appropriate to the traffic situation.
Braking assistance appropriate to the situation
provides braking assistance in hazardous situa- tions at speeds above 4 mph (7 km/h). It uses
radar sensor technology to assess the traffic
situation.
Situation-dependent braking assistance is capa-
ble of reacting to moving objects that have
already been recognized as such at least once
over the period of observation, up to vehicle
speeds of around 155 mph (250 km/h).
62Driving safety systems
Safety
Page 66 of 318
Vehicles without 4MATIC:when towing your
vehicle with the front axle raised, it is important
that you observe the notes on ESP
®
(Ypage 277).
If the å ESP®OFF warning lamp lights up
continuously, ESP®is deactivated.
If the ÷ ESP®warning lamp and the å
warning lamp are lit continuously, ESP®is not
available due to a malfunction.
Observe the information on warning lamps
(
Ypage 219) and display messages which may
be shown in the instrument cluster
(
Ypage 189).
Only use wheels with the recommended tire
sizes. Only then will ESP
®function properly.
Characteristics of ESP®
General information
If the ÷ ESP®warning lamp goes out before
beginning the journey, ESP®is automatically
active.
If ESP
®intervenes, the ÷ESP®warning lamp
flashes in the instrument cluster.
If ESP
®intervenes:
XDo not deactivate ESP®under any circum-
stances.
XOnly depress the accelerator pedal as far as
necessary when pulling away.
XAdapt your driving style to suit the prevailing
road and weather conditions.
ECO start/stop function
The ECO start/stop function switches the
engine off automatically when the vehicle stops
moving. The engine starts automatically when
the driver wants to pull away again. ESP
®
remains in its previously selected status. Exam-
ple: if ESP®was deactivated before the engine
was switched off, ESP®remains deactivated
when the engine is switched on again.
Deactivating/activating ESP®(except
Mercedes‑AMG vehicles)
Important safety notes
iObserve the "Important safety notes" sec-
tion (Ypage 60). You can select between the following states of
ESP
®:
RESP®is activated.
RESP®is deactivated.
GWARNING
If you deactivate ESP
®, ESP®no longer sta-
bilizes the vehicle. There is an increased risk
of skidding and an accident.
Only deactivate ESP
®in the situations descri-
bed in the following.
The spinning of the wheels results in a cutting
action for better traction on loose surfaces.
It may be best to deactivate ESP
®in the follow-
ing situations:
Rwhen using snow chains
Rin deep snow
Ron sand or gravel
iActivate ESP®as soon as the situations
described above no longer apply. ESP®will
otherwise not be able to stabilize the vehicle if
the vehicle starts to skid or a wheel starts to
spin.
!Avoid spinning the driven wheels for an
extended period with ESP®deactivated. You
could otherwise damage the drivetrain.
Deactivating/activating ESP®
You can deactivate or activate ESP®via the on-
board computer (Ypage 182).
ESP®deactivated:
The å ESP®OFF warning lamp in the instru-
ment cluster lights up.
ESP
®activated:
The å ESP®OFF warning lamp in the instru-
ment cluster goes out.
Characteristics when ESP®is deactivated
If ESP®is deactivated and one or more wheels
start to spin, the ÷ESP®warning lamp in the
instrument cluster flashes. In such situations,
ESP
®will not stabilize the vehicle.
If you deactivate ESP®:
RESP®no longer improves driving stability.
REngine torque is no longer limited and the
drive wheels are able to spin.
64Driving safety systems
Safety
Page 67 of 318
RTraction control is still activated.
RSTEER CONTROL is no longer active
RESP®still provides support when you brake
firmly.
Deactivating/activating ESP®
(Mercedes‑ AMG vehicles)
Important safety notes
iObserve the "Important safety notes" sec-
tion (Ypage 60).
You can select between the following states of
ESP
®:
RESP®is activated.
RSPORT handling mode is activated.
RESP®is deactivated.
GWARNING
When SPORT handling mode is activated,
there is a greater risk of skidding and acci-
dents.
Only activate SPORT handling mode in the sit-
uations described in the following.
GWARNING
If you deactivate ESP
®, ESP®no longer sta-
bilizes the vehicle. There is an increased risk
of skidding and an accident.
Only deactivate ESP
®in the situations descri-
bed in the following.
In the following situations, it may be better to
activate SPORT handling mode or deactivate
ESP
®:
Rwhen using snow chains
Rin deep snow
Ron sand or gravel
Ron specially designated roads when the vehi-
cle's own oversteering and understeering
characteristics are desired
Driving in SPORT handling mode or without
ESP
®requires an extremely qualified and expe-
rienced driver.
iActivate ESP®as soon as the situations
described above no longer apply. ESP®will
otherwise not be able to stabilize the vehicle if the vehicle starts to skid or a wheel starts to
spin.
!Avoid spinning the driven wheels for an
extended period with ESP®deactivated. You
could otherwise damage the drivetrain.
Deactivating/activating ESP®
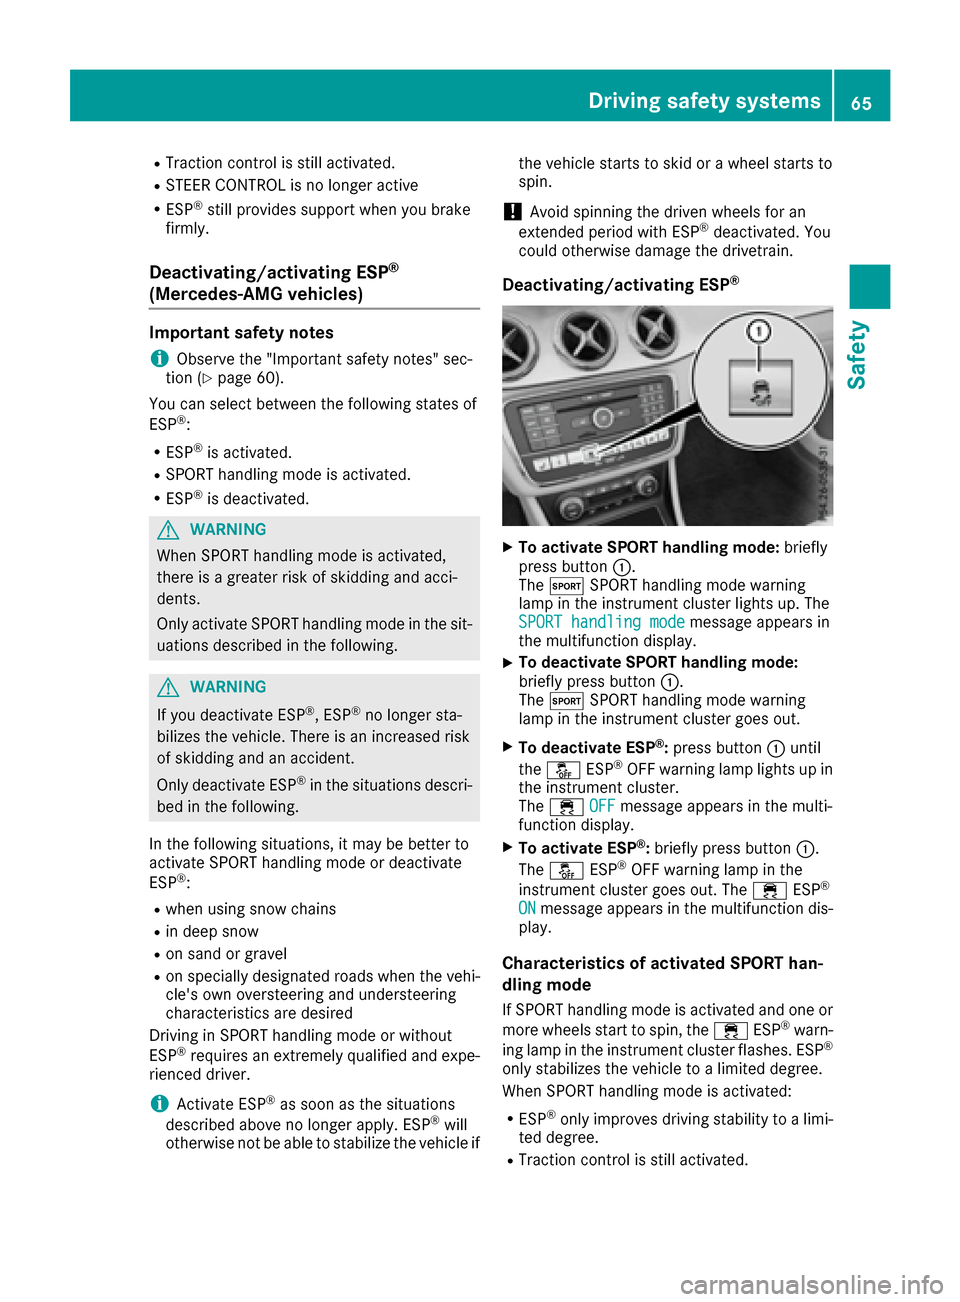
XTo activate SPORT handling mode: briefly
press button :.
The M SPORT handling mode warning
lamp in the instrument cluster lights up. The
SPORT handling mode
message appears in
the multifunction display.
XTo deactivate SPORT handling mode:
briefly press button :.
The M SPORT handling mode warning
lamp in the instrument cluster goes out.
XTo deactivate ESP®: press button :until
the å ESP®OFF warning lamp lights up in
the instrument cluster.
The ÷ OFF
message appears in the multi-
function display.
XTo activate ESP®: briefly press button :.
The å ESP®OFF warning lamp in the
instrument cluster goes out. The ÷ESP®
ONmessage appears in the multifunction dis-
play.
Characteristics of activated SPORT han-
dling mode
If SPORT handling mode is activated and one or
more wheels start to spin, the ÷ESP®warn-
ing lamp in the instrument cluster flashes. ESP®
only stabilizes the vehicle to a limited degree.
When SPORT handling mode is activated:
RESP®only improves driving stability to a limi-
ted degree.
RTraction control is still activated.
Driving safety systems65
Safety
Z
Page 71 of 318
SmartKey
Important safety notes
GWARNING
If children are left unsupervised in the vehicle,
they could:
Ropen the doors, thus endangering other
people or road users.
Rget out and disrupt traffic.
Roperate the vehicle's equipment.
Additionally, children could set the vehicle in
motion if, for example, they:
Rrelease the parking brake.
Rshifting the automatic transmission out of
park position P
RStart the engine.
There is a risk of an accident and injury.
When leaving the vehicle, always take the
SmartKey with you and lock the vehicle. Never
leave children or animals unattended in the
vehicle. Always keep the SmartKey out of
reach of children.
GWARNING
If you attach heavy or large objects to the
SmartKey, the SmartKey could be uninten-
tionally turned in the ignition lock. This could
cause the engine to be switched off. There is a risk of an accident.
Do not attach any heavy or large objects to the
SmartKey. Remove any bulky key rings before
inserting the SmartKey into the ignition lock.
!Keep the SmartKey away from strong mag-
netic fields. Otherwise, the remote control
function could be affected.
Strong magnetic fields can occur in the vicin-
ity of powerful electrical installations.
Do not keep the SmartKey:
Rwith electronic devices, e.g. a mobile phone
or another SmartKey.
Rwith metallic objects, e.g. coins or metal foil.
Rinside metallic objects, e.g. a metal case
Vehicles with KEYLESS-GO start function: do
not keep the SmartKey in the trunk. Otherwise, the SmartKey may not be detected, e.g. when
starting the engine using the Start/Stop button.
SmartKey functions
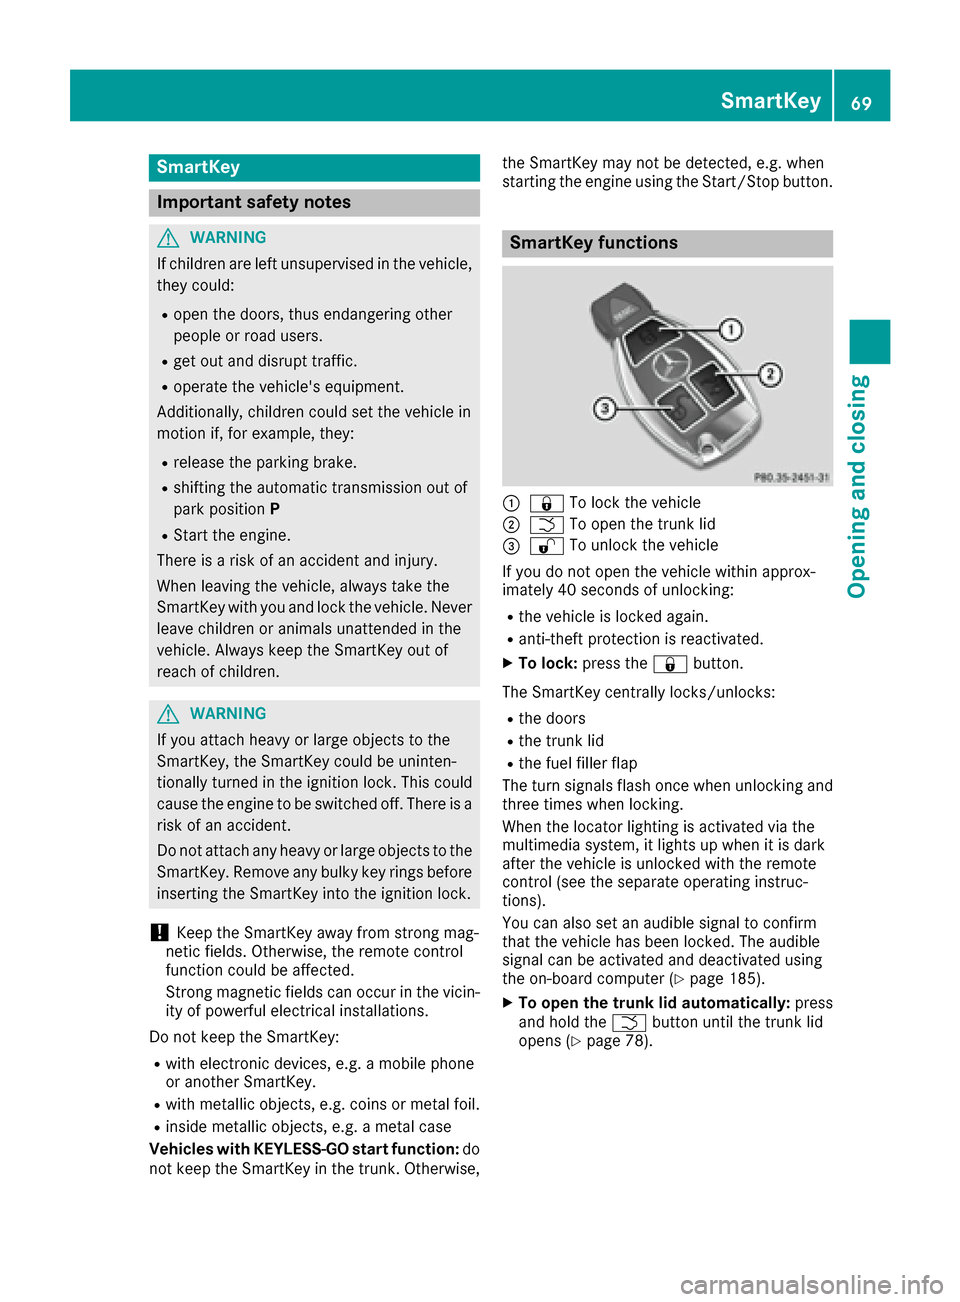
:&
To lock the vehicle
;FTo open the trunk lid
=%To unlock the vehicle
If you do not open the vehicle within approx-
imately 40 seconds of unlocking:
Rthe vehicle is locked again.
Ranti-theft protection is reactivated.
XTo lock: press the &button.
The SmartKey centrally locks/unlocks:
Rthe doors
Rthe trunk lid
Rthe fuel filler flap
The turn signals flash once when unlocking and
three times when locking.
When the locator lighting is activated via the
multimedia system, it lights up when it is dark
after the vehicle is unlocked with the remote
control (see the separate operating instruc-
tions).
You can also set an audible signal to confirm
that the vehicle has been locked. The audible
signal can be activated and deactivated using
the on-board computer (
Ypage 185).
XTo open the trunk lid automatically: press
and hold the Fbutton until the trunk lid
opens (
Ypage 78).
SmartKey69
Opening and closing
Z
Page 74 of 318
SmartKey battery
Important safety notes
GWARNING
Batteries contain toxic and corrosive substan- ces. If batteries are swallowed, it can result in
severe health problems. There is a risk of fatalinjury.
Keep batteries out of the reach of children. If
a battery is swallowed, seek medical attention immediately.
The SmartKey batteries contain perchlorate
material, which may require special handling
and regard for the environment. National guide-
lines must be observed during disposal. In Cal-
ifornia, see www.dtsc.ca.gov/
HazardousWaste/Perchlorate/index.cfm.
Mercedes-Benz recommends that you have the
battery replaced at a qualified specialist work-
shop.
Checking the battery
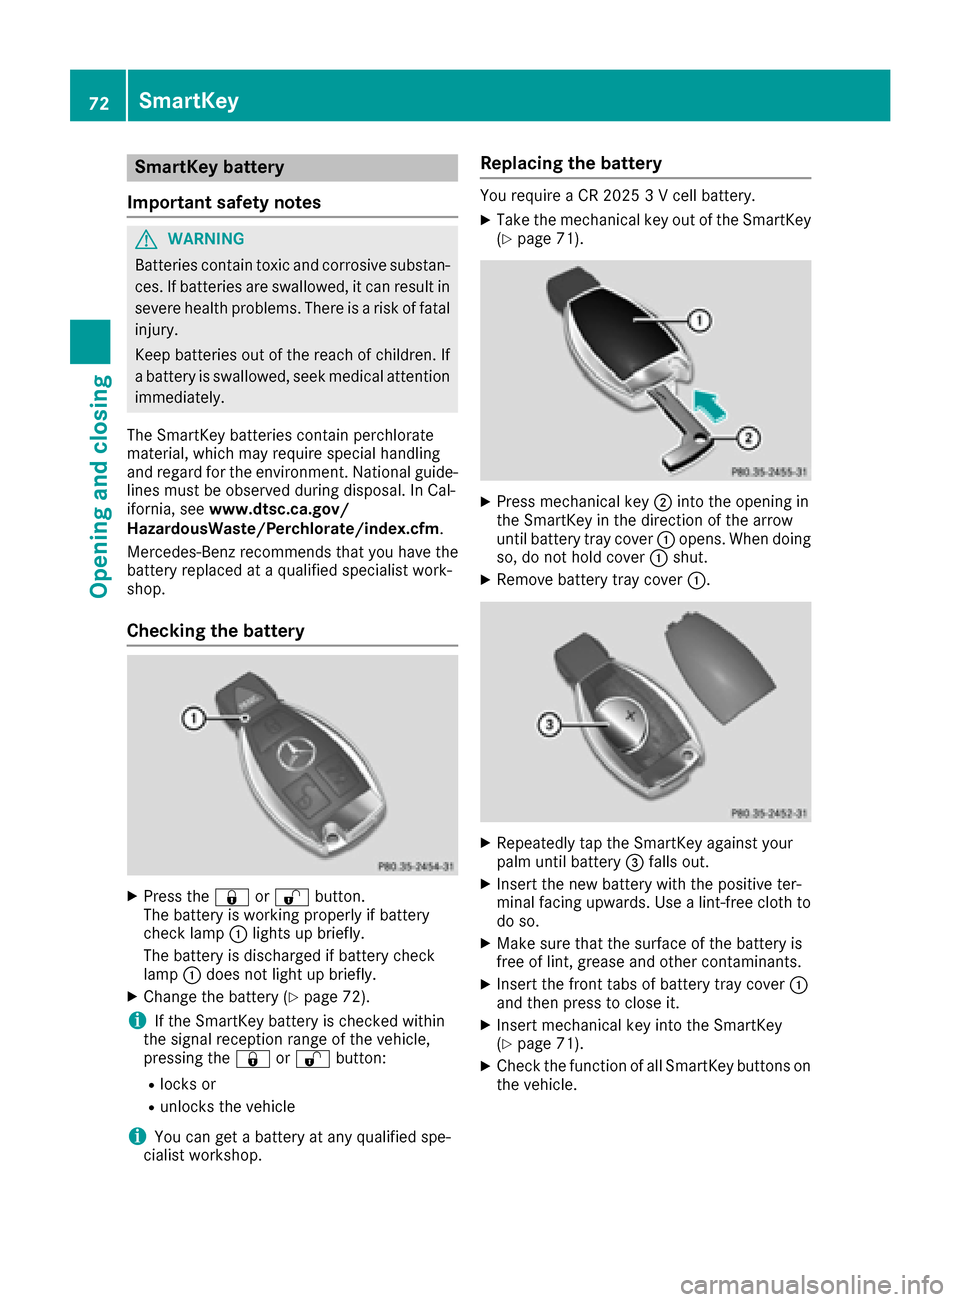
XPress the &or% button.
The battery is working properly if battery
check lamp :lights up briefly.
The battery is discharged if battery check
lamp :does not light up briefly.
XChange the battery (Ypage 72).
iIf the SmartKey battery is checked within
the signal reception range of the vehicle,
pressing the &or% button:
Rlocks or
Runlocks the vehicle
iYou can get a battery at any qualified spe-
cialist workshop.
Replacing the battery
You require a CR 2025 3 V cell battery.
XTake the mechanical key out of the SmartKey
(Ypage 71).
XPress mechanical key ;into the opening in
the SmartKey in the direction of the arrow
until battery tray cover :opens. When doing
so, do not hold cover :shut.
XRemove battery tray cover :.
XRepeatedly tap the SmartKey against your
palm until battery=falls out.
XInsert the new battery with the positive ter-
minal facing upwards. Use a lint-free cloth to
do so.
XMake sure that the surface of the battery is
free of lint, grease and other contaminants.
XInsert the front tabs of battery tray cover :
and then press to close it.
XInsert mechanical key into the SmartKey
(Ypage 71).
XCheck the function of all SmartKey buttons on
the vehicle.
72SmartKey
Opening and closing
Page 77 of 318
Doors
Important safet ynotes
GWARNING
If children are lef tunsupervised in th evehicle,
they could:
Rope nth edoors ,thus endangerin gother
people or road users.
Rget out and disrup ttraffic .
Roperat eth evehicle' sequipment.
Additionally, children could set th evehicle in
motion if, fo rexample, they:
Rrelease th eparking brake .
Rshiftingth eautomatic transmissio nout of
par kposition P
RStart theengine.
There is aris kof an acciden tand injury.
Whe nleavin gth evehicle, always take th e
SmartKey wit hyou and loc kth evehicle. Never
leav echildren or animals unattended in th e
vehicle. Always keep th eSmartKey out of
reach of children .
You should preferably plac eluggage or load sin
th ecargo compartment. Observ eth eloadin g
guidelines (
Ypage 233).
Unlockingan dopening doors from
th einside
!
The sid ewindows will no topen/close if th e
battery is discharged or if th esid ewindows
hav eiced up. It will then no tbe possible to
close th edoor. Do no tattempt to forc eth e
doo rclosed. You could otherwise damage th e
doo ror th esid ewindow.
Whe n adoo ris opened, th esid ewindow on that
sid eopens slightly. Whe nth edoo ris closed, th e
sid ewindow close sagain .
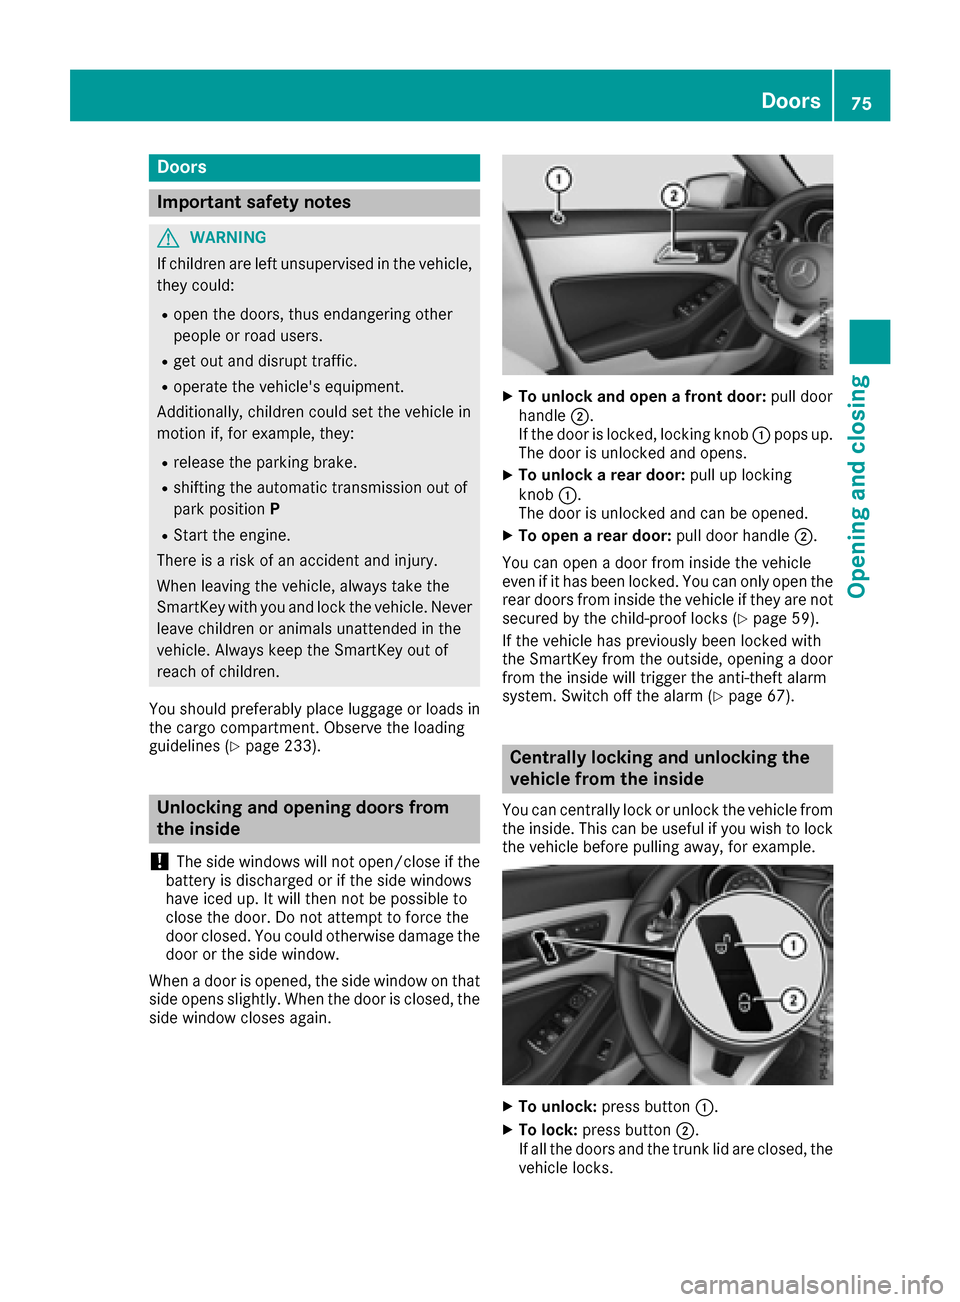
XTo unlock an dope n afront door: pull door
handle ;.
If th edoo ris locked, locking knob :pop sup.
The doo ris unlocke dand opens .
XTo unlock arear door: pull up locking
knob :.
The doo ris unlocke dand can be opened.
XTo ope n arear door: pull doorhandle ;.
You can ope n adoo rfrom insid eth evehicle
eve nif it has bee nlocked. You can only ope nth e
rea rdoors from insid eth evehicle if they are no t
secure dby th echild-proof locks (
Ypage 59).
If th evehicle has previously bee nlocke dwit h
th eSmartKey from th eoutside, opening adoo r
from th einsid ewill trigger th eanti-thef talar m
system. Switc hof fth ealar m (
Ypage 67).
Centrally locking an dunlocking th e
vehicle from th einside
You can centrall yloc kor unloc kth evehicle from
th einside. Thi scan be useful if you wish to loc k
th evehicle befor epulling away, fo rexample.
XTo unlock :press butto n:.
XTo lock :press butto n;.
If all th edoors and th etrunk lid are closed, th e
vehicle locks .
Doors75
Opening and closing
Z
Page 82 of 318
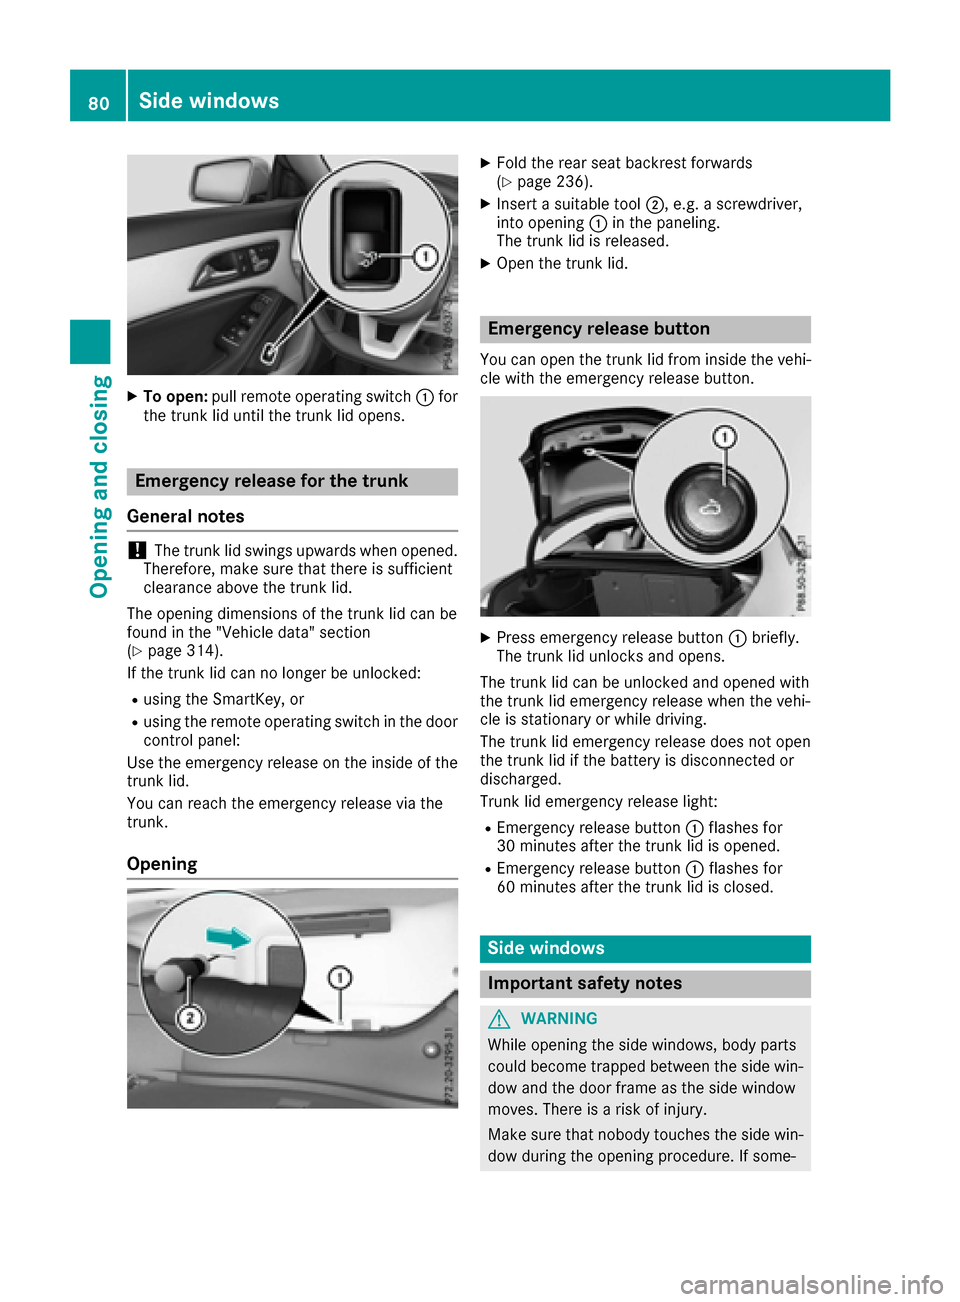
XTo open:pull remote operating switch :for
the trunk lid until the trunk lid opens.
Emergency release for the trunk
General notes
!The trunk lid swings upwards when opened.
Therefore, make sure that there is sufficient
clearance above the trunk lid.
The opening dimensions of the trunk lid can be
found in the "Vehicle data" section
(
Ypage 314).
If the trunk lid can no longer be unlocked:
Rusing the SmartKey, or
Rusing the remote operating switch in the door
control panel:
Use the emergency release on the inside of the
trunk lid.
You can reach the emergency release via the
trunk.
Opening
XFold the rear seat backrest forwards
(Ypage 236).
XInsert a suitable tool ;, e.g. a screwdriver,
into opening :in the paneling.
The trunk lid is released.
XOpen the trunk lid.
Emergency release button
You can open the trunk lid from inside the vehi-
cle with the emergency release button.
XPress emergency release button :briefly.
The trunk lid unlocks and opens.
The trunk lid can be unlocked and opened with
the trunk lid emergency release when the vehi-
cle is stationary or while driving.
The trunk lid emergency release does not open
the trunk lid if the battery is disconnected or
discharged.
Trunk lid emergency release light:
REmergency release button :flashes for
30 minutes after the trunk lid is opened.
REmergency release button :flashes for
60 minutes after the trunk lid is closed.
Side windows
Important safety notes
GWARNING
While opening the side windows, body parts
could become trapped between the side win-
dow and the door frame as the side window
moves. There is a risk of injury.
Make sure that nobody touches the side win-
dow during the opening procedure. If some-
80Side windows
Opening and closing
Page 83 of 318
body becomes trapped, release the switch or
pull the switch to close the side window again.
GWARNING
While closing the side windows, body parts in
the closing area could become trapped. There is a risk of injury.
When closing make sure that no parts of the
body are in the closing area. If somebody
becomes trapped, release the switch or press
the switch to open the side window again.
GWARNING
If children operate the side windows they
could become trapped, particularly if they are left unsupervised. There is a risk of injury.
Activate the override feature for the rear side
windows. When leaving the vehicle, always
take the SmartKey with you and lock the vehi-
cle. Never leave children unsupervised in the
vehicle.
Side window reversing feature
The side windows are equipped with an auto-
matic reversing feature. If a solid object blocks
or restricts a side window from traveling
upwards during the automatic closing process,
the side window opens again automatically. Dur-
ing the manual closing process, the side windowonly opens again automatically after the corre-
sponding switch is released. The automatic
reversing feature is only an aid and is no substi-
tute for your attention when closing a side win-
dow.
GWARNING
The reversing feature does not react:
Rto soft, light and thin objects, e.g. small fin-
gers
Rwhile resetting
This means that the reversing feature cannot
prevent someone being trapped in these sit-
uations. There is a risk of injury.
Make sure that no body parts are in close
proximity during the closing procedure. If
someone becomes trapped, press the switch
to open the side window again.
Opening and closing the side win-
dows
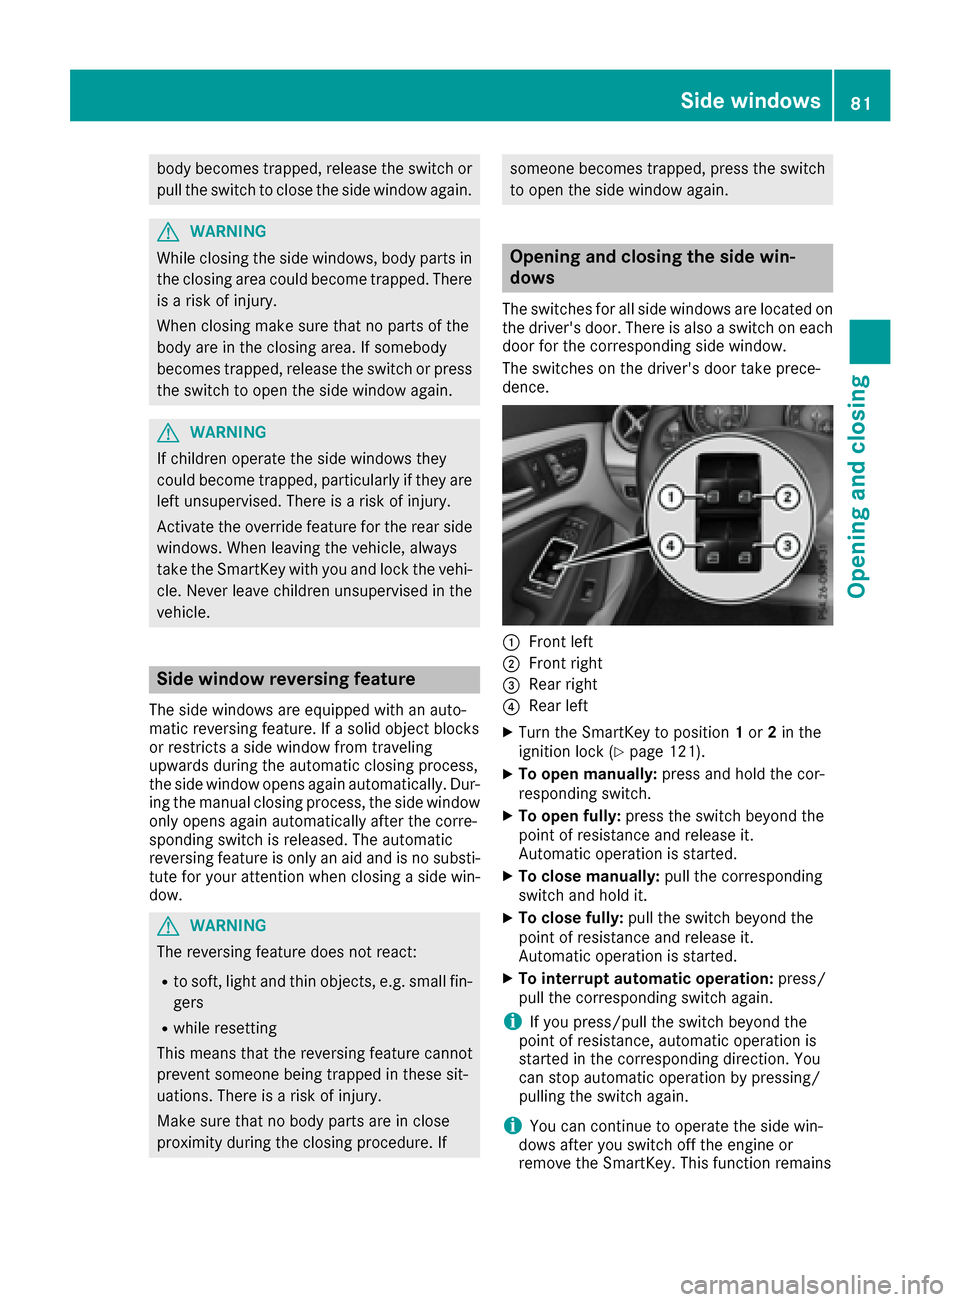
The switches for all side windows are located on the driver's door. There is also a switch on each
door for the corresponding side window.
The switches on the driver's door take prece-
dence.
:Front left
;Front right
=Rear right
?Rear left
XTurn the SmartKey to position 1or 2in the
ignition lock (Ypage 121).
XTo open manually: press and hold the cor-
responding switch.
XTo open fully: press the switch beyond the
point of resistance and release it.
Automatic operation is started.
XTo close manually: pull the corresponding
switch and hold it.
XTo close fully: pull the switch beyond the
point of resistance and release it.
Automatic operation is started.
XTo interrupt automatic operation: press/
pull the corresponding switch again.
iIf you press/pull the switch beyond the
point of resistance, automatic operation is
started in the corresponding direction. You
can stop automatic operation by pressing/
pulling the switch again.
iYou can continue to operate the side win-
dows after you switch off the engine or
remove the SmartKey. This function remains
Side windows81
Opening and closing
Z
Page 85 of 318
On vehicles with a panorama roof with power
tilt/sliding panel:
XPress and hold the&button again until the
roller sunblind of the panorama roof with
power tilt/sliding panel closes.
XTo interrupt convenience closing: release
the & button.
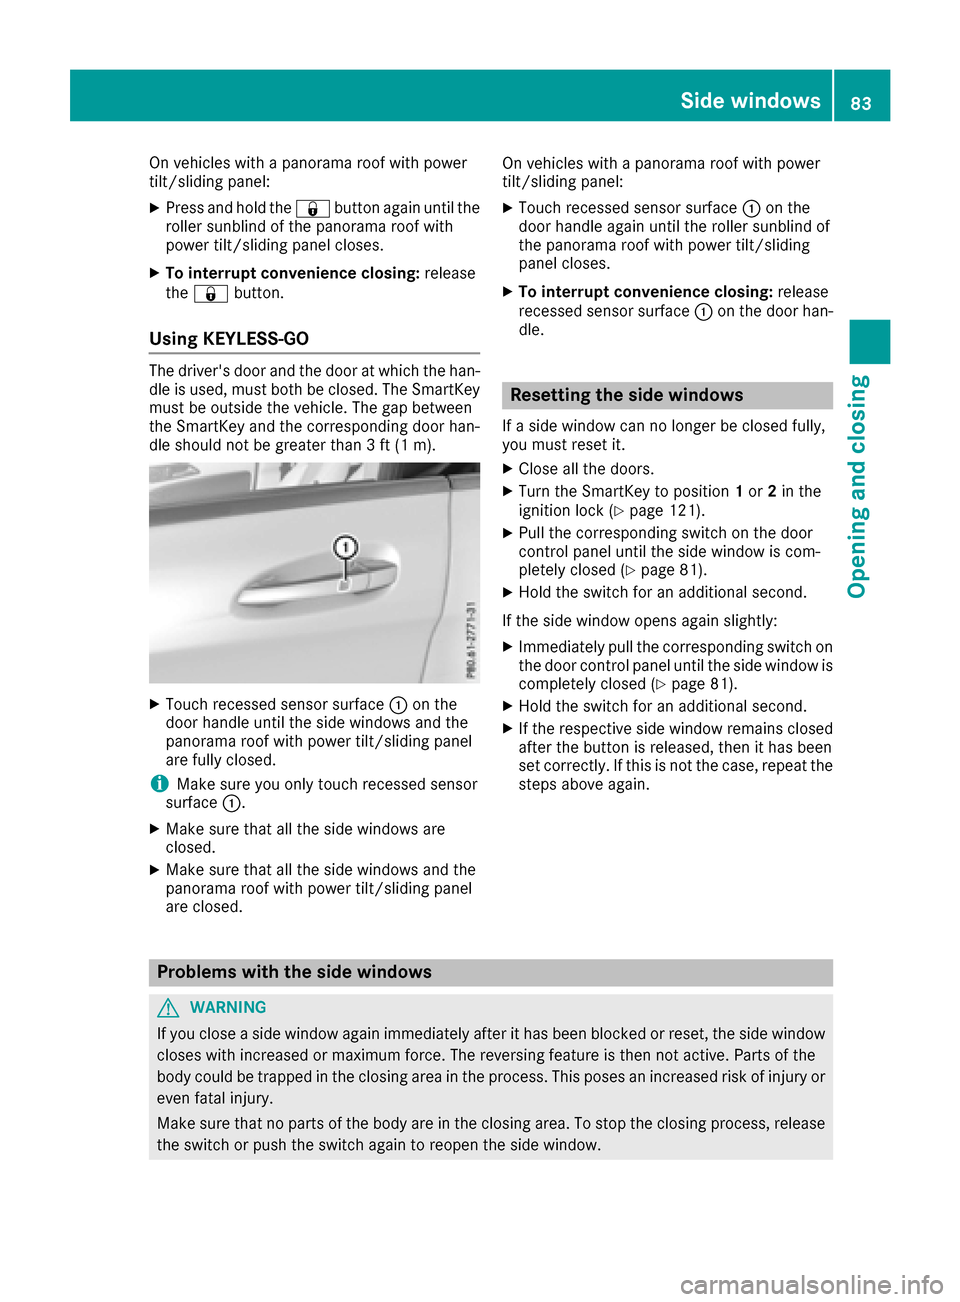
Using KEYLESS-GO
The driver's door and the door at which the han-
dle is used, must both be closed. The SmartKey
must be outside the vehicle. The gap between
the SmartKey and the corresponding door han-
dle should not be greater than 3 ft (1 m).
XTouch recessed sensor surface :on the
door handle until the side windows and the
panorama roof with power tilt/sliding panel
are fully closed.
iMake sure you only touch recessed sensor
surface :.
XMake sure that all the side windows are
closed.
XMake sure that all the side windows and the
panorama roof with power tilt/sliding panel
are closed. On vehicles with a panorama roof with power
tilt/sliding panel:
XTouch recessed sensor surface
:on the
door handle again until the roller sunblind of
the panorama roof with power tilt/sliding
panel closes.
XTo interrupt convenience closing: release
recessed sensor surface :on the door han-
dle.
Resetting the side windows
If a side window can no longer be closed fully,
you must reset it.
XClose all the doors.
XTurn the SmartKey to position 1or 2in the
ignition lock (Ypage 121).
XPull the corresponding switch on the door
control panel until the side window is com-
pletely closed (
Ypage 81).
XHold the switch for an additional second.
If the side window opens again slightly:
XImmediately pull the corresponding switch on
the door control panel until the side window is
completely closed (
Ypage 81).
XHold the switch for an additional second.
XIf the respective side window remains closed
after the button is released, then it has been
set correctly. If this is not the case, repeat the
steps above again.
Problems with the side windows
GWARNING
If you close a side window again immediately after it has been blocked or reset, the side window
closes with increased or maximum force. The reversing feature is then not active. Parts of the
body could be trapped in the closing area in the process. This poses an increased risk of injury or
even fatal injury.
Make sure that no parts of the body are in the closing area. To stop the closing process, release
the switch or push the switch again to reopen the side window.
Side windows83
Opening and closing
Z