turn signal bulb MERCEDES-BENZ CLA-Class 2017 C117 Owner's Manual
[x] Cancel search | Manufacturer: MERCEDES-BENZ, Model Year: 2017, Model line: CLA-Class, Model: MERCEDES-BENZ CLA-Class 2017 C117Pages: 318, PDF Size: 8.02 MB
Page 13 of 318
Fuel filler flapOpening ........................................ .138
Fuel level
Calling up the range (on-board
computer) ...................................... 178
Fuel tank
Capacity ........................................ 310
Problem (malfunction) ................... 139
Fuses
Allocation chart .............................2 80
Before changing .............................2 79
Fuse box in the engine compart-
ment .............................................. 280
Fuse box in the front-passenger
footwell .......................................... 280
Important safety notes .................. 279
G
Garage door opener
Clearing the memory ..................... 251
General notes ................................ 249
Important safety notes .................. 249
Opening/closing the garage door .. 251
Problems when programming ........2 51
Programming (button in the rear-
view mirror) ................................... 249
Synchronizing the rolling code ....... 250
Gasoline ............................................. 310
Gear indicator (on-board com-
puter, Mercedes-AMG vehicles) ....... 185
Genuine parts ...................................... 23
Glove box ...........................................2 34
Google™ Local Search
see also Digital Operator's Man-
ual ..................................................2 27
H
Handbrake
see Parking brake
HANDS-FREE ACCESS .......................... 78
Hazard warning lamps
Display message ............................ 214
Switching on/off ........................... 101
Head restraints
Adjusting ......................................... 91
Adjusting (manually) ........................ 92 Adjusting (rear) ................................ 92
Headlamps
Fogging up ..................................... 102
see Automatic headlamp mode
Heating
see Climate control
High beam flasher .............................1 00
High-beam headlamps
Adaptive Highbeam Assist ............. 101
Display message ............................ 200
Replacing bulbs .............................1 05
Switching on/off ........................... 100
Hill start assist .................................. 124
HOLD function
Activating ....................................... 156
Deactivating ................................... 156
Display message ............................ 205
Function/notes .............................1 56
Home address
see also Digital Operator's Man-
ual ..................................................2 27
Hood
Closing ...........................................2 55
Display message ............................ 213
Important safety notes .................. 254
Opening ......................................... 254
Horn ...................................................... 31
Hydroplaning ..................................... 147
I
Ignition lock
see Key positions
Immobilizer .......................................... 67
Indicator lamp
Replacing bulbs (rear) .................... 105
Indicator lamps
see Warning and indicator lamps
Indicators
see Turn signals
Instrument cluster
Overview .......................................... 32
Settings ......................................... 183
Warning and indicator lamps ........... 32
Instrument cluster lighting .............. 174
Interior lighting
Control ...........................................1 03
Overview ........................................ 102
Index11
Page 14 of 318
Readinglamp ................................ .102
iPod®
see also Digital Operator's Man-
ual ..................................................2 27
J
Jack
Storage location ............................ 266
Using ............................................. 303
Jump starting (engine) ......................273
K
Key positions
Start/Stop button .......................... 121
KEYLESS-GO
Convenience closing feature ............ 82
Deactivation ..................................... 70
Locking ............................................ 70
Unlocking ......................................... 70
Kickdown
Driving tips ....................................1 33
Manual gearshifting ....................... 137
Knee bag .............................................. 45
L
Lamps
see Warning and indicator lamps
Lane Keeping Assist
Activating/deactivating (on-
board computer) ............................ 183
Display message ............................ 205
Function/information .................... 172
Lane Tracking package ..................... 171
Lap time (RACETIMER) ...................... 186
LATCH-type (ISOFIX) child seat
anchors ................................................ 56
License plate lamp (display mes-
sage) ................................................... 200
Light function, active
Display message ............................ 201
Light sensor (display message) ....... 201
Lights
Adaptive Highbeam Assist ............. 101
Automatic headlamp mode .............. 99
Fogged up headlamps .................... 102
Hazard warning lamps ................... 101 High beam flasher .......................... 100
High-beam headlamps ................... 100
Light switch ..................................... 99
Low-beam headlamps .................... 100
Parking lamps ................................ 100
Rear fog lamp ................................ 100
Setting exterior lighting ................... 99
Standing lamps .............................. 100
Switching the daytime running
lamps on/off (on-board com-
puter) ............................................. 184
Turn signals ................................... 100
Loading guidelines ............................ 233
Locking
see Central locking
Locking (doors)
Automatic ........................................ 76
Emergency locking ........................... 76
From inside (central locking but-
ton) .................................................. 75
Locking centrally
see Central locking
Locking verification signal (on-
board computer) ............................... 185
Low-beam headlamps
Display message ............................ 199
Replacing bulbs ............................. 104
Switching on/off ........................... 100
Lumbar support
Adjusting the 4-way lumbar sup-
port .................................................. 92
M
M+S tires ............................................ 284
Malfunction message
see Display messages
Matte finish (cleaning instruc-
tions) .................................................. 261
mbrace
Call priority .................................... 245
Display message ............................ 194
Downloading destinations
(COMAND) ..................................... 245
Downloading routes ....................... 248
Emergency call .............................. 243
General notes ................................ 242
Geo fencing ................................... 248
12Index
Page 22 of 318
Removingth etowin geye .............. .277
Towing a trailer
ESP
®(Electronic Stability Pro-
gram) ............................................... 66
Towing away
Important safety guidelines ........... 276
Installing the towing eye ................ 277
Notes for 4MATIC vehicles ............ 279
Removing the towing eye ...............2 77
Transporting the vehicle ................ 278
With both axles on the ground ....... 278
With front axle raised ..................... 277
Towing eye ......................................... 266
Traffic reports
see also Digital Operator's Man-
ual ..................................................2 27
Transmission
see Automatic transmission
Transmission position display
(DIRECT SELECT lever) ......................129
Transporting the vehicle .................. 278
Trim pieces (cleaning instruc-
tions) ..................................................2 64
Trip computer (on-board com-
puter) ..................................................1 77
Trip odometer
Calling up ....................................... 177
Resetting (on-board computer) ...... 178
Trunk
Emergency release .......................... 80
Emergency release button ...............8 0
Important safety notes .................... 77
Opening (automatically from out-
side) .................................................7 8
Opening (from outside the vehi-
cle, HANDS-FREE ACCESS) .............. 78
Opening automatically from
inside ............................................... 79
Opening/closing (manually from
outside) ............................................ 77
Trunk emergency release button .......80
Trunk lid
Display message ............................ 213
Opening dimensions ...................... 314
Trunk load (maximum) ...................... 314
Turn signals
Display message ............................ 199 Replacing bulbs (front) ................... 105
Swi
tching o
n/off ........................... 100
Two-way radio
Frequencies ................................... 307
Installation ..................................... 307
Transmission output (maximum) .... 307
Type identification plate
see Vehicle identification plate
U
UnlockingEmergency unlocking ....................... 76
From inside the vehicle (central
unlocking button) ............................. 75
Upshift indicator (on-board com-
puter, Mercedes-AMG vehicles) ....... 185
USB devices
Connecting to the Media Inter-
face ............................................... 232
V
Vanity mirror (in the sun visor) ........ 240
Vehicle
Correct use ...................................... 27
Data acquisition ............................... 28
Display message ............................ 211
Equipment ....................................... 24
Individual settings .......................... 183
Limited Warranty ............................. 28
Loading .......................................... 292
Locking (in an emergency) ............... 76
Locking (SmartKey) .......................... 69
Lowering ........................................ 305
Maintenance .................................... 25
Parking for a long period ................ 142
Pulling away ................................... 124
Raising ........................................... 303
Reporting problems .........................2 7
Securing from rolling away ............ 302
Transporting .................................. 278
Unlocking (in an emergency) ........... 76
Unlocking (SmartKey) ...................... 69
Vehicle data ................................... 314
Vehicle data
Roof load (maximum) ..................... 314
Trunk load (maximum) ................... 314
20Index
Page 106 of 318
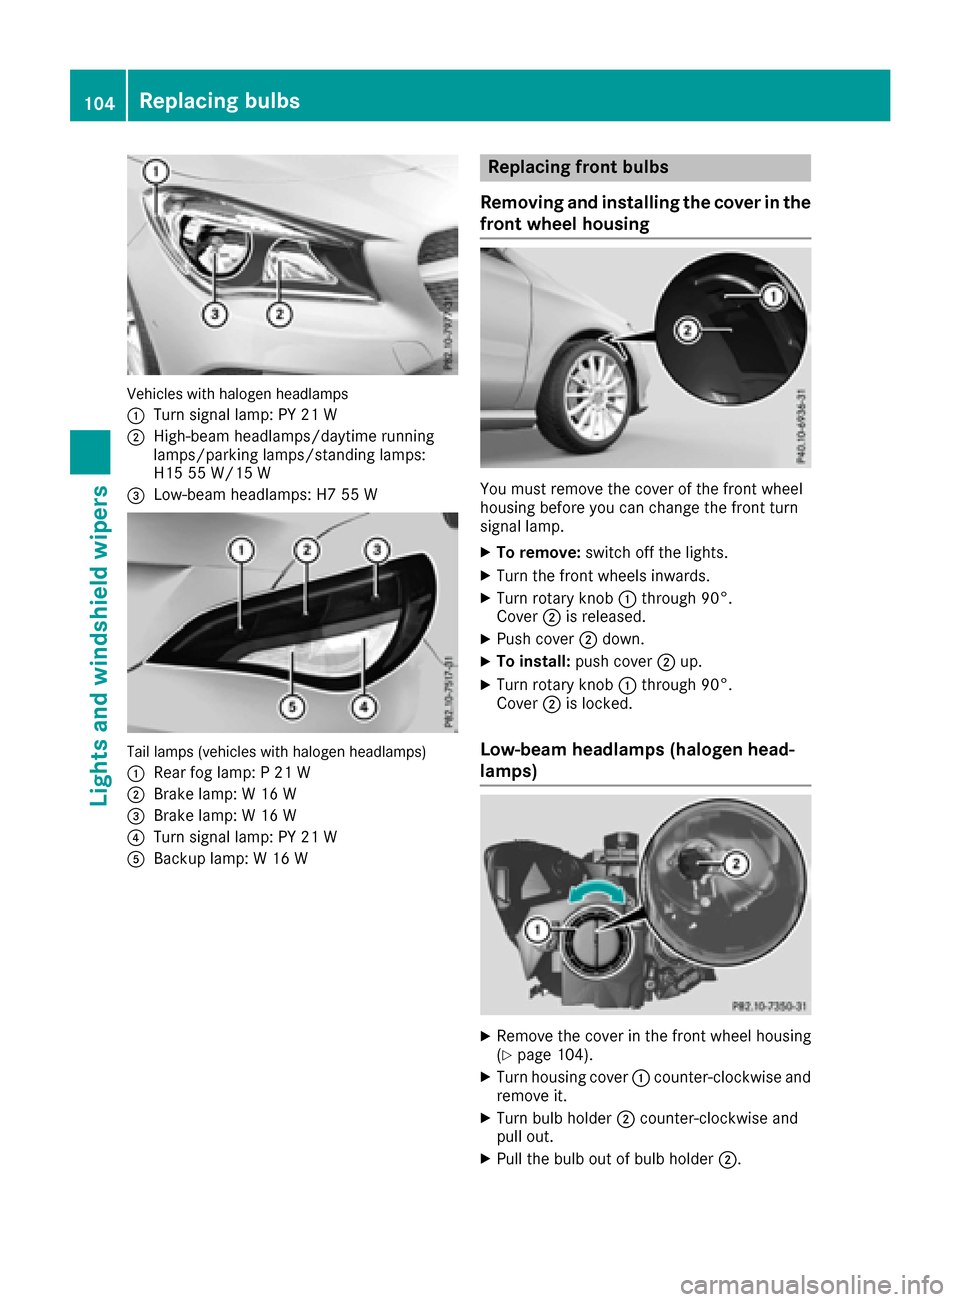
Vehicles with halogen headlamps
:
Turn signal lamp: PY 21 W
;High-beam headlamps/daytime running
lamps/parking lamps/standing lamps:
H15 55 W/15 W
=Low-beam headlamps: H7 55 W
Tail lamps (vehicles with halogen headlamps)
:
Rear fog lamp: P 21 W
;Brake lamp: W 16 W
=Brake lamp: W 16 W
?Turn signal lamp: PY 21 W
ABackup lamp: W 16 W
Replacing front bulbs
Removing and installing the cover in the
front wheel housing
You must remove the cover of the front wheel
housing before you can change the front turn
signal lamp.
XTo remove: switch off the lights.
XTurn the front wheels inwards.
XTurn rotary knob :through 90°.
Cover ;is released.
XPush cover ;down.
XTo install: push cover ;up.
XTurn rotary knob :through 90°.
Cover ;is locked.
Low-beam headlamps (halogen head-
lamps)
XRemove the cover in the front wheel housing
(Ypage 104).
XTurn housing cover :counter-clockwise and
remove it.
XTurn bulb holder ;counter-clockwise and
pull out.
XPull the bulb out of bulb holder ;.
104Replacing bulbs
Lights and windshield wipers
Page 107 of 318
XInsert the new bulb into bulb holder;.
XInsert bulb holder;and turn it clockwise.
XPress on housing cover :and turn it to the
right.
XReplace the cover in the front wheel housing
(Ypage 104).
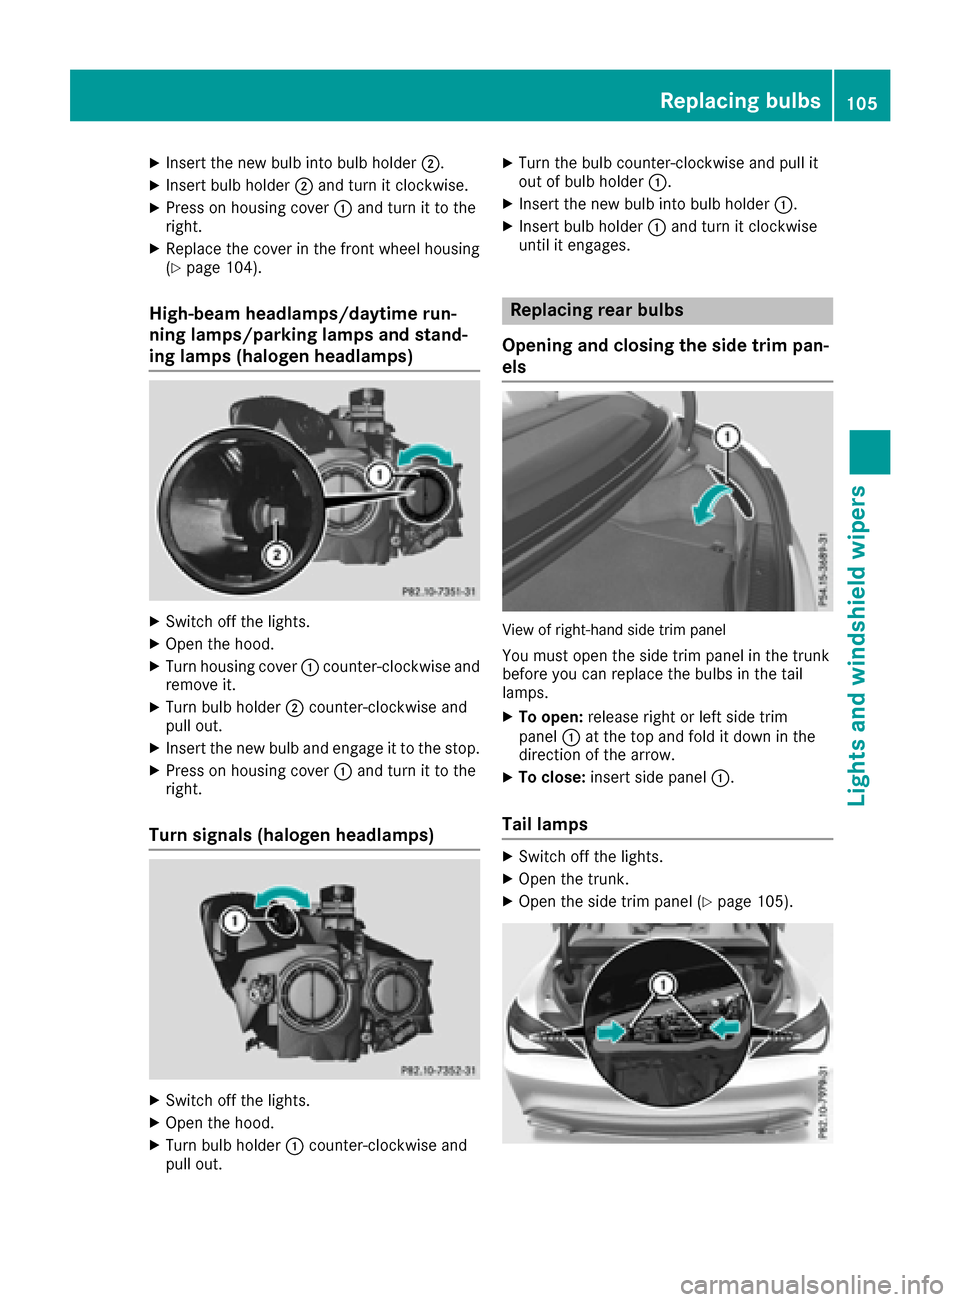
High-beam headlamps/daytime run-
ning lamps/parking lamps and stand-
ing lamps (halogen headlamps)
XSwitch off the lights.
XOpen the hood.
XTurn housing cover :counter-clockwise and
remove it.
XTurn bulb holder ;counter-clockwise and
pull out.
XInsert the new bulb and engage it to the stop.
XPress on housing cover :and turn it to the
right.
Turn signals (halogen headlamps)
XSwitch off the lights.
XOpen the hood.
XTurn bulb holder :counter-clockwise and
pull out.
XTurn the bulb counter-clockwise and pull it
out of bulb holder :.
XInsert the new bulb into bulb holder :.
XInsert bulb holder:and turn it clockwise
until it engages.
Replacing rear bulbs
Opening and closing the side trim pan-
els
View of right-hand side trim panel
You must open the side trim panel in the trunk
before you can replace the bulbs in the tail
lamps.
XTo open: release right or left side trim
panel :at the top and fold it down in the
direction of the arrow.
XTo close: insert side panel :.
Tail lamps
XSwitch off the lights.
XOpen the trunk.
XOpen the side trim panel (Ypage 105).
Replacing bulbs105
Lights and windshield wipers
Z
Page 108 of 318
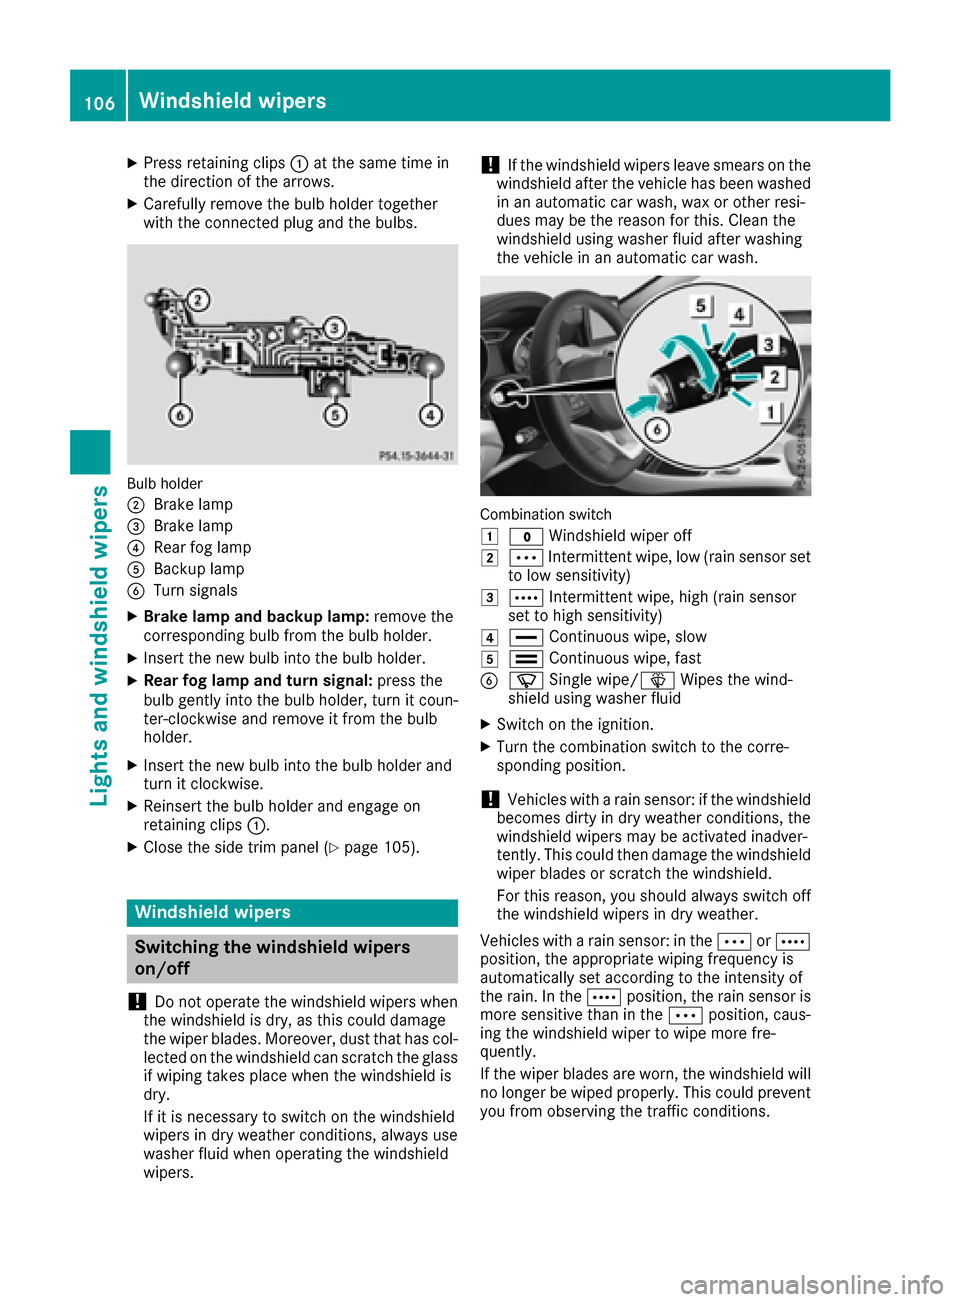
XPress retaining clips:at the same time in
the direction of the arrows.
XCarefully remove the bulb holder together
with the connected plug and the bulbs.
Bulb holder
;
Brake lamp
=Brake lamp
?Rear fog lamp
ABackup lamp
BTurn signals
XBrake lamp and backup lamp: remove the
corresponding bulb from the bulb holder.
XInsert the new bulb into the bulb holder.
XRear fog lamp and turn signal: press the
bulb gently into the bulb holder, turn it coun-
ter-clockwise and remove it from the bulb
holder.
XInsert the new bulb into the bulb holder and
turn it clockwise.
XReinsert the bulb holder and engage on
retaining clips :.
XClose the side trim panel (Ypage 105).
Windshield wipers
Switching the windshield wipers
on/off
!
Do not operate the windshield wipers when
the windshield is dry, as this could damage
the wiper blades. Moreover, dust that has col-
lected on the windshield can scratch the glass
if wiping takes place when the windshield is
dry.
If it is necessary to switch on the windshield
wipers in dry weather conditions, always use
washer fluid when operating the windshield
wipers.
!If the windshield wipers leave smears on the
windshield after the vehicle has been washed
in an automatic car wash, wax or other resi-
dues may be the reason for this. Clean the
windshield using washer fluid after washing
the vehicle in an automatic car wash.
Combination switch
1
$ Windshield wiper off
2ÄIntermittent wipe, low (rain sensor set
to low sensitivity)
3Å Intermittent wipe, high (rain sensor
set to high sensitivity)
4° Continuous wipe, slow
5¯Continuous wipe, fast
BíSingle wipe/î Wipes the wind-
shield using washer fluid
XSwitch on the ignition.
XTurn the combination switch to the corre-
sponding position.
!Vehicles with a rain sensor: if the windshield
becomes dirty in dry weather conditions, the
windshield wipers may be activated inadver-
tently. This could then damage the windshield
wiper blades or scratch the windshield.
For this reason, you should always switch off
the windshield wipers in dry weather.
Vehicles with a rain sensor: in the ÄorÅ
position, the appropriate wiping frequency is
automatically set according to the intensity of
the rain. In the Åposition, the rain sensor is
more sensitive than in the Äposition, caus-
ing the windshield wiper to wipe more fre-
quently.
If the wiper blades are worn, the windshield will
no longer be wiped properly. This could prevent
you from observing the traffic conditions.
106Windshield wipers
Lights and windshield wipers
Page 201 of 318
Display messagesPossible causes/consequences andMSolutions
If thecondition sare no tfulfilled ,th esystem is no toperating correctly.
XVisit aqualified specialist workshop immediately.
Fo rfurther information about th eOccupant Classification System, see
(
Ypage 47).
Lights
i
Vehicles wit hLE Dbulbs in th eligh tclusters :
The display message for th ecorrespondin glamp only appear swhen all of th eLEDs in th elamp
hav efailed.
Display messagesPossible causes/consequences and MSolutions
b
Check LeftCorner ‐ing LightorCheckRight CorneringLight
The lef tor right-hand cornering ligh tis defective.
XChec kwhether you are permitte dto replace th ebulb yourself
(Ypage 103).
or
XVisit aqualified specialist workshop .
b
CheckLeftLowBeamorCheck Right LowBea m
The lef tor right-hand low-beam headlamp is defective.
XChec kwhether you are permitte dto replace th ebulb yourself
(Ypage 103).
or
XVisit aqualified specialist workshop .
b
Check RearLef tTurnSignalor
Check Rea rRight
Tur nSignal
The rear left-han dor rear right-hand tur nsignal is defective.
XChec kwhether you are permitte dto replace th ebulb yourself
(Ypage 103).
or
XVisit aqualified specialist workshop .
b
Check Front LeftTurnSignalor
Check Front Right
Tur nSignal
The fron tleft-han dor fron tright-hand tur nsignal is defective.
XChec kwhether you are permitte dto replace th ebulb yourself
(Ypage 103).
or
XVisit aqualified specialist workshop .
b
Check LeftMirrorTur nSignalor
Check Right Mirror
Tur nSignal
The tur nsignal in th eleft-han dor right-hand exterio rmirror is defec -
tive.
XVisit aqualified specialist workshop .
b
Check Center BrakeLamp
The high-mounte dbrak elamp is faulty.
XVisit aqualified specialist workshop .
Display messages199
On-board computer and displays
Z