rear view mirror MERCEDES-BENZ CLA COUPE 2013 Owners Manual
[x] Cancel search | Manufacturer: MERCEDES-BENZ, Model Year: 2013, Model line: CLA COUPE, Model: MERCEDES-BENZ CLA COUPE 2013Pages: 373, PDF Size: 11.47 MB
Page 16 of 373
Activating/deactivating the inte-
rior lighting delayed switch-off ....... 228
Active light functio n....................... 114
Automatic headlamp mode ............ 111
Cornering light function ................. 114
Dipped-beam headlamp s............... 111
Display message ............................ 245
Driving abroad ............................... 110
Foglamps ....................................... 111
Foglamps (extended range) ........... 115
Hazard warning lamps ................... 113
Headlamp flashe r........................... 113
Headlamp range ............................ 112
Light switch ................................... 110
Main-beam headlamp s................... 113
Motorway mode ............................. 114
Parking lamps ................................ 112
Rear foglamp ................................. 112
Setting the ambient lighting
brightness (on-board computer) .... 227
Side lamps ..................................... 112
Switching the daytime driving
lights on/off (on-board com-
puter) ............................................. 226
Switching the daytime driving
lights on/off (switch) ..................... 111
Switching the exterior lighting
delayed switch-off on/off (on-
board computer) ............................ 228
Switching the surround lighting
on/off (on-board computer) .......... 228
Turn signals ................................... 113
see Interior lighting
see Replacing bulbs
LIM indicator lamp
Cruise control ................................ 174
DISTRONIC PLUS ........................... 179
Variable SPEEDTRONIC ................. 176
Limiting the speed
see SPEEDTRONIC
Loading guidelines ............................ 276
Locking
see Central locking
Locking (doors)
Automatic ........................................ 85
Emergency locking ........................... 86
From inside (central locking but-
ton) .................................................. 84 Locking centrally
see Central locking
Locking verification signal (on-
board computer) ............................... 229
Luggage compartment enlarge-
ment ................................................... 279
Luggage net ....................................... 279
Lumbar support
Adjusting the 4-way lumbar sup-
port ................................................ 102 M
M+S tyres ........................................... 328
Main-beam headlamps
Changing bulb s.............................. 119
Display message ............................ 247
Switching on/of f........................... 113
Maintenance
see ASSYST PLUS
Manual transmission
Engaging reverse gear ................... 155
Gear lever ...................................... 154
Pulling away ................................... 148
Shift recommendation ................... 155
Shifting to neutral .......................... 155
Starting the engine ........................ 148
Matt finish (cleaning instructions) .. 299
Media Interface
see Separate operating instructions
Memory card (audio) ......................... 221
Memory function ............................... 107
Mercedes-Benz Service Centre
see Qualified specialist workshop
Message memory (on-board com-
puter) .................................................. 234
Messages
see Display messages
Mirrors
see Exterior mirrors
see Rear-view mirror
see Vanity mirror (in sun visor)
Mobile phone
Frequencies ................................... 352
Installation ..................................... 352
Menu (on-board computer) ............ 221
Notes/placing in the bracket ......... 286
Transmission output (maximum) .... 352 Index
13
Page 17 of 373
Mobile telephone
Pre-installed bracket ...................... 287
Modifying the programming (key) ..... 79
MOExtended tyres ............................. 308
Motorway mode ................................ 114
MP3
Operating ....................................... 221
see Separate operating instructions
Multifunction display
Function/notes ............................. 216
Permanent display ......................... 226
Multifunction steering wheel
Operating the on-board computer .. 215
Overview .......................................... 33 N
Navigation Menu (on-board computer) ............ 219
see separate operating instructions
Notes on running in a new vehicle .. 146O
Occupant safety Children in the vehicle .................... .51
Important safety notes .................... 40
PRE-SAFE® (anticipatory occu-
pant protection) ............................... 46
Odometer ........................................... 217
see Total distance recorder
see Trip meter
Oil
see Engine oil
On-board computer
AMG menu .....................................2 31
Assistance menu ........................... 223
Audio menu ................................... 220
Convenience submenu .................. 230
Display messages .......................... 234
Displaying a service message ....... .296
DISTRONIC PLUS ........................... 184
Factory setting submenu .............. .231
Heating submenu ........................... 229
Important safety notes .................. 214
Instrument cluster submenu .......... 226
Light submenu ............................... 226
Menu overview .............................. 217 Message memory .......................... 234
Navigation menu ............................ 219
Operating video DVD ..................... 221
Operation ....................................... 215
RACETIMER ................................... 232
Service menu ................................. 225
Settings menu ............................... 225
Standard displa y............................ 217
Telephone menu ............................ 221
Trip menu ...................................... 217
Vehicle submenu ........................... 228
Opening and closing the side trim
panels ................................................. 120
Operating instructions
Vehicle equipment ........................... 22
Operating safety
Declaration of conformity ................ 23
Important safety note ...................... 22
Operating system
see On-board computer
Outside temperature display ........... 215
Overhead control panel ...................... 36
Override feature
Rear side window s........................... 63 P
Paint code .......................................... 354
Paintwork (cleaning instructions) ... 298
Panic alarm .......................................... 40
Panorama sliding sunroof
Important safety information ........... 91
Opening/closing .............................. 92
Opening/closing the roller sun-
blind ................................................. 94
Problem (malfunction) ..................... 95
Rain closing feature ......................... 93
Resetting ......................................... 94
Parking ............................................... 167
Important safety notes .................. 167
Parking brake ................................ 168
Position of exterior mirror, front-
passenger side ............................... 106
Reversing camera .......................... 197
see Active Parking Assist
see PARKTRONIC
Parking aid
Active Parking Assist ..................... 192 14
Index
Page 18 of 373
see Exterior mirrors
see PARKTRONIC
Parking assistance
see PARKTRONIC
Parking brake
Display message ............................2 38
Electric parking brake .................... 168
Warning lamp ................................. 270
Parking lamps
Display message ............................ 247
Switching on/off ........................... 112
PARKTRONIC
Deactivating/activating ................. 191
Driving system ............................... 188
Function/notes ............................ .188
Important safety notes .................. 188
Problem (fault) ............................... 192
Sensor range ................................. 189
Trailer towing ................................. 191
Warning displa y............................. 190
PASSENGER AIRBAG OFF
Problem (malfunction) ..................... 62
PASSENGER AIRBAG OFF warning
lamp ...................................................... 53
Petrol .................................................. 356
Plastic trim (cleaning instruc-
tions) .................................................. 302
Power socket
Boot ............................................... 286
Power windows
see Side windows
PRE-SAFE® (anticipatory occupant
protection)
Operation ......................................... 46
PRE-SAFE® (preventive occupant
safety system)
Display message ............................ 243
Program selector button .................. 159
Protection of the environment
General notes .................................. 21
Pulling away
Automatic transmission ................. 148
Manual transmission ...................... 148
Trailer ............................................ 149 Q
Qualified specialist workshop ........... 24 R
RACE START (AMG vehicles) ............. 187
RACETIMER (on-board computer) .... 232
Radar sensor system
Activating/deactivating ................. 229
Display message ............................ 252
Radio
Selecting a station ......................... 220
see separate operating instructions
Radio-based vehicle components
Declaration of conformity ................ 23
Rain closing feature (panorama
sliding sunroof) ................................... 93
Reading lamp ..................................... 116
Rear bench seat
Folding the backrest forwards/
back ............................................... 280
Rear compartment
Setting the air vents ...................... 144
Rear foglamp
Changing bulb s.............................. 120
Display message ............................ 247
Switching on/of f........................... 112
Rear lamps
see Lights
Rear window heating
Problem (fault) ............................... 136
Switching on/of f........................... 135
Rear-compartment seat belt sta-
tus indicator ........................................ 49
Rear-view mirror
Anti-dazzle mode (automatic) ........ 106
Dipping (manual) ........................... 105
Refuelling
Fuel gaug e....................................... 30
Important safety notes .................. 163
Notes for AMG vehicles ................. 357
Refuelling process ......................... 164
see Fuel
Remote control
Auxiliary heating/ventilation .......... 139
Changing the batteries (auxiliary
heating) ......................................... 140
Replacing bulbs
Important safety notes .................. 117
Overview of bulb types .................. 118 Index
15
Page 39 of 373
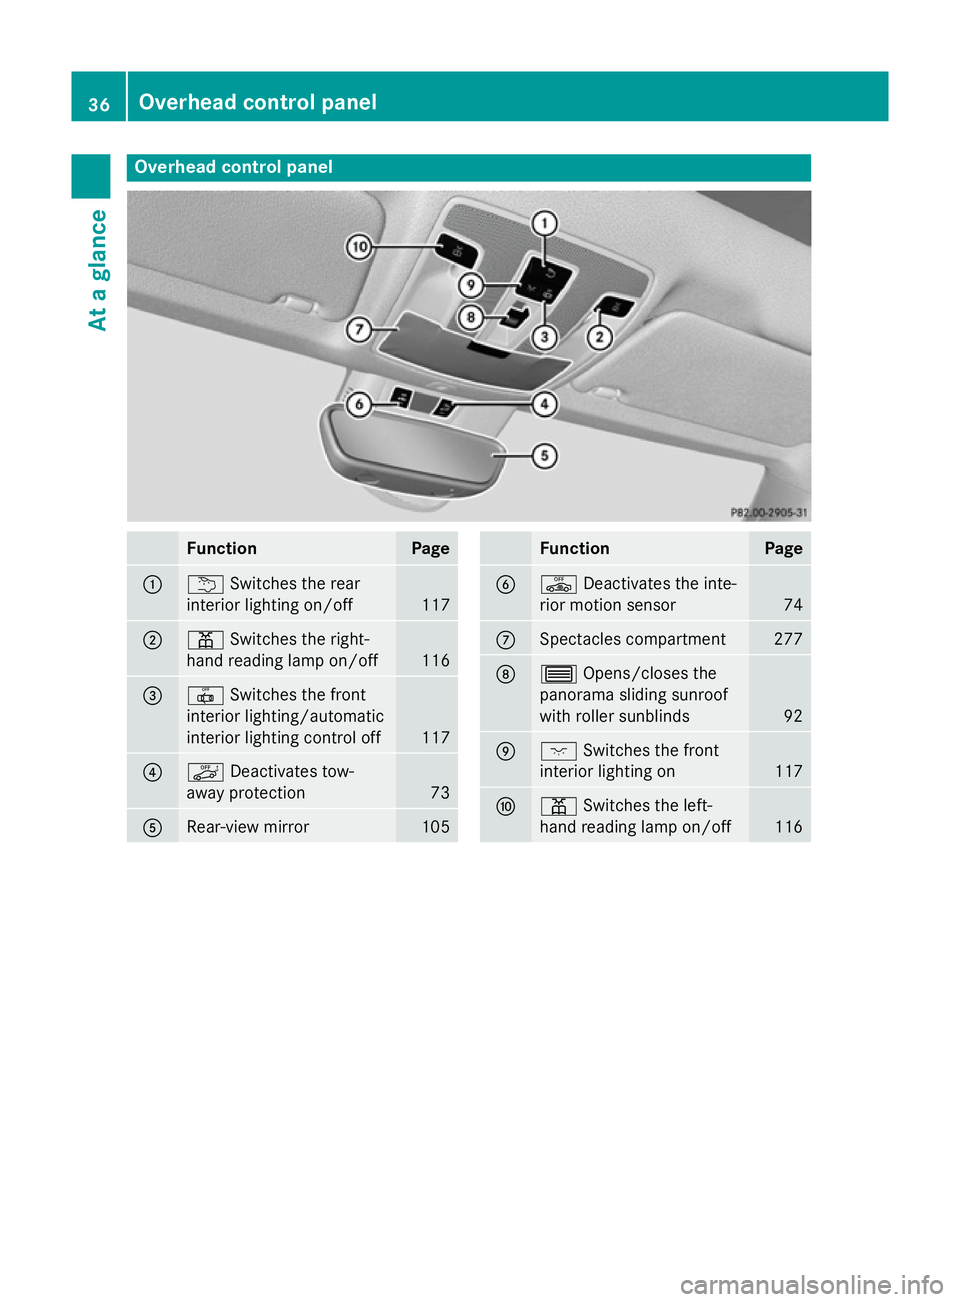
Overhead control panel
Function Page
:
u
Switches the rear
interior lighting on/off 117
;
p
Switches the right-
hand reading lamp on/off 116
=
|
Switches the front
interior lighting/automatic
interior lighting control off 117
?
ë
Deactivates tow-
away protection 73
A
Rear-view mirror 105 Function Page
B
ê
Deactivates the inte-
rior motion sensor 74
C
Spectacles compartment 277
D
3
Opens/closes the
panorama sliding sunroof
with roller sunblinds 92
E
c
Switches the front
interior lighting on 117
F
p
Switches the left-
hand reading lamp on/off 11636
Overhead control panelAt a glance
Page 77 of 373
Tow-away protection remains deactivated
until:
R the vehicle is unlocked again
R a door is opened and closed again
R the vehicle is locked again
To prevent a false alarm, deactivate the tow-
away protection if you lock your vehicle and it:
R is being transported
R is being loaded onto a ferry or car trans-
porter, for example
R is parked on a movable surface, e.g. in a
split-level garage Interior motion sensor
Function When the interior motion sensor is primed, a
visual and audible alarm is triggered if move- ment is detected in the vehicle interior. This
can occur if someone reaches into the vehicle
interior, for example.
Priming X
Make sure that:
R the side windows are closed
R the panorama sliding sunroof is closed
R there are no objects, e.g. mascots, hang-
ing on the rear-view mirror or on the grab handles on the roof trim
This will prevent false alarms.
X Make sure that:
R the doors are closed
R the panorama sliding sunroof is closed
R the boot lid is closed
Only then is the interior motion sensor
primed.
X Lock the vehicle with the key.
The interior motion sensor is primed after
approximately 30 seconds. Deactivating X
Unlock the vehicle with the key.
or X Insert the key into the ignition lock.
The interior motion sensor is automatically
deactivated.
Deactivating X
Remove the key from the ignition lock.
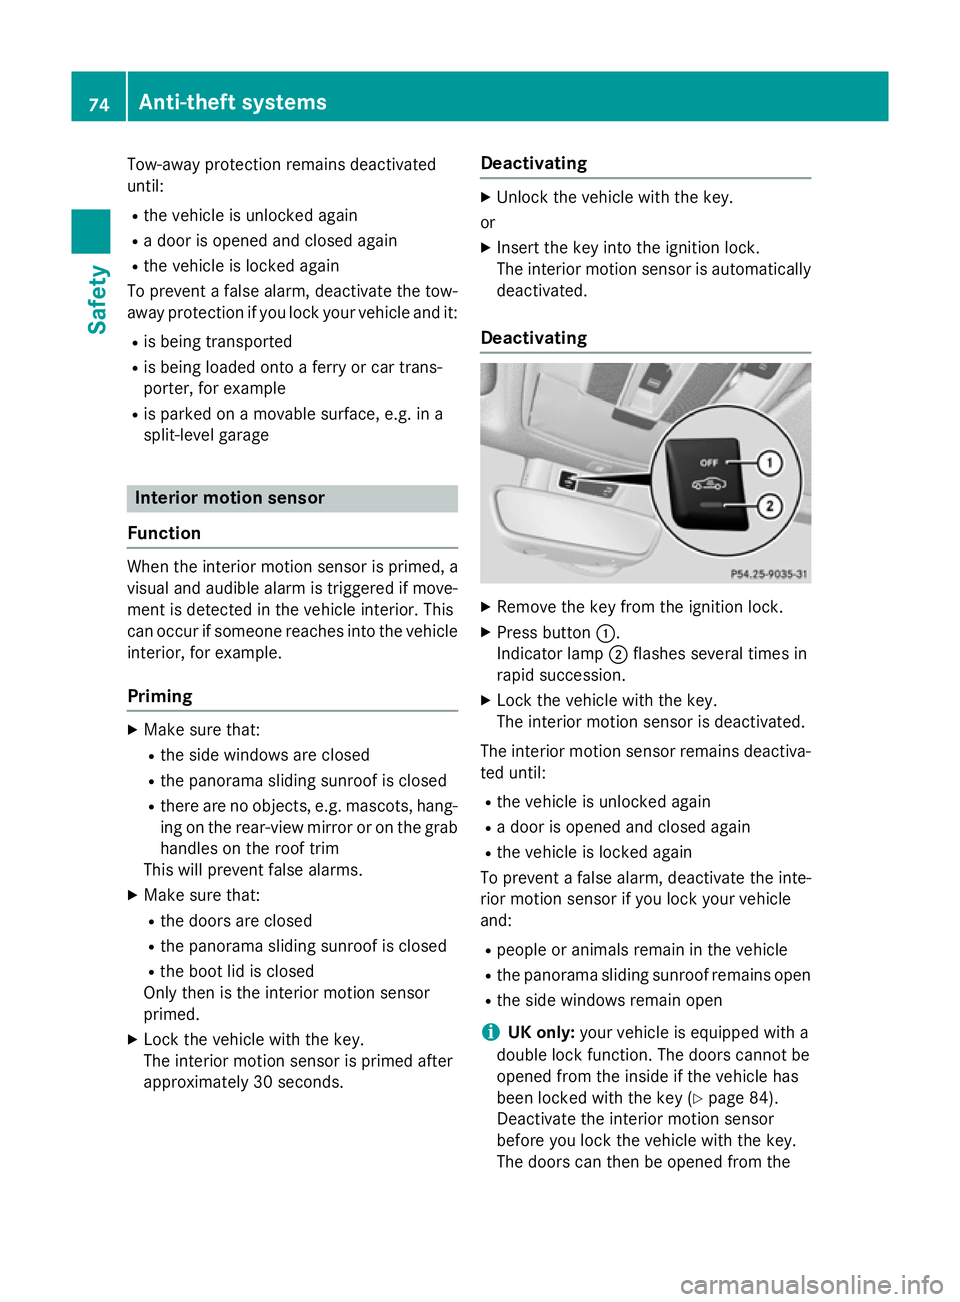
X Press button :.
Indicator lamp ;flashes several times in
rapid succession.
X Lock the vehicle with the key.
The interior motion sensor is deactivated.
The interior motion sensor remains deactiva-
ted until:
R the vehicle is unlocked again
R a door is opened and closed again
R the vehicle is locked again
To prevent a false alarm, deactivate the inte-
rior motion sensor if you lock your vehicle
and:
R people or animals remain in the vehicle
R the panorama sliding sunroof remains open
R the side windows remain open
i UK only:
your vehicle is equipped with a
double lock function. The doors cannot be
opened from the inside if the vehicle has
been locked with the key (Y page 84).
Deactivate the interior motion sensor
before you lock the vehicle with the key.
The doors can then be opened from the 74
Anti-theft systemsSafety
Page 102 of 373
The seat belt should:
R fit snugly across your body.
R be routed across the middle of your
shoulder.
R be routed across your hips in the pelvic
area.
X Before starting off, adjust the rear-view mir-
ror and the exterior mirrors (Y page 105)
so that you have a good view of road and
traffic conditions.
X Vehicles with a memory function: save
the seat and exterior mirror settings
(Y page 107). Seats
Important safety notes
G
WARNING
If children adjust the seats, they could
become trapped, especially if they are unat-
tended. There is a risk of injury.
When leaving the vehicle, always take the key with you and lock the vehicle. Never leave
children unattended in the vehicle. G
WARNING
You could lose control of the vehicle while
driving if you:
R adjust the driver's seat, steering wheel or
mirrors
R fasten the seat belt
There is a risk of an accident.
Adjust the driver's seat, head restraint, steer-
ing wheel and mirrors and fasten your seat
belt before starting the engine. G
WARNING
If you adjust the seat height carelessly, you or other vehicle occupants could be trapped andthereby injured. Children in particular could
accidentally press the electrical seat adjust-
ment buttons and become trapped. There is a
risk of injury. While moving the seats, make sure that your
hands or other body parts do not get under the
lever assembly of the seat adjustment sys-
tem. G
WARNING
When adjusting a seat, you or another vehicle occupant could become trapped by the guiderail of the seat, for instance. There is a risk of
injury.
Make sure that no one has any part of their
body within the sweep of the seat when
adjusting it. G
WARNING
The seat belt does not offer the intended level of protection if you have not moved the back-
rest to an almost vertical position. When brak-
ing or in the event of an accident, you could
slide underneath the seat belt and sustain
abdomen or neck injuries, for example. This
poses an increased risk of injury or even fatal injury.
Adjust the seat properly before beginning
your journey. Always ensure that the backrest
is in an almost vertical position and that the
shoulder section of your seatbelt is routed
across the centre of your shoulder. G
WARNING
The head restraints cannot provide the inten-
ded protection unless they are fitted and
adjusted correctly. There is an increased risk of injury to the head and neck in the event of
an accident or sudden braking, for example.
Always drive with the head restraints fitted.
Ensure that the centre of the head restraints
support the back of each vehicle occupant's
head at eye level before driving off. Seats
99Seats, steering wheel and mirrors Z
Page 105 of 373
Rear seat head restraints
Adjusting the rear seat head restraint
height
X
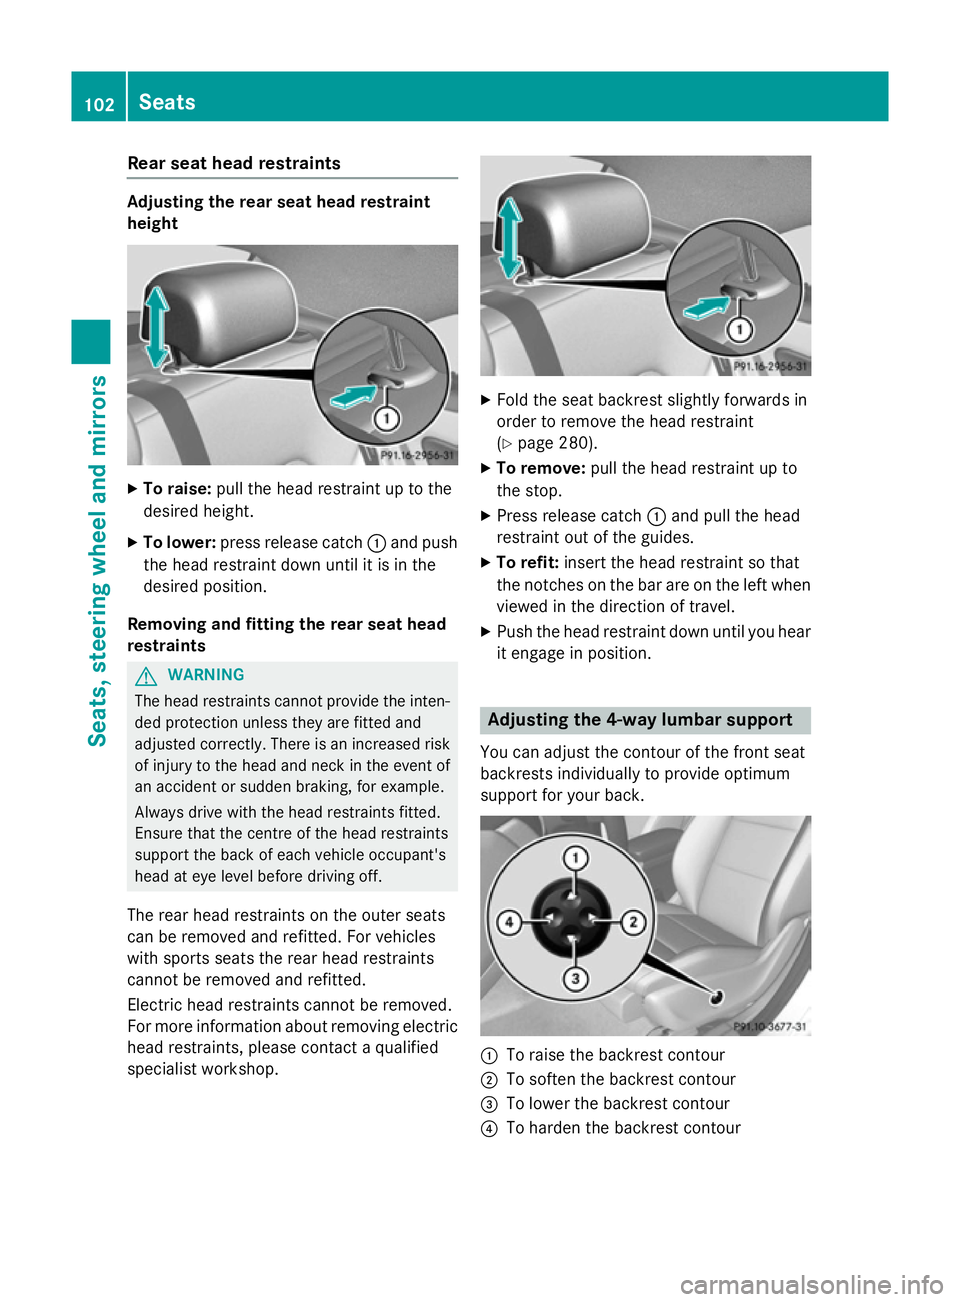
To raise: pull the head restraint up to the
desired height.
X To lower: press release catch :and push
the head restraint down until it is in the
desired position.
Removing and fitting the rear seat head
restraints G
WARNING
The head restraints cannot provide the inten-
ded protection unless they are fitted and
adjusted correctly. There is an increased risk of injury to the head and neck in the event of
an accident or sudden braking, for example.
Always drive with the head restraints fitted.
Ensure that the centre of the head restraints
support the back of each vehicle occupant's
head at eye level before driving off.
The rear head restraints on the outer seats
can be removed and refitted. For vehicles
with sports seats the rear head restraints
cannot be removed and refitted.
Electric head restraints cannot be removed.
For more information about removing electric head restraints, please contact a qualified
specialist workshop. X
Fold the seat backrest slightly forwards in
order to remove the head restraint
(Y page 280).
X To remove: pull the head restraint up to
the stop.
X Press release catch :and pull the head
restraint out of the guides.
X To refit: insert the head restraint so that
the notches on the bar are on the left when viewed in the direction of travel.
X Push the head restraint down until you hear
it engage in position. Adjusting the 4-way lumbar support
You can adjust the contour of the front seat
backrests individually to provide optimum
support for your back. :
To raise the backrest contour
; To soften the backrest contour
= To lower the backrest contour
? To harden the backrest contour 102
SeatsSeats, steering wheel and mirrors
Page 108 of 373
Mirrors
Rear-view mirror
X
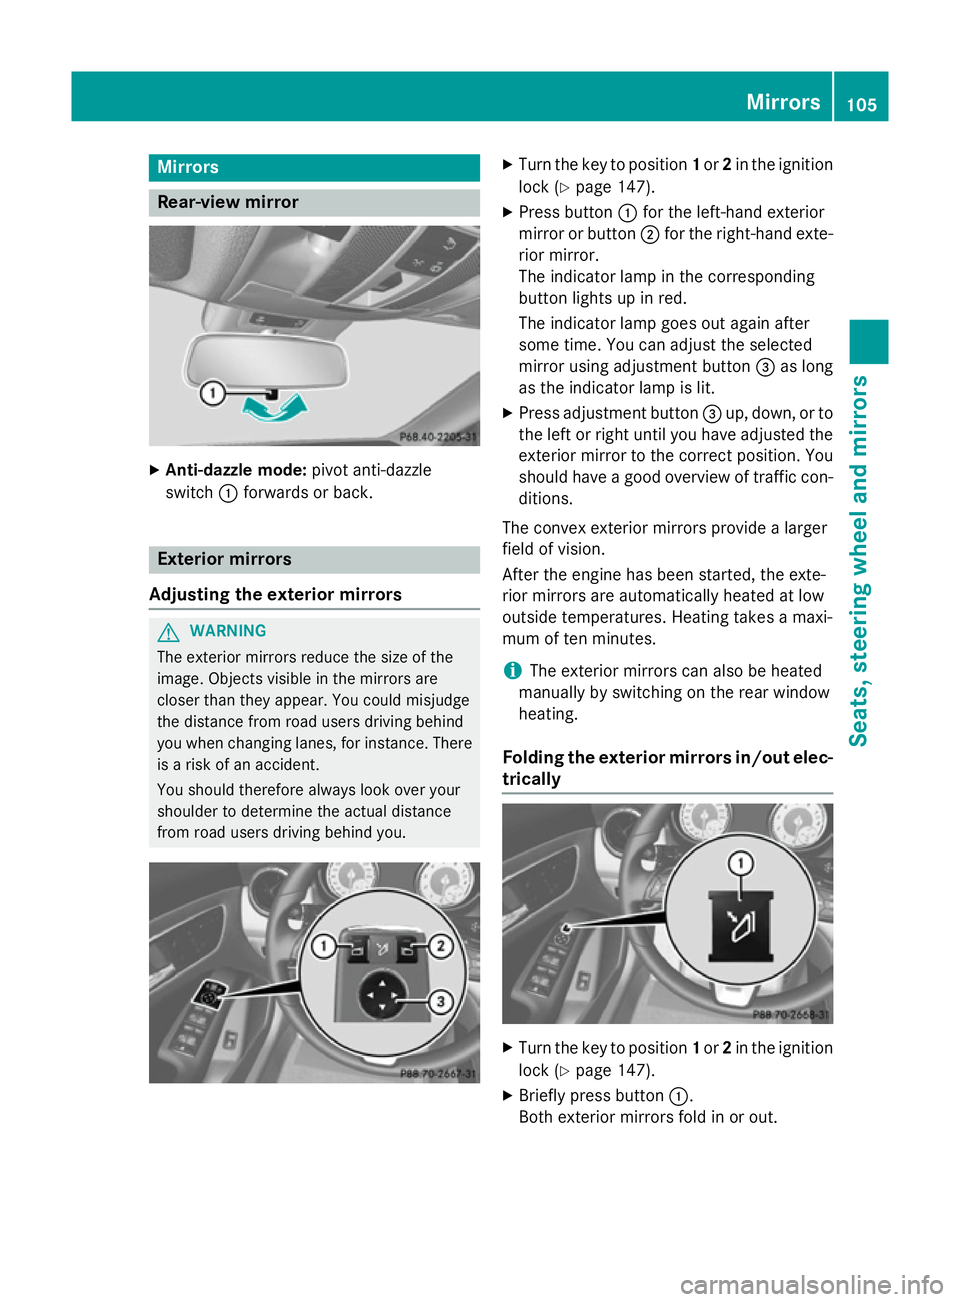
Anti-dazzle mode: pivot anti-dazzle
switch :forwards or back. Exterior mirrors
Adjusting the exterior mirrors G
WARNING
The exterior mirrors reduce the size of the
image. Objects visible in the mirrors are
closer than they appear. You could misjudge
the distance from road users driving behind
you when changing lanes, for instance. There is a risk of an accident.
You should therefore always look over your
shoulder to determine the actual distance
from road users driving behind you. X
Turn the key to position 1or 2in the ignition
lock (Y page 147).
X Press button :for the left-hand exterior
mirror or button ;for the right-hand exte-
rior mirror.
The indicator lamp in the corresponding
button lights up in red.
The indicator lamp goes out again after
some time. You can adjust the selected
mirror using adjustment button =as long
as the indicator lamp is lit.
X Press adjustment button =up, down, or to
the left or right until you have adjusted the
exterior mirror to the correct position. You
should have a good overview of traffic con- ditions.
The convex exterior mirrors provide a larger
field of vision.
After the engine has been started, the exte-
rior mirrors are automatically heated at low
outside temperatures. Heating takes a maxi-
mum of ten minutes.
i The exterior mirrors can also be heated
manually by switching on the rear window
heating.
Folding the exterior mirrors in/out elec-
trically X
Turn the key to position 1or 2in the ignition
lock (Y page 147).
X Briefly press button :.
Both exterior mirrors fold in or out. Mirrors
105Seats, steering wheel and mirrors Z
Page 109 of 373
i
Make sure that the exterior mirrors are
always folded out fully while driving. They
could otherwise vibrate.
i If you are driving faster than 47 km/h, you
can no longer fold in the exterior mirrors.
Resetting the exterior mirrors If the battery has been disconnected or com-
pletely discharged, the exterior mirrors must
be reset. The exterior mirrors will otherwise
not fold in when you select the "Fold in mir-
rors when locking" function in the on-board
computer (Y page 230).
X Turn the key to position 1in the ignition
lock (Y page 147).
X Briefly press button :.
Folding the exterior mirrors in/out
automatically If the "Fold in mirrors when locking" function
is activated in the on-board computer
(Y page 230):
R the exterior mirrors fold in automatically as
soon as you lock the vehicle from the out-
side
R the exterior mirrors fold out again automat-
ically as soon as you unlock the vehicle and
then open the driver's or front-passenger
door.
i If the exterior mirrors have been folded in
manually, they do not fold out.
Exterior mirror pushed out of position If an exterior mirror has been pushed out of
position (forwards or backwards), proceed as
follows:
X Vehicles without electrically folding
exterior mirrors: move the exterior mirror
into the correct position manually.
X Vehicles with electrically folding exte-
rior mirrors: press and hold mirror-folding button (Y
page 105) until you hear a click
and then the mirror engage in position.
The mirror housing is engaged again and
you can adjust the exterior mirrors as usual
(Y page 105). Automatic anti-dazzle mirrors
The "Automatic anti-dazzle mirrors" function
is only available if the vehicle is equipped with
the "Mirror package".
The rear-view mirror and the exterior mirror
on the driver's side automatically go into anti- dazzle mode if:
R the ignition is switched on and
R incident light from headlamps strikes the
sensor in the rear-view mirror
The mirrors do not go into anti-dazzle mode if reverse gear is engaged or if the interior light-
ing is switched on. Parking position of the exterior mirror
on the front-passenger side
General notes The "Parking position for the exterior mirror
on the front-passenger side" function is only
available if the vehicle is equipped with the
"Memory package".
Setting and storing the parking position Using reverse gear
You can set the front-passenger side exterior
mirror so that you can see the rear wheel on
that side as soon as you engage reverse gear. You can store this position. 106
MirrorsSeats, steering wheel and mirrors
Page 200 of 373
A warning tone sounds. The parking symbol
disappears and the multifunction display
shows the Park Assist cancelled
Park Assist cancelled mes-
sage.
When Active Parking Assist is cancelled, you
must steer again yourself.
Towing a trailer For vehicles with a trailer tow hitch, the min-
imum required length for parking spaces is
slightly increased.
If you have attached a trailer to your vehicle,
you should not use Active Parking Assist.
Once the electrical connection is established between your vehicle and the trailer, Active
Parking Assist is no longer available. PARK-
TRONIC is deactivated for the rear area. Reversing camera
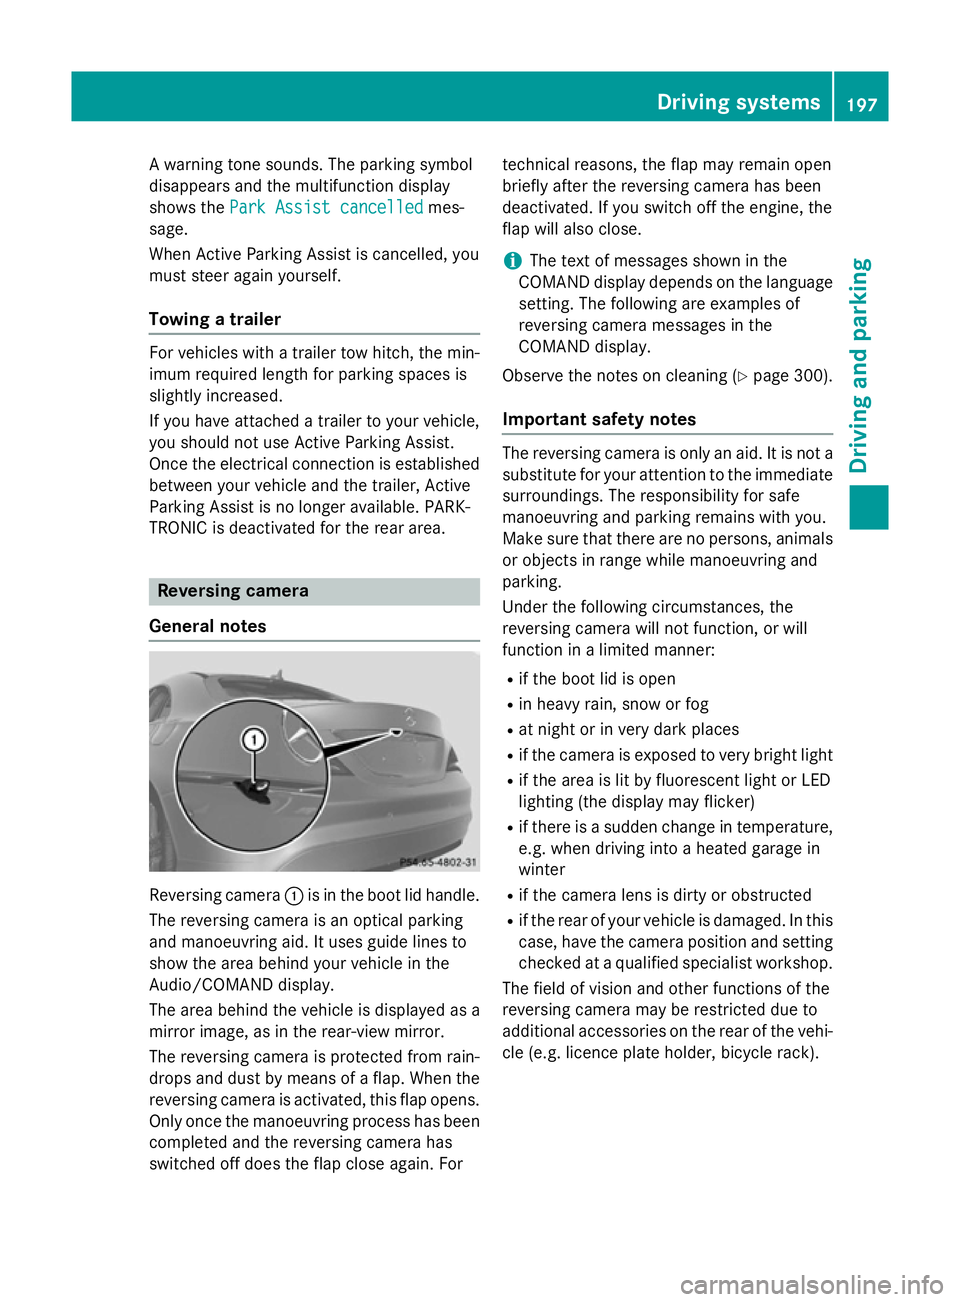
General notes Reversing camera
:is in the boot lid handle.
The reversing camera is an optical parking
and manoeuvring aid. It uses guide lines to
show the area behind your vehicle in the
Audio/COMAND display.
The area behind the vehicle is displayed as a
mirror image, as in the rear-view mirror.
The reversing camera is protected from rain-
drops and dust by means of a flap. When the
reversing camera is activated, this flap opens. Only once the manoeuvring process has been completed and the reversing camera has
switched off does the flap close again. For technical reasons, the flap may remain open
briefly after the reversing camera has been
deactivated. If you switch off the engine, the
flap will also close.
i The text of messages shown in the
COMAND display depends on the language
setting. The following are examples of
reversing camera messages in the
COMAND display.
Observe the notes on cleaning (Y page 300).
Important safety notes The reversing camera is only an aid. It is not a
substitute for your attention to the immediate
surroundings. The responsibility for safe
manoeuvring and parking remains with you.
Make sure that there are no persons, animals
or objects in range while manoeuvring and
parking.
Under the following circumstances, the
reversing camera will not function, or will
function in a limited manner:
R if the boot lid is open
R in heavy rain, snow or fog
R at night or in very dark places
R if the camera is exposed to very bright light
R if the area is lit by fluorescent light or LED
lighting (the display may flicker)
R if there is a sudden change in temperature,
e.g. when driving into a heated garage in
winter
R if the camera lens is dirty or obstructed
R if the rear of your vehicle is damaged. In this
case, have the camera position and setting checked at a qualified specialist workshop.
The field of vision and other functions of the
reversing camera may be restricted due to
additional accessories on the rear of the vehi-
cle (e.g. licence plate holder, bicycle rack). Driving systems
197Driving and parking Z