check oil MERCEDES-BENZ CLA COUPE 2016 Owners Manual
[x] Cancel search | Manufacturer: MERCEDES-BENZ, Model Year: 2016, Model line: CLA COUPE, Model: MERCEDES-BENZ CLA COUPE 2016Pages: 345, PDF Size: 12.41 MB
Page 13 of 345
Fuel ................................................ 159
General .......................................... 159
Icy road surfaces ........................... 162
Limited braking efficiency on sal-
ted roads ....................................... 161
New brake pads/linings ................ 161
Running-in tips ............................... 132
Snow chains .................................. 313
Symmetrical dipped bea m............. 107
The first 1500 km .......................... 132
Towing a trailer .............................. 196
Wet road surface ........................... 161
DVD video
Operating (on-board computer) ..... 206
See also Digital Owner's Manua l... 259
DYNAMIC SELECT button (all vehi-
cles except Mercedes-AMG vehi-
cles) .................................................... 141
DYNAMIC SELECT controller
(Mercedes-AMG vehicles) ................. 141
DYNAMIC SELECT switch
Climate control (air conditioning) .. 119
Climate control
(THERMOTRONIC) .......................... 120 E
EBD (electronic brake force distri-
bution)
Display message ............................ 219
Function/note s................................ 72
ECO display
Function/note s............................. 159
On-board computer ....................... 204
ECO start/stop function
Automatic engine start .................. 138
Automatic engine switch-off .......... 137
Deactivating/activating ................. 138
General information ....................... 137
Important safety notes .................. 137
Introduction ................................... 137
Electromagnetic compatibility
Declaration of conformity ................ 26
Electronic Stability Program
see ESP ®
(Electronic Stability Program)
Emergency
Automatic measures after an acci-
dent ................................................. 53 Emergency key
Unlocking the driver's door .............. 85
Emergency key element
Function/note s................................ 78
Inserting .......................................... 79
Locking vehicle ................................ 85
Removing ......................................... 79
Emergency release
Driver's door .................................... 85
Emergency spare wheel
General notes ................................ 324
Important safety notes .................. 323
Removing ....................................... 324
Emergency unlocking
Boot ................................................. 88
Vehicle ............................................. 85
Engine
Display message ............................ 231
ECO start/stop function ................ 137
Engine number ............................... 327
Jump-starting ................................. 301
Running irregularly ......................... 139
Starting (important safety notes )... 134
Starting problems .......................... 139
Starting the engine with the key .... 135
Starting with the Start/Stop but-
ton ................................................. 135
Stopping ........................................ 156
Tow-starting (vehicle) ..................... 307
Warning lamp (engine diagnos-
tics) ............................................... 255
Engine electronics
Notes ............................................. 325
Problem (fault) ............................... 139
Engine jump starting
see Jump starting (engine)
Engine oil
Additives ........................................ 331
Checking the oil level ..................... 282
Checking the oil level using the
dipstick .......................................... 282
Display message ............................ 233
Filling capacity ............................... 331
Notes about oil grade s................... 330
Notes on oil level/consumption .... 282
Temperature (on-board computer,
Mercedes-AMG vehicles) ............... 213
Topping up ..................................... 283 10
Index
Page 23 of 345
Installing the module .....................2
64
Introduction ................................... 263
Saving/deleting the PIN for the
SIM card ........................................ 266
Settings ......................................... 266
SIM card mode .............................. 265
Text messages ............................... 266
Transferring the phone book .......... 266
Temperature
Coolant .......................................... 201
Coolant (on-board computer,
Mercedes-AMG vehicles) .............. .213
Engine oil (on-board computer,
Mercedes-AMG vehicles) .............. .213
Outside temperature ..................... .200
Setting (climate control) ................ 122
Transmission oil (on-board com-
puter, Mercedes-AMG vehicles) ..... 213
TEMPOMAT
Function/notes ............................ .162
Text messages
Telephone module with Blue-
tooth ®
(SAP profile) ....................... 266
Through-loading ................................ 271
Timing (RACETIMER) ......................... 214
TIREFIT kit .......................................... 296
Declaration of conformity ................ 27
Important safety notes .................. 296
Storage location ............................ 294
Tyre pressure not reached ............. 297
Tyre pressure reached ................... 298
Top Tether ............................................ 56
Total distance recorder .................... 203
Tow-away protection
Activating ......................................... 74
Deactivating ..................................... 74
Function .......................................... .74
Tow-starting
Emergency engine starting ............ 307
Fitting the towing ey e.................... 305
Important safety notes .................. 304
Removing the towing eye ............... 305
Towing
Important safety notes .................. 304
Notes for 4MATIC vehicles ............ 307
Transporting the vehicle ................ 307 Towing a trailer
Axle load, permissibl e.................... 334
ESP ®
(Electronic Stability Pro-
gram) ............................................... 72
Failure check for LEDs ................... 199
General notes ................................ 196
Parking Pilot .................................. 180
Pulling away with a traile r.............. 136
Trailer tow hitch display message .. 245
Towing away
Fitting the towing ey e.................... 305
Removing the towing eye ............... 305
With both axles on the ground ....... 306
With front axle raised ..................... 306
Towing eye ......................................... 294
Traffic Sign Assist
Activating ....................................... 191
Activating/deactivating the warn- ing function .................................... 208
Display message ............................ 236
Function/note s............................. 190
Important safety notes .................. 191
Instrument cluster display ............. 191
Trailer
Folding the ball coupling in/out ..... 197
Trailer coupling
see Towing a trailer
Trailer towing
7-pin connecto r............................. 199
Blind Spot Assist ............................ 193
Cleaning the trailer tow hitch ......... 290
Coupling up a traile r...................... 198
Decoupling a trailer ....................... 198
Driving tip s.................................... 196
Folding in the ball coupling ............ 197
Folding out the ball coupling .......... 197
Important safety notes .................. 194
Lights display message .................. 228
Power supply ................................. 198
Trailer load s................................... 334
Transmission
see Automatic transmission
see Manual transmission
Transmission position display
(DIRECT SELECT lever) ...................... 144
Transporting the vehicle .................. 30720
Index
Page 136 of 345
!
Do not warm up the engine when the vehicle
is stationary. Drive off immediately. Avoid
high engine speeds and driving at full throttle
until the engine has reached its operating
temperature.
Only shift the automatic transmission to the
desired drive position when the vehicle is sta- tionary.
Where possible, avoid spinning the drive
wheels when pulling away on slippery roads.
You could otherwise damage the drive train.
! Mercedes-AMG vehicles:
avoid full-load
operation and engine speeds greater than
5000 rpm when the engine is cold. This will
help to protect the engine and maintain
smooth engine operation. Key positions
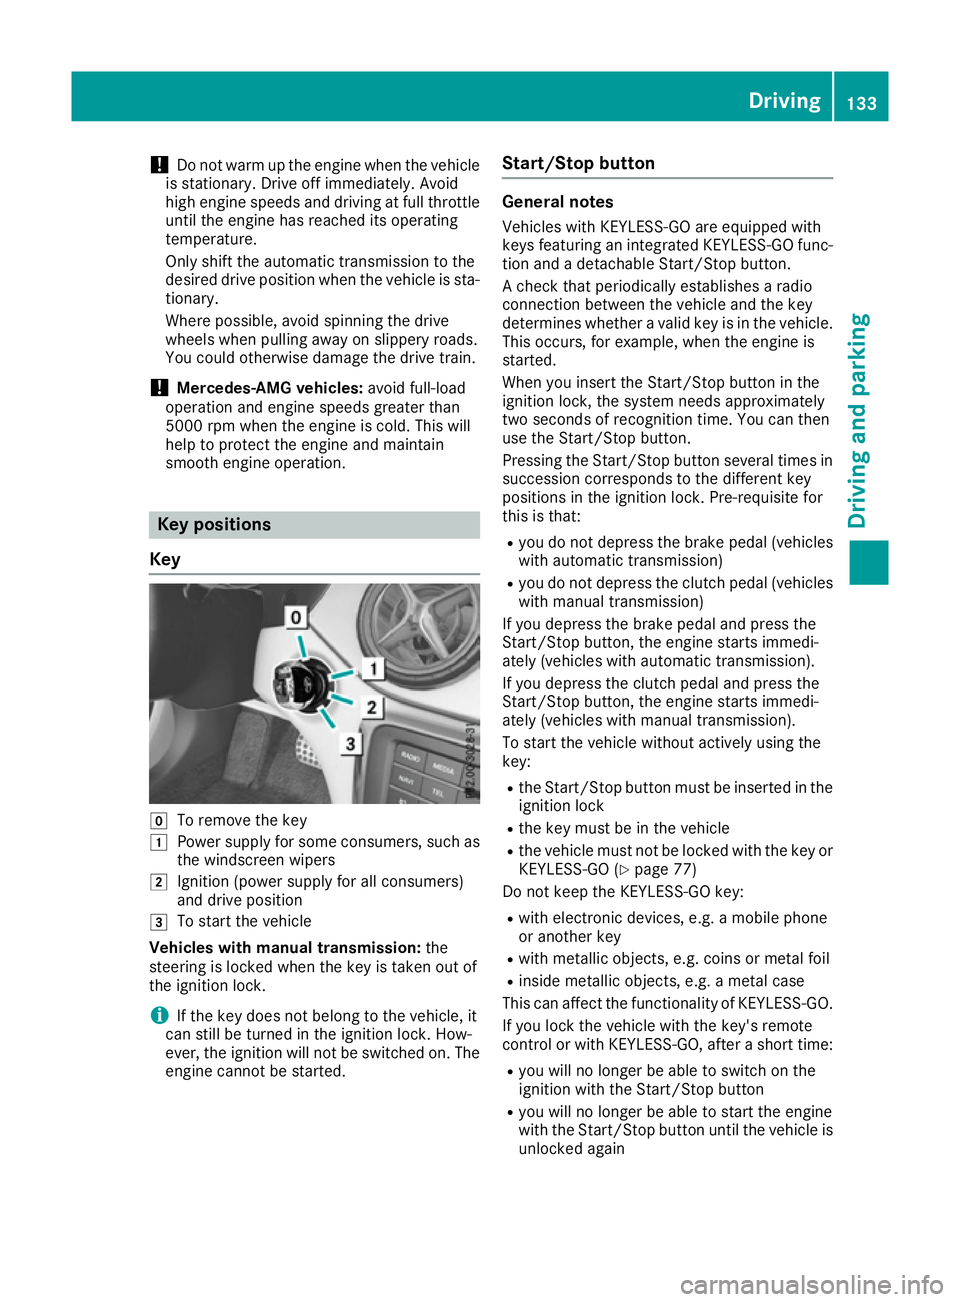
Key g
To remove the key
1 Power supply for some consumers, such as
the windscreen wipers
2 Ignition (power supply for all consumers)
and drive position
3 To start the vehicle
Vehicles with manual transmission: the
steering is locked when the key is taken out of
the ignition lock.
i If the key does not belong to the vehicle, it
can still be turned in the ignition lock. How-
ever, the ignition will not be switched on. The engine cannot be started. Start/Stop button General notes
Vehicles with KEYLESS-GO are equipped with
keys featuring an integrated KEYLESS-GO func- tion and a detachable Start/Stop button.
A check that periodically establishes a radio
connection between the vehicle and the key
determines whether a valid key is in the vehicle.This occurs, for example, when the engine is
started.
When you insert the Start/Stop button in the
ignition lock, the system needs approximately
two seconds of recognition time. You can then
use the Start/Stop button.
Pressing the Start/Stop button several times in
succession corresponds to the different key
positions in the ignition lock. Pre-requisite for
this is that:
R you do not depress the brake pedal (vehicles
with automatic transmission)
R you do not depress the clutch pedal (vehicles
with manual transmission)
If you depress the brake pedal and press the
Start/Stop button, the engine starts immedi-
ately (vehicles with automatic transmission).
If you depress the clutch pedal and press the
Start/Stop button, the engine starts immedi-
ately (vehicles with manual transmission).
To start the vehicle without actively using the
key:
R the Start/Stop button must be inserted in the
ignition lock
R the key must be in the vehicle
R the vehicle must not be locked with the key or
KEYLESS-GO (Y page 77)
Do not keep the KEYLESS-GO key:
R with electronic devices, e.g. a mobile phone
or another key
R with metallic objects, e.g. coins or metal foil
R inside metallic objects, e.g. a metal case
This can affect the functionality of KEYLESS-GO.
If you lock the vehicle with the key's remote
control or with KEYLESS-GO, after a short time:
R you will no longer be able to switch on the
ignition with the Start/Stop button
R you will no longer be able to start the engine
with the Start/Stop button until the vehicle is
unlocked again Driving
133Driving and parking Z
Page 155 of 345
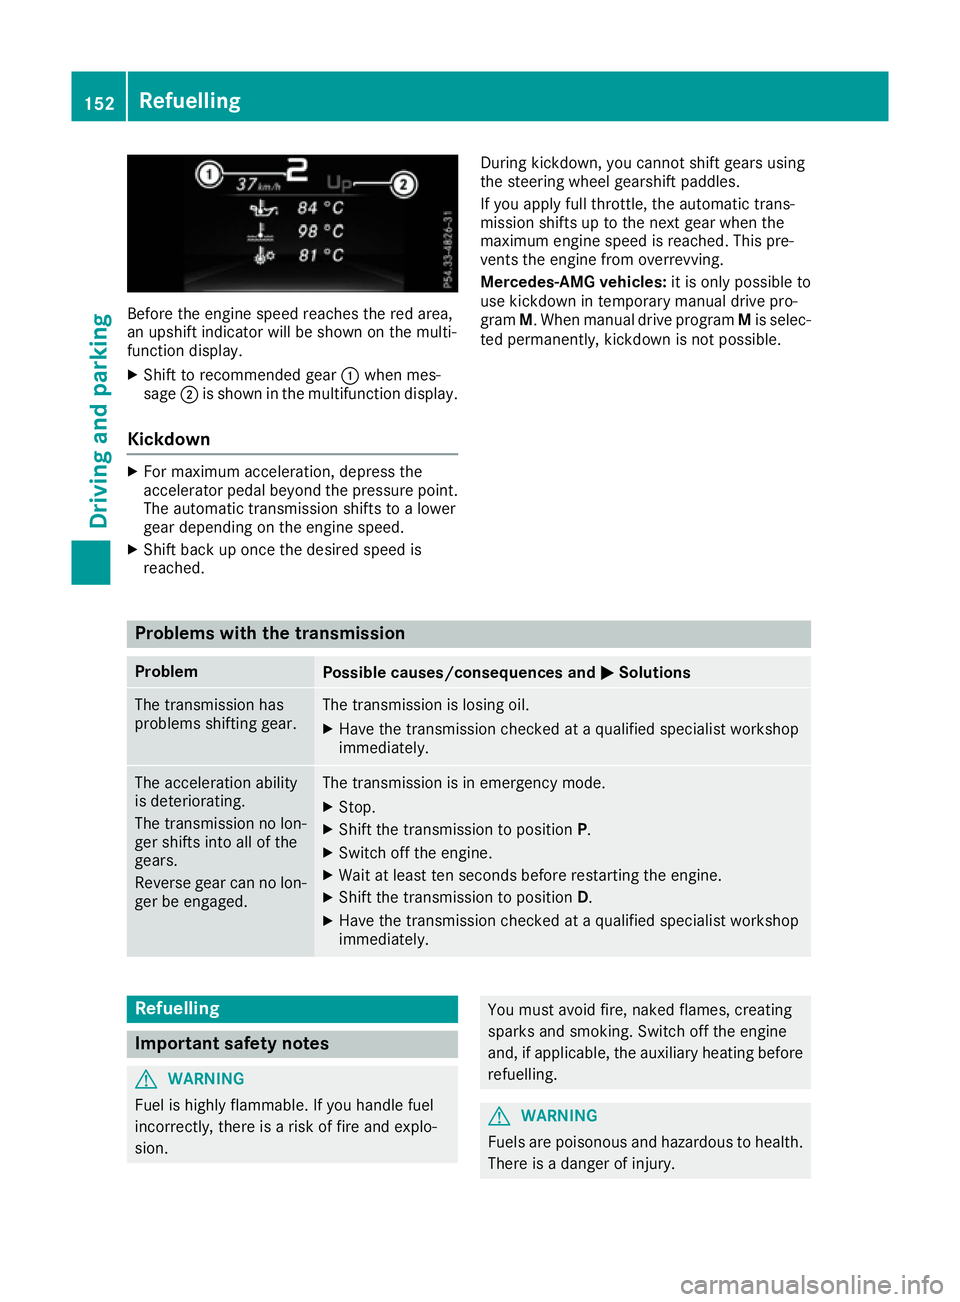
Before the engine speed reaches the red area,
an upshift indicator will be shown on the multi-
function display.
X Shift to recommended gear :when mes-
sage ;is shown in the multifunction display.
Kickdown X
For maximum acceleration, depress the
accelerator pedal beyond the pressure point.
The automatic transmission shifts to a lower
gear depending on the engine speed.
X Shift back up once the desired speed is
reached. During kickdown, you cannot shift gears using
the steering wheel gearshift paddles.
If you apply full throttle, the automatic trans-
mission shifts up to the next gear when the
maximum engine speed is reached. This pre-
vents the engine from overrevving.
Mercedes-AMG vehicles:
it is only possible to
use kickdown in temporary manual drive pro-
gram M. When manual drive program Mis selec-
ted permanently, kickdown is not possible. Problems with the transmission
Problem
Possible causes/consequences and
M MSolutions The transmission has
problems shifting gear. The transmission is losing oil.
X Have the transmission checked at a qualified specialist workshop
immediately. The acceleration ability
is deteriorating.
The transmission no lon-
ger shifts into all of the
gears.
Reverse gear can no lon-
ger be engaged. The transmission is in emergency mode.
X Stop.
X Shift the transmission to position P.
X Switch off the engine.
X Wait at least ten seconds before restarting the engine.
X Shift the transmission to position D.
X Have the transmission checked at a qualified specialist workshop
immediately. Refuelling
Important safety notes
G
WARNING
Fuel is highly flammable. If you handle fuel
incorrectly, there is a risk of fire and explo-
sion. You must avoid fire, naked flames, creating
sparks and smoking. Switch off the engine
and, if applicable, the auxiliary heating before refuelling. G
WARNING
Fuels are poisonous and hazardous to health. There is a danger of injury. 152
RefuellingDriving and parking
Page 236 of 345
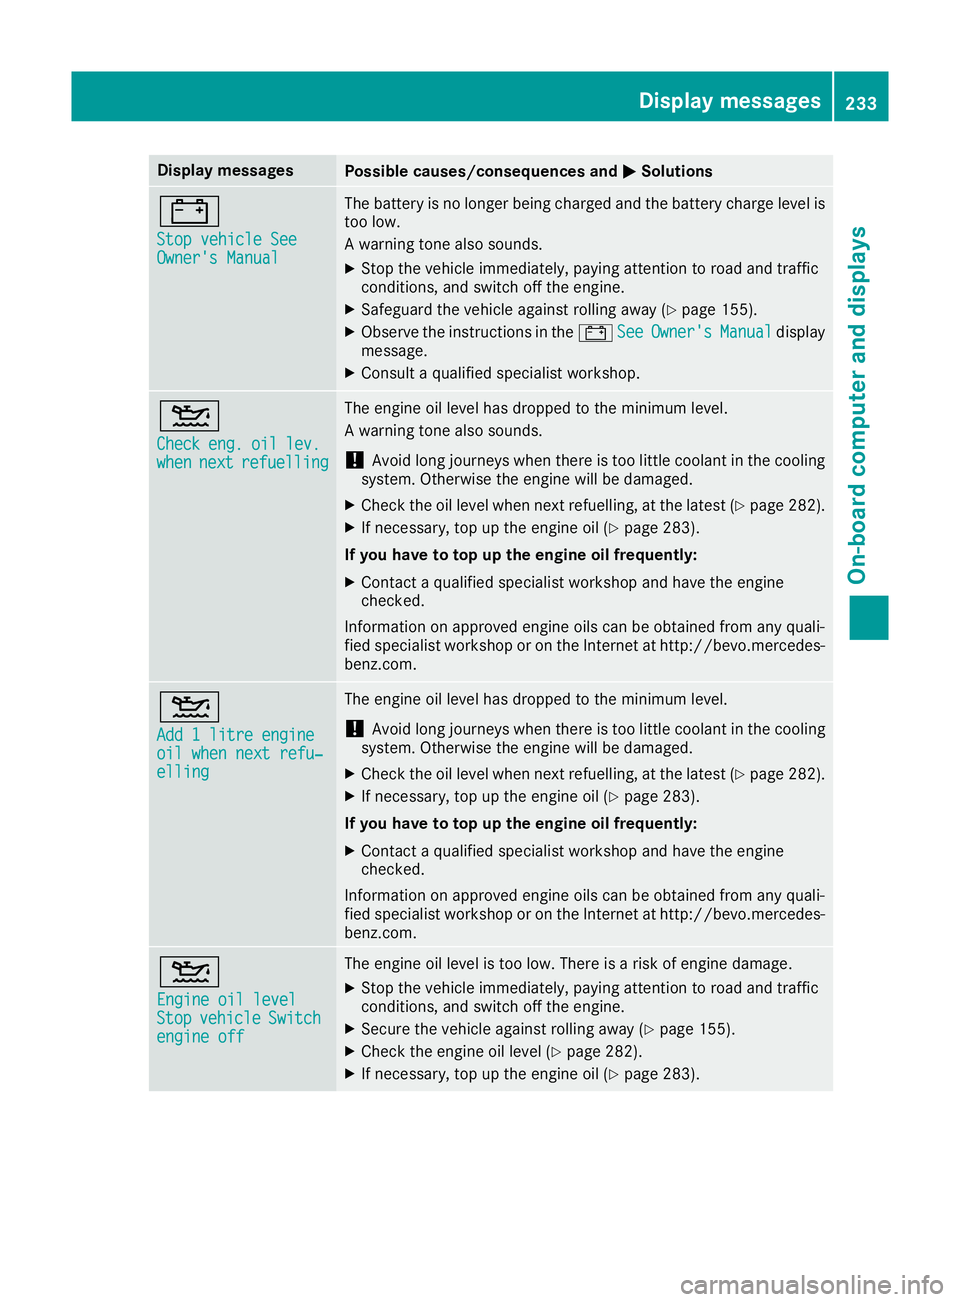
Display messages
Possible causes/consequences and
M
MSolutions #
Stop vehicle See Stop vehicle See
Owner's Manual Owner's Manual The battery is no longer being charged and the battery charge level is
too low.
A warning tone also sounds.
X Stop the vehicle immediately, paying attention to road and traffic
conditions, and switch off the engine.
X Safeguard the vehicle against rolling away (Y page 155).
X Observe the instructions in the #See SeeOwner's
Owner's Manual
Manualdisplay
message.
X Consult a qualified specialist workshop. 4
Check Check
eng.
eng.oil
oillev.
lev.
when
when next
nextrefuelling
refuelling The engine oil level has dropped to the minimum level.
A warning tone also sounds.
! Avoid long journeys when there is too little coolant in the cooling
system. Otherwise the engine will be damaged.
X Check the oil level when next refuelling, at the latest (Y page 282).
X If necessary, top up the engine oil (Y page 283).
If you have to top up the engine oil frequently:
X Contact a qualified specialist workshop and have the engine
checked.
Information on approved engine oils can be obtained from any quali-
fied specialist workshop or on the Internet at http://bevo.mercedes-
benz.co m. 4
Add 1 litre engine Add 1 litre engine
oil when next refu‐ oil when next refu‐
elling elling The engine oil level has dropped to the minimum level.
! Avoid long journeys when there is too little coolant in the cooling
system. Otherwise the engine will be damaged.
X Check the oil level when next refuelling, at the latest (Y page 282).
X If necessary, top up the engine oil (Y page 283).
If you have to top up the engine oil frequently:
X Contact a qualified specialist workshop and have the engine
checked.
Information on approved engine oils can be obtained from any quali-
fied specialist workshop or on the Internet at http://bevo.mercedes-
benz.com. 4
Engine oil level Engine oil level
Stop Stop
vehicle
vehicle Switch
Switch
engine off
engine off The engine oil level is too low. There is a risk of engine damage.
X Stop the vehicle immediately, paying attention to road and traffic
conditions, and switch off the engine.
X Secure the vehicle against rolling away (Y page 155).
X Check the engine oil level (Y page 282).
X If necessary, top up the engine oil (Y page 283). Display messages
233On-board computer and displays Z
Page 285 of 345
Closing the bonnet
X
Raise the bonnet slightly and, at the same
time, remove support strut ?from yellow
retaining clip =.
X Swing support strut ?down and press it into
bracket Auntil it engages.
X Lower the bonnet and let it fall from a height
of approximately 20 cm.
X Check that the bonnet has engaged properly.
If the bonnet can be raised slightly, it is not
properly engaged. Do not press the bonnet
closed. Open the bonnet again and close it
with a little more force. Engine oil
General notes Depending on your driving style, the vehicle
consumes up to 0.8 litres of oil per 1,000 km.
The oil consumption may be higher than this
when the vehicle is new or if you frequently drive
at high engine speeds.
Depending on the engine, the oil dipstick may be installed at a different location.
When checking the oil level:
R park the vehicle on a level surface
R the engine should be switched off for approx-
imately five minutes if the engine is at normal
operating temperature.
R if the engine is not at normal operating tem-
perature, e.g. if the engine was only started
briefly, wait approximately 30 minute sbefore
carrying out the measurement
Checking the oil level using the oil dip-
stick G
WARNING
Certain components in the engine compart-
ment could be very hot, e.g. the engine, the
radiator and parts of the exhaust system.
There is a risk of injury when accessing the
engine compartment.
As far as possible, allow the engine to cool
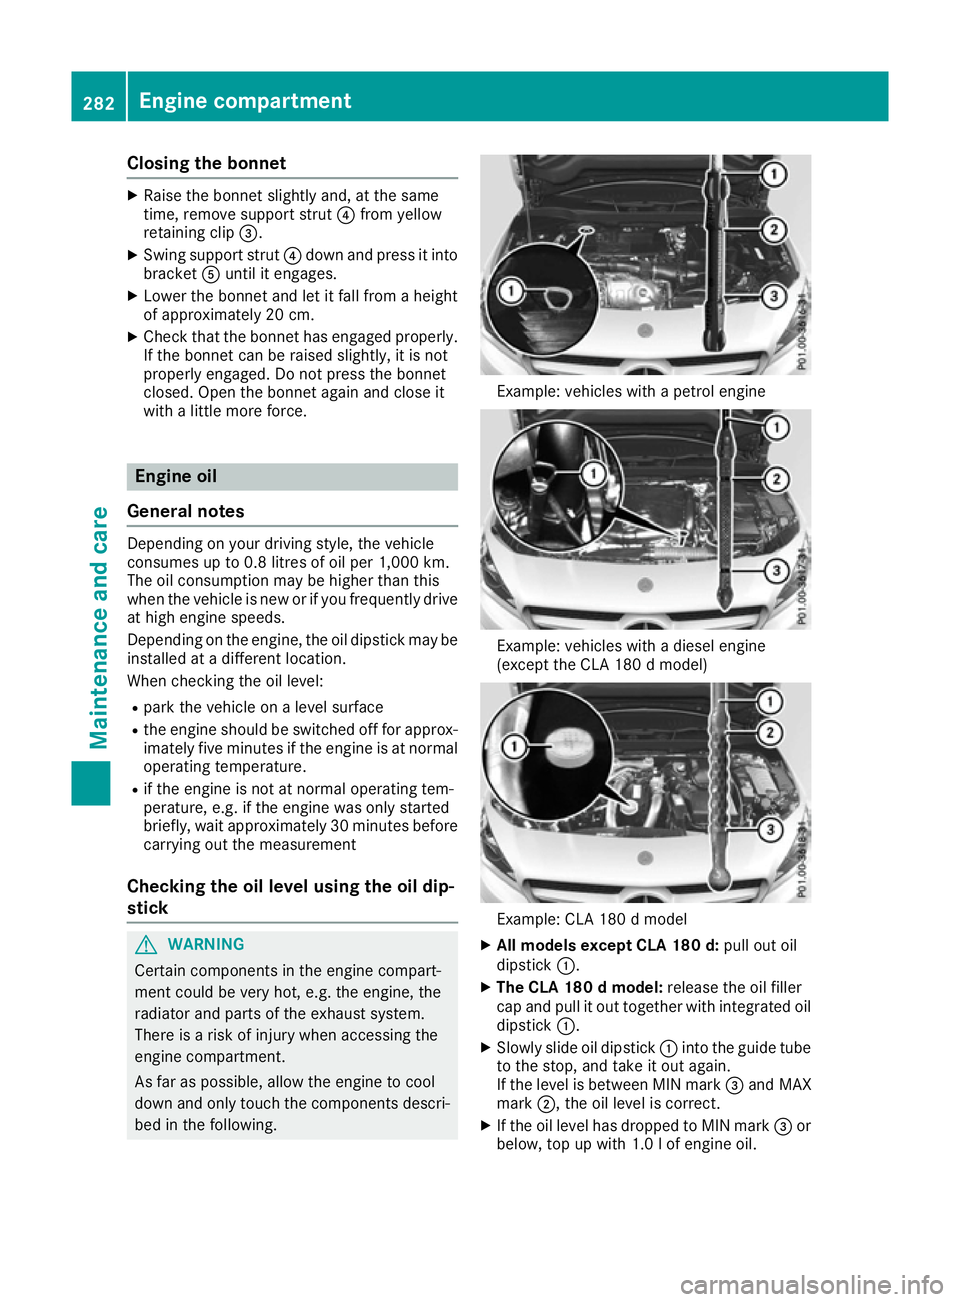
down and only touch the components descri- bed in the following. Example: vehicles with a petrol engine
Example: vehicles with a diesel engine
(except the CLA 180 d model)
Example: CLA 180 d model
X All models except CLA 180 d: pull out oil
dipstick :.
X The CLA 180 d model: release the oil filler
cap and pull it out together with integrated oil dipstick :.
X Slowly slide oil dipstick :into the guide tube
to the stop, and take it out again.
If the level is between MIN mark =and MAX
mark ;, the oil level is correct.
X If the oil level has dropped to MIN mark =or
below, top up with 1.0 lof engine oil. 282
Engine compartmentMaintenance and care
Page 286 of 345
Topping up engine oil
G
WARNING
Certain components in the engine compart-
ment could be very hot, e.g. the engine, the
radiator and parts of the exhaust system.
There is a risk of injury when accessing the
engine compartment.
As far as possible, allow the engine to cool
down and only touch the components descri- bed in the following. G
WARNING
If engine oil comes into contact with hot com- ponents in the engine compartment, it may
ignite. There is a risk of fire and injury.
Make sure that engine oil does not spill out
over the filler neck. Allow the engine to cool
down and thoroughly clean the components
that have come into contact with engine oil
before you start the engine. H
Environmental note
When topping up the oil, take care not to spill
any. If oil enters the soil or waterways, it is
harmful to the environment.
! Use only engine oils and oil filters that are
approved for vehicles with a service system. A
list of the engine oils and oil filters that have
been tested and approved in accordance with Mercedes-Benz Specifications for Service
Products is available at any Mercedes-Benz
Service Centre.
The following cause engine failure or damage
to the exhaust system:
R Use of engine oils and oil filters that have
not been expressly approved for the service system
R Replacement of engine oil and oil filter after
the replacement interval specified by the
service system has expired
R Use of engine oil additives
! Do not add too much oil. Topping up with too
much engine oil can result in damage to the
engine or to the catalytic converter. Have
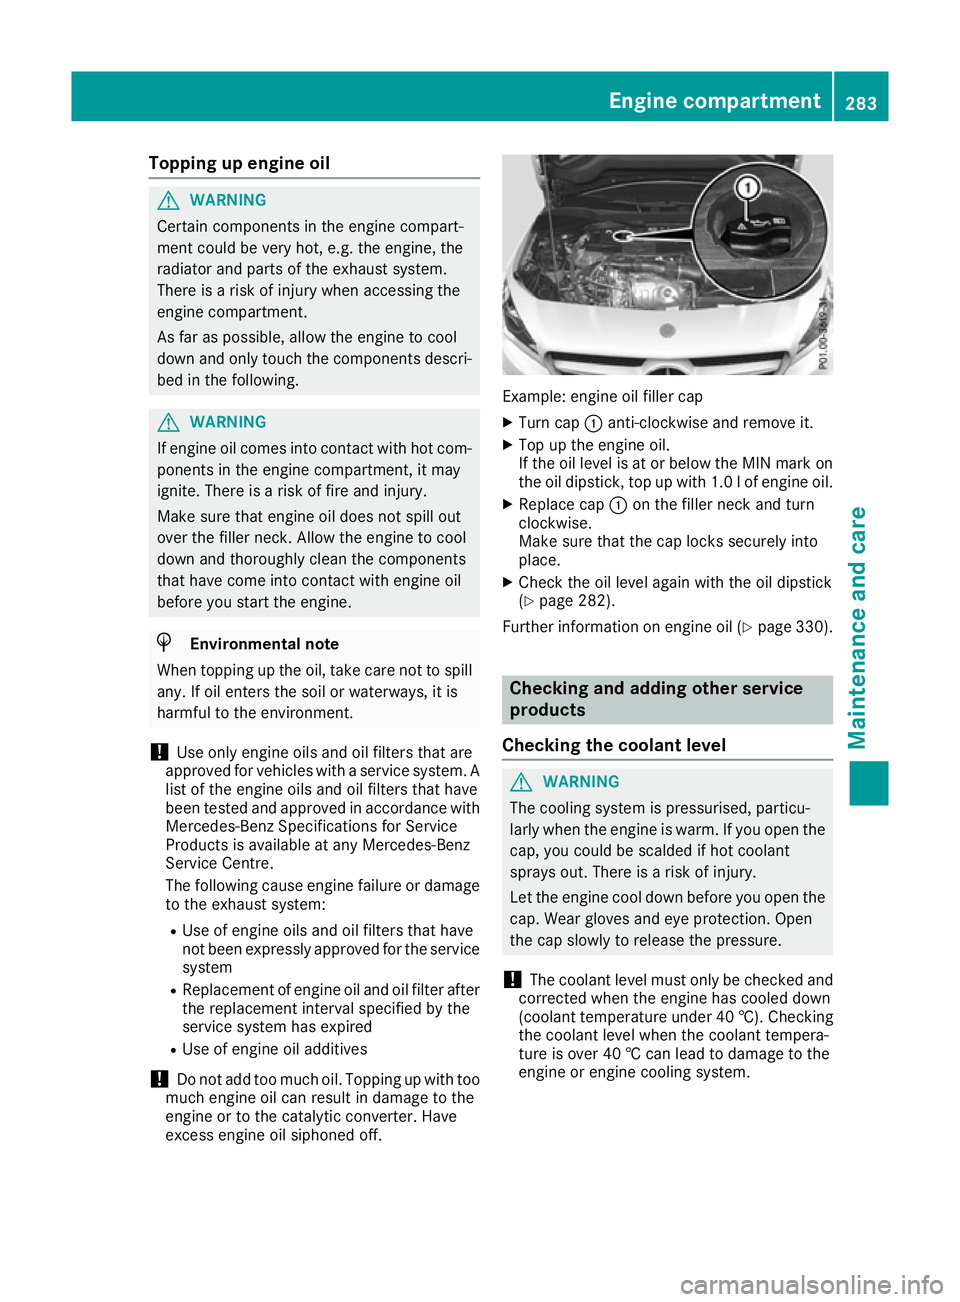
excess engine oil siphoned off. Example: engine oil filler cap
X Turn cap :anti-clockwise and remove it.
X Top up the engine oil.
If the oil level is at or below the MIN mark on
the oil dipstick, top up with 1.0 lof engine oil.
X Replace cap :on the filler neck and turn
clockwise.
Make sure that the cap locks securely into
place.
X Check the oil level again with the oil dipstick
(Y page 282).
Further information on engine oil (Y page 330). Checking and adding other service
products
Checking the coolant level G
WARNING
The cooling system is pressurised, particu-
larly when the engine is warm. If you open the cap, you could be scalded if hot coolant
sprays out. There is a risk of injury.
Let the engine cool down before you open the
cap. Wear gloves and eye protection. Open
the cap slowly to release the pressure.
! The coolant level must only be checked and
corrected when the engine has cooled down
(coolant temperature under 40 †). Checking
the coolant level when the coolant tempera-
ture is over 40 † can lead to damage to the
engine or engine cooling system. Engine compartment
283Maintenance and care Z
Page 287 of 345
X
Park the vehicle on a level surface.
Check the coolant level only if the vehicle is
on a level surface and the engine has cooled
down.
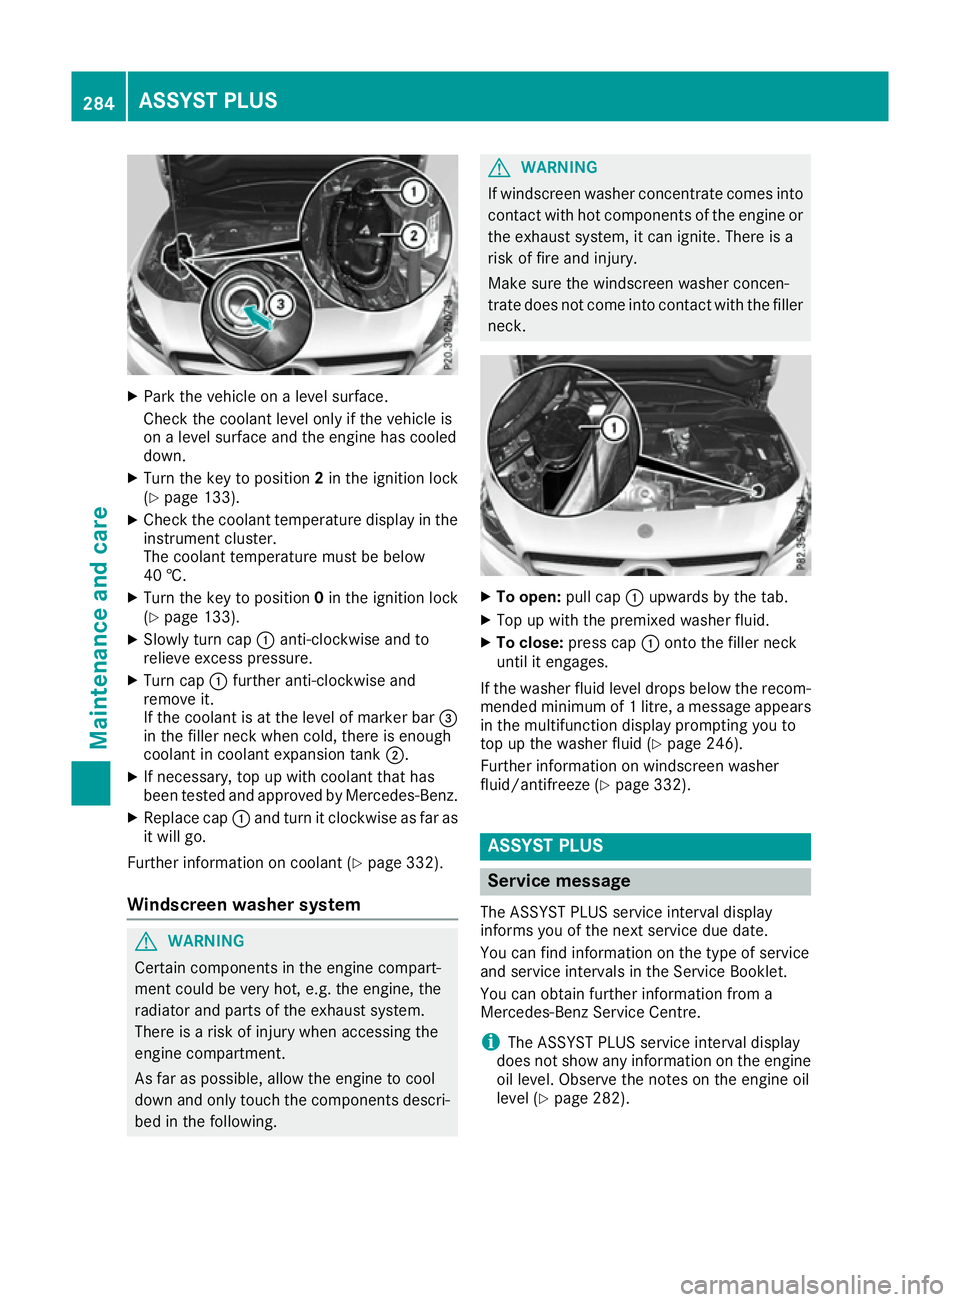
X Turn the key to position 2in the ignition lock
(Y page 133).
X Check the coolant temperature display in the
instrument cluster.
The coolant temperature must be below
40 †.
X Turn the key to position 0in the ignition lock
(Y page 133).
X Slowly turn cap :anti-clockwise and to
relieve excess pressure.
X Turn cap :further anti-clockwise and
remove it.
If the coolant is at the level of marker bar =
in the filler neck when cold, there is enough
coolant in coolant expansion tank ;.
X If necessary, top up with coolant that has
been tested and approved by Mercedes-Benz.
X Replace cap :and turn it clockwise as far as
it will go.
Further information on coolant (Y page 332).
Windscreen washer system G
WARNING
Certain components in the engine compart-
ment could be very hot, e.g. the engine, the
radiator and parts of the exhaust system.
There is a risk of injury when accessing the
engine compartment.
As far as possible, allow the engine to cool
down and only touch the components descri- bed in the following. G
WARNING
If windscreen washer concentrate comes into contact with hot components of the engine or
the exhaust system, it can ignite. There is a
risk of fire and injury.
Make sure the windscreen washer concen-
trate does not come into contact with the filler neck. X
To open: pull cap:upwards by the tab.
X Top up with the premixed washer fluid.
X To close: press cap :onto the filler neck
until it engages.
If the washer fluid level drops below the recom- mended minimum of 1 litre, a message appears in the multifunction display prompting you to
top up the washer fluid (Y page 246).
Further information on windscreen washer
fluid/antifreeze (Y page 332). ASSYST PLUS
Service message
The ASSYST PLUS service interval display
informs you of the next service due date.
You can find information on the type of service
and service intervals in the Service Booklet.
You can obtain further information from a
Mercedes-Benz Service Centre.
i The ASSYST PLUS service interval display
does not show any information on the engine oil level. Observe the notes on the engine oil
level (Y page 282). 284
ASSYST PLUSMaintenance and care
Page 288 of 345
The multifunction display shows a service mes-
sage for a few seconds, e.g.:
R Service A in .. days
Service A in .. days
R Service A due
Service A due
R Service A overdue by .. days
Service A overdue by .. days
Depending on the operating conditions of the
vehicle, the remaining time or distance until the
next service due date is displayed.
The letter indicates which service is due. A
A
stands for a minor service and B Bfor a major ser-
vice. A number or another letter may be dis-
played after the letter.
For certain countries only: the position after the
letter A
A or B Bindicates any necessary additional
maintenance work. If you notify a qualified spe- cialist workshop of this display, you will receive
a statement on the associated costs.
The ASSYST PLUS service interval display does
not take into account any periods of time during
which the battery is disconnected.
Maintaining the time-dependent service sched-
ule:
X Note down the service due date displayed in
the multifunction display before disconnect-
ing the battery.
or
X After reconnecting the battery, subtract the
battery disconnection periods from the ser-
vice date shown on the display. Hiding service messages
X Press the aor% button on the steering
wheel. Displaying service messages
X Switch the ignition on.
X Press the =or; button to select the
Serv. Serv. menu.
X Press the 9or: button to select the
ASSYST
ASSYST PLUS
PLUSsubmenu and confirm by press-
ing the abutton.
The service due date appears in the multi-
function display. Information about service
Resetting the ASSYST PLUS service
interval display !
If the ASSYST PLUS service interval display
has been inadvertently reset, this setting can
be corrected at a qualified specialist work-
shop.
Have service work carried out as described in the Service Booklet. This may otherwise lead
to increased wear and damage to the major
assemblies or the vehicle.
A qualified specialist workshop, e.g. a
Mercedes-Benz Service Centre, will reset the
ASSYST PLUS service interval display after the
service work has been carried out. You can also
obtain further information on maintenance
work, for example.
Special service requirements The prescribed service interval is based on nor-
mal operation of the vehicle. Service work will
need to be performed more often if the vehicle is
operated under arduous conditions or increased loads, for example:
R Regular city driving with frequent intermedi-
ate stops
R If the vehicle is primarily used to travel short
distances
R For frequent use in mountainous terrain or on
poor road surfaces
R If the engine is often left idling for long periods
R In particularly dusty conditions, or if air-recir-
culation mode is frequently used.
In these or similar operating conditions, have
the interior filter, engine air cleaner, engine oil
and oil filter, for example, changed more fre-
quently. The tyres must be checked more fre-
quently if the vehicle is operated under
increased loads. Further information can be
obtained at a qualified specialist workshop, e.g.
a Mercedes-Benz Service Centre.
Driving abroad An extensive Mercedes-Benz Service network is
also available in other countries. You can obtain further information from any Mercedes-Benz
Service Centre. ASSYST PLUS
285Maintenance and care Z
Page 293 of 345
Cleaning the exhaust tail pipes
G
WARNING
The exhaust tail pipe and tail pipe trim can
become very hot. If you come into contact
with these parts of the vehicle, you could burn
yourself. There is a risk of injury.
Always be particularly careful around the
exhaust tail pipe and the tail pipe trim. Allow
these components to cool down before touch-
ing them.
! Do not clean the exhaust pipe with acid-
based cleaning agents, such as sanitary
cleanser or wheel cleaner.
! Mercedes-AMG vehicles with black exhaust
pipes: the black-chrome tailpipe finishers
should not be polished with a chrome polish.
They will otherwise lose their black sheen. For optimal care, the finishers should be rubbed
with a lightly oiled cloth after every car wash.
Commercially available engine and care oils
are suitable for this.
For heavier soiling, you can apply a fine paint- work polish with a microfibre cloth. Remove
the excess polish residue after polishing.
Impurities combined with the effects of road grit and corrosive environmental factors may cause
flash rust to form on the surface. You can
restore the original shine of the exhaust pipe by
cleaning it regularly, especially in winter and
after washing the vehicle.
X Clean the exhaust pipe with a care product
tested and approved by Mercedes-Benz.
Cleaning the trailer tow hitch H
Environmental note
Dispose of oily and greasy cloths in an envi-
ronmentally-responsible manner.
! Do not clean the ball coupling with a high-
pressure cleaner. Do not use solvents.
! Please note the care instructions in the
trailer coupling manufacturer's operating
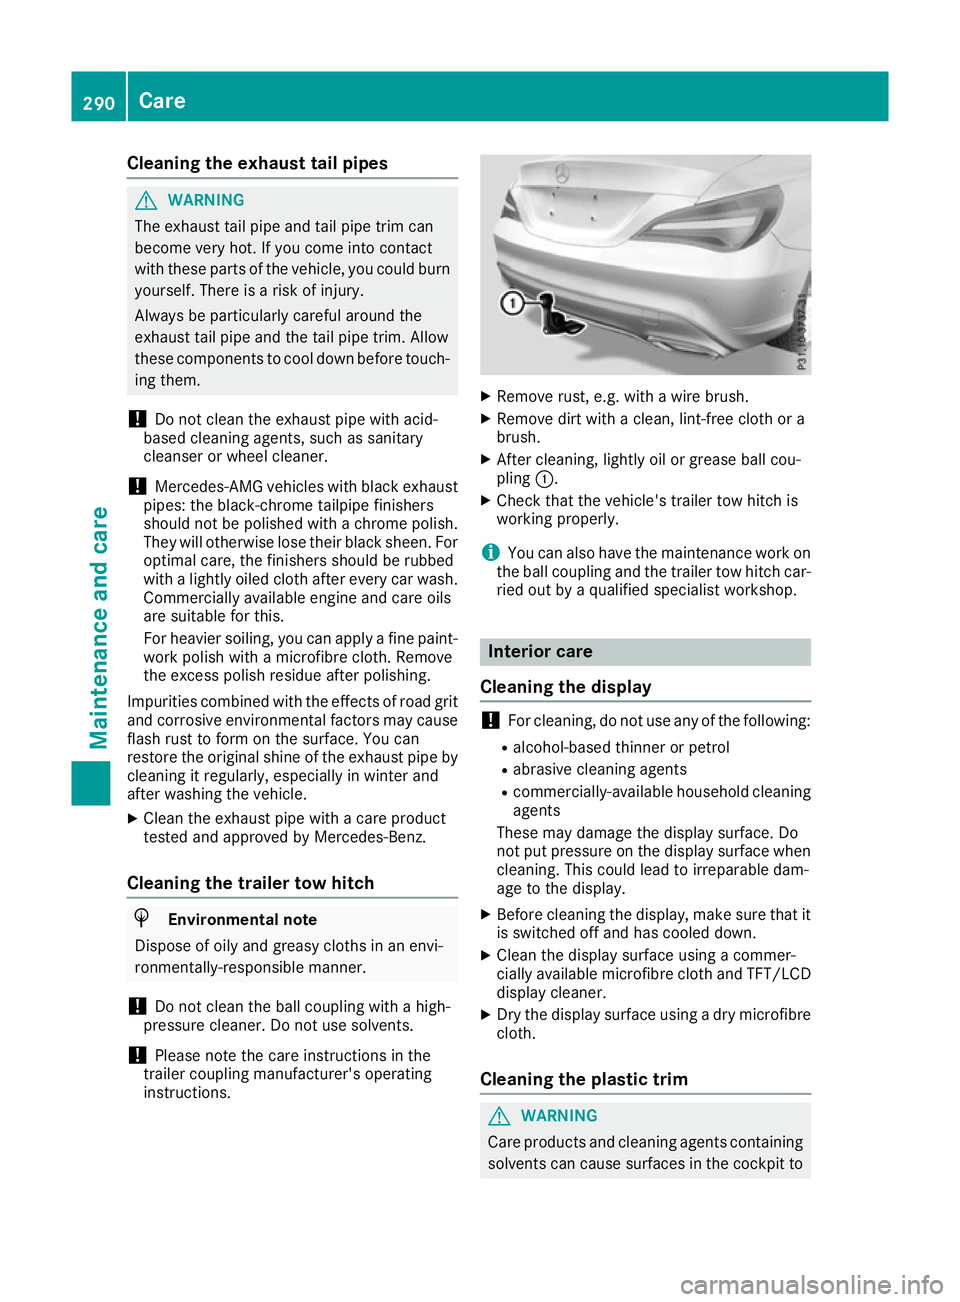
instructions. X
Remove rust, e.g. with a wire brush.
X Remove dirt with a clean, lint-free cloth or a
brush.
X After cleaning, lightly oil or grease ball cou-
pling :.
X Check that the vehicle's trailer tow hitch is
working properly.
i You can also have the maintenance work on
the ball coupling and the trailer tow hitch car-
ried out by a qualified specialist workshop. Interior care
Cleaning the display !
For cleaning, do not use any of the following:
R alcohol-based thinner or petrol
R abrasive cleaning agents
R commercially-available household cleaning
agents
These may damage the display surface. Do
not put pressure on the display surface when
cleaning. This could lead to irreparable dam-
age to the display.
X Before cleaning the display, make sure that it
is switched off and has cooled down.
X Clean the display surface using a commer-
cially available microfibre cloth and TFT/LCD
display cleaner.
X Dry the display surface using a dry microfibre
cloth.
Cleaning the plastic trim G
WARNING
Care products and cleaning agents containing solvents can cause surfaces in the cockpit to 290
CareMaintenance and care