cooling MERCEDES-BENZ CLA COUPE 2016 Owners Manual
[x] Cancel search | Manufacturer: MERCEDES-BENZ, Model Year: 2016, Model line: CLA COUPE, Model: MERCEDES-BENZ CLA COUPE 2016Pages: 345, PDF Size: 12.41 MB
Page 7 of 345
1, 2, 3 ...
4ETS (Electronic Traction System) see ETS/4ETS (Electronic Trac-
tion System)
4MATIC
Display message ............................ 244
4MATIC (permanent four-wheel
drive) .................................................. 176
12 V socket
see Sockets A
ABS (Anti-lock Braking System) Display message ............................ 217
Function/notes ................................ 66
Important safety notes .................... 66
Warning lamp .................................2 50
Accident
Automatic measures after an acci-
dent ................................................. 53
Activating media mode
General notes ................................ 266
Activating/deactivating air-recir-
culation mode ................................... .124
Activating/deactivating cooling
with air dehumidification ................. 121
Active Brake Assist
Activating or deactivating .............. 209
Display message ............................ 223
Function/notes ................................ 67
ADAPTIVE BRAKE ................................. 73
Adaptive brake lights .......................... 69
Adaptive Damping System
Function/notes ............................ .176
Adaptive Highbeam Assist
Display message ............................ 231
Function/notes ............................ .109
Switching on/off ........................... 110
Additional speedometer ................... 210
Additives (engine oil) ........................ 331
Address book
See also Digital Owner's Manual ... 259
Adjusting the headlamp range ......... 108
Adjusting the volume
COMAND Online ............................ 260 Adjusting volume
Audio 20 ........................................ 260
Air conditioning
General notes ................................ 117
Air filter (white display message) .... 234
Air pressure
see Tyre pressure
Air vents
Important safety notes .................. 130
Rear ............................................... 131
Setting the centre air vents ........... 131
Setting the side air vents .............. .131
Air-conditioning system
see Climate control
Airbag
Automatic front-passenger front
airbag deactivatio n .......................... 47
Introduction ..................................... 44
PASSENGER AIR BAG indicator
lamps ............................................... 40
Airbags
Display message ............................ 226
Front airbag (driver, front
passenger) ....................................... 45
Important safety guidelines ............. 44
Kneebag .......................................... .46
Sidebag ............................................ 46
Triggering ......................................... 51
Windowbag ...................................... 46
Alarm
ATA (Anti-Theft Alarm system) ......... 73
Switching off (ATA) .......................... 73
Switching the function on/off
(ATA) ................................................ 73
Alarm system
see ATA (Anti-Theft Alarm system)
AMG
Performance Seat .......................... 101
RIDE CONTROL sports suspen-
sion ................................................ 175
AMG menu (on-board computer) ..... 213
AMG Performance exhaust sys-
tem ..................................................... 139
AMG RIDE CONTROL
General Information ....................... 175
Anti-glare film .................................... 279
Anti-lock braking system
see ABS (Anti-lock Braking System) 4
Index
Page 10 of 345
Braking assistance appropriate to
the situation
Function/note s................................ 68
Breakdown
Where will I find...? ........................ 293
see Flat tyre
see Tow-starting
see Towing away
Buttons on the steering column ...... 201C
Calling up a fault see Display messages
Car
see Vehicle
Car wash (care) ................................. 286
Care
Automatic car wash ....................... 286
Carpets .......................................... 292
Display ........................................... 290
Exhaust pipe .................................. 290
Exterior lighting ............................. 289
Gear or selector lever .................... 291
High-pressure cleaner .................... 287
Interior ........................................... 290
Matt paintwork .............................. 287
Note s............................................. 286
Paint .............................................. 287
Plastic trim .................................... 290
Reversing camera .......................... 289
Roof lining ...................................... 292
Seat belt ........................................ 291
Seat cove r..................................... 291
Sensors ......................................... 289
Steering wheel ............................... 291
Trim pieces .................................... 291
Washing by hand ........................... 286
Wheels ........................................... 288
Windows ........................................ 288
Wiper blades .................................. 288
Wooden trim .................................. 291
CD
See also Digital Owner's Manua l... 259
CD player (on-board computer) ........ 206
Central locking
Automatic locking (on-board com-puter) ............................................. 211 Locking/unlocking (key) .................. 76
Centre console
Lower section .................................. 35
Upper section .................................. 34
Child
Restraint system .............................. 54
Child seat
Forward-facing restraint system ...... 59
i-Size ................................................ 55
ISOFIX .............................................. 55
On the front-passenger seat ............ 57
Rearward-facing restraint system .... 58
Recommendations ........................... 63
Suitable positions ............................ 59
Top Tether ....................................... 56
Child-proof locks
Important safety notes .................... 64
Rear doors ....................................... 65
Cigarette lighter ................................ 276
Cleaning
Mirror turn signal ........................... 289
Trailer tow hitch ............................. 290
Climate control
Air conditioning ............................. 118
Auxiliary heating/ventilation .......... 126
Controlling automaticall y............... 121
Convenience opening/closing
(air-recirculation mode) ................. 125
Cooling with air dehumidification .. 121
Demisting the windows .................. 124
Demisting the windscreen ............. 123
Indicator lamp ................................ 121
Information on using
THERMOTRONIC automatic cli-
mate control .................................. 120
Notes on using the air-condition-
ing system ..................................... 118
Overview of systems ...................... 117
Problem with the rear window
heating .......................................... 124
Problems with cooling with air
dehumidification ............................ 121
Setting the air distribution ............. 122
Setting the air vents ...................... 130
Setting the airflow ......................... 123
Setting the temperature ................ 122
Switching air-recirculation mode
on/of f............................................ 124 Index
7
Page 11 of 345
Switching on/of
f........................... 120
Switching residual heat on/off ...... 126
Switching the rear window heat-
ing on/of f...................................... 124
Switching the ZONE function
on/of f............................................ 123
THERMOTRONIC (2-zone) auto-
matic climate control ..................... 119
Cockpit
Overview .......................................... 30
COMAND display
Cleaning ......................................... 290
COMAND Online
Switching on/of f........................... 259
Combination switch .......................... 109
Connecting a USB device
See also Digital Owner's Manua l... 259
Consumption statistics (on-board
computer) .......................................... 203
Controller ........................................... 260
Convenience closing feature .............. 90
Convenience opening feature ............ 90
Convenience opening/closing (air-
recirculation mode) ........................... 125
Coolant (engine)
Checking the level ......................... 283
Display message ............................ 231
Important safety notes .................. 332
Temperature (on-board computer, Mercedes-AMG vehicles) ............... 213
Temperature gaug e........................ 201
Warning lamp ................................. 255
Cooling
see Climate control
Copyright ............................................. 29
Cornering light function
Display message ............................ 228
Cruise control
Activation conditions ..................... 163
Cruise control lever ....................... 163
Deactivating ................................... 164
Display message ............................ 237
Driving system ............................... 162
Important safety notes .................. 163
LIM indicator lamp ......................... 163
Selecting ........................................ 163
Setting a speed .............................. 164 Storing and maintaining current
speed ............................................. 163
Cup holder
Centre console .............................. 274
Important safety notes .................. 273
Rear compartment ......................... 274 D
Dashboard see Instrument cluster
Data
see Technical data
Data modem mode
Telephone with Bluetooth ®
(SAP
profile) ........................................... 265
Daytime driving lights
Display message ............................ 230
Function/note s............................. 107
Switching on/off (on-board com-
puter) ............................................. 211
Dealership
see Qualified specialist workshop
Declarations of conformity ................. 26
Diagnostics connection ...................... 27
Diesel .................................................. 330
Digital Owner's Manual
Help ................................................. 23
Introduction ..................................... 23
Digital speedometer ......................... 204
Dipped-beam headlamps
Display message ............................ 228
Replacing bulb s............................. 112
Setting for driving abroad (sym-
metrical) ........................................ 107
Switching on/of f........................... 108
DIRECT SELECT lever
Automatic transmission ................. 144
Display message
Driving systems ............................. 234
Display messages
ASSYST PLUS ................................ 284
Calling up (on-board computer) ..... 216
Engine ............................................ 231
General information ....................... 216
Hiding (on-board computer) ........... 216
Key ................................................ 246
Lights ............................................. 228 8
Index
Page 120 of 345
Overview of climate control systems
General notes
Observe the settings recommended on the fol-
lowing pages. Otherwise, the windows could
mist up.
To prevent the windows from misting up:
R switch off climate control only briefly
R activate air-recirculation mode only briefly
R switch on "Cooling with air dehumidification"
R activate the "Windscreen demisting" function
briefly, if required
The air-conditioning system or THERMOTRONIC
automatic climate control regulates the temper- ature and the humidity of the vehicle interior andfilters undesirable substances from the air.
The air-conditioning system or THERMOTRONIC automatic climate control can only be operatedwhen the engine is running. Optimum operationis only achieved with the side windows and pan-
orama sliding sunroof closed.
The residual heat function can only be activated or deactivated with the ignition switched off
(Y page 126).
Always keep the ventilation flaps behind the
side panelling clear (Y page 113). Otherwise the
vehicle will not be ventilated correctly.
i Ventilate the vehicle for a brief period during
warm weather, e.g. using the convenience
opening feature (Y page 90). This will speed up the cooling process and the desired inte-
rior temperature will be reached more
quickly.
i The integrated filter filters out most parti-
cles of dust and soot and completely filters
out pollen. With THERMOTRONIC automatic
climate control, gaseous pollutants and
odours will also be reduced. A clogged filter
reduces the amount of air supplied to the
vehicle interior. For this reason, you should
always observe the interval for replacing the
filter, which is specified in the Service Book-
let. As this depends on environmental condi-
tions, e.g. heavy air pollution, the interval may be shorter than stated in the Service Booklet.
i Vehicles with auxiliary heating:
Under
certain environmental conditions, the resid-
ual heat function may be activated automati-
cally an hour after the ignition key has been
removed in order to dry the automatic climate
control. The blue LED on the rocker switch in the centre console lights up when the active
function to dry the automatic climate control is on. The vehicle is then ventilated for
30 minutes.
Vehicles without auxiliary heating: Under
certain environmental conditions, the resid-
ual heat function may be activated automati-
cally an hour after the ignition key has been
removed in order to dry the automatic climate control. The vehicle is then ventilated for
30 minutes. Overview of climate control systems
117Climate control
Page 121 of 345
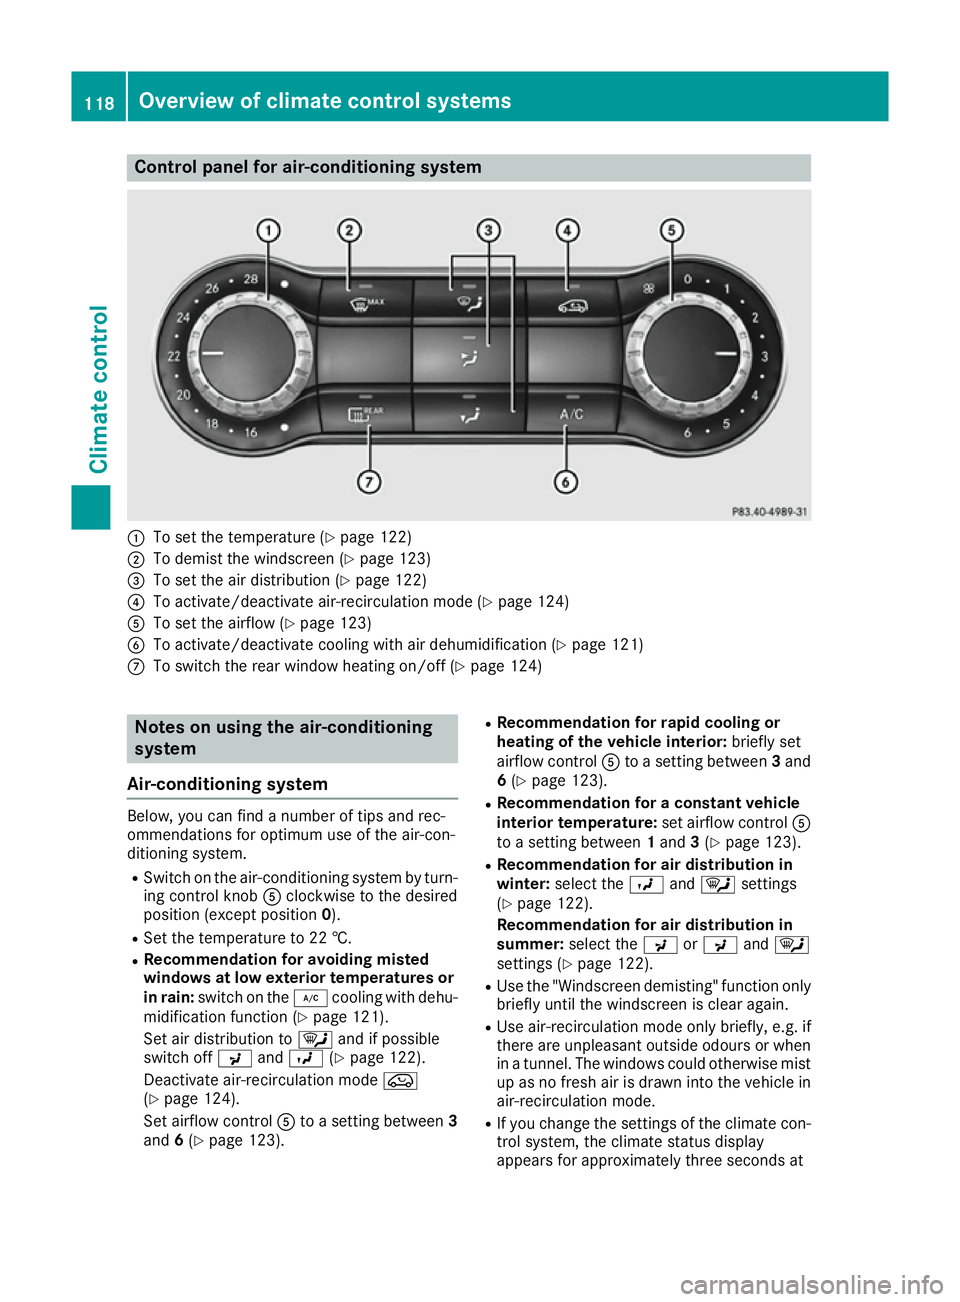
Control panel for air-conditioning system
:
To set the temperature (Y page 122)
; To demist the windscreen (Y page 123)
= To set the air distribution (Y page 122)
? To activate/deactivate air-recirculation mode (Y page 124)
A To set the airflow (Y page 123)
B To activate/deactivate cooling with air dehumidification (Y page 121)
C To switch the rear window heating on/off (Y page 124)Notes on using the air-conditioning
system
Air-conditioning system Below, you can find a number of tips and rec-
ommendations for optimum use of the air-con-
ditioning system.
R Switch on the air-conditioning system by turn-
ing control knob Aclockwise to the desired
position (except position 0).
R Set the temperature to 22 †.
R Recommendation for avoiding misted
windows at low exterior temperatures or
in rain: switch on the ¿cooling with dehu-
midification function (Y page 121).
Set air distribution to ¯and if possible
switch off PandO (Ypage 122).
Deactivate air-recirculation mode e
(Y page 124).
Set airflow control Ato a setting between 3
and 6(Y page 123). R
Recommendation for rapid cooling or
heating of the vehicle interior: briefly set
airflow control Ato a setting between 3and
6 (Y page 123).
R Recommendation for a constant vehicle
interior temperature: set airflow controlA
to a setting between 1and 3(Y page 123).
R Recommendation for air distribution in
winter: select the Oand¯ settings
(Y page 122).
Recommendation for air distribution in
summer: select the PorP and¯
settings (Y page 122).
R Use the "Windscreen demisting" function only
briefly until the windscreen is clear again.
R Use air-recirculation mode only briefly, e.g. if
there are unpleasant outside odours or when
in a tunnel. The windows could otherwise mist up as no fresh air is drawn into the vehicle inair-recirculation mode.
R If you change the settings of the climate con-
trol system, the climate status display
appears for approximately three seconds at 118
Overview of climate control systemsClimate control
Page 122 of 345
the bottom of the screen in the multimedia
system display (see separate operating
instructions). You will see the current settings
of the various climate control functions.
DYNAMIC SELECT button (except
Mercedes-AMG vehicles) You can choose between various drive programs
with the DYNAMIC SELECT button
(Y page 141).
If you have selected drive program E:
R when heating, the electrical heater booster is
deactivated and in the warming-up phase
heat output is reduced
R the rear window heating running time is
reduced Depending on the configuration, the climate set-
tings can also be influenced in drive program I.
If you have selected drive program Cor S, the
climate settings are not affected.
ECO start/stop function During automatic engine switch-off, the climate
control operates only at a reduced capacity. If
you require the full climate control output, you
can switch off the ECO start/stop function by
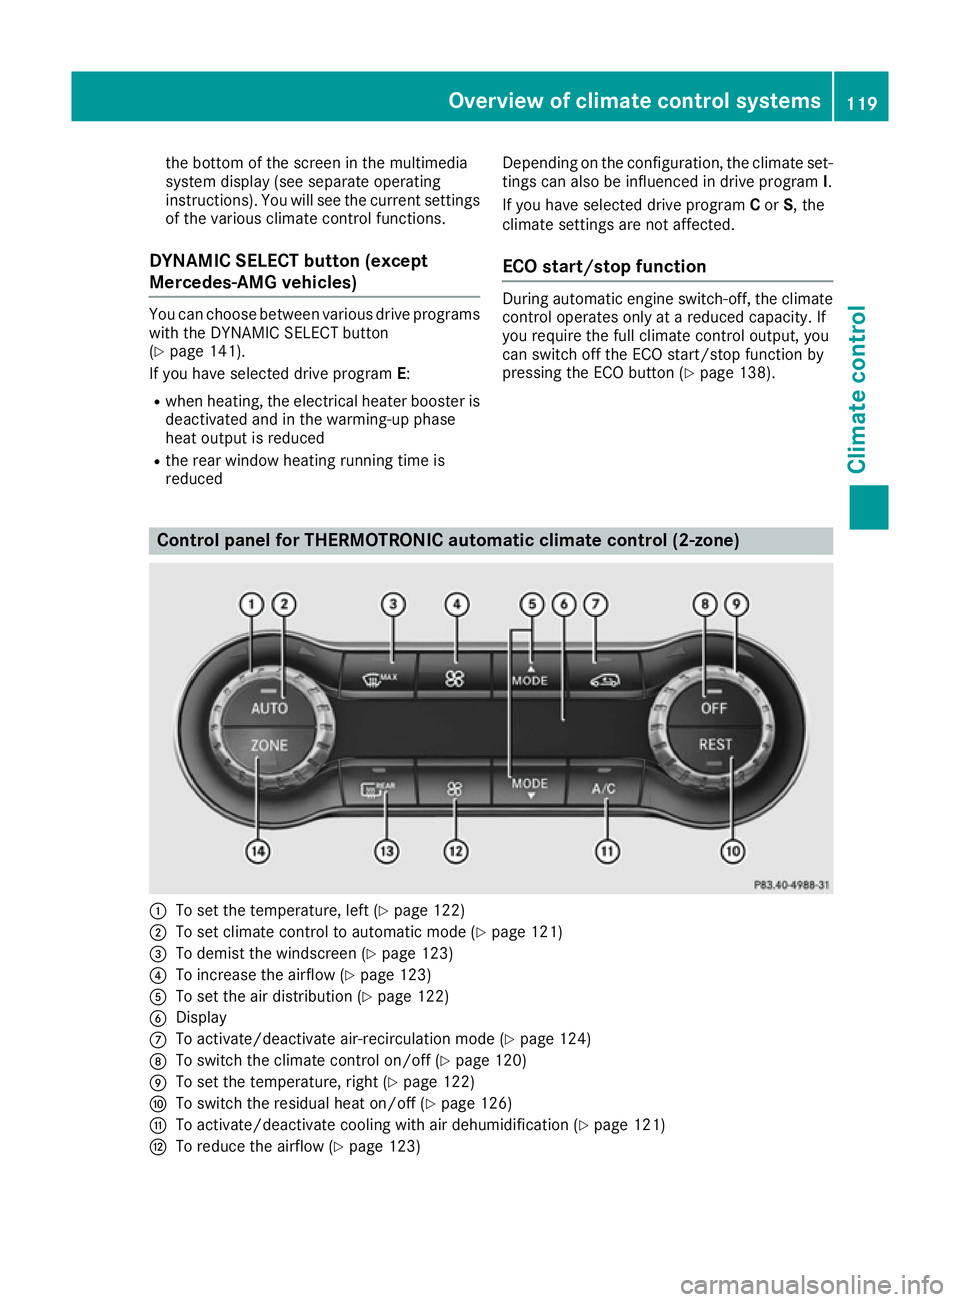
pressing the ECO button (Y page 138).Control panel for THERMOTRONIC automatic climate control (2-zone)
:
To set the temperature, left (Y page 122)
; To set climate control to automatic mode (Y page 121)
= To demist the windscreen (Y page 123)
? To increase the airflow (Y page 123)
A To set the air distribution (Y page 122)
B Display
C To activate/deactivate air-recirculation mode (Y page 124)
D To switch the climate control on/off (Y page 120)
E To set the temperature, right (Y page 122)
F To switch the residual heat on/off (Y page 126)
G To activate/deactivate cooling with air dehumidification (Y page 121)
H To reduce the airflow (Y page 123) Overvie
w of climate cont rol systems
119Climate control
Page 124 of 345
THERMOTRONIC automatic climate
control X
Turn the key to position 2in the ignition lock
(Y page 133).
X To activate: press theÃbutton.
The indicator lamp in the Ãbutton lights
up. Airflow and air distribution are set to auto-
matic mode.
or X Press the ^button.
The indicator lamp in the ^button goes
out. The previous settings are reactivated.
X To deactivate: press the^button.
The indicator lamp in the ^button lights
up.
i THERMOTRONIC automatic climate control:
switch on climate control primarily using the
à button. Activating/deactivating cooling with
dehumidification
General notes If you deactivate the "Cooling with air dehumid-
ification" function, the air inside the vehicle will not be cooled during warm weather. The air
inside the vehicle will also not be dehumidified.
The windows can mist up more quickly. There-
fore, only deactivate the "Cooling with air dehu- midification" function briefly.
The "Cooling with air dehumidification" function
is available only when the engine is running. The air inside the vehicle is cooled and dehumidified
according to the temperature selected.
Condensation may drip from the underside of
the vehicle when cooling mode is active. This is
normal and not a sign that there is a malfunc-
tion.
Activating/deactivating X
Press the ¿button.
The indicator lamp in the ¿button lights
up or goes out.
The indicator lamp in the button indicates that the respective function is activated. The cool- ing with air dehumidification function has a
delayed switch-off feature.
Problems with the "Cooling with air dehumidification" function Problem
Possible causes/consequences and
M MSolutions The indicator lamp in the
¿ button flashes
three times or remains
off. The cooling with air
dehumidification func-
tion cannot be activated. The cooling with air dehumidification function has been deactivated
due to a malfunction.
X Consult a qualified specialist workshop. Setting climate control to automatic
mode
General notes Only THERMOTRONIC automatic climate con-
trol features the "Control climate control auto-
matically" function.
In automatic mode, the set temperature is main-
tained automatically at a constant level. The
system automatically regulates the temperature of the dispensed air, the airflow and the air dis-
tribution.
The "Cooling with air dehumidification" function
is activated automatically in automatic mode. Operating the climate control system
121Climate control
Page 127 of 345
or
X Air-conditioning system: turn temperature
control :anti-clockwise or clockwise
(Y page 118).
THERMOTRONIC automatic climate control:
turn temperature control :orE anti-clock-
wise or clockwise (Y page 119).Demisting the windows
Windows misted up on the inside Air-conditioning system
X Activate the ¿"Cooling with air dehumid-
ification" function.
X If the windows continue to mist up, activate
the ¬ "Windscreen demisting" function.
i You should only select this setting until the
windscreen is clear again.
THERMOTRONIC automatic climate con-
trol
X Activate the ¿"Cooling with air dehumid-
ification" function.
X Activate automatic mode Ã.
X If the windows continue to mist up, activate
the ¬ "Windscreen demisting" function.
i You should only select this setting until the
windscreen is clear again. Windows misted up on the outside X
Activate the windscreen wipers.
X Set the air distribution to PorO.
i You should only select this setting until the
windscreen is clear again. Rear window heating
General notes The rear window heating has a high current
draw. You should therefore switch it off as soon
as the window is clear. The rear window heating otherwise switches off automatically after sev-
eral minutes.
If the battery voltage is too low, the rear window
heating may switch off.
Activating/deactivating X
Turn the key to position 2in the ignition lock
(Y page 133).
X Press the ¤button.
The indicator lamp in the ¤button lights
up or goes out.
Problems with the rear window heating Problem
Possible causes/consequences and
M MSolutions The rear window heating
has switched off prema-
turely or cannot be
switched on. The battery has not been sufficiently charged.
X Switch off any consumers that are not required, e.g. reading lamps,
interior lighting or the seat heating.
When the battery is sufficiently charged, the rear window heating
can be switched on again. Activating/deactivating air-recircula-
tion mode
General notes You can deactivate the flow of fresh air tempo-
rarily if unpleasant odours are entering the vehi-
cle from outside. The air already inside the vehi- cle will then be recirculated. If you activate air-recirculation mode, the win-
dows can mist up more quickly, particularly at
low temperatures. Use air-recirculation mode
only briefly to prevent the windows from misting
up.
The operation of air-recirculation mode is the
same for all control panels. 124
Operating the climate control systemClimate control
Page 128 of 345
Activating/deactivating
X
Turn the key to position 2in the ignition lock
(Y page 133).
X To activate: press theebutton.
The indicator lamp in the ebutton lights
up.
Air-recirculation mode is activated automati-
cally: R at high outside temperatures
R at high levels of pollution
When air-recirculation mode is activated auto-
matically, the indicator lamp in the ebutton
is not lit. Outside air is added after about
30 minutes.
X To deactivate: press theebutton.
The indicator lamp in the ebutton goes
out.
i Air-recirculation mode is deactivated auto-
matically:
R after approximately five minutes at outside
temperatures below approximately 7 †
R after approximately five minutes if the
"Cooling with air dehumidification" func-
tion is deactivated
R after approximately 30 minutes at outside
temperatures above approximately 7 † if
the cooling with air dehumidification func-
tion is activated Convenience opening or closing using
the air-recirculation button G
WARNING
When the convenience closing feature is oper- ating, parts of the body could become trapped
in the closing area of the side window and the
sliding sunroof. There is a risk of injury.
Observe the complete closing procedure
when the convenience closing feature is oper-
ating. When closing make sure that no parts of the body are in the closing area. G
WARNING
During convenience opening parts of the body could be drawn in or become trapped between the side window and window frame.
There is a risk of injury.
When opening, make sure that nobody is
touching the side window. If someone
becomes trapped, immediately press
the W switch in the door to stop the move-
ment of the side windows. To continue closing
the side window, pull on the Wswitch.
X Convenience closing feature: press and
hold the ebutton until the side windows
start to close automatically.
Vehicles with panorama sliding sunroof:
the sliding sunroof or panorama sliding sun-
roof closes simultaneously.
The indicator lamp in the ebutton lights
up. Air-recirculation mode is activated.
If parts of the body are in the closing area during convenience closing, proceed as follows:
X Press the Wbutton to stop the side win-
dows.
The side windows stop.
X To then open the side window, press the W
button again.
or
X Press and hold the ebutton again for at
least two seconds.
The side windows move in the opposite direc- tion.
X Only vehicles with panorama sliding sun-
roof:
press the 3switch to stop the pan-
orama sliding sunroof.
The panorama sliding sunroof stops.
X To then open the panorama sliding sunroof,
pull back on the 3switch.
i Observe the notes on the automatic revers-
ing feature for:
R the side windows (Y page 89)
R the panorama sliding sunroof (Y page 93)
X Convenience opening feature: press and
hold the ebutton until the side windows
start to open automatically.
Vehicles with panorama sliding sunroof:
the panorama sliding sunroof opens simulta-
neously.
The indicator lamp in the ebutton goes
out. Air-recirculation mode is deactivated.
i If you open the side windows or the pano-
rama sliding sunroof manually after closing Operating the climate control system
125Climate control Z
Page 198 of 345
G
WARNING
If the maximum permissible load for a carrier system is exceeded, the carrier could come
loose from the vehicle and endanger other
road users. There is a risk of an accident and injury.
Never exceed the maximum permissible load
when using a carrier.
! If you have a trailer tow hitch retrofitted,
changes to the engine cooling system may be necessary, depending on the vehicle type.
If you have a trailer tow hitch retrofitted,
observe the anchorage points on the chassis.
Retrofitting a trailer tow hitch is only permissible
if a trailer load is specified in your vehicle docu-
ments. If this is not the case, then the vehicle is not approved for towing a trailer.
For more information, please contact a qualifiedspecialist workshop.
Exceeding the maximum permissible nose-
weight of the trailer drawbar on the ball coupling
may cause damage to the following:
R your vehicle
R trailer
R ball coupling
R trailer tow hitch
The vehicle/trailer combination could become
unstable.
The vehicle/trailer combination could also
become unstable if the noseweight used is lower than the minimum permissible noseweight.
To avoid hazardous situations:
R make sure to check the noseweight before
each journey
R the noseweight should be as close as possible
to the maximum noseweight
R do not exceed the maximum permissible
noseweight
R the noseweight must not be lower than the
minimum permissible noseweight
Make sure that the following values are not
exceeded:
R the permissible noseweight
R the permissible trailer load R
the permissible rear axle load of the towing
vehicle
R the maximum permissible gross vehicle
weight of both the towing vehicle and the
trailer
The applicable permissible values, which must
not be exceeded, can be found:
R in your vehicle documents
R on the identification plates of the trailer tow
hitch and the trailer
R on the vehicle identification plate
If the values differ, the lowest value applies.
You will find the values approved by the manu-
facturer on the identification plates and for the
towing vehicle under "Technical data"
(Y page 334). G
WARNING
If you release the ball coupling or it does not
engage correctly when folding in, it will swing out. Within pivoting range of the ball coupling,
there is an increased risk of an accident and
injury.
Only release the ball coupling if the pivoting
range is unobstructed. Always make sure that the ball coupling engages when folding in.
When reversing the towing vehicle, make sure
there is nobody between the trailer and the vehi- cle.
Couple and uncouple the trailer carefully. If youdo not couple the trailer to the towing vehicle
correctly, the trailer could become detached.
When towing a trailer, your vehicle's handling
characteristics will be different to when driving
without a trailer.
The vehicle/trailer combination:
R is heavier
R is restricted in its acceleration and gradient-
climbing capability
R has an increased braking distance
R is affected more by strong crosswinds
R demands more sensitive steering
R has a larger turning circle
This can impair the vehicle's handling charac-
teristics. Adapt your driving style accordingly.
Maintain a safe distance. Drive carefully.
When towing a trailer, always adjust your speed to the current road and weather conditions. Do Towing a trailer
195Driving and parking Z