oil temperature MERCEDES-BENZ CLA COUPE 2016 Owners Manual
[x] Cancel search | Manufacturer: MERCEDES-BENZ, Model Year: 2016, Model line: CLA COUPE, Model: MERCEDES-BENZ CLA COUPE 2016Pages: 345, PDF Size: 12.41 MB
Page 8 of 345
Anti-Theft Alarm system
see ATA (Anti-Theft Alarm system)
Aquaplaning ...................................... .161
Ashtray ............................................... 275
Assistance display (on-board com-
puter) ................................................. .208
Assistance menu (on-board com-
puter) ................................................. .208
ASSYST PLUS
Displaying a service message ....... .285
Driving abroad ............................... 285
Hiding a service message .............. 285
Information about Service ............. 285
Resetting the service interval dis-
play ................................................ 285
Service message ............................ 284
Special service requirements ......... 285
ATA (Anti-Theft Alarm system)
Activating/deactivating ................... 73
Function .......................................... .73
Switching off the alarm .................... 73
ATTENTION ASSIST
Activating/deactivating ................. 209
Display message ............................ 234
Function/note s............................. 189
Audio 20
Switching on/of f........................... 259
Audio menu (on-board computer) .... 206
Authorised workshop
see Qualified specialist workshop
AUTO lights
Display message ............................ 230
see Lights
Automatic engine start (ECO start/
stop function) .................................... 138
Automatic engine switch-off (ECO
start/stop function) .......................... 137
Automatic front-passenger front
airbag deactivation
Display message ............................ 226
Automatic front-passenger front
airbag deactivation system
Operation ......................................... 47
Problems ......................................... 50
System self-test ............................... 49
Automatic headlamp mode .............. 107Automatic transmission
Accelerator pedal position ............. 147
Changing gear ............................... 147
DIRECT SELECT lever ..................... 144
Drive program display .................... 144
Drive programs .............................. 148
Driving tips .................................... 147
DYNAMIC SELECT button (all vehi-
cles except Mercedes-AMG vehi-
cles) ............................................... 141
DYNAMIC SELECT controller
(Mercedes-AMG vehicles) .............. 141
Emergency running mod e.............. 152
Engaging drive position .................. 145
Engaging neutral ............................ 145
Engaging park position
(Mercedes-AMG vehicles) .............. 146
Engaging park position automati-
cally ............................................... 144
Engaging reverse gear ................... 145
Engaging the park position ............ 144
Holding the vehicle stationary on
uphill gradients .............................. 148
Kickdown ....................................... 148
Manual shifting .............................. 150
Oil temperature (on-board com-
puter, Mercedes-AMG vehicles) ..... 213
Overview ........................................ 143
Problem (fault) ............................... 152
Pulling away ................................... 135
Selector lever ................................ 146
Starting the engine ........................ 135
Steering wheel gearshift paddle s... 150
Trailer towing ................................. 148
Transmission position display ........ 146
Transmission position display
(DIRECT SELECT lever) ................... 144
Transmission positions .................. 147
Automatic transmission emer-
gency running mode ......................... 152
Auxiliary heating
Activating/deactivating ................. 127
Activating/deactivating (on the
centre console ).............................. 127
Remote control .............................. 127
Setting ........................................... 211
Auxiliary heating/ventilation
Display message ............................ 245 Index
5
Page 13 of 345
Fuel ................................................ 159
General .......................................... 159
Icy road surfaces ........................... 162
Limited braking efficiency on sal-
ted roads ....................................... 161
New brake pads/linings ................ 161
Running-in tips ............................... 132
Snow chains .................................. 313
Symmetrical dipped bea m............. 107
The first 1500 km .......................... 132
Towing a trailer .............................. 196
Wet road surface ........................... 161
DVD video
Operating (on-board computer) ..... 206
See also Digital Owner's Manua l... 259
DYNAMIC SELECT button (all vehi-
cles except Mercedes-AMG vehi-
cles) .................................................... 141
DYNAMIC SELECT controller
(Mercedes-AMG vehicles) ................. 141
DYNAMIC SELECT switch
Climate control (air conditioning) .. 119
Climate control
(THERMOTRONIC) .......................... 120 E
EBD (electronic brake force distri-
bution)
Display message ............................ 219
Function/note s................................ 72
ECO display
Function/note s............................. 159
On-board computer ....................... 204
ECO start/stop function
Automatic engine start .................. 138
Automatic engine switch-off .......... 137
Deactivating/activating ................. 138
General information ....................... 137
Important safety notes .................. 137
Introduction ................................... 137
Electromagnetic compatibility
Declaration of conformity ................ 26
Electronic Stability Program
see ESP ®
(Electronic Stability Program)
Emergency
Automatic measures after an acci-
dent ................................................. 53 Emergency key
Unlocking the driver's door .............. 85
Emergency key element
Function/note s................................ 78
Inserting .......................................... 79
Locking vehicle ................................ 85
Removing ......................................... 79
Emergency release
Driver's door .................................... 85
Emergency spare wheel
General notes ................................ 324
Important safety notes .................. 323
Removing ....................................... 324
Emergency unlocking
Boot ................................................. 88
Vehicle ............................................. 85
Engine
Display message ............................ 231
ECO start/stop function ................ 137
Engine number ............................... 327
Jump-starting ................................. 301
Running irregularly ......................... 139
Starting (important safety notes )... 134
Starting problems .......................... 139
Starting the engine with the key .... 135
Starting with the Start/Stop but-
ton ................................................. 135
Stopping ........................................ 156
Tow-starting (vehicle) ..................... 307
Warning lamp (engine diagnos-
tics) ............................................... 255
Engine electronics
Notes ............................................. 325
Problem (fault) ............................... 139
Engine jump starting
see Jump starting (engine)
Engine oil
Additives ........................................ 331
Checking the oil level ..................... 282
Checking the oil level using the
dipstick .......................................... 282
Display message ............................ 233
Filling capacity ............................... 331
Notes about oil grade s................... 330
Notes on oil level/consumption .... 282
Temperature (on-board computer,
Mercedes-AMG vehicles) ............... 213
Topping up ..................................... 283 10
Index
Page 23 of 345
Installing the module .....................2
64
Introduction ................................... 263
Saving/deleting the PIN for the
SIM card ........................................ 266
Settings ......................................... 266
SIM card mode .............................. 265
Text messages ............................... 266
Transferring the phone book .......... 266
Temperature
Coolant .......................................... 201
Coolant (on-board computer,
Mercedes-AMG vehicles) .............. .213
Engine oil (on-board computer,
Mercedes-AMG vehicles) .............. .213
Outside temperature ..................... .200
Setting (climate control) ................ 122
Transmission oil (on-board com-
puter, Mercedes-AMG vehicles) ..... 213
TEMPOMAT
Function/notes ............................ .162
Text messages
Telephone module with Blue-
tooth ®
(SAP profile) ....................... 266
Through-loading ................................ 271
Timing (RACETIMER) ......................... 214
TIREFIT kit .......................................... 296
Declaration of conformity ................ 27
Important safety notes .................. 296
Storage location ............................ 294
Tyre pressure not reached ............. 297
Tyre pressure reached ................... 298
Top Tether ............................................ 56
Total distance recorder .................... 203
Tow-away protection
Activating ......................................... 74
Deactivating ..................................... 74
Function .......................................... .74
Tow-starting
Emergency engine starting ............ 307
Fitting the towing ey e.................... 305
Important safety notes .................. 304
Removing the towing eye ............... 305
Towing
Important safety notes .................. 304
Notes for 4MATIC vehicles ............ 307
Transporting the vehicle ................ 307 Towing a trailer
Axle load, permissibl e.................... 334
ESP ®
(Electronic Stability Pro-
gram) ............................................... 72
Failure check for LEDs ................... 199
General notes ................................ 196
Parking Pilot .................................. 180
Pulling away with a traile r.............. 136
Trailer tow hitch display message .. 245
Towing away
Fitting the towing ey e.................... 305
Removing the towing eye ............... 305
With both axles on the ground ....... 306
With front axle raised ..................... 306
Towing eye ......................................... 294
Traffic Sign Assist
Activating ....................................... 191
Activating/deactivating the warn- ing function .................................... 208
Display message ............................ 236
Function/note s............................. 190
Important safety notes .................. 191
Instrument cluster display ............. 191
Trailer
Folding the ball coupling in/out ..... 197
Trailer coupling
see Towing a trailer
Trailer towing
7-pin connecto r............................. 199
Blind Spot Assist ............................ 193
Cleaning the trailer tow hitch ......... 290
Coupling up a traile r...................... 198
Decoupling a trailer ....................... 198
Driving tip s.................................... 196
Folding in the ball coupling ............ 197
Folding out the ball coupling .......... 197
Important safety notes .................. 194
Lights display message .................. 228
Power supply ................................. 198
Trailer load s................................... 334
Transmission
see Automatic transmission
see Manual transmission
Transmission position display
(DIRECT SELECT lever) ...................... 144
Transporting the vehicle .................. 30720
Index
Page 136 of 345
!
Do not warm up the engine when the vehicle
is stationary. Drive off immediately. Avoid
high engine speeds and driving at full throttle
until the engine has reached its operating
temperature.
Only shift the automatic transmission to the
desired drive position when the vehicle is sta- tionary.
Where possible, avoid spinning the drive
wheels when pulling away on slippery roads.
You could otherwise damage the drive train.
! Mercedes-AMG vehicles:
avoid full-load
operation and engine speeds greater than
5000 rpm when the engine is cold. This will
help to protect the engine and maintain
smooth engine operation. Key positions
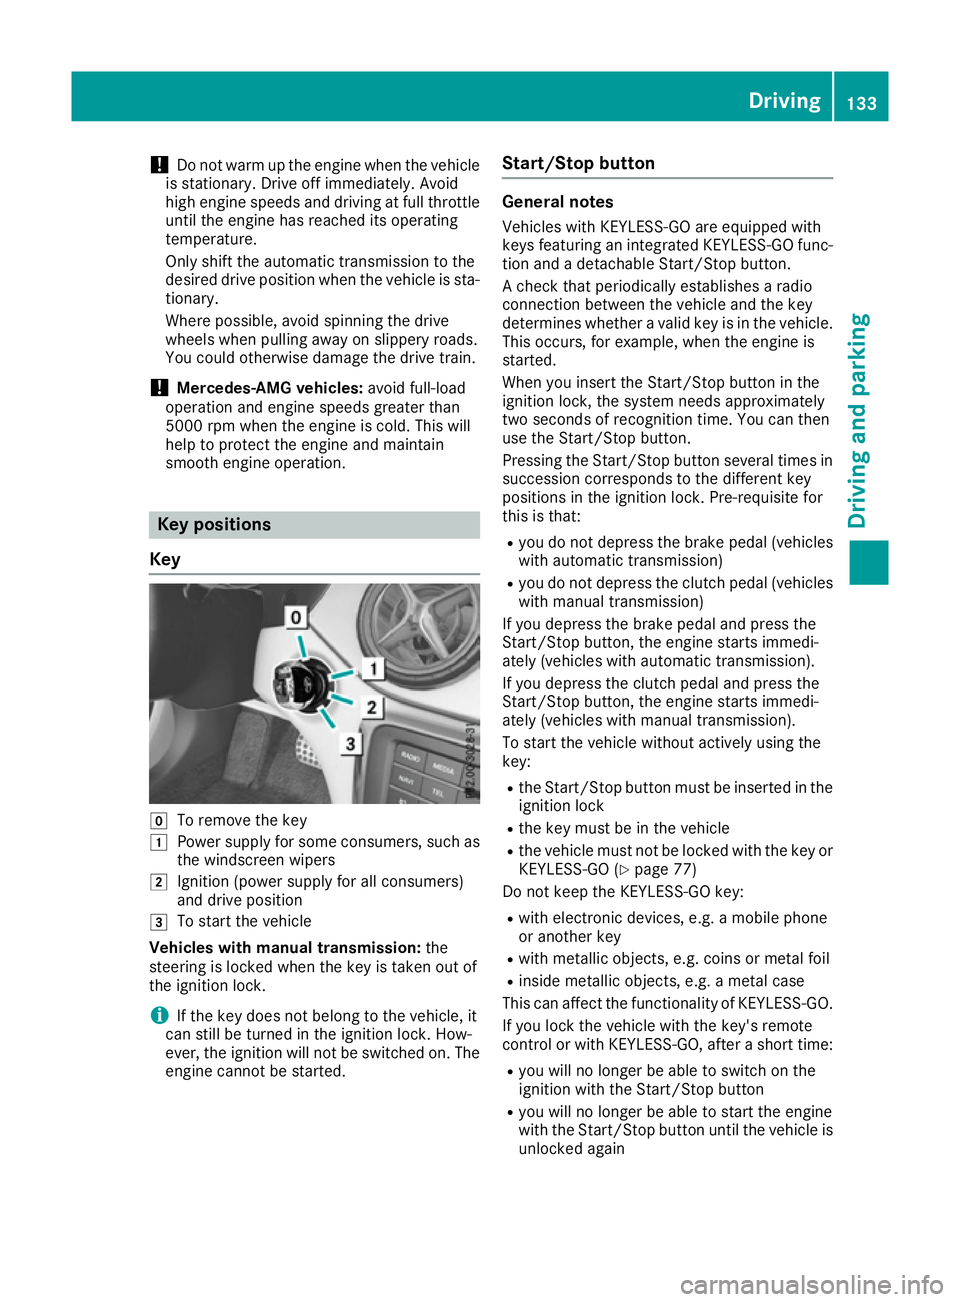
Key g
To remove the key
1 Power supply for some consumers, such as
the windscreen wipers
2 Ignition (power supply for all consumers)
and drive position
3 To start the vehicle
Vehicles with manual transmission: the
steering is locked when the key is taken out of
the ignition lock.
i If the key does not belong to the vehicle, it
can still be turned in the ignition lock. How-
ever, the ignition will not be switched on. The engine cannot be started. Start/Stop button General notes
Vehicles with KEYLESS-GO are equipped with
keys featuring an integrated KEYLESS-GO func- tion and a detachable Start/Stop button.
A check that periodically establishes a radio
connection between the vehicle and the key
determines whether a valid key is in the vehicle.This occurs, for example, when the engine is
started.
When you insert the Start/Stop button in the
ignition lock, the system needs approximately
two seconds of recognition time. You can then
use the Start/Stop button.
Pressing the Start/Stop button several times in
succession corresponds to the different key
positions in the ignition lock. Pre-requisite for
this is that:
R you do not depress the brake pedal (vehicles
with automatic transmission)
R you do not depress the clutch pedal (vehicles
with manual transmission)
If you depress the brake pedal and press the
Start/Stop button, the engine starts immedi-
ately (vehicles with automatic transmission).
If you depress the clutch pedal and press the
Start/Stop button, the engine starts immedi-
ately (vehicles with manual transmission).
To start the vehicle without actively using the
key:
R the Start/Stop button must be inserted in the
ignition lock
R the key must be in the vehicle
R the vehicle must not be locked with the key or
KEYLESS-GO (Y page 77)
Do not keep the KEYLESS-GO key:
R with electronic devices, e.g. a mobile phone
or another key
R with metallic objects, e.g. coins or metal foil
R inside metallic objects, e.g. a metal case
This can affect the functionality of KEYLESS-GO.
If you lock the vehicle with the key's remote
control or with KEYLESS-GO, after a short time:
R you will no longer be able to switch on the
ignition with the Start/Stop button
R you will no longer be able to start the engine
with the Start/Stop button until the vehicle is
unlocked again Driving
133Driving and parking Z
Page 216 of 345
X
Press the :or9 button to select the
Belt adjustment
Belt adjustment function.
When the Belt adjustment
Belt adjustment function is acti-
vated, the seat belt is displayed in orange in
the multifunction display.
X Press the abutton to save the setting.
For further information on belt adjustment, see
(Y page 43).
Switching the fold mirrors in when lock-
ing function on/off This function is only available when the vehicle is
equipped with the electrical fold-in function.
When you activate the Auto. fold-in mir‐ Auto. fold-in mir‐
rors
rors function, the exterior mirrors are folded in
when the vehicle is locked. When you unlock the vehicle and then open the driver's or front-
passenger door, the exterior mirrors fold out
again.
If you have switched on the Auto. fold-in Auto. fold-in
mirrors
mirrors function and you fold in the exterior
mirrors using the button on the door
(Y page 104), they will not fold out automati-
cally. The exterior mirrors can then only be fol-
ded out using the button on the door.
X Press the =or; button on the steering
wheel to select the Settings
Settings menu.
X Press the :or9 button to select the
Convenience
Convenience submenu.
X Press ato confirm.
X Press the :or9 button to select the
Auto. fold-in mirrors
Auto. fold-in mirrors function.
If the Auto. fold-in mirrors Auto. fold-in mirrors function is
switched on, the multifunction display shows the exterior mirror in orange.
X Press the abutton to save the setting.
Resetting to factory settings X
Press the =or; button on the steering
wheel to select the Settings
Settings menu.
X Press the :or9 button to select the
Factory setting
Factory setting submenu.
X Press ato confirm.
The Reset all settings?
Reset all settings? function
appears. X
Press the :or9 button to select No
No or
Yes
Yes.
X Press the abutton to confirm the selec-
tion.
If you have selected Yes Yes, the multifunction
display shows a confirmation message.
For safety reasons, not all functions are reset:
the Limit Limit speed
speed(winter
(winter tyres)
tyres)function of
the permanent speed limiter can only be set in
the Vehicle
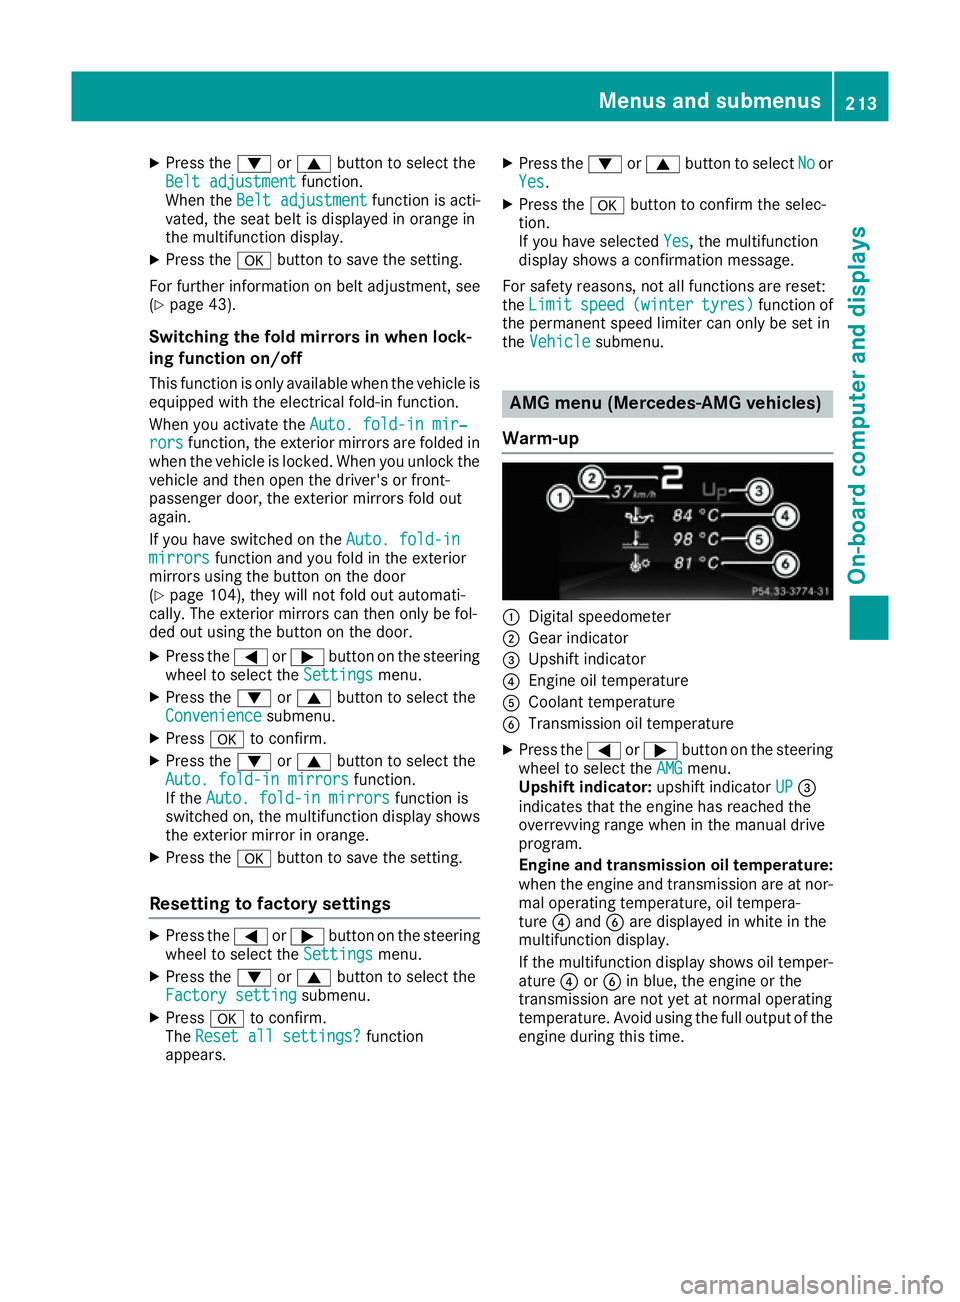
Vehicle submenu. AMG menu (Mercedes-AMG vehicles)
Warm-up :
Digital speedometer
; Gear indicator
= Upshift indicator
? Engine oil temperature
A Coolant temperature
B Transmission oil temperature
X Press the =or; button on the steering
wheel to select the AMG AMGmenu.
Upshift indicator: upshift indicatorUP
UP=
indicates that the engine has reached the
overrevving range when in the manual drive
program.
Engine and transmission oil temperature:
when the engine and transmission are at nor- mal operating temperature, oil tempera-
ture ?and Bare displayed in white in the
multifunction display.
If the multifunction display shows oil temper-
ature ?orB in blue, the engine or the
transmission are not yet at normal operating
temperature. Avoid using the full output of the engine during this time. Menus and submenus
213On-board computer and displays Z
Page 285 of 345
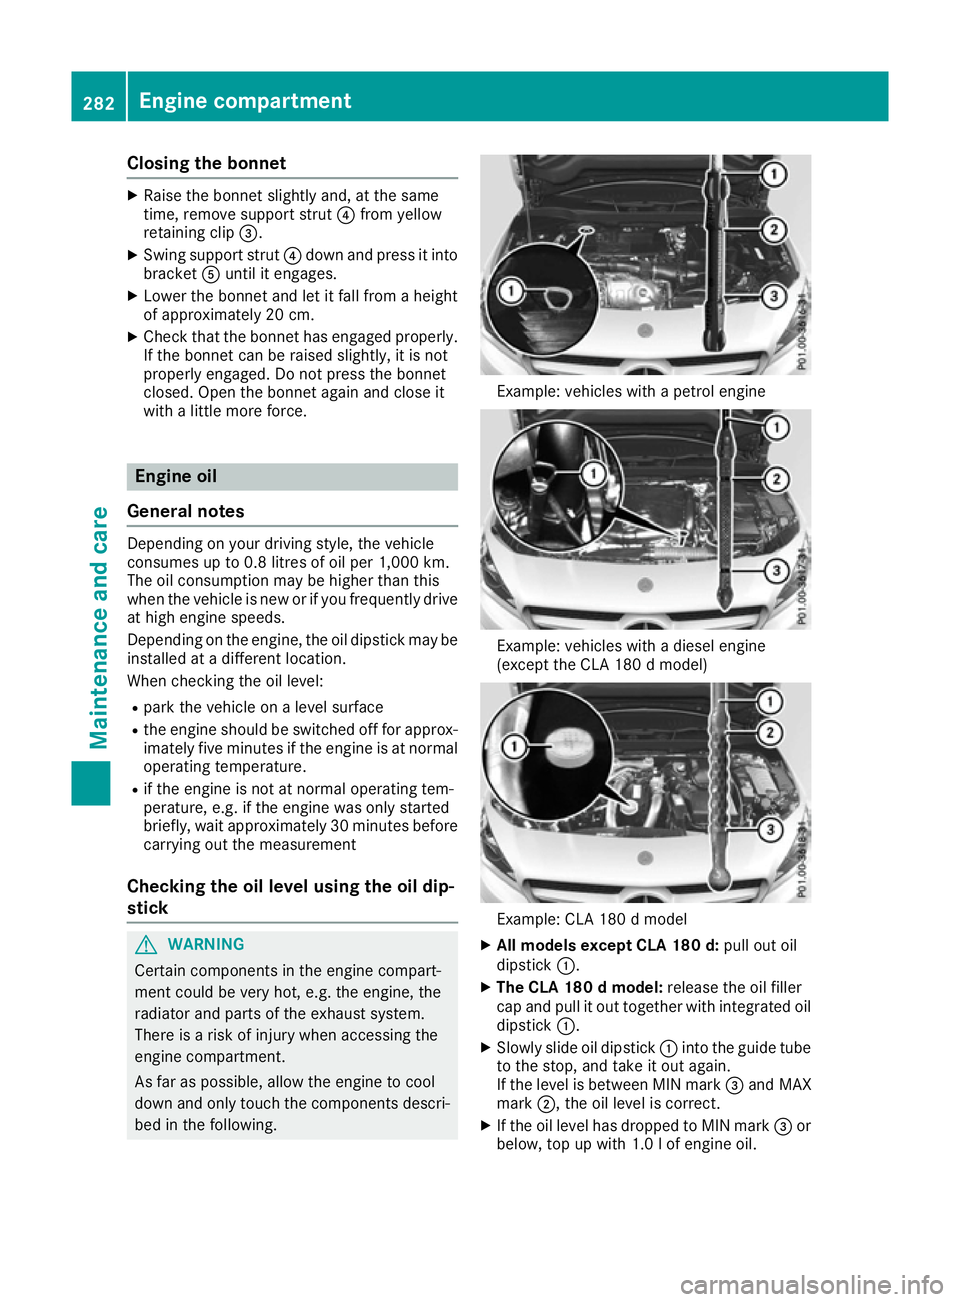
Closing the bonnet
X
Raise the bonnet slightly and, at the same
time, remove support strut ?from yellow
retaining clip =.
X Swing support strut ?down and press it into
bracket Auntil it engages.
X Lower the bonnet and let it fall from a height
of approximately 20 cm.
X Check that the bonnet has engaged properly.
If the bonnet can be raised slightly, it is not
properly engaged. Do not press the bonnet
closed. Open the bonnet again and close it
with a little more force. Engine oil
General notes Depending on your driving style, the vehicle
consumes up to 0.8 litres of oil per 1,000 km.
The oil consumption may be higher than this
when the vehicle is new or if you frequently drive
at high engine speeds.
Depending on the engine, the oil dipstick may be installed at a different location.
When checking the oil level:
R park the vehicle on a level surface
R the engine should be switched off for approx-
imately five minutes if the engine is at normal
operating temperature.
R if the engine is not at normal operating tem-
perature, e.g. if the engine was only started
briefly, wait approximately 30 minute sbefore
carrying out the measurement
Checking the oil level using the oil dip-
stick G
WARNING
Certain components in the engine compart-
ment could be very hot, e.g. the engine, the
radiator and parts of the exhaust system.
There is a risk of injury when accessing the
engine compartment.
As far as possible, allow the engine to cool
down and only touch the components descri- bed in the following. Example: vehicles with a petrol engine
Example: vehicles with a diesel engine
(except the CLA 180 d model)
Example: CLA 180 d model
X All models except CLA 180 d: pull out oil
dipstick :.
X The CLA 180 d model: release the oil filler
cap and pull it out together with integrated oil dipstick :.
X Slowly slide oil dipstick :into the guide tube
to the stop, and take it out again.
If the level is between MIN mark =and MAX
mark ;, the oil level is correct.
X If the oil level has dropped to MIN mark =or
below, top up with 1.0 lof engine oil. 282
Engine compartmentMaintenance and care
Page 286 of 345
Topping up engine oil
G
WARNING
Certain components in the engine compart-
ment could be very hot, e.g. the engine, the
radiator and parts of the exhaust system.
There is a risk of injury when accessing the
engine compartment.
As far as possible, allow the engine to cool
down and only touch the components descri- bed in the following. G
WARNING
If engine oil comes into contact with hot com- ponents in the engine compartment, it may
ignite. There is a risk of fire and injury.
Make sure that engine oil does not spill out
over the filler neck. Allow the engine to cool
down and thoroughly clean the components
that have come into contact with engine oil
before you start the engine. H
Environmental note
When topping up the oil, take care not to spill
any. If oil enters the soil or waterways, it is
harmful to the environment.
! Use only engine oils and oil filters that are
approved for vehicles with a service system. A
list of the engine oils and oil filters that have
been tested and approved in accordance with Mercedes-Benz Specifications for Service
Products is available at any Mercedes-Benz
Service Centre.
The following cause engine failure or damage
to the exhaust system:
R Use of engine oils and oil filters that have
not been expressly approved for the service system
R Replacement of engine oil and oil filter after
the replacement interval specified by the
service system has expired
R Use of engine oil additives
! Do not add too much oil. Topping up with too
much engine oil can result in damage to the
engine or to the catalytic converter. Have
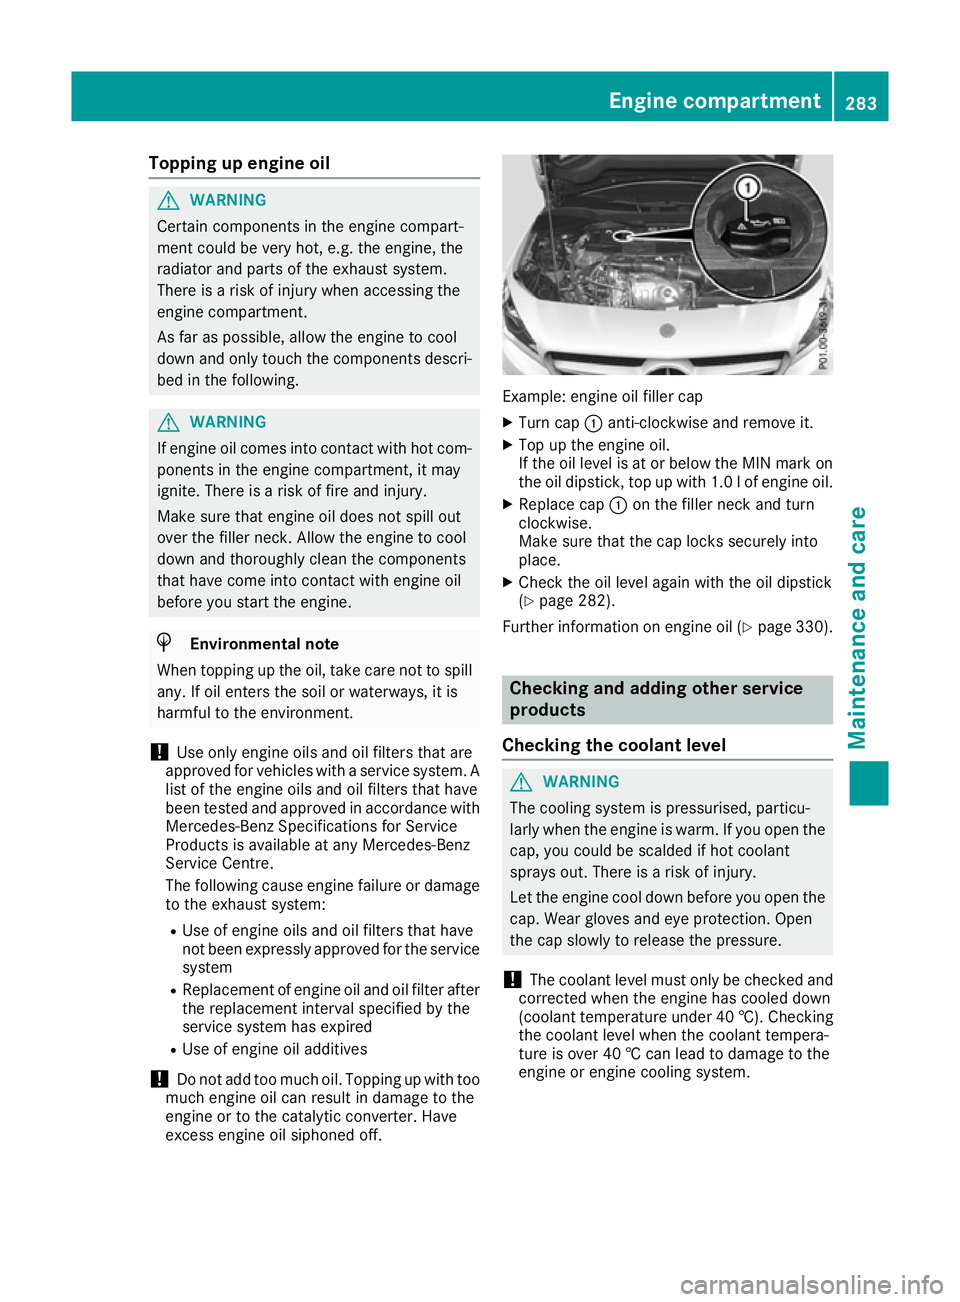
excess engine oil siphoned off. Example: engine oil filler cap
X Turn cap :anti-clockwise and remove it.
X Top up the engine oil.
If the oil level is at or below the MIN mark on
the oil dipstick, top up with 1.0 lof engine oil.
X Replace cap :on the filler neck and turn
clockwise.
Make sure that the cap locks securely into
place.
X Check the oil level again with the oil dipstick
(Y page 282).
Further information on engine oil (Y page 330). Checking and adding other service
products
Checking the coolant level G
WARNING
The cooling system is pressurised, particu-
larly when the engine is warm. If you open the cap, you could be scalded if hot coolant
sprays out. There is a risk of injury.
Let the engine cool down before you open the
cap. Wear gloves and eye protection. Open
the cap slowly to release the pressure.
! The coolant level must only be checked and
corrected when the engine has cooled down
(coolant temperature under 40 †). Checking
the coolant level when the coolant tempera-
ture is over 40 † can lead to damage to the
engine or engine cooling system. Engine compartment
283Maintenance and care Z
Page 287 of 345
X
Park the vehicle on a level surface.
Check the coolant level only if the vehicle is
on a level surface and the engine has cooled
down.
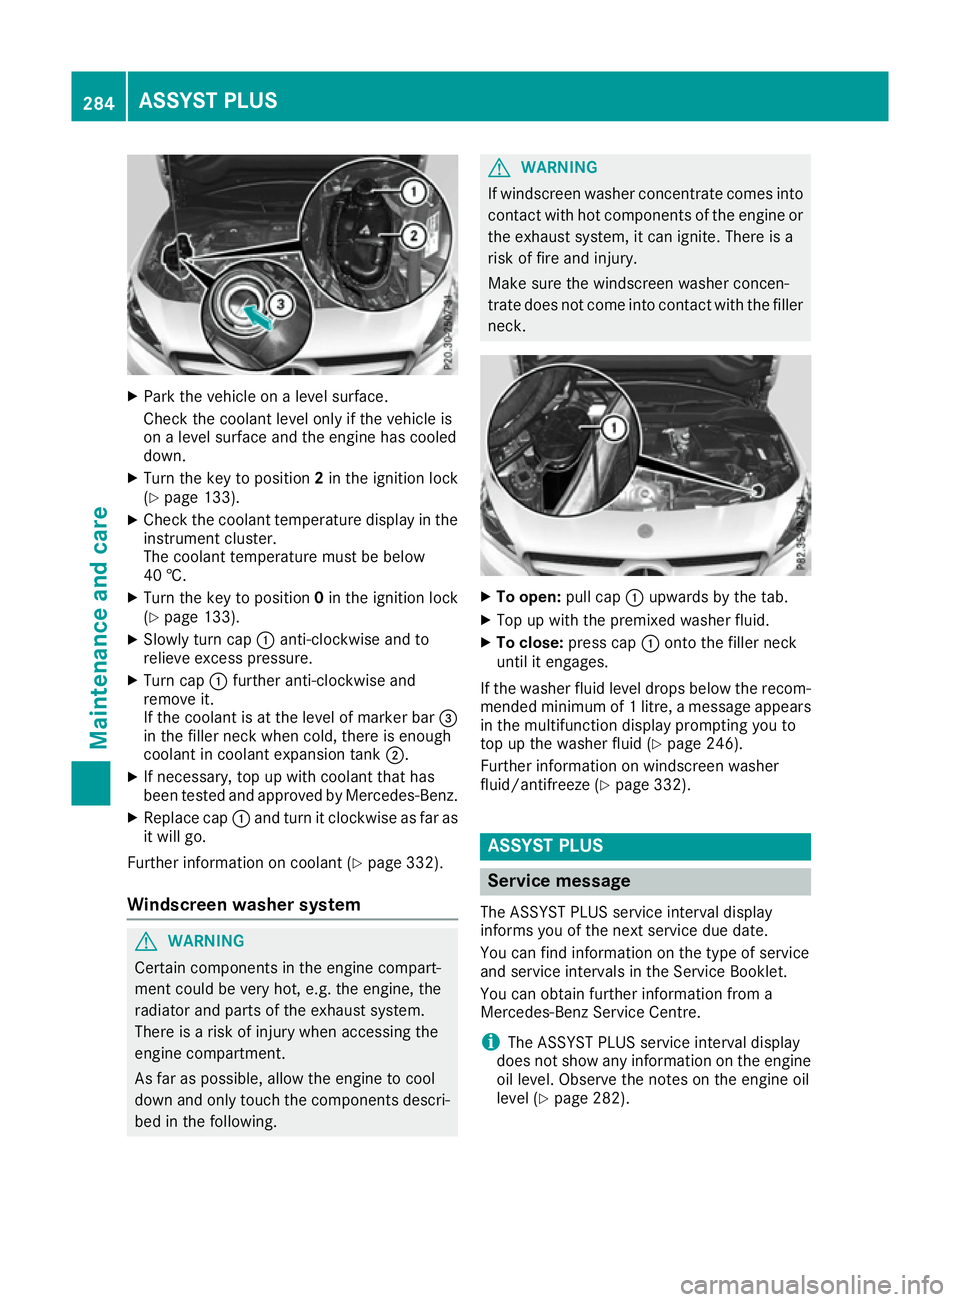
X Turn the key to position 2in the ignition lock
(Y page 133).
X Check the coolant temperature display in the
instrument cluster.
The coolant temperature must be below
40 †.
X Turn the key to position 0in the ignition lock
(Y page 133).
X Slowly turn cap :anti-clockwise and to
relieve excess pressure.
X Turn cap :further anti-clockwise and
remove it.
If the coolant is at the level of marker bar =
in the filler neck when cold, there is enough
coolant in coolant expansion tank ;.
X If necessary, top up with coolant that has
been tested and approved by Mercedes-Benz.
X Replace cap :and turn it clockwise as far as
it will go.
Further information on coolant (Y page 332).
Windscreen washer system G
WARNING
Certain components in the engine compart-
ment could be very hot, e.g. the engine, the
radiator and parts of the exhaust system.
There is a risk of injury when accessing the
engine compartment.
As far as possible, allow the engine to cool
down and only touch the components descri- bed in the following. G
WARNING
If windscreen washer concentrate comes into contact with hot components of the engine or
the exhaust system, it can ignite. There is a
risk of fire and injury.
Make sure the windscreen washer concen-
trate does not come into contact with the filler neck. X
To open: pull cap:upwards by the tab.
X Top up with the premixed washer fluid.
X To close: press cap :onto the filler neck
until it engages.
If the washer fluid level drops below the recom- mended minimum of 1 litre, a message appears in the multifunction display prompting you to
top up the washer fluid (Y page 246).
Further information on windscreen washer
fluid/antifreeze (Y page 332). ASSYST PLUS
Service message
The ASSYST PLUS service interval display
informs you of the next service due date.
You can find information on the type of service
and service intervals in the Service Booklet.
You can obtain further information from a
Mercedes-Benz Service Centre.
i The ASSYST PLUS service interval display
does not show any information on the engine oil level. Observe the notes on the engine oil
level (Y page 282). 284
ASSYST PLUSMaintenance and care
Page 333 of 345
Diesel
Fuel grade
G
WARNING
If you mix diesel fuel with petrol, the flash
point of this fuel mixture is lower than that of pure diesel fuel. When the engine is running,
components in the exhaust system may over-
heat unnoticed. There is a risk of fire.
Never refuel with petrol. Never add petrol to
diesel fuel.
! When refuelling, only use diesel fuel that
conforms to the European standard EN 590 or is of equivalent quality. Fuel that does not
conform to EN 590 can lead to increased wear
as well as damage to the engine and exhaust system.
! Do not use the following:
R marine diesel
R heating oil
R bio-diesel
R vegetable oil
R petrol
R paraffin
R kerosene
Do not mix such fuels with diesel fuel and do
not use any special additives. Otherwise,
engine damage may occur.
! Vehicles with diesel particle filters:
in
countries outside the EU, only use low sulphur
Euro diesel with a sulphur content of under
50 ppm. Otherwise, the emission control sys- tem could be damaged.
! Vehicles without a diesel particle filte
r:
in countries where only diesel fuel with a high sulphur content is available, you will need to
carry out your vehicle's oil change at shorter
intervals. More information about the interval for oil change can be obtained from any quali-
fied specialist workshop.
Usually you will find information about the fuel
grade on the pump. If you cannot find the label
on the petrol pump, ask the filling station staff.
Information on refuelling (Y page 153).Low outside temperatures
In winter months, diesel fuel with an improved
cold flow quality is available. In Europe, the
EN 590 standard defines various climate-
dependent temperature categories. Malfunc-
tions can be avoided by refuelling with diesel
fuel that corresponds to the climatic specifica-
tions outlined in EN 590. At unusually low out-
side temperatures, it is possible that the flow
characteristics of the diesel fuel could be insuf- ficient. Accordingly, diesel fuel from warmer
areas may not be suitable for operation in colder
climatic conditions.
i Further information on country-specific fuel
properties and fuel types with low-tempera-
ture resistance can be obtained from oil com-
panies, e.g. at filling stations. Engine oil
General notes When handling engine oil, observe the important
safety notes on service products (Y page 327).
The quality of the engine oil is decisive for the
function and service life of an engine. After
extensive tests, Mercedes-Benz approves
engine oils that correspond to the current tech-
nical standard.
Therefore, only Mercedes-Benz-approved
engine oils may be used in Mercedes-Benz
engines.
Further information on tested and approved
engine oils can be obtained from any Mercedes- Benz Service Centre. Mercedes-Benz recom-
mends that you have the oil change carried out
at a qualified specialist workshop. Mercedes-
Benz approval is indicated on the oil container
by the inscription "MB-Freigabe" or "MB- 330
Service products and filling capacitiesTechnical data
Page 335 of 345
i
Have the brake fluid regularly replaced at a
qualified specialist workshop and the replace-
ment confirmed in the Service Booklet. Coolant
Important safety notes G
WARNING
If antifreeze comes into contact with hot com- ponents in the engine compartment, it may
ignite. There is a risk of fire and injury.
Let the engine cool down before you top up
the antifreeze. Make sure that antifreeze is
not spilled next to the filler neck. Thoroughly
clean the antifreeze from components before
starting the engine.
! Only add coolant that has been premixed
with the desired antifreeze protection. You
could otherwise damage the engine.
Further information on coolants can be found in the Mercedes-Benz Specifications for Ser-
vice Products, MB Specifications for Service
Products 310.1, e.g. on the Internet at
http://bevo.mercedes-benz.com. Or contact
a qualified specialist workshop.
! Always use a suitable coolant mixture, even
in countries where high temperatures prevail.
Otherwise, the engine cooling system is not
sufficiently protected from corrosion and
overheating.
i Have the coolant regularly replaced at a
qualified specialist workshop and the replace-
ment confirmed in the Service Booklet.
Comply with the important safety precautions
for service products when handling coolant
(Y page 327).
The coolant is a mixture of water and corrosion
inhibitor/antifreeze concentrate. It is responsi-
ble for the following:
R anti-corrosion protection
R antifreeze protection
R raising the boiling point
If corrosion inhibitor/antifreeze concentrate is
present in the correct concentration, the boiling
point of the coolant during operation will be
approximately 130 †. The antifreeze concentrate/corrosion inhibitor
concentration in the engine cooling system
should:
R
be at least 50%. This will protect the engine
cooling system against freezing down to
approximately -37 †.
R not exceed 55% (antifreeze protection down
to -45 †). Heat will otherwise not be dissipa-
ted as effectively.
Mercedes-Benz recommends a coolant or cor-
rosion inhibitor/antifreeze concentrate in
accordance with
MB Specifications for Service Products 310.1.
i When the vehicle is first delivered, it is filled
with a coolant mixture that ensures adequate
antifreeze and corrosion protection.
i The coolant is checked at every mainte-
nance interval at a qualified specialist work-
shop. Windscreen washer system
Important safety notes G
WARNING
If windscreen washer concentrate comes into contact with hot components of the engine or
the exhaust system, it can ignite. There is a
risk of fire and injury.
Make sure the windscreen washer concen-
trate does not come into contact with the filler neck.
! Only the washer fluids SummerFit and Win-
terFit can be mixed. Otherwise, the spraying
nozzles could become blocked.
Do not use distilled or de-ionised water. Other-
wise, the level sensor may give a false reading.
When handling washer fluid, observe the impor- tant safety notes on service products
(Y page 327).
At temperatures above freezing:
X Fill the washer fluid reservoir with a mixture of
water and washer fluid, e.g. MB SummerFit.
Mix 1 part MB SummerFit to 100 parts water.
At temperatures below freezing:
X Fill the washer fluid reservoir with a mixture of
water and washer fluid, e.g. MB WinterFit. 332
Service products and filling capacitiesTechnical data