jump start MERCEDES-BENZ CLA COUPE 2019 Owners Manual
[x] Cancel search | Manufacturer: MERCEDES-BENZ, Model Year: 2019, Model line: CLA COUPE, Model: MERCEDES-BENZ CLA COUPE 2019Pages: 645, PDF Size: 10.94 MB
Page 276 of 645
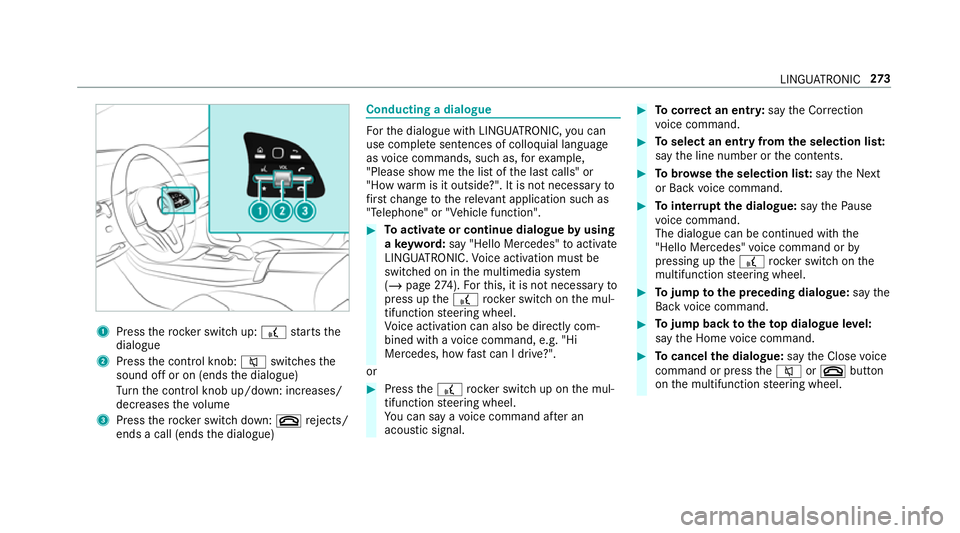
1
Press therock er switch up: £starts the
dialogue
2 Press the control knob: 8switches the
sound off or on (ends the dialogue)
Tu rn the control knob up/down: increases/
decreases thevo lume
3 Press therock er switch down: ~rejects/
ends a call (ends the dialogue) Conducting a dialogue
Fo
rth e dialogue with LINGU ATRO NIC, you can
use co mplete sentences of colloquial language
as voice commands, such as, forex ample,
"Please show me the list of the last calls" or
"How warm is it outside?". It is not necessary to
fi rs tch ange tothere leva nt application su chas
"Telephone" or "Vehicle function". #
Toactivate or continue dialogue byusing
a ke yword: say "Hello Mercedes" toactivate
LINGU ATRO NIC. Voice activation must be
switched on in the multimedia sy stem
(/ page 274).Fo rth is, it is not necessary to
press up the£ rock er switch on the mul‐
tifunction steering wheel.
Vo ice activation can also be directly com‐
bined with a voice command, e.g. "Hi
Mercedes, how fastcan I drive?".
or #
Press the£ rocker switch up on the mul‐
tifunction steering wheel.
Yo u can say a voice command af ter an
acou stic signal. #
Tocor rect an ent ry:say theCorrection
vo ice command. #
Toselect an entry from the selection lis t:
say the line number or the conte nts. #
Tobrows eth e selection lis t:say theNext
or Back voice command. #
Tointer rupt the dialogue: saythePause
vo ice command.
The dialogue can be continued with the
"Hello Mercedes" voice command or by
pressing up the£ rock er switch on the
multifunction steering wheel. #
Tojump tothe preceding dialogue: saythe
Back voice command. #
Tojump back totheto p dialogue le vel:
say theHome voice command. #
Tocancel the dialogue: saytheClose voice
command or press the8 or~ button
on the multifunction steering wheel. LINGU
ATRO NIC 273
Page 475 of 645
specialist wo
rkshop or toa collection
point for used batteries. If
yo u ha vetodisconnect the12 V batter y,con‐
ta ct a qualified specialist workshop.
Comply with saf ety no tes and take protective
measures when handling batteries. Risk of
explosion. Fire, naked
flames and smoking are
prohibi ted when handling the batter y.
Av oid creating spar ks. Electrolyte
or battery acid is cor ro‐
sive. Avoid contact with the skin, eyes
or clo thing. Wear suitable pr otective
clo thing, in particular glove s, an
apron and a face mas k.Immedia tely
ri nse electrolyte or acid splashes off
with clean water.Consult a doc tor if
necessar y. We
ar saf etygl asses. Ke
ep children away. Obser
vethis Owner's Manual.
Obser vethefo llowing if you do not intend touse
th eve hicle over an extended pe riod of time:
R Activate standby mode.
R Alternatively: connect the battery toa bat‐
te ry charge r appro vedby Mercedes-Benz or
consult a qualified specialist workshop to
disconnect the batter y. Note
s onstarting assi stance and on charg‐
ing the12 V battery Ve
hicles with a lithium-ion battery
When charging the battery and during starting
assis tance, al ways use the jump-s tart connec‐
tion point in the engine compartment.
* NO
TEDama getothe battery from over‐
vo ltage When
charging using a bat tery charge r with‐
out a maximum charging voltage, the battery
or the on-board electronics may be damaged. #
Only use battery charge rs with a maxi‐
mum charging voltage of 14.4 V. All
other vehicles
When charging the battery and during starting
assis tance, al ways use the jump-s tart connec‐
tion point in the engine compartment. 472
Breakdown assis tance
Page 476 of 645
*
NO
TEDamaging the battery thro ugh
ove rvoltage When using a battery
charge r without a maxi‐
mum charging voltage, the battery or the
ve hicle electronics may be damaged. #
Only use battery charge rs with a maxi‐
mum charging voltage of 14.8 V. &
WARNING Risk ofexplosion from hydro‐
ge nga s igniting
A battery generates hydrogen gas during the
ch arging process. If there is a short circuit or
spar ksstart toform ,th ere is a danger of the
hy drogen gas igniting. #
Make sure that the positive term inal of
th e connected battery does not come
into conta ct withvehicle parts. #
Never place me tal objects or tools on a
batter y. #
When connecting and disconnecting the
batter y,yo u must obse rveth e descri‐
bed order forth e battery clamps. #
When giving starting assis tance, al ways
make sure that you on lyconnect bat‐
te ry term inals with identical polarity. #
During starting assis tance, you must
obse rveth e described order for con‐
necting and disconnecting the jump
lead. #
Do not connect or disconnect the bat‐
te ry cla mp s while the engine is running. &
WARNING Risk ofexplosion during
ch arging process and starting assis tance
During thech arging process and starting
assis tance, the battery may release an explo‐
sive gas mixture. #
Avoid fire , naked flames, creating
spar ksand smoking. #
Make sure that there is suf ficient venti‐
lation du ring thech arging process and
during starting assis tance. #
Do not lean over a batter y. &
WARNING Risk ofexplosion from a fro‐
zen battery
A dischar ged battery may freeze at temp era‐
tures slightly abo veor below freezing point.
During starting assis tance or battery charg‐
ing, bat tery gas may be released. #
Alw aysth aw a frozen bat tery out first
before charging it or per form ing start‐
ing assis tance. If
th e indicator/warning lamps in the instrument
clus ter do not light up at low temp eratures, it is
ve ry likely that the dischar ged battery has fro‐
zen. In this case you may neither jump-s tart the
ve hicle nor charge the batter y.
The service life of a battery that has been
th awe d may be dramatically shor tened. The
st arting characteristics may be impaired, espe‐
cially at low temp eratures.
It is recommended that you ha veathaw ed bat‐
te ry checked at a qualified specialist workshop. Breakdown assis
tance 473
Page 477 of 645
All
vehicles
* NO
TEDama gecaused bynumerous or
ex tended attem ptsto start the engine Nume
rous or extended attem ptsto start the
engine may damage the catalytic con verter
due tonon-combu sted fuel. #
Avoid numerous and extended attem pts
to start the engine. Obser
vethefo llowing points during starting
assis tance and when charging the battery:
R Only use undamaged jump lead/charging
cables with a suf ficient cross-section and
insula tedte rm inal clamps.
R Non- insulated parts of thete rm inal clamps
must not come into con tact wi thother me tal
parts while the jump lead/charging cable is
connected tothe battery/jump-s tart connec‐
tion point.
R The jump lead/charging cable must not
come into contact wi thany parts which may
mo vewhen the engine is running. R
Alw ays make sure that nei ther you nor the
battery is elect rostatically charge d.
R Keep away from fire and naked flames.
R Do not lean overth e batter y.
Obser vethe additional following points when
ch arging the battery:
R Only use battery charge rs tested and
appr oved for Mercedes-Benz.
R Read the battery charge r's operating instruc‐
tions before charging the batter y.
Obser vethe additional following points during
st arting assis tance:
R Starting assis tance may only be pr ovided
using batteries with a nominal voltage of
12 V.
R The vehicles must not touch.
R Petrol engine: only acceptstarting assis‐
ta nce if the engine and exhaust sy stem are
cold. St
arting assi stance and charging the12 V
battery Re
quirements:
R The vehicle is secured with the electric park‐
ing brake.
R Vehicles with automatic transmission: the
transmission is in position j.
R Vehicles with manual transmission: the
transmission is in neutral.
R The ignition and all electrical consumers are
switched off.
R The bonnet is open. 474
Breakdown assis tance
Page 478 of 645
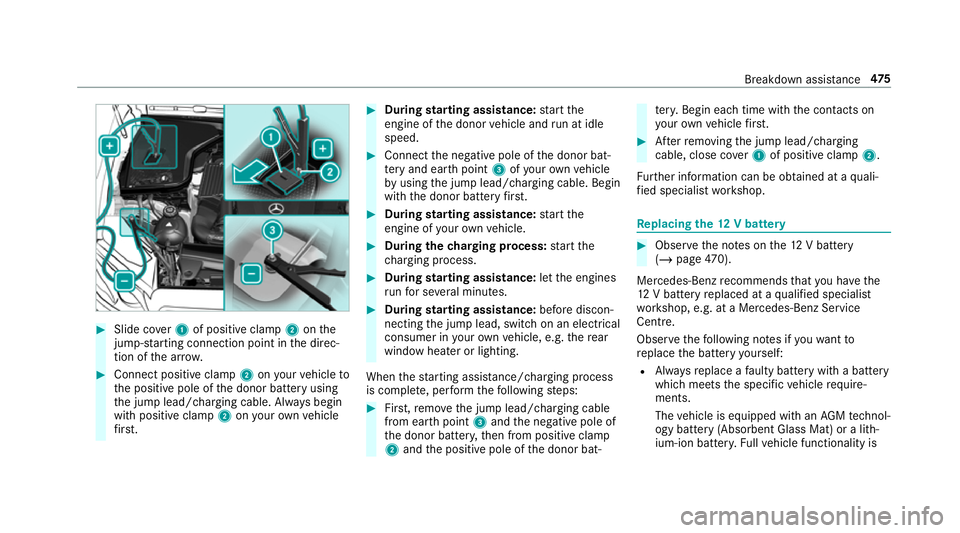
#
Slide co ver1 of positive clamp 2onthe
jump-s tarting connection point in the direc‐
tion of the ar row. #
Connect positive clamp 2onyour vehicle to
th e positive pole of the donor battery using
th e jump lead/charging cable. Alw ays begin
with positive clamp 2onyour ow nve hicle
fi rs t. #
During starting assi stance: start the
engine of the donor vehicle and run at idle
speed. #
Connect the negative pole of the donor bat‐
te ry and ear thpoint 3ofyour ow nve hicle
by using the jump lead/charging cable. Begin
with the donor battery firs t. #
During starting assi stance: start the
engine of your ow nve hicle. #
During thech arging process: start the
ch arging process. #
During starting assi stance: letthe engines
ru nfo r se veral minutes. #
During starting assi stance: before discon‐
necting the jump lead, switch on an electrical
consumer in your ow nve hicle, e.g. there ar
wind owheater or lighting.
When thest arting assis tance/charging process
is compl ete, per form thefo llowing steps: #
First,re mo vethe jump lead/charging cable
from ear thpoint 3and the negative pole of
th e donor batter y,then from positive clamp
2 and the positive pole of the donor bat‐ te
ry. Begin ea chtime wi th the conta cts on
yo ur ow nve hicle firs t. #
Afterre moving the jump lead/charging
cable, close co ver1 of positive clamp 2.
Fu rther information can be obtained at a quali‐
fi ed specialist workshop. Re
placing the 12V battery #
Obser vethe no tes on the12 V battery
(/ page 470).
Me rcedes-Benz recommends that you ha vethe
12 V battery replaced at a qualified specialist
wo rkshop, e.g. at a Mercedes-Benz Service
Centre.
Obser vethefo llowing no tes if youwa ntto
re place the battery yourself:
R Alw aysre place a faulty bat tery with a battery
which meets the specific vehicle require‐
ments.
The vehicle is equipped with an AGMtech nol‐
ogy battery (Absorbent Glass Mat) or a li th‐
ium-ion batter y.Fu llve hicle functionality is Breakdown assis
tance 475
Page 619 of 645
Communication module function ........
.421
Connection status .............................. .424
Displ aying the connection status ........ .424
Es tablishing .........................................4 23
Es tablishing automatically ...................4 23
Information .......................................... 421
Mobile phone de tails .......................... .423
Re strictions ......................................... 421
Setting access da ta(Blue tooth ®
) ........ 422
Setting automatic disconnection .........4 24
Setting up (Blue tooth®
) .......................4 22
Setting up (Wi-Fi) ................................. 422
Internet radio
Calling up ............................................ 428
Calling up thest ation list (category
last selec ted) .......................................4 30
Deleting stations ................................ .430
Logging out ......................................... 430
Overview ............................................. 429
Re gis tering .......................................... 430
Saving stations .................................... 430
Selecting and connecting toast ation
............................................................ .430
Selecting stre am ................................ .430
Setting options ................................... .430 Te
rm s of use ........................................4 30
iPhone ®
see Apple CarPlay™
see Mercedes-Benz Link
ISOFIX child seat securing sy stem
Fitting .................................................... 63
Seats suitable for attaching ................... 59 J
Jack Declaration of conformity ...................... 27
St orage location ..................................4 99
Jump-start connection ............................474
Gene ral no tes ...................................... 472 K
Ke y.............................................................. 76
Ac oustic locking verification signal ........ 77
Battery ................................................... 78
Emergency key ...................................... 78
Energy consumption .............................. 77
Fe atures ................................................ 76
Ke yring attachment .............................. 78
Overview ................................................ 76Problem .................................................79
Un locking setting .................................. 77
Ke y functions
Deactivating .......................................... 77
KEYLESS-GO Locking theve hicle ................................ 82
Problem .................................................83
Un locking setting .................................. 77
Un locking theve hicle ............................82
Kickd own.................................................. 173
Using ................................................... 173
Knee airbag ................................................ 41 L
Lamp see In terior lighting
Lamps (instrument display) see Warning/indicator lamps
Lane de tection (au tomatic)
see Active Lane Keeping Assist
Lane Keeping Assist
see Active Lane Keeping Assist 61 6
Index
Page 632 of 645
Snow
chains ............................................ 485
Soc ket (12 V) ............................................ 121
Boot ..................................................... 124
Fr ont centre console ............................ 121
Soc ket (1 15V) .......................................... 12 2
Re ar .................................................... .122
Soc ket (230 V) ......................................... 12 3
Re ar .................................................... .123
Software update ...................................... 334
Impor tant sy stem updates .................. 335
Information .......................................... 334
Pe rforming .......................................... 335
Sound PRE-SAFE ®
Sound ................................. 48
Wheels and tyres ................................. 485
Sound see Burmes ter®
sur round sound sy stem
see Tone settings
Sound settings Adjusting the balance/fader ............... 442
Ad justing treble, mid-range and bass
settings ................................................ 441
Au tomatic volume adjustment ............ .442 Spare wheel
see Collapsible spa rewheel
see Emer gency spa rewheel
Spectacles compa rtment ........................ 11 2
Speech dialogue sy stem
see LINGU ATRO NIC
Speed Limit Assist .................................. 24 2
Fu nction/no tes ................................... 24 2
Setting ................................................. 24 4
Sy stem limitations ...............................2 42
Speed limitation for winter tyres
Setting ................................................. 207
Speedome ter
Digital .................................................. 265
St andby mode
Ac tivating/deactivating ...................... .191
Fu nction .............................................. 19 0
St anding lights ........................................ 12 8
St art-off assi st
Ac tivating ............................................ 221
Fu nction .............................................. 221
St art/s top button
Pa rking theve hicle .............................. 181St
arting theve hicle .............................. 157
Switching on the po wer supply or
ignition ................................................ 15 6
St art/s top function
see ECO start/ stop function
St arting assi stance
see Jump -sta rt connection
St arting the engine
see Vehicle
St arting-o ffaid
see Hill Start Assist
St ation
Deleting ............................................... 440
Direct frequency entry ........................ 440
Fr equency fix ....................................... 441
Moving ................................................ 440
Sea rching ............................................ 440
Setting ................................................. 440
St oring ................................................ 440
St ation list
Calling up ............................................ 440
St ation presets
Modifying ............................................ 440 Index
629