length MERCEDES-BENZ CLA COUPE 2019 Owners Manual
[x] Cancel search | Manufacturer: MERCEDES-BENZ, Model Year: 2019, Model line: CLA COUPE, Model: MERCEDES-BENZ CLA COUPE 2019Pages: 645, PDF Size: 10.94 MB
Page 20 of 645
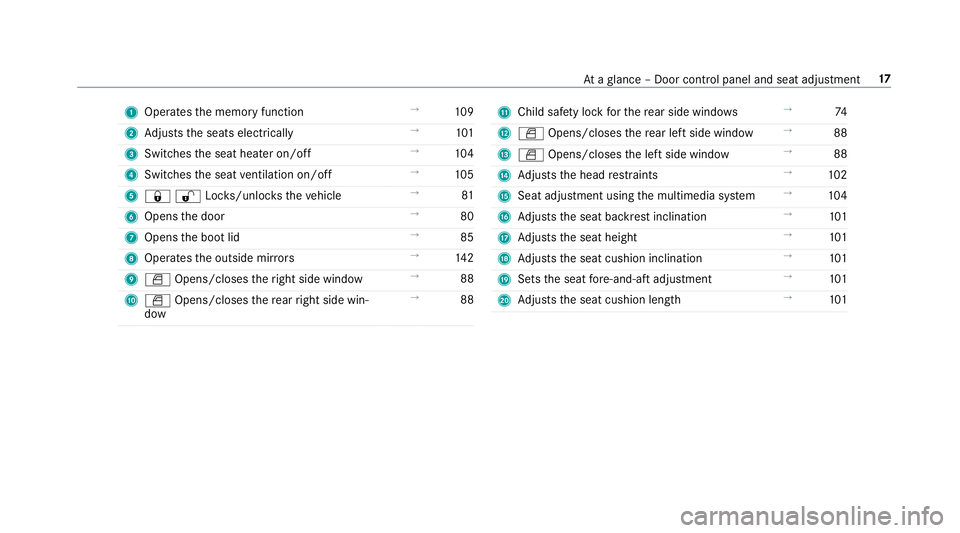
1
Operates the memory function →
109
2 Adjusts the seats electrically →
101
3 Switches the seat heater on/off →
104
4 Switches the seat ventilation on/o ff →
105
5 &%Loc ks/unloc kstheve hicle →
81
6 Opens the door →
80
7 Opens the boot lid →
85
8 Operates the outside mir rors →
14 2
9 W Opens/closes theright side window →
88
A W Opens/closes there ar right side win‐
dow →
88 B
Child saf ety lock forth ere ar side wind ows →
74
C W Opens/closes there ar left side wind ow→
88
D W Opens/closes the left side window →
88
E Adjusts the head restra ints →
102
F Seat adjustment using the multimedia sy stem →
104
G Adjusts the seat backrest inclination →
101
H Adjusts the seat height →
101
I Adjusts the seat cushion inclination →
101
J Sets the seat fore -and-aft adjustment →
101
K Adjusts the seat cushion length →
101 At
aglance – Door control panel and seat adjustment 17
Page 47 of 645
Consequentl
y,the airbags cann otprotect
ve hicle occupants as they are designed to
do. #
Never modify the doors or parts of the
doors. #
Alw ays ha vewo rkon the doors or door
panelling car ried out at a qualified spe‐
cialist workshop. &
WARNING Risk of inju rydue todeplo yed
airbag
A deplo yed airbag no longer of fers any pro‐
te ction and cannot pr ovide the intended pro‐
te ctive function in theeve nt of an accident. #
Have theve hicle towe dto aqu alified
specialist workshop in order tohave the
deplo yed airbag replaced. Ha
ve deplo yed airbags replaced immediately. St
atus of the front passenger front airbag Fu
nction of the automatic front passenger
front airbag shu toff
The automatic front passenger front airbag shut‐
off is able todetect whe ther the front passenger
seat is occupied bya person or a child restra int
sy stem. The front passenger front airbag is ena‐
bled or disabled accordingly.
When fitting a child restra int sy stem tothe front
passenger seat, alw ays make sure of thefo llow‐
ing:
R Ensure that thech ild restra int sy stem is posi‐
tioned cor rectly (/ page 56).
R Alw ays obser vethech ild restra int sy stem
manufacturer's ins tallation instructions.
R Never place objects, e.g. cushions, under or
behind thech ild restra int sy stem.
R Fully retract the seat cushion length adjust‐
ment.
R The entire base of thech ild restra int sy stem
must alw aysre st on the sitting sur face of the
front passenger seat. R
The backrest of thefo rw ard-facing child
re stra int sy stem must, as far as possible, be
re sting on the seat backrest of the front
passenger seat.
R The child restra int sy stem must not touch the
ro of or be put under stra in by the head
re stra ints. Adjust the seat backrest inclina‐
tion and the head restra int setting accord‐
ing ly. &
WARNING Risk of inju ryor death due to
objects between the seat sur face and
th ech ild restra int sy stem
Objects between the seat sur face and the
ch ild restra int sy stem could af fect the func‐
tion of the automatic front passenger front
airbag shutoff.
This could result in the front passenger front
airbag not functioning as intended during an
accident. #
Do not place any objects between the
sitting sur face and thech ild restra int
sy stem. 44
Occupant saf ety
Page 50 of 645
cator la
mpis off, the front passenger airbag
can deploy in theev ent of an accident.
The child could be stru ck bythe airbag.
Alw ays ensure that the front passenger air‐
bag is disabled. The PASSENGER AIR BAG
OFF indicator lamp must be lit.
NEVER use a rear wa rd-facing child restra int
sy stem on a seat pr otected byan ENABLED
FRONT AIRB AGin front of it, DE ATH or SERI‐
OUS INJU RYtotheCH ILD can occur. When
fitting a child restra int sy stem tothe front
passenger seat, obser vetheve hicle-specific
information (/ page71).
Depending on thech ild restra int sy stem and the
st ature of thech ild, thePA SSENGER AIR BAG
OFF indicator lamp may be off. In this case, do
not fit th ere ar wa rd-facing child restra int sy stem
to the front passenger seat.
Ins tead, fit th ere ar wa rd-facing child restra int
sy stem toa suitable rear seat.
Af terfitting a forw ard-facing child restra int
sy stem tothe front passenger seat: depend‐
ing on thech ild restra int sy stem and thest ature of
thech ild, PASSENGER AIR BAG OFF may be lit
continuously or be off. Alw ays obser vethefo l‐
lowing information. &
WARNING Risk of inju ryor death due to
incor rect positioning of thefo rw ard-
fa cing child restra int sy stem
If yo u secure a child in a forw ard-facing child
re stra int sy stem on the front passenger seat
and you position the front passenger seat too
close tothe dashboard, in theev ent of an
accident, thech ild could:
R come into con tact wi thparts of theve hi‐
cle's interior if thePA SSENGER AIR BAG
OFF indicator lamp is lit, forex ample
R bestru ck bythe airbag if thePA SSENGER
AIR BAG OFF indicator lamp is off #
Alw ays mo vethe front passenger seat
as far back as possible and fully retract
th e seat cushion length adjustment.
Alw ays make sure that the shoulder belt
st ra p is cor rectly routed from the seat
belt outlet on theve hicle tothe shoul‐
der belt guide on thech ild restra int sys‐ te
m. The shoulder belt stra p must be
ro uted forw ards and down wards from
th e seat belt outlet. If necessar y,adjust
th e front passenger seat according ly. #
Alw ays obser vethech ild restra int sys‐
te m manufacturer's ins tallation instruc‐
tions. When
fitting a child restra int sy stem tothe front
passenger seat, obser vetheve hicle-specific
information (/ page71).
If a person is sitting on the front passenger
seat: PASSENGER AIR BAG OFF may be lit con‐
tinuously or be off, depending on the person's
st ature.
A person on the front passenger seat must
alw ays obser vethefo llowing information:
R Ifth e front passenger seat is occupied byan
adult or a person with a stature cor respond‐
ing tothat of an adult, thePA SSENGER AIR
BA G OFF indicator lamp must be off. This
indicates that the front passenger front air‐
bag is enabled. Occupant saf
ety47
Page 75 of 645
R
When using a rear wa rd-facing child restra int
sy stem on the front passenger seat, the front
passenger front airbag must alw ays be disa‐
bled. This is only the case if thePA SSENGER
AIR BAG OFF indicator lamp is lit continu‐
ously (/ page 46).
R Ifth ePA SSENGER AIR BAG OFF indicator
lamp is off, the front passenger front airbag
is enabled. The front passenger front airbag
may deploy during an accident.
Securing the child restra int sy stem with the
seat belt on the front passenger seat
When fitting a belt-secu redch ild restra int sys‐
te m on the front passenger seat, alw ays obser ve
th efo llowing:
O Obser
vethech ild restra int sy stem manufac‐
turer's ins tallation and operating instruc‐
tions.
O Fo
r a child restra int sy stem in the "Univer‐
sal" or "Semi-Universal" categor y,make
sure that the sy stem has been appr ovedfor
th eve hicle seat. Obser
vethe no tes under "Suitability of
seats for attaching belt-secu redch ild
re stra int sy stems" (/ page67).
O When using a
forw ard-facing child restra int
sy stem in Group I: remo vethe head
re stra int from there spective seat, if possi‐
ble.
Af terth ech ild restra int sy stem has been
re mo ved, replace the head restra ints again
immediately and adjust them cor rectly.
O The ba
ckrest of thefo rw ard-facing child
re stra int sy stem must, as far as possible, be
re sting on the seat backrest of the front
passenger seat.
O Fo
r cer tainch ild restra int sy stems of weight
category II or III there may be limitations for
th e maximum size setting, e.g. due topossi‐
ble con tact wi th th ero of.
O The
child restra int sy stem must not be ten‐
sioned between thero of and the seat cush‐
ion and/or be fitted facing the wrong direc‐
tion. Adjust the seat backrest inclination
according ly. O
The
child restra int sy stem must not be put
under stra in by the head restra ints. Adjust
th e head restra ints accordingly.
O Ne
ver place objects under or behind the
ch ild restra int sy stem, e.g. cushions. #
Set the front passenger seat as far back as
possible and mo vethe seat into the highest
position. #
Fully retract the seat cushion length adjust‐
ment. #
Adjust the seat cushion inclination so that
th e front edge of the seat cushion is in the
highest position and there ar edge of the
seat cushion is in the lo west position. #
Set the seat backrest toan almost vertical
position. #
Fitthech ild restra int sy stem.
The entire base of thech ild restra int sy stem
must alw aysre st on the sitting sur face of the
front passenger seat. #
Alw ays make sure that the shoulder belt
st ra p is cor rectly routed from the seat belt 72
Occupant saf ety
Page 91 of 645
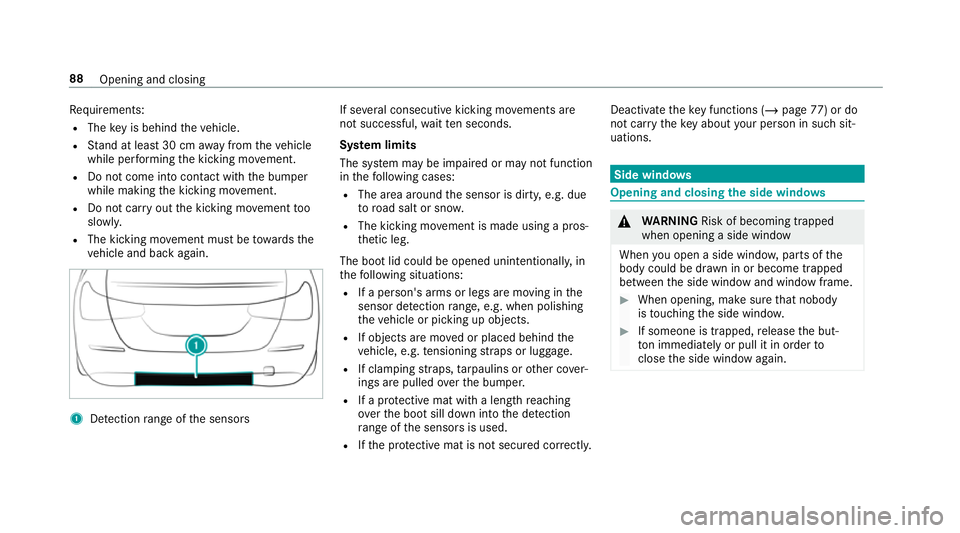
Re
quirements:
R The key is behind theve hicle.
R Stand at least 30 cm away from theve hicle
while per form ing the kicking mo vement.
R Do not come into contact with the bumper
while making the kicking mo vement.
R Do not car ryout the kicking mo vement too
slowl y.
R The kicking mo vement must be towa rdsthe
ve hicle and back again. 1
Detection range of the sensors If se
veral consecutive kicking mo vements are
not successful, waitte n seconds.
Sy stem limits
The sy stem may be impaired or may not function
in thefo llowing cases:
R The area around the sensor is dirty, e.g. due
to road salt or sn ow.
R The kicking mo vement is made using a pros‐
th etic leg.
The boot lid could be opened unin tentionally, in
th efo llowing situations:
R If a person's arms or legs are moving in the
sensor de tection range, e.g. when polishing
th eve hicle or picking up objects.
R If objects are mo ved or placed behind the
ve hicle, e.g. tensioning stra ps or luggage.
R If clamping stra ps, tarp aulins or other co ver‐
ings are pulled overth e bumper.
R If a pr otective mat with a length reaching
ove rth e boot sill down into the de tection
ra nge of the sensors is used.
R Ifth e pr otective mat is not secured cor rectl y. Deactivate
theke y functions (/ page77) or do
not ca rryth eke y about your person in such sit‐
uations. Side wind
ows Opening and closing
the side windo ws &
WARNING Risk of becoming trapped
when opening a side window
When you open a side wind ow, parts of the
body could be dr awn in or become trapped
between the side window and window frame. #
When opening, make sure that nobody
is touching the side windo w. #
If someone is trapped, release the but‐
to n immedia tely or pull it in order to
close the side window again. 88
Opening and closing
Page 104 of 645
Seats
Ad
justing the front seat mechanically (with
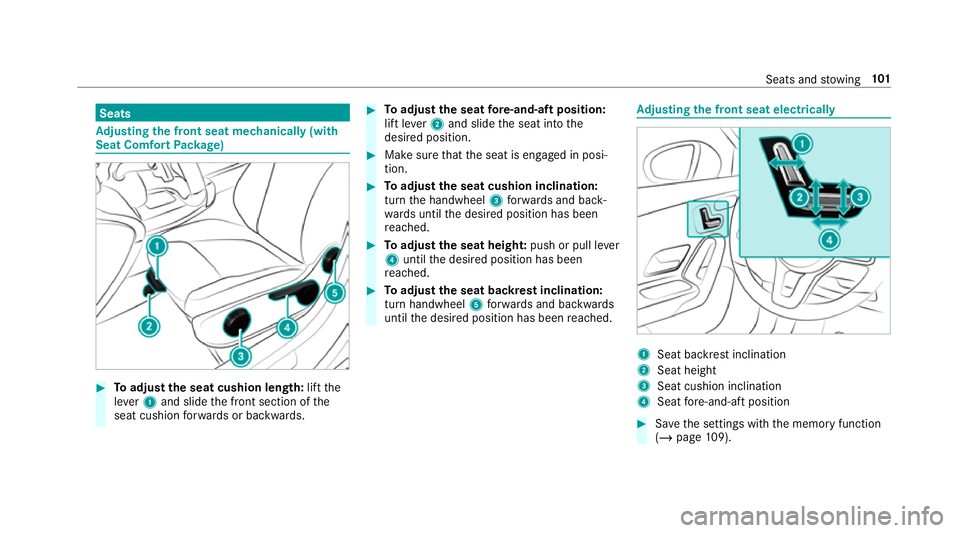
Seat Comfort Package) #
Toadjust the seat cushion length: liftthe
le ve r1 and slide the front section of the
seat cushion forw ards or backwards. #
Toadjust the seat fore -and-aft position:
lift le ver2 and slide the seat into the
desired position. #
Make sure that the seat is engaged in posi‐
tion. #
Toadjust the seat cushion inclination:
turn the handwheel 3forw ards and back‐
wa rds until the desired position has been
re ached. #
Toadjust the seat heigh t:push or pull le ver
4 until the desired position has been
re ached. #
Toadjust the seat backrest inclination:
turn handwheel 5forw ards and backwards
until the desired position has been reached. Ad
justing the front seat electrically 1
Seat ba ckrest inclination
2 Seat height
3 Seat cushion inclination
4 Seat fore -and-aft position #
Save the settings with the memory function
(/ page 109). Seats and
stowing 101
Page 228 of 645
Problem
Possible causes/consequences and M
MSolutions #
Ifth e problem persists, consult a qualified specialist workshop. Fu
nction of the passive side impact pr otec‐
tion
Pa ssive side impact pr otection is an additional
Pa rking Assist PARKTRONIC function which
wa rnsth e driver about obs tacles at the side of
th eve hicle. A warning is issued when obs tacles
are de tected between the front and rear de tec‐
tion range. In order for an object on the side to
be de tected, the sensors in the front and rear
bumper must firs t de tect the object while you
are driving past it.
During the parking procedure or manoeuvring,
objects are de tected as theve hicle drives past.
If yo usteer in the direction of a de tected obs ta‐
cle and there is a risk of a lateral collision, a
wa rning is issued. The segments on the sides
light up yellow or red, depending on the dis tance
to the obs tacle. Segment colour depending on distance
Colour Lateral distance
Ye llo wA pprox. 30 - 60 cm
Re dA pprox. < 30 cm In order
for lateral front or rear segments tobe
displa yed, theve hicle must firs t tr ave l a dis tance
of at least half of theve hicle length. Once the
ve hicle has tr avelled the length of theve hicle, all
of the lateral front and rear segments can be dis‐
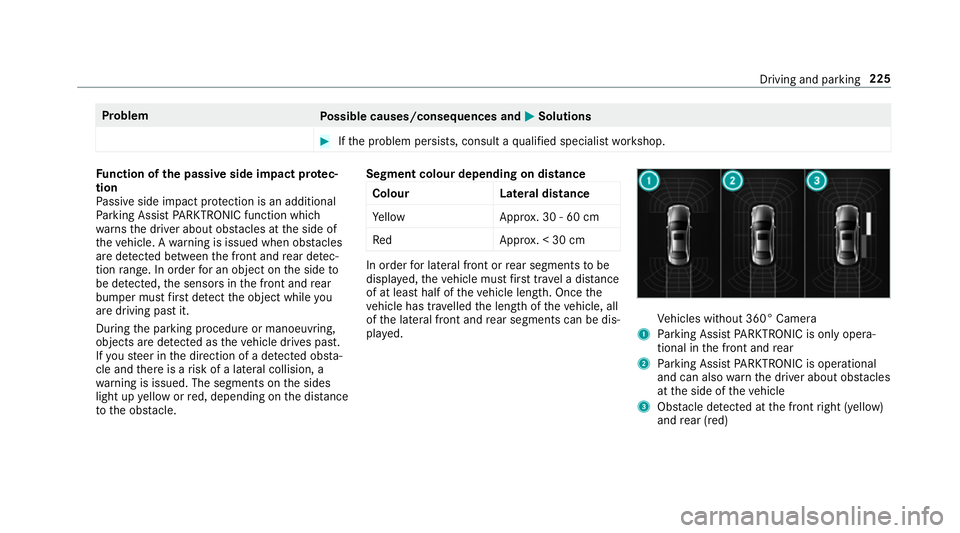
pla yed. Ve
hicles without 360° Camera
1 Parking Assist PARKTRONIC is on ly opera‐
tional in the front and rear
2 Parking Assist PARKTRONIC is operational
and can also warnthe driver about obs tacles
at the side of theve hicle
3 Obstacle de tected at the front right (yellow)
and rear (red) Driving and parking
225
Page 244 of 645
re
sted and attentive driver. On long journe ys,
ta ke regular breaks in good time that allow for
adequate recuperation.
Yo u can choose between two settings:
R Standard: normal sy stem sensitivity.
R Sensitive: higher system sensitivity. The
driver is warned earlier and the attention
le ve l de tected byATTENTION ASSIST is adap‐
te d according ly.
If dr owsiness or increasing lapses in concentra‐
tion are de tected, theATTENTION ASSIST: Take
a break! warning appears in the instrument dis‐
pla y.Yo u can ackn owledge the message and
tak e a break where necessar y.Ifyo u do not take
a break and ATTENTION ASSIST continues to
de tect increasing lapses in concentration, you
will be warned again af ter a minimum of
15 minutes. Yo
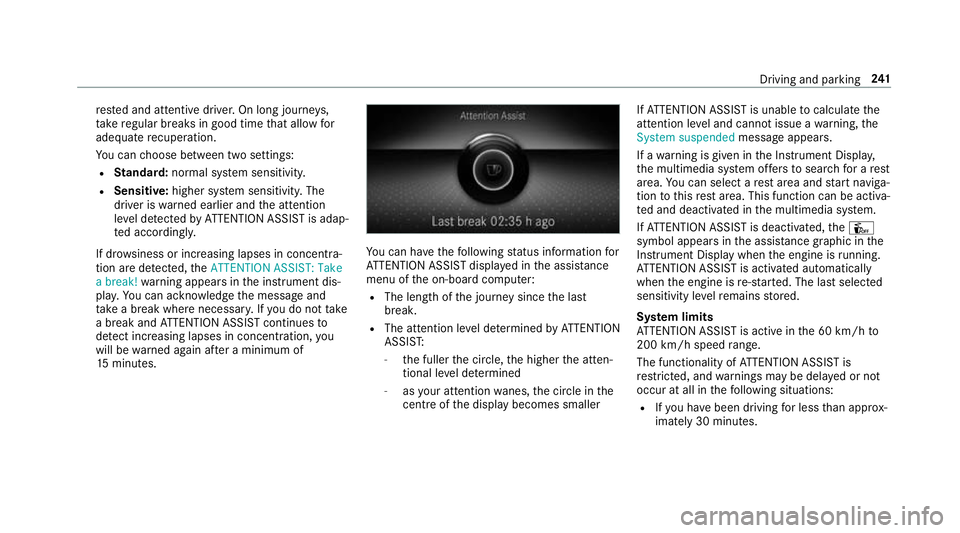
u can ha vethefo llowing status information for
AT TENTION ASSIST displa yed in the assis tance
menu of the on-board computer:
R The length of the journey since the last
break.
R The attention le vel de term ined byATTENTION
ASSIS T:
- the fuller the circle, the higher the atten‐
tional le vel de term ined
- asyour attention wanes, the circle in the
centre of the display becomes smaller If
AT TENTION ASSIST is unable tocalculate the
attention le vel and cannot issue a warning, the
System suspended messageappears.
If a warning is given in the Instrument Displa y,
th e multimedia sy stem of fers to sear chfor a rest
area. You can select a rest area and start naviga‐
tion tothis rest area. This function can be activa‐
te d and deactivated in the multimedia sy stem.
If AT TENTION ASSIST is deactivated, theÛ
symbol appears in the assis tance graphic in the
Instrument Display when the engine is running.
AT TENTION ASSIST is activated automatically
when the engine is re-sta rted. The last selected
sensitivity le velre mains stored.
Sy stem limits
AT TENTION ASSIST is active in the 60 km/h to
200 km/h speed range.
The functionality of ATTENTION ASSIST is
re stricted, and warnings may be dela yed or not
occur at all in thefo llowing situations:
R Ifyo u ha vebeen driving for less than appr ox‐
imately 30 minutes. Driving and parking
241
Page 388 of 645
vidual
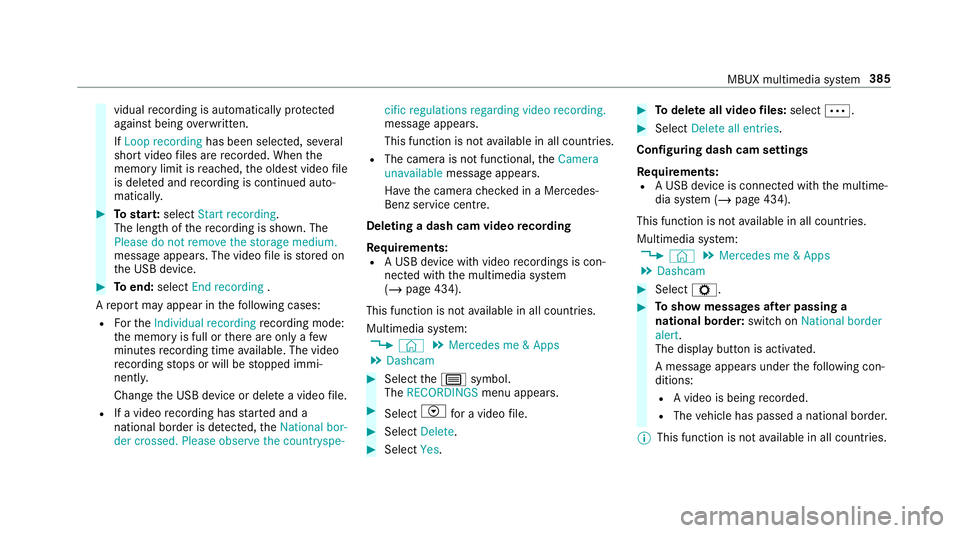
recording is au tomatical lyprotected
against being overwritten.
If Loop recording has been selected, se veral
short video files are recorded. When the
memory limit is reached, the oldest video file
is dele ted and recording is continued au to‐
matical ly. #
Tostar t:select Start recording.
The length of there cording is shown. The
Please do not remove the storage medium.
message appea rs. The video file is stored on
th e USB device. #
Toend: select End recording .
A report may appear in thefo llowing cases:
R Forth eIndividual recording recording mode:
th e memory is full or there are only a few
minutes recording time available. The video
re cording stops or will be stopped immi‐
nently.
Chan gethe USB device or dele tea video file.
R If a video recording has star ted and a
national border is de tected, theNational bor-
der crossed. Please observe the countryspe- cific regulations regarding video recording.
message appears.
This function is not
available in all countries.
R The camera is not functional, theCamera
unavailable message appears.
Ha ve the camera checked in a Mercedes-
Benz service centre.
Deleting a dash cam video recording
Requ irements:
R A USB device with video recordings is con‐
nected wi th the multimedia sy stem
(/ page 434).
This function is not available in all countries.
Multimedia sy stem:
4 © 5
Mercedes me & Apps
5 Dashcam #
Select thep symbol.
The RECORDINGS menu appears. #
Select Vfor a video file. #
Select Delete. #
Select Yes. #
Todel ete all video files: select Ä. #
Select Delete all entries.
Configuring dash cam settings
Re quirements:
R A USB device is connec ted with the multime‐
dia sy stem (/ page 434).
This function is not available in all countries.
Multimedia sy stem:
4 © 5
Mercedes me & Apps
5 Dashcam #
Select Z. #
Toshow messages af ter passing a
national bo rder: swit chon National border
alert.
The display button is activated.
A message appears under thefo llowing con‐
ditions:
R A video is being recorded.
R The vehicle has passed a national border.
% This function is not available in all countries. MBUX multimedia sy
stem 385
Page 638 of 645
Diagno
stics connection ........................ .28
Equipment ............................................. 23
Implied warranty .................................. .30
Locking (auto matically) ......................... 83
Locking (digital vehicle keyst icke r) ...... .81
Locking (from the inside) ....................... 81
Locking (KEYLESS-GO) ..........................82
Locking (mobile phone) ......................... 81
Locking/unlocking (emergency key) .... .84
Lo we ring ............................................. 503
Pa rking up .......................................... .190
QR code rescue card ............................. 30
Qualifi ed specialist workshop ................29
Ra ising ................................................ 500
REA CHregulation ..................................30
Re gistration ...........................................29
St andby mode function ...................... .190
St arting (Digital Vehicle Keyst icke r) .... 15 8
St arting (eme rgency operation
mode) .................................................. 15 9
St arting (mobile phone) ...................... .158
St arting (Remo teOnline) ..................... 16 0
St arting (s tart/s top button) .................1 57
Switching off (s tart/s top button) .........1 81
To wing ................................................ .257
Un locking (digital vehicle keyst icke r) .... 81 Un
locking (from the inside) .................... 81
Un locking (KEYLESS-GO) ...................... .82
Un locking (mobile phone) ...................... 81
Ve ntilating (co nvenience opening) ......... 90
Vo ice commands (LINGU ATRO NIC) .....2 87
Ve hicle data
Displ aying (DYNAMIC SELECT) ............ 16 8
Ro of load ............................................. 524
Tr ans ferring toAndroid Auto ............... 409
Tr ans ferring toApple CarPl ay™ ........... 409
Tr ans ferring toBaidu CarLife ............... 409
Ve hicle height ...................................... 523
Ve hicle length ...................................... 523
Ve hicle width ....................................... 523
Wheelbase ...........................................5 23
Ve hicle dimensions ................................. 523
Ve hicle identification number
see VIN
Ve hicle identification plate .....................512
EU general operating pe rmit number .. .512
Pa int code ............................................ 512
Pe rm issible axle load .......................... .512
Pe rm issible gross mass ...................... .512
VIN ....................................................... 512Ve
hicle interior
Cooling or heating (Remo teOnline) ..... 16 0
Ve hicle key
see Key
Ve hicle maintenance
see ASS YST PLUS
Ve hicle position
Switching transmission on/off ............ 328
Ve hicle tool kit ........................................ 466
TIREFIT kit .......................................... .466
To wing eye .......................................... 480
Ve ntilating
Con venience opening ............................ 90
Ve ntilation
see Climate cont rol
Ve nts
see Air vents
VIN ............................................................ 512
Engine compa rtment ........................... 512
Identification plate ............................... 512
Wi ndsc reen .......................................... 512
Vi sion
Demisting windo ws............................. 14 9 Index
635