MERCEDES-BENZ CLA SHOOTING BRAKE 2015 Owners Manual
Manufacturer: MERCEDES-BENZ, Model Year: 2015, Model line: CLA SHOOTING BRAKE, Model: MERCEDES-BENZ CLA SHOOTING BRAKE 2015Pages: 421, PDF Size: 12.52 MB
Page 241 of 421
other road users. There is a risk of an accident
and injury.
Never exceed the permissible noseweight
when using a carrier.
Exceeding the maximum permissible nose-
weight of the trailer drawbar on the ball cou-
pling may cause damage to the following: R your vehicle
R the trailer
R the ball coupling
R trailer tow hitch
The vehicle/trailer combination could
become unstable.
If the noseweight used is lower than the min- imum permissible noseweight, the vehicle/
trailer combination could also become unsta- ble.
To avoid hazardous situations:
R make sure to check the noseweight before
each journey
R use a drawbar noseweight as close as pos-
sible to the maximum noseweight
R do not exceed the maximum permissible
noseweight
R do not use a noseweight lower than the
minimum noseweight
Make sure that the following values are not
exceeded:
R the permissible trailer drawbar noseweight
R the permissible trailer load
R the permissible rear axle load of the towing
vehicle
R the maximum permissible gross vehicle
weight of both the towing vehicle and the
trailer
The applicable permissible values, which
must not be exceeded, can be found:
R in your vehicle documents
R on the identification plates of the trailer tow
hitch and the trailer
R on the vehicle identification plate
If the values differ, the lowest value applies. You will find the values approved by the man-
ufacturer on the vehicle identification plates
and those for the towing vehicle under "Tech- nical data" (Y page 412). G
WARNING
If you release the ball coupling or it does not
engage correctly when folding in, it will swing out. Within pivoting range of the ball coupling,
there is an increased risk of an accident and
injury.
Only release the ball coupling if the pivoting
range is unobstructed. Always make sure that the ball coupling engages when folding in.
When reversing the vehicle towards the
trailer, make sure there is nobody between
the trailer and the vehicle.
Couple and uncouple the trailer carefully. If
you do not couple the trailer to the towing
vehicle correctly, the trailer could become
detached.
When towing a trailer, your vehicle's handling
characteristics will be different in comparison to when driving without a trailer.
The vehicle/trailer combination:
R is heavier
R is restricted in its acceleration and gradi-
ent-climbing capability
R has an increased braking distance
R is affected more by strong crosswinds
R demands more sensitive steering
R has a larger turning circle
This can impair the vehicle's handling char-
acteristics. Adapt your driving style accord-
ingly. Maintain a safe distance. Drive care-
fully.
When towing a trailer, always adjust your
speed to the current road and weather con-
ditions. Do not exceed the maximum permis-
sible speed for your vehicle/trailer combina-
tion. 238
Towing a trailerDriving and parking
Page 242 of 421
Notes on towing a trailer
General notes Trailer towing is not permissible on the fol-
lowing models:
R
Mercedes‑ AMG CLA 45 4MATIC
R Vehicles with AMG Line
When towing a trailer, set the tyre pressure on
the rear axle of the towing vehicle for the
maximum load. Further information on the
tyre pressure table in the fuel filler flap
(Y page 374).
Please note that when towing a trailer, the
following driving systems have limited avail-
ability or are not available at all.
R PARKTRONIC (Y page 216)
R Blind Spot Assist (Y page 234)
The height of the ball coupling changes with
the load of the vehicle. If necessary, use a
trailer with a height-adjustable drawbar.
You will find fitting dimensions and loads
under "Technical data" (Y page 411).
Driving tips Observe the notes on ESP
®
trailer stabilisa-
tion (Y page 79).
The maximum permissible speed for vehicle/
trailer combinations depends on the type of
trailer. Before beginning the journey, check
the trailer's documents to see what the max- imum permitted speed is. Observe the legally
prescribed maximum speed in the relevant
country.
For certain Mercedes-Benz vehicles, the max-
imum permissible rear axle load is increased
when towing a trailer. See the "Technical
data" section to find out whether this applies to your vehicle. If you utilise any of the added
maximum rear axle load when towing a trailer, the vehicle/trailer combination may not
exceed a maximum speed of 100 km/h for
reasons concerning the operating permit.
This also applies in countries in which the permissible maximum speed for vehicle/
trailer combinations is above 100 km/h.
When towing a trailer, your vehicle's handling
characteristics will be different in comparison to when driving without a trailer and it will
consume more fuel.
Change into a lower gear in good time on long
and steep downhill gradients. For vehicles
with automatic transmission, you need to
have selected manual drive program M
(Y page 185).
This also applies if you have activated cruise
control, SPEEDTRONIC or DISTRONIC PLUS.
This will use the braking effect of the engine,
so less braking will be required to maintain
vehicle speed. This relieves the load on the
brake system and prevents the brakes from
overheating and wearing too quickly. If you
need additional braking, depress the brake
pedal repeatedly rather than continuously.
Briefly depressing the accelerator pedal on
downhill gradients while the manual drive
program Mis temporarily activated (vehicles
with automatic transmission): the automatic
transmission may switch back to the last
active automatic drive program Eor S. The
automatic transmission may shift to a higher
gear. This can reduce the engine's braking
effect.
Driving tips If the trailer swings from side to side:
X Do not accelerate.
X Do not countersteer.
X Brake if necessary.
R Maintain a greater distance to the vehicle in
front than when driving without a trailer.
R Avoid braking abruptly. If possible, brake
gently at first to allow the trailer to run on.
Then, increase the braking force rapidly.
R The values given for gradient-climbing
capabilities from a standstill refer to sea
level. When driving in mountainous areas,
note that the power output of the engine,
and consequently the vehicle's gradient- Towing a trailer
239Driving and parking Z
Page 243 of 421
climbing capability, decrease with increas-
ing altitude. Folding out the ball coupling
G
WARNING
If the ball coupling is not correctly engaged,
the trailer can detach. There is a risk of an
accident.
Always engage the ball coupling as described. G
WARNING
If you release the ball coupling or it does not
engage correctly when folding in, it will swing out. Within pivoting range of the ball coupling,
there is an increased risk of an accident and
injury.
Only release the ball coupling if the pivoting
range is unobstructed. Always make sure that the ball coupling engages when folding in.
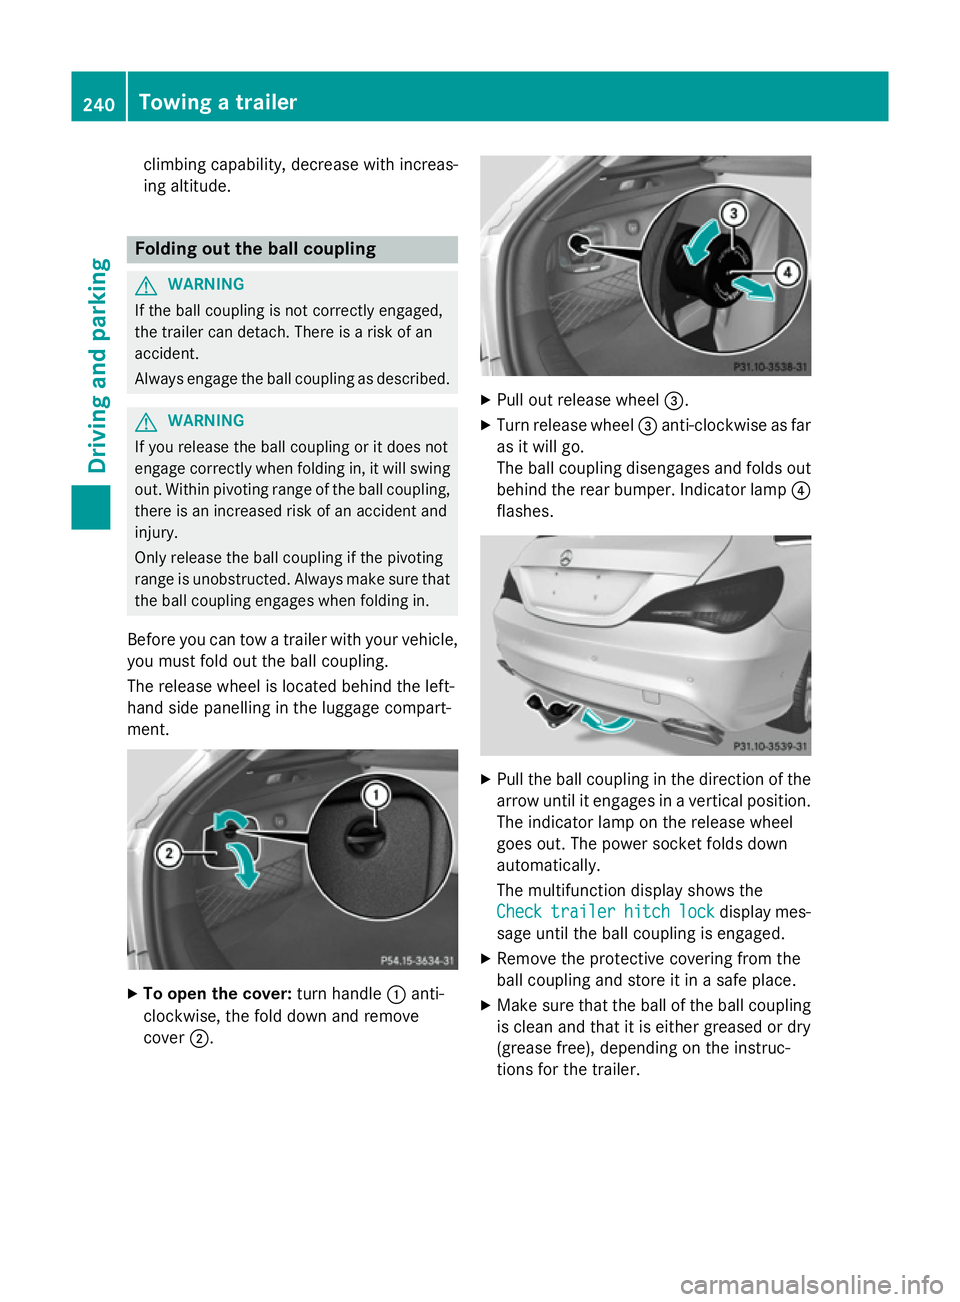
Before you can tow a trailer with your vehicle, you must fold out the ball coupling.
The release wheel is located behind the left-
hand side panelling in the luggage compart-
ment. X
To open the cover: turn handle:anti-
clockwise, the fold down and remove
cover ;. X
Pull out release wheel =.
X Turn release wheel =anti-clockwise as far
as it will go.
The ball coupling disengages and folds out
behind the rear bumper. Indicator lamp ?
flashes. X
Pull the ball coupling in the direction of the
arrow until it engages in a vertical position.
The indicator lamp on the release wheel
goes out. The power socket folds down
automatically.
The multifunction display shows the
Check
Check trailer trailer hitch
hitchlock
lockdisplay mes-
sage until the ball coupling is engaged.
X Remove the protective covering from the
ball coupling and store it in a safe place.
X Make sure that the ball of the ball coupling
is clean and that it is either greased or dry
(grease free), depending on the instruc-
tions for the trailer. 240
Towing a trailerDriving and parking
Page 244 of 421
Coupling up a trailer
X Make sure that the transmission is in posi-
tion P.
X Apply the electric parking brake.
X Position the trailer horizontally behind the
vehicle.
X Couple up the trailer.
X Establish the electric connection between
the vehicle and the trailer.
X Check that the trailer lighting system is
working.
A connected trailer is only recognised when
the electrical connection is established
correctly and when the lighting system is
working properly. The function of other sys-
tems, such as ESP ®
or PARKTRONIC also
depends on this. Uncoupling a trailer
G
WARNING
If you uncouple a trailer with an engaged over- run brake, you could trap your hand between
the vehicle and the trailer drawbar. This poses a risk of injury.
Do not uncouple a trailer with an engaged
overrun brake.
! Do not disconnect a trailer with an
engaged overrun brake. Otherwise, your
vehicle could be damaged by the rebound- ing of the overrun brake.
! Remove the installed adapter cable
before folding in the ball coupling. Other-
wise, damage may occur to the rear
bumper and the adapter cable.
X Make sure that the transmission is in posi-
tion P.
X Apply the electric parking brake.
X Secure the trailer against rolling away.
X Remove the trailer cable and decouple the
trailer. Folding in the ball coupling
G
WARNING
If you release the ball coupling or it does not
engage correctly when folding in, it will swing out. Within pivoting range of the ball coupling,
there is an increased risk of an accident and
injury.
Only release the ball coupling if the pivoting
range is unobstructed. Always make sure that the ball coupling engages when folding in.
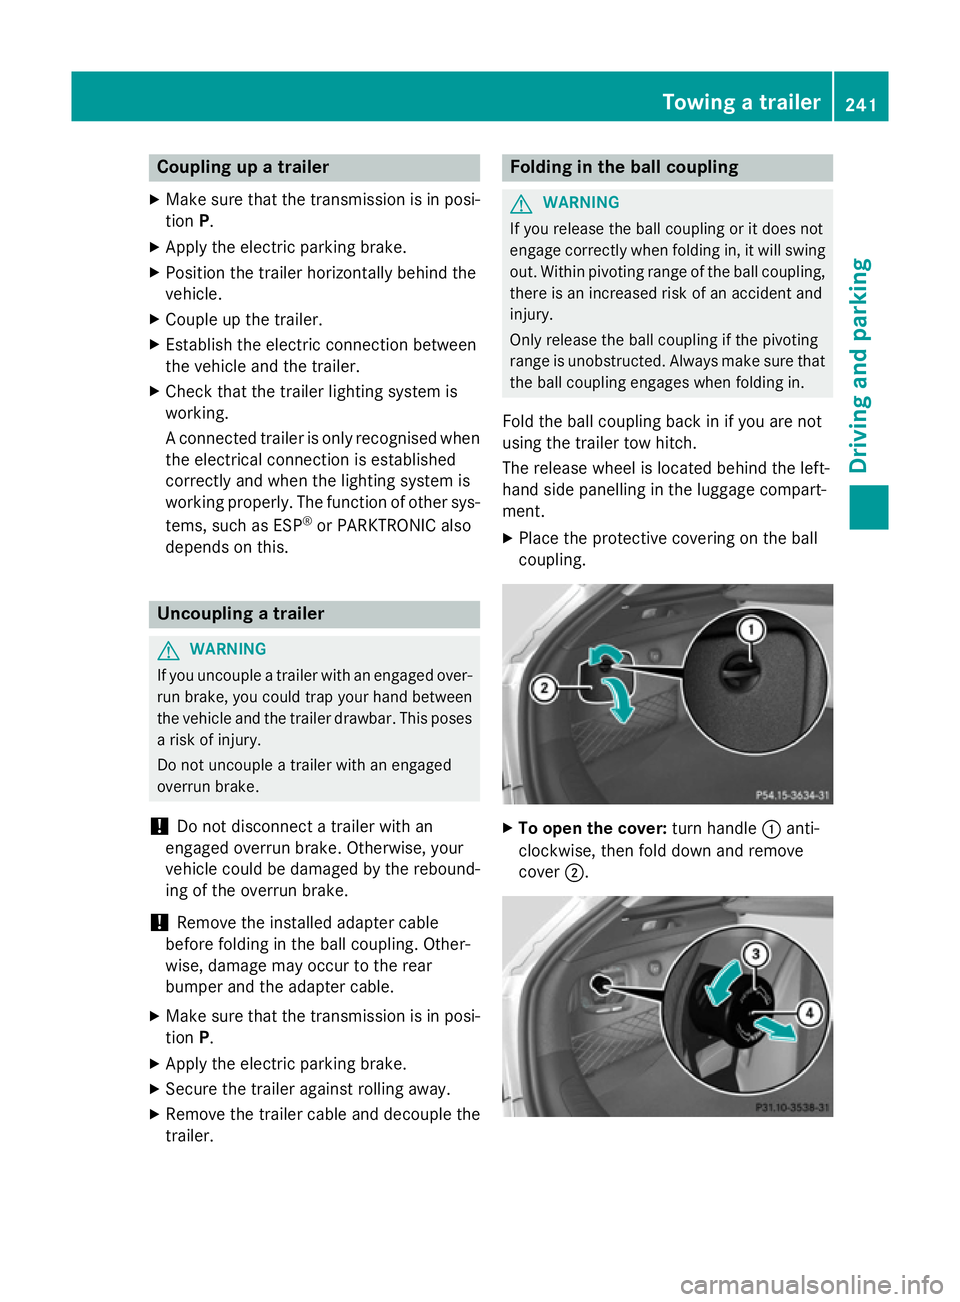
Fold the ball coupling back in if you are not
using the trailer tow hitch.
The release wheel is located behind the left-
hand side panelling in the luggage compart-
ment.
X Place the protective covering on the ball
coupling. X
To open the cover: turn handle:anti-
clockwise, then fold down and remove
cover ;. Towing a trailer
241Driving and parking Z
Page 245 of 421
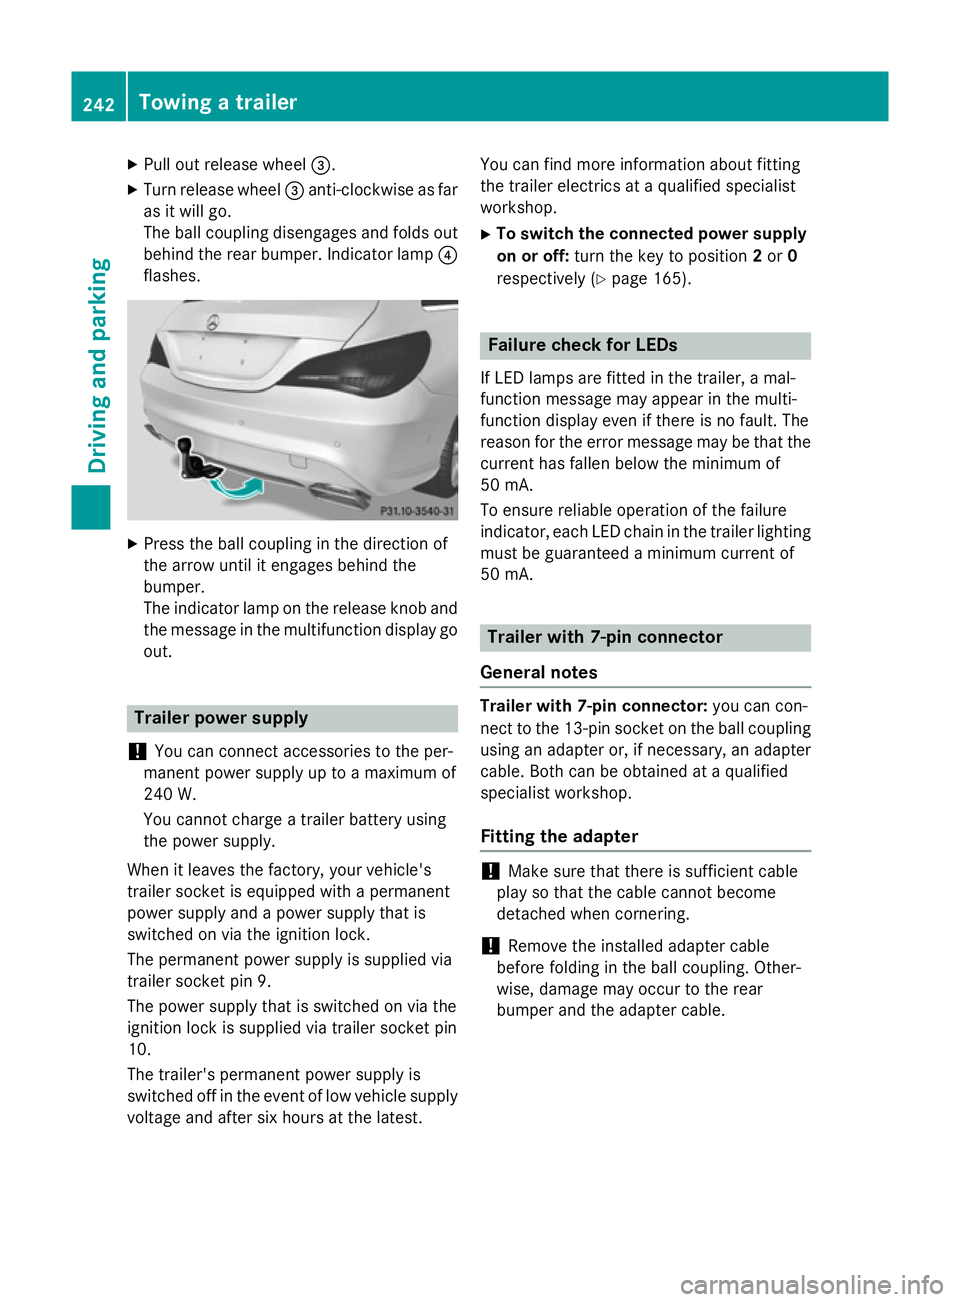
X
Pull out release wheel =.
X Turn release wheel =anti-clockwise as far
as it will go.
The ball coupling disengages and folds out
behind the rear bumper. Indicator lamp ?
flashes. X
Press the ball coupling in the direction of
the arrow until it engages behind the
bumper.
The indicator lamp on the release knob and
the message in the multifunction display go
out. Trailer power supply
! You can connect accessories to the per-
manent power supply up to a maximum of
240 W.
You cannot charge a trailer battery using
the power supply.
When it leaves the factory, your vehicle's
trailer socket is equipped with a permanent
power supply and a power supply that is
switched on via the ignition lock.
The permanent power supply is supplied via
trailer socket pin 9.
The power supply that is switched on via the
ignition lock is supplied via trailer socket pin
10.
The trailer's permanent power supply is
switched off in the event of low vehicle supply
voltage and after six hours at the latest. You can find more information about fitting
the trailer electrics at a qualified specialist
workshop.
X To switch the connected power supply
on or off: turn the key to position 2or 0
respectively (Y page 165). Failure check for LEDs
If LED lamps are fitted in the trailer, a mal-
function message may appear in the multi-
function display even if there is no fault. The
reason for the error message may be that the
current has fallen below the minimum of
50 mA.
To ensure reliable operation of the failure
indicator, each LED chain in the trailer lighting
must be guaranteed a minimum current of
50 mA. Trailer with 7-pin connector
General notes Trailer with 7-pin connector:
you can con-
nect to the 13-pin socket on the ball coupling
using an adapter or, if necessary, an adapter
cable. Both can be obtained at a qualified
specialist workshop.
Fitting the adapter !
Make sure that there is sufficient cable
play so that the cable cannot become
detached when cornering.
! Remove the installed adapter cable
before folding in the ball coupling. Other-
wise, damage may occur to the rear
bumper and the adapter cable. 242
Towing a trailerDriving and parking
Page 246 of 421
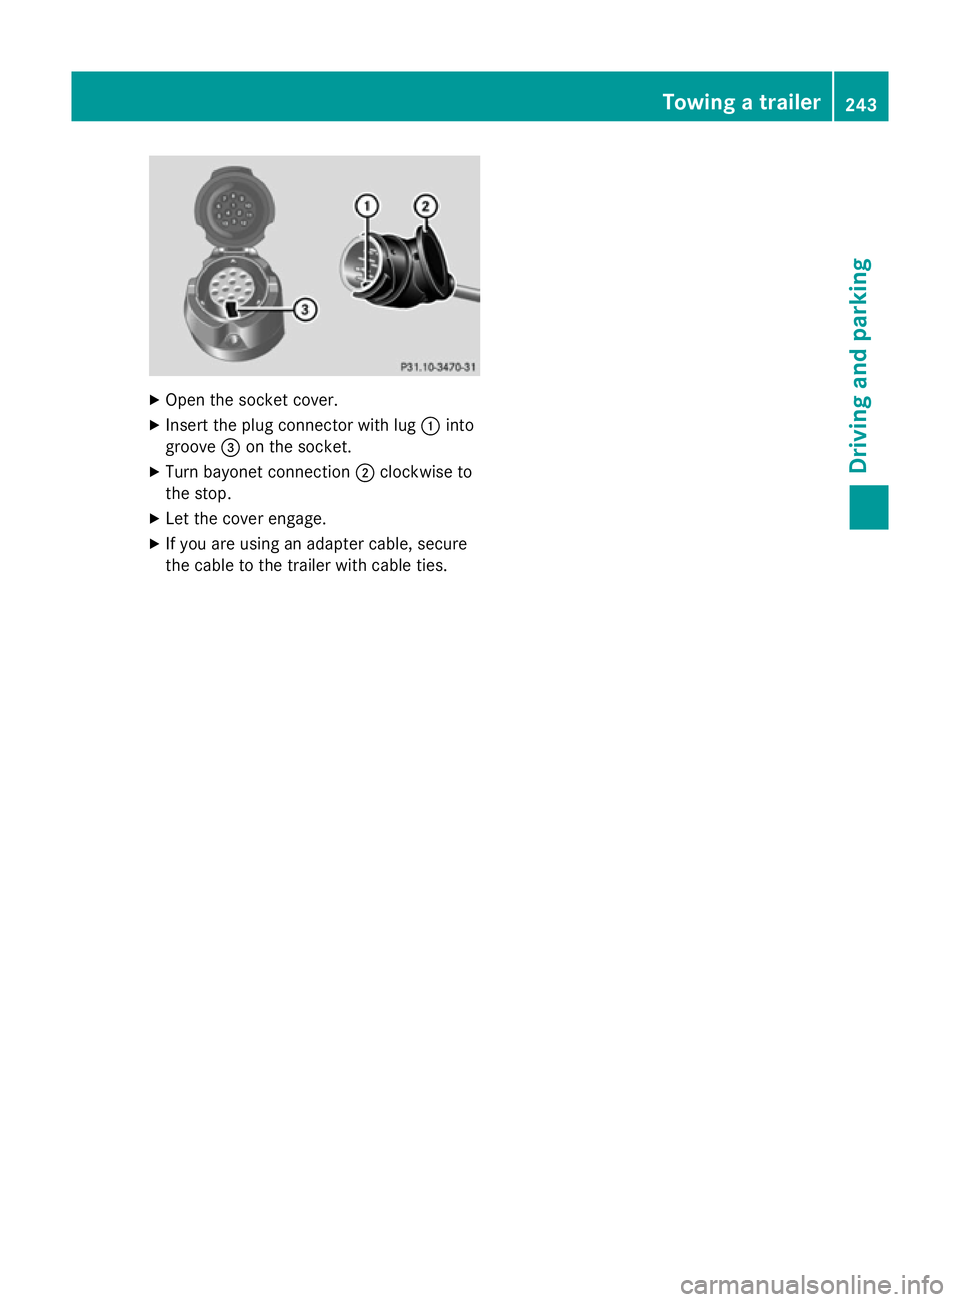
X
Open the socket cover.
X Insert the plug connector with lug :into
groove =on the socket.
X Turn bayonet connection ;clockwise to
the stop.
X Let the cover engage.
X If you are using an adapter cable, secure
the cable to the trailer with cable ties. Towing a trailer
243Driving and parking Z
Page 247 of 421

244
Page 248 of 421
Useful information
............................246
Important safety notes .....................246
Displays and operation .....................246
Menus and submenus ......................249
Display messages ............................. 265
Warning and indicator lamps in the instrument cluster ............................301 245On-board computer and displays
Page 249 of 421
Useful information
i This Owner's Manual describes all mod-
els, series and optional equipment for your
vehicle that were available at the time of
going to press. National variations are pos- sible. Note that your vehicle may not be
equipped with all of the functions descri-
bed. This is also the case for systems and
functions relevant to safety.
i Read the information on qualified special-
ist workshops: (Y page 25). Important safety notes
G
WARNING
Operating the integrated information systems and communications equipment in the vehicle
while driving will distract you from traffic con-
ditions. You could then lose control of the
vehicle. There is a risk of an accident.
Only operate these devices if road traffic con-
ditions permit. If you are unsure about the
surrounding conditions, pull over to a safe
location and make entries only while the vehi-
cle is stationary.
You must observe the legal requirements for
the country in which you are currently driving when operating the on-board computer. G
WARNING
If the instrument cluster has failed or mal-
functioned, you may not recognise function
restrictions relevant to safety. The operating
safety of your vehicle may be impaired. There is a risk of an accident.
Drive on carefully. Have the vehicle checked
at a qualified specialist workshop immedi-
ately.
The on-board computer only shows messages
or warnings from certain systems in the mul- tifunction display. You should therefore make
sure your vehicle is operating safely at all
times. If the operating safety of your vehicle is
impaired, park the vehicle safely as soon as
possible. Contact a qualified specialist work-
shop.
For an overview, see the instrument panel
illustration (Y
page 32). Displays and operation
Instrument cluster lighting
The light sensor in the instrument cluster
automatically controls the brightness of the
multifunction display. In daylight, the displays
in the instrument cluster are not illuminated.
The lighting in the instrument cluster, in the
displays and the controls in the vehicle inte-
rior can be adjusted using the brightness con-
trol knob.
The brightness control knob is located on the bottom left of the instrument cluster
(Y page 32).
X Turn the brightness control knob clockwise
or anti-clockwise.
If the light switch is set to the Ã,Tor
L position, the brightness is dependent
upon the brightness of the ambient light. Speedometer with segments
The speedometer is divided into segments
only on vehicles with DISTRONIC PLUS.
The segments in the speedometer indicate
which speed range is available.
R Variable SPEEDTRONIC activated
(Y page 202):
The segments light up from the start of the
scale to the selected limit speed.
R DISTRONIC PLUS activated (Y page 204):
One or two segments in the set speed
range light up.
R DISTRONIC PLUS detects a vehicle in front
moving more slowly than the stored speed: 246
Displays and operationOn-board computer and displays
Page 250 of 421
The segments between the speed of the
vehicle in front and the stored speed light
up. Rev counter
! Do not drive in the overrevving range.
Doing so will damage the engine.
The red band in the rev counter indicates the
engine's overrevving range.
The engine is limited within a range to protect the engine when the red band is reached. Outside temperature display
You should pay special attention to road con-
ditions when temperatures are around freez-
ing point.
Bear in mind that the outside temperature
display indicates the measured air tempera-
ture and not the road surface temperature.
The outside temperature display is in the mul- tifunction display (Y page 249).
There is a short delay before a change in out- side temperature appears in the multifunc-
tion display. Coolant temperature gauge
G
WARNING
If you open the bonnet while the engine is
overheating or while there is a fire in the
engine compartment, you could come into
contact with hot gases or other leaking ser-
vice products. There is a danger of injury.
Allow an overheating engine to cool down
before opening the bonnet. If there is a fire in the engine compartment, leave the bonnet
closed and notify the fire brigade.
The coolant temperature gauge is in the
instrument cluster on the right-hand side
(Y page 32). Under normal operating conditions and with
the specified coolant level, the coolant tem-
perature may rise to 120 †.
At high outside temperatures and when driv-
ing uphill, the coolant temperature may rise
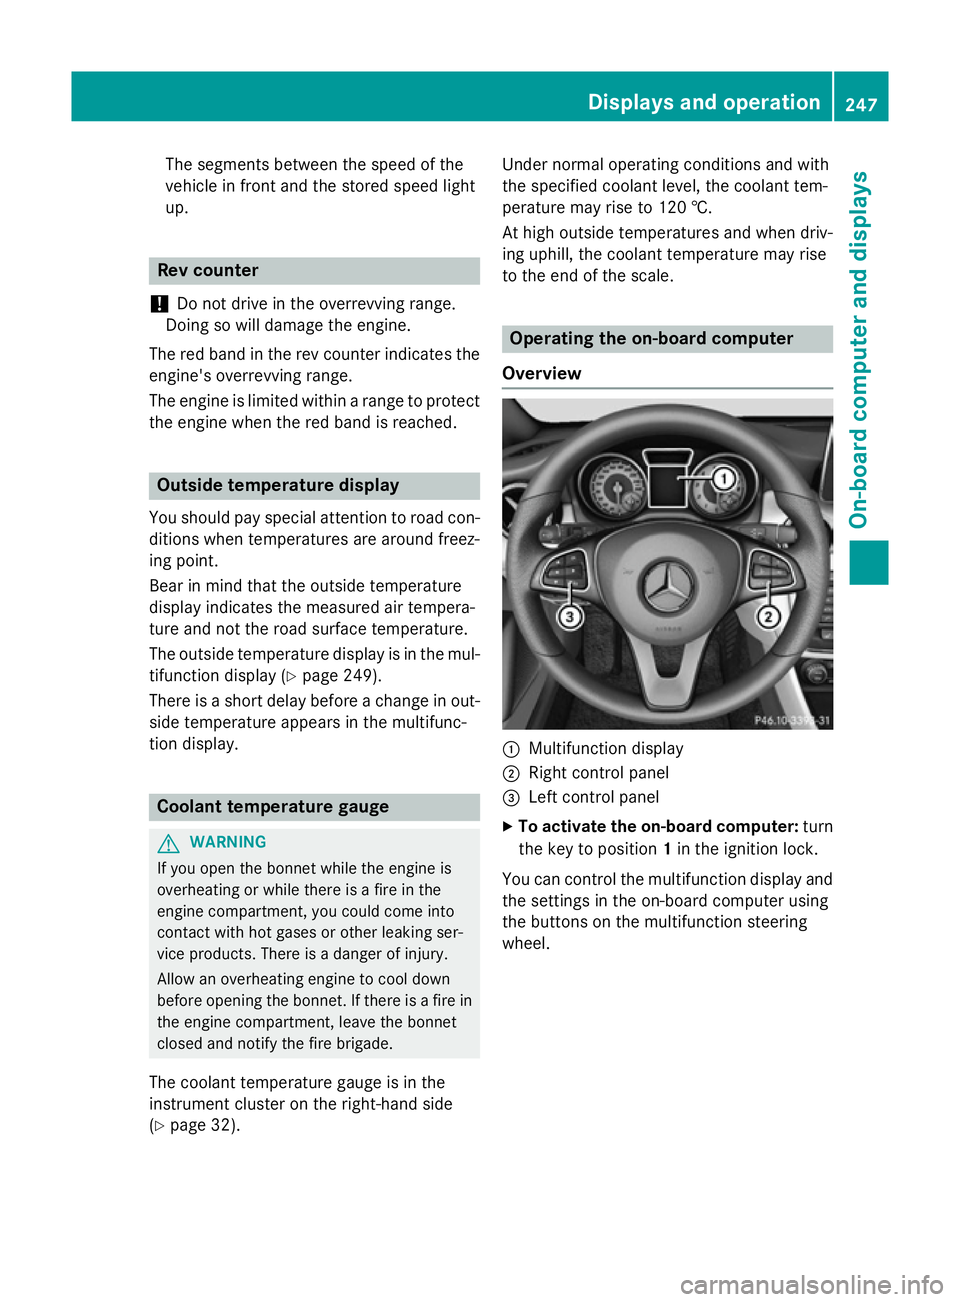
to the end of the scale. Operating the on-board computer
Overview :
Multifunction display
; Right control panel
= Left control panel
X To activate the on-board computer: turn
the key to position 1in the ignition lock.
You can control the multifunction display and
the settings in the on-board computer using
the buttons on the multifunction steering
wheel. Displays and operation
247On-board computer and displays Z