MERCEDES-BENZ CLA SHOOTING BRAKE 2015 Owners Manual
Manufacturer: MERCEDES-BENZ, Model Year: 2015, Model line: CLA SHOOTING BRAKE, Model: MERCEDES-BENZ CLA SHOOTING BRAKE 2015Pages: 421, PDF Size: 12.52 MB
Page 321 of 421
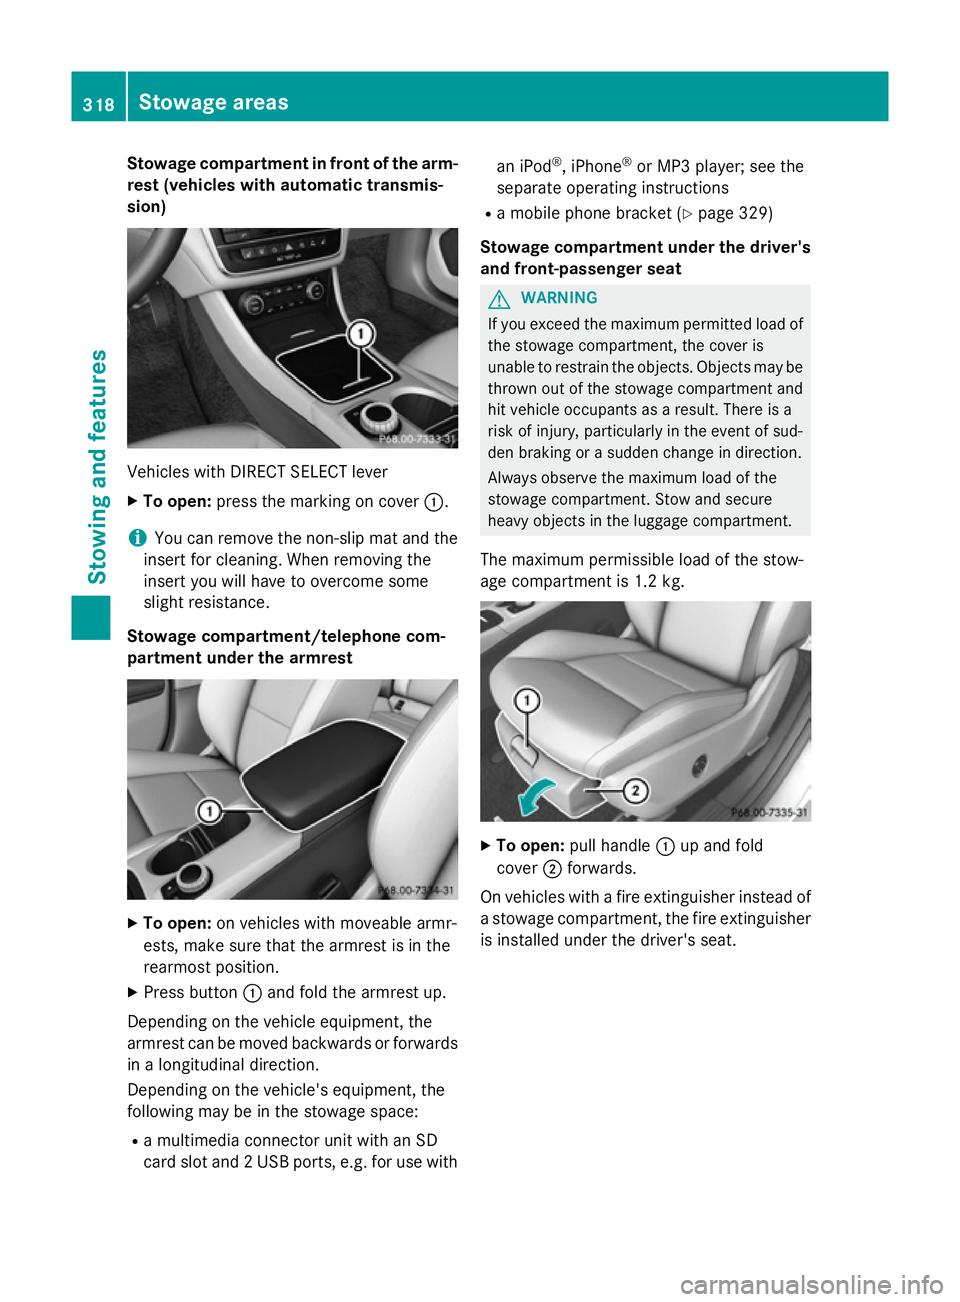
Stowage compartment in front of the arm-
rest (vehicles with automatic transmis-
sion) Vehicles with DIRECT SELECT lever
X To open: press the marking on cover :.
i You can remove the non-slip mat and the
insert for cleaning. When removing the
insert you will have to overcome some
slight resistance.
Stowage compartment/telephone com-
partment under the armrest X
To open: on vehicles with moveable armr-
ests, make sure that the armrest is in the
rearmost position.
X Press button :and fold the armrest up.
Depending on the vehicle equipment, the
armrest can be moved backwards or forwards
in a longitudinal direction.
Depending on the vehicle's equipment, the
following may be in the stowage space:
R a multimedia connector unit with an SD
card slot and 2 USB ports, e.g. for use with an iPod
®
, iPhone ®
or MP3 player; see the
separate operating instructions
R a mobile phone bracket (Y page 329)
Stowage compartment under the driver's and front-passenger seat G
WARNING
If you exceed the maximum permitted load of the stowage compartment, the cover is
unable to restrain the objects. Objects may be
thrown out of the stowage compartment and
hit vehicle occupants as a result. There is a
risk of injury, particularly in the event of sud-
den braking or a sudden change in direction.
Always observe the maximum load of the
stowage compartment. Stow and secure
heavy objects in the luggage compartment.
The maximum permissible load of the stow-
age compartment is 1.2 kg. X
To open: pull handle :up and fold
cover ;forwards.
On vehicles with a fire extinguisher instead of
a stowage compartment, the fire extinguisher
is installed under the driver's seat. 318
Stowage areasStowing and features
Page 322 of 421
Rear stowage compartments
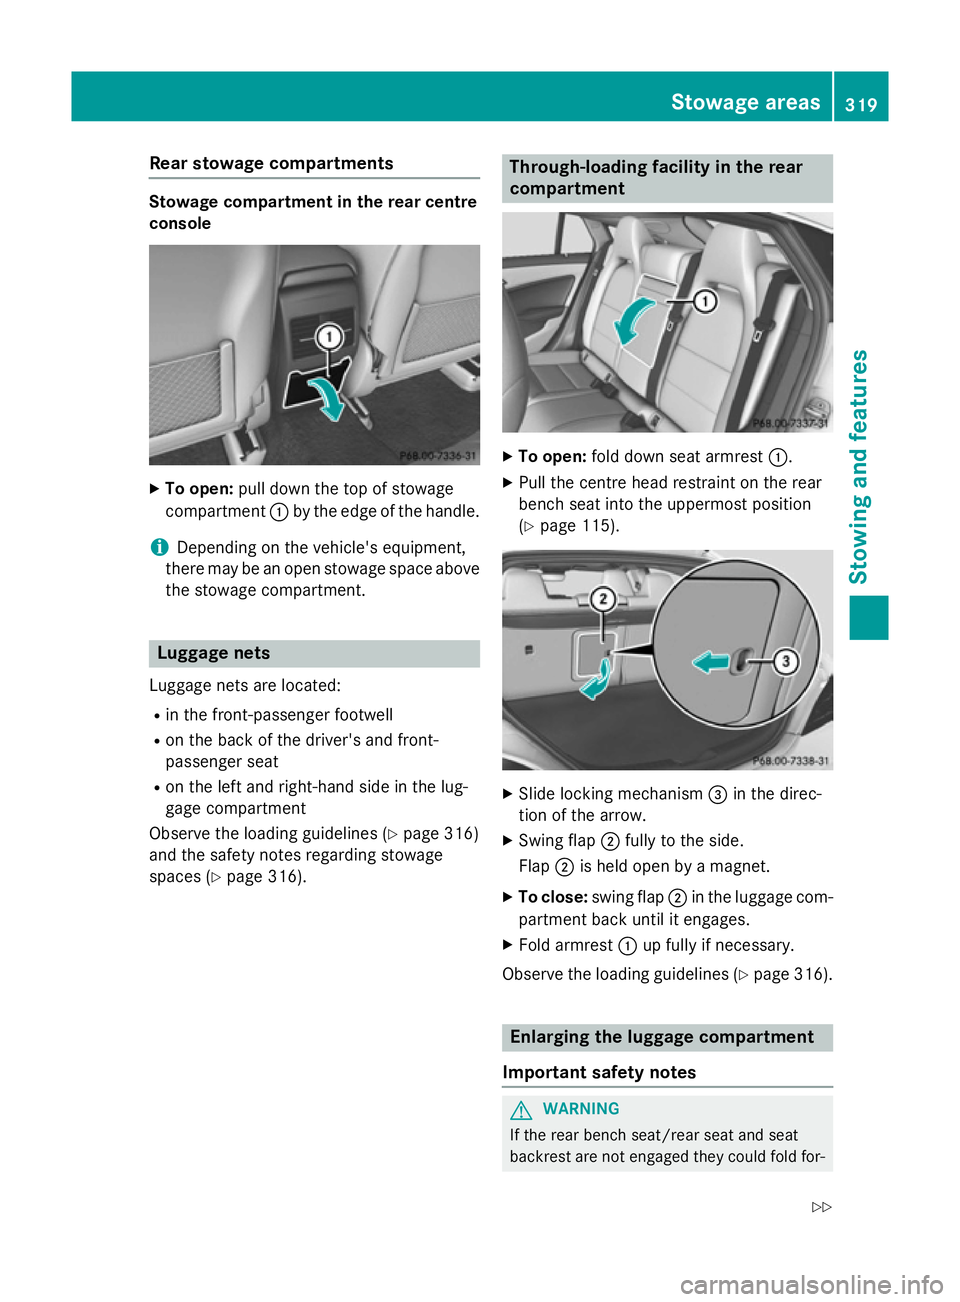
Stowage compartment in the rear centre
console
X
To open: pull down the top of stowage
compartment :by the edge of the handle.
i Depending on the vehicle's equipment,
there may be an open stowage space above the stowage compartment. Luggage nets
Luggage nets are located: R in the front-passenger footwell
R on the back of the driver's and front-
passenger seat
R on the left and right-hand side in the lug-
gage compartment
Observe the loading guidelines (Y page 316)
and the safety notes regarding stowage
spaces (Y page 316). Through-loading facility in the rear
compartment
X
To open: fold down seat armrest :.
X Pull the centre head restraint on the rear
bench seat into the uppermost position
(Y page 115). X
Slide locking mechanism =in the direc-
tion of the arrow.
X Swing flap ;fully to the side.
Flap ;is held open by a magnet.
X To close: swing flap ;in the luggage com-
partment back until it engages.
X Fold armrest :up fully if necessary.
Observe the loading guidelines (Y page 316). Enlarging the luggage compartment
Important safety notes G
WARNING
If the rear bench seat/rear seat and seat
backrest are not engaged they could fold for- Stowage areas
319Stowing and features
Z
Page 323 of 421
wards, e.g. when braking suddenly or in the
event of an accident.
R The vehicle occupant would thereby be
pushed into the seat belt by the rear bench
seat/rear seat or by the seat backrest. The
seat belt cannot protect as intended and
could result in additional injury.
R Objects or loads in the boot/luggage com-
partment cannot be restrained by the seat
backrest.
This poses an increased risk of injury.
Before every trip, make sure that the seat
backrests and the rear bench seat/rear seat
are engaged before every trip.
! Before folding the backrest in the rear
compartment forwards, make sure that the rear compartment armrest and the
cupholder are folded in. They may other-
wise be damaged.
Observe the loading guidelines (Y page 316).
The left-hand and right-hand rear seat backr-
ests can be folded forwards separately to
increase the luggage compartment capacity.
Folding the rear seat backrest forwardsand back Folding the rear seat backrest forward
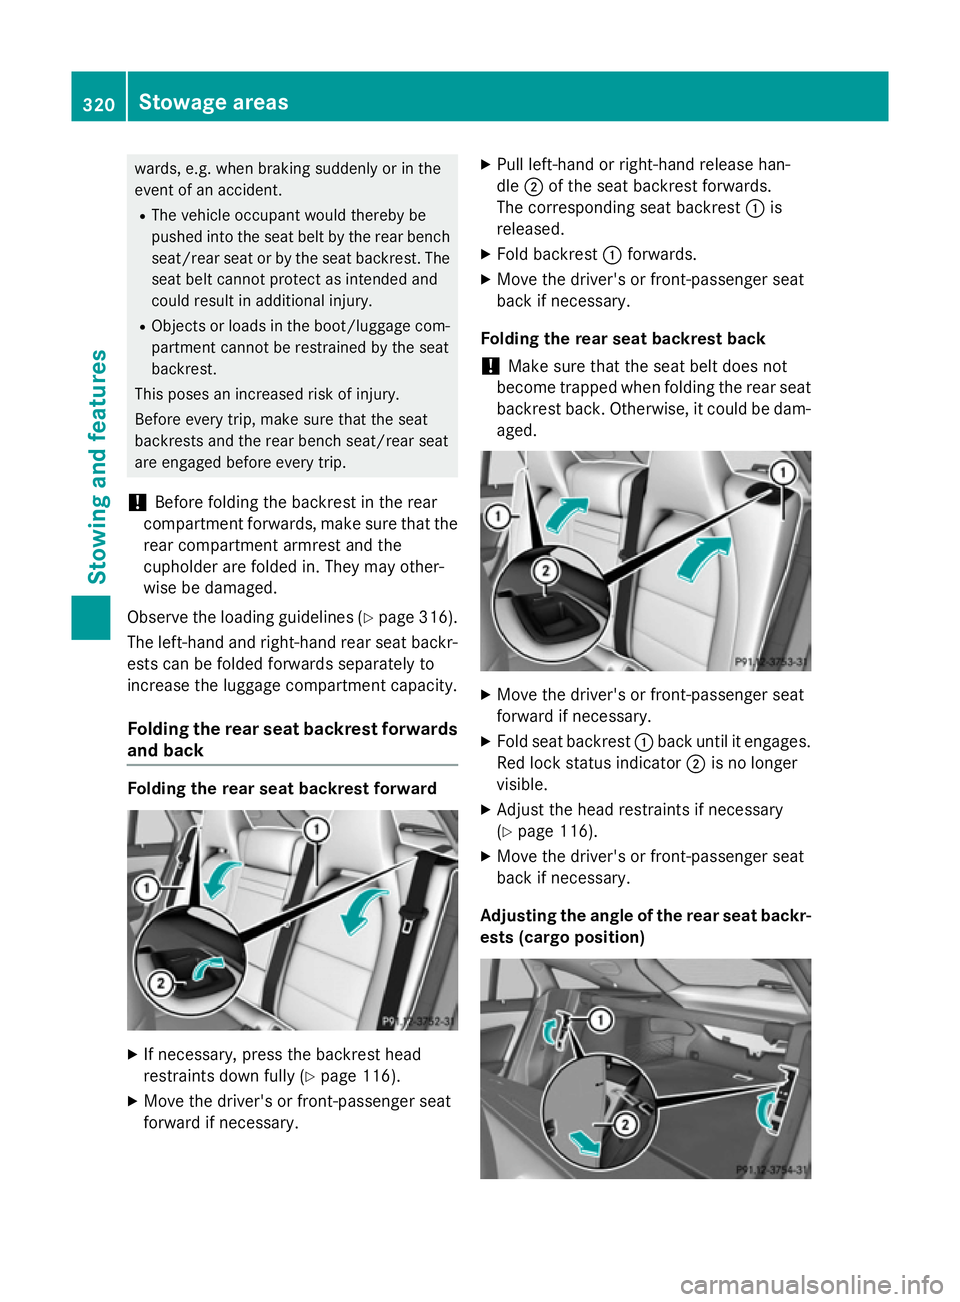
X
If necessary, press the backrest head
restraints down fully (Y page 116).
X Move the driver's or front-passenger seat
forward if necessary. X
Pull left-hand or right-hand release han-
dle ;of the seat backrest forwards.
The corresponding seat backrest :is
released.
X Fold backrest :forwards.
X Move the driver's or front-passenger seat
back if necessary.
Folding the rear seat backrest back ! Make sure that the seat belt does not
become trapped when folding the rear seat
backrest back. Otherwise, it could be dam- aged. X
Move the driver's or front-passenger seat
forward if necessary.
X Fold seat backrest :back until it engages.
Red lock status indicator ;is no longer
visible.
X Adjust the head restraints if necessary
(Y page 116).
X Move the driver's or front-passenger seat
back if necessary.
Adjusting the angle of the rear seat backr-
ests (cargo position) 320
Stowage areasStowing and features
Page 324 of 421
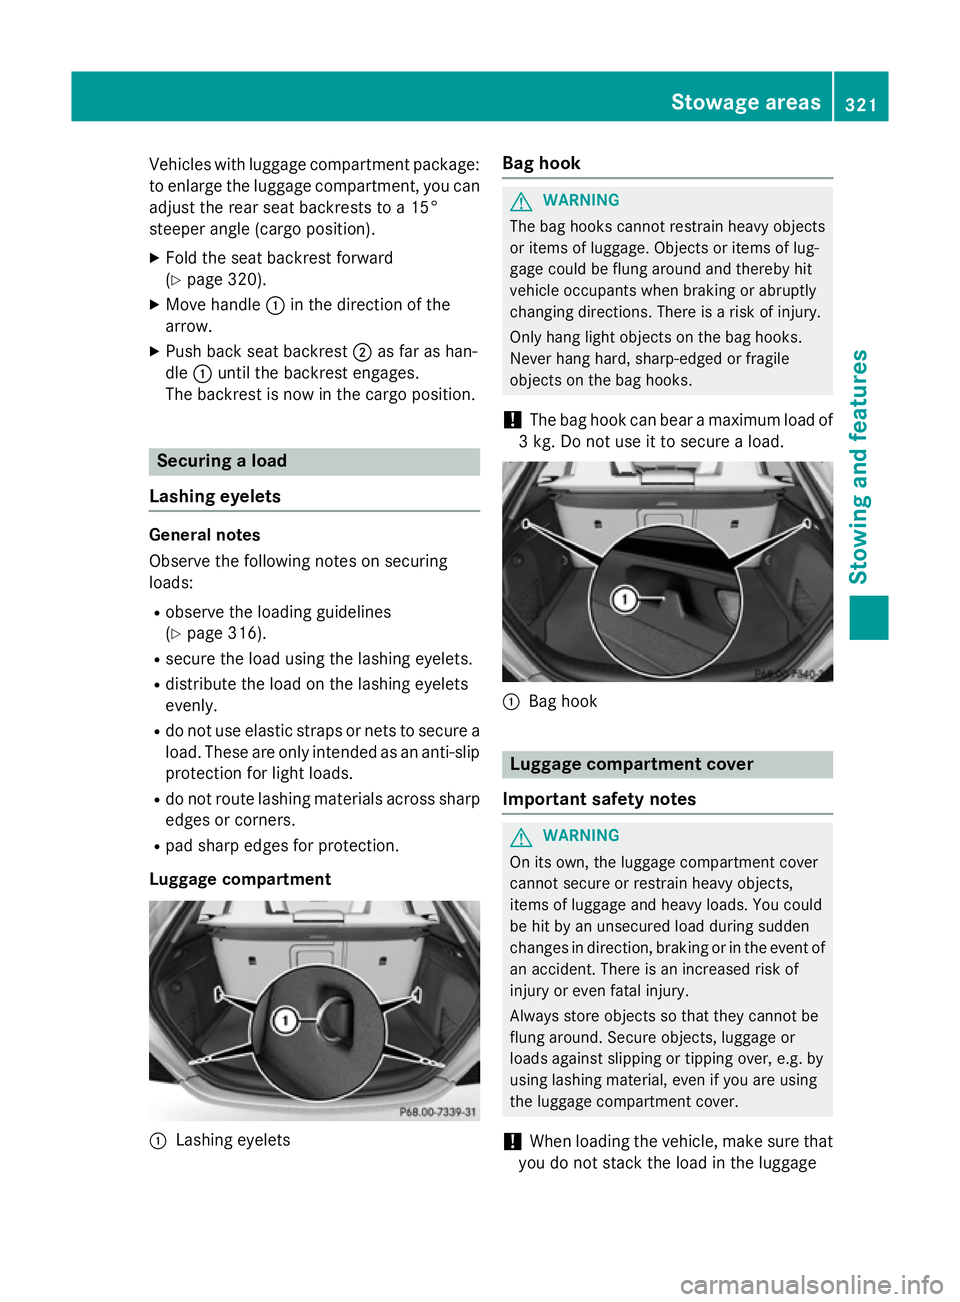
Vehicles with luggage compartment package:
to enlarge the luggage compartment, you canadjust the rear seat backrests to a 15°
steeper angle (cargo position).
X Fold the seat backrest forward
(Y page 320).
X Move handle :in the direction of the
arrow.
X Push back seat backrest ;as far as han-
dle :until the backrest engages.
The backrest is now in the cargo position. Securing a load
Lashing eyelets General notes
Observe the following notes on securing
loads:
R observe the loading guidelines
(Y page 316).
R secure the load using the lashing eyelets.
R distribute the load on the lashing eyelets
evenly.
R do not use elastic straps or nets to secure a
load. These are only intended as an anti-slip protection for light loads.
R do not route lashing materials across sharp
edges or corners.
R pad sharp edges for protection.
Luggage compartment :
Lashing eyelets Bag hook G
WARNING
The bag hooks cannot restrain heavy objects
or items of luggage. Objects or items of lug-
gage could be flung around and thereby hit
vehicle occupants when braking or abruptly
changing directions. There is a risk of injury.
Only hang light objects on the bag hooks.
Never hang hard, sharp-edged or fragile
objects on the bag hooks.
! The bag hook can bear a maximum load of
3 kg. Do not use it to secure a load. :
Bag hook Luggage compartment cover
Important safety notes G
WARNING
On its own, the luggage compartment cover
cannot secure or restrain heavy objects,
items of luggage and heavy loads. You could
be hit by an unsecured load during sudden
changes in direction, braking or in the event of an accident. There is an increased risk of
injury or even fatal injury.
Always store objects so that they cannot be
flung around. Secure objects, luggage or
loads against slipping or tipping over, e.g. by
using lashing material, even if you are using
the luggage compartment cover.
! When loading the vehicle, make sure that
you do not stack the load in the luggage Stowage areas
321Stowing and features Z
Page 325 of 421
compartment higher than the lower edge of
the side windows. Do not place heavy
objects on top of the luggage compartment cover.
The luggage compartment cover is located
behind the rear bench seat backrest.
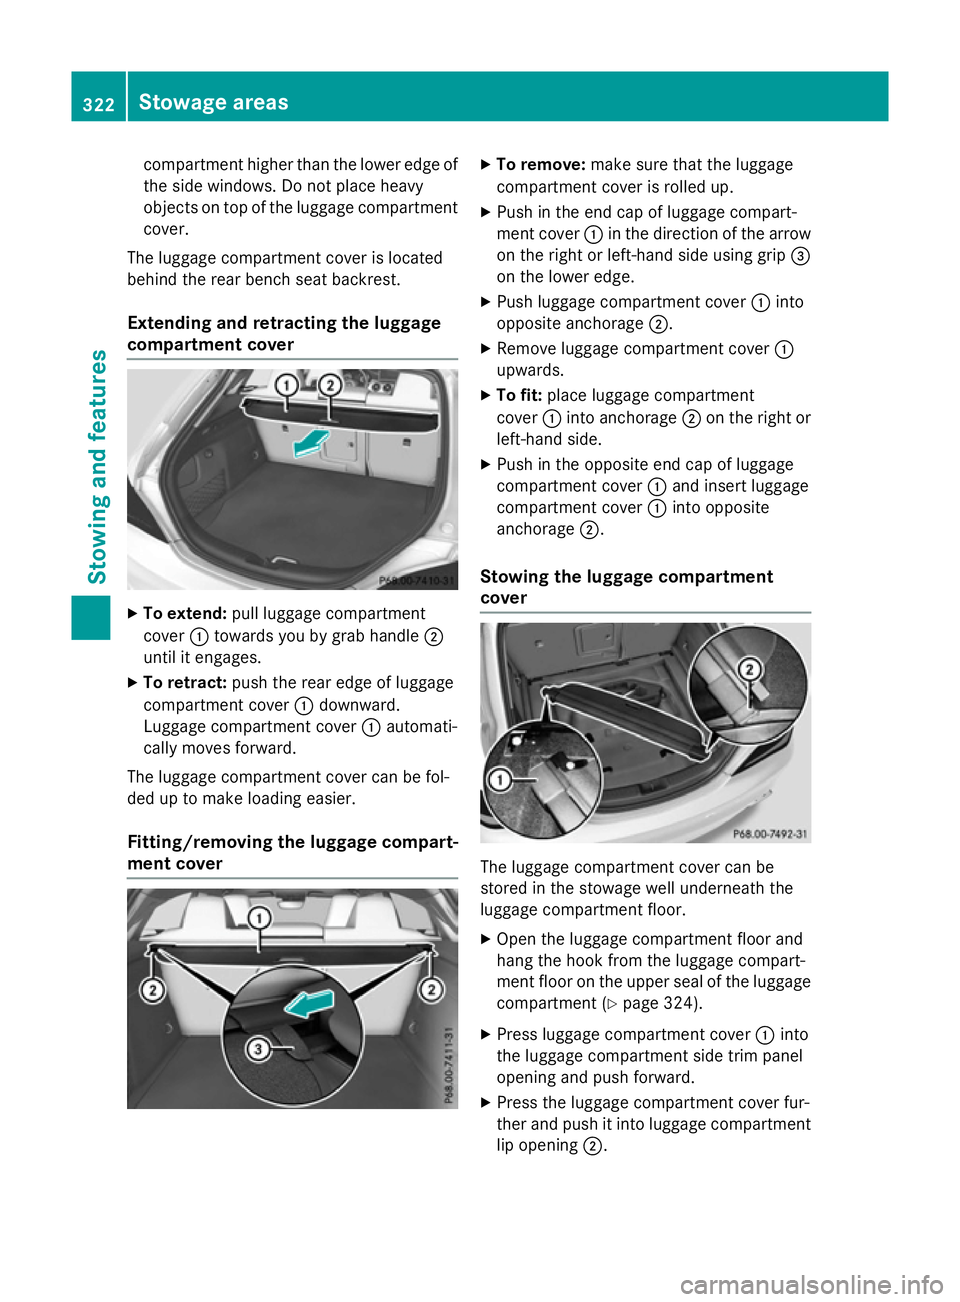
Extending and retracting the luggage
compartment cover X
To extend: pull luggage compartment
cover :towards you by grab handle ;
until it engages.
X To retract: push the rear edge of luggage
compartment cover :downward.
Luggage compartment cover :automati-
cally moves forward.
The luggage compartment cover can be fol-
ded up to make loading easier.
Fitting/removing the luggage compart-
ment cover X
To remove: make sure that the luggage
compartment cover is rolled up.
X Push in the end cap of luggage compart-
ment cover :in the direction of the arrow
on the right or left-hand side using grip =
on the lower edge.
X Push luggage compartment cover :into
opposite anchorage ;.
X Remove luggage compartment cover :
upwards.
X To fit: place luggage compartment
cover :into anchorage ;on the right or
left-hand side.
X Push in the opposite end cap of luggage
compartment cover :and insert luggage
compartment cover :into opposite
anchorage ;.
Stowing the luggage compartment
cover The luggage compartment cover can be
stored in the stowage well underneath the
luggage compartment floor.
X Open the luggage compartment floor and
hang the hook from the luggage compart-
ment floor on the upper seal of the luggage compartment (Y page 324).
X Press luggage compartment cover :into
the luggage compartment side trim panel
opening and push forward.
X Press the luggage compartment cover fur-
ther and push it into luggage compartment
lip opening ;.322
Stowage areasStowing and features
Page 326 of 421
Safety net
Important safety notes G
WARNING
On its own, the safety net cannot secure or
restrain heavy objects, items of luggage and
heavy loads. You could be hit by an unsecured load during sudden changes in direction,
braking or in the event of an accident. There isan increased risk of injury or even fatal injury.
Always store objects so that they cannot be
flung around. Secure objects, luggage or
loads against slipping or tipping over, e.g. by
using lashing material, even if you are using
the safety net.
It is important to use a safety net if you load
the vehicle with small objects above the seat backrests. For safety reasons, always use a
safety net when transporting a load.
Damaged safety nets can no longer fulfil their
protective function and must be replaced.
Visit a qualified specialist workshop.
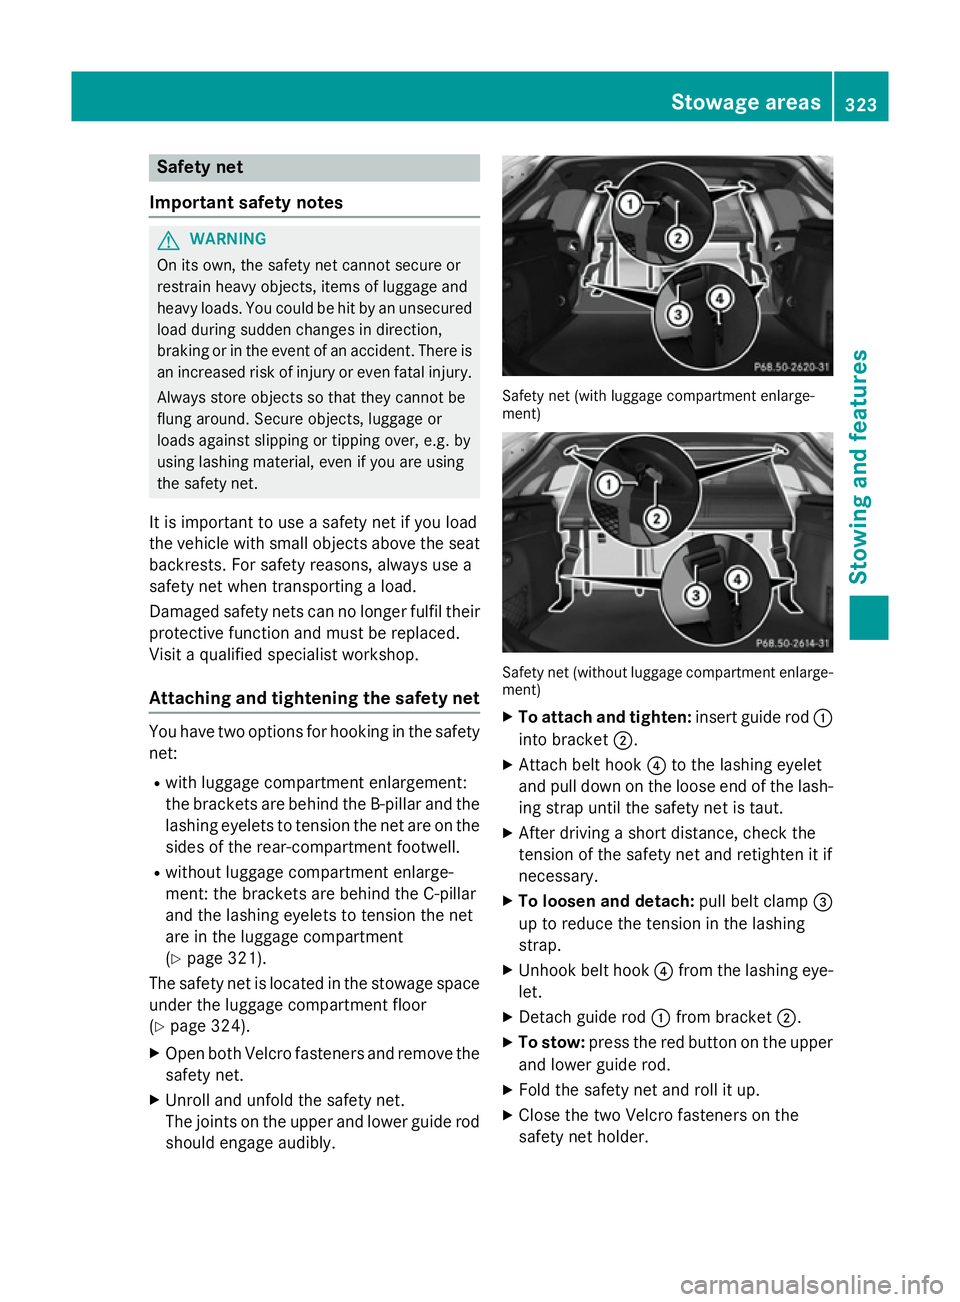
Attaching and tightening the safety net You have two options for hooking in the safety
net:
R with luggage compartment enlargement:
the brackets are behind the B‑pillar and the
lashing eyelets to tension the net are on the sides of the rear-compartment footwell.
R without luggage compartment enlarge-
ment: the brackets are behind the C-pillar
and the lashing eyelets to tension the net
are in the luggage compartment
(Y page 321).
The safety net is located in the stowage space
under the luggage compartment floor
(Y page 324).
X Open both Velcro fasteners and remove the
safety net.
X Unroll and unfold the safety net.
The joints on the upper and lower guide rod
should engage audibly. Safety net (with luggage compartment enlarge-
ment) Safety net (without luggage compartment enlarge-
ment)
X To attach and tighten: insert guide rod:
into bracket ;.
X Attach belt hook ?to the lashing eyelet
and pull down on the loose end of the lash- ing strap until the safety net is taut.
X After driving a short distance, check the
tension of the safety net and retighten it if
necessary.
X To loosen and detach: pull belt clamp=
up to reduce the tension in the lashing
strap.
X Unhook belt hook ?from the lashing eye-
let.
X Detach guide rod :from bracket ;.
X To stow: press the red button on the upper
and lower guide rod.
X Fold the safety net and roll it up.
X Close the two Velcro fasteners on the
safety net holder. Stowage areas
323Stowing and features Z
Page 327 of 421
Stowage well under the luggage com-
partment floor
Important safety notes G
WARNING
If you drive when the luggage compartment
floor is open, objects could be flung around,
thus striking vehicle occupants. There is a risk of injury, especially when braking or abruptly
changing directions.
Always close the luggage compartment floor
before a journey.
! The maximum load capacity of the stow-
age well under the luggage compartment
floor is 25 kg.
There is a stowage area for TIREFIT, the vehi-
cle tool kit, a folding box, etc. underneath the luggage compartment floor.
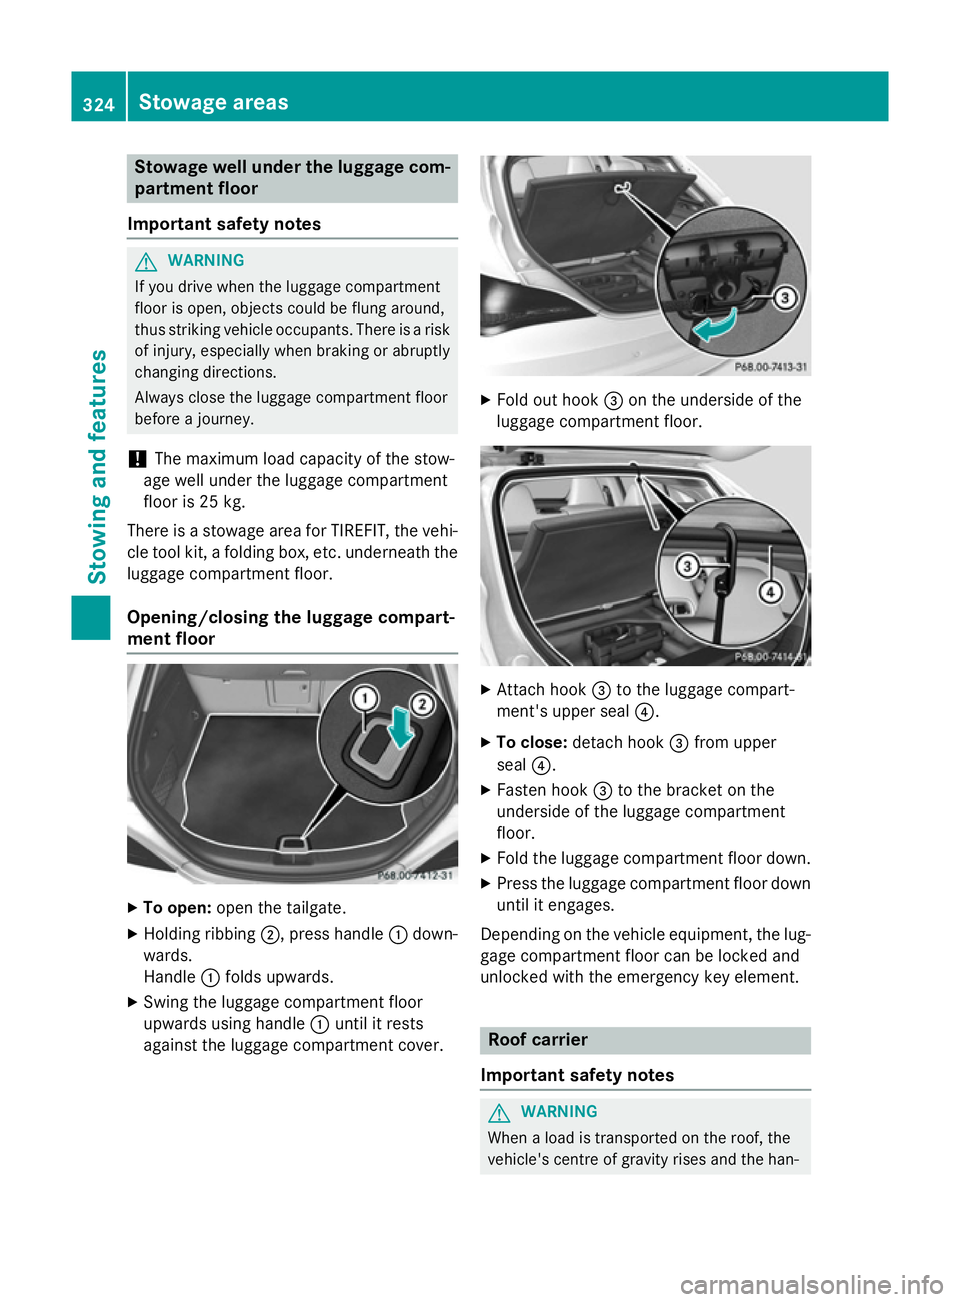
Opening/closing the luggage compart-
ment floor X
To open: open the tailgate.
X Holding ribbing ;, press handle :down-
wards.
Handle :folds upwards.
X Swing the luggage compartment floor
upwards using handle :until it rests
against the luggage compartment cover. X
Fold out hook =on the underside of the
luggage compartment floor. X
Attach hook =to the luggage compart-
ment's upper seal ?.
X To close: detach hook =from upper
seal ?.
X Fasten hook =to the bracket on the
underside of the luggage compartment
floor.
X Fold the luggage compartment floor down.
X Press the luggage compartment floor down
until it engages.
Depending on the vehicle equipment, the lug- gage compartment floor can be locked and
unlocked with the emergency key element. Roof carrier
Important safety notes G
WARNING
When a load is transported on the roof, the
vehicle's centre of gravity rises and the han- 324
Stowage areasStowing and features
Page 328 of 421
dling changes. If you exceed the maximum
roof load, the handling as well as steering and braking characteristics are severely affected.
There is a risk of an accident.
Always observe the maximum roof load and
adapt your driving style.
! Mercedes-Benz recommends that you
only use roof carriers that have been tested and approved for Mercedes-Benz vehicles.
This helps to prevent damage to the vehi-
cle.
Position the load on the roof carrier in such
a way that the vehicle will not sustain dam-
age even when it is in motion.
Ensure that, depending on the vehicle's
equipment, you can raise the panorama
sliding sunroof fully and open the tailgate
fully when the roof carrier is fitted.
You will find information on the maximum roof
load in the "Technical data" section
(Y page 410).
An incorrectly secured roof carrier or roof
load may become detached from the vehicle.
You must therefore ensure that you observe
the roof carrier manufacturer's installation
instructions.
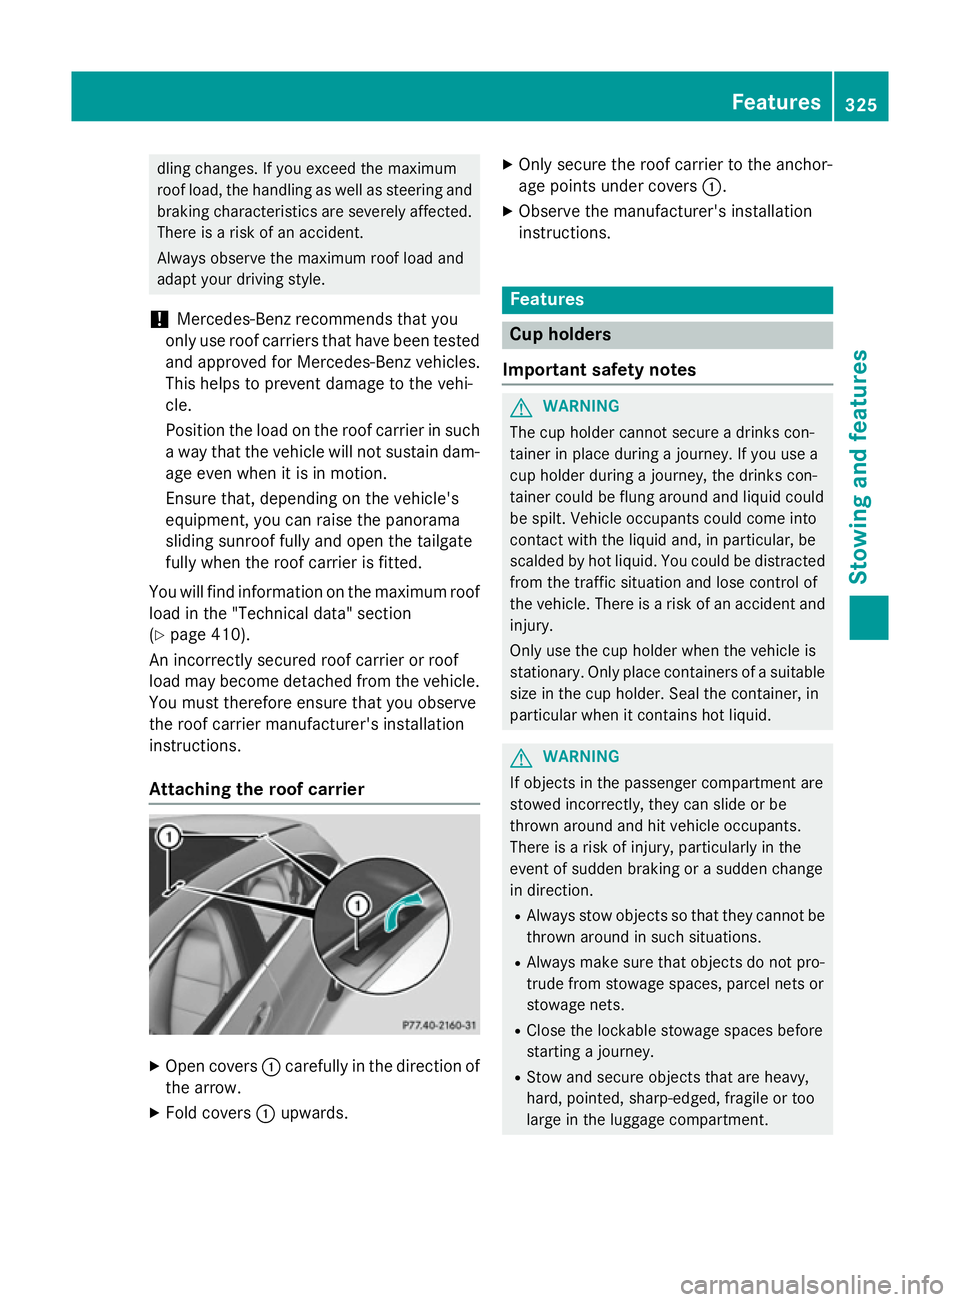
Attaching the roof carrier X
Open covers :carefully in the direction of
the arrow.
X Fold covers :upwards. X
Only secure the roof carrier to the anchor-
age points under covers :.
X Observe the manufacturer's installation
instructions. Features
Cup holders
Important safety notes G
WARNING
The cup holder cannot secure a drinks con-
tainer in place during a journey. If you use a
cup holder during a journey, the drinks con-
tainer could be flung around and liquid could
be spilt. Vehicle occupants could come into
contact with the liquid and, in particular, be
scalded by hot liquid. You could be distracted
from the traffic situation and lose control of
the vehicle. There is a risk of an accident and
injury.
Only use the cup holder when the vehicle is
stationary. Only place containers of a suitable size in the cup holder. Seal the container, in
particular when it contains hot liquid. G
WARNING
If objects in the passenger compartment are
stowed incorrectly, they can slide or be
thrown around and hit vehicle occupants.
There is a risk of injury, particularly in the
event of sudden braking or a sudden change
in direction. R Always stow objects so that they cannot be
thrown around in such situations.
R Always make sure that objects do not pro-
trude from stowage spaces, parcel nets or
stowage nets.
R Close the lockable stowage spaces before
starting a journey.
R Stow and secure objects that are heavy,
hard, pointed, sharp-edged, fragile or too
large in the luggage compartment. Features
325Stowing and features Z
Page 329 of 421
!
Only use the cup holders for containers of
the right size and which have lids. The
drinks could otherwise spill.
Observe the loading guidelines (Y page 316).
The stowage compartments in the doors pro- vide space for bottles:
R front: capacity up to 1.0 l
R rear: capacity up to 0.5 l
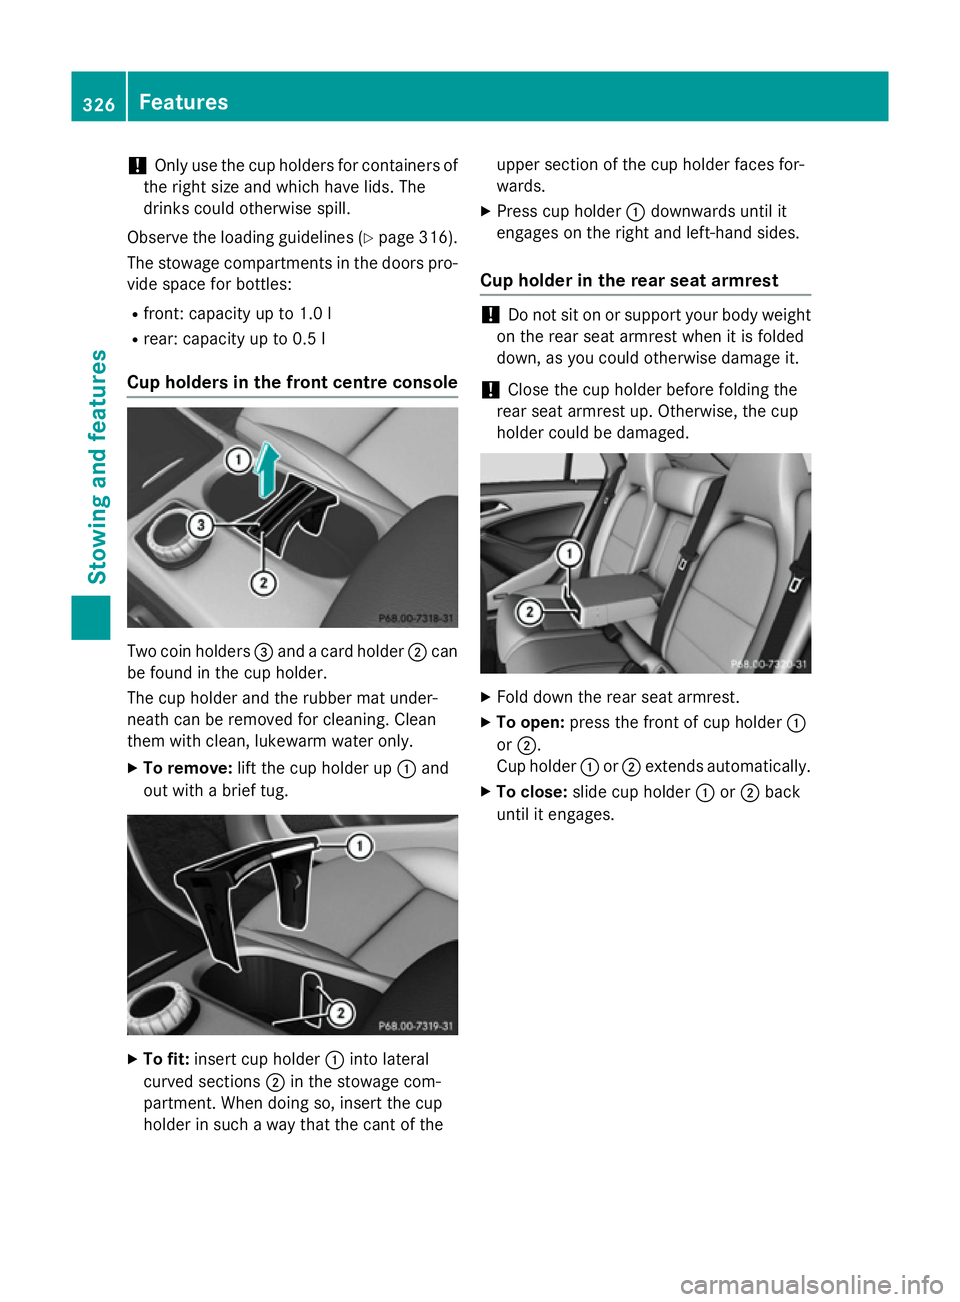
Cup holders in the front centre console Two coin holders
=and a card holder ;can
be found in the cup holder.
The cup holder and the rubber mat under-
neath can be removed for cleaning. Clean
them with clean, lukewarm water only.
X To remove: lift the cup holder up :and
out with a brief tug. X
To fit: insert cup holder :into lateral
curved sections ;in the stowage com-
partment. When doing so, insert the cup
holder in such a way that the cant of the upper section of the cup holder faces for-
wards.
X Press cup holder :downwards until it
engages on the right and left-hand sides.
Cup holder in the rear seat armrest !
Do not sit on or support your body weight
on the rear seat armrest when it is folded
down, as you could otherwise damage it.
! Close the cup holder before folding the
rear seat armrest up. Otherwise, the cup
holder could be damaged. X
Fold down the rear seat armrest.
X To open: press the front of cup holder :
or ;.
Cup holder :or; extends automatically.
X To close: slide cup holder :or; back
until it engages. 326
FeaturesStowing and features
Page 330 of 421
Sun visors
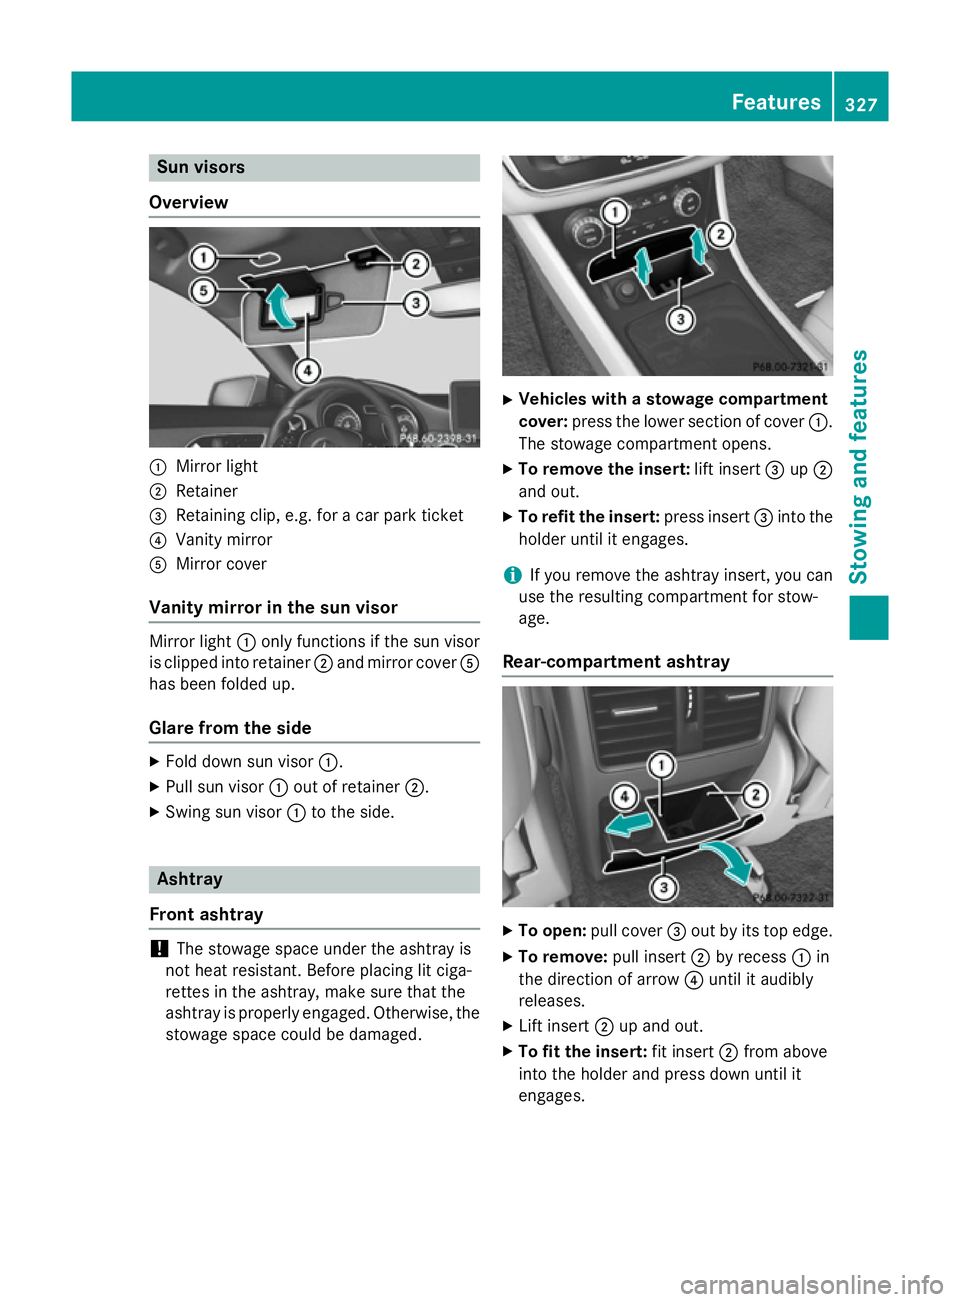
Overview :
Mirror light
; Retainer
= Retaining clip, e.g. for a car park ticket
? Vanity mirror
A Mirror cover
Vanity mirror in the sun visor Mirror light
:only functions if the sun visor
is clipped into retainer ;and mirror cover A
has been folded up.
Glare from the side X
Fold down sun visor :.
X Pull sun visor :out of retainer ;.
X Swing sun visor :to the side. Ashtray
Front ashtray !
The stowage space under the ashtray is
not heat resistant. Before placing lit ciga-
rettes in the ashtray, make sure that the
ashtray is properly engaged. Otherwise, the
stowage space could be damaged. X
Vehicles with a stowage compartment
cover: press the lower section of cover :.
The stowage compartment opens.
X To remove the insert: lift insert=up;
and out.
X To refit the insert: press insert=into the
holder until it engages.
i If you remove the ashtray insert, you can
use the resulting compartment for stow-
age.
Rear-compartment ashtray X
To open: pull cover =out by its top edge.
X To remove: pull insert;by recess :in
the direction of arrow ?until it audibly
releases.
X Lift insert ;up and out.
X To fit the insert: fit insert;from above
into the holder and press down until it
engages. Features
327Stowing and features Z