wheel size MERCEDES-BENZ CLA SHOOTING BRAKE 2015 Owners Manual
[x] Cancel search | Manufacturer: MERCEDES-BENZ, Model Year: 2015, Model line: CLA SHOOTING BRAKE, Model: MERCEDES-BENZ CLA SHOOTING BRAKE 2015Pages: 421, PDF Size: 12.52 MB
Page 23 of 421
see Manual transmission
Transmission position display
(DIRECT SELECT lever) ......................178
Transporting the vehicle .................. 365
Trim pieces (cleaning instruc-
tions) ................................................. .346
Trip computer (on-board com-
puter) ................................................. .250
Trip meter
Calling up ....................................... 250
Resetting (on-board computer) ...... 251
Turn signals
Changing bulbs (front) ................... 136
Changing bulbs (rear) .................... 137
Switching on/off ........................... 129
Two-way radio
Frequencies ................................... 400
Installation ..................................... 400
Transmission output (maximum) .... 400
Type identification plate
see Vehicle identification plate
Tyre pressure
Calling up (on-board computer) ..... 376
Display message ............................ 292
Not reached (TIREFIT) .................... 355
Reached (TIREFIT) .......................... 355
Recommended ............................... 374
Tyre pressure loss warning
General notes ................................ 375
Important safety notes .................. 375
Restarting ...................................... 376
Tyre pressure monitor
Checking the tyre pressure elec-
tronically ........................................ 377
Function/notes ............................ .376
General notes ................................ 376
Important safety notes .................. 376
Radio type approval for the tyre
pressure monitor ........................... 379
Restarting ...................................... 378
Warning lamp ................................. 313
Warning message .......................... 378
Tyres
Changing a wheel .......................... 379
Checking ........................................ 371
Direction of rotatio n...................... 380
Display message ............................ 292
General notes ................................ 384 Important safety notes .................. 370
Information on driving .................... 370
M+S tyres ...................................... 372
MOExtended tyre
s......................... 372
Replacing ....................................... 379
Service life ..................................... 371
Storing ........................................... 380
Summer tyres ................................ 372
Tyre size (data ).............................. 384
Tyre tread ...................................... 371
Wheel and tyre combinations ........ 386
see Flat tyre U
Unlocking Emergency unlocking ....................... 95
From inside the vehicle (central
unlocking button) ............................. 94
Upshift indicator (on-board com-
puter, Mercedes-AMG vehicles) ....... 262 V
Vanity mirror (in sun visor) .............. 327
Variable SPEEDTRONIC
see SPEEDTRONIC
Vehicle
Correct use ...................................... 25
Data acquisition ............................... 26
Display message ............................ 294
Electronics ..................................... 400
Equipment ....................................... 23
Implied warranty .............................. 25
Individual settings .......................... 258
Leaving parked up ......................... 195
Locking (in an emergency) ............... 96
Locking (key) ................................... 87
Lowering ........................................ 383
Pulling away ................................... 168
Raising ........................................... 381
Registration ..................................... 25
Securing from rolling away ............ 381
Transporting .................................. 365
Unlocking (in an emergency) ........... 95
Unlocking (key) ................................ 87
Vehicle data ................................... 410
Vehicle data
Boot load (maximum) ..................... 410 20
Index
Page 24 of 421
Roof load (maximum
)..................... 410
Vehicle dimensions ........................... 410
Vehicle emergency locking ................ 96
Vehicle identification number
see VIN
Vehicle identification plate .............. 402
Vehicle tool kit .................................. 351
Ventilation
Setting the vents ........................... 161
Video
Operating the DVD ......................... 253
VIN
Seat ............................................... 402
Type plate ...................................... 402 W
Warning and indicator lamps ABS ................................................ 304
Brakes ........................................... 303
Distance warning signal ................. 312
ESP ®
.............................................. 306
ESP ®
OFF ....................................... 307
Fuel tank ........................................ 310
LIM (cruise control) ........................ 200
LIM (DISTRONIC PLUS) .................. 205
LIM (variable SPEEDTRONIC) ......... 202
Overview .......................................... 33
PASSENGER AIR BAG ...................... 43
Reserve fue l................................... 310
Seat belt ........................................ 301
Tyre pressure monitor ................... 313
Warning triangle ................................ 350
Washer fluid
Display message ............................ 299
Wheel and tyre combinations
Tyres .............................................. 386
Wheel bolt tightening torque ........... 383
Wheel chock ...................................... 381
Wheels
Changing a whee l.......................... 379
Changing/replacing ....................... 379
Checking ........................................ 371
Cleaning ......................................... 343
Emergency spare wheel ................. 396
Fitting a new wheel ........................ 383
General notes ................................ 384
Important safety notes .................. 370 Information on driving .................... 370
Removing a whee
l.......................... 383
Storing ........................................... 380
Tightening torque ........................... 383
Wheel size/tyre size ...................... 384
Windowbag
Display message ............................ 276
Operation ......................................... 51
Windows
Cleaning ......................................... 343
see Side windows
Windscreen
Demisting ...................................... 152
Windscreen washer fluid
see Windscreen washer system
Windscreen washer system
Important safety notes .................. 409
Topping up ..................................... 339
Windscreen wipers
Display message ............................ 300
Problem (malfunction) ................... 142
Rear window wipe r........................ 138
Replacing the wiper blades ............ 138
Switching on/of f........................... 137
Winter driving
General notes ................................ 372
Winter operation
Slippery road surfaces ................... 198
Snow chains .................................. 373
Winter tyres
Limiting the speed (on-board com-
puter) ............................................. 259
M+S tyres ...................................... 372
Wiper blades
Cleaning ......................................... 344
Important safety notes .................. 138
Replacing (on the rear window )..... 140
Replacing (windscreen) .................. 139
Wooden trim (cleaning instruc-
tions) .................................................. 346
Workshop
see Qualified specialist workshop Z
ZONE function Switching on/of f........................... 151 Index
21
Page 80 of 421
pulling away on wet or slippery roads. ESP
®
can also stabilise the vehicle during braking.
ETS/4ETS (Electronic Traction System) i
Observe the "Important safety notes" sec-
tion (Y page 72).
ETS traction control is part of ESP ®
. On vehi-
cles with 4MATIC, 4ETS is a component of
ESP ®
.
Traction control brakes the drive wheels indi-
vidually if they spin. This enables you to pull
away and accelerate on slippery surfaces, for
example if the road surface is slippery on one side. In addition, more drive torque is trans-
ferred to the wheel or wheels with traction.
Traction control remains active if you deacti-
vate ESP ®
.
Important safety notes i
Observe the "Important safety notes" sec-
tion (Y page 72). G
WARNING
If ESP ®
is malfunctioning, ESP ®
is unable to
stabilise the vehicle. In addition, other driving
safety systems are switched off. This increa-
ses the risk of skidding and an accident.
Drive on carefully. Have ESP ®
checked at a
qualified specialist workshop.
Vehicles without 4MATIC: when towing
away your vehicle with the front axle raised,
please observe the notes on ESP ®
(Y page 364).
If the å ESP®
OFF warning lamp lights up
continuously, ESP ®
is deactivated.
If the ÷ ESP®
warning lamp and the å
warning lamp are lit continuously, ESP ®
is not
available due to a malfunction.
Observe the information on warning lamps
(Y page 306) and display messages which
may be shown in the instrument cluster
(Y page 266). Only use wheels with the recommended tyre
sizes. Only then will ESP
®
function properly.
Characteristics of ESP ® General notes
If the
÷ ESP warning lamp goes out before
beginning the journey, ESP ®
is automatically
active.
If ESP ®
intervenes, the ÷ESP®
warning
lamp flashes in the instrument cluster.
If ESP ®
intervenes:
X Do not deactivate ESP ®
under any circum-
stances.
X When pulling away, only depress the accel-
erator pedal as far as is necessary.
X Adapt your driving style to suit the prevail-
ing road and weather conditions.
ECO start/stop function
The ECO start/stop function switches the
engine off automatically if the vehicle stops
moving. When pulling away again, the engine starts automatically. ESP ®
remains in its pre-
viously selected status. Example:if ESP®
was deactivated before the engine was
switched off, ESP ®
remains deactivated when
the engine is switched on again.
Deactivating/activating ESP ®
(except
Mercedes ‑AMG vehicles) Important safety notes
You can select between the following sta-
tuses of ESP ®
:
R ESP ®
is activated
R ESP ®
is deactivated G
WARNING
If you deactivate ESP ®
, ESP ®
no longer sta-
bilises the vehicle. There is an increased risk
of skidding and an accident.
Only deactivate ESP ®
in the situations descri-
bed in the following. Driving safety systems
77Safety Z
Page 122 of 421
Mirrors
Rear-view mirror
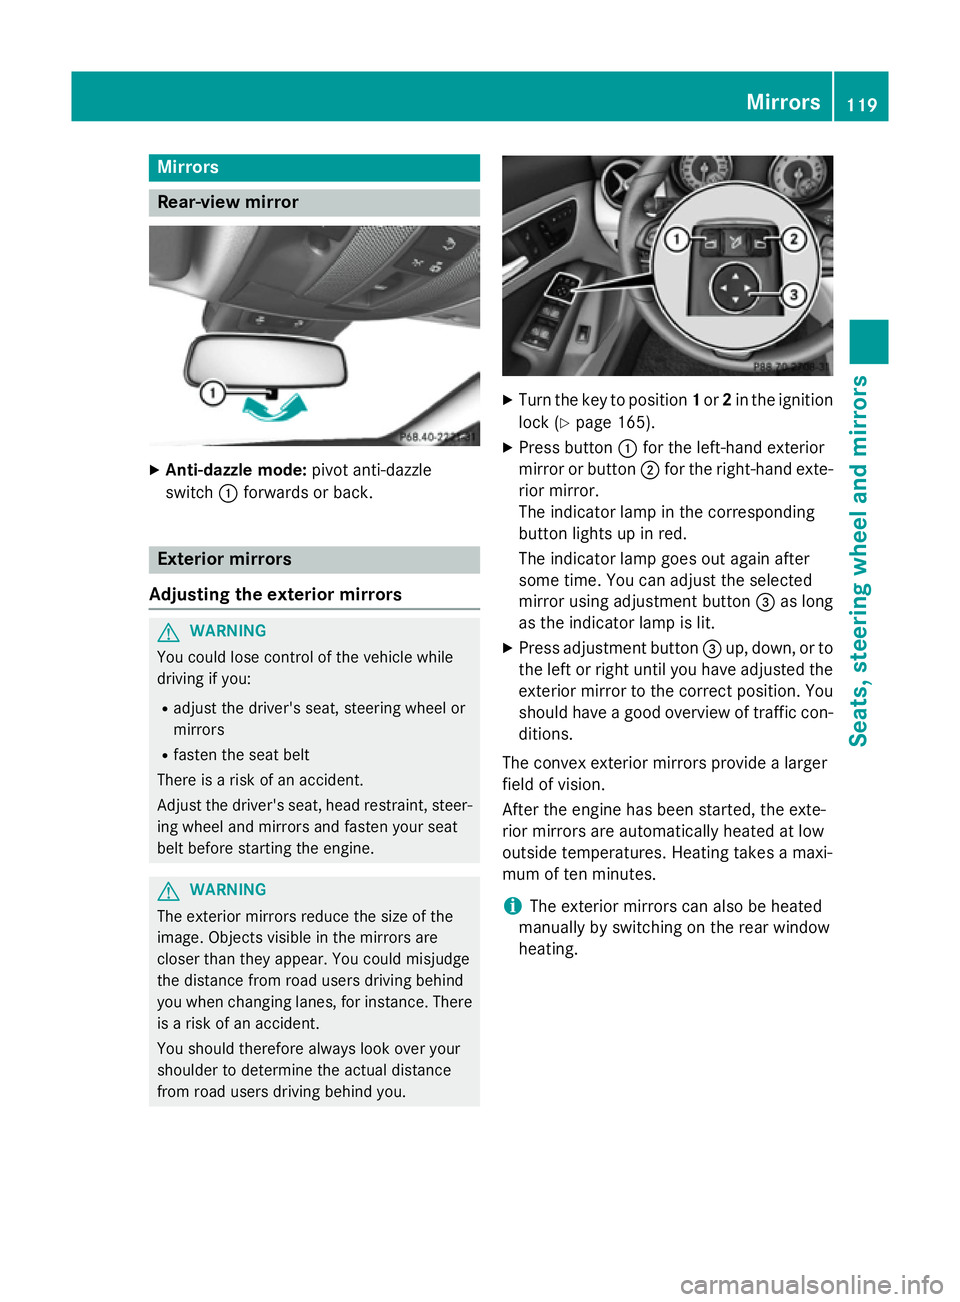
X
Anti-dazzle mode: pivot anti-dazzle
switch :forwards or back. Exterior mirrors
Adjusting the exterior mirrors G
WARNING
You could lose control of the vehicle while
driving if you:
R adjust the driver's seat, steering wheel or
mirrors
R fasten the seat belt
There is a risk of an accident.
Adjust the driver's seat, head restraint, steer-
ing wheel and mirrors and fasten your seat
belt before starting the engine. G
WARNING
The exterior mirrors reduce the size of the
image. Objects visible in the mirrors are
closer than they appear. You could misjudge
the distance from road users driving behind
you when changing lanes, for instance. There is a risk of an accident.
You should therefore always look over your
shoulder to determine the actual distance
from road users driving behind you. X
Turn the key to position 1or 2in the ignition
lock (Y page 165).
X Press button :for the left-hand exterior
mirror or button ;for the right-hand exte-
rior mirror.
The indicator lamp in the corresponding
button lights up in red.
The indicator lamp goes out again after
some time. You can adjust the selected
mirror using adjustment button =as long
as the indicator lamp is lit.
X Press adjustment button =up, down, or to
the left or right until you have adjusted the
exterior mirror to the correct position. You
should have a good overview of traffic con- ditions.
The convex exterior mirrors provide a larger
field of vision.
After the engine has been started, the exte-
rior mirrors are automatically heated at low
outside temperatures. Heating takes a maxi-
mum of ten minutes.
i The exterior mirrors can also be heated
manually by switching on the rear window
heating. Mirrors
119Seats, steering wheel and mirrors Z
Page 355 of 421
Flat tyre
Preparing the vehicle
Your vehicle may be equipped with: R MOExtended tyres (tyres with run-flat char-
acteristics) (Y page 352)
Vehicle preparation is not necessary on
vehicles with MOExtended tyres.
R a TIREFIT kit (Y page 351)
R an emergency spare wheel (certain coun-
tries only) (Y page 396)
Vehicles with MOExtended tyres are not
equipped with a TIREFIT kit at the factory. It is therefore recommended that you additionallyequip your vehicle with a TIREFIT kit if you fit tyres that do not feature run-flat characteris-
tics, e.g. winter tyres. A TIREFIT kit can be
obtained from a qualified specialist work-
shop.
Information on changing and fitting a wheel
(Y page 379).
X Stop the vehicle as far away as possible
from traffic on solid, non-slippery and level
ground.
X Switch on the hazard warning lamps.
X Secure the vehicle against rolling away
(Y page 192).
X If possible, bring the front wheels into the
straight-ahead position.
X Switch off the engine.
X Vehicles without KEYLESS-GO: remove
the key from the ignition lock.
X Vehicles with KEYLESS-GO start-func-
tion or KEYLESS-GO: open the driver's
door.
The on-board electronics now have status
0 . This is the same as the key having been
removed.
X Vehicles with KEYLESS-GO start-func-
tion or KEYLESS-GO: remove the Start/
Stop button from the ignition lock
(Y page 165).
X Make sure that the passengers are not
endangered as they do so. Make sure that no one is near the danger area while a
wheel is being changed. Anyone who is not
directly assisting in the wheel change
should, for example, stand behind the bar-
rier.
X Get out of the vehicle. Pay attention to traf-
fic conditions when doing so.
X Close the driver's door.
X Place the warning triangle at a suitable dis-
tance (Y page 350). Observe legal require-
ments. MOExtended tyres (tyres with run-flat
characteristics)
General notes With MOExtended tyres (tyres with run-flat
characteristics), you can continue to drive
your vehicle even if there is a total loss of
pressure in one or more tyres. The affected
tyre must not show any clearly visible dam-
age.
You can recognise MOExtended tyres by the
MOExtended marking which appears on the
tyre wall. You will find this marking next to the
tyre size designation, the load-bearing capa-
city and the speed index.
MOExtended tyres may only be used in con-
junction with an activated tyre pressure loss
warning system or tyre pressure monitor.
If a pressure loss warning message
appears in the multifunction display:
R observe the instructions in the display mes-
sages (Y page 292)
R check the tyre for damage
R if driving on, observe the following notes
The driving distance possible in run-flat mode is approximately 80 km when the vehicle is
partially laden and approximately 30 km
when the vehicle is fully laden. 352
Flat tyreBreakdown assistance
Page 356 of 421
In addition to the vehicle load, the driving dis-
tance possible depends upon:
R vehicle speed
R road condition
R outside temperature
The driving distance possible in run-flat mode may be reduced by extreme driving condi-
tions/manoeuvres, or it can be increased
through a moderate style of driving.
The driving distance possible in run-flat mode
is counted from the moment the tyre pressure loss warning appears in the multifunction dis-
play.
You must not exceed a maximum speed of
80 km/h.
When replacing one or all tyres, observe the
following specifications for your vehicle's
tyres:
R size
R type and
R the "MOExtended" mark.
If a tyre has gone flat and cannot be replaced
with an MOExtended tyre, a standard tyre
may be used as a temporary measure. Make
sure that you use the proper size and type
(summer or winter tyre).
Vehicles with MOExtended tyres are not
equipped with a TIREFIT kit at the factory. It is therefore recommended that you additionally
equip your vehicle with a TIREFIT kit if you fit tyres that do not feature run-flat characteris- tics, e.g. winter tyres. A TIREFIT kit can be
obtained from a qualified specialist work-
shop.
Important safety notes G
WARNING
When driving in emergency mode, the driving characteristics deteriorate, e.g. when corner-
ing, accelerating quickly and when braking.
There is a risk of accident.
Do not exceed the stated maximum speed.
Avoid abrupt steering and driving manoeu-
vres, and driving over obstacles (kerbs, pot- holes, off-road). This applies in particular to a
laden vehicle.
Stop driving in emergency mode if:
R you hear banging noises.
R the vehicle starts to shake.
R you see smoke and smell rubber.
R ESP ®
is intervening constantly.
R there are tears in the sidewalls of the tyre.
After driving in emergency mode, have the
wheel rims checked at a qualified specialist
workshop with regard to their further use. The faulty tyre must be replaced. TIREFIT kit
Important safety notes TIREFIT is a tyre sealant.
You can use TIREFIT to seal punctures of up to
4 mm, particularly those in the tyre tread. You
can use TIREFIT at outside temperatures
down to Ò20 †. G
WARNING
In the following situations, the tyre sealant is
unable to provide sufficient breakdown assis- tance, as it is unable to seal the tyre properly:
R there are cuts or punctures in the tyre
larger than those mentioned above.
R the wheel rim is damaged.
R you have driven at very low tyre pressures
or on a flat tyre.
There is a risk of an accident.
Do not drive any further. Contact a qualified
specialist workshop. G
WARNING
The tyre sealant is harmful and causes irrita-
tion. It must not come into contact with your
skin, eyes or clothing or be swallowed. Do not inhale TIREFIT fumes. Keep tyre sealant away
from children. There is a risk of injury. Flat tyre
353Breakdown assistance
Z
Page 373 of 421
Useful information
i This Owner's Manual describes all mod-
els, series and optional equipment for your
vehicle that were available at the time of
going to press. National variations are pos- sible. Note that your vehicle may not be
equipped with all of the functions descri-
bed. This is also the case for systems and
functions relevant to safety.
i Read the information on qualified special-
ist workshops: (Y page 25). Important safety notes
G
WARNING
If wheels and tyres of the wrong size are used, the wheel brakes or suspension components
may be damaged. There is a risk of an acci-
dent.
Always replace wheels and tyres with those
that fulfil the specifications of the original
part.
When replacing wheels, make sure to fit the
correct:
R designation
R type
When replacing tyres, make sure to fit the
correct:
R designation
R manufacturer
R type G
WARNING
A flat tyre severely impairs the driving, steer-
ing and braking characteristics of the vehicle.
There is a risk of accident.
Tyres without run-flat characteristics:
R do not drive with a flat tyre.
R immediately replace the flat tyre with your
emergency spare wheel or spare wheel, or
consult a qualified specialist workshop. Tyres with run-flat characteristics:
R pay attention to the information and warn-
ing notices on MOExtended tyres (tyres
with run-flat characteristics).
Accessories that are not approved for your
vehicle by Mercedes-Benz or are not being
used correctly can impair the operating
safety.
Before purchasing and using non-approved
accessories, visit a qualified specialist work-
shop and enquire about:
R suitability
R legal stipulations
R factory recommendations
Information on the sizes and types of wheels
and tyres for your vehicle can be found under
"Wheel/tyre combinations" (Y page 384).
Information on tyre pressures can be found:
R in the tyre pressure table in the fuel filler
flap (Y page 189)
R under "Tyre pressure" (Y page 374)
Modification work on the brake system and
wheels is not permitted. The use of spacers or
brake dust shields is not permitted. This inva- lidates the general operating permit for the
vehicle.
i Further information on wheels and tyres
can be obtained at any qualified specialist
workshop. Operation
Information on driving
Check the tyre pressure when the vehicle is
heavily laden and adjust prior to a trip.
While driving, pay attention to vibrations,
noises and unusual handling characteristics,
e.g. pulling to one side. This may indicate that
the wheels or tyres are damaged. If you sus-
pect that a tyre is defective, reduce your
speed immediately. Stop the vehicle as soon
as possible to check the wheels and tyres for damage. Hidden tyre damage could also be 370
OperationWheels and tyres
Page 374 of 421
causing the unusual handling characteristics.
If you find no signs of damage, have the tyres
and wheels checked at a qualified specialist
workshop.
When parking your vehicle, make sure not to
squash the tyre sidewalls. If this cannot be
avoided, drive slowly over obstacles, e.g.
kerbs, and only at an obtuse angle. You could
otherwise damage the wheel rims and tyres. Regular checking of wheels and tyres
G
WARNING
Damaged tyres can cause tyre inflation pres-
sure loss. As a result, you could lose control of your vehicle. There is a risk of accident.
Check the tyres regularly for signs of damageand replace any damaged tyres immediately.
Check wheels and tyres for damage at least
once a month. Check wheels and tyres after
driving off-road or on rough roads. Damaged
wheels can cause a loss of tyre pressure. Pay
particular attention to damage such as:
R cuts in the tyres
R punctures
R tears in the tyres
R bulges on the tyres
R deformation or severe corrosion on wheels
Regularly check the tyre tread depth and the
condition of the tread across the whole width of the tyre (Y page 371). If necessary, turn
the front wheels to full lock in order to inspect the inner side of the tyre surface.
All wheels must have a valve cap to protect
the valve against dirt and moisture. Do not fit
anything onto the valve other than the stand-
ard valve cap or other valve caps approved for
your vehicle by Mercedes-Benz. Do not fit any other valve caps or systems, e.g. tyre pres-
sure monitoring systems.
Regularly check the pressure of all the tyres,
particularly prior to long trips. Adjust the tyre
pressure as necessary (Y page 374).Observe the notes on the emergency spare
wheel (Y page 396).
The service life of tyres depends on various
factors, including the following:
R driving style
R tyre pressure
R mileage Notes on the tyre tread
G
WARNING
Insufficient tyre tread will reduce tyre trac-
tion. The tyre is no longer able to dissipate
water. This means that on wet road surfaces, the risk of aquaplaning increases, in particularwhere speed is not adapted to suit the driving
conditions. There is a risk of accident.
If the tyre pressure is too high or too low, tyres may exhibit different levels of wear at differ-
ent locations on the tyre tread. Thus, you
should regularly check the tread depth and
the condition of the tread across the entire
width of all tyres.
Minimum tyre tread depth for:
R summer tyres: 3 mm
R M+S tyres: 4 mm
For safety reasons, replace the tyres before
the legally prescribed limit for the minimum
tyre tread depth is reached. Selecting, fitting and replacing tyres
G
WARNING
Exceeding the stated tyre load-bearing capa-
city and the approved maximum speed could
lead to tyre damage or the tyre bursting. There is a risk of accident.
Therefore, only use tyre types and sizes
approved for your vehicle model. Observe the
tyre load rating and speed rating required for your vehicle.
Pay special attention to country-specific
requirements for tyre approval. These Operation
371Wheels and tyres Z
Page 375 of 421
requirements can stipulate a specific tyre
type for your vehicle. Furthermore, the use of certain tyre types in certain regions and areas
of operation can be highly beneficial. You can find further information regarding tyres at
specialist tyre retailers, at qualified specialist
workshops or at any Mercedes-Benz Service
Centre.
R Only fit tyres and wheels of the same type
and make.
Exception: it is permissible to fit a different type or make in the event of a flat tyre.
Observe here the "MOExtended tyres (tyres
with run-flat characteristics)" section
(Y page 352).
R Only fit tyres of the correct size onto the
wheels.
R Run in new tyres at moderate speeds for
the first 100 km. They only reach their full
performance after this distance.
R Do not drive with tyres which have too little
tread depth. This otherwise significantly
reduces the traction on wet roads (aqua-
planing).
R Replace the tyres after six years at the lat-
est, regardless of wear.
Observe the notes on the emergency spare
wheel (Y page 396). MOExtended tyres (tyres with run-flat
characteristics)
With MOExtended tyres (tyres with run-flat
characteristics), you can continue to drive
your vehicle even if there is a total loss of
pressure in one or more tyres.
MOExtended tyres may only be used in con-
junction with an activated tyre pressure loss
warning system or with an activated tyre pres- sure monitor and on wheels specifically tes-
ted by Mercedes-Benz.
Notes on driving with MOExtended tyres with
a flat tyre (Y page 352).
Vehicles with MOExtended tyres are not
equipped with a TIREFIT kit at the factory. It is therefore recommended that you additionally
equip your vehicle with a TIREFIT kit if you fit
tyres that do not feature run-flat characteris- tics, e.g. winter tyres. A TIREFIT kit can be
obtained from a qualified specialist work-
shop. Winter operation
General notes
Have your vehicle winterproofed at a qualified specialist workshop at the onset of winter.
Observe the notes in the "Changing a wheel"
section (Y page 379). Driving with summer tyres
At temperatures below +7 †, summer tyres
lose elasticity and therefore traction and
braking power. Change the tyres on your vehi- cle to M+S tyres. Using summer tyres at very
cold temperatures could cause tears to form, thereby damaging the tyres permanently.
Mercedes-Benz cannot accept responsibility
for this type of damage. G
WARNING
Damaged tyres can cause tyre inflation pres-
sure loss. As a result, you could lose control of your vehicle. There is a risk of accident.
Check the tyres regularly for signs of damageand replace any damaged tyres immediately. M+S tyres
G
WARNING
M+S tyres with a tyre tread depth of less than 4 mm are not suitable for use in winter as they
do not provide sufficient traction. There is a
risk of accident.
M+S tyres with a tread depth of less than
4 mm must be replaced. 372
Winter operationWheels and tyres
Page 377 of 421
Tyre pressure
Tyre pressure specifications
G
WARNING
Underinflated or overinflated tyres pose the
following risks:
R the tyres may burst, especially as the load
and vehicle speed increase.
R the tyres may wear excessively and/or
unevenly, which may greatly impair tyre
traction.
R the driving characteristics, as well as steer-
ing and braking, may be greatly impaired.
There is a risk of an accident.
Observe the recommended tyre pressure and check the tyre pressure of all the tyres includ-
ing the spare wheel:
R at least every two weeks
R when the load changes
R before embarking on a longer journey
R for changed operating conditions, e.g. off-
road driving
If necessary, correct the tyre pressure. G
WARNING
If you fit unsuitable accessories onto tyre
valves, the tyre valves may be overloaded and malfunction, which can cause tyre pressure
loss. Due to their design, retrofitted tyre pres-
sure monitors keep the tyre valve open. This
can also result in tyre pressure loss. There is a risk of accident.
Only screw standard valve caps or valve caps
specifically provided by Mercedes-Benz for
your vehicle onto the tyre valve. G
WARNING
If the tyre pressure drops repeatedly, the
wheel, valve or tyre may be damaged. Tyre
pressure that is too low may result in a tyre
blow-out. There is a risk of accident.
R Check the tyre for foreign objects.
R Check whether the wheel is losing air or the
valve is leaking. If you are unable to rectify the damage, con-
tact a qualified specialist workshop.
H
Environmental note
Check the tyre pressure regularly, at least
every 14 days.
The recommended tyre pressures for various
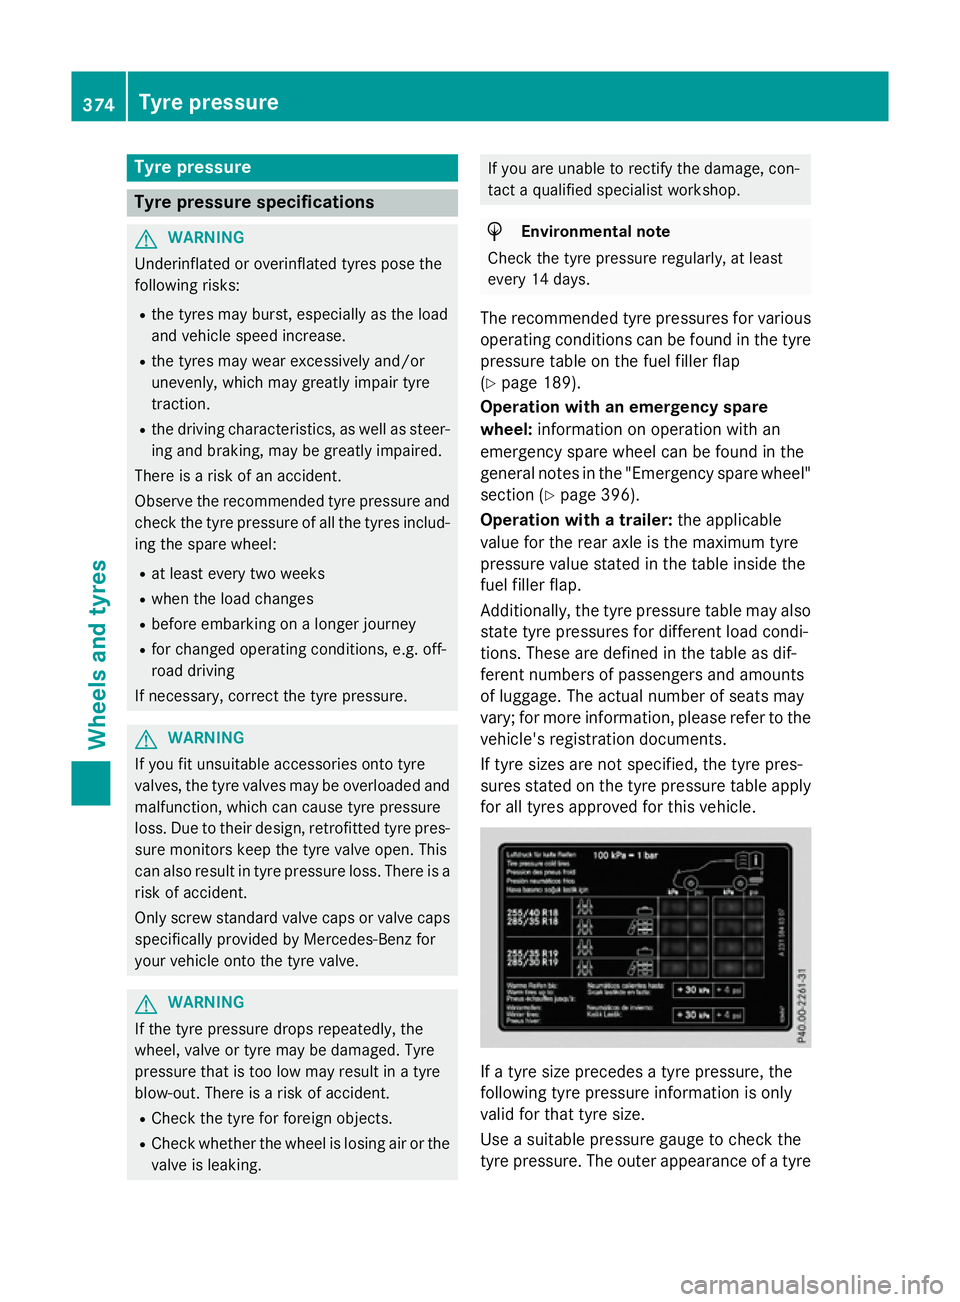
operating conditions can be found in the tyre pressure table on the fuel filler flap
(Y page 189).
Operation with an emergency spare
wheel: information on operation with an
emergency spare wheel can be found in the
general notes in the "Emergency spare wheel"
section (Y page 396).
Operation with a trailer: the applicable
value for the rear axle is the maximum tyre
pressure value stated in the table inside the
fuel filler flap.
Additionally, the tyre pressure table may also state tyre pressures for different load condi-
tions. These are defined in the table as dif-
ferent numbers of passengers and amounts
of luggage. The actual number of seats may
vary; for more information, please refer to the
vehicle's registration documents.
If tyre sizes are not specified, the tyre pres-
sures stated on the tyre pressure table apply for all tyres approved for this vehicle. If a tyre size precedes a tyre pressure, the
following tyre pressure information is only
valid for that tyre size.
Use a suitable pressure gauge to check the
tyre pressure. The outer appearance of a tyre374
Tyre pressureWheels and tyres