Roof MERCEDES-BENZ CLK430 2000 C208 Owner's Manual
[x] Cancel search | Manufacturer: MERCEDES-BENZ, Model Year: 2000, Model line: CLK430, Model: MERCEDES-BENZ CLK430 2000 C208Pages: 299, PDF Size: 7.31 MB
Page 4 of 299

Operation Audio and telephone 123
DrivingBrakes 185
Power windows 141 Driving off 186
Sliding/pop-up roof 143 Control and operation of radio Parking 187
Interior lighting 145 transmitters 162 Tires 187
Rear window sunshade 146 COMAND, radio, telephone and Snow chains 190
Sun visors 146 two-way radio 162 Winter driving instructions 190
Illuminated vanity mirrors 147 Maintenance 163 Deep water 191
Interior 147 Catalytic converter 164 Passenger compartment 192
Storage compartments, armrest and
cup holder 147Emission control 165 Travelling abroad 192
Glove box 148 Tele Aid 166 Cruise control 193
Ashtrays 150 Steering lock 172 Brake assist system (BAS) 196
Lighter 151 Starting and turning off the engine 174 Antilock brake system (ABS) 198
Enlarged cargo area – split folding rear
seat backrest 152Automatic transmission 175
Electronic stability program (ESP)
200
Loading instructions 153 Parking brake 184 What you should know at the
Cargo tie down rings 155 Driving instructions 184 gas station 203
Parcel net in front passenger footwell 155 Drive sensibly – save fuel 184 Check regularly and before a
long trip 205
Telephone, general 156 Drinking and driving 185
Cellular telephone 156 Pedals 185
Garage door opener 157 Power assistance 185
4
Page 5 of 299

Instrument cluster displayBRAKE FLUID 217 Coolant level 236
PARKING BRAKE 218 Adding coolant 237
Malfunction and indicator lamps in the
instrument cluster 208ENGINE FAN 218 Windshield washer / headlamp
clean.system 238
On-board diagnostic systemCheck engine malfunction indicator lamp
208COOLANT (coolant level) 219 Windshield and headlamp
washer fluid mixing ratio 238
Brake warning lamp 209 COOLANT (coolant temp.) 220 Wheels 239
Supplemental restraint system STEER. WHEEL ADJUST. 221 Tire replacement 239
(SRS) indicator lamp 210 LIGHT SENSOR 221 Rotating wheels 240
Fuel reserve and fuel cap LIGHTING SYSTEM 222 Spare wheel 241
placement warning 210 WASHER FLUID 223 Changing wheels 242
Electronic stability program(ESP) OIL TEMP. (engine oil temperature) 224 Tire inflation pressure 247
warning lamp 211 ENGINE OIL LEVEL 224 Battery 249
BAS/ESP malfunction indicator lamp 211 ELEC. STABIL. PROG. (Electronic Jump starting 251
ABS malfunction indicator lamp 211 stability program) 226 Towing the vehicle 253
Telescoping steering column – Transmission selector lever,
indicator lamp 212
Practical hintsmanually unlocking 255
Seat belt warning lamp 212 Bulbs 256
Malfunction and indicator lamps in the First aid kit 228 Adjusting headlamp aim 261
center console 212 Shelf below rear window 228 Changing batteries in the
AIRBAG OFF indicator lamp 212 Stowing things in the vehicle 228 electronic main key 264
Roll bar warning lamp 221 Spare wheel, vehicle tools, storage Synchronizing remote control 266
Malfunction and warning messages in compartment 229 Emergency operation of
the multifunction display 213 Vehicle jack 230 sliding/pop-up roof 267
DISPLAY DEFECTIVE 214 Fuses 231
Manual release for fuel filler flap
268
BATTERY/ALTERNATOR 215 Hood 233 Replacing wiper blade insert 268
ABS-SYSTEM 216 Checking engine oil level 234 Trunk lamp 270
BRAKE ASSIST 216 Automatic transmission fluid level 236 Roof rack 270
BRAKE LINING WEAR 217
5
Page 21 of 299
Instruments and controls
Te ch n ica l
data Instruments
and controlsOperation DrivingInstrument
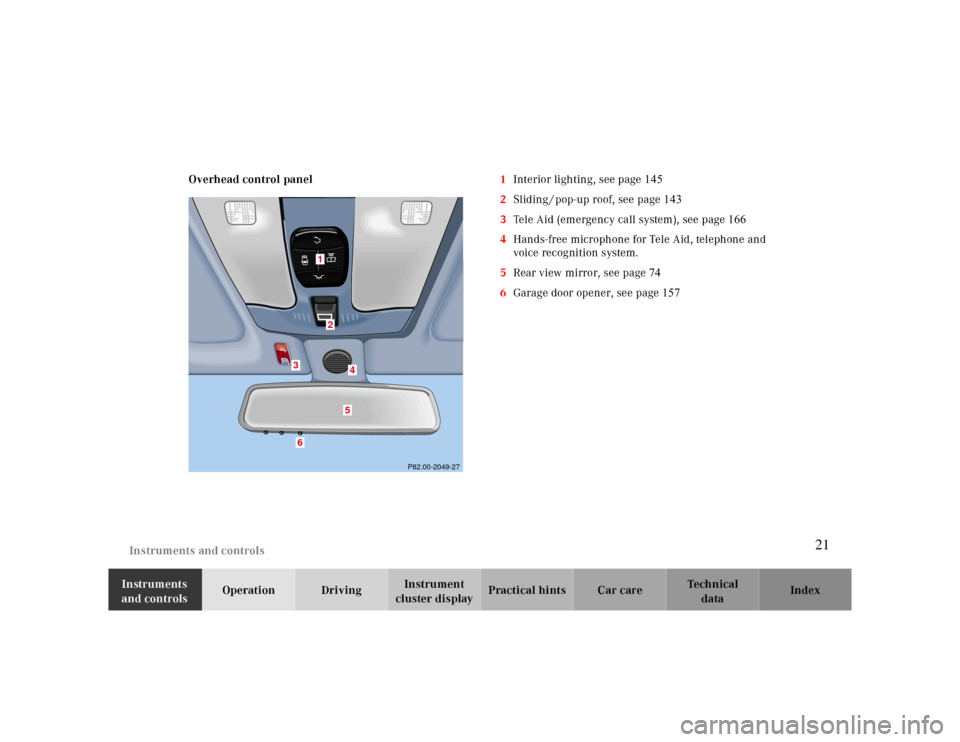
cluster displayPractical hints Car care Index Overhead control panel1Interior lighting, see page 145
2Sliding / pop-up roof, see page 143
3Tele Aid (emergency call system), see page 166
4Hands-free microphone for Tele Aid, telephone and
voice recognition system.
5Rear view mirror, see page 74
6Garage door opener, see page 157
1
1
6
P82.00-2049-27
5
2
3
4
21
Page 23 of 299

Engine oil consumption 109 Glove box 148
Exterior lamp switch 110 Ashtrays 150
Night security illumination 111 Lighter 151
Headlamp cleaning system 112 Enlarged cargo area – split folding rear
seat backrest 152
Combination switch 113 Loading instructions 153
Hazard warning flasher switch 115 Cargo tie down rings 155
Automatic climate control 116 Parcel net in front passenger footwell 155
Operation Audio and telephone 123 Telephone, general 156
Power windows 141 Cellular telephone 156
Sliding/pop-up roof 143 Garage door opener 157
Interior lighting 145
Rear window sunshade 146
Sun visors 146
Illuminated vanity mirrors 147
Interior 147
Storage compartments, armrest and
cup holder 147
23
Page 30 of 299
Central locking system
Te ch n ica l
data Instruments
and controlsOperationDrivingInstrument
cluster displayPractical hints Car care Index Opening the trunk
The trunk lid will swing open automatically. You should
always make sure there is sufficient clearance.
A minimum height clearance of 5.9 ft. (1.8 m) is
required to open the trunk lid.
Press transmit buttonŠ until trunk lid is open.
Important!
Do not place remote control in trunk since trunk is
locked when the lid is closed if the vehicle is centrally
locked.
Note:
If the trunk was previously locked separately, it will
remain locked, see page 38.Opening and closing windows and
sliding / pop-up roof from outside
Aim transmitter eye of remote control at a door receiver.
To o pen :
Continue to press transmit button Πafter unlocking
the vehicle.
The windows and sliding / pop-up roof begin to open
after approx. 1 second.
To interrupt opening procedure, release transmit
button.
30
Page 31 of 299
Central locking system
Te ch n ica l
data Instruments
and controlsOperationDrivingInstrument
cluster displayPractical hints Car care Index
To cl os e:
Continue to press transmit button ‹ after locking
the vehicle.
The windows and sliding / pop-up roof begin to close
after approx. 1 second.
To interrupt closing procedure, release transmit button.Note:
If the windows and sliding / pop-up roof cannot be
operated automatically by pressing the transmit button
of the remote control then it may be necessary to change
the batteries in the electronic main key (if ok, battery
check lamp in electronic main key will light briefly
when pressing transmit button), or to synchronize the
remote control, see page264and266.
Wa r n i n g !
Never operate the windows or sliding / pop-up roof
if there is the possibility of anyone being harmed
by the opening or closing procedure.In case the procedure causes potential danger, the
procedure can be immediately halted by releasing
the remote control button. To reverse direction of
movement press Œ for opening or ‹ for
closing.
31
Page 143 of 299
Interior equipment
Te ch n ica l
data Instruments
and controlsOperationDrivingInstrument
cluster displayPractical hints Car care Index
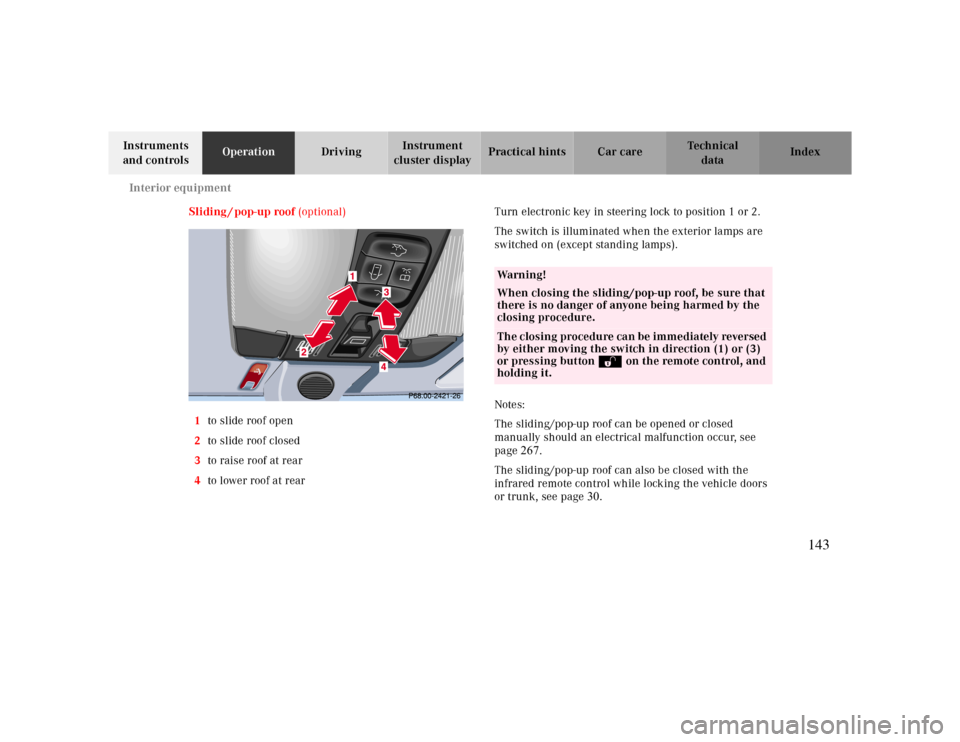
Sliding / pop-up roof (optional)
1to slide roof open
2to slide roof closed
3to raise roof at rear
4to lower roof at rearTurn electronic key in steering lock to position 1 or 2.
The switch is illuminated when the exterior lamps are
switched on (except standing lamps).
Notes:
The sliding/pop-up roof can be opened or closed
manually should an electrical malfunction occur, see
page
267.
The sliding/pop-up roof can also be closed with the
infrared remote control while locking the vehicle doors
or trunk, see page
30
.
Wa r n i n g !
When closing the sliding/pop-up roof, be sure that
there is no danger of anyone being harmed by the
closing procedure.The closing procedure can be immediately reversed
by either moving the switch in direction (1) or (3)
or pressing button Πon the remote control, and
holding it.
143
Page 144 of 299
Interior equipment
Te ch n ica l
data Instruments
and controlsOperationDrivingInstrument
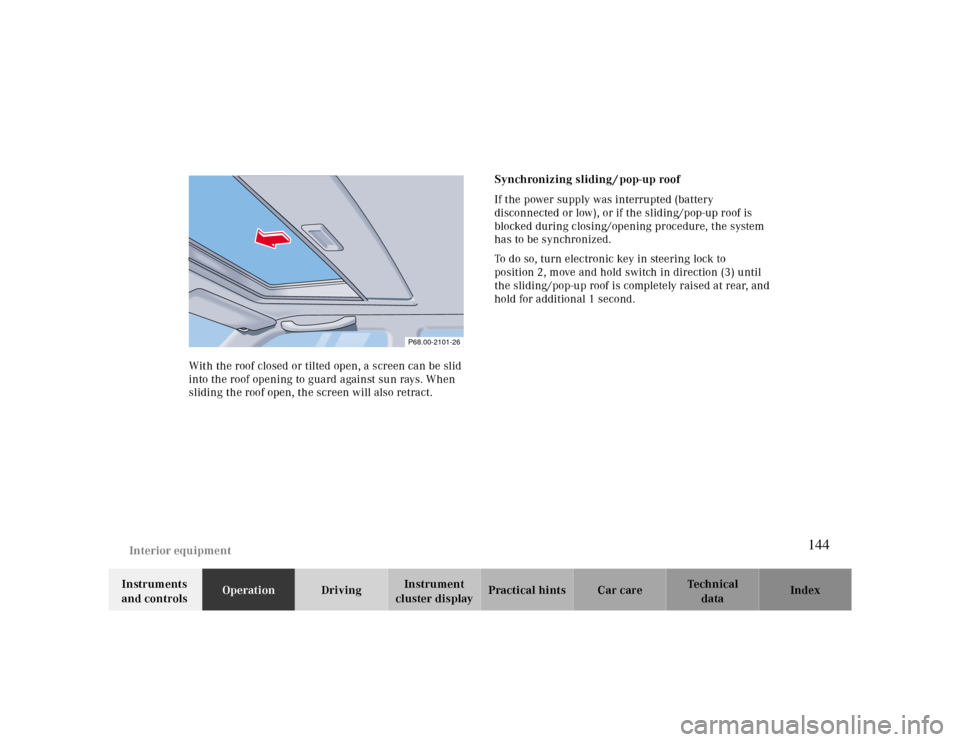
cluster displayPractical hints Car care Index With the roof closed or tilted open, a screen can be slid
into the roof opening to guard against sun rays. When
sliding the roof open, the screen will also retract.Synchronizing sliding / pop-up roof
If the power supply was interrupted (battery
disconnected or low), or if the sliding/pop-up roof is
blocked during closing/opening procedure, the system
has to be synchronized.
To do so, turn electronic key in steering lock to
position 2, move and hold switch in direction (3) until
the sliding/pop-up roof is completely raised at rear, and
hold for additional 1 second.
P68.00-2101-26
144
Page 227 of 299

Practical hints
Spare wheel 241
Changing wheels 242
First aid kit 228 Tire inflation pressure 247
Shelf below rear window 228 Battery 249
Stowing things in the vehicle 228 Jump starting 251
Spare wheel, vehicle tools, storage Towing the vehicle 253
compartment 229 Transmission selector lever,
Vehicle jack 230 manually unlocking 255
Fuses 231 Bulbs 256
Hood 233 Adjusting headlamp aim 261
Checking engine oil level 234 Changing batteries in the
Automatic transmission fluid level 236 electronic main key 264
Coolant level 236 Synchronizing remote control 266
Adding coolant 237 Emergency operation of
Windshield washer / headlamp
clean.system 238sliding/pop-up roof 267
Windshield and headlamp washer fluid
mixing ratio 238Manual release for fuel filler flap
268
Wheels 239 Replacing wiper blade insert 268
Tire replacement 239 Trunk lamp 270
Rotating wheels 240 Roof rack 270
227
Page 267 of 299
Emergency operation of sliding/pop-up roof
Te ch n ica l
data Instruments
and controlsOperation DrivingInstrument
cluster displayPractical hintsCar care Index
Emergency operation of sliding/pop-up roof
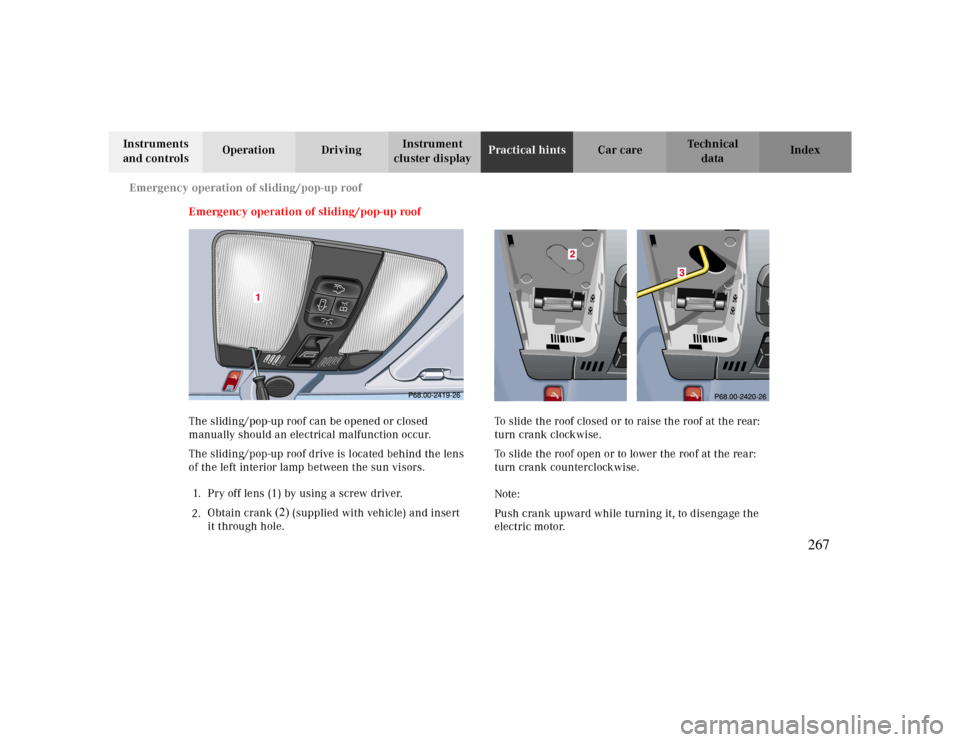
The sliding/pop-up roof can be opened or closed
manually should an electrical malfunction occur.
The sliding/pop-up roof drive is located behind the lens
of the left interior lamp between the sun visors.
1. Pry off lens (1) by using a screw driver.
2.
(2)
Obtain crank (supplied with vehicle) and insert
it through hole.To slide the roof closed or to raise the roof at the rear:
turn crank clockwise.
To slide the roof open or to lower the roof at the rear:
turn crank counterclockwise.
Note:
Push crank upward while turning it, to disengage the
electric motor.
267