change wheel MERCEDES-BENZ CLS 2012 Owners Manual
[x] Cancel search | Manufacturer: MERCEDES-BENZ, Model Year: 2012, Model line: CLS, Model: MERCEDES-BENZ CLS 2012Pages: 356, PDF Size: 14.25 MB
Page 8 of 356
C
Calling up a malfunction see Display messages
Capacities
see Technical data
Car
see Vehicle
Care
Carpets .......................................... 292
Car wash ........................................ 286
Display ........................................... 290
Exterior lights ................................ 289
Gear or selector lever ....................291
Matte finish ................................... 288
Night View Assist Plus ...................290
Notes ............................................. 285
Paint .............................................. 287
Plastic trim .................................... 290
Power washer ................................ 287
Rear view camera .......................... 289
Roof lining ...................................... 292
Seat belt ........................................ 292
Seat cover ..................................... 291
Sensors ......................................... 289
Steering wheel ............................... 291
Tail pipes ....................................... 290
Trim pieces .................................... 291
Washing by hand ........................... 287
Wheels ........................................... 287
Windows ........................................ 288
Wiper blades .................................. 289
Wooden trim .................................. 291
Cargo tie down rings ......................... 260
Car wash (care) ................................. 286
CD player/CD changer (on-board
computer) .......................................... 203
Cell phone see Mobile phone
Center console
Lower section .................................. 31
Lower section (AMG vehicles) ..........32
Upper section .................................. 30
Central locking
Automatic locking (on-board
computer) ...................................... 211
Locking/unlocking (SmartKey) ........72Changing bulbs
Important safety notes ..................112
Overview of bulb types ..................113
Reversing lamps ............................ 113
Child-proof locks
Important safety notes ....................59
Rear doors ....................................... 59
Children
In the vehicle ................................... 55
Restraint systems ............................ 55
Child seat
LATCH-type (ISOFIX ) child seat
anchors ............................................ 57
Special seat belt retractor ...............57
Top Tether ....................................... 58
Cigarette lighter ................................ 265
Classification system for
occupants (OCS) Faults ............................................... 47
Operation ......................................... 43
System self-test ............................... 46
Climate control
3-zone automatic climate control ..121
Controlling automatically ...............123
Cooling with air dehumidification ..122
Defrosting the windshield ..............125
Demisting the windows .................. 126
Dual-zone automatic climate
control ........................................... 119
Important safety notes ..................118
Indicator lamp ................................ 123
Maximum cooling .......................... 125
Notes on using automatic climate
control ................................... 120, 122
Overview of systems ......................118
Problems with cooling with air
dehumidification ............................ 123
Problem with the rear window
defroster ........................................ 126
Rear control panel .........................121
Refrigerant ..................................... 350
Setting the air distribution .............124
Setting the airflow .........................124
Setting the air vents ......................127
Setting the climate mode (AIR
FLOW) ............................................ 123
Setting the temperature ................1236Index
Page 24 of 356
Maintenance
The Service and Warranty Booklet describes
all the necessary maintenance work which
should be done at regular intervals.
Always have the Service and Warranty
Booklet with you when you bring the vehicle
to an authorized Mercedes-Benz Center. The
service advisor will record every service for
you in the Service and Warranty Booklet.
Roadside Assistance
The Mercedes-Benz Roadside Assistance
Program offers technical help in the event of
a breakdown. Calls to the toll-free Roadside
Assistance Hotline are answered by our
agents 24 hours a day, 365 days a year.
1-800-FOR-MERCedes(1-800-367-6372)
(USA)
1-800-387-0100 (Canada)
For additional information, refer to the
Mercedes-Benz Roadside Assistance
Program brochure (USA) or the "Roadside
Assistance" section in the Service and
Warranty booklet (Canada). You will find both
in your vehicle literature portfolio.
Change of address or ownership
If you sell your Mercedes, please leave the
entire literature in the vehicle so that it is
available to the next owner.
Operating safety
Safety notes
GWARNING
Work improperly carried out on electronic
components and associated software could
cause them to cease functioning. Because the
vehicle's electronic components are
interconnected, any modifications made may
produce an undesired effect on other
systems. Electronic malfunctions could
seriously impair the operating safety of your
vehicle.
Contact an authorized Mercedes-Benz Center
for repairs or modifications to electronic
components.
Other improper work or modifications on the
vehicle could also have a negative impact on
the operating safety of the vehicle.
Some safety systems only function when the
engine is running. You should therefore never
turn off the engine while driving.GWARNING
Heavy blows against the vehicle underbody or
tires/wheels may cause serious damage and
impair the operating safety of your vehicle.
Such blows can be caused, for example, by
running over an obstacle, road debris or a
pothole.
If you feel a sudden significant vibration or
ride disturbance, or you suspect that damage
to your vehicle has occurred:
R turn on your hazard warning flashers.
R slow down carefully.
R drive with caution to an area which is a safe
distance from the road.
Inspect the vehicle underbody and tires/
wheels for possible damage. If the vehicle
appears unsafe, have it towed to the nearest
authorized Mercedes-Benz Center or other
qualified maintenance or repair facility for
further inspection or repairs.
Qualified specialist workshop
An authorized Mercedes-Benz Center is a
qualified specialist workshop. It has the
necessary specialist knowledge, tools and
qualifications to correctly carry out the work
required on your vehicle. This is especially the
case for work relevant to safety.
Observe the notes in the service booklet.
22Introduction
Page 39 of 356
The SRS components are in operational
readiness when the 6 SRS warning lamp
is not lit while the engine is running .GWARNING
The SRS self-check has detected a
malfunction if the 6 SRS warning lamp:
R does not come on at all
R fails to go out approximately 4 seconds
after the engine was started
R comes on after the engine was started or
while driving
For your safety, Mercedes-Benz strongly
recommends that you have the system
checked as soon as possible at an authorized
Mercedes-Benz Center. Otherwise the SRS
may not be activated when it is needed in an
accident, which could result in serious or fatal
injury. The SRS might also deploy
unexpectedly and unnecessarily which could
also result in injury.
In addition, improper work on the SRS creates
a risk of rendering the SRS inoperative or
causing unintended air bag deployment. Work
on the SRS must therefore only be performed
by qualified technicians. Contact an
authorized Mercedes-Benz Center.
If it is necessary to modify an air bag system
to accommodate a person with disabilities,
contact an authorized Mercedes-Benz Center
for details. USA only: Call our Customer
Assistance Center at 1-800-FOR-MERCedes
(1-800-367-6372) for details.
Safety guidelines for seat belts,
Emergency Tensioning Devices (ETDs)
and air bags
GWARNING
R Damaged seat belts or seat belts that have
been subjected to stress in an accident
must be replaced. Their anchoring points
must also be checked. Only use seat belts
installed or supplied by an authorized
Mercedes-Benz Center.
R Air bags and pyrotechnic Emergency
Tensioning Devices (ETDs) contain
perchlorate material, which may require
special handling and regard for the
environment. Check your national disposal
guidelines. California residents, see
www.dtsc.ca.gov/HazardousWaste/
Perchlorate/index.cfm .
R Air bags and ETDs are designed to function
on a one-time-only basis. An air bag or ETD
that has deployed must be replaced. PRE-
SAFE ®
has electrically operated reversible
belt tensioners in addition to the
pyrotechnic ETDs.
R Do not pass seat belts over sharp edges.
They could tear.
R Do not make any modification that could
change the effectiveness of the seat belts.
R Do not bleach or dye seat belts as this may
severely weaken them. In a crash they may
not be able to provide adequate protection.
R No modifications of any kind may be made
to any components or wiring of the SRS.
R Do not change or remove any component
or part of the SRS.
R Do not install additional trim material, seat
covers, badges, etc. to the:
- padded steering wheel boss
- knee bag covers
- front-passenger air bag cover
- outer side of front seat bolsters
- side trim next to the rear seat backrest
- roof lining trim
R Do not install additional electrical/
electronic equipment on or near SRS
components and wiring.
R Keep area between air bags and occupants
free of objects (e.g. packages, purses,
umbrellas, etc.).
R Do not hang items such as coat hangers
from the coat hooks or handles over the
door. These items may be thrown around inOccupant safety37SafetyZ
Page 59 of 356
even if the SmartKey is removed from the
ignition lock or removed from the vehicle,
such as seat adjustment, steering wheel
adjustment, or the memory function
If children open a door, they could injure other
persons or get out of the vehicle and injure
themselves or be injured by following traffic.
Do not expose the child restraint system to
direct sunlight. The child restraint system's
metal parts, for example, could become very
hot, and the child could be burned on these
parts.GWARNING
Do not carry heavy or hard objects in the
passenger compartment or trunk unless they
are firmly secured in place.
Unsecured or improperly positioned cargo
increases a child's risk of injury in the event
of
R strong braking maneuvers
R sudden changes of direction
R an accident
Special seat belt retractor
All seat belts except the driver's seat belt are
equipped with a special seat belt retractor.
When activated, the special seat belt
retractor ensures the seat belt will not
slacken once the child restraint system has
been secured.
Installing a child restraint system:
XAlways comply with the manufacturer's
installation instructions.XPull the seat belt smoothly from the inertia
reel.XEngage the seat belt tongue in the belt
buckle.Activating the special seat belt retractor:XPull the seat belt out fully and let the inertia
reel retract it again.
While the seat belt is retracting, you should
hear a ratcheting sound. The special seat
belt retractor is enabled.XPush down on the child restraint system to
take up any slack.
Removing a child restraint system/
deactivating the special seat belt retractor:
XAlways comply with the manufacturer's
installation instructions.XPress the seat belt release button and
guide the belt tongue to the belt outlet.
The special seat belt retractor is
deactivated.GWARNING
Never release the seat belt buckle while the
vehicle is in motion, since the special seat belt
retractor will be deactivated.
LATCH-type (ISOFIX) child seat anchors
in the rear
GWARNING
Children that are too large for a child restraint
must travel in seats using normal seat belts.
Position shoulder belt across the chest and
shoulder, not face or neck.
In order to attain the correct seating position
for children weighing over 41 lb (18 kg), it may
be necessary to use a booster seat until they
reach a height where a normal lap/shoulder
seat belt lies properly across their bodies
without the need for a booster seat.
Install the child restraint system according to
the manufacturer's instructions.
The child restraint system must be installed
firmly on both brackets.
An incorrectly installed child restraint system
can come loose in the event of an accident,
causing the child to be severely or fatally
injured.
Children in the vehicle57SafetyZ
Page 81 of 356
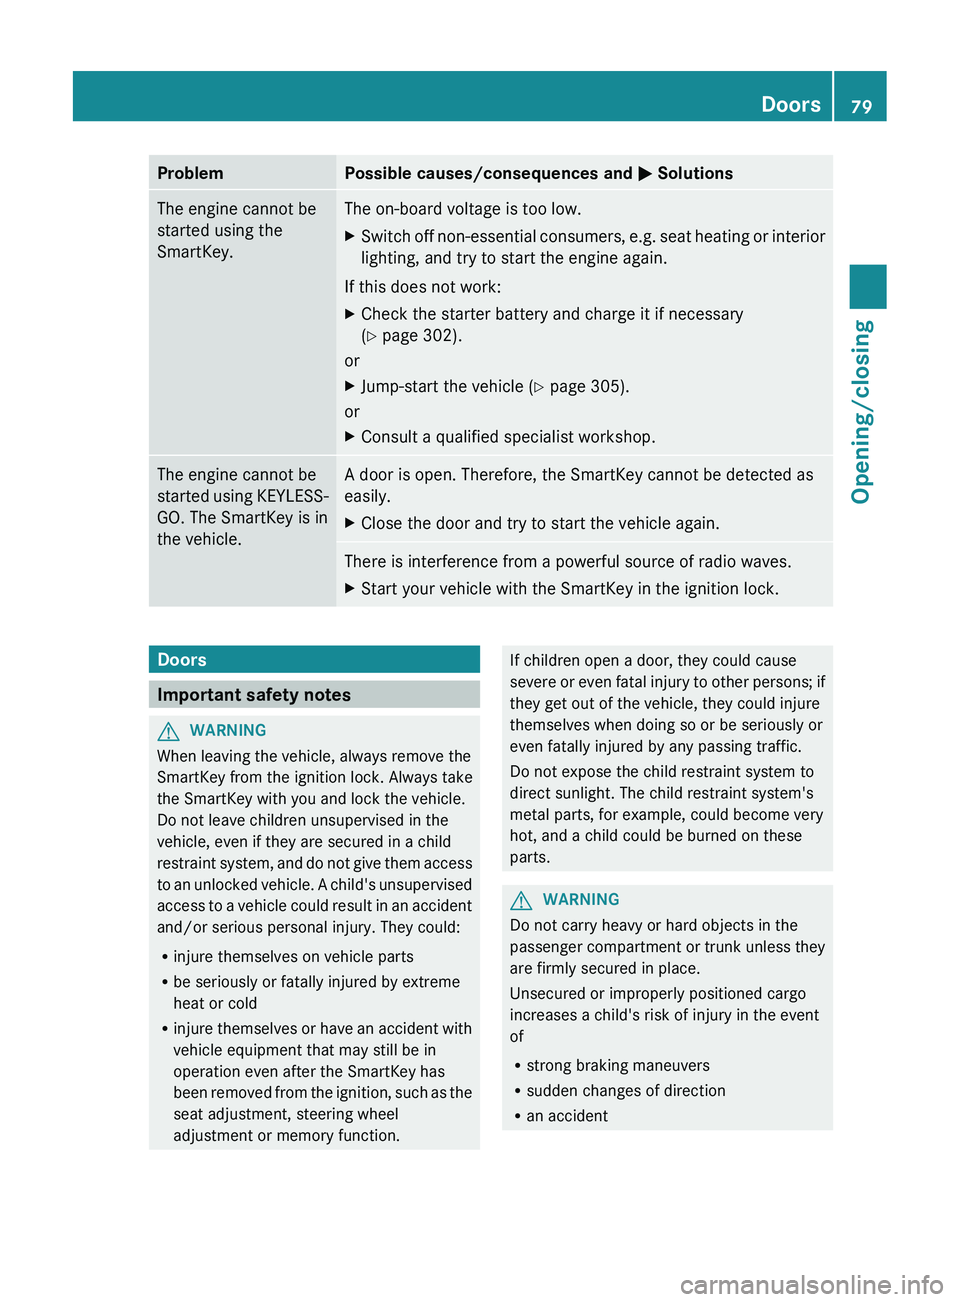
ProblemPossible causes/consequences and M SolutionsThe engine cannot be
started using the
SmartKey.The on-board voltage is too low.XSwitch off non-essential consumers, e.g. seat heating or interior
lighting, and try to start the engine again.
If this does not work:
XCheck the starter battery and charge it if necessary
( Y page 302).
or
XJump-start the vehicle ( Y page 305).
or
XConsult a qualified specialist workshop.The engine cannot be
started using KEYLESS-
GO. The SmartKey is in
the vehicle.A door is open. Therefore, the SmartKey cannot be detected as
easily.XClose the door and try to start the vehicle again.There is interference from a powerful source of radio waves.XStart your vehicle with the SmartKey in the ignition lock.Doors
Important safety notes
GWARNING
When leaving the vehicle, always remove the
SmartKey from the ignition lock. Always take
the SmartKey with you and lock the vehicle.
Do not leave children unsupervised in the
vehicle, even if they are secured in a child
restraint system, and do not give them access
to an unlocked vehicle. A child's unsupervised
access to a vehicle could result in an accident
and/or serious personal injury. They could:
R injure themselves on vehicle parts
R be seriously or fatally injured by extreme
heat or cold
R injure themselves or have an accident with
vehicle equipment that may still be in
operation even after the SmartKey has
been removed from the ignition, such as the
seat adjustment, steering wheel
adjustment or memory function.
If children open a door, they could cause
severe or even fatal injury to other persons; if
they get out of the vehicle, they could injure
themselves when doing so or be seriously or
even fatally injured by any passing traffic.
Do not expose the child restraint system to
direct sunlight. The child restraint system's
metal parts, for example, could become very
hot, and a child could be burned on these
parts.GWARNING
Do not carry heavy or hard objects in the
passenger compartment or trunk unless they
are firmly secured in place.
Unsecured or improperly positioned cargo
increases a child's risk of injury in the event
of
R strong braking maneuvers
R sudden changes of direction
R an accident
Doors79Opening/closingZ
Page 84 of 356
iIf you lock the vehicle as described above,
the fuel filler flap is not locked. The anti-
theft alarm system is not armed.
Trunk
Important safety notes
Do not leave the SmartKey in the trunk. You
could otherwise lock yourself out.
GWARNING
When leaving the vehicle, always remove the
SmartKey from the ignition lock. Always take
the SmartKey with you and lock the vehicle.
Do not leave children unsupervised in the
vehicle, even if they are secured in a child
restraint system, and do not give them access
to an unlocked vehicle. A child's unsupervised
access to a vehicle could result in an accident
and/or serious personal injury. They could:
R injure themselves on vehicle parts
R be seriously or fatally injured by extreme
heat or cold
R injure themselves or have an accident with
vehicle equipment that may still be in
operation even after the SmartKey has
been removed from the ignition, such as the
seat adjustment, steering wheel
adjustment or memory function.
If children open a door, they could cause
severe or even fatal injury to other persons; if
they get out of the vehicle, they could injure
themselves when doing so or be seriously or
even fatally injured by any passing traffic.
Do not expose the child restraint system to
direct sunlight. The child restraint system's
metal parts, for example, could become very
hot, and a child could be burned on these
parts.
GWARNING
Do not carry heavy or hard objects in the
passenger compartment or trunk unless they
are firmly secured in place.
Unsecured or improperly positioned cargo
increases a child's risk of injury in the event
of
R strong braking maneuvers
R sudden changes of direction
R an accidentGWARNING
Make sure the trunk lid is closed when the
engine is running and while driving. Among
other dangers, deadly carbon monoxide (CO)
gases may enter the vehicle interior resulting
in unconsciousness and death.
! The trunk lid swings upwards when
opened. Therefore, make sure that there is
sufficient clearance above the trunk lid.
To open the trunk lid completely, a minimum
clearance of 5.41 ft (1.65 m) above the
ground is necessary.
The trunk lid can be:
R opened and closed manually from outside
R opened and closed automatically from
outside
R opened automatically from inside
R locked separately
R unlocked with the mechanical key
R opened with the emergency release button
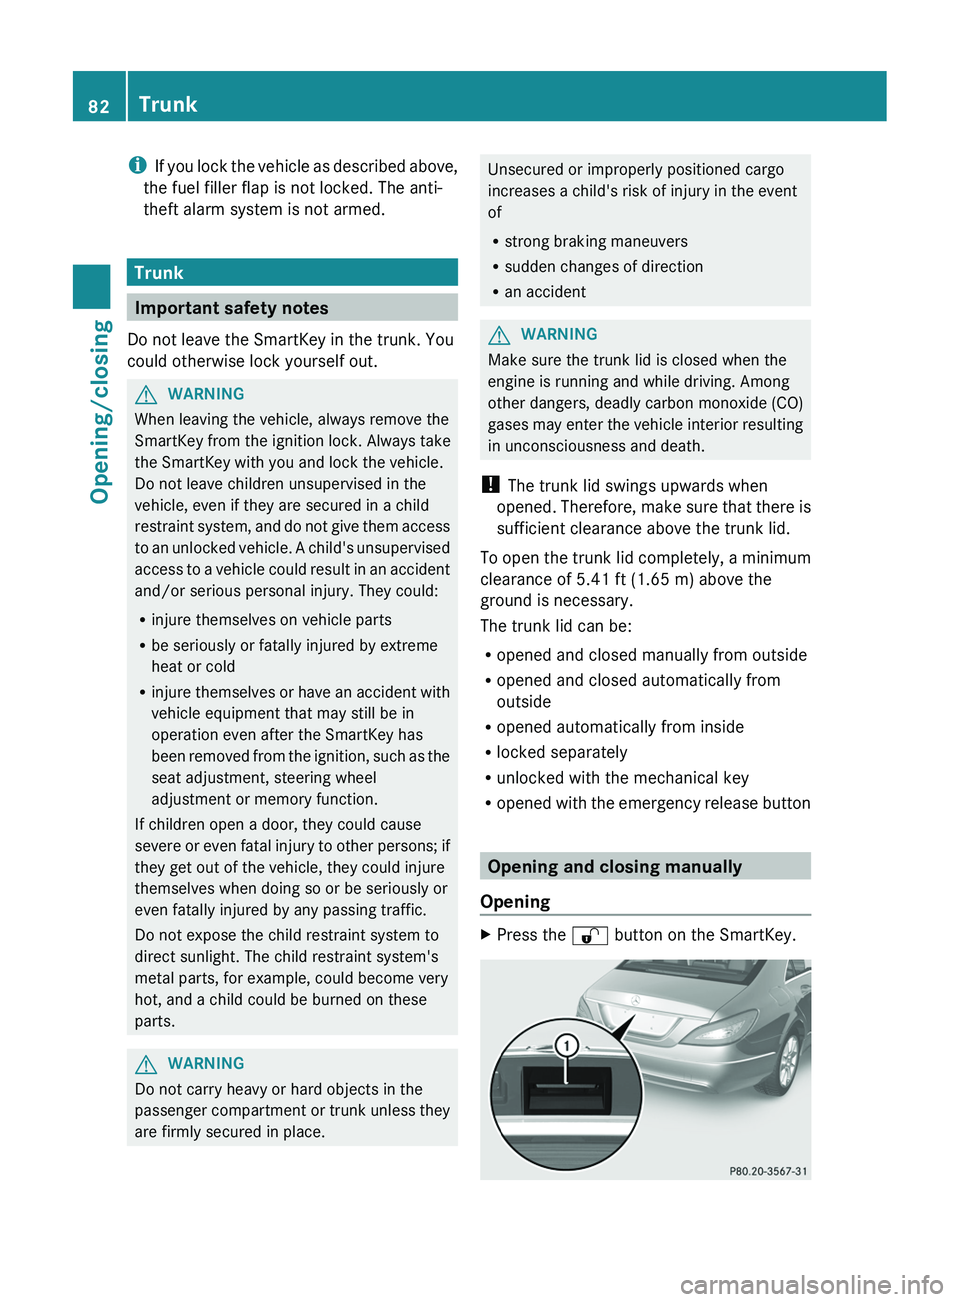
Opening and closing manually
Opening
XPress the % button on the SmartKey.82TrunkOpening/closing
Page 111 of 356
The hazard warning lamps are deactivated
automatically if the vehicle returns to a speed
of over 6 mph(10 km/h) after a full
application of the brakes.
i The hazard warning lamps still operate if
the ignition is switched off.
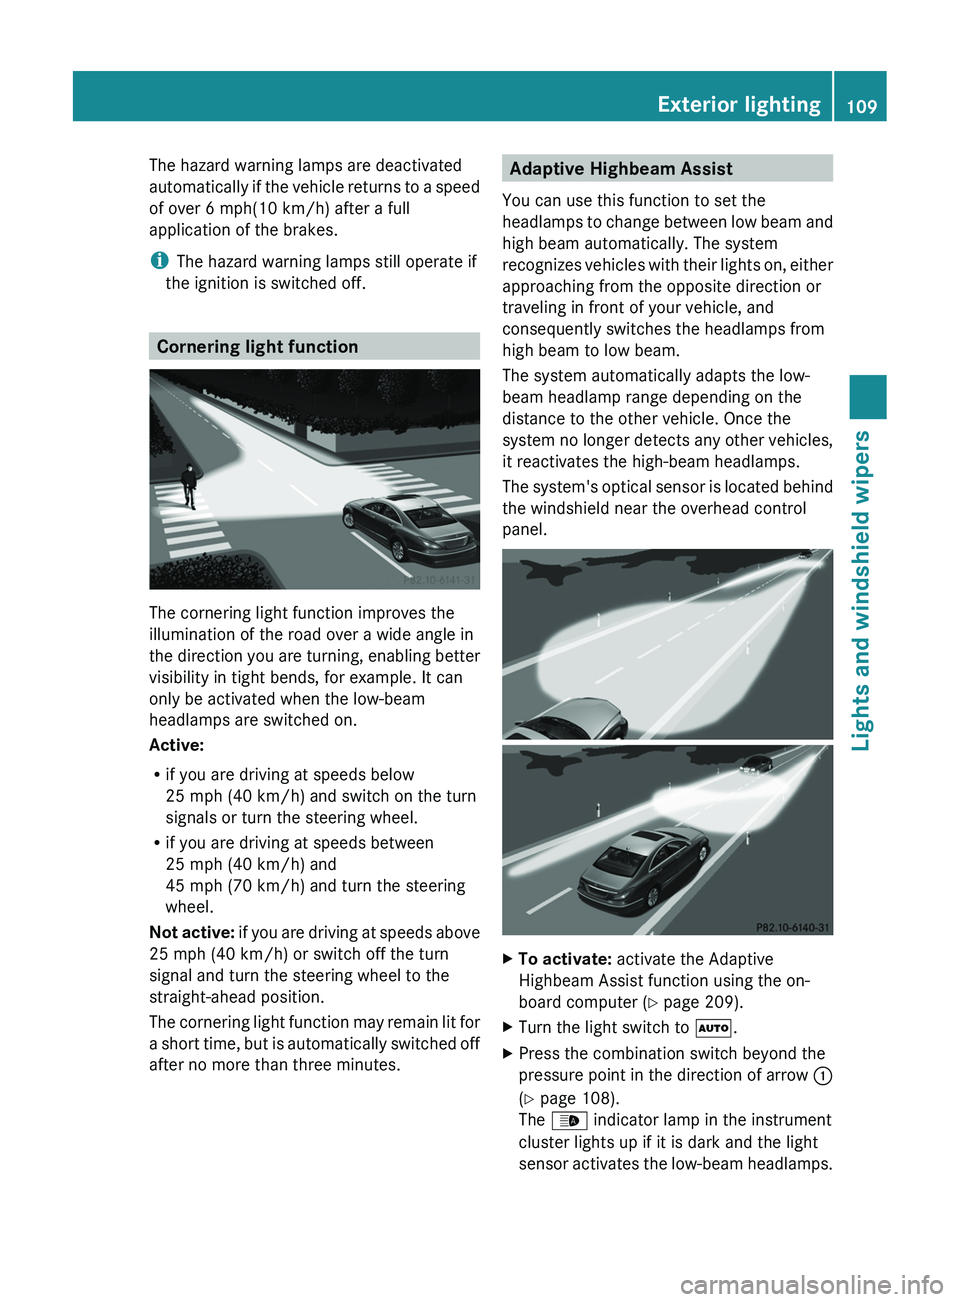
Cornering light function
The cornering light function improves the
illumination of the road over a wide angle in
the direction you are turning, enabling better
visibility in tight bends, for example. It can
only be activated when the low-beam
headlamps are switched on.
Active:
R if you are driving at speeds below
25 mph (40 km/h) and switch on the turn
signals or turn the steering wheel.
R if you are driving at speeds between
25 mph (40 km/h) and
45 mph (70 km/h) and turn the steering
wheel.
Not active: if you are driving at speeds above
25 mph (40 km/h) or switch off the turn
signal and turn the steering wheel to the
straight-ahead position.
The cornering light function may remain lit for
a short time, but is automatically switched off
after no more than three minutes.
Adaptive Highbeam Assist
You can use this function to set the
headlamps to change between low beam and
high beam automatically. The system
recognizes vehicles with their lights on, either
approaching from the opposite direction or
traveling in front of your vehicle, and
consequently switches the headlamps from
high beam to low beam.
The system automatically adapts the low-
beam headlamp range depending on the
distance to the other vehicle. Once the
system no longer detects any other vehicles,
it reactivates the high-beam headlamps.
The system's optical sensor is located behind
the windshield near the overhead control
panel.XTo activate: activate the Adaptive
Highbeam Assist function using the on-
board computer ( Y page 209).XTurn the light switch to Ã.XPress the combination switch beyond the
pressure point in the direction of arrow :
( Y page 108).
The _ indicator lamp in the instrument
cluster lights up if it is dark and the light
sensor activates the low-beam headlamps.Exterior lighting109Lights and windshield wipersZ
Page 146 of 356
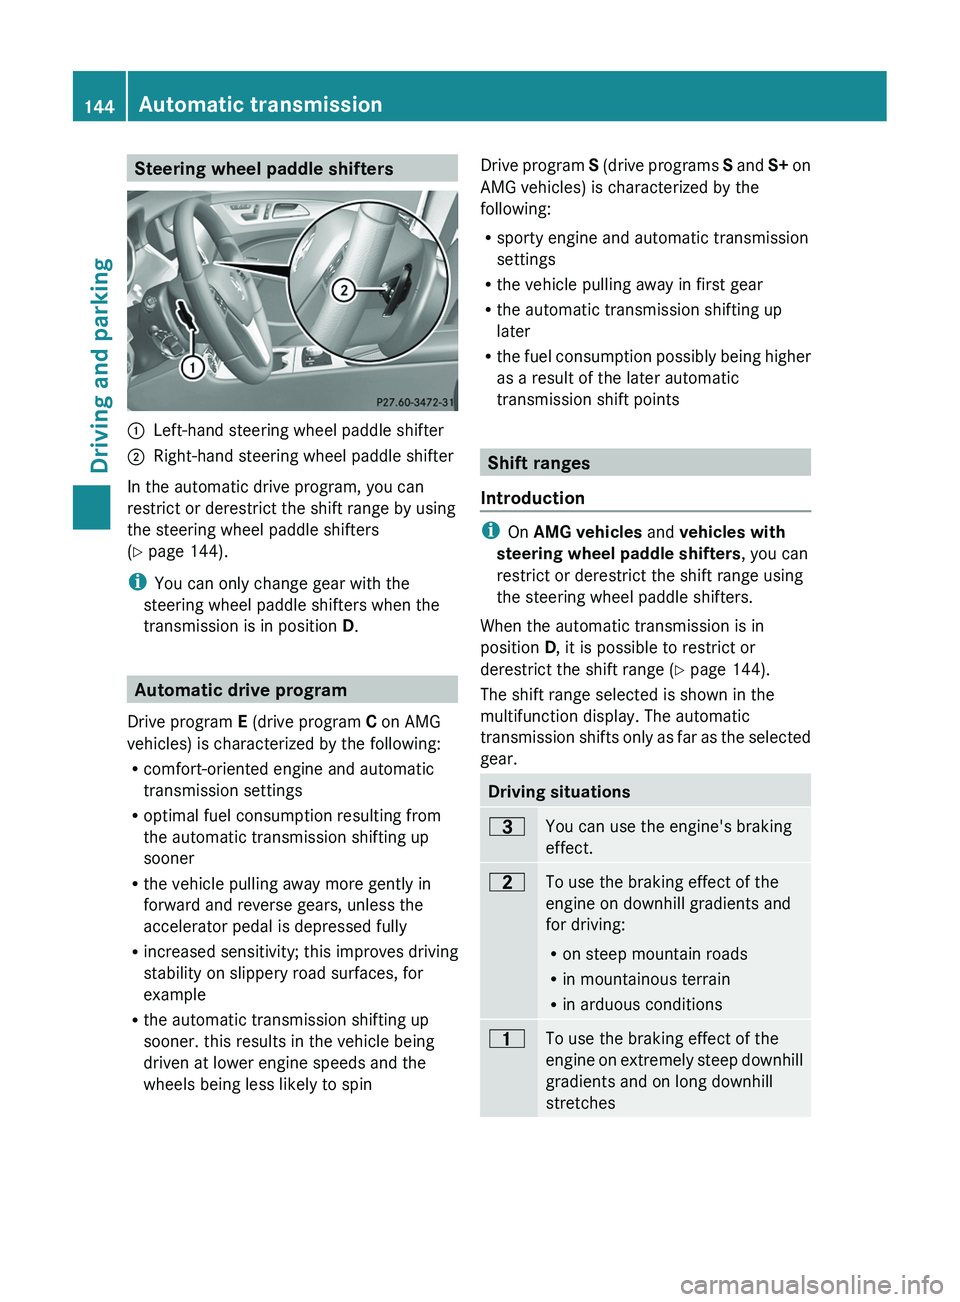
Steering wheel paddle shifters:Left-hand steering wheel paddle shifter;Right-hand steering wheel paddle shifter
In the automatic drive program, you can
restrict or derestrict the shift range by using
the steering wheel paddle shifters
( Y page 144).
i You can only change gear with the
steering wheel paddle shifters when the
transmission is in position D.
Automatic drive program
Drive program E (drive program C on AMG
vehicles) is characterized by the following:
R comfort-oriented engine and automatic
transmission settings
R optimal fuel consumption resulting from
the automatic transmission shifting up
sooner
R the vehicle pulling away more gently in
forward and reverse gears, unless the
accelerator pedal is depressed fully
R increased sensitivity; this improves driving
stability on slippery road surfaces, for
example
R the automatic transmission shifting up
sooner. this results in the vehicle being
driven at lower engine speeds and the
wheels being less likely to spin
Drive program S (drive programs S and S+ on
AMG vehicles) is characterized by the
following:
R sporty engine and automatic transmission
settings
R the vehicle pulling away in first gear
R the automatic transmission shifting up
later
R the fuel consumption possibly being higher
as a result of the later automatic
transmission shift points
Shift ranges
Introduction
i On AMG vehicles and vehicles with
steering wheel paddle shifters , you can
restrict or derestrict the shift range using
the steering wheel paddle shifters.
When the automatic transmission is in
position D, it is possible to restrict or
derestrict the shift range ( Y page 144).
The shift range selected is shown in the
multifunction display. The automatic
transmission shifts only as far as the selected
gear.
Driving situations=You can use the engine's braking
effect.5To use the braking effect of the
engine on downhill gradients and
for driving:
R on steep mountain roads
R in mountainous terrain
R in arduous conditions4To use the braking effect of the
engine on extremely steep downhill
gradients and on long downhill
stretches144Automatic transmissionDriving and parking
Page 147 of 356
Restricting the shift rangeXPull the left-hand steering wheel paddle
shifter.
The automatic transmission shifts down
one gear and restricts the shift range to the
relevant gear.
i If the engine exceeds the maximum
engine speed when shifting down, the
automatic transmission protects against
engine damage by not shifting down.
i If the maximum engine speed for the shift
range is reached and you continue to
accelerate, the automatic transmission
shifts up in order to prevent the engine
from overrevving, even if the shift range is
restricted.
Derestricting the shift range
XPull the right-hand steering wheel paddle
shifter.
The shift range is derestricted.
Clearing the shift range restriction
XPull and hold the right-hand steering wheel
paddle shifter until D is shown again in the
multifunction display.
The automatic transmission shifts from the
current shift range directly to D.
Selecting the ideal shift range
XPull the left-hand steering wheel paddle
shifter and hold it in position.
The automatic transmission shifts to the
gear which allows optimum acceleration
and deceleration. To do this, the automatic
transmission shifts down one or more
gears.Manual drive program
Switching on the manual drive program
The manual drive program is only available for
AMG vehicles.
Manual drive program M is different from
drive programs S and S+ with regard to
spontaneity, responsiveness and
smoothness of gear changes.
Manual drive program M can be selected
using the drive program selector. In manual
drive program M, you can change gear
yourself using the steering wheel paddle
shifters if the transmission is in position D.
The gear currently selected and engaged is
shown in the multifunction display.
XTurn the drive program selector
( Y page 143) until M appears in the
multifunction display.
The indicator M on the drive program
selector lights up in red.
Upshifting
! In manual drive program M, the automatic
transmission does not shift up
automatically even when the engine
limiting speed for the current gear is
reached. When the engine limiting speed is
reached, the fuel supply is cut to prevent
the engine from overrevving. Always make
sure that the engine speed does not reach
the red area of the tachometer. There is
otherwise a risk of engine damage.
XPull the right-hand steering wheel paddle
shifter ( Y page 144).
The automatic transmission shifts up to the
next gear.
Before the engine speed reaches the red area,
an upshift indicator appears in the
multifunction display.
Automatic transmission145Driving and parkingZ
Page 157 of 356
Driving systems
Cruise control
Important safety notes
Cruise control maintains a constant road
speed for you. It brakes automatically in order
to avoid exceeding the set speed. On long and
steep downhill gradients, especially if the
vehicle is laden, you must select shift range
1 , 2 or 3 in good time. By doing so, you will
make use of the braking effect of the engine,
which relieves the load on the brake system
and prevents the brakes from overheating
and wearing too quickly.
Use cruise control only if road and traffic
conditions make it appropriate to maintain a
steady speed for a prolonged period. You can
set any road speed above 20 mph
(30 km/h).
GWARNING
The cruise control is a convenience system
designed to assist the driver during vehicle
operation. The driver is and must always
remain responsible for the vehicle's speed
and for safe brake operation.
Only use the cruise control if the road, traffic,
and weather conditions make it advisable to
travel at a constant speed.
R The use of the cruise control can be
dangerous on winding roads or in heavy
traffic because conditions do not allow safe
driving at a constant speed.
R The use of the cruise control can be
dangerous on slippery roads. Rapid
changes in tire traction can result in wheel
spin and loss of control.
R Deactivate the cruise control when driving
in fog.
The "Resume" function should only be
operated if the driver is fully aware of the
previously set speed and wishes to resume
this particular preset speed.
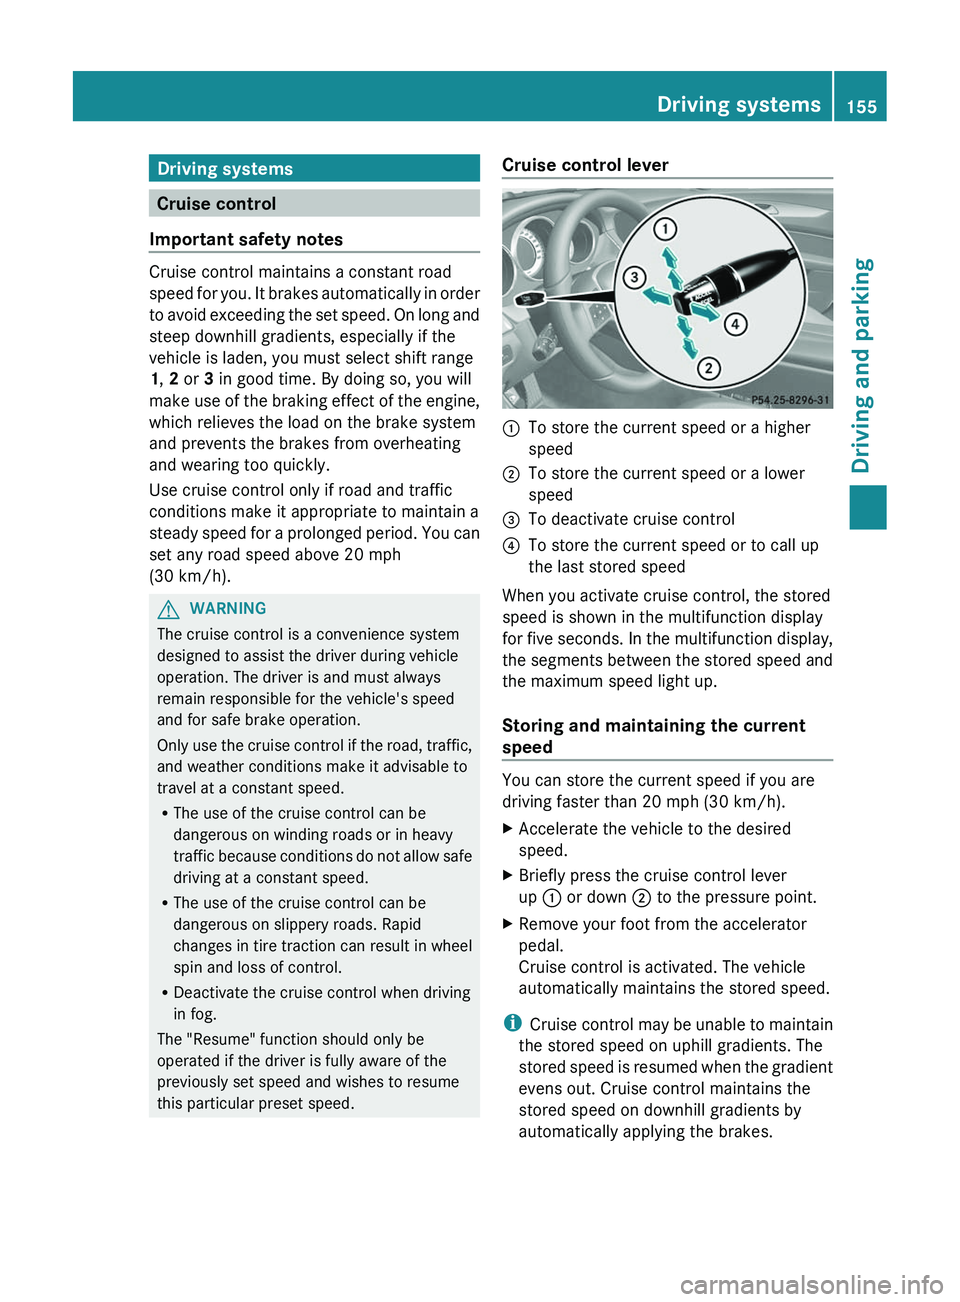
Cruise control lever:To store the current speed or a higher
speed;To store the current speed or a lower
speed=To deactivate cruise control?To store the current speed or to call up
the last stored speed
When you activate cruise control, the stored
speed is shown in the multifunction display
for five seconds. In the multifunction display,
the segments between the stored speed and
the maximum speed light up.
Storing and maintaining the current
speed
You can store the current speed if you are
driving faster than 20 mph (30 km/h).
XAccelerate the vehicle to the desired
speed.XBriefly press the cruise control lever
up : or down ; to the pressure point.XRemove your foot from the accelerator
pedal.
Cruise control is activated. The vehicle
automatically maintains the stored speed.
i Cruise control may be unable to maintain
the stored speed on uphill gradients. The
stored speed is resumed when the gradient
evens out. Cruise control maintains the
stored speed on downhill gradients by
automatically applying the brakes.
Driving systems155Driving and parkingZ