child lock MERCEDES-BENZ CLS 2012 Owners Manual
[x] Cancel search | Manufacturer: MERCEDES-BENZ, Model Year: 2012, Model line: CLS, Model: MERCEDES-BENZ CLS 2012Pages: 356, PDF Size: 14.25 MB
Page 8 of 356
C
Calling up a malfunction see Display messages
Capacities
see Technical data
Car
see Vehicle
Care
Carpets .......................................... 292
Car wash ........................................ 286
Display ........................................... 290
Exterior lights ................................ 289
Gear or selector lever ....................291
Matte finish ................................... 288
Night View Assist Plus ...................290
Notes ............................................. 285
Paint .............................................. 287
Plastic trim .................................... 290
Power washer ................................ 287
Rear view camera .......................... 289
Roof lining ...................................... 292
Seat belt ........................................ 292
Seat cover ..................................... 291
Sensors ......................................... 289
Steering wheel ............................... 291
Tail pipes ....................................... 290
Trim pieces .................................... 291
Washing by hand ........................... 287
Wheels ........................................... 287
Windows ........................................ 288
Wiper blades .................................. 289
Wooden trim .................................. 291
Cargo tie down rings ......................... 260
Car wash (care) ................................. 286
CD player/CD changer (on-board
computer) .......................................... 203
Cell phone see Mobile phone
Center console
Lower section .................................. 31
Lower section (AMG vehicles) ..........32
Upper section .................................. 30
Central locking
Automatic locking (on-board
computer) ...................................... 211
Locking/unlocking (SmartKey) ........72Changing bulbs
Important safety notes ..................112
Overview of bulb types ..................113
Reversing lamps ............................ 113
Child-proof locks
Important safety notes ....................59
Rear doors ....................................... 59
Children
In the vehicle ................................... 55
Restraint systems ............................ 55
Child seat
LATCH-type (ISOFIX ) child seat
anchors ............................................ 57
Special seat belt retractor ...............57
Top Tether ....................................... 58
Cigarette lighter ................................ 265
Classification system for
occupants (OCS) Faults ............................................... 47
Operation ......................................... 43
System self-test ............................... 46
Climate control
3-zone automatic climate control ..121
Controlling automatically ...............123
Cooling with air dehumidification ..122
Defrosting the windshield ..............125
Demisting the windows .................. 126
Dual-zone automatic climate
control ........................................... 119
Important safety notes ..................118
Indicator lamp ................................ 123
Maximum cooling .......................... 125
Notes on using automatic climate
control ................................... 120, 122
Overview of systems ......................118
Problems with cooling with air
dehumidification ............................ 123
Problem with the rear window
defroster ........................................ 126
Rear control panel .........................121
Refrigerant ..................................... 350
Setting the air distribution .............124
Setting the airflow .........................124
Setting the air vents ......................127
Setting the climate mode (AIR
FLOW) ............................................ 123
Setting the temperature ................1236Index
Page 13 of 356
HoodClosing ........................................... 281
Display message ............................ 238
Opening ......................................... 280
I
Ignition lock see SmartKey positions
Immobilizer .......................................... 69
Indicator lamps see Warning and indicator lamps
Instrument cluster
Overview .......................................... 27
Settings ......................................... 208
Warning and indicator lamps ...........28
Instrument cluster lighting .............. 209
Instrument lighting see Instrument cluster lighting
Interior lighting
Automatic control ..........................111
Delayed switch-off (on-board
computer) ...................................... 210
Emergency lighting ........................111
Manual control ............................... 111
Overview ........................................ 111
Reading lamp ................................. 111
Setting the brightness of the
ambient lighting (on-board
computer) ...................................... 209
Setting the brightness of the
display/switch (on-board
computer) ...................................... 209
Setting the color of the ambient
lighting (on-board computer) .........210
see Interior lighting
J
Jack Storage location ............................ 294
Using ............................................. 297
Jump starting (engine) ...................... 305
K
Key see SmartKey
KEYLESS-GO
Convenience closing feature ............87
Display message ............................ 239
Locking ............................................ 73
Start/Stop button .......................... 133
Starting the engine ........................134
Unlocking ......................................... 73
Key positions
KEYLESS-GO .................................. 133
SmartKey ....................................... 132
Kickdown
Driving tips .................................... 142
Manual drive program ....................146
Knee bag .............................................. 40
L
Lamps see Warning and indicator lamps
Lane-change assistant
see Blind Spot Assist
Lane detection (automatic)
see Lane Keeping Assist
Lane Keeping Assist
Activating/deactivating .................207
Display message ............................ 231
Function/information ....................186
Lane Tracking package ..................... 184
Lap time (RACETIMER) ...................... 213
LATCH-type (ISOFIX) child seat
anchors ................................................ 57
Lighting see Lights
Lights
Activating/deactivating the
interior lighting delayed switch-off . 210
Automatic headlamp mode ............107
Cornering light function .................109
Display message ............................ 224
Driving abroad ............................... 106
Hazard warning lamps ...................108
High beam flasher .......................... 108
High-beam headlamps ...................108
Light switch ................................... 106
Index11
Page 37 of 356
Useful information ..............................36
Occupant safety .................................. 36
Children in the vehicle ........................55
Panic alarm .......................................... 60
Driving safety systems .......................60
Theft deterrent locking systems .......6935Safety
Page 47 of 356
passenger seat. We therefore strongly
recommend that you always place a child
in a rear-facing child restraint on the rear
seat.
R If you install a rear-facing child restraint on
the front-passenger seat, make sure the
45 indicator lamp is illuminated,
indicating that the front-passenger front air
bag and front-passenger knee bag are
deactivated. Should the 45
indicator lamp not illuminate or go out while
the restraint is installed, please check
installation. Periodically check the
45 indicator lamp while driving to
make sure that the 45 indicator
lamp is illuminated. If the 45
indicator lamp goes out or remains out, do
not transport a child on the front-passenger
seat until the system has been repaired.
A child in a rear-facing child restraint on the
front-passenger seat could be seriously
injured or even killed if the front-passenger
front air bag is deployed.
R If you place a child in a forward-facing child
restraint on the front-passenger seat:
- move the seat as far back as possible
- use the proper child restraint
recommended for the age, size and
weight of the child
- secure child restraint with the vehicle's
seat belt according to the child seat
manufacturer's instructions
R For children larger than the typical 12-
month-old child, the front-passenger front
air bag and the front-passenger knee bag
may or may not be activated.
If the driver's air bag deploys, this does not
mean that the front-passenger front air bag
also has to deploy.
The OCS may have detected that the seat:
R was empty or occupied by a person with a
weight of up to or less than that of a typical12-month-old child seated in a standard
child restraint
R was occupied by a small individual, such as
a young teenager or a small adult
R was occupied by a child in a child restraint
system, whose weight is greater than that
of a typical 12-month-old child.
These are examples of when the OCS
deactivates the front-passenger front air bag
and front-passenger knee bag. Deactivation
takes place although the collision fulfills the
criteria for deploying the driver's air bag.
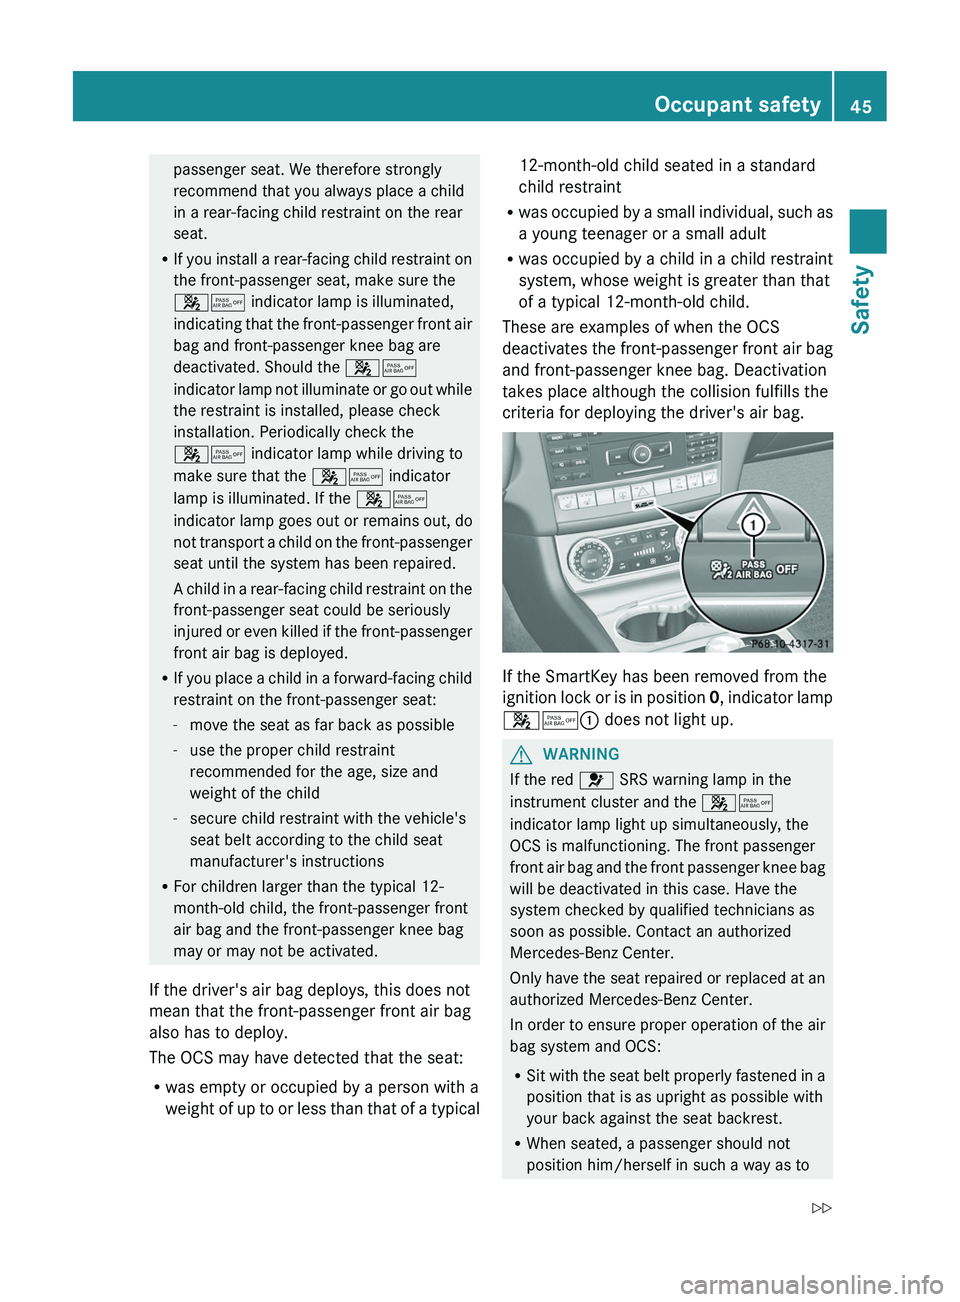
If the SmartKey has been removed from the
ignition lock or is in position 0, indicator lamp
45 : does not light up.
GWARNING
If the red 6 SRS warning lamp in the
instrument cluster and the 45
indicator lamp light up simultaneously, the
OCS is malfunctioning. The front passenger
front air bag and the front passenger knee bag
will be deactivated in this case. Have the
system checked by qualified technicians as
soon as possible. Contact an authorized
Mercedes-Benz Center.
Only have the seat repaired or replaced at an
authorized Mercedes-Benz Center.
In order to ensure proper operation of the air
bag system and OCS:
R Sit with the seat belt properly fastened in a
position that is as upright as possible with
your back against the seat backrest.
R When seated, a passenger should not
position him/herself in such a way as to
Occupant safety45SafetyZ
Page 48 of 356
cause the passenger's weight to be lifted
from the seat cushion as this may result in
the OCS being unable to correctly
approximate the passenger's weight
category.
R Read and observe all warnings in this
chapter.
System self-test
The 45 indicator lamp illuminates
when you:
R turn the SmartKey to position 1 or 2 in the
ignition lock
R on vehicles with KEYLESS-GO, press the
Start/Stop button once or twice
If an adult occupant is properly sitting on the
passenger seat and the OCS classifies the
occupant as an adult, the 45 indicator
lamp illuminates and goes out again after
approximately 6 seconds.
If the seat is not occupied and the OCS
classifies the front passenger seat as being
unoccupied, the 45 indicator lamp
will illuminate and not go out.
GWARNING
If the 4 5 indicator lamp does not
illuminate, the system is not functioning. You
must contact an authorized Mercedes-Benz
Center before seating any child on the front
passenger seat.
For more information, see "Problems with the
Occupant Classification System"
( Y page 47).
GWARNING
Never place anything between seat cushion
and child seat (e.g. a pillow), since it reduces
the effectiveness of the OCS. The underside
and rear side child restraint system must be
placed entirely on the seat cushion and the
backrest of the front-passenger seat
backrest.
If necessary, adjust the tilt of the passenger
seat backrest.
An incorrectly mounted child seat could cause
injuries to the child in case of an accident,
instead of increasing protection for the child.
Follow the manufacturer's instructions for
installation of child restraint systems.46Occupant safetySafety
Page 58 of 356
lamp is illuminated, indicating that the front
passenger front air bag is deactivated.
R A child in a rear-facing child restraint on the
front passenger seat will be seriously
injured or even killed if the front passenger
front air bag inflates in a collision which
could occur under some circumstances,
even with the air bag technology installed
in your vehicle. The only means to
completely eliminate this risk is to never
place a child in a rear-facing child restraint
in the front seat. We therefore strongly
recommend that you always place a child
in a rear-facing child restraint in a backseat.
R If you must install a rear-facing child
restraint on the front passenger seat
because circumstances require you to do
so, make sure the 4 5 indicator
lamp is illuminated, indicating that the front
passenger front air bag is deactivated.
Should the 4 5 indicator lamp not
illuminate or go out while the restraint is
installed, please check installation.
Periodically check the 4 5 indicator
lamp while driving to make sure the 4
5 indicator lamp is illuminated. If the
4 5 indicator lamp goes out or
remains out, do not transport a child on the
front passenger seat until the system has
been repaired.
A child in a rear-facing child restraint on the
front passenger seat will be seriously
injured or even killed if the front passenger
front air bag inflates.
R If you have to place a child in a forward-
facing child restraint on the front passenger
seat, move the seat as far back as possible,
use the proper child restraint
recommended for the age, size and weight
of the child, and secure child restraint with
the vehicle's seat belt according to the
child seat manufacturer's instructions.GWARNING
Infants and small children should never share
a seat belt with another occupant. During an
accident, they could be crushed between the
occupant and seat belt.
A child's risk of serious or fatal injuries is
significantly increased if the child restraints
are not properly secured in the vehicle and/
or the child is not properly secured in the child
restraint.
Children too big for a toddler restraint must
ride in seats using regular seat belts. Position
the shoulder belt across the chest and
shoulder, not face or neck. A booster seat
may be necessary to achieve proper seat belt
positioning for children over 41 lb (18 kg) until
they reach a height where a lap/shoulder belt
fits properly without a booster.
When the child restraint is not in use, remove
it from the vehicle or secure it with the seat
belt to prevent the child restraint from
becoming a projectile in the event of an
accident.
If an infant or child is traveling in the vehicle:XSecure the infant or child with an
appropriate infant or child restraint
recommended for the child's age and
weight.XMake sure that the infant or child is
properly secured at all times while the
vehicle is in motion.GWARNING
When leaving the vehicle, always remove the
SmartKey from the ignition lock. Always take
the SmartKey with you and lock the vehicle.
Do not leave children unattended in the
vehicle, even if they are secured in a child
restraint system, or with access to an
unlocked vehicle. A child's unsupervised
access to a vehicle could result in an accident
and/or serious personal injury. The children
could:
R injure themselves on parts of the vehicle
R be seriously or fatally injured through
excessive exposure to extreme heat or cold
R injure themselves or cause an accident with
vehicle equipment that can be operated
56Children in the vehicleSafety
Page 59 of 356
even if the SmartKey is removed from the
ignition lock or removed from the vehicle,
such as seat adjustment, steering wheel
adjustment, or the memory function
If children open a door, they could injure other
persons or get out of the vehicle and injure
themselves or be injured by following traffic.
Do not expose the child restraint system to
direct sunlight. The child restraint system's
metal parts, for example, could become very
hot, and the child could be burned on these
parts.GWARNING
Do not carry heavy or hard objects in the
passenger compartment or trunk unless they
are firmly secured in place.
Unsecured or improperly positioned cargo
increases a child's risk of injury in the event
of
R strong braking maneuvers
R sudden changes of direction
R an accident
Special seat belt retractor
All seat belts except the driver's seat belt are
equipped with a special seat belt retractor.
When activated, the special seat belt
retractor ensures the seat belt will not
slacken once the child restraint system has
been secured.
Installing a child restraint system:
XAlways comply with the manufacturer's
installation instructions.XPull the seat belt smoothly from the inertia
reel.XEngage the seat belt tongue in the belt
buckle.Activating the special seat belt retractor:XPull the seat belt out fully and let the inertia
reel retract it again.
While the seat belt is retracting, you should
hear a ratcheting sound. The special seat
belt retractor is enabled.XPush down on the child restraint system to
take up any slack.
Removing a child restraint system/
deactivating the special seat belt retractor:
XAlways comply with the manufacturer's
installation instructions.XPress the seat belt release button and
guide the belt tongue to the belt outlet.
The special seat belt retractor is
deactivated.GWARNING
Never release the seat belt buckle while the
vehicle is in motion, since the special seat belt
retractor will be deactivated.
LATCH-type (ISOFIX) child seat anchors
in the rear
GWARNING
Children that are too large for a child restraint
must travel in seats using normal seat belts.
Position shoulder belt across the chest and
shoulder, not face or neck.
In order to attain the correct seating position
for children weighing over 41 lb (18 kg), it may
be necessary to use a booster seat until they
reach a height where a normal lap/shoulder
seat belt lies properly across their bodies
without the need for a booster seat.
Install the child restraint system according to
the manufacturer's instructions.
The child restraint system must be installed
firmly on both brackets.
An incorrectly installed child restraint system
can come loose in the event of an accident,
causing the child to be severely or fatally
injured.
Children in the vehicle57SafetyZ
Page 60 of 356
Child restraint systems/child restraint
retaining brackets that are damaged or have
suffered damage due to an impact must be
replaced.
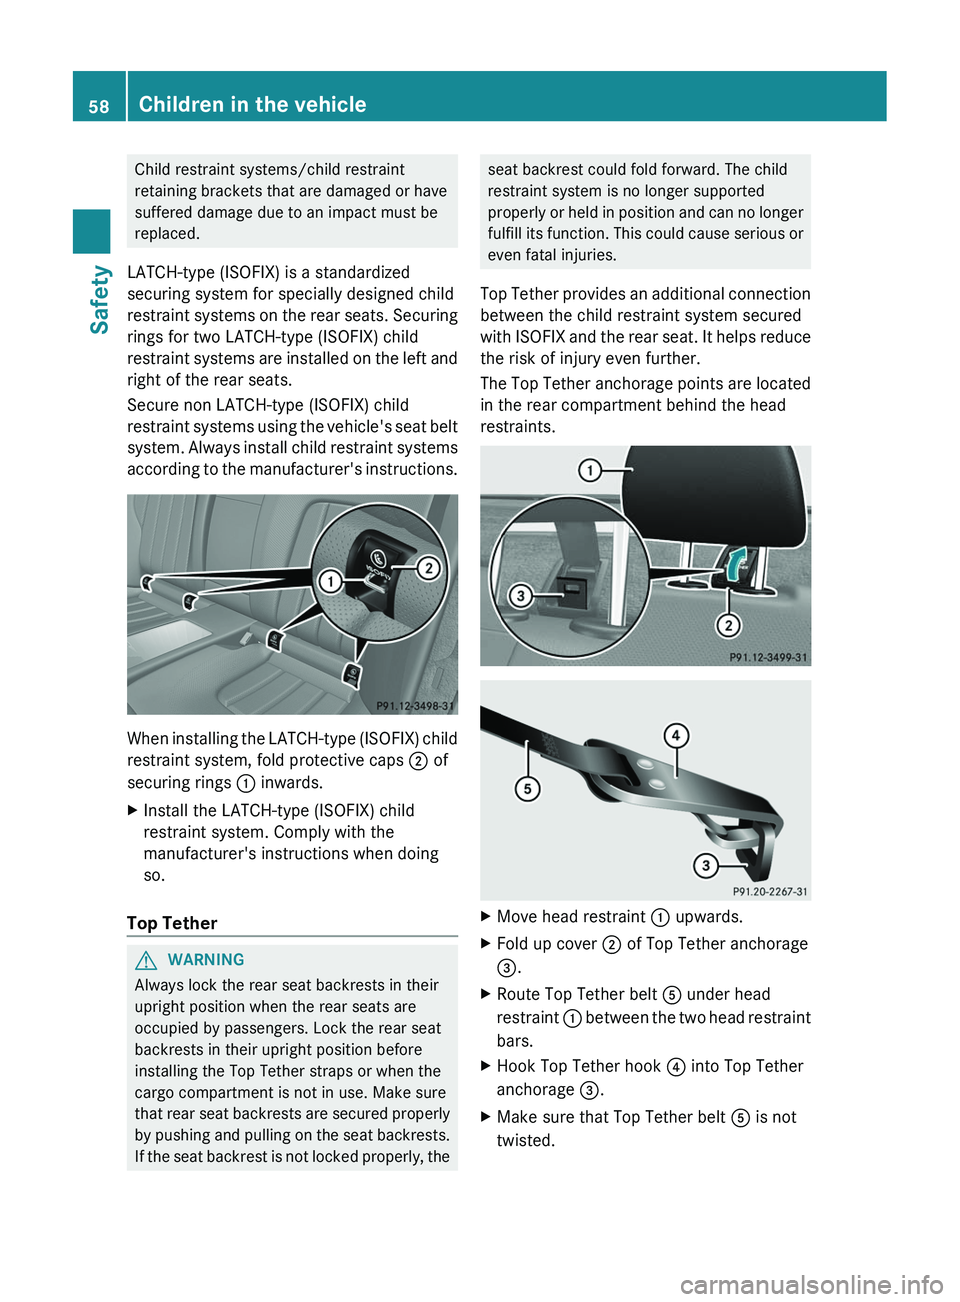
LATCH-type (ISOFIX) is a standardized
securing system for specially designed child
restraint systems on the rear seats. Securing
rings for two LATCH-type (ISOFIX) child
restraint systems are installed on the left and
right of the rear seats.
Secure non LATCH-type (ISOFIX) child
restraint systems using the vehicle's seat belt
system. Always install child restraint systems
according to the manufacturer's instructions.
When installing the LATCH-type (ISOFIX) child
restraint system, fold protective caps 2 of
securing rings 1 inwards.
XInstall the LATCH-type (ISOFIX) child
restraint system. Comply with the
manufacturer's instructions when doing
so.
Top Tether
GWARNING
Always lock the rear seat backrests in their
upright position when the rear seats are
occupied by passengers. Lock the rear seat
backrests in their upright position before
installing the Top Tether straps or when the
cargo compartment is not in use. Make sure
that rear seat backrests are secured properly
by pushing and pulling on the seat backrests.
If the seat backrest is not locked properly, the
seat backrest could fold forward. The child
restraint system is no longer supported
properly or held in position and can no longer
fulfill its function. This could cause serious or
even fatal injuries.
Top Tether provides an additional connection
between the child restraint system secured
with ISOFIX and the rear seat. It helps reduce
the risk of injury even further.
The Top Tether anchorage points are located
in the rear compartment behind the head
restraints.XMove head restraint : upwards.XFold up cover ; of Top Tether anchorage
= .XRoute Top Tether belt A under head
restraint : between the two head restraint
bars.XHook Top Tether hook ? into Top Tether
anchorage =.XMake sure that Top Tether belt A is not
twisted.58Children in the vehicleSafety
Page 61 of 356
XFold down cover ; of Top Tether
anchorage =.XSlide down head restraint : until it
engages ( Y page 95). Make sure that you
do not interfere with the correct routing of
Top Tether belt A.XInstall the LATCH-type (ISOFIX) child
restraint system with Top Tether. Comply
with the manufacturer's installation
instructions when doing so. Make sure that
Top Tether belt A is tight.
Child-proof locks
Important safety notes
GWARNING
When leaving the vehicle, always remove the
SmartKey from the ignition lock. Always take
the SmartKey with you and lock the vehicle.
Do not leave children unattended in the
vehicle, even if they are secured in a child
restraint system, or with access to an
unlocked vehicle. A child's unsupervised
access to a vehicle could result in an accident
and/or serious personal injury. The children
could:
R injure themselves on parts of the vehicle
R be seriously or fatally injured through
excessive exposure to extreme heat or cold
R injure themselves or cause an accident with
vehicle equipment that can be operated
even if the SmartKey is removed from the
ignition lock or removed from the vehicle,
such as seat adjustment, steering wheel
adjustment, or the memory function
If children open a door, they could injure other
persons or get out of the vehicle and injure
themselves or be injured by following traffic.
Do not expose the child restraint system to
direct sunlight. The child restraint system's
metal parts, for example, could become very
hot, and the child could be burned on these
parts.
Child-proof locks for the rear doorsGWARNING
Children could open a rear door from inside
the vehicle. This could result in serious
injuries or an accident. Therefore, when
children ride in the rear always secure the rear
doors with the child-proof locks.
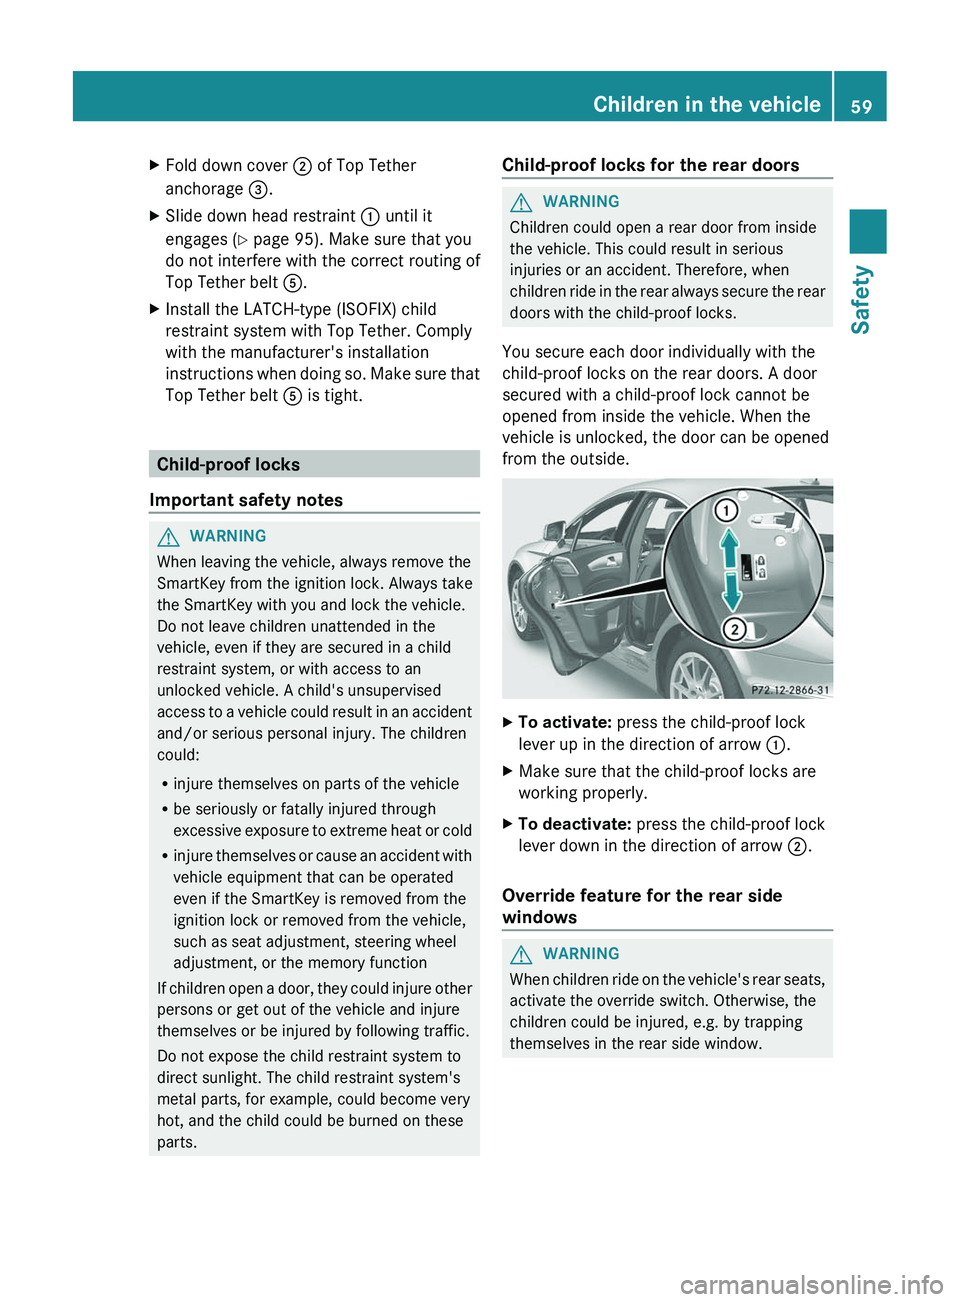
You secure each door individually with the
child-proof locks on the rear doors. A door
secured with a child-proof lock cannot be
opened from inside the vehicle. When the
vehicle is unlocked, the door can be opened
from the outside.
XTo activate: press the child-proof lock
lever up in the direction of arrow :.XMake sure that the child-proof locks are
working properly.XTo deactivate: press the child-proof lock
lever down in the direction of arrow ;.
Override feature for the rear side
windows
GWARNING
When children ride on the vehicle's rear seats,
activate the override switch. Otherwise, the
children could be injured, e.g. by trapping
themselves in the rear side window.
Children in the vehicle59SafetyZ
Page 74 of 356
Useful information
i This Operator's Manual describes all
models and all standard and optional
equipment of your vehicle available at the
time of publication of the Operator's
Manual. Country-specific differences are
possible. Please note that your vehicle may
not be equipped with all features
described. This also applies to safety-
related systems and functions.
i You can find information on qualified
specialist workshops here ( Y page 22).
SmartKey
Important safety notes
GWARNING
When leaving the vehicle, always remove the
SmartKey from the ignition lock. Always take
the SmartKey with you and lock the vehicle.
Do not leave children unsupervised in the
vehicle, even if they are secured in a child
restraint system, and do not give them access
to an unlocked vehicle. A child's unsupervised
access to a vehicle could result in an accident
and/or serious personal injury. They could:
R injure themselves on vehicle parts
R be seriously or fatally injured by extreme
heat or cold
R injure themselves or have an accident with
vehicle equipment that may still be in
operation even after the SmartKey has
been removed from the ignition, such as the
seat adjustment, steering wheel
adjustment or memory function.
If children open a door, they could cause
severe or even fatal injury to other persons; if
they get out of the vehicle, they could injure
themselves when doing so or be seriously or
even fatally injured by any passing traffic.
Do not expose the child restraint system to
direct sunlight. The child restraint system's
metal parts, for example, could become very
hot, and a child could be burned on these
parts.GWARNING
If a key ring is too heavy or too large, the
weight acting on the key could cause it to turn
in the ignition lock or catch on the steering
wheel. This could cause the engine to be
switched off suddenly. You could lose control
of the vehicle and cause an accident. Do not
attach any heavy or large key rings to the key
that is inserted in the ignition.
General information
If you cannot lock or unlock the vehicle with
the SmartKey, either the battery in the
SmartKey is discharged, the SmartKey is
faulty or the starter battery is discharged.
XCheck the battery in the SmartKey and
replace it if necessary ( Y page 76).XUnlock the driver's door using the
mechanical key ( Y page 81).XLock the vehicle using the mechanical key
( Y page 81).XHave the starter battery and battery
contacts checked at an authorized
Mercedes-Benz Center.
If the SmartKey is faulty, contact Roadside
Assistance or an authorized Mercedes-Benz
Center.
SmartKey functions
General notes
i USA only:
This device complies with Part 15 of the
FCC Rules. Operation is subject to the
following two conditions:
1. This device may not cause harmful
interference, and
2. this device must accept any interference
received, including interference that may
cause undesired operation.
72SmartKeyOpening/closing