tire type MERCEDES-BENZ CLS 2012 Owners Manual
[x] Cancel search | Manufacturer: MERCEDES-BENZ, Model Year: 2012, Model line: CLS, Model: MERCEDES-BENZ CLS 2012Pages: 356, PDF Size: 14.25 MB
Page 20 of 356
GVW (Gross Vehicle Weight)
(definition) ..................................... 336
GVWR (Gross Vehicle Weight
Rating) (definition) .........................336
Important safety notes ..................314
Increased vehicle weight due to
optional equipment (definition) ......336
Kilopascal (kPa) (definition) ...........336
Labeling (overview) ........................331
Load bearing index (definition) ......337
Load index ..................................... 334
Load index (definition) ...................336
Maximum loaded vehicle weight
(definition) ..................................... 336
Maximum load on a tire
(definition) ..................................... 337
Maximum permissible tire
pressure (definition) ....................... 337
Maximum tire load .........................329
Maximum tire load (definition) .......337
Optional equipment weight
(definition) ..................................... 337
PSI (pounds per square inch)
(definition) ..................................... 337
Replacing ....................................... 338
Service life ..................................... 315
Sidewall (definition) .......................337
Speed index (definition) .................336
Storing ........................................... 339
Structure and characteristics
(definition) ..................................... 335
Temperature .................................. 331
TIN (Tire Identification Number)
(definition) ..................................... 337
Tire bead (definition) ......................337
Tire pressure (definition) ................337
Tire pressures (recommended) ......335
Tire size (data) ............................... 339
Tire size designation, load-bearing
capacity, speed index ....................332
Tire tread ....................................... 315
Tire tread (definition) .....................337
Total load limit (definition) .............338
Traction ......................................... 330
Traction (definition) .......................338
Tread wear ..................................... 330
Uniform Tire Quality Grading
Standards ...................................... 330Uniform Tire Quality Grading
Standards (definition) ....................335
Unladen weight (definition) ............336
Wear indicator (definition) .............338
Wheel rim (definition) ....................336
see Flat tire
Top Tether ............................................ 58
Towing Important safety guidelines ...........306
Installing the towing eye ................307
Removing the towing eye ...............308
With the rear axle raised ................308
Towing away
With both axles on the ground .......308
Tow-starting
Emergency engine starting ............309
Important safety notes ..................306
Transmission
see Automatic transmission
Transporting the vehicle .................. 309
Trim pieces (cleaning instructions) . 291
Trip computer (on-board
computer) .......................................... 201
Trip meter see Trip odometer
Trip odometer
Calling up ....................................... 201
Resetting (on-board computer) ......202
Trunk
Emergency release ..........................85
Important safety guidelines .............82
Locking separately ...........................84
Opening/closing (automatically
from outside) ................................... 83
Opening (automatically from
inside) .............................................. 84
Trunk lid
Display message ............................ 238
Opening/closing .............................. 82
Trunk load (maximum)
see Technical data
Turn signals
Display message ............................ 224
Switching on/off ........................... 108
see Turn signals
Type identification plate
see Vehicle identification plate 18Index
Page 115 of 356
that these function correctly at all times.
Have the headlamp setting checked regularly.
Overview: changing bulbs/bulb types
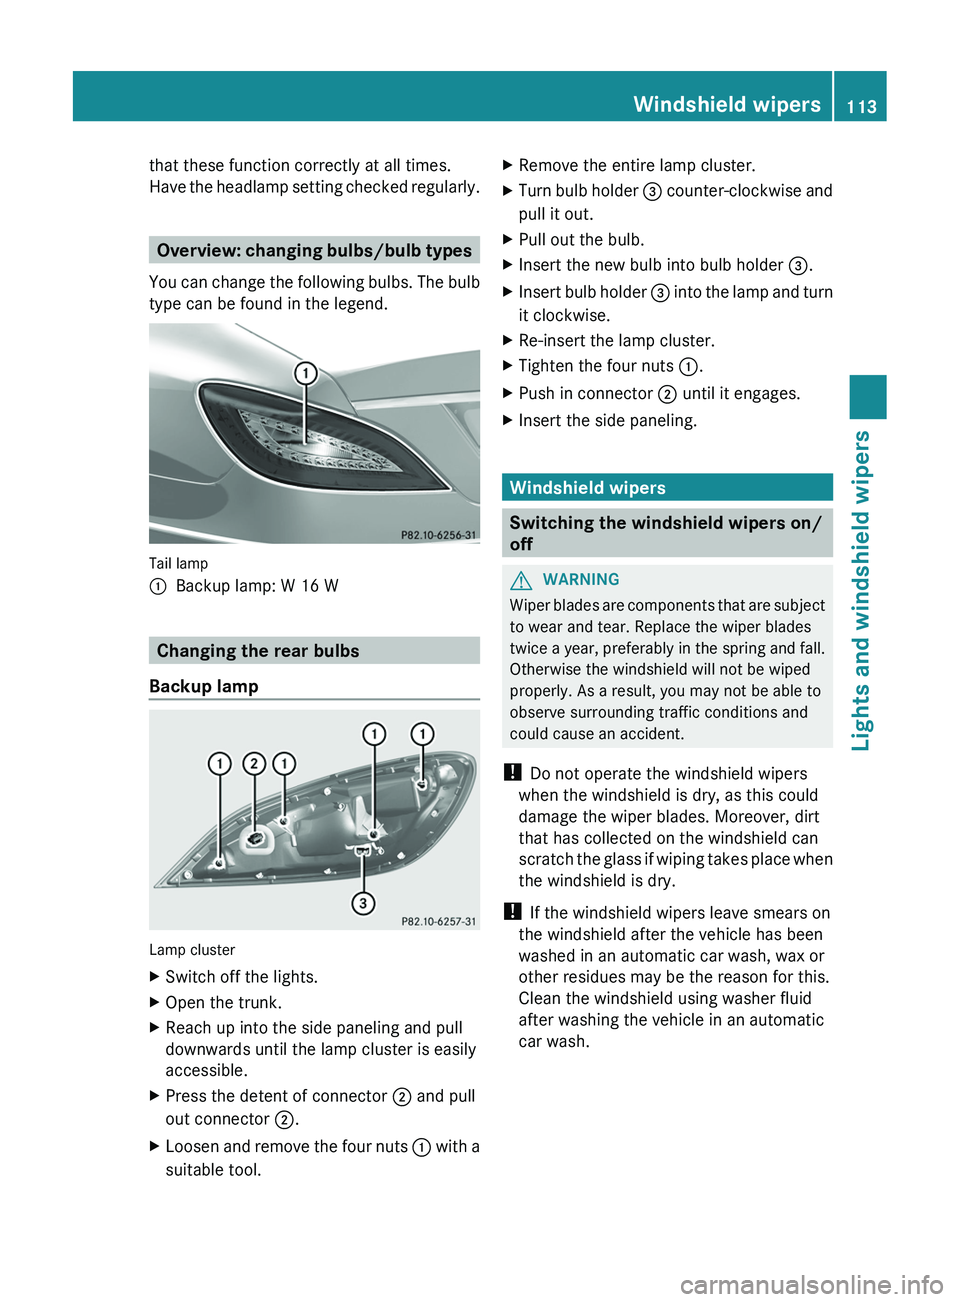
You can change the following bulbs. The bulb
type can be found in the legend.
Tail lamp
:Backup lamp: W 16 W
Changing the rear bulbs
Backup lamp
Lamp cluster
XSwitch off the lights.XOpen the trunk.XReach up into the side paneling and pull
downwards until the lamp cluster is easily
accessible.XPress the detent of connector ; and pull
out connector ;.XLoosen and remove the four nuts : with a
suitable tool.XRemove the entire lamp cluster.XTurn bulb holder = counter-clockwise and
pull it out.XPull out the bulb.XInsert the new bulb into bulb holder =.XInsert bulb holder = into the lamp and turn
it clockwise.XRe-insert the lamp cluster.XTighten the four nuts :.XPush in connector ; until it engages.XInsert the side paneling.
Windshield wipers
Switching the windshield wipers on/
off
GWARNING
Wiper blades are components that are subject
to wear and tear. Replace the wiper blades
twice a year, preferably in the spring and fall.
Otherwise the windshield will not be wiped
properly. As a result, you may not be able to
observe surrounding traffic conditions and
could cause an accident.
! Do not operate the windshield wipers
when the windshield is dry, as this could
damage the wiper blades. Moreover, dirt
that has collected on the windshield can
scratch the glass if wiping takes place when
the windshield is dry.
! If the windshield wipers leave smears on
the windshield after the vehicle has been
washed in an automatic car wash, wax or
other residues may be the reason for this.
Clean the windshield using washer fluid
after washing the vehicle in an automatic
car wash.
Windshield wipers113Lights and windshield wipersZ
Page 150 of 356
If engine running problems are apparent,
have the cause checked immediately and
repaired. Excess unburned fuel can
otherwise enter the catalytic converter,
leading to overheating and possibly
causing a fire.
! Use a filter when refueling from a fuel can.
Otherwise, the fuel lines and/or injection
system could be blocked by particles from
the fuel can.
i Only refuel with premium-grade unleaded
gasoline with a specified minimum octane
number of 91 (average value of 96 RON/
86 MON).
Usually, you will find information about the
fuel grade on the pump. If you cannot find
the label on the gasoline pump, ask the gas
station staff.
You can find more information under “Fuel”
( Y page 347), or by contacting an
authorized Mercedes-Benz Service Center
or visiting http://www.mbusa.com (USA
only).
Refueling
Fuel filler flap
The fuel filler flap is unlocked or locked
automatically when you open or close the
vehicle with the SmartKey or using KEYLESS-
GO.
The position of the fuel filler cap is displayed
in the instrument cluster 8. The arrow
next to the filling pump indicates the side of
the vehicle.
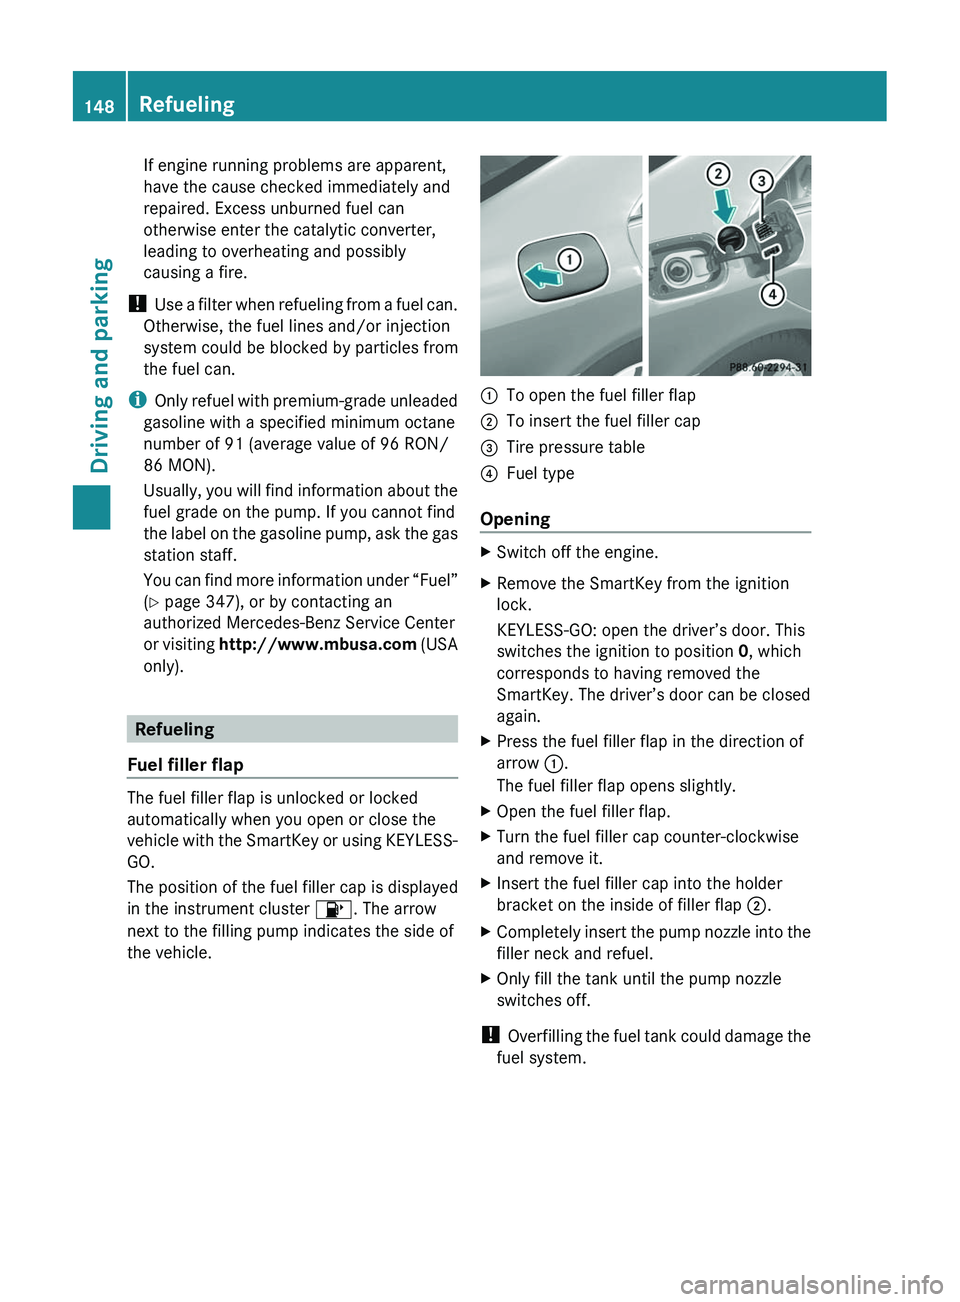
:To open the fuel filler flap;To insert the fuel filler cap=Tire pressure table?Fuel type
Opening
XSwitch off the engine.XRemove the SmartKey from the ignition
lock.
KEYLESS-GO: open the driver’s door. This
switches the ignition to position 0, which
corresponds to having removed the
SmartKey. The driver’s door can be closed
again.XPress the fuel filler flap in the direction of
arrow :.
The fuel filler flap opens slightly.XOpen the fuel filler flap.XTurn the fuel filler cap counter-clockwise
and remove it.XInsert the fuel filler cap into the holder
bracket on the inside of filler flap ;.XCompletely insert the pump nozzle into the
filler neck and refuel.XOnly fill the tank until the pump nozzle
switches off.
! Overfilling the fuel tank could damage the
fuel system.
148RefuelingDriving and parking
Page 156 of 356
! Vehicles with 4MATIC: as the ESP®
system operates automatically, the engine
and the ignition system must be switched
off (SmartKey in position 0 or 1 in the
ignition lock or Start/Stop button in
position 0 or 1) when:
R testing the parking brake on a brake
dynamometer.
R you intend to have the vehicle towed with
one of the axles raised.
Braking maneuvers triggered automatically
by ESP ®
may seriously damage the brake
system.
If your brake system is subject only to
moderate loads, you should test the
functionality of your brakes at regular
intervals by pressing firmly on the brake pedal
at high speeds. This improves the grip of the
brake pads.GWARNING
Make sure that you do not endanger other
road users when you apply the brakes.
You can find a description of Brake Assist
(BAS) on ( Y page 62) or of BAS PLUS on
( Y page 62).
Winter driving
General information
GWARNING
If the vehicle becomes trapped in snow,
ensure that snow is kept away from the
exhaust pipe and from around the vehicle as
long as the engine is running. Otherwise,
poisonous carbon monoxide (CO) may enter
the vehicle, resulting in loss of consciousness
and even death.
To assure sufficient fresh air ventilation, open
a window slightly on the side of the vehicle
not facing the wind.
At the onset of winter, have your vehicle
winterproofed at a qualified specialist
workshop, e.g. at an authorized Mercedes-
Benz Center.
Observe the notes in the "Winter operation"
section ( Y page 316).
Driving with summer tires
Observe the notes in the "Winter operation"
section ( Y page 316).
Slippery road surfaces
GWARNING
The outside temperature indicator is not
designed to serve as an ice-warning device
and is therefore unsuitable for that purpose.
Indicated temperatures just above the
freezing point do not guarantee that the road
surface is free of ice. The road may still be icy,
especially in wooded areas or on bridges.
GWARNING
On slippery road surfaces, never downshift in
order to obtain braking action. This could
result in drive wheel slip and reduced vehicle
control. Your vehicle's ABS will not prevent
this type of loss of control.
Drive particularly carefully on slippery road
surfaces. Avoid sudden acceleration, steering
and braking maneuvers. Do not use cruise
control or DISTRONIC PLUS.
If the vehicle threatens to skid or cannot be
stopped when moving at low speed:
XShift the transmission to position N.
i
For more information on driving with
snow chains, see ( Y page 317).
GWARNING
Make sure that you do not endanger other
road users when you apply the brakes.
154Driving tipsDriving and parking
Page 293 of 356
agents containing solvents cause the surface
to become porous, and as a result, plastic
parts may break away and be thrown around
the interior when an air bag is deployed, which
may result in severe injuries.
! Do not affix the following to plastic
surfaces:
R stickers
R films
R scented oil bottles or similar items
You can otherwise damage the plastic.
! Do not allow cosmetics, insect repellent
or sunscreen to come into contact with the
plastic trim. This maintains the high-quality
look of the surfaces.XWipe the plastic trim with a damp, lint-free
cloth, e.g. a microfiber cloth.XHeavy soiling: use car care and cleaning
products recommended and approved by
Mercedes-Benz.
The surface may change color temporarily.
Wait until the surface is dry again.
Cleaning the steering wheel and gear or
selector lever
XThoroughly wipe with a damp cloth or use
leather care agents that have been
recommended and approved by Mercedes-
Benz.
Cleaning genuine wood and trim
elements
XWipe the wooden trim and trim pieces with
a damp, lint-free cloth, e.g. a microfiber
cloth.XHeavy soiling: use car care and cleaning
products recommended and approved by
Mercedes-Benz.
! Do not use solvent-based cleaning agents
such as tar remover, wheel cleaners,
polishes or waxes. There is otherwise a risk
of damaging the surface.
! Do not use chrome polish on trim pieces.
The trim pieces have a chrome look but are
mostly made of anodized aluminum and
can lose their shine if chrome polish is
used. Use a damp, lint-free cloth instead
when cleaning the trim pieces.
If the chrome-plated trim pieces are very
dirty, you can use a chrome polish. If you
are unsure as to whether the trim pieces
are chrome-plated or not, consult an
authorized Mercedes-Benz Center.
Cleaning the seat covers
! Do not use microfiber cloths to clean
genuine leather, artificial leather or
Alcantara® covers. If used often, these can
damage the cover.
! Observe the following when cleaning:
R clean genuine leather covers carefully
with a damp cloth and then wipe the
covers down with a dry cloth. Make sure
that the leather does not become
soaked. It may otherwise become rough
and cracked. Only use leather care
agents that have been tested and
approved by Mercedes-Benz. You can
obtain these from a qualified specialist
workshop, e.g. a Mercedes-Benz Service
center.
R clean artificial leather covers with a cloth
moistened with a solution containing 1%
detergent (e.g. dish washing liquid).
R clean cloth covers with a microfiber cloth
moistened with a solution containing 1%
detergent (e.g. dish washing liquid). Rub
carefully and always wipe entire seat
sections to avoid leaving visible lines.
Leave the seat to dry afterwards.
Cleaning results depend on the type of
dirt and how long it has been there.
R clean Alcantara® covers with a damp
cloth. Make sure you wipe entire seat
sections to avoid leaving visible lines.
Care291Maintenance and careZ
Page 316 of 356
Useful information
i This Operator's Manual describes all
models and all standard and optional
equipment of your vehicle available at the
time of publication of the Operator's
Manual. Country-specific differences are
possible. Please note that your vehicle may
not be equipped with all features
described. This also applies to safety-
related systems and functions.
i Please read the information on qualified
specialist workshops ( Y page 22).
Important safety notes
Consult an authorized Mercedes-Benz Center
if you require information on approved and
recommended tires and wheels for summer
and winter operation. Advice on purchasing
and caring for tires is also available there.
GWARNING
Replace rims or tires with the same
designation, manufacturer and type as shown
on the original part. For further information
contact an authorized Mercedes-Benz Center.
If incorrectly sized rims and tires are
mounted, the wheel brakes or suspension
components can be damaged. Also, the
operating clearance of the wheels and the
tires may no longer be correct.
GWARNING
Worn, old tires can cause accidents. If the tire
tread is worn to minimum tread depth, or if
the tires have sustained damage, replace
them.
When replacing rims, only use genuine
Mercedes-Benz wheel bolts specified for the
particular rim type. Failure to do so can result
in the bolts loosening and possibly an
accident.
Retreaded tires are not tested or
recommended by Mercedes-Benz, since
previous damage cannot always be
recognized on retreads. The operating safety
of the vehicle cannot be assured when such
tires are used.GWARNING
If you feel a sudden significant vibration or
ride disturbance, or you suspect that possible
damage to your vehicle has occurred, you
should turn on the hazard warning flashers,
carefully slow down, and drive with caution to
an area which is a safe distance from the road.
Inspect the tires and the vehicle underbody
for possible damage. If the vehicle appears
unsafe, have the vehicle towed to the nearest
authorized Mercedes-Benz Center or tire
dealer for repairs.
GWARNING
Do not drive with a flat tire. A flat tire affects
the ability to steer or brake the vehicle. You
might lose control of the vehicle. Continued
driving with a flat tire or driving at high speed
with a flat tire will cause excessive heat build-
up and possibly a fire.
i Further information about Tires and
wheels can be obtained from any
authorized Mercedes-Benz Center.
Operation
Notes on driving
R If the vehicle is heavily laden, check the tire
pressures and correct them if necessary.
R When parking your vehicle, make sure that
the tires do not get deformed by the curb
or other obstacles. If it is necessary to drive
over curbs, speed humps or similar
elevations, try to do so slowly and at an
obtuse angle. Otherwise, the tires,
particularly the sidewalls, can get
damaged.
314OperationWheels and tires
Page 317 of 356

Notes on regularly inspecting wheels
and tiresGWARNING
Regularly check the tires for damage.
Damaged tires can cause tire inflation
pressure loss. As a result, you could lose
control of your vehicle.
Worn, old tires can cause accidents. If the tire
tread is worn to minimum tread depth, or if
the tires have sustained damage, replace
them.
R Regularly check the wheels and tires of
your vehicle for damage (e.g. cuts,
punctures, tears, bulges on tires and
deformation or cracks or severe corrosion
on wheels) at least once a month, as well
as after driving off-road or on rough roads.
Damaged wheels can cause a loss of tire
pressure.
R Regularly check the tire tread depth and
the condition of the tread across the whole
width of the tire (Y page 315). If necessary,
turn the front wheels to full lock in order to
inspect the inner side of the tire surface.
R All wheels must have a valve cap to protect
the valve against dirt and moisture. Do not
mount anything onto the valve (such as tire
pressure monitoring systems) other than
the standard valve cap or other valve caps
approved by Mercedes-Benz for your
vehicle.
R Regularly check the pressure of all the tires
including the emergency spare wheel or the
spare wheel, particularly prior to long trips,
and correct the pressure as necessary
( Y page 317).
Tire tread
GWARNING
Although the applicable federal motor vehicle
safety laws consider a tire to be worn when
the tread wear indicators (TWI) become
visible at approximately 1
/ 16 in (1.6 mm), we
recommend that you do not allow your tires
to wear down to that level. As tread depth
approaches 1
/ 8 in (3 mm), the adhesion
properties on a wet road are sharply reduced.
Depending upon the weather and/or road
surface (conditions), the tire traction varies
widely.
Do not use tires that are excessively worn as
the tire traction on wet road surfaces
decreases significantly when the tread depth
is less than 1
/ 8 inch (3 mm).
Tread wear indicators (TWI) are required by
law. Six indicators are positioned over the tire
tread. They are visible as soon as a tread
depth of approx. 1
/ 16 inch (1.6 mm) is
reached. If this is the case, the tire is so worn
that it must be replaced.
The recommended tread depth for summer
tires is at least 1
/ 8 inch (3 mm). The
recommended tread depth for winter tires is
at least 1
/ 6 inch (4 mm).
Bar marking
: for tread wear is integrated
into the tire tread.
Notes on selecting, mounting and
replacing tires
R Only mount tires and wheels of the same
type and make.
R Only mount tires of the correct size onto
the wheels.
R After mounting new tires, run them in at
moderate speeds for the first 60 miles
Operation315Wheels and tiresZ
Page 318 of 356
(100 km) as they only reach their full
performance after this distance.
R Do not use tires that are excessively worn
as the tire traction on wet road surfaces
decreases significantly when the tread
depth is less than 1
/ 8 inch (3 mm).
R Replace the tires after six years at the
latest, regardless of wear. This also applies
to the emergency spare wheel/spare
wheel.
The service life of tires depends on the
following factors amongst other things:
R driving style
R tire pressure
R mileage
MOExtended tires (tires with run-flat
properties)
MOExtended tires (tires with run-flat
properties) allow you to continue driving your
vehicle even if one or more tires are entirely
deflated.
MOExtended tires may be used only in
conjunction with the activated tire pressure
loss warning system or the activated tire
pressure monitoring system and only on
wheels specifically tested by Mercedes-Benz.
You will find notes on driving with a flat tire in
the "Breakdown assistance" section
( Y page 302).
Winter operation
Please bear the following in mind
At the onset of winter, have your vehicle
winterproofed at a qualified specialist
workshop, e.g. at an authorized Mercedes-
Benz Center.
Observe the notes in the "Changing a wheel"
section ( Y page 338).
Driving with summer tires
At temperatures below 45 ‡ (+7 †), the
elasticity of summer tires and therefore also
traction and braking capability are reduced
considerably — equip your vehicle with
M+S tires. Using summer tires at very cold
temperatures could cause tears to form,
thereby damaging the tires permanently.
Mercedes-Benz cannot accept responsibility
for this type of damage.
M+S tires
At temperatures below 45 ‡(+7 †), use
winter tires or all-season tires. Both types of
tire are identified by the M+S marking.
Only winter tires bearing the i snowflake
symbol in addition to the M+S marking
provide the best possible grip in wintry road
conditions. Only these tires will allow driving
safety systems such as ABS and ESP ®
to
function optimally in winter, as these tires
have been designed specifically for driving on
snow.
Use M+S tires of the same make and tread on
all wheels to maintain safe handling
characteristics.
GWARNING
M+S tires with a tread depth of less than 1
/ 6
inch (4 mm) must be replaced immediately.
They are no longer suitable for use in winter.
Always observe the maximum permissible
speed specified for the M+S tires you have
mounted.
Once you have mounted the winter tires:
XCheck the tire pressures ( Y page 321).XRestart the tire pressure monitor
( Y page 322).GWARNING
If you use your spare wheel when M+S tires
are mounted on the other wheels, be aware
that the difference in tire characteristics
316Winter operationWheels and tires
Page 334 of 356
DLoad index (Y page 334)ETire name
i
Tire data is vehicle-specific and may
deviate from the data in the example.
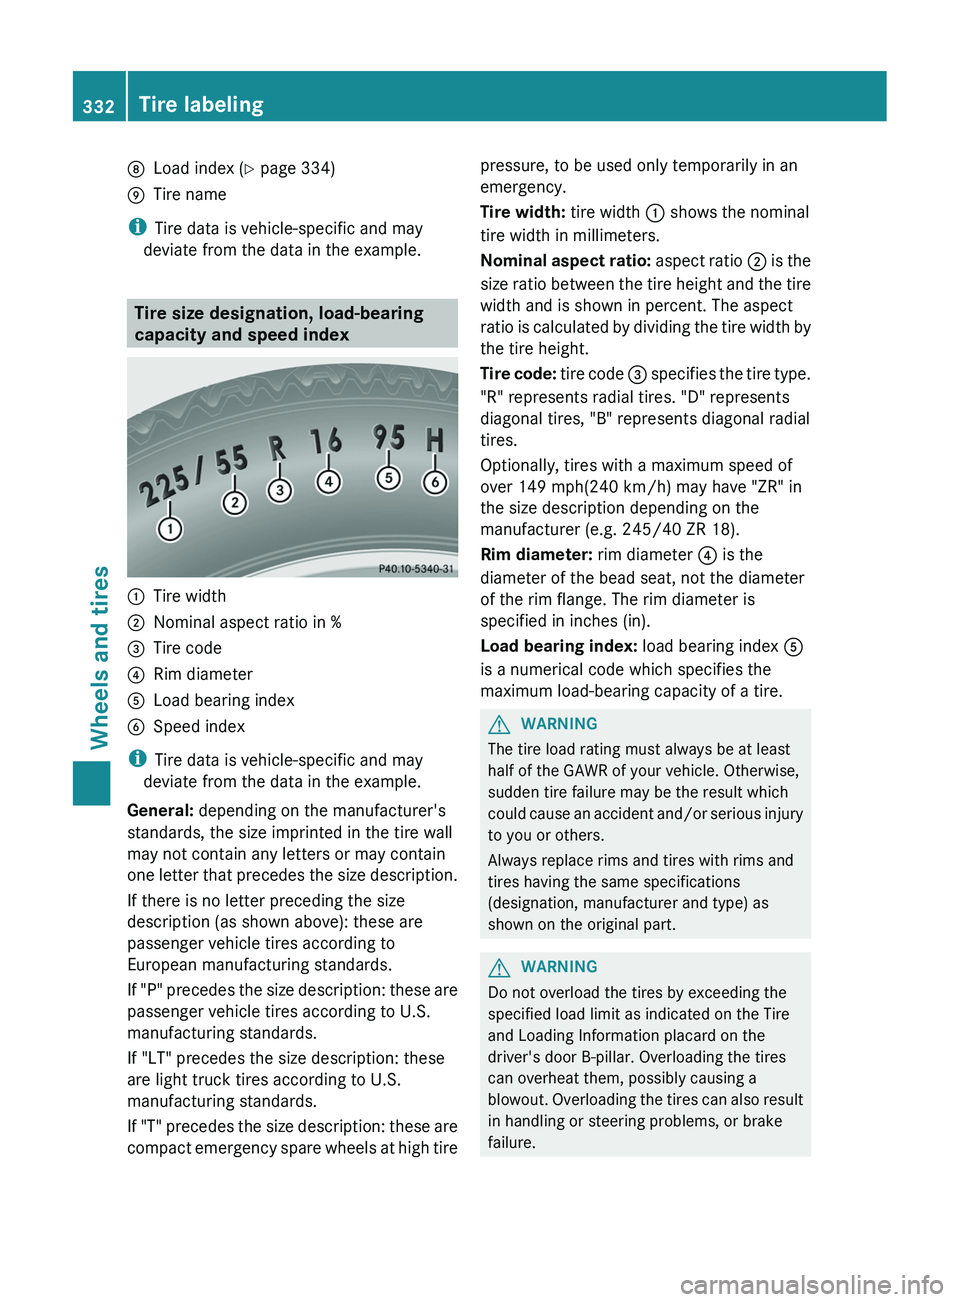
Tire size designation, load-bearing
capacity and speed index
:Tire width;Nominal aspect ratio in %=Tire code?Rim diameterALoad bearing indexBSpeed index
i Tire data is vehicle-specific and may
deviate from the data in the example.
General: depending on the manufacturer's
standards, the size imprinted in the tire wall
may not contain any letters or may contain
one letter that precedes the size description.
If there is no letter preceding the size
description (as shown above): these are
passenger vehicle tires according to
European manufacturing standards.
If "P" precedes the size description: these are
passenger vehicle tires according to U.S.
manufacturing standards.
If "LT" precedes the size description: these
are light truck tires according to U.S.
manufacturing standards.
If "T" precedes the size description: these are
compact emergency spare wheels at high tire
pressure, to be used only temporarily in an
emergency.
Tire width: tire width : shows the nominal
tire width in millimeters.
Nominal aspect ratio: aspect ratio ; is the
size ratio between the tire height and the tire
width and is shown in percent. The aspect
ratio is calculated by dividing the tire width by
the tire height.
Tire code: tire code = specifies the tire type.
"R" represents radial tires. "D" represents
diagonal tires, "B" represents diagonal radial
tires.
Optionally, tires with a maximum speed of
over 149 mph(240 km/h) may have "ZR" in
the size description depending on the
manufacturer (e.g. 245/40 ZR 18).
Rim diameter: rim diameter ? is the
diameter of the bead seat, not the diameter
of the rim flange. The rim diameter is
specified in inches (in).
Load bearing index: load bearing index A
is a numerical code which specifies the
maximum load-bearing capacity of a tire.GWARNING
The tire load rating must always be at least
half of the GAWR of your vehicle. Otherwise,
sudden tire failure may be the result which
could cause an accident and/or serious injury
to you or others.
Always replace rims and tires with rims and
tires having the same specifications
(designation, manufacturer and type) as
shown on the original part.
GWARNING
Do not overload the tires by exceeding the
specified load limit as indicated on the Tire
and Loading Information placard on the
driver's door B-pillar. Overloading the tires
can overheat them, possibly causing a
blowout. Overloading the tires can also result
in handling or steering problems, or brake
failure.
332Tire labelingWheels and tires
Page 336 of 356
Manufacturers Association (RMA) and the
Rubber Association of Canada (RAC)
regarding the tire traction on snow and
have been especially developed for driving
on snow.
An electronic speed limiter prevents your
vehicle from exceeding the following speeds:
R All vehicles (except AMG vehicles):
130 mph (210 km/h)
R AMG vehicles: 155 mph (250 km/h)
R AMG vehicles with Performance Package:
186 mph (300 km/h)
The speed index of tires mounted at the
factory may be higher than the maximum
speed that the electronic speed limiter
permits.
Make sure that your tires have the required
speed index as specified in the "tires" section
( Y page 339), e.g. if you buy new tires.
More information on reading the tire data can
be obtained at any qualified specialist
workshop, e.g. at an authorized Mercedes-
Benz Center.
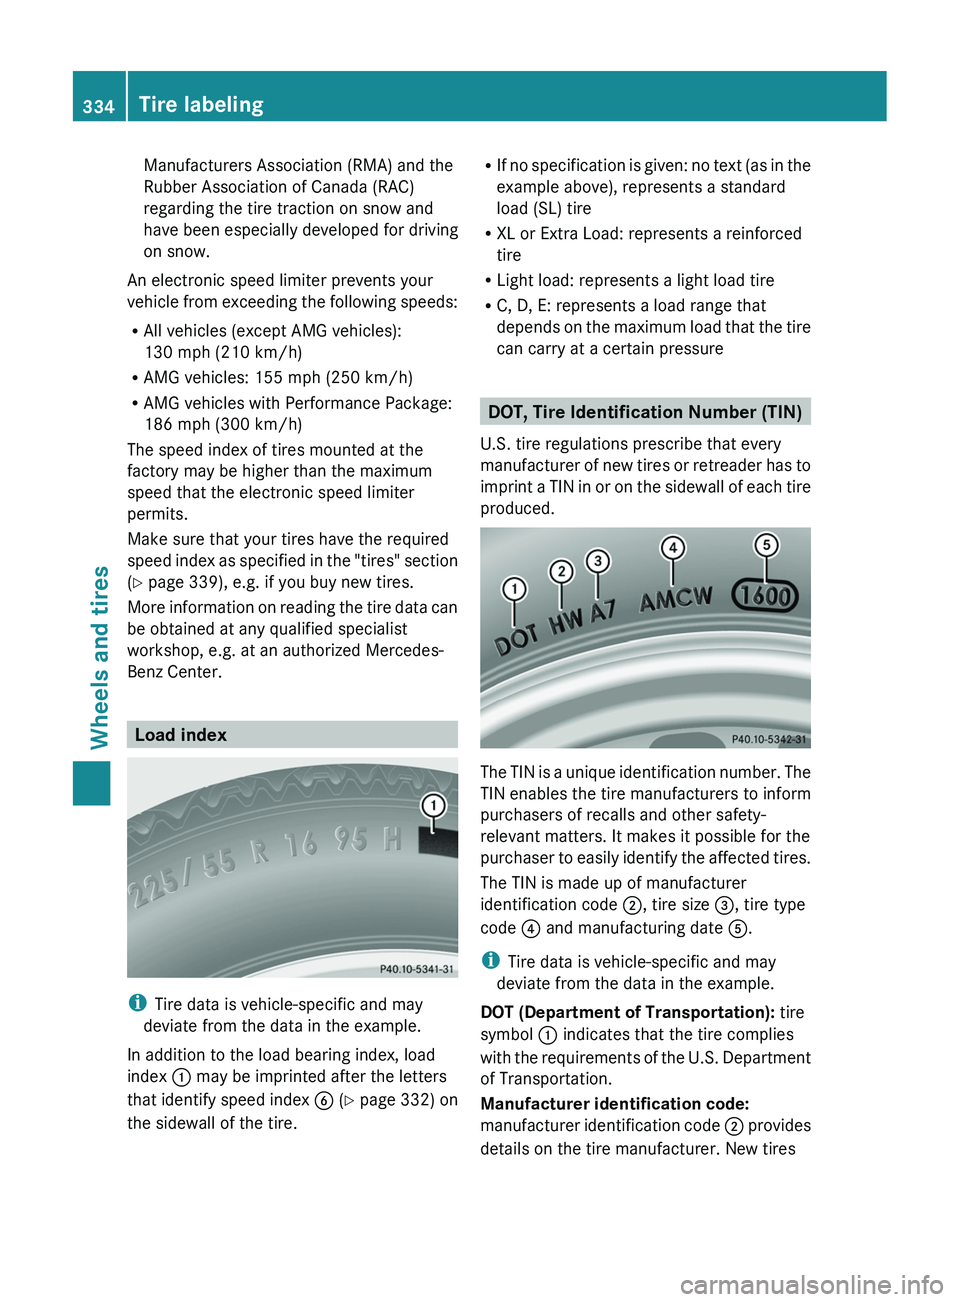
Load index
i Tire data is vehicle-specific and may
deviate from the data in the example.
In addition to the load bearing index, load
index : may be imprinted after the letters
that identify speed index B (Y page 332) on
the sidewall of the tire.
R If no specification is given: no text (as in the
example above), represents a standard
load (SL) tire
R XL or Extra Load: represents a reinforced
tire
R Light load: represents a light load tire
R C, D, E: represents a load range that
depends on the maximum load that the tire
can carry at a certain pressure
DOT, Tire Identification Number (TIN)
U.S. tire regulations prescribe that every
manufacturer of new tires or retreader has to
imprint a TIN in or on the sidewall of each tire
produced.
The TIN is a unique identification number. The
TIN enables the tire manufacturers to inform
purchasers of recalls and other safety-
relevant matters. It makes it possible for the
purchaser to easily identify the affected tires.
The TIN is made up of manufacturer
identification code ;, tire size =, tire type
code ? and manufacturing date A.
i Tire data is vehicle-specific and may
deviate from the data in the example.
DOT (Department of Transportation): tire
symbol : indicates that the tire complies
with the requirements of the U.S. Department
of Transportation.
Manufacturer identification code:
manufacturer identification code ; provides
details on the tire manufacturer. New tires
334Tire labelingWheels and tires