trunk MERCEDES-BENZ CLS 2012 Owners Manual
[x] Cancel search | Manufacturer: MERCEDES-BENZ, Model Year: 2012, Model line: CLS, Model: MERCEDES-BENZ CLS 2012Pages: 356, PDF Size: 14.25 MB
Page 11 of 356
E
EASY-ENTRY feature Activating/deactivating .................212
Function/notes ................................ 99
EASY-EXIT feature
Crash-responsive ........................... 100
Function/notes ................................ 99
Switching on/off ........................... 212
EBD (electronic brake force
distribution) Display message ............................ 218
Function/notes ................................ 67
ECO start/stop function
Deactivating/activating .................137
General information .......................135
Electrical fuses
see Fuses
Electronic brake force distribution
see EBD (Electronic Brake force
Distribution)
Electronic Stability Program
see ESP ®
(Electronic Stability Program)
Electronic Traction System
see ETS/4ETS (Electronic
Traction System)
Emergency release
Driver's door .................................... 81
Fuel filler flap ................................. 149
Trunk ............................................... 85
Vehicle ............................................. 81
Emergency spare wheel
Storage location ............................ 295
Stowing .......................................... 295
Emergency Tensioning Devices
Function ........................................... 54
Safety guidelines ............................. 37
Emissions purification
Service and warranty information ....21
Engine
Check Engine warning lamp ........... 248
Display message ............................ 226
ECO start/stop function ................135
Emergency starting ........................309
Engine number ............................... 346
Irregular running ............................ 138
Starting problems ..........................138Starting the engine with the
SmartKey ....................................... 134
Starting with KEYLESS-GO .............134
Switching off .................................. 150
Engine electronics
Problem (malfunction) ...................138
Engine oil
Adding ........................................... 282
Additives ........................................ 349
Checking the oil level ..................... 281
Display message ............................ 228
Filling capacity ............................... 347
Notes about oil grades ................... 349
Notes on oil level/consumption ....281
Temperature (on-board computer) . 213
Viscosity ........................................ 349
ESP ®
(Electronic Stability
Program) AMG menu (on-board computer) ...213
Deactivating/activating (AMG
vehicles) .......................................... 65
Deactivating/activating (except
AMG vehicles) ................................ 206
Deactivating/activating (notes;
except AMG vehicles) ......................64
Display message ............................ 217
ETS/4ETS ........................................ 64
Function/notes ................................ 63
Important safety information ...........63
Warning lamp ................................. 245
ETS/4ETS (Electronic Traction
System) ................................................ 64
Exhaust tail pipe (cleaning
instructions) ...................................... 290
Exterior lighting see Lights
Exterior mirrors
Adjusting ....................................... 100
Dipping (automatic) .......................101
Folding in/out (automatically) .......101
Folding in/out (electrically) ...........101
Folding in when locking (on-board
computer) ...................................... 212
Out of position (troubleshooting) ...101
Setting ........................................... 101
Storing settings (memory
function) ........................................ 102
Storing the parking position ..........102Index9
Page 12 of 356
F
Filler cap see Fuel filler flap
First-aid kit ......................................... 294
Flat tire Changing a wheel/mounting the
spare wheel ................................... 296
MOExtended run-flat system .........302
Preparing the vehicle .....................296
Raising the vehicle .........................297
Floormat ............................................. 278
Frequencies Garage door opener .......................277
Front windshield
see Windshield
Fuel
Additives ........................................ 348
Consumption statistics ..................201
Displaying the current
consumption .................................. 201
Displaying the range ......................201
Fuel gauge ....................................... 27
Important safety notes ..................347
Premium-grade unleaded gasoline . 348
Problem (malfunction) ...................150
Refueling ........................................ 147
Specifications ................................ 348
Tank content/reserve fuel .............347
Fuel filler flap
Emergency release ........................149
Opening/closing ............................ 148
Fuel level
Calling up the range (on-board
computer) ...................................... 201
Fuel tank
Capacity ........................................ 347
Problem (malfunction) ...................150
Fuse allocation chart (vehicle tool
kit) ...................................................... 294
Fuses Allocation chart ............................. 310
Before changing ............................. 310
Fuse box in the engine
compartment ................................. 310
Fuse box in the trunk .....................310
Important safety notes ..................309G
Garage door opener Clearing the memory .....................276
Frequencies ................................... 277
Notes ............................................. 273
Opening/closing the garage door ..276
Programming (button in the rear-
view mirror) ................................... 274
Gasoline ............................................. 147
Gear indicator (on-board
computer) .......................................... 213
Gear or selector lever (cleaning
guidelines) ......................................... 291
Genuine Mercedes-Benz parts ......... 344
Glove box ........................................... 256
H
Handbrake see Parking brake
Hazard warning lamps ...................... 108
Headlamp cleaning system Notes ............................................. 351
Headlamps
Adding fluid to cleaning system .....283
Cleaning system (function) ............107
Misting up ...................................... 110
see Automatic headlamp mode
Head restraints
Adjusting ......................................... 94
Adjusting (electrically) .....................94
Adjusting (rear) ................................ 95
Installing/removing (rear) ................95
Luxury .............................................. 94
see NECK-PRO head restraints/
NECK-PRO luxury head restraints
Heating
see Climate control
High-beam headlamps
Display message ............................ 225
Switching Adaptive Highbeam
Assist on/off ................................. 109
Switching on/off ........................... 108
Hill start assist .................................. 135
HOLD function Display message ............................ 230
Function/notes ............................. 166
10Index
Page 18 of 356
Sliding sunroofImportant safety notes ....................88
Opening/closing .............................. 89
Problem (malfunction) .....................90
Resetting ......................................... 89
SmartKey
Changing the battery .......................76
Changing the programming .............75
Checking the battery .......................76
Convenience closing feature ............87
Convenience opening feature ..........87
Display message ............................ 239
Door central locking/unlocking .......72
Important safety notes ....................72
Loss ................................................. 78
Mechanical key ................................ 75
Positions (ignition lock) .................132
Problem (malfunction) .....................78
Starting the engine ........................134
Snow chains ...................................... 317
Socket Under the armrest .........................266
Sockets
Center console .............................. 267
Points to observe before use .........266
Rear compartment .........................267
Trunk ............................................. 267
Spare wheel
Notes/data .................................... 341
Storage location ............................ 295
Stowing .......................................... 295
see Emergency spare wheel
Specialist workshop ............................ 22
Speed, controlling see Cruise control
Speedometer
Digital ............................................ 201
In the Instrument cluster .................27
Segments ...................................... 197
Selecting the unit of
measurement ................................ 208
see Instrument cluster
SPORT handling mode
Activating/deactivating (AMG
vehicles) .......................................... 65
Warning lamp ................................. 246SRS (Supplemental Restraint
System) Display message ............................ 221
Introduction ..................................... 36
Warning lamp ................................. 247
Warning lamp (function) ................... 36
Standing lamps
Display message ............................ 225
Switching on/off ........................... 106
Starting (engine) ................................ 134
Station see Radio
Steering (display message) .............. 239
Steering wheel Adjusting (electrically) .....................99
Button overview ............................... 29
Buttons (on-board
computer) ...................................... 197
Important safety notes ....................98
Paddle shifters ............................... 144
Steering wheel heating ....................99
Storing settings (memory
function) ........................................ 102
Steering wheel (cleaning
instructions) ...................................... 291
Steering wheel heating Indicator lamp (malfunction) ............99
Switching on/off .............................. 99
Steering wheel paddle shifters ........ 144
Stopwatch (RACETIMER) ................... 213
Stowage compartments Armrest (under) ............................. 257
Glove box ....................................... 256
Parcel net ...................................... 258
Rear ............................................... 258
Under driver's seat/front-
passenger seat .............................. 258
Stowage space
Center console .............................. 257
Cup holders ................................... 261
Important safety information .........256
Stowage well beneath the trunk
floor .................................................... 260
Summer opening see Convenience opening feature
Summer tires ..................................... 316
Sun visor ............................................ 26316Index
Page 20 of 356
GVW (Gross Vehicle Weight)
(definition) ..................................... 336
GVWR (Gross Vehicle Weight
Rating) (definition) .........................336
Important safety notes ..................314
Increased vehicle weight due to
optional equipment (definition) ......336
Kilopascal (kPa) (definition) ...........336
Labeling (overview) ........................331
Load bearing index (definition) ......337
Load index ..................................... 334
Load index (definition) ...................336
Maximum loaded vehicle weight
(definition) ..................................... 336
Maximum load on a tire
(definition) ..................................... 337
Maximum permissible tire
pressure (definition) ....................... 337
Maximum tire load .........................329
Maximum tire load (definition) .......337
Optional equipment weight
(definition) ..................................... 337
PSI (pounds per square inch)
(definition) ..................................... 337
Replacing ....................................... 338
Service life ..................................... 315
Sidewall (definition) .......................337
Speed index (definition) .................336
Storing ........................................... 339
Structure and characteristics
(definition) ..................................... 335
Temperature .................................. 331
TIN (Tire Identification Number)
(definition) ..................................... 337
Tire bead (definition) ......................337
Tire pressure (definition) ................337
Tire pressures (recommended) ......335
Tire size (data) ............................... 339
Tire size designation, load-bearing
capacity, speed index ....................332
Tire tread ....................................... 315
Tire tread (definition) .....................337
Total load limit (definition) .............338
Traction ......................................... 330
Traction (definition) .......................338
Tread wear ..................................... 330
Uniform Tire Quality Grading
Standards ...................................... 330Uniform Tire Quality Grading
Standards (definition) ....................335
Unladen weight (definition) ............336
Wear indicator (definition) .............338
Wheel rim (definition) ....................336
see Flat tire
Top Tether ............................................ 58
Towing Important safety guidelines ...........306
Installing the towing eye ................307
Removing the towing eye ...............308
With the rear axle raised ................308
Towing away
With both axles on the ground .......308
Tow-starting
Emergency engine starting ............309
Important safety notes ..................306
Transmission
see Automatic transmission
Transporting the vehicle .................. 309
Trim pieces (cleaning instructions) . 291
Trip computer (on-board
computer) .......................................... 201
Trip meter see Trip odometer
Trip odometer
Calling up ....................................... 201
Resetting (on-board computer) ......202
Trunk
Emergency release ..........................85
Important safety guidelines .............82
Locking separately ...........................84
Opening/closing (automatically
from outside) ................................... 83
Opening (automatically from
inside) .............................................. 84
Trunk lid
Display message ............................ 238
Opening/closing .............................. 82
Trunk load (maximum)
see Technical data
Turn signals
Display message ............................ 224
Switching on/off ........................... 108
see Turn signals
Type identification plate
see Vehicle identification plate 18Index
Page 36 of 356
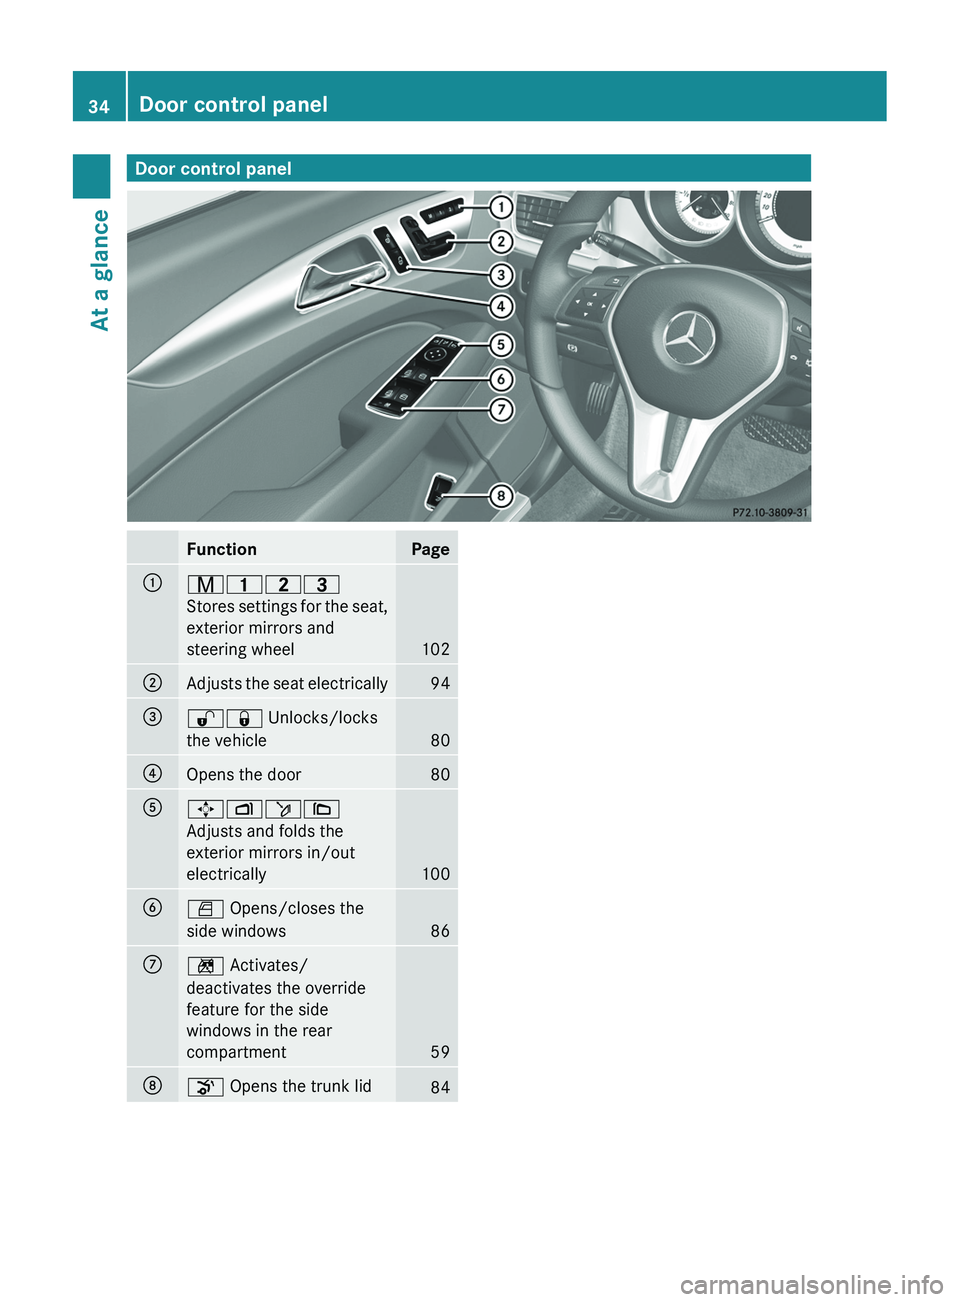
Door control panelFunctionPage:r45=
Stores settings for the seat,
exterior mirrors and
steering wheel
102
;Adjusts the seat electrically94=%& Unlocks/locks
the vehicle
80
?Opens the door80A7 Zö\
Adjusts and folds the
exterior mirrors in/out
electrically
100
BW Opens/closes the
side windows
86
Cn Activates/
deactivates the override
feature for the side
windows in the rear
compartment
59
Do Opens the trunk lid8434Door control panelAt a glance
Page 59 of 356
even if the SmartKey is removed from the
ignition lock or removed from the vehicle,
such as seat adjustment, steering wheel
adjustment, or the memory function
If children open a door, they could injure other
persons or get out of the vehicle and injure
themselves or be injured by following traffic.
Do not expose the child restraint system to
direct sunlight. The child restraint system's
metal parts, for example, could become very
hot, and the child could be burned on these
parts.GWARNING
Do not carry heavy or hard objects in the
passenger compartment or trunk unless they
are firmly secured in place.
Unsecured or improperly positioned cargo
increases a child's risk of injury in the event
of
R strong braking maneuvers
R sudden changes of direction
R an accident
Special seat belt retractor
All seat belts except the driver's seat belt are
equipped with a special seat belt retractor.
When activated, the special seat belt
retractor ensures the seat belt will not
slacken once the child restraint system has
been secured.
Installing a child restraint system:
XAlways comply with the manufacturer's
installation instructions.XPull the seat belt smoothly from the inertia
reel.XEngage the seat belt tongue in the belt
buckle.Activating the special seat belt retractor:XPull the seat belt out fully and let the inertia
reel retract it again.
While the seat belt is retracting, you should
hear a ratcheting sound. The special seat
belt retractor is enabled.XPush down on the child restraint system to
take up any slack.
Removing a child restraint system/
deactivating the special seat belt retractor:
XAlways comply with the manufacturer's
installation instructions.XPress the seat belt release button and
guide the belt tongue to the belt outlet.
The special seat belt retractor is
deactivated.GWARNING
Never release the seat belt buckle while the
vehicle is in motion, since the special seat belt
retractor will be deactivated.
LATCH-type (ISOFIX) child seat anchors
in the rear
GWARNING
Children that are too large for a child restraint
must travel in seats using normal seat belts.
Position shoulder belt across the chest and
shoulder, not face or neck.
In order to attain the correct seating position
for children weighing over 41 lb (18 kg), it may
be necessary to use a booster seat until they
reach a height where a normal lap/shoulder
seat belt lies properly across their bodies
without the need for a booster seat.
Install the child restraint system according to
the manufacturer's instructions.
The child restraint system must be installed
firmly on both brackets.
An incorrectly installed child restraint system
can come loose in the event of an accident,
causing the child to be severely or fatally
injured.
Children in the vehicle57SafetyZ
Page 71 of 356
XTo activate/deactivate: activate or
deactivate PRE-SAFE ®
Brake in the on-
board computer ( Y page 207).
The Ä symbol appears in the
multifunction display as long as the HOLD
function is not activated ( Y page 166).
On vehicles with Active Parking Assist, the
Ä symbol is displayed when
transmission position P is selected or if you
drive faster than 22 mph(35 km/h).
For PRE-SAFE ®
Brake to assist you when
driving, the radar sensor system must be
switched on ( Y page 211) and operational.
Following damage to the front end of the
vehicle, have the configuration and operation
of the radar sensors checked at a qualified
specialist workshop. This also applies to
collisions at slow speeds where there is no
visible damage to the front of the vehicle.
Theft deterrent locking systems
Immobilizer
The immobilizer prevents your vehicle from
being started without the correct SmartKey.
When leaving the vehicle, always take the
SmartKey with you and lock the vehicle. The
engine can be started by anyone with a valid
SmartKey that is left inside the vehicle.
XTo activate with the SmartKey: remove
the SmartKey from the ignition lock.XTo activate with KEYLESS-GO: switch the
ignition off and open the driver's door.XTo deactivate: switch on the ignition.
i
The immobilizer is always deactivated
when you start the engine.
In the event that the engine cannot be
started when the starter battery is fully
charged, the immobilizer may be faulty.
Contact an authorized Mercedes-Benz
Center or call 1-800-FOR-MERCedes (in
USA) or 1-800-387-0100 (in Canada).
ATA (Anti-Theft Alarm system)
A visual and audible alarm is triggered if the
alarm system is armed and you open:
R a door
R the vehicle with the mechanical key
R the trunk lid
R the hood
The alarm is not switched off, even if you
close the open door that has triggered it, for
example.
i If the alarm stays on for more than 30
seconds, the emergency call system
mbrace (USA only) or TELE AID (Canada
only) initiates a call to the Customer
Assistance Center automatically. The
emergency call system initiates the call
provided that:
R you have subscribed to the mbrace/
TELE AID service.
R the mbrace/TELE AID service has been
activated properly.
R the required mobile phone, power supply
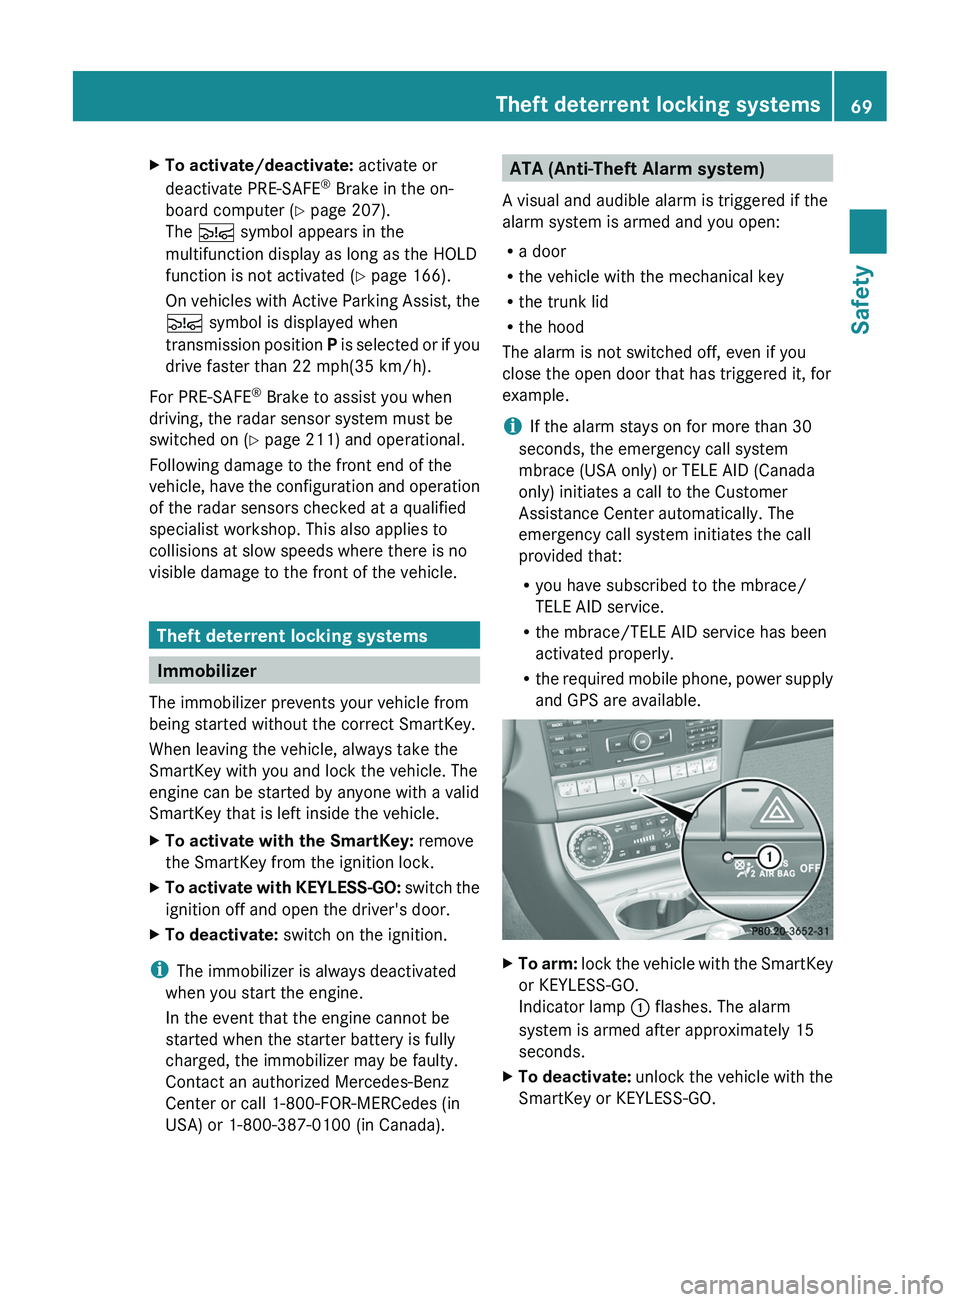
and GPS are available.XTo arm: lock the vehicle with the SmartKey
or KEYLESS-GO.
Indicator lamp : flashes. The alarm
system is armed after approximately 15
seconds.XTo deactivate: unlock the vehicle with the
SmartKey or KEYLESS-GO.Theft deterrent locking systems69SafetyZ
Page 73 of 356
Useful information ..............................72
SmartKey ............................................. 72
Doors .................................................... 79
Trunk .................................................... 82
Side windows ...................................... 86
Sliding sunroof .................................... 8871Opening/closing
Page 75 of 356
Any unauthorized modification to this
device could void the user’s authority to
operate the equipment.
The Product label with FCC ID and IC
certification number can be found in the
battery case of the SmartKey.
i Canada only:
This device complies with RSS-210 of
Industry Canada. Operation is subject to
the following two conditions:
1. This device may not cause interference,
and
2. this device must accept any interference
received, including interference that may
cause undesired operation of the device.
Any unauthorized modification to this
device could void the user’s authority to
operate the equipment.
The Product label with FCC ID and IC
certification number can be found in the
battery case of the SmartKey.
Locking and unlocking centrally
The SmartKey centrally locks/unlocks:
R the doors
R the trunk lid
R the fuel filler flap
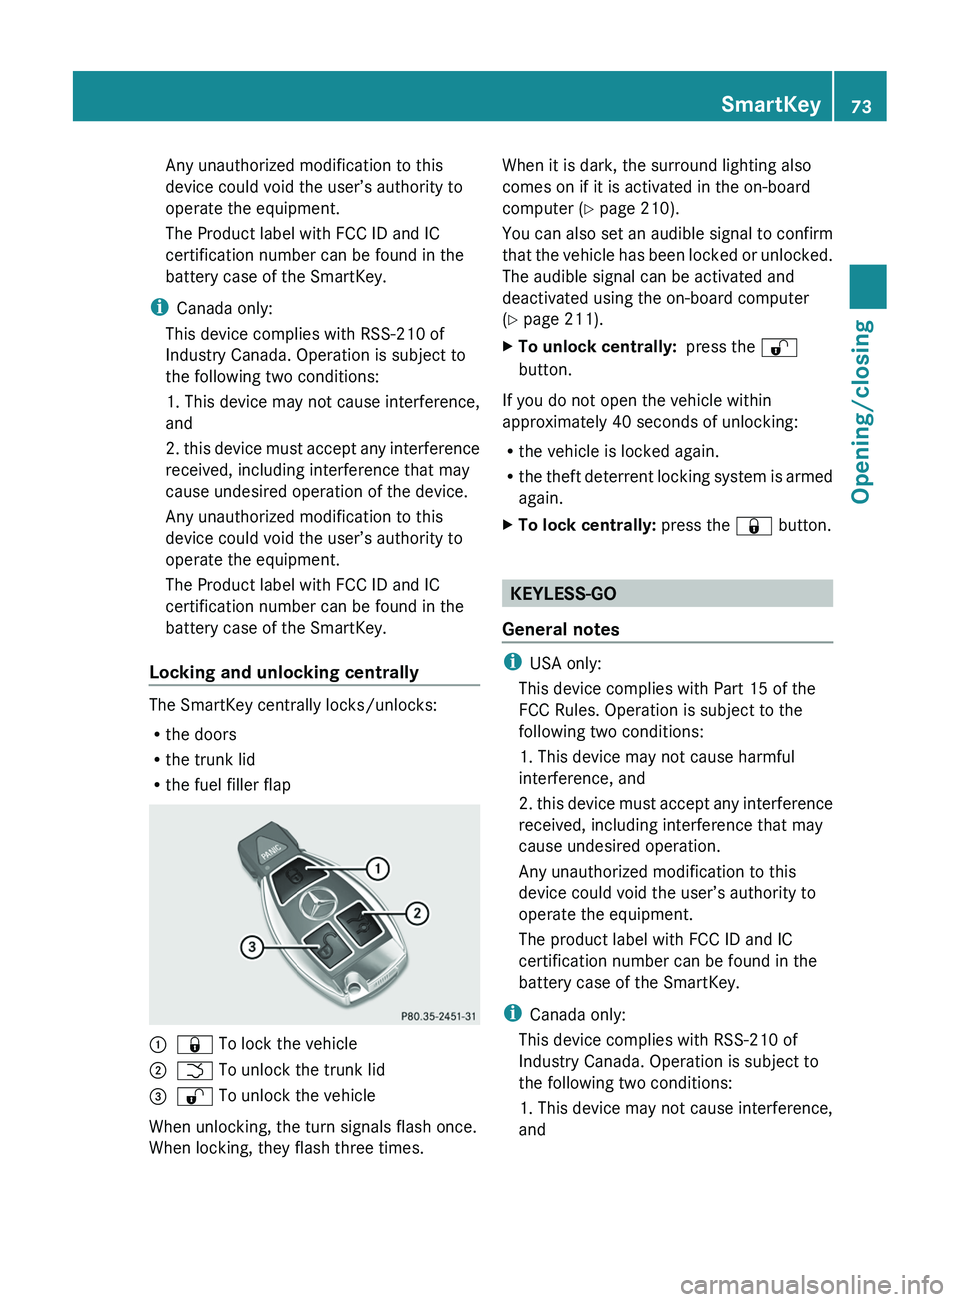
:& To lock the vehicle;F To unlock the trunk lid=% To unlock the vehicle
When unlocking, the turn signals flash once.
When locking, they flash three times.
When it is dark, the surround lighting also
comes on if it is activated in the on-board
computer ( Y page 210).
You can also set an audible signal to confirm
that the vehicle has been locked or unlocked.
The audible signal can be activated and
deactivated using the on-board computer
( Y page 211).XTo unlock centrally: press the %
button.
If you do not open the vehicle within
approximately 40 seconds of unlocking:
R the vehicle is locked again.
R the theft deterrent locking system is armed
again.
XTo lock centrally: press the & button.
KEYLESS-GO
General notes
i USA only:
This device complies with Part 15 of the
FCC Rules. Operation is subject to the
following two conditions:
1. This device may not cause harmful
interference, and
2. this device must accept any interference
received, including interference that may
cause undesired operation.
Any unauthorized modification to this
device could void the user’s authority to
operate the equipment.
The product label with FCC ID and IC
certification number can be found in the
battery case of the SmartKey.
i Canada only:
This device complies with RSS-210 of
Industry Canada. Operation is subject to
the following two conditions:
1. This device may not cause interference,
and
SmartKey73Opening/closingZ
Page 77 of 356
If you pull on the handle of the trunk lid, only
the trunk of the vehicle is unlocked.
Changing the settings of the locking
system
You can change the setting of the locking
system in such a way that only the driver's
door and the fuel filler flap are unlocked. This
is useful if you frequently travel on your own.
XTo change the setting: press and hold
down the % and & buttons
simultaneously for approximately six
seconds until the battery check lamp
( Y page 76) flashes twice.
i
If the setting of the locking system is
changed within the signal range of the
vehicle, pressing the & or % button
locks or unlocks the vehicle.
The SmartKey now functions as follows:
XTo unlock the driver's door: press the
% button once.XTo unlock centrally: press the %
button twice.XTo lock centrally: press the & button.
The KEYLESS-GO function is changed as
follows:
XTo unlock the driver's door: touch the
inner surface of the door handle on the
driver's door.XTo unlock centrally: touch the inner
surface of the door handle on the front-
passenger door or the rear door.XTo lock centrally: touch the outer sensor
surface on one of the door handles.
Restoring the factory settings
XPress the % and & buttons
simultaneously for approximately six
seconds until the battery check lamp
flashes twice.Mechanical key
General notes
If the vehicle can no longer be locked or
unlocked with the SmartKey, use the
mechanical key.
If you use the mechanical key to unlock and
open the driver's door or the trunk lid, the
anti-theft alarm system will be triggered
( Y page 69).
There are several ways to turn off the alarm:
XTo turn the alarm off with the
SmartKey: press the % or & button
on the SmartKey.
or
XInsert the SmartKey into the ignition lock.
or
XTo deactivate the alarm with KEYLESS-
GO: press the Start/Stop button in the
ignition lock. The SmartKey must be in the
vehicle.
or
XLock or unlock the vehicle using KEYLESS-
GO. The SmartKey must be outside the
vehicle.
If you unlock the vehicle using the mechanical
key, the fuel filler flap will not be unlocked
automatically.
XTo unlock the fuel filler flap: insert the
SmartKey in the ignition lock.
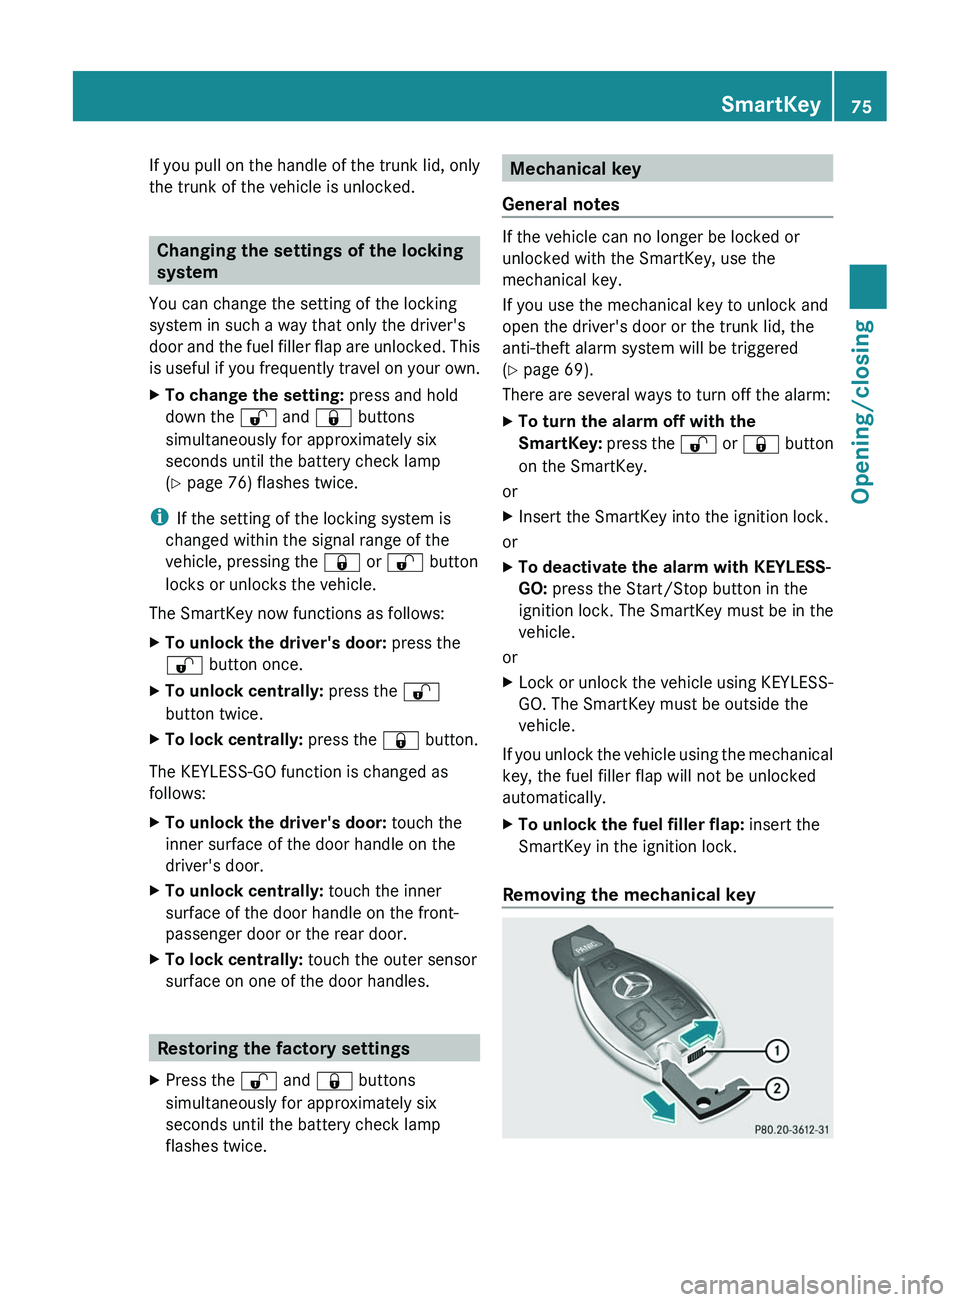
Removing the mechanical key
SmartKey75Opening/closingZ