window MERCEDES-BENZ CLS-Class 2010 W164 Comand Manual
[x] Cancel search | Manufacturer: MERCEDES-BENZ, Model Year: 2010, Model line: CLS-Class, Model: MERCEDES-BENZ CLS-Class 2010 W164Pages: 224, PDF Size: 7 MB
Page 43 of 224
Voice Control
Switching the Help Screen On or Off
XSelect System £Settings £Voice
Control .XSelect Help Window .
You have switched the help window on
Ç or off c.
i
In addition to the audible instructions, the
help screen displays other information
during the individualization process and the
later voice control mode.
Individualization Function
You can use the individualization function
option to adapt the Voice control system to
your own voice and therefore improve voice
recognition. This will affect the ability of the
system to recognize the voices of other users,
and for this reason it can be switched off
( Y page 42).
The individualization function comprises two
parts and lasts around five minutes. During
the process you will practice a few number
sequences and voice commands.
Starting New Individualization Process
i You can only start the individualization
function when the vehicle is stationary.
First switch off all interfering units/
functions. After starting, the system will
take you through the training by means of
audible instructions.
XSelect System £Settings £Voice
Control £Start New
Individualization .
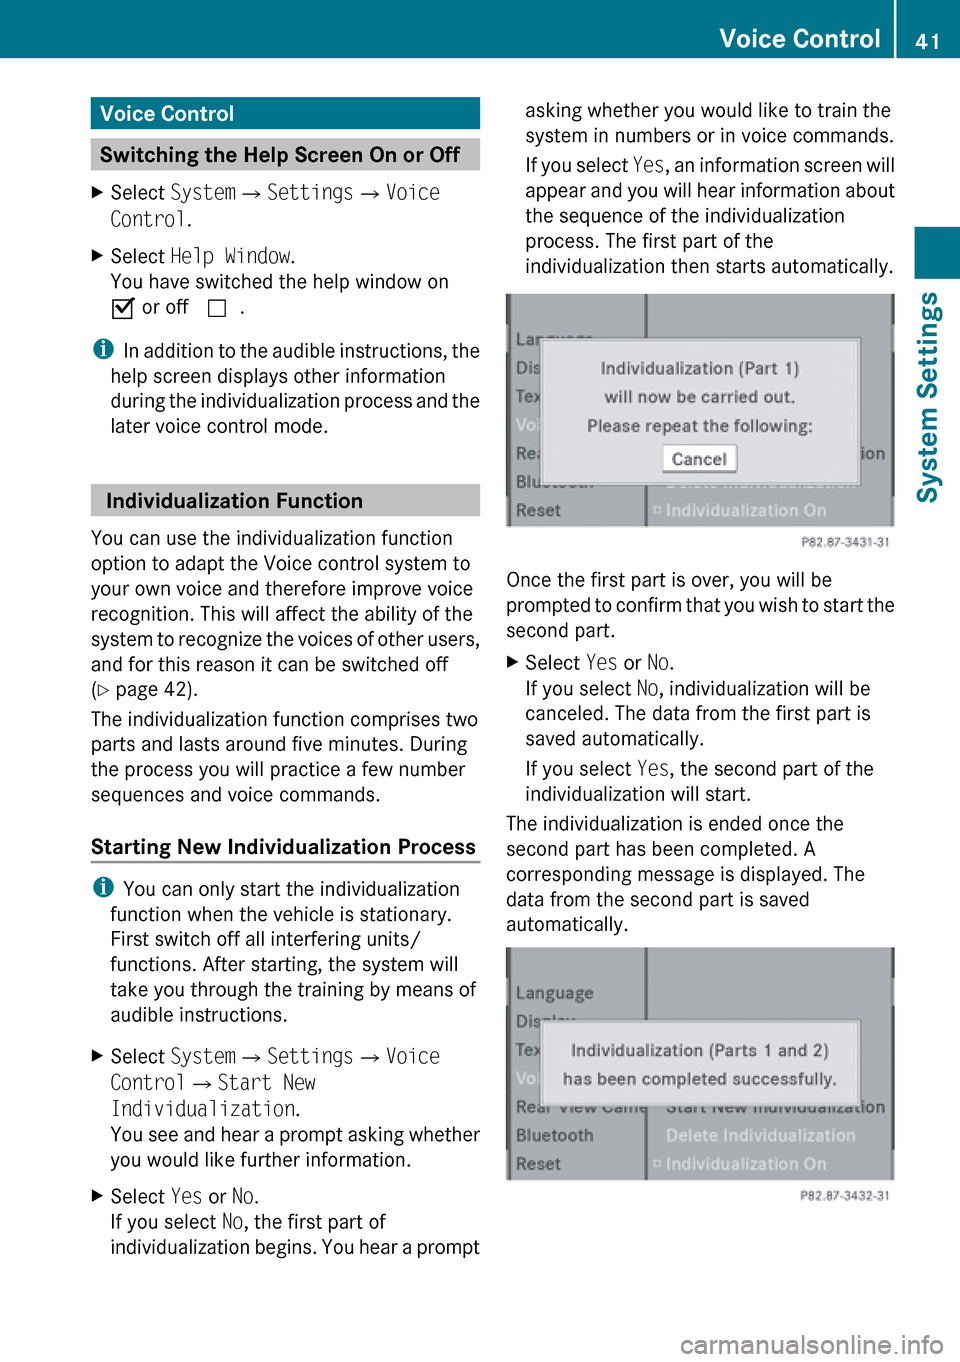
You see and hear a prompt asking whether
you would like further information.XSelect Yes or No.
If you select No, the first part of
individualization begins. You hear a promptasking whether you would like to train the
system in numbers or in voice commands.
If you select Yes, an information screen will
appear and you will hear information about
the sequence of the individualization
process. The first part of the
individualization then starts automatically.
Once the first part is over, you will be
prompted to confirm that you wish to start the
second part.
XSelect Yes or No.
If you select No, individualization will be
canceled. The data from the first part is
saved automatically.
If you select Yes, the second part of the
individualization will start.
The individualization is ended once the
second part has been completed. A
corresponding message is displayed. The
data from the second part is saved
automatically.
Voice Control41System SettingsZ
Page 55 of 224
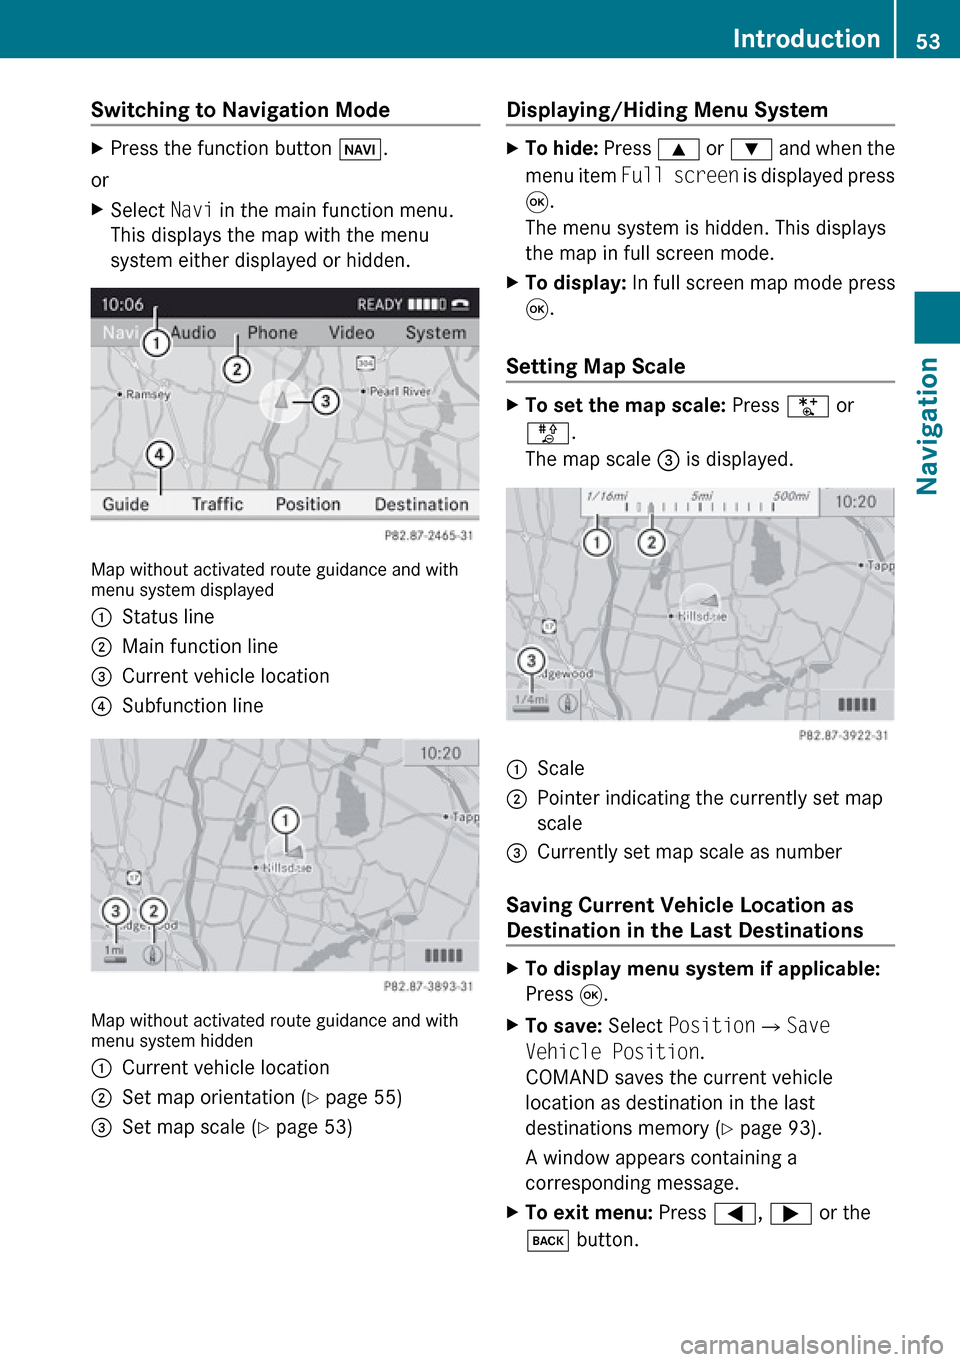
Switching to Navigation Mode XPress the function button Ø.
or
XSelect Navi in the main function menu.
This displays the map with the menu
system either displayed or hidden.
Map without activated route guidance and with
menu system displayed
1Status line2Main function line3Current vehicle location4Subfunction line
Map without activated route guidance and with
menu system hidden
1Current vehicle location2Set map orientation ( Y page 55)3Set map scale ( Y page 53)Displaying/Hiding Menu System XTo hide: Press 9 or : and when the
menu item Full screen is displayed press
9 .
The menu system is hidden. This displays
the map in full screen mode.XTo display: In full screen map mode press
9 .
Setting Map Scale
XTo set the map scale: Press U or
T .
The map scale 3 is displayed.1Scale2Pointer indicating the currently set map
scale3Currently set map scale as number
Saving Current Vehicle Location as
Destination in the Last Destinations
XTo display menu system if applicable:
Press 9.XTo save: Select Position £Save
Vehicle Position .
COMAND saves the current vehicle
location as destination in the last
destinations memory ( Y page 93).
A window appears containing a
corresponding message.XTo exit menu: Press =, ; or the
k button.Introduction53NavigationZ
Page 56 of 224
Scrolling the Map
iYou can only scroll the map when the
menu system is hidden (map in full-screen
mode).
XHide menu system if applicable
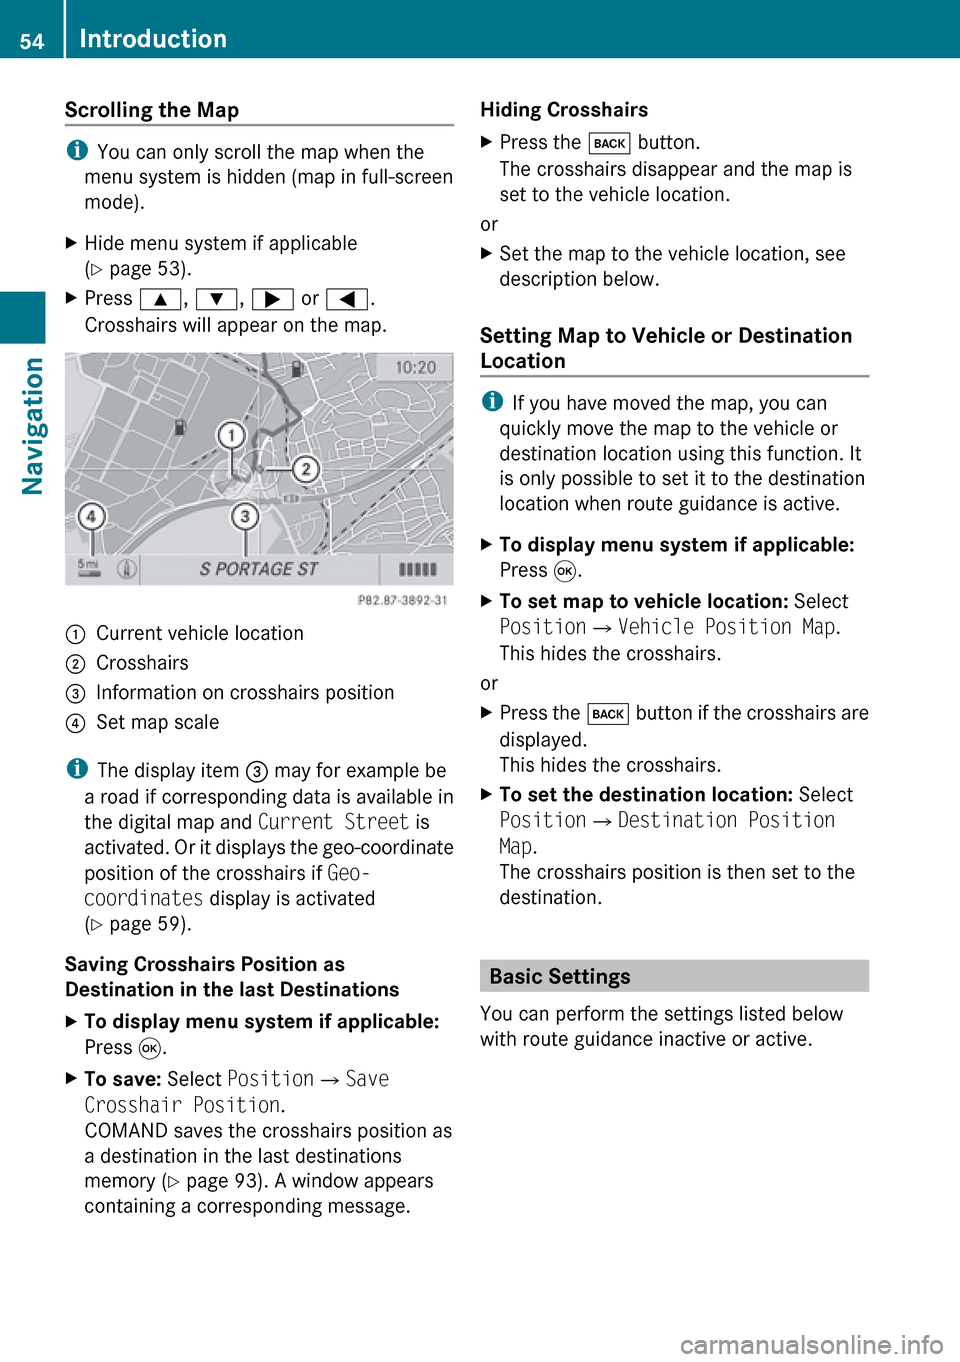
( Y page 53).XPress 9, : , ; or = .
Crosshairs will appear on the map.1Current vehicle location2Crosshairs3Information on crosshairs position4Set map scale
i The display item 3 may for example be
a road if corresponding data is available in
the digital map and Current Street is
activated. Or it displays the geo-coordinate
position of the crosshairs if Geo-
coordinates display is activated
( Y page 59).
Saving Crosshairs Position as
Destination in the last Destinations
XTo display menu system if applicable:
Press 9.XTo save: Select Position £Save
Crosshair Position .
COMAND saves the crosshairs position as
a destination in the last destinations
memory ( Y page 93). A window appears
containing a corresponding message.Hiding Crosshairs XPress the k button.
The crosshairs disappear and the map is
set to the vehicle location.
or
XSet the map to the vehicle location, see
description below.
Setting Map to Vehicle or Destination
Location
i If you have moved the map, you can
quickly move the map to the vehicle or
destination location using this function. It
is only possible to set it to the destination
location when route guidance is active.
XTo display menu system if applicable:
Press 9.XTo set map to vehicle location: Select
Position £Vehicle Position Map .
This hides the crosshairs.
or
XPress the k button if the crosshairs are
displayed.
This hides the crosshairs.XTo set the destination location: Select
Position £Destination Position
Map .
The crosshairs position is then set to the
destination.
Basic Settings
You can perform the settings listed below
with route guidance inactive or active.
54IntroductionNavigation
Page 109 of 224
Making Calls
Incoming Call
Rejecting or Accepting Calls
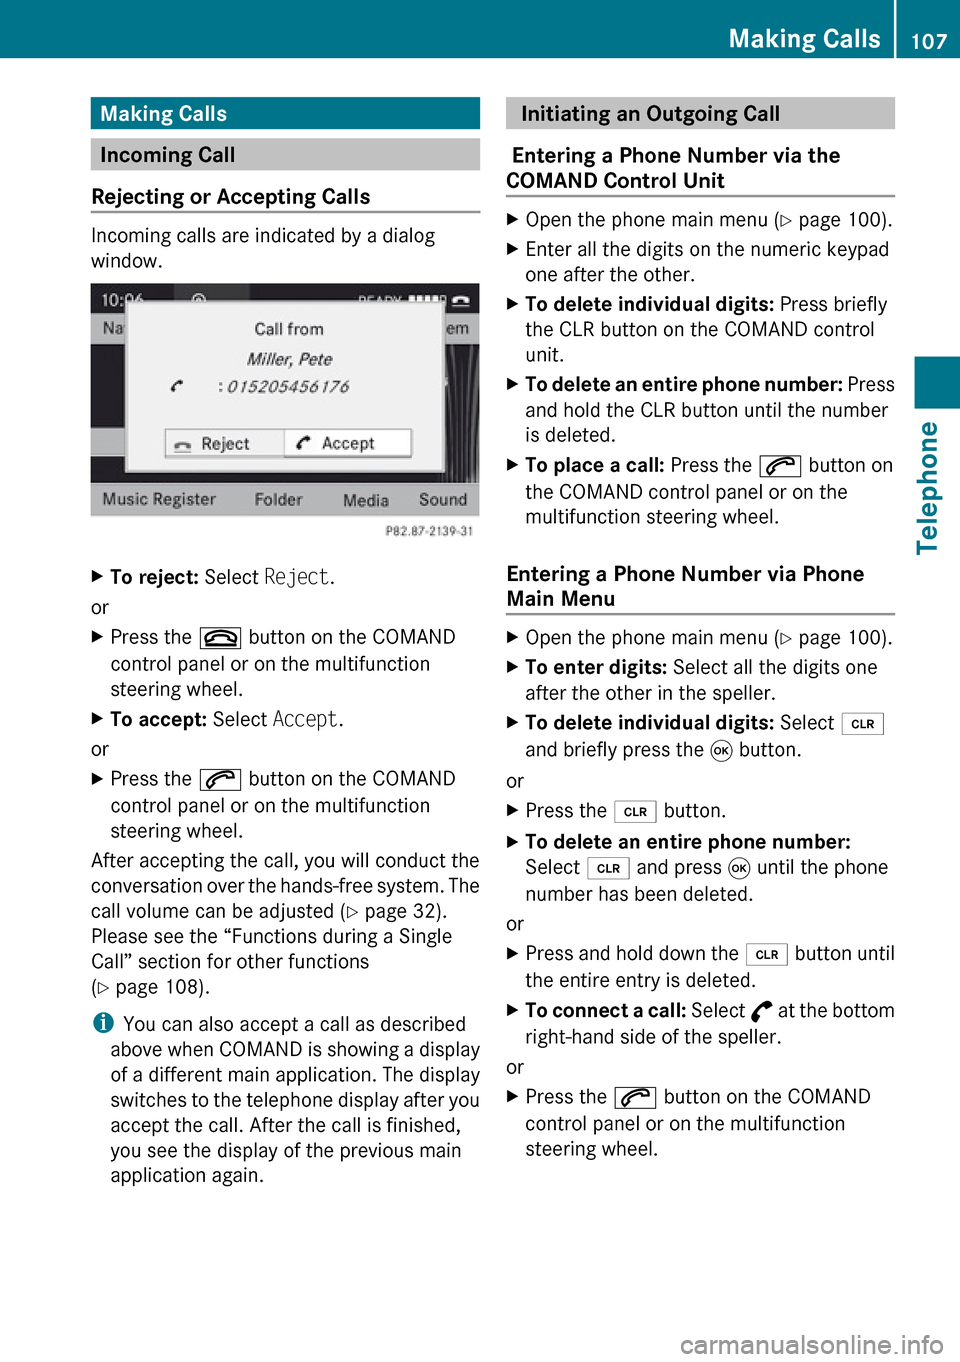
Incoming calls are indicated by a dialog
window.
XTo reject: Select Reject.
or
XPress the ~ button on the COMAND
control panel or on the multifunction
steering wheel.XTo accept: Select Accept.
or
XPress the 6 button on the COMAND
control panel or on the multifunction
steering wheel.
After accepting the call, you will conduct the
conversation over the hands-free system. The
call volume can be adjusted ( Y page 32).
Please see the “Functions during a Single
Call” section for other functions
( Y page 108).
i You can also accept a call as described
above when COMAND is showing a display
of a different main application. The display
switches to the telephone display after you
accept the call. After the call is finished,
you see the display of the previous main
application again.
Initiating an Outgoing Call
Entering a Phone Number via the
COMAND Control UnitXOpen the phone main menu ( Y page 100).XEnter all the digits on the numeric keypad
one after the other.XTo delete individual digits: Press briefly
the CLR button on the COMAND control
unit.XTo delete an entire phone number: Press
and hold the CLR button until the number
is deleted.XTo place a call: Press the 6 button on
the COMAND control panel or on the
multifunction steering wheel.
Entering a Phone Number via Phone
Main Menu
XOpen the phone main menu ( Y page 100).XTo enter digits: Select all the digits one
after the other in the speller.XTo delete individual digits: Select õ
and briefly press the 9 button.
or
XPress the 2 button.XTo delete an entire phone number:
Select õ and press 9 until the phone
number has been deleted.
or
XPress and hold down the 2 button until
the entire entry is deleted.XTo connect a call: Select ° at the bottom
right-hand side of the speller.
or
XPress the 6 button on the COMAND
control panel or on the multifunction
steering wheel.Making Calls107TelephoneZ
Page 112 of 224
Selecting Entry in the Address BookXPress ; or = if the display/selection
window is active.
Creating a New Address Book Entry
i You can create address data directly in
the address book. If you save phone
numbers in the COMAND phone book,
these are saved in the address book. When
you save a navigation destination,
COMAND creates an address book entry
containing the complete address data that
support navigation.
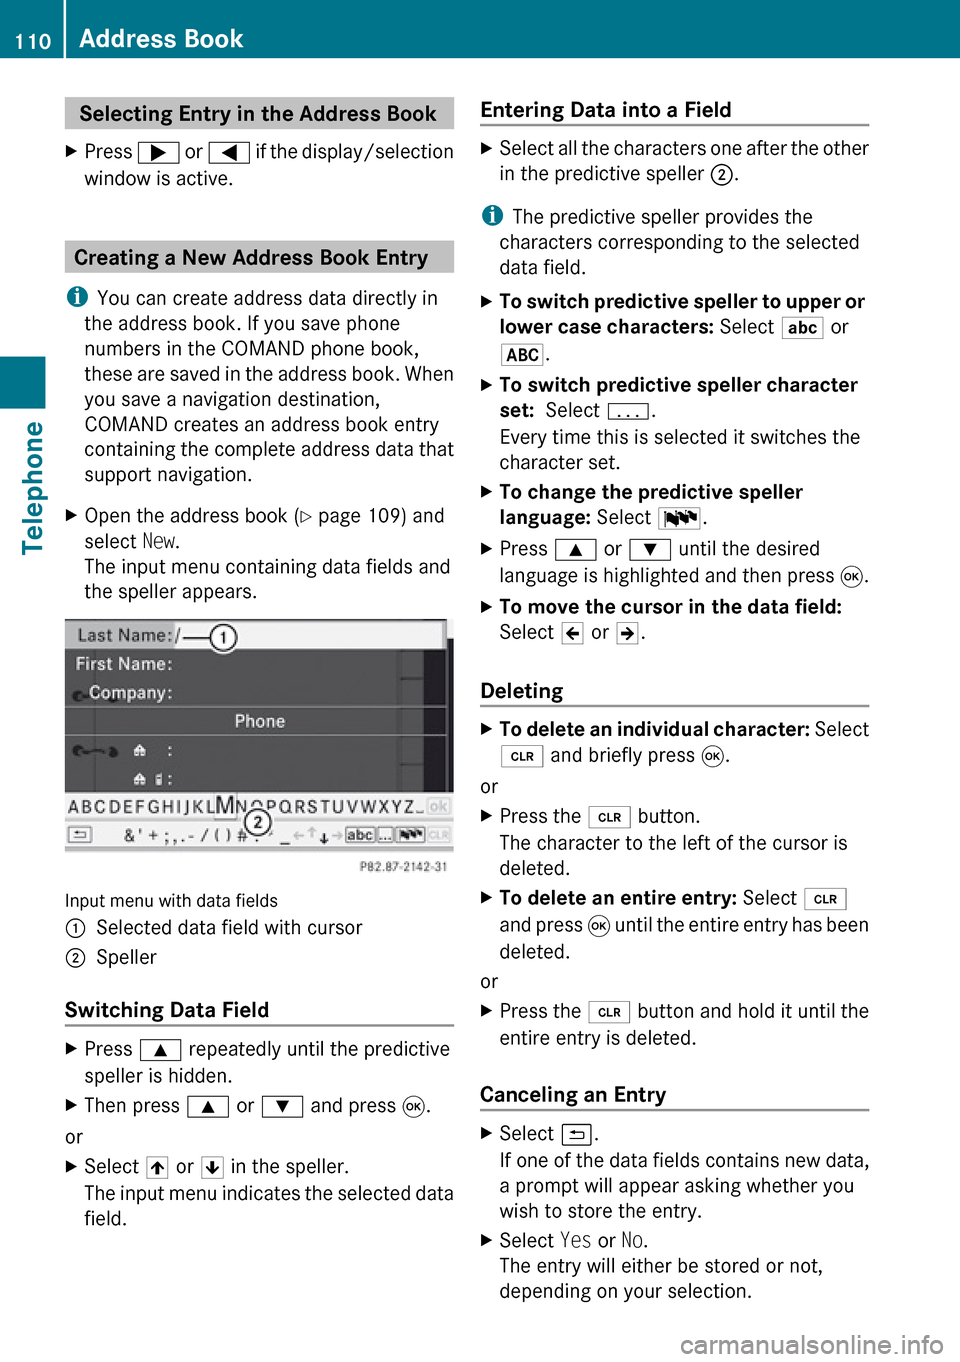
XOpen the address book ( Y page 109) and
select New.
The input menu containing data fields and
the speller appears.
Input menu with data fields
1Selected data field with cursor2Speller
Switching Data Field
XPress 9 repeatedly until the predictive
speller is hidden.XThen press 9 or : and press 9.
or
XSelect [ or ] in the speller.
The input menu indicates the selected data
field.Entering Data into a FieldXSelect all the characters one after the other
in the predictive speller 2.
i
The predictive speller provides the
characters corresponding to the selected
data field.
XTo switch predictive speller to upper or
lower case characters: Select ( or
& .XTo switch predictive speller character
set: Select k.
Every time this is selected it switches the
character set.XTo change the predictive speller
language: Select !.XPress 9 or : until the desired
language is highlighted and then press 9.XTo move the cursor in the data field:
Select Y or Z.
Deleting
XTo delete an individual character: Select
õ and briefly press 9.
or
XPress the 2 button.
The character to the left of the cursor is
deleted.XTo delete an entire entry: Select õ
and press 9 until the entire entry has been
deleted.
or
XPress the 2 button and hold it until the
entire entry is deleted.
Canceling an Entry
XSelect á.
If one of the data fields contains new data,
a prompt will appear asking whether you
wish to store the entry.XSelect Yes or No.
The entry will either be stored or not,
depending on your selection.110Address BookTelephone
Page 133 of 224
If the first session, for example, contains data
in audio CD format and the second session
contains MP3 tracks, COMAND handles the
CD as a conventional audio CD. This means
that the MP3 tracks cannot be accessed.
Similarly, if the first session contains MP3
tracks and the second session contains data
in audio CD format, COMAND handles the CD
as an MP3 CD. Only the MP3 tracks can be
accessed.
File Structure of Storage Medium
When creating an MP3 storage medium, you
can organize MP3 tracks into folders. A folder
can also contain additional folders. A storage
medium may have a maximum of 255 folders
in total. A maximum of 255 tracks and 255
folders are permissible per folder. A
maximum of 1200 tracks in total are
permissible per storage medium.
Track Names and Folder Names
When creating an MP3 storage medium, you
can assign names to the MP3 tracks and to
the folders.
COMAND uses these names in MP3 mode for
the corresponding display. Empty folders or
folders containing data other than MP3 tracks
will not be displayed by COMAND.
If MP3 files are stored in the root directory
itself, the root directory also counts as a
folder. COMAND will then display the root
directory name as a folder name.
Please note the following when assigning
track names:
R Track names must contain at least one
character.
R Track names must have the extension
“mp3”.
R A period must appear between the track
name and the extension.
i COMAND does not support ID3 tags.
Permissible Formats
COMAND supports the following formats:
R MPEG1 audio layer 3 format
i In everyday speech, this format
designation has been replaced by the
designation “MP3”.
R Microsoft Windows ®
Media Audio V2, V7,
V8 und V9 (WMA).
Notes on Copyright
The music tracks that you can create for
playback in MP3 mode are generally
copyright-protected under applicable
international and national laws.
In many countries, the reproduction of
copyrighted material is not permitted even if
only for personal use without the express
prior consent of the copyright holder.
Please check the current copyright laws for
your country and comply with them.
These restrictions do not apply, for example,
to your own compositions and recordings or
for recordings for which authorization has
been obtained from the copyright holder.
Notes about Audio DVD Discs
COMAND can playback commercially
available, prerecorded audio DVDs that bear
the following label. You will usually find the
label on the DVD booklet, the inlay or the DVD
itself.
i Audio DVDs differ from recordable DVD-R
and DVD-RW discs.
Data on audio DVDs are stored either in
uncompressed format or in lossless
compressed format. The sound quality on
CD Audio/DVD Audio/MP3131AudioZ
Page 134 of 224
audio DVDs is therefore better than on
recordable DVDs that contain MP3 data
because the MP3 format uses a lossy type of
compression. You cannot delete data from or
record additional data to commercially
available, prerecorded audio DVDs. Please
note the following information about CDs/
DVDs and pay special attention to the notes
on copied and/or self-written CDs/DVDs.
Permissible Bit and Scan Rates
R Fixed and variable bit rates from 32 kbps
to 320 kbps
R Scan rates from 8 kHz to 48 kHz
i Only use MP3 tracks with a bit rate of
128 kbps or higher and with a scan rate of
44.1 kHz or higher. Lower rates may result
in impaired sound quality. This is
particularly true if the surround sound
function has been activated.
WMA (Windows ®
Media Audio) format of the
following type:
R fixed bit rates from 5 kBit/s up to
384 kBit/s
R sampling rates from 8 kHz to 48 kHz.
COMAND does not support WMA files of the
following type:
R DRM (Digital Rights Management)
encrypted files
i If other music files are stored in these
audio formats on a storage medium, in
addition to MP3 files, the loading process
may take longer before the first track is
played.
Notes about CD/DVD Discs
i Discs with copy protection do not comply
with the CD audio standard and in some
cases cannot be played by COMAND. When
playing copied discs, problems may occur
with the playback.
A wide variety of discs, disc writing software
and writers are available. Due to this variety
we cannot guarantee that the system will be
able to play discs that you have written/
copied yourself.
There may be playback problems with
userburned CDs with a storage capacity of
more than 700 MB. These CDs do not meet
current valid standards.
i When playing a DVD audio, it may be the
case with numerous albums that the last
track does not contain any music and
COMAND switches to the next track. This
is due to the production method and does
not imply a fault with the unit.
! Do not attach stickers or labels of any
kind to discs. They may come loose and
damage COMAND.
COMAND has been designed for discs
meeting the requirements of standard
EN 60908. Therefore, only discs with a
maximum thickness of 1.3 mm can be
used.
If a thicker disc is inserted, e.g. one which
stores data on both sides, (DVD on one
side, audio data on the other side), this
cannot be ejected and COMAND will be
damaged.
Do not use 8 cm diameter discs, not even
with an adapter. Only use round discs with
a diameter of 12 cm.
i COMAND can play audio CDs with the
high resolution surround format.
Notes on the Care of CD/DVD Discs
R Only touch the discs at the edges.
R Handle discs with care in order to prevent
malfunctions during playback.
R Avoid scratching, leaving fingerprints and
dust on the discs.
R Clean the discs occasionally with a
commercially available cleaning cloth.
132CD Audio/DVD Audio/MP3Audio
Page 141 of 224
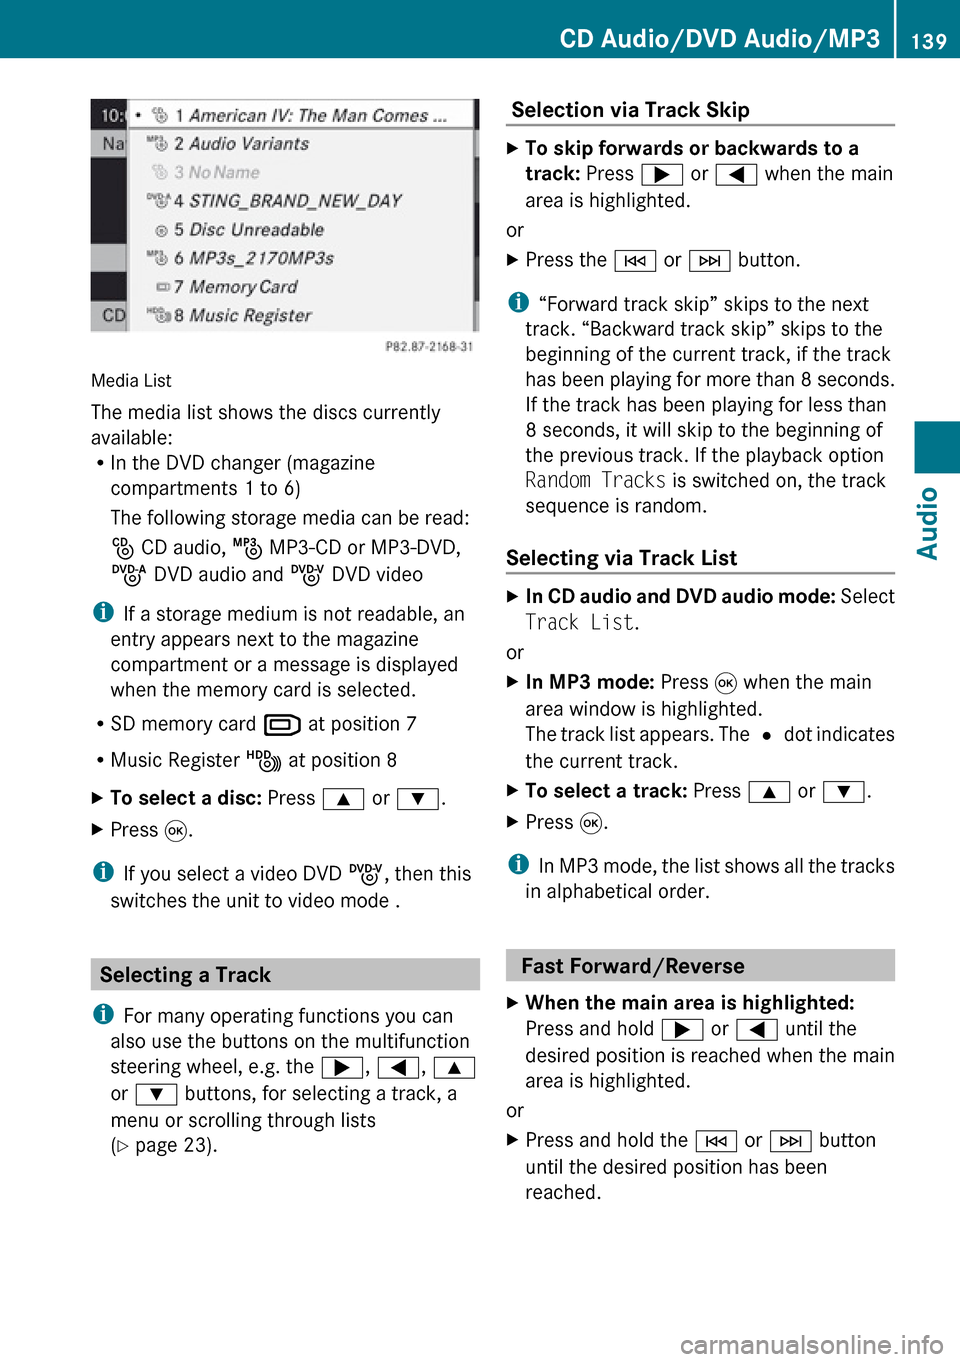
Media List
The media list shows the discs currently
available:
R In the DVD changer (magazine
compartments 1 to 6)
The following storage media can be read:
_ CD audio, þ MP3-CD or MP3-DVD,
ü DVD audio and ý DVD video
i If a storage medium is not readable, an
entry appears next to the magazine
compartment or a message is displayed
when the memory card is selected.
R SD memory card º at position 7
R Music Register Ñ at position 8
XTo select a disc: Press 9 or : .XPress 9.
i
If you select a video DVD ý, then this
switches the unit to video mode .
Selecting a Track
i For many operating functions you can
also use the buttons on the multifunction
steering wheel, e.g. the ;, = , 9
or : buttons, for selecting a track, a
menu or scrolling through lists
( Y page 23).
Selection via Track Skip XTo skip forwards or backwards to a
track: Press ; or = when the main
area is highlighted.
or
XPress the E or F button.
i
“Forward track skip” skips to the next
track. “Backward track skip” skips to the
beginning of the current track, if the track
has been playing for more than 8 seconds.
If the track has been playing for less than
8 seconds, it will skip to the beginning of
the previous track. If the playback option
Random Tracks is switched on, the track
sequence is random.
Selecting via Track List
XIn CD audio and DVD audio mode: Select
Track List .
or
XIn MP3 mode: Press 9 when the main
area window is highlighted.
The track list appears. The R dot indicates
the current track.XTo select a track: Press 9 or : .XPress 9.
i
In MP3 mode, the list shows all the tracks
in alphabetical order.
Fast Forward/Reverse
XWhen the main area is highlighted:
Press and hold ; or = until the
desired position is reached when the main
area is highlighted.
or
XPress and hold the E or F button
until the desired position has been
reached.CD Audio/DVD Audio/MP3139AudioZ
Page 146 of 224
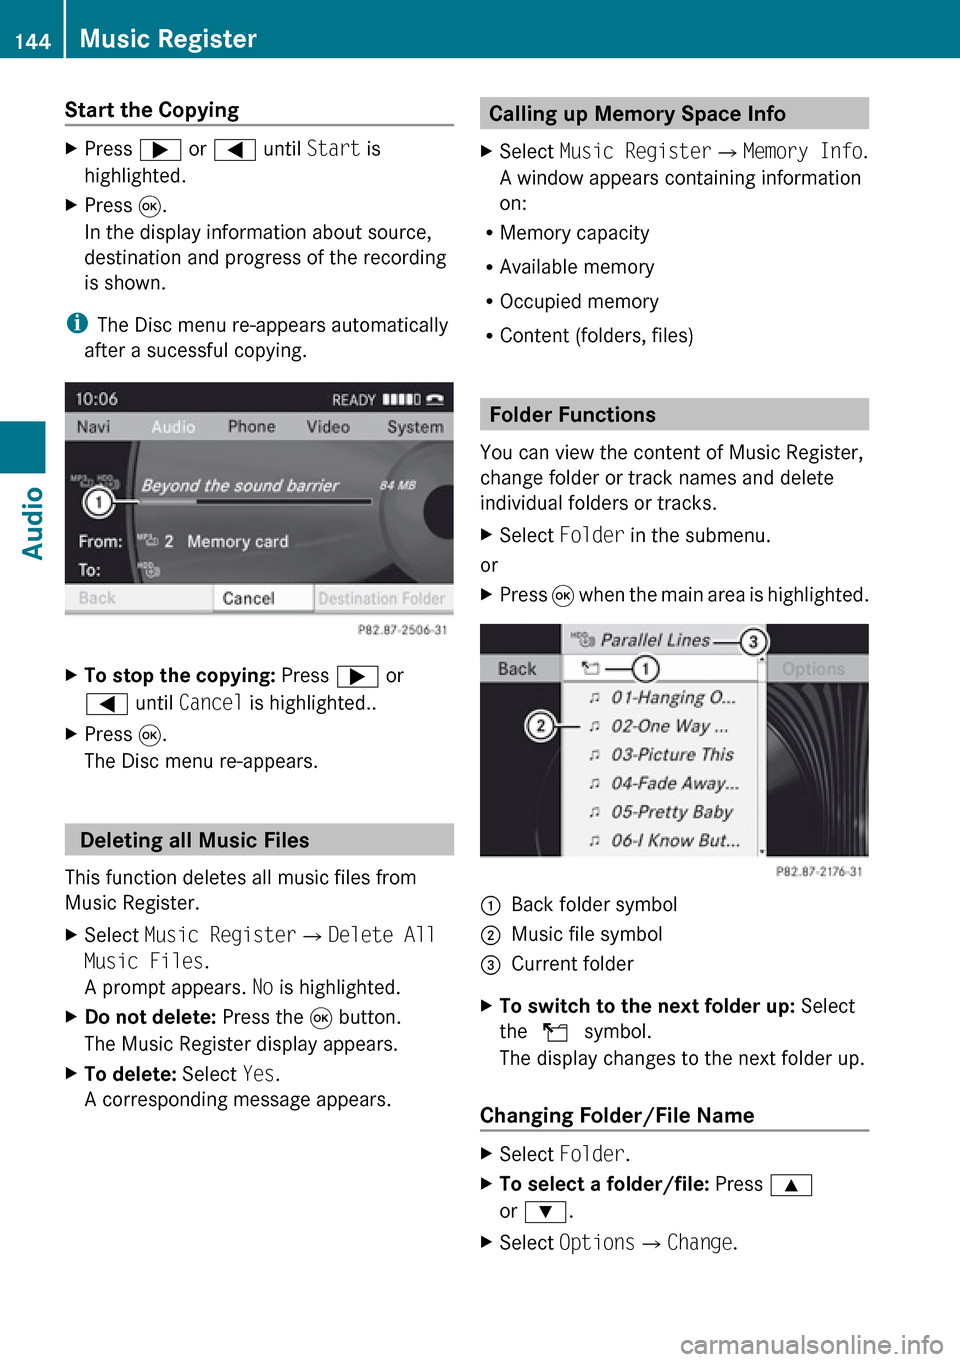
Start the CopyingXPress ; or = until Start is
highlighted.XPress 9.
In the display information about source,
destination and progress of the recording
is shown.
i The Disc menu re-appears automatically
after a sucessful copying.
XTo stop the copying: Press ; or
= until Cancel is highlighted..XPress 9.
The Disc menu re-appears.
Deleting all Music Files
This function deletes all music files from
Music Register.
XSelect Music Register £Delete All
Music Files .
A prompt appears. No is highlighted.XDo not delete: Press the 9 button.
The Music Register display appears.XTo delete: Select Yes.
A corresponding message appears.Calling up Memory Space Info XSelect Music Register £Memory Info .
A window appears containing information
on:
R Memory capacity
R Available memory
R Occupied memory
R Content (folders, files)
Folder Functions
You can view the content of Music Register,
change folder or track names and delete
individual folders or tracks.
XSelect Folder in the submenu.
or
XPress 9 when the main area is highlighted.1Back folder symbol2Music file symbol3Current folderXTo switch to the next folder up: Select
the Q symbol.
The display changes to the next folder up.
Changing Folder/File Name
XSelect Folder .XTo select a folder/file: Press 9
or : .XSelect Options £Change .144Music RegisterAudio
Page 152 of 224
Playing the Content of a Category or
FolderXSelect a category or folder.XPress 9 for longer than two seconds.
The content of the category or folder
selected is played in accordance with the
playback option ( Y page 150) selected.
Alphabetical Track Selection
iPods and MP3 Players
i This function is available for categories
which are arranged in alphabetical order.
This function is not available for playlists,
for example.
XSelect a category, e.g. Artists.
The available artists appear.XPress the corresponding number key once
or repeatedly to select the initial letter of
the desired artist. For example, to select an
artist whose name begins with C, press the
number key l three times.
You see the available letters at the bottom
edge of the display.
After a message, the first entry in the list
which matches the letter entered is
highlighted.
i If there is no entry which matches the
letter which has been entered, the last
entry in the list which matches a previous
letter is highlighted.
USB Devices
i This function is available for directories
which are arranged in alphabetical order.
This function is not available for playlists.
XPress the number key in question once or
repeatedly in a directory to select the initial
letter of the desired artist.For example, to select an artist whose
name begins with C, press the number key
l three times.
You see the available letters at the bottom
edge of the display.
If the directory only contains folders,
COMAND searches for folders. The first
entry in the list that matches the letter is
highlighted.
If this does not happen, COMAND searches
for tracks. After a message, the first entry
in the list which matches the letter entered
is highlighted.
Selecting the Active Partition (USB
Devices Only)
You can select this function for USB devices
when the storage device is partitioned. Up to
four partitions (primary or logical and FAT-
formatted) are supported.
i The Windows formatting program
supports FAT partitions with either FAT16
or FAT32.
XSelect Media Interface £Active
partition .
Playback Options
The following options are available to you:
R Normal Track Sequence:
You hear the tracks in their normal order
(numerical or alphabetical).
R Random Tracks:
You hear all tracks in random order.
R Random Categories or Random Folder
(in the case of USB devices when Folder
has been selected):
You hear the tracks in the current active
category or folder and any subfolders in
random order.
150Media InterfaceAudio