Rear vent MERCEDES-BENZ CLS-Class 2012 W218 Owner's Guide
[x] Cancel search | Manufacturer: MERCEDES-BENZ, Model Year: 2012, Model line: CLS-Class, Model: MERCEDES-BENZ CLS-Class 2012 W218Pages: 356, PDF Size: 14.25 MB
Page 258 of 356

Useful information
i This Operator's Manual describes all
models and all standard and optional
equipment of your vehicle available at the
time of publication of the Operator's
Manual. Country-specific differences are
possible. Please note that your vehicle may
not be equipped with all features
described. This also applies to safety-
related systems and functions.
i Please read the information on qualified
specialist workshops ( Y page 22).
Loading guidelines
GWARNING
Always fasten items being carried as securely
as possible. Use cargo tie-down rings and
fastening materials appropriate for the weight
and size of the load.
In an accident, during hard braking or sudden
maneuvers, loose items will be thrown around
inside the vehicle. This can cause injury to
vehicle occupants unless the items are
securely fastened in the vehicle.
To help avoid personal injury during a collision
or sudden maneuver, exercise care when
transporting cargo. Do not pile luggage or
cargo higher than the seat backrests.
The trunk is the preferred place to carry
objects.
Never drive a vehicle with the trunk open.
Deadly carbon monoxide (CO) gases may
enter vehicle interior resulting in
unconsciousness and death.
The handling characteristics of a laden
vehicle are dependent on the distribution of
the load within the vehicle. For this reason,
you should observe the following notes when
transporting a load:
R when transporting a load, never exceed the
maximum permissible gross vehicle weight
or the gross axle weight rating of the
vehicle (including occupants). The values
are specified on the vehicle identification
plate on the B-pillar of the driver's door.
R position heavy loads as far forwards as
possible and as low down in the trunk as
possible.
R the load must not protrude above the upper
edge of the seat backrests.
R always place the load against the rear or
front seat backrests. Make sure that the
seat backrests are securely locked into
place.
R always place the load behind unoccupied
seats if possible.
R secure the load with sufficiently strong and
wear-resistant tie down. pad sharp edges
for protection.
Stowage areas
Stowage compartments
Important safety notes
GWARNING
To help avoid personal injury during a collision
or sudden maneuver, exercise care when
storing objects in the vehicle. Put luggage or
cargo in the trunk if possible.
Do not pile luggage or cargo higher than the
seat backrests.
Keep compartment lids closed. This will help
to prevent stored objects from being thrown
about and injuring vehicle occupants during
R braking
R vehicle maneuvers
R an accident
Stowage compartments in the front
Glove box
i The glove box can be ventilated
( Y page 128).
256Stowage areasStowing and features
Page 260 of 356

XTo open: pull handle : upwards.
The armrest folds out.
Stowage compartment under the front
seats
XTo open: pull handle : up and fold
cover ; forwards.
Stowage compartments in the rear
Stowage compartment in the rear seat
armrest
! Do not sit or lean your bodyweight on the
armrests when they are folded out as you
could damage them.
! Close the cover of the stowage
compartment before folding the rear seat
armrest back into the seat backrest.
XTo open: fold down seat armrest ;.XFold cover : of the armrest upwards.
Stowage pockets
GWARNING
Storage bags are intended for storing light-
weight items only.
Heavy objects, objects with sharp edges or
fragile objects may not be transported in the
storage bag. In an accident, during hard
braking, or sudden maneuvers, they could be
thrown around inside the vehicle and cause
injury to vehicle occupants.
Storage bags cannot protect transported
goods in the event of an accident.
Storage bags are located in the rear
compartment on the driver's and front-
passenger seat backrests.
Parcel nets
GWARNING
Parcel nets are intended for storing light-
weight items only, such as road maps, mail,
etc.
Heavy objects, objects with sharp edges, or
fragile objects may not be transported in the
parcel nets. In an accident, during hard
braking, or sudden maneuvers, they could be
thrown around inside the vehicle and cause
injury to vehicle occupants.
Parcel nets cannot protect transported goods
in the event of an accident.
258Stowage areasStowing and features
Page 262 of 356

GWARNING
Always lock the seat backrest in its upright
position when the rear seat bench is
occupied, or the extended cargo volume is not
in use.
Check for secure locking by pushing and
pulling on the seat backrest.
In an accident, during hard braking or sudden
maneuvers, loose items will be thrown around
inside the vehicle. This can cause injury to
vehicle occupants unless the items are
securely fastened in the vehicle.
To help avoid personal injury during a collision
or sudden maneuver, exercise care when
transporting cargo.
i You should always engage the rear seat
backrests if you do not need the through-
loading feature. This will prevent
unauthorized access to the trunk from the
vehicle interior.
XMove the driver's or front-passenger seat
back if necessary.
Securing loads
Cargo tie-down rings
Observe the following notes on securing
loads:
R secure the load using the cargo tie down
rings.
R do not use elastic straps or nets to secure
a load, as these are only intended as an
anti-slip protection for light loads.
R do not route tie downs across sharp edges
or corners.
R pad sharp edges for protection.
There are six cargo tie down rings in the trunk.
:Cargo tie down rings
Bag hooks
! The bag hook can bear a maximum load
of 6.6 lbs (3 kg). Do not use it to secure a
load.
XPull bag hook ; down by tab :.
Stowage well under the trunk floor
The TIREFIT kit, the vehicle tool kit, etc. are
located in the stowage compartment.
XTo open: pull handle : upwards.260Stowage areasStowing and features
Page 265 of 356

XFold down the rear seat armrest.XTo open: raise the rear seat armrest cover.XPress release catch :.
Cup holder ; folds out forwards.XSwing the rear seat armrest cover back
down, if necessary.XTo close: raise the rear seat armrest cover.
Swing cup holder ; back until it engages.
Bottle holder
GWARNING
Do not transport heavy, sharp-edged, or
fragile bottles in the bottle holder.
In the event of an accident, the bottle holder
cannot secure a bottle sufficiently. You and/
or vehicle occupants could be injured.
! Make sure that any bottles weighing more
than 0.5 kg that are stored in the bottle
holder rest on the vehicle floor. The bottle
holder could otherwise be damaged.
The bottle holder is suitable for bottles sized
between 25 fl. oz. (0.7 l) and 54 fl. oz. (1.5 l).
The bottle holder does not secure the bottles;
it merely prevents them from tipping over.
XPress the outer edge of button : and slide
in the direction of the arrow until the bottle
fits into the opening.XInsert the bottle into the bottle holder.Sun visors
Overview of sun visorsGWARNING
Do not use the vanity mirror while driving.
Keep the vanity mirrors in the sun visors
closed while the vehicle is in motion.
Reflected glare can endanger you and others.
:Mirror light;Bracket=Retaining clip, e.g. for a car park ticket?Vanity mirrorAMirror cover
Vanity mirror in the sun visor
Mirror light : only functions if the sun visor
is clipped into retainer ; and mirror cover
A has been folded up.
Glare from the side
Features263Stowing and featuresZ
Page 266 of 356

XFold down sun visor :.XPull sun visor : out of retainer ;.XSwing sun visor : to the side.XSlide sun visor : forwards and back as
required.
Rear window roller sunblind
GWARNING
When leaving the vehicle, always remove the
SmartKey from the ignition lock. Always take
the SmartKey with you and lock the vehicle.
Do not leave children unattended in the
vehicle, even if they are secured in a child
restraint system, or with access to an
unlocked vehicle. A child's unsupervised
access to a vehicle could result in an accident
and/or serious personal injury. The children
could:
R injure themselves on parts of the vehicle
R be seriously or fatally injured through
excessive exposure to extreme heat or cold
R injure themselves or cause an accident with
vehicle equipment that can be operated
even if the SmartKey is removed from the
ignition lock or removed from the vehicle,
such as seat adjustment, steering wheel
adjustment, or the memory function
If children open a door, they could injure other
persons or get out of the vehicle and injure
themselves or be injured by following traffic.
Do not expose the child restraint system to
direct sunlight. The child restraint system's
metal parts, for example, could become very
hot, and the child could be burned on these
parts.
GWARNING
When adjusting a roller sunblind, the roller
blind moves up or down. You might become
trapped in the process.
In the event of danger, briefly press the button
for the roller sunblind to change the roller
blind's direction of movement.
! Make sure that the roller sunblind can
move freely. Otherwise, the roller sunblind
or other objects could be damaged.XTurn the SmartKey to position 2 in the
ignition lock.XTo extend or retract: briefly press
button :.
The roller sunblind fully extends or fully
retracts.
Ashtray
Ashtray in the front-compartment
center console
i You can remove the ashtray insert and
use the resulting compartment for
stowage.
! The stowage space under the ashtray is
not heat resistant. Before placing lit
cigarettes in the ashtray, make sure that
the ashtray is properly engaged. Otherwise,
the stowage space could be damaged.
All vehicles (except AMG)
264FeaturesStowing and features
Page 276 of 356
operator, make sure people and objects are
out of the way of the device to prevent
potential harm or damage. When
programming a garage door opener, the door
moves up or down. When programming a gate
operator, the gate opens or closes.
Do not use the integrated remote control with
any garage door opener that lacks safety stop
and reverse features as required by U.S.
federal safety standards (this includes any
garage door opener model manufactured
before April 1, 1982). A garage door that
cannot detect an object - signaling the door
to stop and reverse - does not meet current
U.S. federal safety standards.
When programming a garage door opener,
park vehicle outside the garage.
Do not run the engine while programming the
integrated remote control. Inhalation of
exhaust gas is hazardous to your health. All
exhaust gas contains carbon monoxide (CO),
and inhaling it can cause unconsciousness
and possible death. All exhaust gas contains
carbon monoxide (CO), and inhaling it can
cause unconsciousness and possible death.
i USA only:
FCC Rules. Operation is subject to the
following two conditions:
1. This device may not cause harmful
interference, and
2. this device must accept any interference
received, including interference that may
cause undesired operation.
Any unauthorized modification to this
device could void the user’s authority to
operate the equipment.
i Canada only:
This device complies with RSS-210 of
Industry Canada. Operation is subject to
the following two conditions:
1. This device may not cause harmful
interference, and2. this device must accept any interference
received, including interference that may
cause undesired operation.
Any unauthorized modification to this
device could void the user’s authority to
operate the equipment.
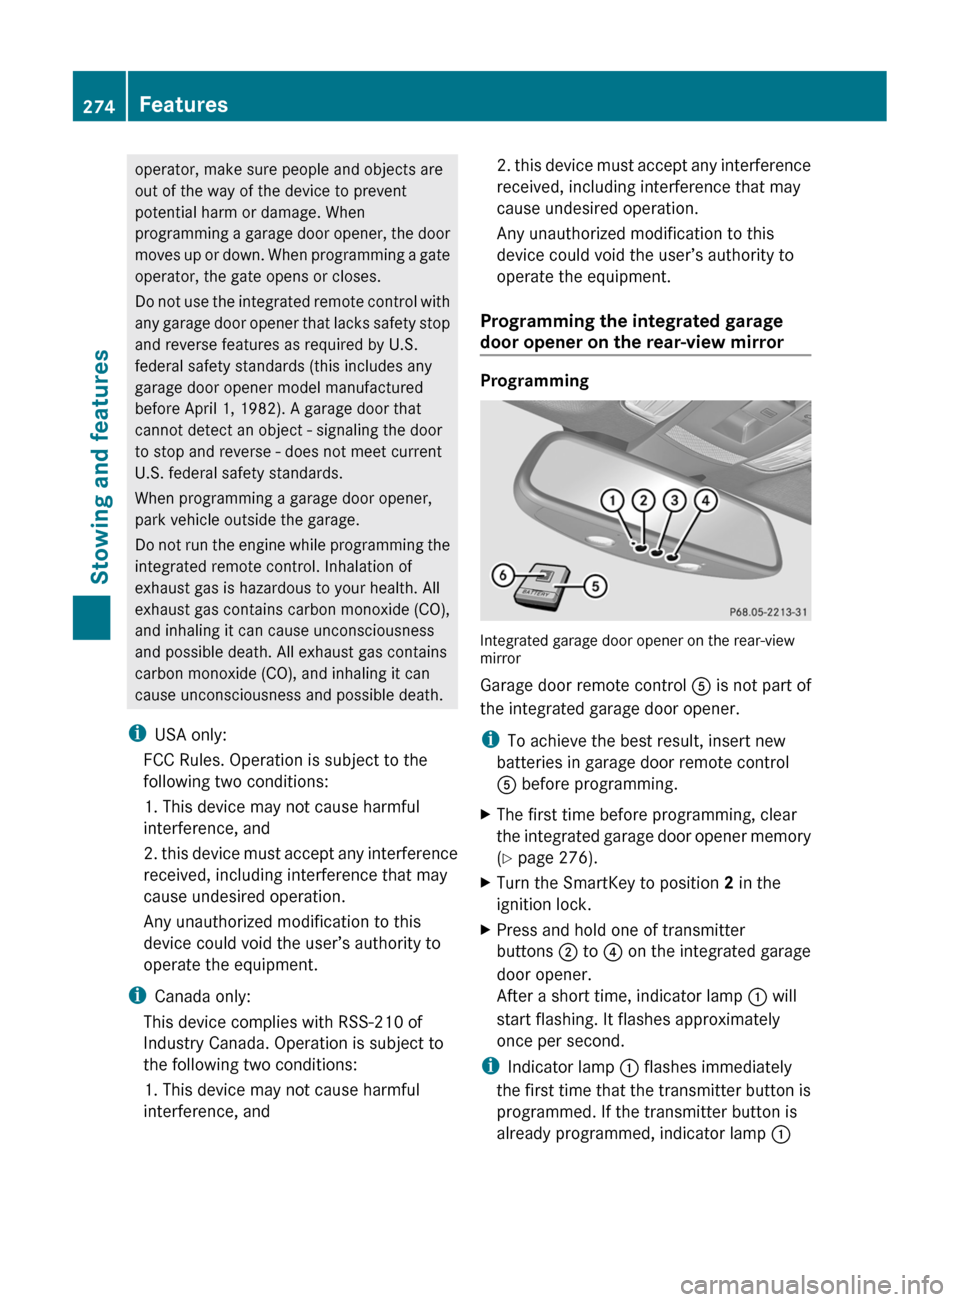
Programming the integrated garage
door opener on the rear-view mirror
Programming
Integrated garage door opener on the rear-view
mirror
Garage door remote control A is not part of
the integrated garage door opener.
i To achieve the best result, insert new
batteries in garage door remote control
A before programming.
XThe first time before programming, clear
the integrated garage door opener memory
( Y page 276).XTurn the SmartKey to position 2 in the
ignition lock.XPress and hold one of transmitter
buttons ; to ? on the integrated garage
door opener.
After a short time, indicator lamp : will
start flashing. It flashes approximately
once per second.
i Indicator lamp : flashes immediately
the first time that the transmitter button is
programmed. If the transmitter button is
already programmed, indicator lamp :
274FeaturesStowing and features
Page 290 of 356
to painted surfaces. You could otherwise
damage the paintwork.
If water no longer forms "beads" on the paint
surface, use the paint care products
recommended and approved by Mercedes-
Benz. This is the case approximately every
three to five months, depending on the
climate conditions and the care product used.
If dirt has penetrated the paint surface or the
paint has become dull, the paint cleaner
recommended and approved by Mercedes-
Benz should be used.
Do not use these care products in the sun or
on the hood while the hood is hot.XUse a suitable touch-up stick, e.g. MB
Touch-Up Stick, to correct smaller areas of
paint damage quickly and provisionally.
Matte finish care
If your vehicle has a clear matte finish,
observe the following instructions in order to
avoid damage to the paintwork due to
incorrect care.
These notes also apply to light alloy wheels
with a clear matte finish.
! Never polish the vehicle or the light alloy
wheels. Polishing causes the finish to
shine.
! The following may cause the paint to
become shiny and thus reduce the matte
effect:
R Vigorous rubbing with unsuitable
materials.
R Frequent use of car washes.
R Washing the vehicle in direct sunlight.
! Never use paint cleaner, buffing or
polishing products, or gloss preserver, e.g.
wax. These products are only suitable for
high-gloss surfaces. Their use on vehicles
with matte finish leads to considerable
surface damage (shiny, spotted areas).
Always have paintwork repairs performed
at a qualified specialist workshop, e.g. an
authorized Mercedes-Benz Center.
! Do not use wash programs with a hot wax
treatment under any circumstances.
i The vehicle should preferably be washed
by hand using a soft sponge, car shampoo
and plenty of water.
i Use only insect remover and car shampoo
from the range of recommended and
approved Mercedes-Benz care products.
Cleaning the windowsGWARNING
Before cleaning the windshield or wiper
blades, switch off the windshield wipers and
remove the SmartKey from the ignition lock.
On vehicles with KEYLESS-GO, press the
Start/Stop button repeatedly until all
indicator lamps in the instrument cluster have
gone out. The windshield wipers could
otherwise move and injure you.
XClean the inside and outside of the
windows with a damp cloth and a cleaning
agent that is recommended and approved
by Mercedes-Benz.
! Do not use dry cloths, abrasive products,
solvents or cleaning agents containing
solvents to clean the inside of the windows.
Do not touch the insides of the windows
with hard objects, e.g. an ice scraper or
ring. There is otherwise a risk of damaging
the windows.
! Clean the water drainage channels of the
windshield and the rear window at regular
intervals. Deposits such as leaves, petals
and pollen may under certain
circumstances prevent water from draining
away. This can lead to corrosion damage
and damage to electronic components.
288CareMaintenance and care
Page 299 of 356

XPrepare the vehicle as described
( Y page 296).XRemove the following items (depending on
the vehicle's equipment) from the stowage
well under the trunk floor:
R the emergency spare wheel
R the tire inflation compressor
R the vehicle tool kit
R the folding wheel chock
R the jackXSecure the vehicle to prevent it from rolling
away.
Securing the vehicle to prevent it from
rolling away
GWARNING
Only jack up the vehicle on level ground or on
slight inclines/declines. The vehicle could
otherwise fall off the jack and injure you or
others.
If your vehicle is equipped with a wheel chock,
it can be found in the vehicle tool kit
( Y page 294).
The folding wheel chock is an additional
securing measure to prevent the vehicle from
rolling away, for example when changing a
wheel.
XFold both plates upwards :.XFold out lower plate ;.XGuide the lugs on the lower plate fully into
the openings in base plate =.
Securing the vehicle on level ground
XOn level ground: place chocks or other
suitable items under the front and rear of
the wheel that is diagonally opposite the
wheel you wish to change.
Securing the vehicle on slight downhill gradients
XOn downhill gradients: place chocks or
other suitable items in front of the wheels
of the front and rear axle.
Raising the vehicle
GWARNING
When jacking up the vehicle, only use the jack
which has been specifically approved by
Mercedes-Benz for your vehicle.
The jack is designed exclusively for jacking up
the vehicle at the jacking points built into both
sides of the vehicle. The jack saddle must be
placed centrally under the jacking point. The
jack must always be vertical when in use,
especially on inclines or declines.
The jack is intended only for lifting the vehicle
briefly for wheel changes. It is not suited for
Flat tire297Breakdown assistanceZ
Page 310 of 356
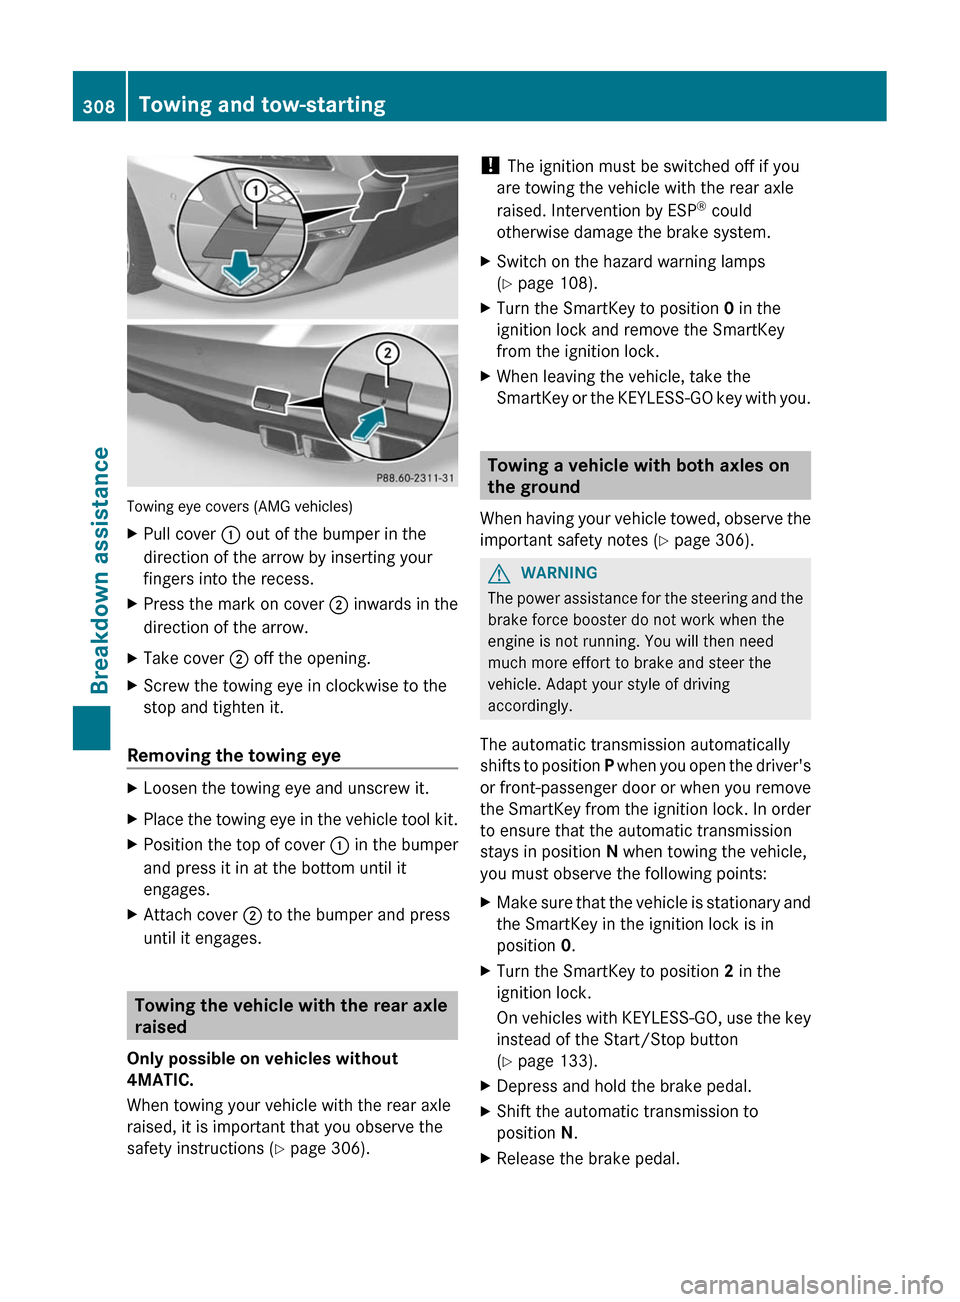
Towing eye covers (AMG vehicles)
XPull cover : out of the bumper in the
direction of the arrow by inserting your
fingers into the recess.XPress the mark on cover ; inwards in the
direction of the arrow.XTake cover ; off the opening.XScrew the towing eye in clockwise to the
stop and tighten it.
Removing the towing eye
XLoosen the towing eye and unscrew it.XPlace the towing eye in the vehicle tool kit.XPosition the top of cover : in the bumper
and press it in at the bottom until it
engages.XAttach cover ; to the bumper and press
until it engages.
Towing the vehicle with the rear axle
raised
Only possible on vehicles without
4MATIC.
When towing your vehicle with the rear axle
raised, it is important that you observe the
safety instructions ( Y page 306).
!
The ignition must be switched off if you
are towing the vehicle with the rear axle
raised. Intervention by ESP ®
could
otherwise damage the brake system.XSwitch on the hazard warning lamps
( Y page 108).XTurn the SmartKey to position 0 in the
ignition lock and remove the SmartKey
from the ignition lock.XWhen leaving the vehicle, take the
SmartKey or the KEYLESS-GO key with you.
Towing a vehicle with both axles on
the ground
When having your vehicle towed, observe the
important safety notes ( Y page 306).
GWARNING
The power assistance for the steering and the
brake force booster do not work when the
engine is not running. You will then need
much more effort to brake and steer the
vehicle. Adapt your style of driving
accordingly.
The automatic transmission automatically
shifts to position P when you open the driver's
or front-passenger door or when you remove
the SmartKey from the ignition lock. In order
to ensure that the automatic transmission
stays in position N when towing the vehicle,
you must observe the following points:
XMake sure that the vehicle is stationary and
the SmartKey in the ignition lock is in
position 0.XTurn the SmartKey to position 2 in the
ignition lock.
On vehicles with KEYLESS-GO, use the key
instead of the Start/Stop button
( Y page 133).XDepress and hold the brake pedal.XShift the automatic transmission to
position N.XRelease the brake pedal.308Towing and tow-startingBreakdown assistance
Page 311 of 356
XRelease the parking brake.XLeave the SmartKey in position 2 in the
ignition lock.
Transporting the vehicle
The towing eye can be used to pull the vehicle
onto a trailer or transporter for transporting
purposes.
XTurn the SmartKey to position 2 in the
ignition lock.XShift the automatic transmission to
position N.
As soon as the vehicle is loaded:
XPrevent the vehicle from rolling away by
applying the parking brake.XShift the automatic transmission to
position P.XTurn the SmartKey to position 0 in the
ignition lock and remove the SmartKey
from the ignition lock.XSecure the vehicle.
! Only lash the vehicle down by the wheels
or wheel rims, not by parts of the vehicle
such as axle or steering components.
Otherwise, the vehicle could be damaged.
Notes for 4MATIC vehicles
! Vehicles with 4MATIC must not be towed
with either the front or the rear axle raised,
as doing so will damage the transmission.
If the vehicle has transmission damage or
damage to the front or rear axle, have it
transported on a transporter or trailer.
In the event of damage to the electrical
system
If the battery is defective, the automatic
transmission will be locked in position P. To
shift the automatic transmission to position
N , you must provide power to the vehicle's
electrical system in the same way as when
jump-starting ( Y page 305).
Have the vehicle transported on a transporter
or trailer.
Tow-starting (emergency engine
starting)
! Vehicles with automatic transmission
must not be started by tow-starting. This
could otherwise damage the transmission.
Fuses
Important safety notes
The fuses in your vehicle serve to close down
faulty circuits. If a fuse blows, all the
components on the circuit and their functions
stop operating.
GWARNING
Only use fuses approved by Mercedes-Benz
with the specified amperage for the system in
question and do not attempt to repair or
bridge a blown fuse. Using other than
approved fuses or using repaired or bridged
fuses may cause an overload leading to a fire,
and/or cause damage to electrical
components and/or systems. Have the cause
determined and remedied by an authorized
Mercedes-Benz Center.
Blown fuses must be replaced with fuses of
the same rating, which you can recognize by
the color and value. The fuse ratings are listed
in the fuse allocation chart. An authorized
Mercedes-Benz Center will be happy to
advise you.
i If a fuse has blown, contact a breakdown
service or an authorized Mercedes-Benz
Center.
If the newly inserted fuse also blows, have the
cause traced and rectified at a qualified
specialist workshop, e.g. an authorized
Mercedes-Benz Center.
! Only use fuses that have been approved
for Mercedes-Benz vehicles and which
Fuses309Breakdown assistanceZ