MERCEDES-BENZ CLS-Class 2013 W218 Manual PDF
Manufacturer: MERCEDES-BENZ, Model Year: 2013, Model line: CLS-Class, Model: MERCEDES-BENZ CLS-Class 2013 W218Pages: 376, PDF Size: 13.45 MB
Page 71 of 376
R
PRE-SAFE ®
is no longer available, nor is it
activated if you brake firmly and ESP ®
intervenes.
R PRE-SAFE ®
Brake is no longer available, it
is
also not activated if you brake firmly and
ESP ®
intervenes.
R ABS still provides support when you brake.
R engine torque is no longer limited and the
drive wheels are able to spin. The spinning
wheels produce a cutting effect for better
traction.
Vehicles with ECO start/stop function: the
ECO start/stop function switches the engine
off automatically when the vehicle comes to
a stop. The engine starts automatically when
the driver wants to pull away again. ESP ®
remains in its previously selected status.
Example: if ESP ®
was deactivated before the
engine was switched off, ESP ®
remains
deactivated when the engine is switched on
again. EBD (electronic brake force
distribution)
i Observe the "Important safety notes"
section ( Y page 63). G
WARNING
If EBD has malfunctioned, the rear wheels can
still lock, e.g. under full braking. This
increases
the risk of skidding and an accident.
You should therefore adapt your driving style
to the different handling characteristics. Have
the brake system checked at a qualified
specialist workshop.
Observe information regarding indicator and
warning lamps ( Y page 258) as well as
display messages ( Y page 231).
EBD monitors and controls the brake
pressure on the rear wheels to improve
driving stability while braking. ADAPTIVE BRAKE
ADAPTIVE BRAKE enhances braking safety
and offers increased braking comfort. In
addition to the braking function, ADAPTIVE
BRAKE also has the HOLD function
(Y page 178) and hill start assist
(Y page 142). PRE-SAFE
®
Brake
i Observe the "Important safety notes"
section ( Y page 63).
PRE-SAFE ®
Brake is only available in vehicles
with DISTRONIC PLUS.
PRE-SAFE ®
Brake can help you to minimize
the risk of a collision with a vehicle ahead or
reduce the effects of such a collision. If PRE-
SAFE ®
Brake detects a risk of collision, you
will be warned visually and acoustically as
well as by automatic braking. PRE-SAFE ®
Brake cannot prevent a collision without your
intervention.
Above a speed of around 4 mph (7 km/h), this
function warns you if you are very quickly
approaching a vehicle in front. An
intermittent warning tone will then sound and
the · distance warning lamp will light up
in the instrument cluster.
X Brake immediately in order to increase the
distance from the vehicle in front.
or
X Take evasive action provided it is safe to do
so.
If the driver and front passenger have their
seat
belt fastened, PRE-SAFE ®
Brake can also
brake the vehicle automatically at speeds
from approximately 4 mph (7 km/h) to
approximately 124 mph (200 km/h).
Due to the nature of the system, particularly
complicated driving conditions may cause
unnecessary warnings or the unnecessary
intervention of PRE-SAFE ®
Brake. Driving safety systems
69
Safety Z
Page 72 of 376
You can prevent the intervention of the PRE-
SAFE
®
Brake at any time by:
R depressing the accelerator pedal further
R activating kickdown
R releasing the brake pedal.
The braking action of PRE-SAFE ®
Brake is
ended automatically if:
R you maneuver to avoid the obstacle.
R there
is no longer any danger of a rear-end
collision.
R there is no longer an obstacle detected in
front of your vehicle.
With the help of the radar sensor system,
PRE-SAFE ®
Brake can detect obstacles that
are in front of your vehicle for an extended
period of time.
At speeds of up to 40 mph (70 km/h), PRE-
SAFE ®
Brake can also detect stationary
obstacles, for example, stopped or parked
vehicles.
If you approach an obstacle and PRE-SAFE ®
Brake detects a risk of a collision, the system
will alert you both visually and acoustically. If
you do not brake or take evasive action, the
system will warn you by automatically braking
the vehicle gently. If there is an increased risk
of collision, preventive passenger protection
measures (PRE-SAFE ®
) are activated
(Y page 52). If, at speeds over 20 mph
(30 km/h), a risk of collision remains and you
do not brake, take evasive action or
significantly accelerate, automatic braking
may be performed up to the level of
emergency braking. Automatic emergency
braking is not performed until immediately
prior to an accident that can no longer be
avoided. G
WARNING
PRE-SAFE ®
Brake will initially brake your
vehicle by a partial application of the brakes
if
a danger of collision is detected. There may
be a collision unless you also brake.
Automatic emergency braking cannot prevent
a collision. There is a risk of an accident. Always apply the brakes yourself and try to
take evasive action.
G
WARNING
PRE-SAFE ®
Brake cannot always clearly
identify objects and complex traffic
conditions.
In these cases, PRE-SAFE ®
Brake may:
R give an unnecessary warning and then
brake the vehicle
R not give a warning or intervene
There is a risk of an accident.
Always pay particular attention to the traffic
situation and be ready to brake, especially if
PRE-SAFE ®
Brake warns you. Terminate the
intervention
in a non-critical driving situation.
In particular, the detection of obstacles can
be impaired if there is:
R dirt on the sensors or anything else
covering the sensors
R snow or heavy rain
R interference by other radar sources
R the possibility of strong radar reflections,
for example in parking garages
R a narrow vehicle traveling in front, e.g. a
motorbike
R a vehicle traveling in front on a different line
relative to the center of your vehicle G
WARNING
PRE-SAFE ®
Brake does not react:
R to people or animals
R to oncoming vehicles
R to crossing traffic
R when cornering
As a result, PRE-SAFE ®
Brake may neither
give warnings nor intervene in all critical
situations. There is a risk of an accident.
Always pay careful attention to the traffic
situation and be ready to brake. 70
Driving safety systems
Safety
Page 73 of 376
In order to maintain the appropriate distance
to the vehicle in front and thus prevent a
collision,
you must apply the brakes yourself.
X To activate/deactivate: activate or
deactivate PRE-SAFE ®
Brake in the on-
board computer ( Y page 218).
When PRE-SAFE ®
Brake is activated, the
Ä symbol appears in the multifunction
display, as long as the HOLD function is
deactivated (Y
page 178). On vehicles with
the Active Parking Assist driving system,
the Ä symbol is displayed when position
P is engaged or you are driving faster than
22 mph (35 km/h).
For PRE-SAFE ®
Brake to assist you when
driving, the radar sensor system must be
switched on (Y page 223) and be
operational.
Following damage to the front end of the
vehicle,
have the configuration and operation
of the radar sensors checked at a qualified
specialist workshop. This also applies to
collisions at low speeds where there is no
visible damage to the front of the vehicle.
i USA only: This device has been approved
by the FCC as a "Vehicular Radar System".
The radar sensor is intended for use in an
automotive radar system only. Removing,
altering or tampering with the device will
void any warranties, and is not permitted
by the FCC. Do not tamper with, alter, or
use the device in any non-approved way.
Any unauthorized modification to this
device could void the user's authority to
operate the equipment.
i Canada only: This device complies with
RSS-210 of Industry Canada. Operation is
subject to the following two conditions:
1. This device may not cause interference,
and
2. this device must accept any interference
received, including interference that may
cause undesired operation of the device.
Removal, tampering, or altering of the
device will void any warranties, and is not permitted. Do not tamper with, alter, or use
the device in any non-approved way.
Any unauthorized modification to this
device could void the user's authority to
operate the equipment.
Theft deterrent locking system
Immobilizer
X To activate with the SmartKey: remove
the SmartKey from the ignition lock.
X To activate with KEYLESS-GO:
switch the
ignition off and open the driver's door.
X To deactivate: switch on the ignition.
The immobilizer prevents your vehicle from
being started without the correct SmartKey.
When leaving the vehicle, always take the
SmartKey with you and lock the vehicle.
Anyone can start the engine if a valid
SmartKey has been left inside the vehicle.
i The immobilizer is always deactivated
when you start the engine.
In the event that the engine cannot be
started when the starter battery is fully
charged, the immobilizer may be faulty.
Contact an authorized Mercedes-Benz
Center
or call 1-800-FOR-MERCedes (in the
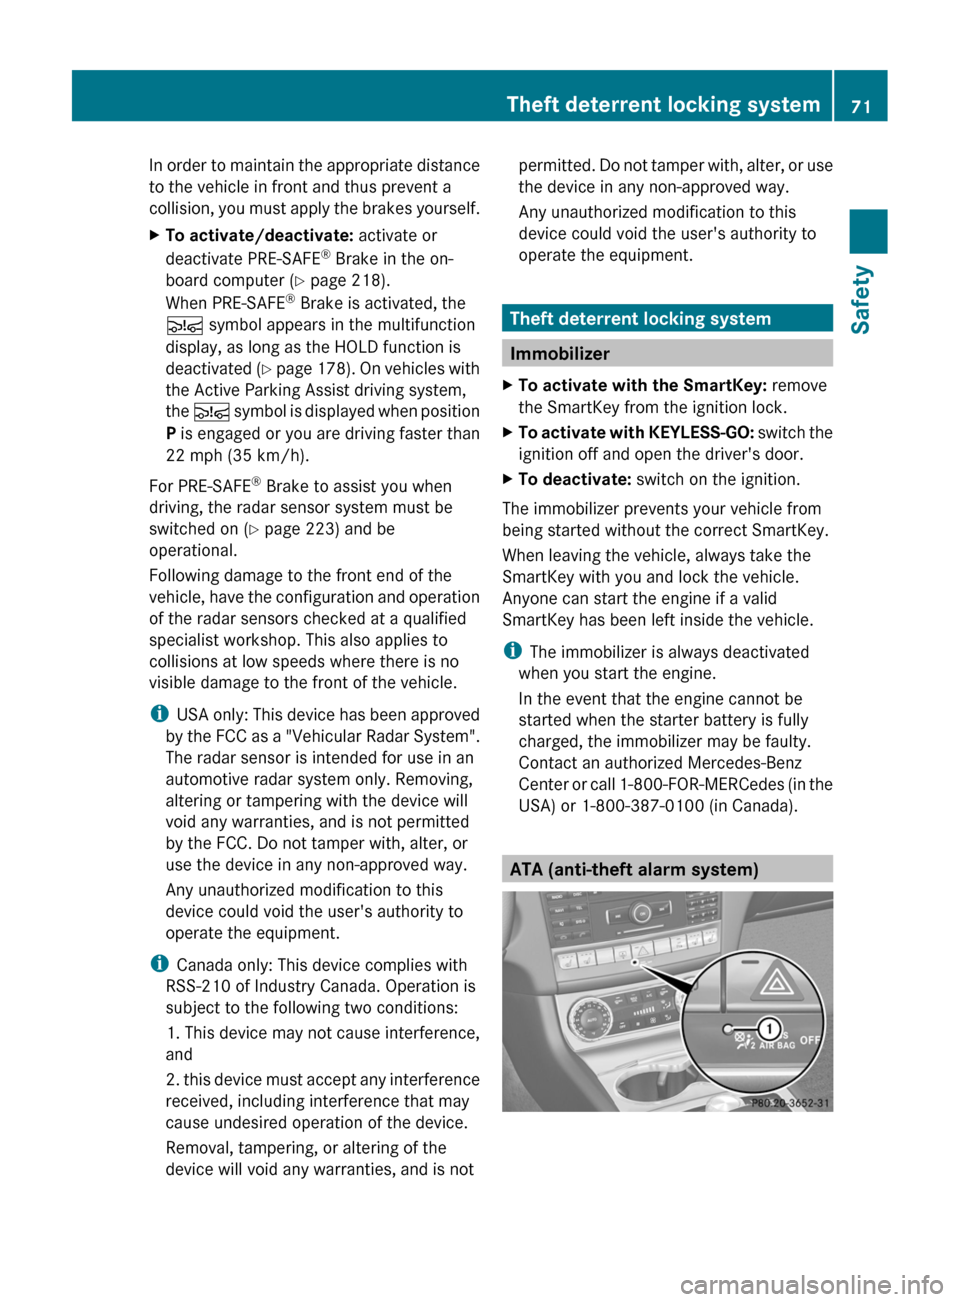
USA) or 1-800-387-0100 (in Canada). ATA (anti-theft alarm system)Theft deterrent locking system
71
Safety Z
Page 74 of 376
X
To arm: lock the vehicle with the SmartKey
or KEYLESS-GO.
Indicator lamp : flashes. The alarm
system is armed after approximately
15 seconds.
X To disarm: unlock the vehicle with the
SmartKey or KEYLESS-GO.
A visual and audible alarm is triggered if the
alarm system is armed and you open:
R a door
R the vehicle with the mechanical key
R the trunk lid
R the hood
X To turn the alarm off with the
SmartKey:
press the % or & button
on the SmartKey.
The alarm is switched off.
or
X Insert the SmartKey into the ignition lock.
The alarm is switched off.
X To stop the alarm using KEYLESS-GO:
grasp the outside door handle. The
SmartKey must be outside the vehicle.
The alarm is switched off.
or
X Press the Start/Stop button on the
dashboard. The SmartKey must be inside
the vehicle.
The alarm is switched off.
The alarm is not switched off, even if you
close the open door that has triggered it, for
example.
i If the alarm stays on for more than
30 seconds,
the Tele Aid system initiates a
call to the Customer Assistance center
automatically. The emergency call system
initiates the call provided that:
R you have subscribed to the mbrace/
TELEAID Service.
R the mbrace/TELEAID Service has been
activated properly.
R the required mobile phone, power supply
and GPS are available.72
Theft deterrent locking system
Safety
Page 75 of 376

Useful information ..............................
74
SmartKey ............................................. 74
Doors .................................................... 80
Trunk .................................................... 82
Side windows ...................................... 87
Sliding sunroof .................................... 90 73Opening/closing
Page 76 of 376
Useful information
i This Operator's Manual describes all
models and all standard and optional
equipment of your vehicle available at the
time of publication of the Operator's
Manual. Country-specific differences are
possible.
Please note that your vehicle may
not be equipped with all features
described. This also applies to safety-
related systems and functions.
i Read the information on qualified
specialist workshops: ( Y page 24).SmartKey
Important safety notes
G
WARNING
When leaving the vehicle, always remove the
SmartKey from the ignition lock. Always take
the SmartKey with you and lock the vehicle.
Do not leave children unsupervised in the
vehicle, even if they are secured in a child
restraint
system, and do not give them access
to an unlocked vehicle. A child's unsupervised
access to a vehicle could result in an accident
and/or serious personal injury. They could:
R injure themselves on vehicle parts
R be seriously or fatally injured by extreme
heat or cold
R injure themselves or have an accident with
vehicle equipment that may still be in
operation even after the SmartKey has
been removed from the ignition, such as the
seat adjustment, steering wheel
adjustment or memory function.
If children open a door, they could cause
severe or even fatal injury to other persons; if
they get out of the vehicle, they could injure
themselves when doing so or be seriously or
even fatally injured by any passing traffic.
Do not expose the child restraint system to
direct sunlight. The child restraint system's
metal parts, for example, could become very hot, and a child could be burned on these
parts.
G
WARNUNG
If a key ring is too heavy or too large, the
weight
acting on the SmartKey could cause it
to turn in the ignition lock or catch on the
steering wheel. This could cause the engine
to be switched off suddenly. You could lose
control of the vehicle and cause an accident.
Do not attach any heavy or large key rings to
the SmartKey that is inserted in the ignition.
i USA only:
This device complies with Part 15 of the
FCC Rules. Operation is subject to the
following two conditions:
1. This device may not cause interference,
and
2. this device must accept any interference
received, including interference that may
cause undesired operation.
Any unauthorized modification to this
device could void the user's authority to
operate the equipment.
The Product label with FCC ID and IC
certification number can be found in the
battery case of the SmartKey.
i Canada only:
This device complies with RSS-210 of
Industry Canada. Operation is subject to
the following two conditions:
1. This device may not cause interference,
and
2. this device must accept any interference
received, including interference that may
cause undesired operation.
Any unauthorized modification to this
device could void the user's authority to
operate the equipment. 74
SmartKey
Opening/closing
Page 77 of 376
The Product label with FCC ID and IC
certification number can be found in the
battery case of the SmartKey.
R Do not keep the SmartKey:
-with electronic devices, e.g. a mobile
phone or another SmartKey
- with
metallic objects, e.g. coins or metal
foil
- inside metallic objects, e.g. a metal case
This can affect the SmartKey's
functionality.
Keep the SmartKey away from strong
magnetic fields. Otherwise, the remote
control function could be affected. SmartKey functions
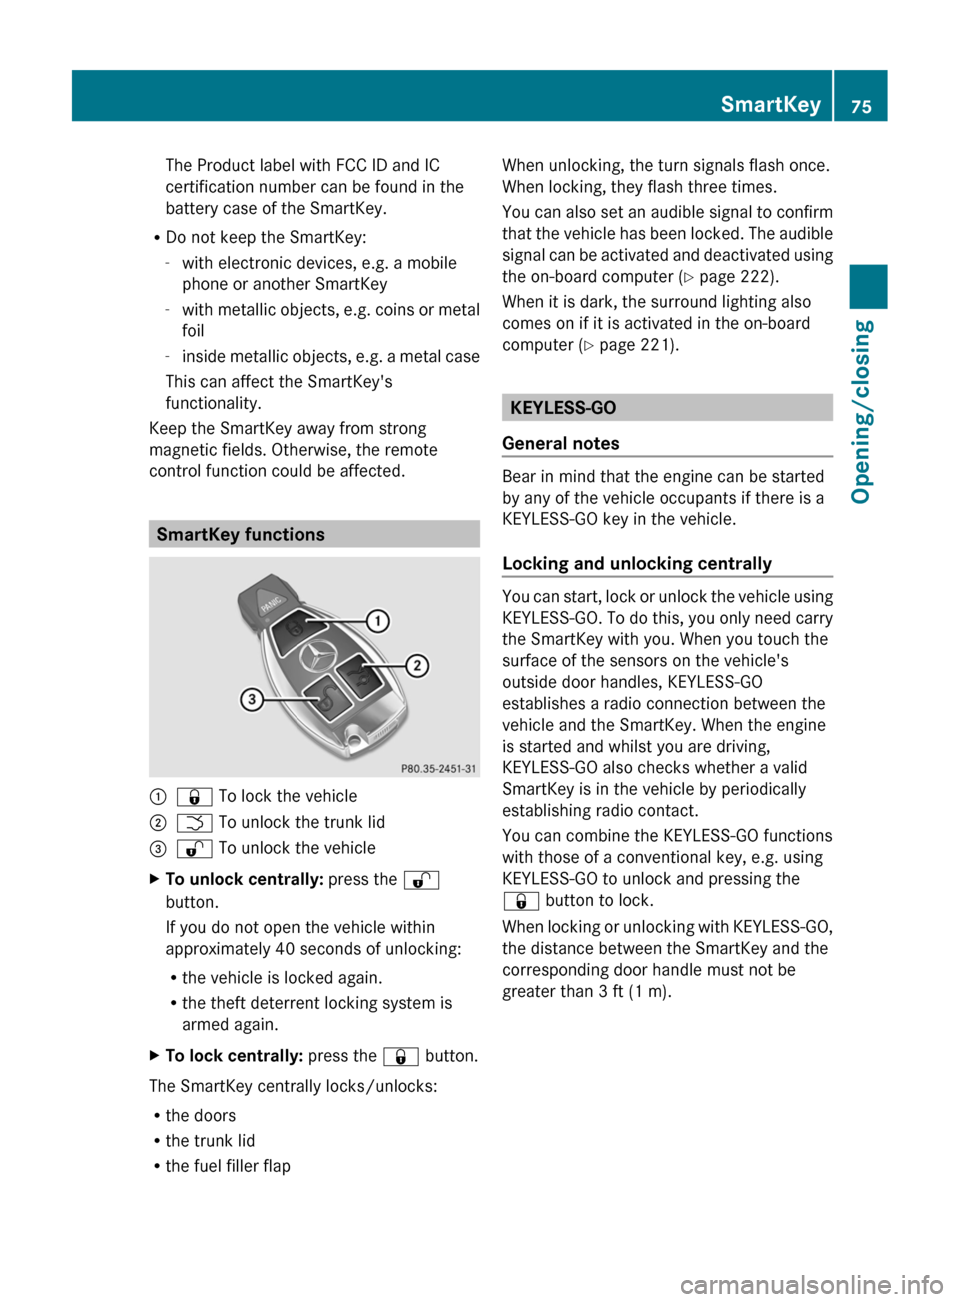
:
& To lock the vehicle
; F To unlock the trunk lid
= % To unlock the vehicle
X To unlock centrally: press the %
button.
If you do not open the vehicle within
approximately
40 seconds of unlocking:
R the vehicle is locked again.
R the theft deterrent locking system is
armed again.
X To lock centrally: press the & button.
The SmartKey centrally locks/unlocks:
R the doors
R the trunk lid
R the fuel filler flap When unlocking, the turn signals flash once.
When locking, they flash three times.
You
can also set an audible signal to confirm
that the vehicle has been locked. The audible
signal can be activated and deactivated using
the on-board computer (Y page 222).
When it is dark, the surround lighting also
comes on if it is activated in the on-board
computer (Y page 221). KEYLESS-GO
General notes Bear in mind that the engine can be started
by any of the vehicle occupants if there is a
KEYLESS-GO key in the vehicle.
Locking and unlocking centrally
You can start, lock or unlock the vehicle using
KEYLESS-GO.
To do this, you only need carry
the SmartKey with you. When you touch the
surface of the sensors on the vehicle's
outside door handles, KEYLESS-GO
establishes a radio connection between the
vehicle and the SmartKey. When the engine
is started and whilst you are driving,
KEYLESS-GO also checks whether a valid
SmartKey is in the vehicle by periodically
establishing radio contact.
You can combine the KEYLESS-GO functions
with those of a conventional key, e.g. using
KEYLESS-GO to unlock and pressing the
& button to lock.
When locking or unlocking with KEYLESS-GO,
the distance between the SmartKey and the
corresponding door handle must not be
greater than 3 ft (1 m). SmartKey
75
Opening/closing Z
Page 78 of 376
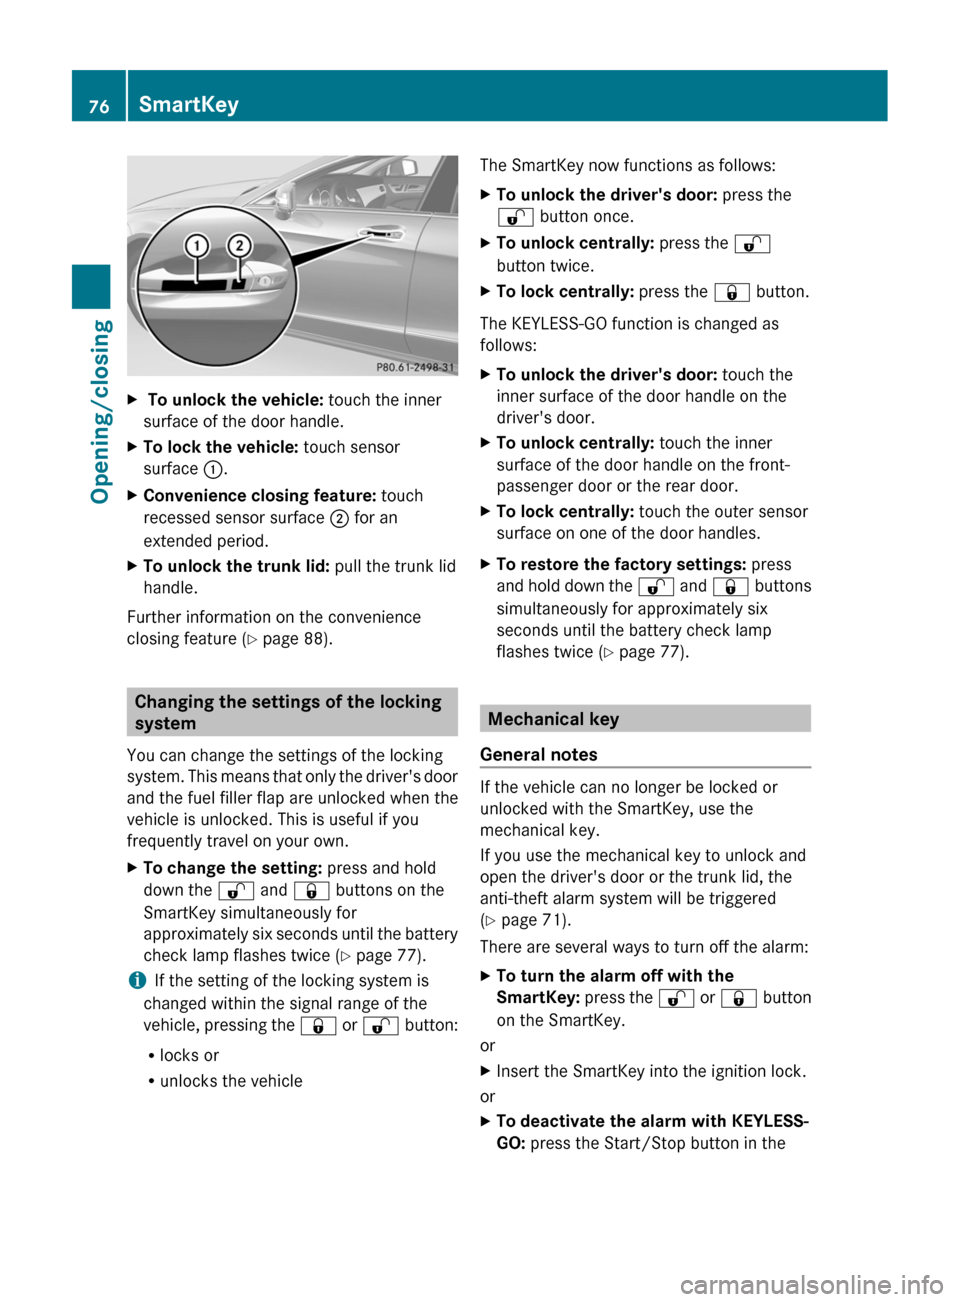
X
To unlock the vehicle: touch the inner
surface of the door handle.
X To lock the vehicle: touch sensor
surface :.
X Convenience closing feature: touch
recessed sensor surface ; for an
extended period.
X To unlock the trunk lid: pull the trunk lid
handle.
Further information on the convenience
closing feature ( Y page 88).Changing the settings of the locking
system
You can change the settings of the locking
system.
This means that only the driver's door
and the fuel filler flap are unlocked when the
vehicle is unlocked. This is useful if you
frequently travel on your own.
X To change the setting: press and hold
down the % and & buttons on the
SmartKey simultaneously for
approximately
six seconds until the battery
check lamp flashes twice ( Y page 77).
i If the setting of the locking system is
changed within the signal range of the
vehicle,
pressing the & or % button:
R locks or
R unlocks the vehicle The SmartKey now functions as follows:
X
To unlock the driver's door: press the
% button once.
X To unlock centrally: press the %
button twice.
X To lock centrally: press the & button.
The KEYLESS-GO function is changed as
follows:
X To unlock the driver's door: touch the
inner surface of the door handle on the
driver's door.
X To unlock centrally: touch the inner
surface of the door handle on the front-
passenger door or the rear door.
X To lock centrally: touch the outer sensor
surface on one of the door handles.
X To restore the factory settings: press
and
hold down the % and & buttons
simultaneously for approximately six
seconds until the battery check lamp
flashes twice ( Y page 77). Mechanical key
General notes If the vehicle can no longer be locked or
unlocked with the SmartKey, use the
mechanical key.
If you use the mechanical key to unlock and
open the driver's door or the trunk lid, the
anti-theft alarm system will be triggered
(Y page 71).
There are several ways to turn off the alarm:
X
To turn the alarm off with the
SmartKey:
press the % or & button
on the SmartKey.
or
X Insert the SmartKey into the ignition lock.
or
X To deactivate the alarm with KEYLESS-
GO: press the Start/Stop button in the76
SmartKey
Opening/closing
Page 79 of 376
ignition lock. The SmartKey must be in the
vehicle.
or
X Lock or unlock the vehicle using KEYLESS-
GO. The SmartKey must be outside the
vehicle.
If you unlock the vehicle using the mechanical
key, the fuel filler flap will not be unlocked
automatically.
X To unlock the fuel filler flap: insert the
SmartKey into the ignition lock.
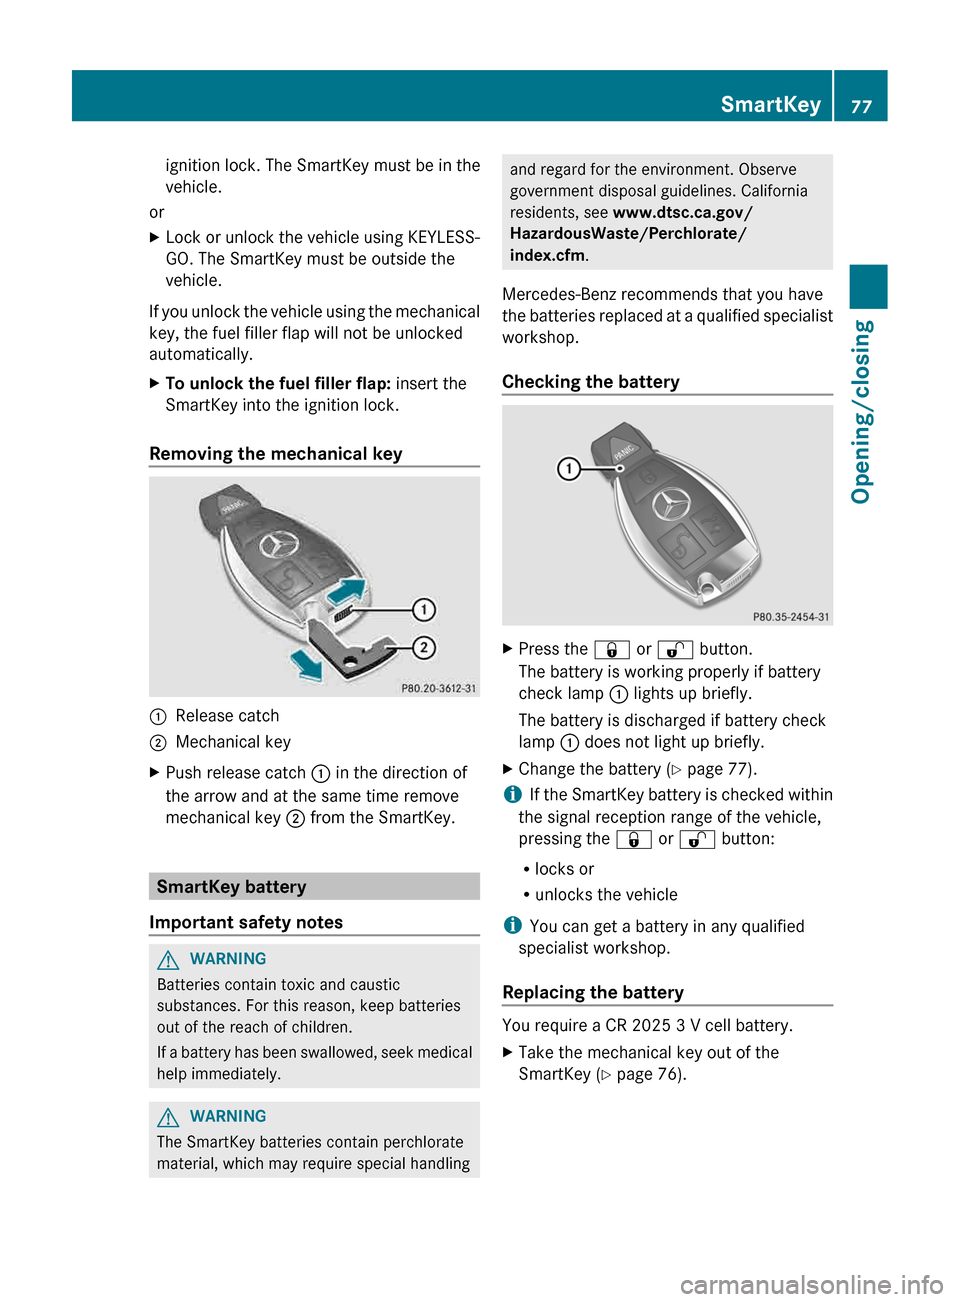
Removing the mechanical key :
Release catch
; Mechanical key
X Push release catch : in the direction of
the arrow and at the same time remove
mechanical key ; from the SmartKey.SmartKey battery
Important safety notes G
WARNING
Batteries contain toxic and caustic
substances. For this reason, keep batteries
out of the reach of children.
If
a battery has been swallowed, seek medical
help immediately. G
WARNING
The SmartKey batteries contain perchlorate
material, which may require special handling and regard for the environment. Observe
government disposal guidelines. California
residents, see www.dtsc.ca.gov/
HazardousWaste/Perchlorate/
index.cfm.
Mercedes-Benz recommends that you have
the
batteries replaced at a qualified specialist
workshop.
Checking the battery X
Press the & or % button.
The battery is working properly if battery
check lamp : lights up briefly.
The battery is discharged if battery check
lamp : does not light up briefly.
X Change the battery ( Y page 77).
i If
the SmartKey battery is checked within
the signal reception range of the vehicle,
pressing the & or % button:
R locks or
R unlocks the vehicle
i You can get a battery in any qualified
specialist workshop.
Replacing the battery You require a CR 2025 3 V cell battery.
X
Take the mechanical key out of the
SmartKey (Y page 76). SmartKey
77
Opening/closing Z
Page 80 of 376
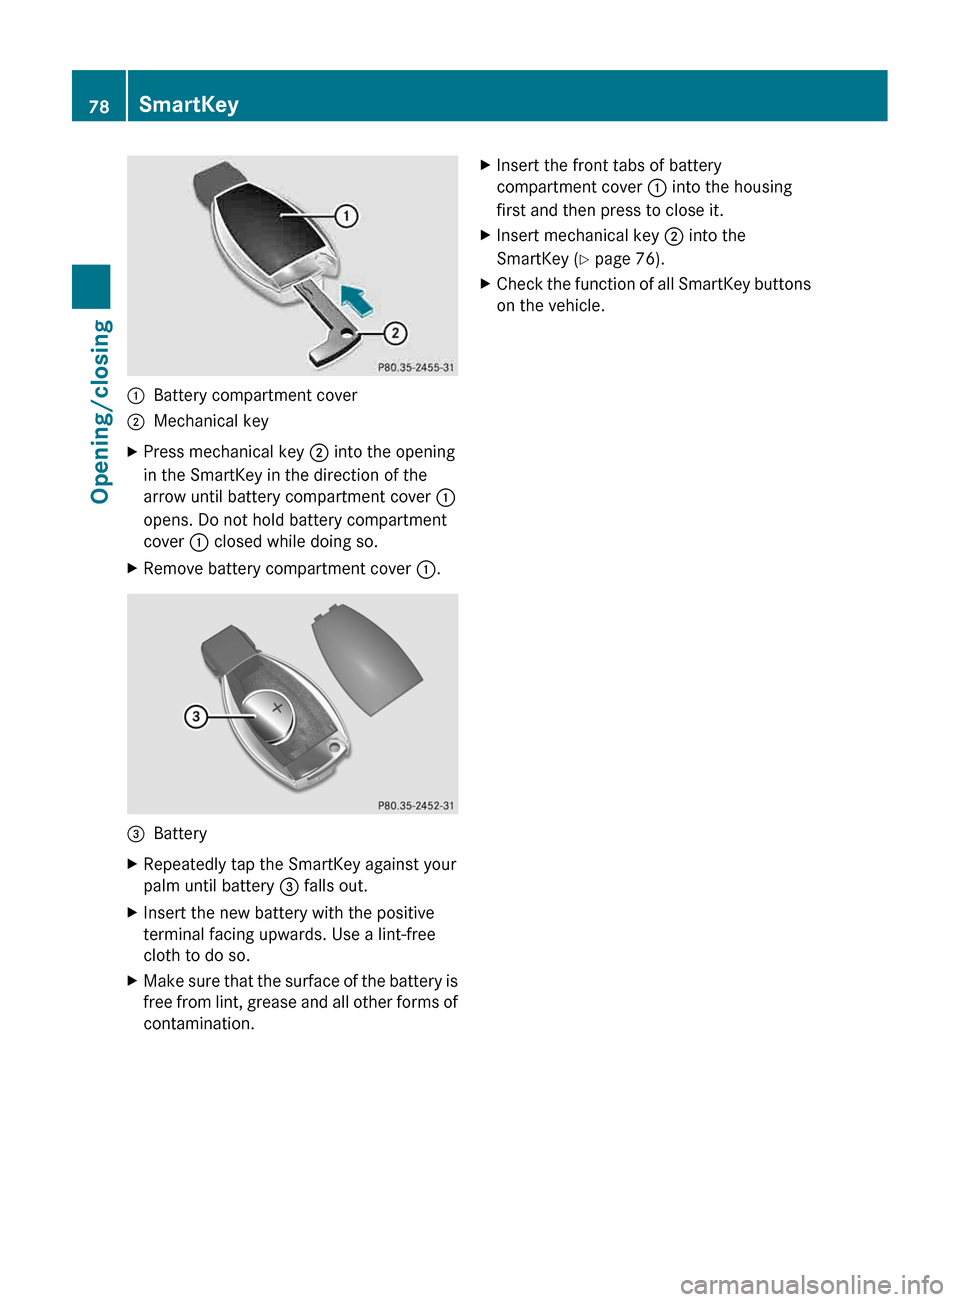
:
Battery compartment cover
; Mechanical key
X Press mechanical key ; into the opening
in the SmartKey in the direction of the
arrow until battery compartment cover :
opens. Do not hold battery compartment
cover : closed while doing so.
X Remove battery compartment cover :.=
Battery
X Repeatedly tap the SmartKey against your
palm until battery = falls out.
X Insert the new battery with the positive
terminal facing upwards. Use a lint-free
cloth to do so.
X Make sure that the surface of the battery is
free
from lint, grease and all other forms of
contamination. X
Insert the front tabs of battery
compartment cover : into the housing
first and then press to close it.
X Insert mechanical key ; into the
SmartKey (Y page 76).
X Check the function of all SmartKey buttons
on the vehicle.78
SmartKey
Opening/closing