window MERCEDES-BENZ CLS-Class 2014 W218 Service Manual
[x] Cancel search | Manufacturer: MERCEDES-BENZ, Model Year: 2014, Model line: CLS-Class, Model: MERCEDES-BENZ CLS-Class 2014 W218Pages: 382, PDF Size: 5.36 MB
Page 143 of 382
Problems with the rear window defroster
Problem Possible causes/consequences and
000B Solutions
The rear window
defroster has
deactivated
prematurely or cannot
be activated. The battery has not been sufficiently charged.
X
Switch off any consumers that are not required, e.g. reading
lamps, interior lighting or the seat heating.
When the battery is sufficiently charged, the rear window
defroster can be activated again. Activating/deactivating air-
recirculation mode
Points to observe before use You can deactivate the flow of fresh air if
unpleasant odors are enteringt he vehicle
from outside. The air already inside the
vehicle will then be recirculated.
If you switch on air-recirculation mode, the
windows can fog up more quickly, in
particular at low temperatures. Only use air-
recirculation mode briefly to prevent the
windows from fogging up.
The operation of air-recirculation mode is the
same for all control panels.
Activating/deactivating X
Turn the SmartKey to position 2in the
ignition lock (Y page 147).
X To activate: press the0008button.
The indicator lamp in the 0008button lights
up.
i Dual-zone automatic climate control: air-
recirculation mode is automatically
activated at high outside temperatures.
3-zone automatic climate control: air-
recirculation mode is automatically
activated at high levels of pollution or at
high outside temperatures.
When air-recirculation mode is activated
automatically ,the indicator lamp above the 0008
button does not light up. Outside air
is added after about 30 minutes.
X To deactivate: press the0008button.
The indicator lamp in the 0008button goes
out.
i Air-recirculation mode deactivates
automatically:
R after approximately five minutes at
outside temperatures below
approximately 41 ‡(5†)
R after approximately five minutes if
cooling with air dehumidification is
deactivated
R after approximately 30 minutes at
outside temperatures above
approximately 41 ‡(5 †)if the "Cooling
with air dehumidification" function is
activated Activating/deactivating th
eresidual
heat function
The residual heat function is only available in
vehicles for Canada with 3-zon eautomatic
climate control.
It is possible to mak euse of the residual heat
of the engine to continue heatin gthe vehicle
for approximately 30 minutes after the engine
has been switched off .The heating time
depends on the temperature that has been
set. Operating the climate control systems
141Climatecontrol
Page 144 of 382

X
Turn the SmartKey to position 0in the
ignition lock or remove it (Y page 147).
X To activate: press the0018button.
The indicator lamp in the 0018button lights
up.
i If the residual heat function is activated,
the windows may fog up on the inside.
i The blower will run at alow speed
regardless of the airflow setting.
i If you activat ethe residual heat function
at high temperatures, only the ventilation
will be activated. The blower runs at
medium speed.
X To deactivate: press the0018button.
The indicator lamp in the 0018button goes
out.
Residua lheat is deactivated automatically:
R after approximately 30 minutes
R when the ignition is switched on
R if the battery voltage drops Setting the air vents
Important safety notes
G
WARNING
Very hot or very cold air can flow from the air
vents. This could result in burns or frostbite in
the immediate vicinit yofthe air vents. There
is ar isk of injury.
Make sure that all vehicle occupant salways
maintain asufficient distanc etothe air
outlets. If necessary, redirect the airflow to
another area of the vehicle interior.
In order to ensure the direct flow of fresh air
through the air ventsi nto the vehicle interior,
please observe the following notes:
R keep the air inlet between the windshield
and the hood free of blockages, such as ice,
snow or leaves.
R never cover the air ventsora ir intakegrilles
in the vehicle interior. Setting the center air vents
001A
Center air vent,l eft
0010 Center air vent,r ight
0024 Center vent thumbwheel, right
0021 Center vent thumbwheel, left
X To open/close: turn thumbwheels 0024
and 0021up or down. Setting the side air vents
001A
Defroster vent
0010 Side air vent
0024 Control for side air vent
X To open/close: turn thumbwheel 0024up or
down. Setting the glove box air vent
! Close the air vent when heating the
vehicle.
At high outside temperatures, open the air
vent and activat ethe "cooling with air 142
Setting the air ventsClimate control
Page 208 of 382
pedestrians cannot be gaged accurately by
lookin
gatas creen.
It may be the case that objects are highlighted
as well as pedestrians.
Fogged up or dirty windshield G
WARNING
Always remembe rthat you must concentrate
primarily on driving the vehicle. Adriver's
attention to the road must always be his/her
primary focus when driving. For your safety
and the safety of others: stop the vehicle
before attempting to clean fogged up
windows or the windshield area in front of the
Night View Assist Plus camera.
Please remember that when your vehicle is
traveling at aspeed of only 30 mph
(approximately 50 km/h )itcovers adistance
of 44 ft (approximately 14 m) per second.
If the windshield in front of the camera is
fogged up or dirty on the inside or outside, the
Night View Assist Plus displayisa ffected.
X To defrost: check the automatic air
conditioning settings (Y page 140) and fold
down the camera cover (Y page 316).
X To defrost the inside of the windshield:
fold down the camera cover (Y page 316)
and clean the windshield( Ypage 314).206
Driving systemsDriving and parking
Page 244 of 382
Display messages Possible causes/consequences and
000B Solutions
0012
SRS Malfunction
Servic
eRequired There is
amalfunction in th eSRS (Supplemental Restraint
System). The 0012warnin glamp also lights up in th einstrument
cluster.
G WARNING
The air bags or Emergency Tensioning Devices may either be
triggered unintentionally or, in th eevent of an accident, may not
be triggered.
There is an increase driskofi njury.
X Visi taq ualified specialist workshop.
For further information about SRS, see (Y page 41).0012
Front Left
Malfunction
Servic
eRequired or
Front Right Malfunction
Servic
eRequired SRS has malfunctioned at the fron
tonthe left or right .The 0012
warning lamp also lights up in the instrument cluster.
G WARNING
The air bags or Emergenc yTensioning Devices may either be
triggered unintentionally or, in the event of an accident, may not
be triggered.
There is an increased risk of injury.
X Visit aqualified specialist workshop. 0012
Rear Left
Malfunction
Servic
eRequired or
Rear Right Malfunction
Servic
eRequired G
WARNING
The air bags or Emergenc yTensioning Devices may either be
triggered unintentionally or, in the event of an accident, may not
be triggered.
There is an increased risk of injury.
SRS has malfunctioned at the rear on the left or right .The 0012
warning lamp also lights up in the instrument cluster.
X Visit aqualified specialist workshop. 0012
Left Side Curtain
Airbag Malfunction
Servic
eRequired or
Right Side Curtai
nAirbag malfunction
Servic
eRequired There is
amalfunction in the left-hand or right-han dwindow
curtain air bag.
The 0012 warning lamp also lights up in the instrument cluster.
G WARNING
The left or right window curtain air bag may either be triggered
unintentionally or, in the event of an accident, may not be
triggered.
There is an increased risk of injury.
X Visit aqualified specialist workshop. 242
Display messagesOn-boar
dcomputer and displays
Page 297 of 382
X
Select Yes with the
000Aor0004 buttons
on the COMAND system.
X Confirm with the 0001button on the
COMAND system.
The system calculate sthe route and
subsequently starts the route guidance with
the address entered.
i If yo uselect No ,t
he address can be saved
in the address book.
i The Destination Download function is
available if the corresponding mobile
phone network is available and data
transfer is possible.
i Youc an onl yusethe Destination
Download function if the vehicl eis
equipped with anavigation system.
Route Assistance
Thi sservice is part of the mbrace PLUS
Packag eand canno tbepurchased
separately.
i You can also use the Route Assistance
function if your vehicle is not equipped with
an avigation system.
Within the framework of this service, you
receive aprofessional and reliable form of
navigation support without having to leave
your vehicle.
The customer servic erepresentativ efinds a
suitable route depending on your vehicle's
curren tposition and the desired destination.
You will then be guided live through the
current route section.
Search &Send General notes
i
To use "Search &Send", your vehicle
must be equipped with mbrace and a
navigation system. You must also have an
mbrace servic esubscription.
"Search &Send" is adestination entry
service. Adestination address which is found
on Google Maps ®
can be transferred via mbrace directly to your vehicle's navigation
system.
Specifying and sending the destination
address
X
Go to the website http://
www.maps.google.com and enter a
destination address intot he entry field.
X To send the destination address to the
e-mail address of your mbrace
account: click on the corresponding
button.
i Example:
If you select 'Sen dtovehicle' and then
'Mercedes-Benz', the destination address
will be sent to your vehicle.
X When the "Send" dialog window appears:
In the relevant field, enter the e-mail
address which you specified when
activating your mbrace account.
X Click "Send".
i Information on specific commands such
as "Address entry" or "Send" can be found
on the website.
Calling up destination addresses
X Switc hont he ignition.
The destination address is loaded intot he
vehicle's navigation system.
Ad isplay message appears, asking
whether navigation should be started.
X Select Yes by sliding
0003000C0009and turning
0004000C000B the COMAND controller and confirm
with 000E.
The system calculates the rout eand
subsequently starts the rout eguidance
wit hthe address entered.
i If you select No ,t
he address can be saved
in th eaddress book.
i If you have sen tmoret hano ne
destination address ,eachi ndividual
destination must be confirmed separately. Features
295Stowage and featu res Z
Page 305 of 382
Calibratin
gthe compass X
Mak esure that there is sufficient spac efor
you to driv einacircle without impeding
traffic.
In order to calibrat ethe compas scorrectly,
do th efollowing:
R calibrat ethe compas sintheopen and not
in th evicinity of steel structures or high-
voltage transmission lines.
R switch off electrical consumer ssuchast he
climate control, windshield wiper sorrear
window defroster.
R close all door sand th etrunk lid.
X Switch on th eignition.
X Press and hold button 0024(Ypage 302) for
approximately six seconds until the
C symbol appear
sincompas sdisplay 0010
(Y page 302).
X Drive in afull circle at approximately
3m ph (5 km/h )to6mph (10 km/h).
When th ecalibration has successfully been
completed, th ecurren tdirection is shown
in compass display 0010(Ypage 302). Floormats
G
WARNING
Object sinthe driver's footwell can restric tthe
pedal travel or obstruct adepressed pedal.
The operatin gand road safety of the vehicle
is jeopardized. There is arisk of an accident.
Make sure that all objects in the vehicle are
stowed correctly, and that they cannot enter
the driver's footwell. Install the floormats
securely and as specified in order to ensure
sufficien tclearanc efor the pedals. Do not use
loose floormats. X
Slide the seat backwards.
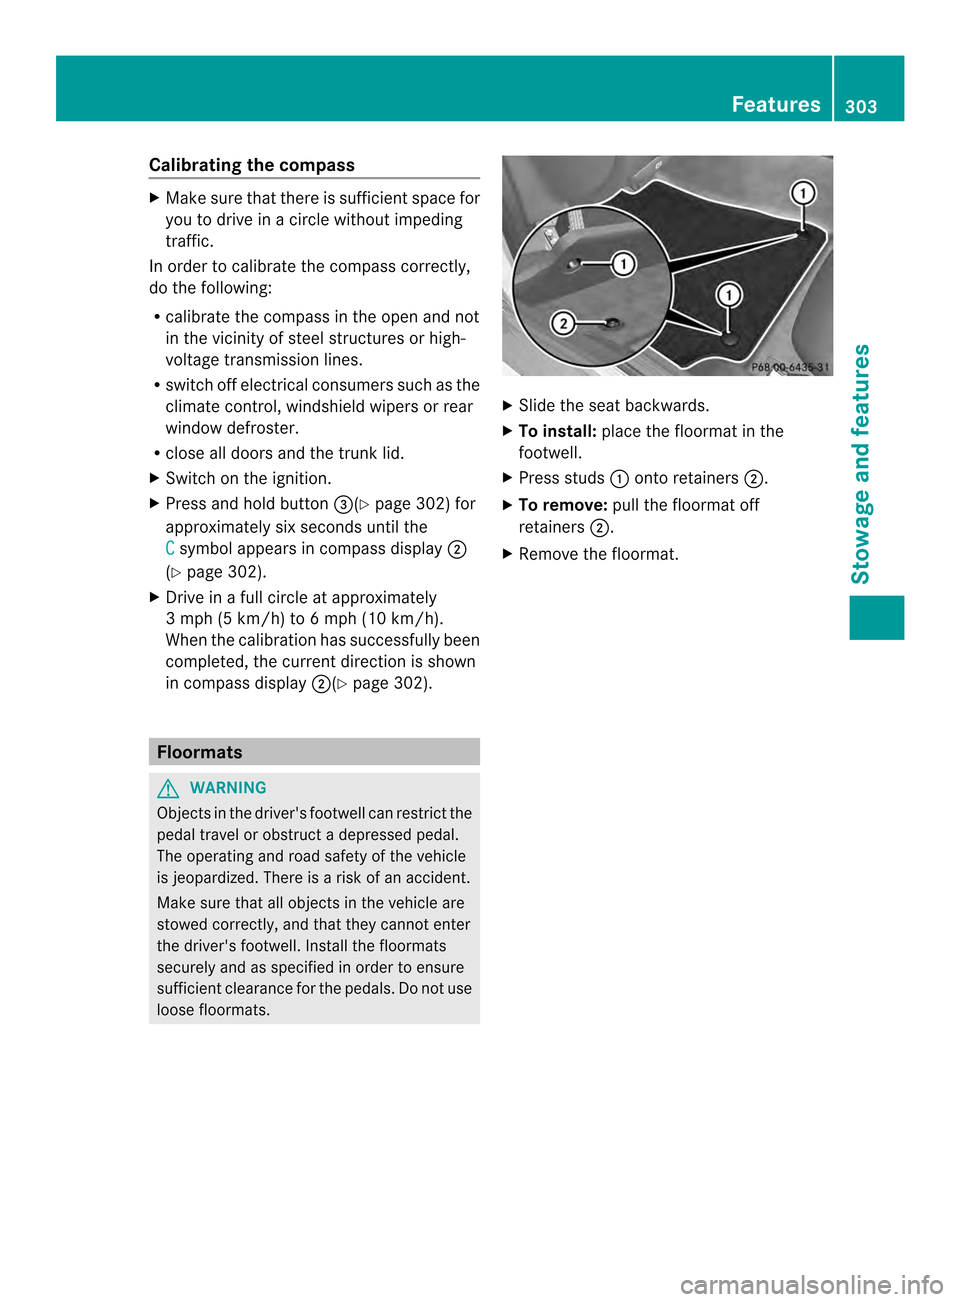
X To install: place the floormat in the
footwell.
X Press studs 001Aontoretainers 0010.
X To remove: pull the floormat off
retainers 0010.
X Remove the floormat. Features
303Stowage and features Z
Page 313 of 382
Under these or similarc
onditions, have, for
example, the air filter, engine oil and oil filter
replaced or changed more frequently. Under
arduous operating conditions, the tires must
be checked more often.F urther information
can be obtained at aqualified specialist
workshop, e.g. an authorized Mercedes-Benz
Center.
Driving abroad
An extensive Mercedes-Benz Servic enetwork
is also available in other countries. You can
obtain further information from any
authorized Mercedes-Benz Center. Care
General notes
H
Environmental note
Dispose of empty packagin gand cleaning
cloth sinane nvironmentally responsible
manner.
! For cleanin gyour vehicle, do not use any
of the following:
R dry, rough or hard cloths
R abrasive cleanin gagents
R solvents
R cleanin gagents containin gsolvents
Do not scrub.
Do not touch the surfaces or protective
films with hard objects, e.g. aring or ice
scraper. You could otherwise scratch or
damage the surfaces and protective film.
! Do not park the vehicle for an extended
period straight after cleanin git, particularly
after having cleaned the wheels with wheel
cleaner. Wheel cleaners could cause
increased corrosion of the brake discs and
brake pads/linings. For this reason, you
should drive for afew minutes after
cleaning. Braking heats the brake discs and
the brake pads/linings, thus drying them.
The vehicle can then be parked. Regular care of your vehicle is
acondition for
retaining the quality in the long term.
Use care product sand cleanin gagents
recommended and approved by Mercedes-
Benz. Washing the vehicle and cleaning the
paintwork
Automatic car wash G
WARNING
Braking efficiency is reduced after washing
the vehicle. There is arisk of an accident.
After the vehicle has been washed, brake
carefully while paying attention to the traffic
conditions until full brakin gpower is restored.
! If DISTRONIC PLUS or the HOLD function
is activated, the vehicle brakes
automatically in certain situations. To
preven tdamage to th evehicle ,deactivate
DISTRONI CPLUS and the HOLD function in
the following or other similar situations:
R when towing the vehicle
R in the car wash
! Never clean yourv ehicle inaTouchless
Automatic Car Wash as these use special
cleanin gagents .These cleaning agents can
damage the paintwork or plastic parts.
! Make sure that:
R the side windows and the sliding sunroof
are fully closed.
R the ventilation/heating is switched off
(the OFF button has been pressed).
R the windshield wiper switch is in position
0.
Otherwise, the vehicle might be damaged.
! In car washes with atowing mechanism,
make sure that the automatic transmission
is in transmission position N,otherwise the
vehicle could be damaged.
R Vehicles with aSmartKey: Care
311Maintenance and care Z
Page 316 of 382
Cleaning th
evehicle parts
Cleaning th ewheels !
Do no tuse acidic wheel cleaning products
to remove brake dust. This could damage
wheel bolts and brake components.
! Do not park the vehicle for an extended
period straight after cleaning it, particularly
after having cleaned the wheels with wheel
cleaner. Wheel cleaners could cause
increased corrosion of the brake discs and
brake pads/linings. For this reason, you
should drive for afew minutes after
cleaning. Braking heats the brake discs and
the brake pads/linings, thus drying them.
The vehicle can then be parked.
Cleaning the windows G
WARNING
You could become trapped by the windshield
wipers if they start moving while cleaning the
windshieldorw iper blades. There is arisk of
injury.
Always switch off the windshieldw ipers and
the ignition before cleaning the windshieldor
wiper blades.
! Do not use dry cloths, abrasive products,
solvents or cleaning agents containing
solvents to clean the inside of the windows.
Do not touch the insides of the windows
with hard objects, e.g. an ice scraper or
ring. There is otherwise arisk of damaging
the windows.
! Cleant he water drainage channels of the
windshield and the rear window at regular
intervals. Deposits such as leaves, petals
and pollen may under certain
circumstances prevent water from draining
away.T his can lead to corrosion damage
and damage to electronic components.
X Cleant he inside and outside of the
windows with adamp cloth and acleaning
product that is recommended and
approved by Mercedes-Benz. Cleaningw
iper blades G
WARNING
You could become trapped by the windshield
wipers if they start moving while cleaning the
windshield or wiper blades. There is arisk of
injury.
Always switch off the windshield wipers and
the ignition before cleaning the windshield or
wiper blades.
! Do not pull the wiper blade. Otherwise,
the wiper blade could be damaged.
! Do not clean wiper blades too often and
do not rub them too hard. Otherwise, the
graphite coating could be damaged. This
could cause wiper noise.
! Hold the wiper arm securely when folding
back. The windshield could be damaged if
the wiper arm smacks against it suddenly.
X Fold the windshield wiper arms away from
the windshield.
X Carefully clean the wiper blades with a
damp cloth.
X Fold the windshield wiper arms back again
before switching on the ignition.
Cleaningt he exterior lighting !
Only use cleaning agents or cleaning
cloths which are suitable for plastic light
lenses. Unsuitable cleaning agents or
cleaning cloths could scratchord amage
the plastic light lenses.
X Cleant he plastic lenses of the exterior
lighting using awet sponge and amild
cleaning agent, e.g. Mercedes-Ben zcar
shampoo or cleanin gcloths.
Mirror turn signals !
Only use cleanin gagents or cleaning
cloth sthata re suitable for plastic lenses.
Unsuitable cleanin gagents or cleaning
cloth scould scratch or damag ethe plastic
lenses of th emirror tur nsignals. 314
CareMaintenance and care