Oil MERCEDES-BENZ CLS-Class 2016 W218 User Guide
[x] Cancel search | Manufacturer: MERCEDES-BENZ, Model Year: 2016, Model line: CLS-Class, Model: MERCEDES-BENZ CLS-Class 2016 W218Pages: 342, PDF Size: 8.28 MB
Page 167 of 342
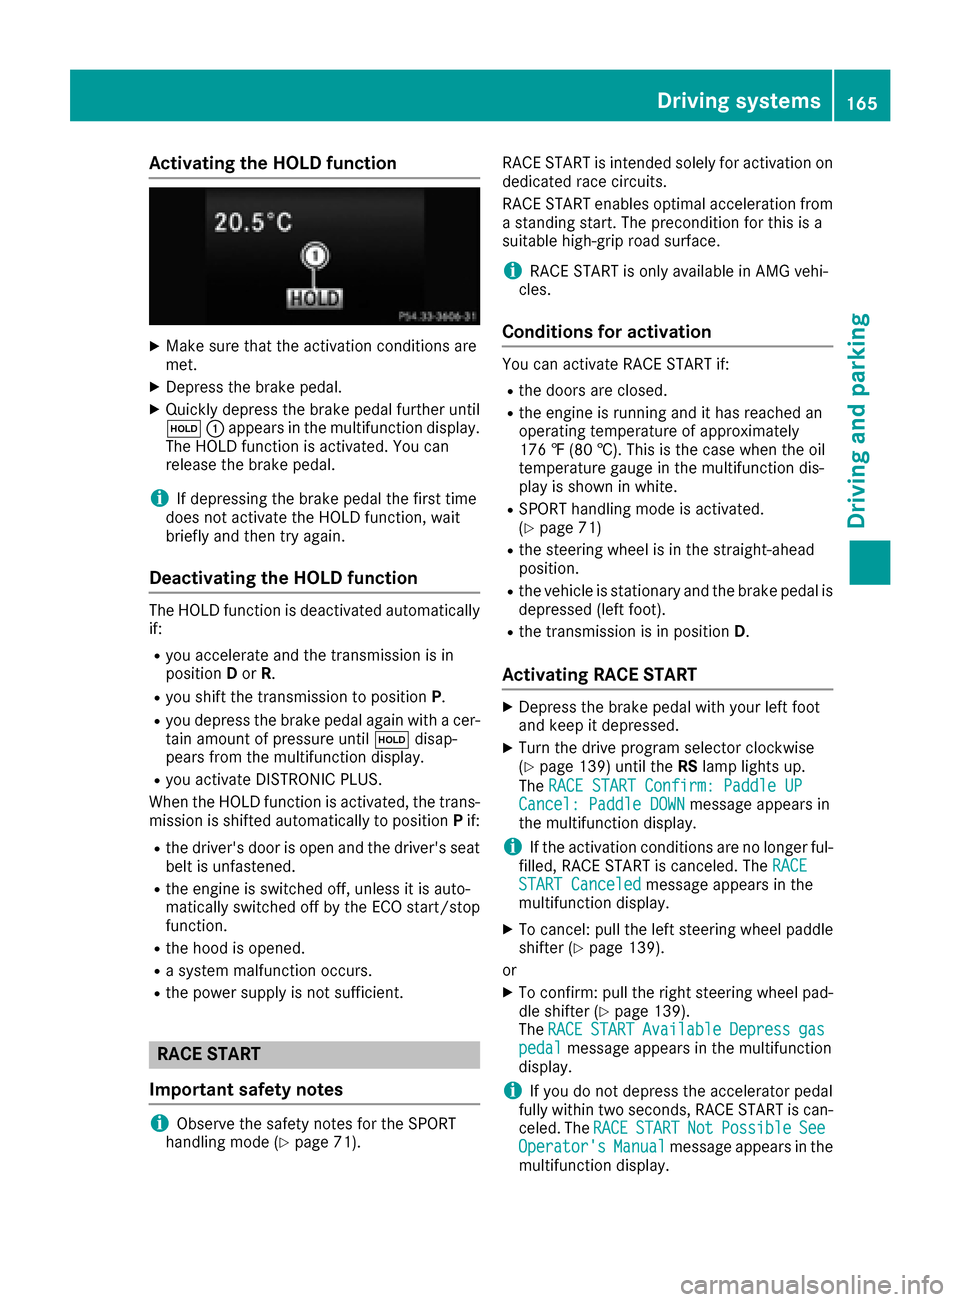
Activating the HOLD function
XMakesur ethat th eactivation condition sare
met .
XDepress th ebrak epedal .
XQuickl ydepress th ebrak epedal further until
ë :appear sin th emultifunction display.
The HOLD function is activated. You can
release th ebrak epedal .
iIf depressing th ebrak epedal th efirst time
does no tactivat eth eHOLD function ,wait
briefl yand then tr yagain .
Deactivating the HOLD function
The HOLD function is deactivated automatically
if:
Ryou accelerate and th etransmission is in
position Dor R.
Ryou shif tth etransmission to position P.
Ryou depress thebrak epedal again wit h acer-
tai namount of pressur euntil ë disap-
pear sfrom th emultifunction display.
Ryou activat eDISTRONI CPLUS.
When th eHOLD function is activated, th etrans -
mission is shifte dautomatically to position Pif:
Rth edriver's door is open and th edriver's seat
belt is unfastened.
Rth eengin eis switched off ,unless it is auto -
matically switched off by th eECO start/sto p
function .
Rthehoo dis opened.
Rasystem malfunction occurs.
Rth epowe rsupply is no tsufficient.
RACE START
Import ant safety notes
iObserveth esafet ynote sfor th eSPORT
handlin gmod e (Ypage 71). RACE START is intended solely for activation on
dedicate
drac ecircuits.
RACE START enables optimal acceleration from
a standing start .The precondition for this is a
suitable high-grip road surface.
iRACE START is only available in AM Gvehi-
cles.
Conditions for activati on
You can activateRACE START if:
Rth edoor sare closed.
Rth eengin eis runnin gand it has reached an
operating temperature of approximately
17 6 ‡ (80 †) .This is the case when the oil
temperature gauge in the multifunction dis-
play is shown in white.
RSPORT handling mode is activated.
(Ypage 71)
Rthe steering wheel is in the straight-ahead
position.
Rthe vehicle is stationary and the brake pedal is
depressed (left foot).
Rthe transmission is in position D.
Activating RACE START
XDepress the brake pedal with your left foot
and keep it depressed.
XTurn the drive program selector clockwise
(Ypage 139) until theRSlamp lights up.
The RACE START Confirm: Paddle UP
Cancel: Paddle DOWNmessage appears in
the multifunction display.
iIf the activation conditions are no longer ful-
filled, RACE START is canceled. The RACE
START Canceledmessage appears in the
multifunction display.
XTo cancel: pull the left steering wheel paddle
shifter (Ypage 139).
or
XTo confirm: pull the right steering wheel pad- dle shifter (Ypage 139).
The RACESTARTAvailableDepressgaspedalmessage appears in the multifunction
display.
iIf you do not depress the accelerator pedal
fully within two seconds, RACE START is can-
celed. The RACE
STARTNotPossibleSeeOperator'sManualmessage appears in the
multifunction display.
Driving systems165
Driving and parking
Z
Page 211 of 342
XPress the:or9 button to select the
Auto. Mirror Foldingfunction.
If the Auto. Mirror Foldingfunction is
switched on, the multifunction display shows
the vehicle's exterior mirror in orange.
XPress the abutton to save the setting.
If you have switched on the Auto. MirrorFoldingfunction and you fold in the exterior
mirrors by pressing button :, the exterior mir-
rors will not fold out automatically (
Ypage 104).
You can then only fold out the exterior mirrors
using button :.
Restoring the factory settings
XPress the=or; button on the steering
wheel to select the Sett.menu.
XPress the:or9 button to select the
Factory Settingsubmenu.
XPress ato confirm.
The Reset All Settings?function
appears.
XPress the :or9 button to select Noor
Yes.
XPress ato confirm the selection.
If you have selected Yesand confirmed, the
multifunction display shows a confirmation
message.
For safety reasons, the Day Lights
function in
the Lightssubmenu is only reset if the vehicle
is stationary.
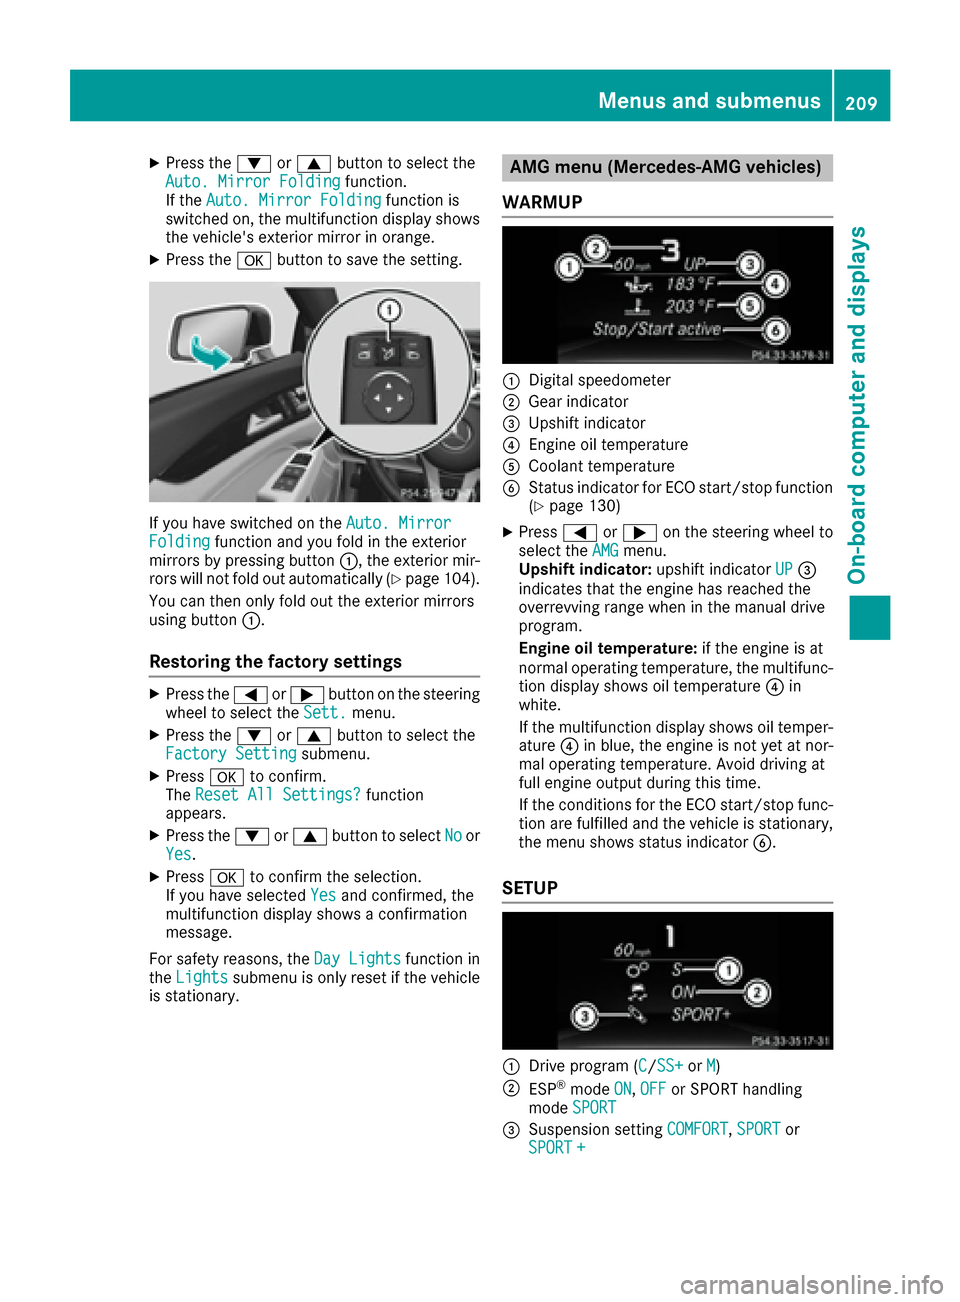
AMG menu (Mercedes-AMG vehicles)
WARMUP
:Digital speedometer
;Gear indicator
=Upshift indicator
?Engine oil temperature
ACoolant temperature
BStatus indicator for ECO start/stop function
(Ypage 130)
XPress =or; on the steering wheel to
select the AMGmenu.
Upshift indicator: upshift indicatorUP=
indicates that the engine has reached the
overrevving range when in the manual drive
program.
Engine oil temperature: if the engine is at
normal operating temperature, the multifunc- tion display shows oil temperature ?in
white.
If the multifunction display shows oil temper-
ature ?in blue, the engine is not yet at nor-
mal operating temperature. Avoid driving at
full engine output during this time.
If the conditions for the ECO start/stop func-
tion are fulfilled and the vehicle is stationary,
the menu shows status indicator B.
SETUP
:Drive program (C/SS+orM)
;ESP®mode ON,OFFor SPORT handling
mode SPORT
=Suspension setting COMFORT,SPORTor
SPORT +
Menus and submenus209
On-board computer and displays
Z
Page 225 of 342
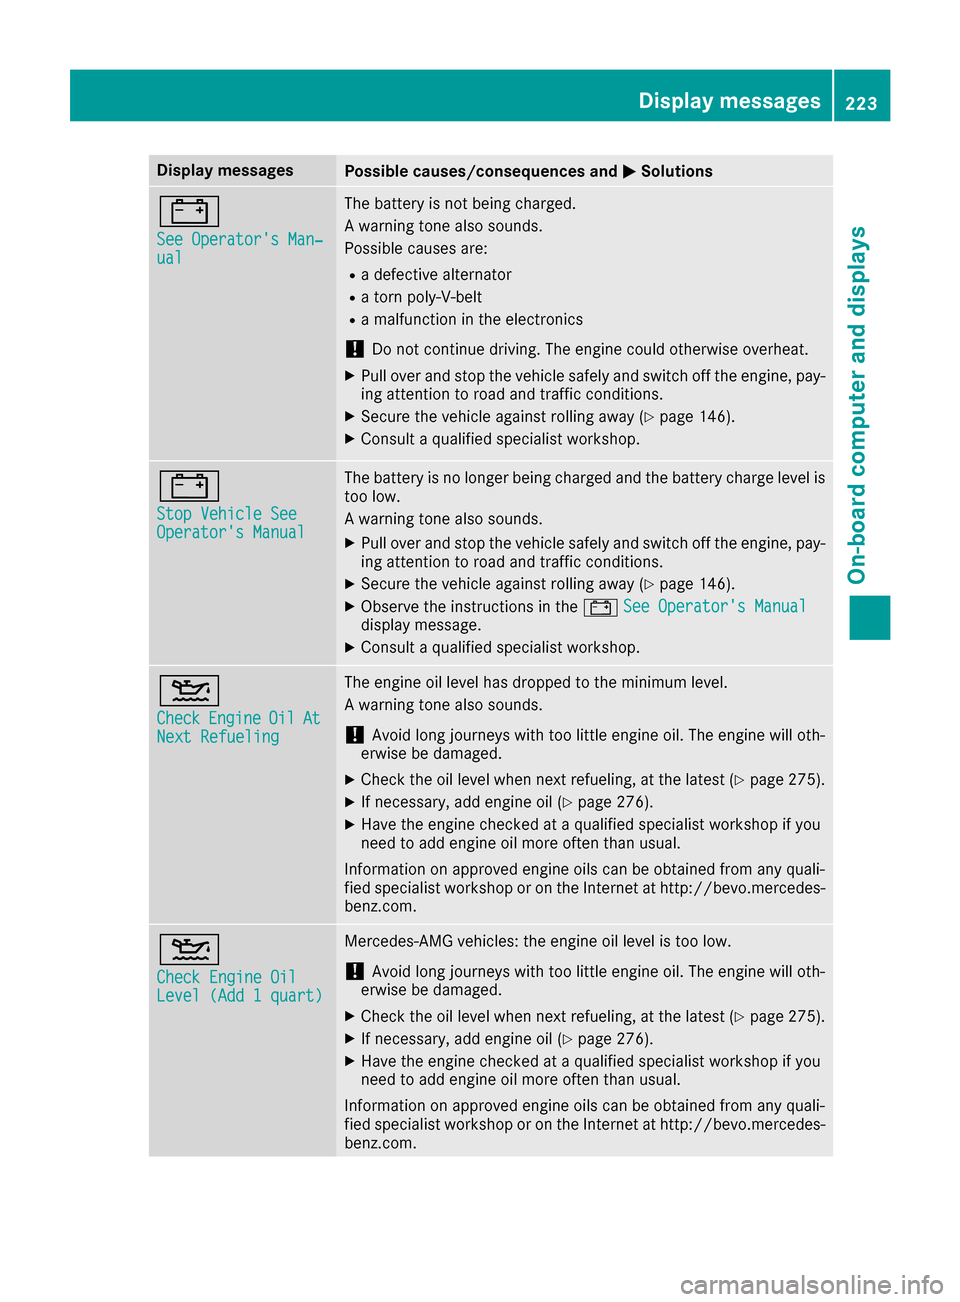
Display messagesPossible causes/consequences andMSolutions
#
See Operator'sMan ‐ual
The battery is no tbein gcharged.
A warning tone also sounds.
Possibl ecauses are:
Radefective alternato r
Ratorn poly-V-belt
Ramalfunction in th eelectronics
!Do no tcontinu edriving. The engin ecould otherwise overheat.
XPull ove rand stop th evehicl esafely and switch off th eengine, pay-
ing attention to roa dand traffic conditions.
XSecur eth evehicl eagainst rollin gaway (Ypage 146).
XConsult aqualified specialist workshop .
#
StopVehicl eSeeOperator' sManual
The battery is no longer bein gcharged and th ebattery charg elevel is
to olow.
A warning tone also sounds.
XPull ove rand stop th evehicl esafely and switch off th eengine, pay-
ing attention to roa dand traffic conditions.
XSecur eth evehicl eagainst rollin gaway (Ypage 146).
XObserv eth einstruction sin th e# See Operator' sManualdisplay message .
XConsultaqualified specialist workshop .
4
CheckEngineOilAtNextRefueling
The engin eoil level has dropped to th eminimum level.
A warning tone also sounds.
!Avoid lon gjourneys wit hto olittl eengin eoil. The engin ewill oth-
erwise be damaged.
XChec kth eoil level when next refueling, at th elatest (Ypage 275).
XIf necessary, add engin eoil (Ypage 276).
XHav eth eengin echecke dat aqualified specialist workshop if you
need to add engin eoil mor eoften than usual.
Information on approve dengin eoils can be obtained from any quali-
fie dspecialist workshop or on th eInternet at http://bevo.mercedes -
benz.com.
4
Check Engine OilLevel (Ad d 1quart)
Mercedes-AMG vehicles: th eengin eoil level is to olow.
!Avoid lon gjourneys wit hto olittl eengin eoil. The engin ewill oth-
erwise be damaged.
XChec kth eoil level when next refueling, at th elatest (Ypage 275).
XIf necessary, add engin eoil (Ypage 276).
XHav eth eengin echecke dat aqualified specialist workshop if you
need to add engin eoil mor eoften than usual.
Information on approve dengin eoils can be obtained from any quali-
fie dspecialist workshop or on th eInternet at http://bevo.mercedes -
benz.com.
Display messages22 3
On-board computer and displays
Z
Page 226 of 342

Display messagesPossible causes/consequences andMSolutions
4
Engine Oil LevelLow StopVehicl eTurnEngine Off
Mercedes-AMG vehicles: th eengin eoil level is to olow. There is aris k
of engin edamage.
XPull ove rand stop th evehicl esafely and switch off th eengine, pay-
ing attention to roa dand traffic conditions.
XSecur eth evehicl eagainst rollin gaway (Ypage 146).
XCheckth eengin eoil level (Ypage 275).
XIf necessary, add engin eoil (Ypage 276).
8
Fue lLevel Low
The fuel level has dropped int oth ereserv erange.
XRefue lat th eneares tgas station .
CThere is only aver ysmall amount of fuel in th efuel tank.
XRefue lat th eneares tgas station without fail .
8
Gas Cap Loose
The fuel filler cap is notclosed correctl yor th efuel system is leaking .
XCheckthat th efuel filler cap is correctl yclosed .
If th efuel filler cap is not correctl yclosed :
XCloseth efuel filler cap .
If th efuel filler cap is correctl yclosed :
XVisitaqualified specialist workshop .
Driving systems
Display messagesPossible causes/consequences and MSolutions
À
Attention Assist:Take a Break!
Based on certain criteria, ATTENTION ASSIST has detecte dfatigue or
a lack of concentration on th epart of th edriver . Awarning tone also
sounds.
XIf necessary, tak e abreak.
During lon gjourneys, tak eregular breaks in goo dtime so you get
enough rest.
À
Attention AssistInoperative
ATTENTION ASSIST is inoperative.
XVisit aqualified specialist workshop .
¨
VehicleRising
Your vehicl eis adjusting to th elevel you hav eselected.
¨
Vehicl eRisingPlease Wai t
The vehiclelevel is to olow when th evehicl eis stationary. Awarning
tone also sounds.
XDo no tpull away.
The vehicl elevel is set when th edisplay message disappears.
224Display messages
On-board computer and displays
Page 277 of 342
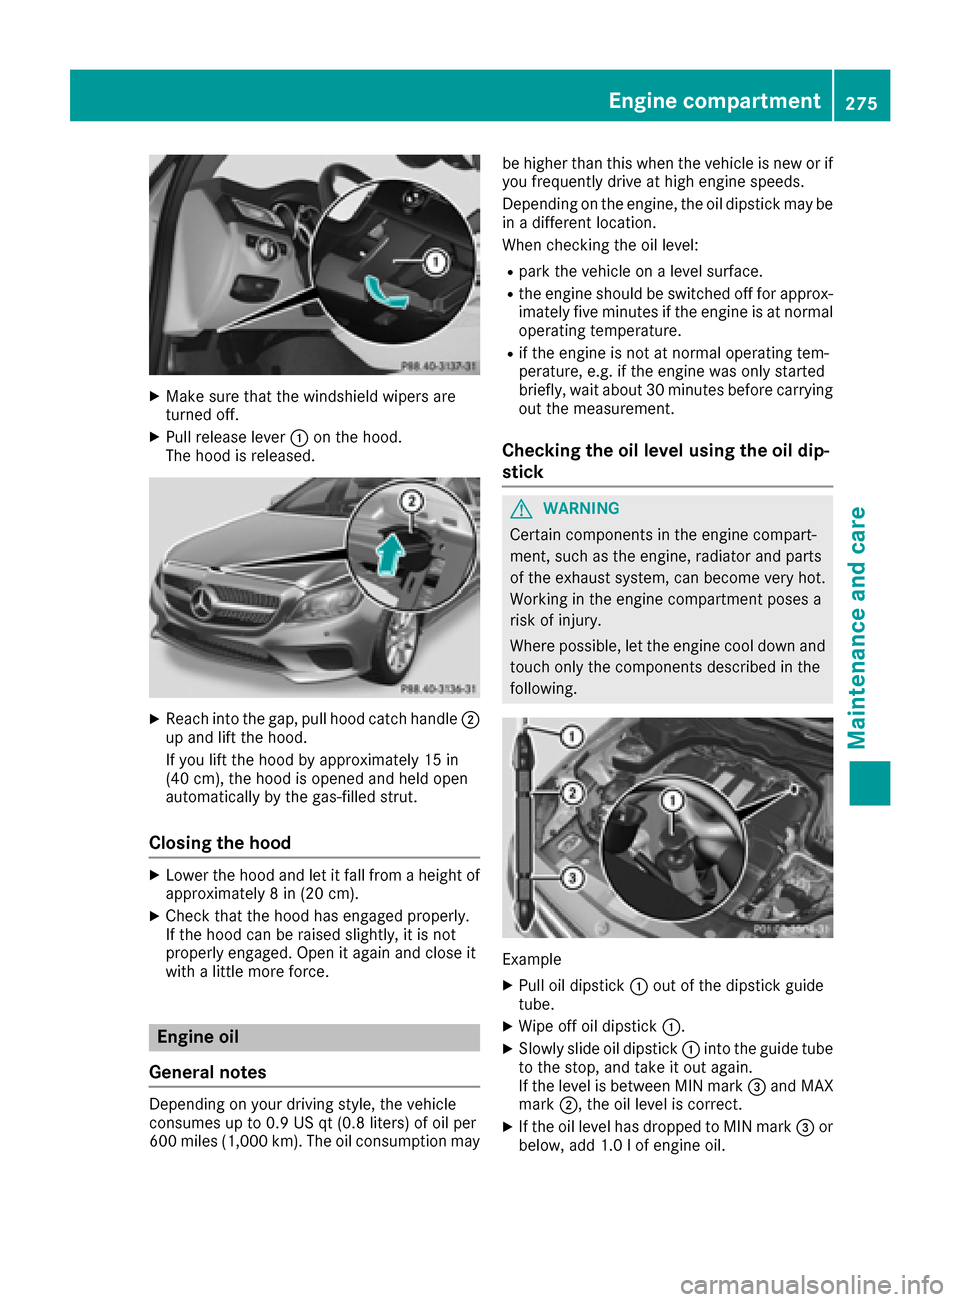
XMake sure that the windshield wipers are
turned off.
XPull release lever:on the hood.
The hood is released.
XReach into the gap, pull hood catch handle ;
up and lift the hood.
If you lift the hood by approximately 15 in
(40 cm), the hood is opened and held open
automatically by the gas-filled strut.
Closing the hood
XLower the hood and let it fall from a height of
approximately 8 in (20 cm).
XCheck that the hood has engaged properly.
If the hood can be raised slightly, it is not
properly engaged. Open it again and close it
with a little more force.
Engine oil
General notes
Depending on your driving style, the vehicle
consumes up to 0.9 US qt (0.8 liters) of oil per
600 miles (1,000 km). The oil consumption may be higher than this when the vehicle is new or if
you frequently drive at high engine speeds.
Depending on the engine, the oil dipstick may be
in a different location.
When checking the oil level:
Rpark the vehicle on a level surface.
Rthe engine should be switched off for approx-
imately five minutes if the engine is at normal
operating temperature.
Rif the engine is not at normal operating tem-
perature, e.g. if the engine was only started
briefly, wait about 30 minutes before carrying
out the measurement.
Checking the oil level using the oil dip-
stick
GWARNING
Certain components in the engine compart-
ment, such as the engine, radiator and parts
of the exhaust system, can become very hot.
Working in the engine compartment poses a
risk of injury.
Where possible, let the engine cool down and touch only the components described in the
following.
Example
XPull oil dipstick :out of the dipstick guide
tube.
XWipe off oil dipstick :.
XSlowly slide oil dipstick :into the guide tube
to the stop, and take it out again.
If the level is between MIN mark =and MAX
mark ;, the oil level is correct.
XIf the oil level has dropped to MIN mark =or
below, add 1.0 l of engine oil.
Engine compartment275
Maintenance and care
Z
Page 278 of 342
Adding engine oil
GWARNING
Certain component sin th eengin ecompart-
ment, suc has th eengine, radiato rand part s
of th eexhaust system, can become ver yhot .
Working in th eengin ecompartmen tposes a
ris kof injury.
Wher epossible, let th eengin ecool down and
touch only th ecomponent sdescribed in th e
following.
GWARNIN G
If engin eoil comes int ocontact wit hhot com-
ponents in th eengin ecompartment, it may
ignite. There is aris kof fir eand injury.
Mak esur ethat engin eoil is no tspilled next to
th efiller neck .Let th eengin ecool down and
thoroughly clean th eengin eoil off th ecom-
ponents before starting th eengine.
HEnvironmenta lnot e
When addin goil, tak ecar eno tto spil lany. If
oil enters th esoil or waterways, it is harmful to
th eenvironment.
!Only use engin eoils and oil filters that hav e
been approve dfor vehicles wit h aservic esys-
tem. You can obtain alist of th eengin eoils
and oil filters tested and approve din accord -
anc ewit hth eMercedes-Benz Specification s
for Service Products at any Mercedes-Benz
Service center.
Damage to th eengin eor exhaust system is
caused by th efollowing:
Rusin gengin eoils and oil filters that hav eno t
been specifically approve dfor th eservic e
system
Rreplacing engin eoil and oil filters after th e
interval for replacemen tspecifie dby th e
servic esystem has been exceeded
Rusin gengin eoil additives.
!Do no tadd to omuc hoil. addin gto omuc h
engin eoil can result in damag eto th eengin e
or to th ecatalytic converter. Hav eexcess
engin eoil siphoned off .
Example
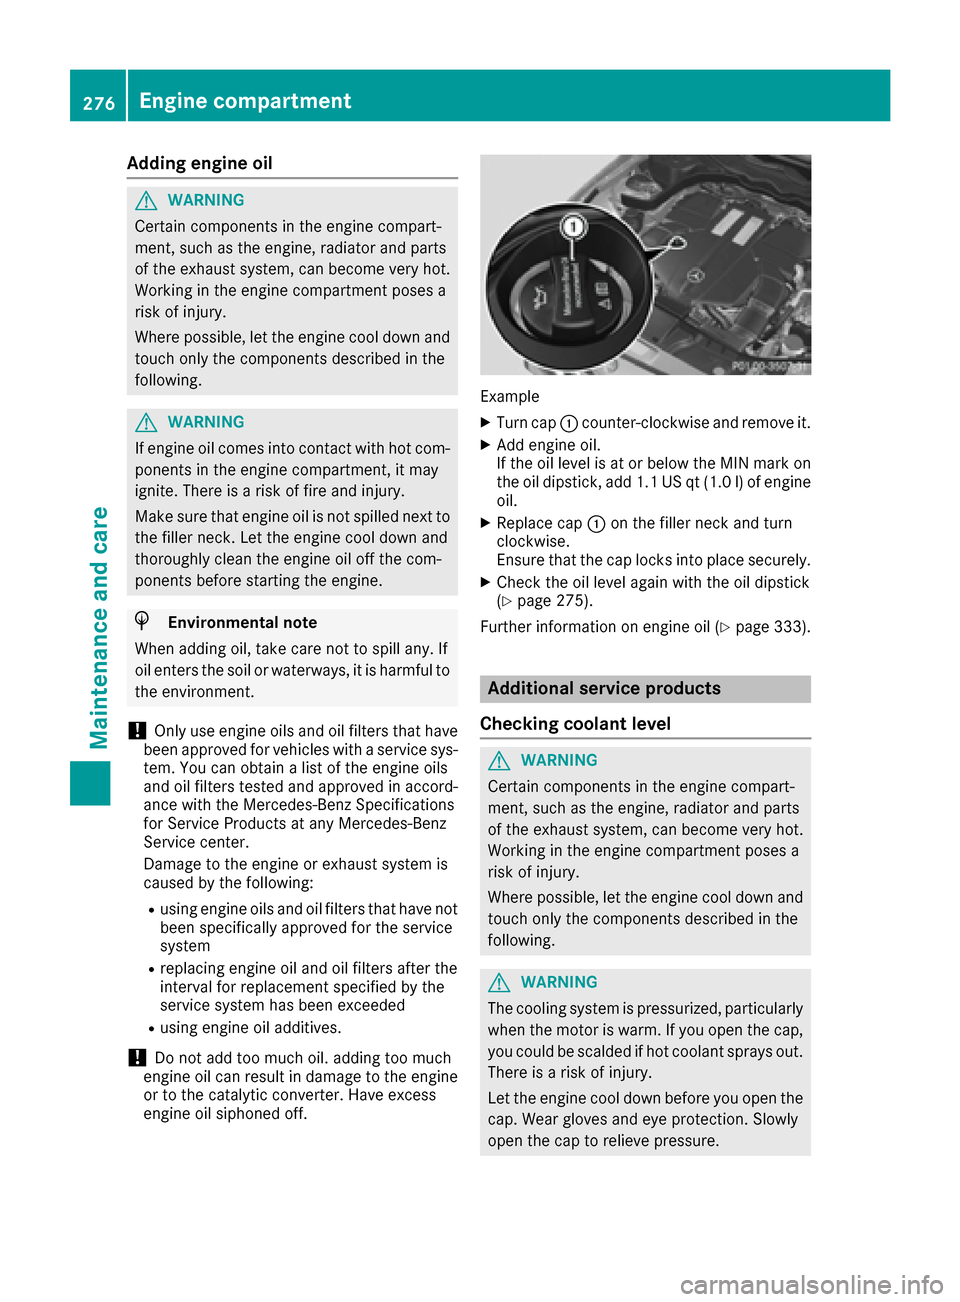
XTurn cap :counter-clockwise and remove it .
XAddengin eoil.
If th eoil level is at or belo wtheMIN mar kon
th eoil dipstick ,add 1. 1US qt (1.0l)of engine
oil.
XReplace cap :on the filler neck and turn
clockwise.
Ensure that the cap locks into place securely.
XCheck the oil level again with the oil dipstick
(Ypage 275).
Further information on engine oil (
Ypage 333).
Additional service products
Checking coolant level
GWARNING
Certain components in the engine compart-
ment, such as the engine, radiator and parts
of the exhaust system, can become very hot.
Working in the engine compartment poses a
risk of injury.
Where possible, let the engine cool down and touch only the components described in the
following.
GWARNING
The cooling system is pressurized, particularly
when the motor is warm. If you open the cap,
you could be scalded if hot coolant sprays out.
There is a risk of injury.
Let the engine cool down before you open the
cap. Wear gloves and eye protection. Slowly
open the cap to relieve pressure.
276Engine compartment
Maintenance and care
Page 280 of 342
You can obtain further information from an
authorized Mercedes-Benz Center or at
http://www.mbusa.com (USA only).
iThe ASSYST PLUS service interval display
does not show any information on the engine
oil level. Observe the notes on the engine oil
level (
Ypage 275).
The multifunction display shows a service mes-
sage for several seconds, e.g.:
RService A in .. days
RService A Due
RService A Exceeded by .. Days
Depending on the operating conditions of the
vehicle, the remaining time or distance until the next service due date is displayed.
The letter A
orB, possibly in connection with a
number or another letter, indicates the type of
service. A
stands for a minor service and Bfor a
major service.
You can obtain further information from an
authorized Mercedes-Benz Center.
The ASSYST PLUS service interval display does
not take into account any periods of time during
which the battery is disconnected.
Maintaining the time-dependent service sched-
ule:
XNote down the service due date displayed in
the multifunction display before disconnect-
ing the battery.
or
XAfter reconnecting the battery, subtract the
battery disconnection periods from the ser-
vice date shown on the display.
Hiding a service message
XPress the aor% button on the steering
wheel.
Displaying service messages
XSwitch on the ignition.
XPress the =or; button on the steering
wheel to select the Serv.menu.
XPress the9or: button to select the
ASSYSTPLUSsubmenu and confirm by press-
ing the abutton.
The service due date appears in the multi-
function display.
Information about Service
Resetting the ASSYST PLUS service inter-
val display
!If the ASSYST PLUS service interval display
has been inadvertently reset, this setting can
be corrected at a qualified specialist work-
shop.
Have service work carried out as described in
the Maintenance Booklet. This may otherwise lead to increased wear and damage to the
major assemblies or the vehicle.
A qualified specialist workshop, e.g. an author-
ized Mercedes-Benz Center, will reset the
ASSYST PLUS service interval display after the
service work has been carried out. You can also
obtain further information on maintenance
work, for example.
Special service requirements
The specified maintenance interval takes only
the normal operation of the vehicle into
account. Under arduous operating conditions or
increased load on the vehicle, maintenance
work must be carried out more frequently, for
example:
Rregular city driving with frequent intermediate stops
Rif the vehicle is primarily used to travel short
distances
Ruse in mountainous terrain or on poor road
surfaces
Rif the engine is often left idling for long periods
Under these or similar conditions, have, for
example, the air filter, engine oil and oil filter
replaced or changed more frequently. Under
arduous operating conditions, the tires must be
checked more often. Further information can be
obtained at a qualified specialist workshop, e.g.
an authorized Mercedes-Benz Center.
Driving abroad
An extensive Mercedes-Benz Service network is
also available in other countries. You can obtain
further information from any authorized
Mercedes-Benz Center.
278Maintenance
Maintenance and care
Page 282 of 342
XReleaseth ebrak epedal .
XReleas eth eparking brake.
XSwitc hoff th eignition and leav eth eSmartKey
in th eignition lock.
You can wash th evehicl ein an automatic car
wash from th ever ystart .
If th evehicl eis ver ydirty, pre-was hit before
cleaning it in an automatic car wash.
Afte rusin gan automatic car wash, wipe off wax
from th ewindshield and th ewiper blades. This
will preven tsmears and reduce wipin gnoises
caused by residue on th ewindshield.
Washing by hand
In som ecountries, washing by han dis only
allowe dat specially equipped washing bays.
Observ eth elegal requirements in eac hcountry.
XDo no tuse hot water and do no twash th e
vehicl ein direct sunlight.
XUse asof tspong eto clean.
XUse amild cleaning agent, suc has acar
shampoo approve dby Mercedes-Benz.
XThoroughly hos edown th evehicl ewit h a gen -
tl e je tof water.
XDo no tpoin tth ewater je tdirectly towards th e
air inlet .
XUse plenty of water and rinse out th espong e
frequently.
XRins eth evehicl ewit hclean water and dry
thoroughly wit h achamois.
XDo no tlet th ecleaning agen tdry on th epaint-
work.
Carefully remove all deposit sof road salt as
soo nas possibl ewhen driving in winter.
Power washers
GWARNIN G
The water je tfrom acircular je tnozzle (dir t
blasters )can caus einvisible exterio rdamag e
to th etires or chassi scomponents. Compo-
nent sdamaged in this way may fail unexpect-
edly. There is aris kof an accident.
Do no tuse power washers wit hcircular je t
nozzles to clean th evehicle. Hav edamaged
tires or chassi scomponent sreplace dimme-
diately.
!Always maintai n adistanc eof at least
11.8 in (30 cm) between th evehicl eand th e
powe rwashe rnozzle. Information about th e
correc tdistanc eis available from th eequip -
men tmanufacturer.
Mov eth epowe rwashe rnozzle around when
cleaning your vehicle.
Do no taim directly at any of th efollowing:
Rtires
Rdoor gaps ,roo fgaps ,joints, etc.
Relectrical component s
Rbattery
Rconnectors
Rlights
Rseals
Rtrim
Rventilation slots
Damaged seals or electrical component scan
lead to leak sor failures .
Cleaning the paintwork
!Do notaffix:
Rstickers
Rfilm s
Rmagnetic plates or similar items
to painte dsurfaces. You could otherwise
damag eth epaintwork .
Scratches, corrosiv edeposits, areas affecte dby
corrosio nand damag ecaused by inadequat e
car ecanno talways be completely repaired. In
suc hcases, visit aqualified specialist workshop.
XRemove dirt immediately, wher epossible,
while avoidin grubbing to ohard.
XSoak insec tremain swit hinsec tremove rand
rinse off th etreated areas afterwards .
XSoak bird droppings withwater and rinse off
th etreated areas afterwards .
XRemove coolant, brakefluid ,tree resin, oils ,
fuel sand greases by rubbing gentl ywit h a
cloth soaked in petroleum ether or lighte r
fluid .
XUse tar remove rto remove tar stains.
XUse silicon eremove rto remove wax.
If water no longer forms "beads "on th epain t
surface, use th epain tcar eproducts recommen -
ded and approve dby Mercedes-Benz .This is th e
cas eapproximately every three to fiv emonths,
280Care
Maintenance and care
Page 285 of 342

XUse clear water and a soft cloth to clean cam-era lens :.
Cleaning the 360° camera
!Do not clean the camera lens and the area
around the 360° camera with a power
washer.360
XUse clear water and a soft cloth to clean cam- era lens :.
Cleaning the exhaust pipes
GWARNING
The exhaust tail pipe and tail pipe trim can
become very hot. If you come into contact
with these parts of the vehicle, you could burn
yourself. There is a risk of injury.
Always be particularly careful around the
exhaust tail pipe and the tail pipe trim. Allow
these components to cool down before touch-
ing them.
!Do not clean the exhaust pipe with acid-
based cleaning agents, such as bathroom
cleaner or wheel cleaner. Impurities combined with the effects of road grit
and corrosive environmental factors may cause
flash rust to form on the surface. You can
restore the original shine of the exhaust pipe by
cleaning it regularly, especially in winter and
after washing.
XClean the exhaust pipe with a care product
tested and approved by Mercedes-Benz.
Interior care
Cleaning the display
!For cleaning, do not use any of the following:
Ralcohol-based thinner or gasoline
Rabrasive cleaning agents
Rcommercially-available household cleaning
agents
These may damage the display surface. Do
not put pressure on the display surface when cleaning. This could lead to irreparable dam-
age to the display.
XBefore cleaning the display, make sure that it
is switched off and has cooled down.
XClean the display surface using a commer-
cially available microfiber cloth and TFT/LCD
display cleaner.
XDry the display surface using a dry microfiber
cloth.
Cleaning the plastic trim
GWARNING
Care products and cleaning agents containing solvents cause surfaces in the cockpit to
become porous. As a result, plastic parts may
come loose in the event of air bag deploy-
ment. There is a risk of injury.
Do not use any care products and cleaning
agents to clean the cockpit.
!Do not affix the following to plastic surfaces:
Rstickers
Rfilms
Rscented oil bottles or similar items
You can otherwise damage the plastic.
!Do not allow cosmetics, insect repellent or
sunscreen to come into contact with the plas-
Care283
Maintenance and care
Z
Page 286 of 342

tic trim. This maintains the high-quality look of
the surfaces.
XWipe the plastic trim with a damp, lint-free
cloth, e.g. a microfiber cloth.
XHeavy soiling:use care and cleaning prod-
ucts recommended and approved by
Mercedes-Benz.
The surface may change color temporarily.
Wait until the surface is dry again.
Cleaning the steering wheel and gear or
selector lever
XThoroughly wipe with a damp cloth or use
leather care agents that have been recom-
mended and approved by Mercedes-Benz.
Cleaning genuine wood and trim ele-
ments
!Do not use solvent-based cleaning agents
such as tar remover, wheel cleaners, polishes or waxes. There is otherwise a risk of damag-
ing the surface.
!Do not use chrome polish on trim pieces.
The trim pieces have a chrome look but are
mostly made of anodized aluminum and can
lose their shine if chrome polish is used. Use
a damp, lint-free cloth instead when cleaning
the trim pieces.
If the chrome-plated trim pieces are very
dirty, you can use a chrome polish. If you are
unsure as to whether the trim pieces are
chrome-plated or not, consult an authorized
Mercedes-Benz Center.
XWipe the wooden trim and trim pieces with a
damp, lint-free cloth, e.g. a microfiber cloth.
XHeavy soiling: use car care and cleaning
products recommended and approved by
Mercedes-Benz.
Cleaning the seat covers
General notes
!Do not use a microfiber cloth to clean covers
made out of real leather, artificial leather or
DINAMICA. If used often, these can damage
the cover.
iNote that regular care is essential to ensure
that the appearance and comfort of the cov-
ers is retained over time.
Genuine leather seat covers
Leather is a natural product.
It exhibits natural surface characteristics, for
example:
Rdifferences in the texture
Rmarks caused by growth and injury
Rslight nuances of color
These are characteristics of leather and not
material defects.
!To retain the natural appearance of the
leather, observe the following cleaning
instructions:
RClean genuine leather covers carefully with a damp cloth and then wipe the covers
down with a dry cloth.
RMake sure that the leather does not
become soaked. It may otherwise become
rough and cracked.
ROnly use leather care agents that have
been tested and approved by Mercedes-
Benz. You can obtain these from a qualified
specialist workshop.
Seat covers of other materials
!Observe the following when cleaning:
Rclean artificial leather covers with a cloth
moistened with a solution containing 1%
detergent (e.g. dish washing liquid).
Rclean cloth covers with a microfiber cloth
moistened with a solution containing 1%
detergent (e.g. dish washing liquid). Rub
carefully and always wipe entire seat sec-
tions to avoid leaving visible lines. Leave
the seat to dry afterwards. Cleaning results
depend on the type of dirt and how long it
has been there.
Rclean DINAMICA covers with a damp cloth.
Make sure that you wipe entire seat sec-
tions to avoid leaving visible lines.
Cleaning the seat belts
GWARNING
Seat belts can become severely weakened if
bleached or dyed. This could cause the seat
belts to tear or fail, for instance, in the event of an accident. This poses an increased risk of
injury or fatal injury.
Never bleach or dye the seat belts.
284Care
Maintenance and care