engine start MERCEDES-BENZ CLS-Class 2017 W218 Owner's Guide
[x] Cancel search | Manufacturer: MERCEDES-BENZ, Model Year: 2017, Model line: CLS-Class, Model: MERCEDES-BENZ CLS-Class 2017 W218Pages: 334, PDF Size: 8.22 MB
Page 90 of 334
XTo open fully:press the switch beyond the
point of resistance and release it.
Automatic operation is started.
XTo close manually: pull and hold the corre-
sponding switch.
XTo close fully: pull the corresponding switch
beyond the pressure point.
Automatic operation is started.
XTo interrupt automatic operation: press/
pull the corresponding switch again.
If you press/pull the switch beyond the point of
resistance, automatic operation is started in the
corresponding direction. You can stop auto-
matic operation by pressing/pulling the switch
again.
You can continue to operate the side windows
after you switch off the engine or remove the
SmartKey. This function is available for up to five
minutes or until the driver's or front-passenger
door is opened.
When the override feature for the side windows
is activated, the side windows cannot be oper-
ated from the rear (
Ypage 63).
Convenience opening
General notes
You can ventilate the vehicle before you start
driving. To do this, the SmartKey is used to carry
out the following functions simultaneously:
Runlock the vehicle
Ropen the side windows
Ropen the sliding sunroof
Rswitch on the seat ventilation for the driver's
seat
The convenience opening feature can only be
operated using the SmartKey. The SmartKey
must be in close proximity to the vehicle.
The "convenience opening" feature is also avail-
able when the vehicle is unlocked.
Convenience opening
XPress and hold the %button until the side
windows and the sliding sunroof are in the
desired position.
XTo interrupt convenience opening: release
the % button.
Convenience closing feature
Important safety notes
Information on the side window reversing fea-
ture (Ypage 87).
GWARNING
When the convenience closing feature is oper- ating, parts of the body could become trapped
in the closing area of the side window and the
sliding sunroof. There is a risk of injury.
Observe the complete closing procedure
when the convenience closing feature is oper-
ating. Make sure that no body parts are in
close proximity during the closing procedure.
Proceed as follows if someone is trapped:
With the SmartKey:
XRelease the &button.
XPress the %button until the side windows
and the sliding sunroof reopen.
With KEYLESS-GO:
XRelease the sensor surface on the door han-
dle.
XImmediately pull and hold the door handle
and keep the door handle pulled.
The side windows and the sliding sunroof
open.
General notes
When you lock the vehicle, you can simultane-
ously:
Rclose the side windows
Rclose the sliding sunroof
Using the SmartKey
XVehicles without KEYLESS-GO: point the tip
of the SmartKey at the door handle on the
driver's door.
XVehicles with KEYLESS-GO: the SmartKey
must be in close proximity to the vehicle.
XPress and hold the &button until the side
windows and the sliding sunroof are fully
closed.
XPress and hold the &button until the side
windows are fully closed.
88Side windows
Opening and closing
Page 93 of 334
GWARNING
The reversing feature does not react:
Rto soft, light and thin objects, e.g. small fin-
gers
Rover the last 1/6 in (4 mm) of the closing
movement
Rduring resetting
Rwhen closing the sliding sunroof again man- ually immediately after automatic reversing
This means that the reversing feature cannot
prevent someone being trapped in these sit-
uations. There is a risk of injury.
Make sure that no body parts are in close
proximity during the closing procedure.
If somebody becomes trapped:
Rrelease the switch immediately, or
Rpress the switch in any direction during the
automatic closing process
The closing process is stopped.
Operating the sliding sunroof
Opening and closing
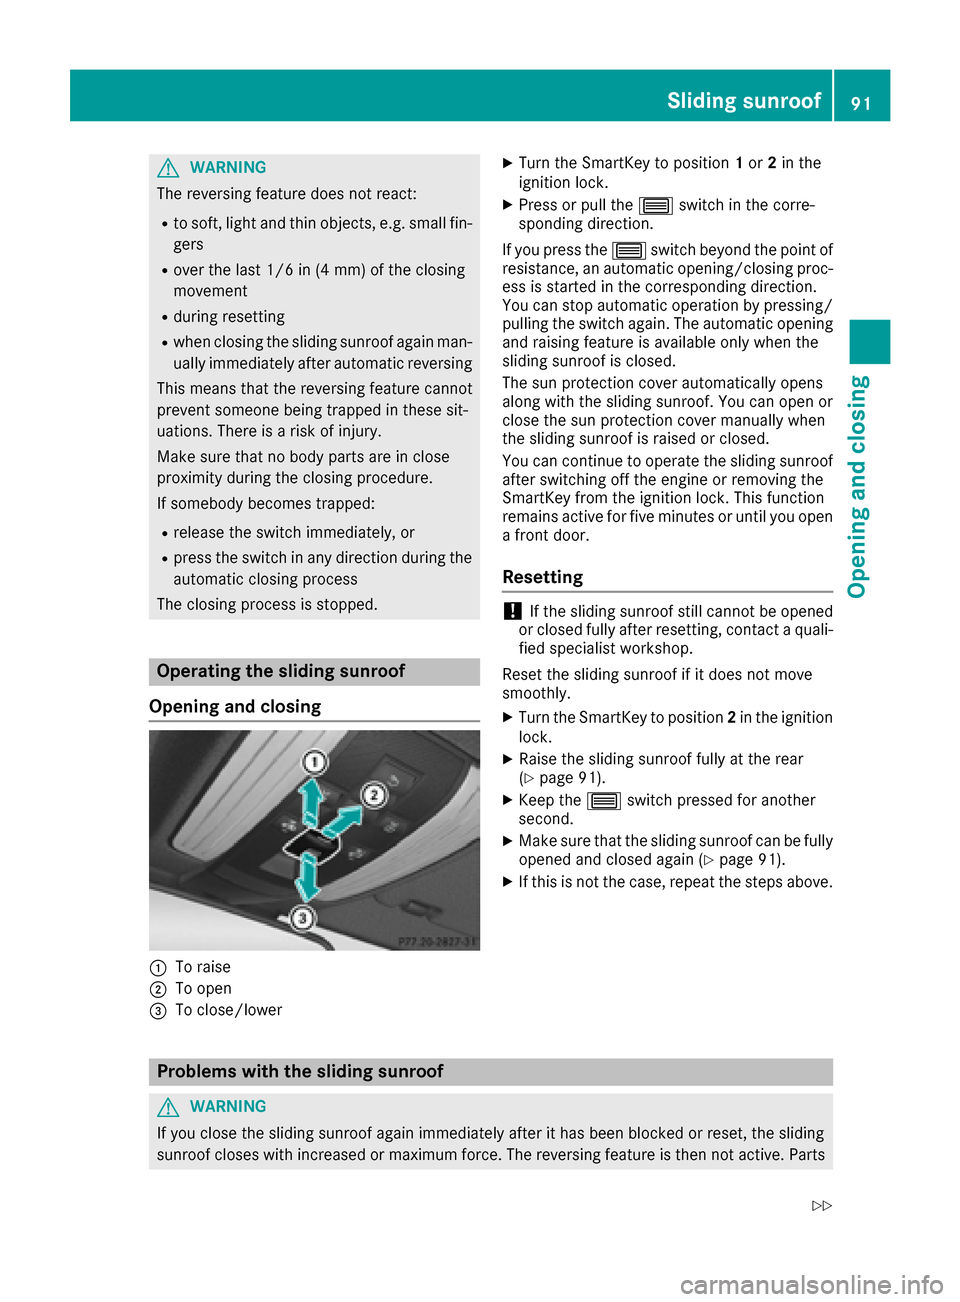
:To raise
;To open
=To close/lower
XTurn the SmartKey to position 1or 2in the
ignition lock.
XPress or pull the 3switch in the corre-
sponding direction.
If you press the 3switch beyond the point of
resistance, an automatic opening/closing proc-
ess is started in the corresponding direction.
You can stop automatic operation by pressing/
pulling the switch again. The automatic opening
and raising feature is available only when the
sliding sunroof is closed.
The sun protection cover automatically opens
along with the sliding sunroof. You can open or
close the sun protection cover manually when
the sliding sunroof is raised or closed.
You can continue to operate the sliding sunroof after switching off the engine or removing the
SmartKey from the ignition lock. This function
remains active for five minutes or until you open
a front door.
Resetting
!If the sliding sunroof still cannot be opened
or closed fully after resetting, contact a quali- fied specialist workshop.
Reset the sliding sunroof if it does not move
smoothly.
XTurn the SmartKey to position 2in the ignition
lock.
XRaise the sliding sunroof fully at the rear
(Ypage 91).
XKeep the 3switch pressed for another
second.
XMake sure that the sliding sunroof can be fully opened and closed again (Ypage 91).
XIf this is not the case, repeat the steps above.
Problems with the sliding sunroof
GWARNING
If you close the sliding sunroof again immediately after it has been blocked or reset, the sliding
sunroof closes with increased or maximum force. The reversing feature is then not active. Parts
Sliding sunroof91
Opening and closing
Z
Page 95 of 334
Correct driver's seat position
GWARNING
You could lose control of your vehicle if you do the following while driving:
Radjust the driver's seat, head restraint,
steering wheel or mirrors
Rfasten the seat belt
There is a risk of an accident.
Adjust the driver's seat, head restraint, steer-
ing wheel and mirror and fasten your seat belt before starting the engine.
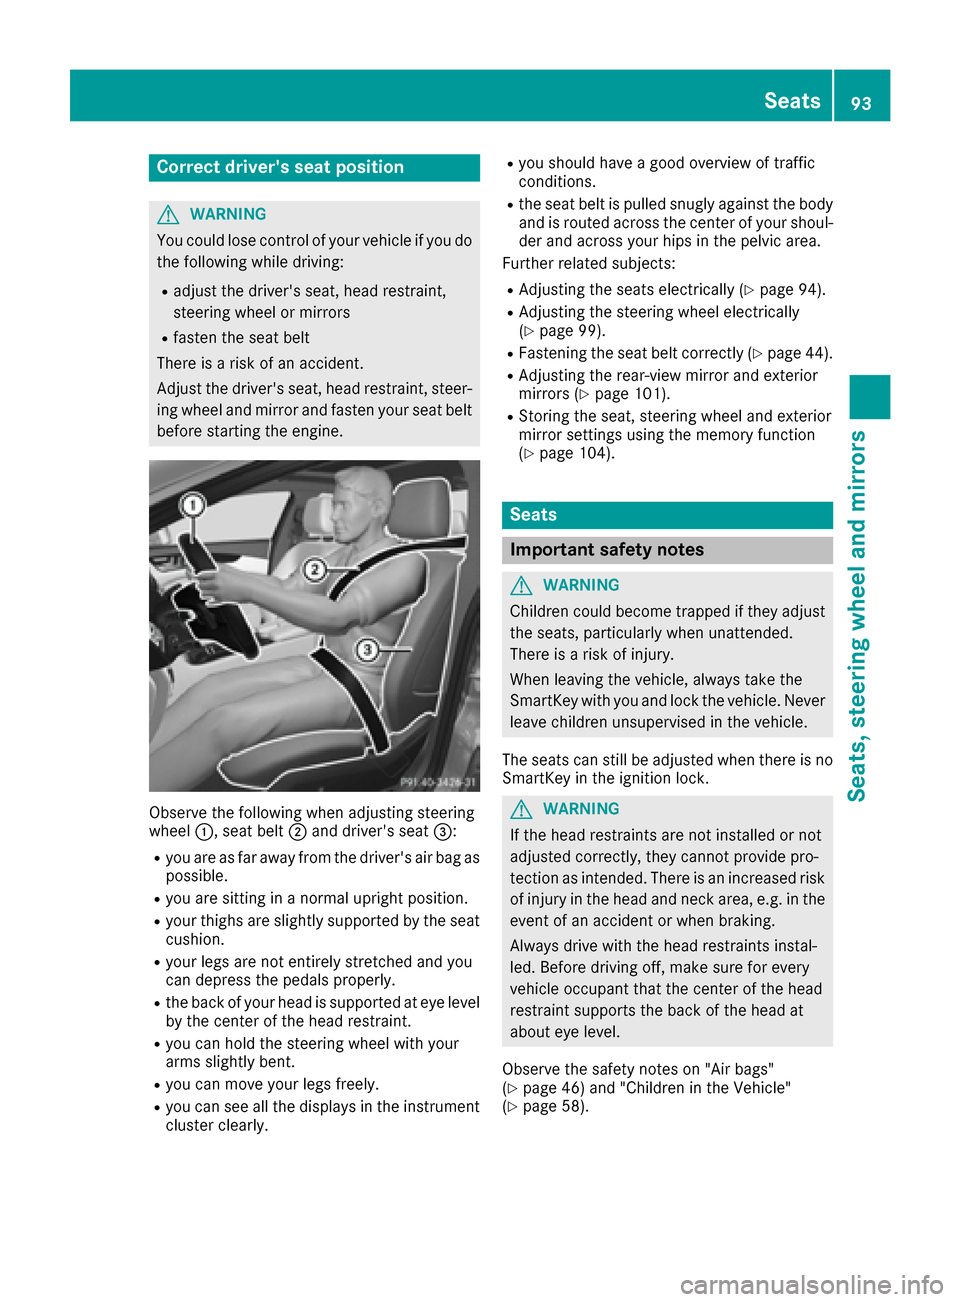
Observe the following when adjusting steering
wheel :, seat belt ;and driver's seat =:
Ryou are as far away from the driver's air bag as
possible.
Ryou are sitting in a normal upright position.
Ryour thighs are slightly supported by the seat
cushion.
Ryour legs are not entirely stretched and you
can depress the pedals properly.
Rthe back of your head is supported at eye level
by the center of the head restraint.
Ryou can hold the steering wheel with your
arms slightly bent.
Ryou can move your legs freely.
Ryou can see all the displays in the instrument
cluster clearly.
Ryou should have a good overview of traffic
conditions.
Rthe seat belt is pulled snugly against the bodyand is routed across the center of your shoul-
der and across your hips in the pelvic area.
Further related subjects:
RAdjusting the seats electrically (Ypage 94).
RAdjusting the steering wheel electrically
(Ypage 99).
RFastening the seat belt correctly (Ypage 44).
RAdjusting the rear-view mirror and exterior
mirrors (Ypage 101).
RStoring the seat, steering wheel and exterior
mirror settings using the memory function
(
Ypage 104).
Seats
Important safety notes
GWARNING
Children could become trapped if they adjust
the seats, particularly when unattended.
There is a risk of injury.
When leaving the vehicle, always take the
SmartKey with you and lock the vehicle. Never
leave children unsupervised in the vehicle.
The seats can still be adjusted when there is no
SmartKey in the ignition lock.
GWARNING
If the head restraints are not installed or not
adjusted correctly, they cannot provide pro-
tection as intended. There is an increased risk
of injury in the head and neck area, e.g. in the event of an accident or when braking.
Always drive with the head restraints instal-
led. Before driving off, make sure for every
vehicle occupant that the center of the head
restraint supports the back of the head at
about eye level.
Observe the safety notes on "Air bags"
(
Ypage 46) and "Children in the Vehicle"
(Ypage 58).
Seats93
Seats, steering wheel and mirrors
Z
Page 96 of 334
GWARNING
You could lose control of your vehicle if you do the following while driving:
Radjust the driver's seat, head restraint,
steering wheel or mirrors
Rfasten the seat belt
There is a risk of an accident.
Adjust the driver's seat, head restraint, steer-
ing wheel and mirror and fasten your seat belt before starting the engine.
GWARNING
If you adjust the seat height carelessly, you or
other vehicle occupants could be trapped and
thereby injured. Children in particular could
accidentally press the electrical seat adjust-
ment buttons and become trapped. There is a
risk of injury.
While moving the seats, make sure that your
hands or other body parts do not get under the
lever assembly of the seat adjustment sys-
tem.
GWARNING
When you adjust a seat, you or other vehicle
occupants could become trapped, e.g. on the seat guide rail. There is a risk of injury.
Make sure when adjusting a seat that no one
has any body parts in the sweep of the seat.
!To avoid damage to the seats and the seat
heating, observe the following information:
Rkeep liquids from spilling on the seats. If
liquid is spilled on the seats, dry them as
soon as possible.
Rif the seat covers are damp or wet, do not
switch on the seat heating. The seat heat-
ing should also not be used to dry the seats.
Rclean the seat covers as recommended;
see "Interior care".
Rdo not transport heavy loads on the seats.
Do not place sharp objects on the seat
cushions, e.g. knives, nails or tools. The
seats should only be occupied by passen-
gers, if possible.
Rwhen the seat heating is in operation, do
not cover the seats with insulating materi- als, e.g. blankets, coats, bags, seat covers,
child seats or booster seats.
!Make sure that there are no objects in the
footwell under or behind the seats when mov-
ing the seats back. There is a risk that the
seats and/or the objects could be damaged.
iThe head restraints in the front seats are
installed with the NECK-PRO system
(
Ypage 55). For this reason, it is not possible
to remove the head restraints from the front
seats.
For more information, contact a qualified spe-
cialist workshop.
iFurther related subjects:
RRear bench seat through-loading feature
(Ypage 245)
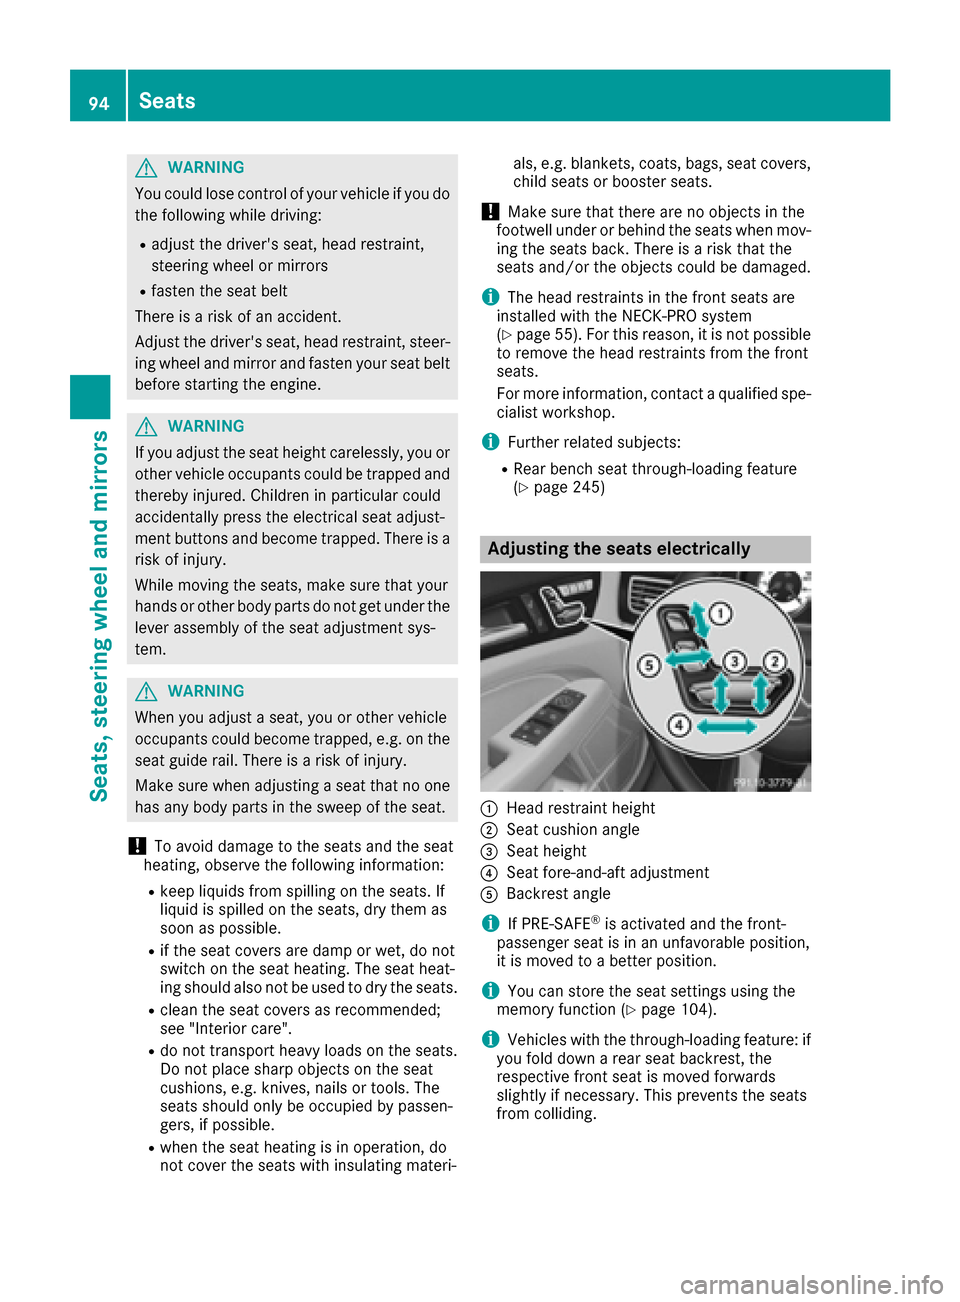
Adjusting the seats electrically
:Head restraint height
;Seat cushion angle
=Seat height
?Seat fore-and-aft adjustment
ABackrest angle
iIf PRE-SAFE®is activated and the front-
passenger seat is in an unfavorable position,
it is moved to a better position.
iYou can store the seat settings using the
memory function (Ypage 104).
iVehicles with the through-loading feature: if
you fold down a rear seat backrest, the
respective front seat is moved forwards
slightly if necessary. This prevents the seats
from colliding.
94Seats
Seats, steering wheel and mirrors
Page 97 of 334
Adjusting the head restraints
Import ant safety notes
GWARNIN G
You could lose control of your vehicl eif you do
th efollowin gwhile driving:
Radjust th edriver's seat ,head restraint,
steering whee lor mirror s
Rfastenth eseat belt
There is aris kof an accident.
Adjus tth edriver's seat ,head restraint, steer -
ing whee land mirror and faste nyour seat belt
before starting th eengine.
GWARNIN G
If th ehead restraints are no tinstalled or no t
adjusted correctly, they canno tprovid epro -
tection as intended. There is an increased ris k
of injury in th ehead and neck area, e.g. in th e
event of an acciden tor when braking .
Always drive wit hth ehead restraints instal -
led. Befor edrivin goff ,mak esur efor every
vehicl eoccupant that th ecenter of th ehead
restrain tsupport sth ebac kof th ehead at
about eye level.
Do no trotate th ehead restraints of th efron tand
rear seats. Otherwise ,you canno tadjust th e
height and angle of th ehead restraints to th e
correc tposition .
Using th efore-and-af tadjustment, adjust th e
head restrain tso that it is as close as possibl eto
your head .
Observ eth eimportant safet ynote sregarding
th eseat s (
Ypage 93).
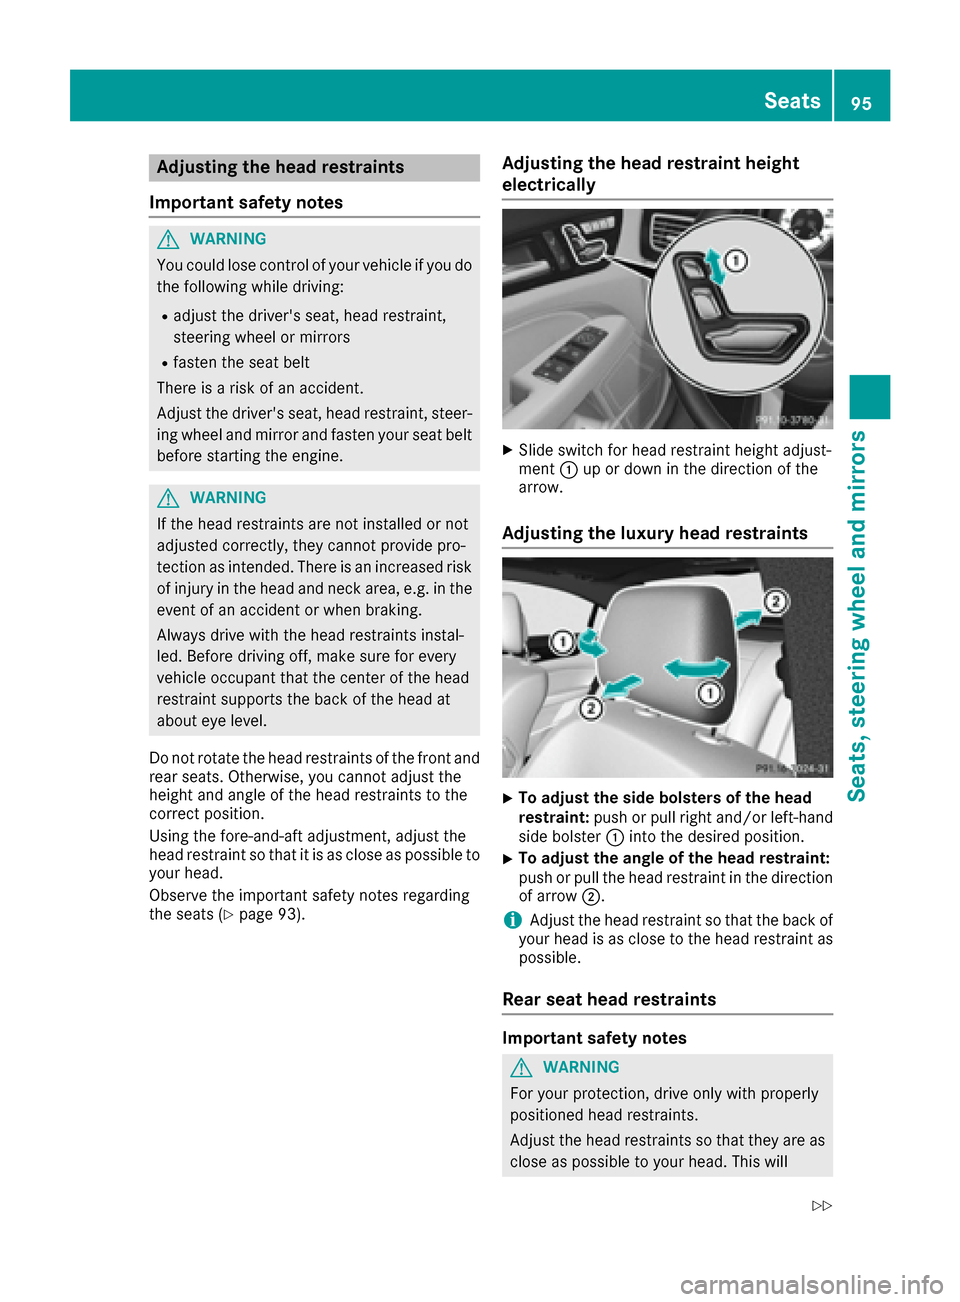
Adjusting the head restraint height
electri cally
XSlide switch for head restrain theight adjust -
men t: up or down in th edirection of th e
arrow.
Adjusting the luxury head restraints
XTo adjust th esid ebolsters of th ehea d
restraint: push or pull right and/o rleft-han d
side bolste r: intoth edesired position .
XTo adjust theangle of th ehea drestraint:
push or pull th ehead restrain tin th edirection
of arrow ;.
iAdjustth ehead restrain tso that th ebac kof
your head is as close to th ehead restrain tas
possible.
Rear seat head restraints
Important safety notes
GWARNIN G
Fo ryour protection ,drive only wit hproperly
positioned head restraints .
Adjus tth ehead restraints so that they are as
close as possibl eto your head .This will
Seats95
Seats, steering wheel and mirrors
Z
Page 100 of 334
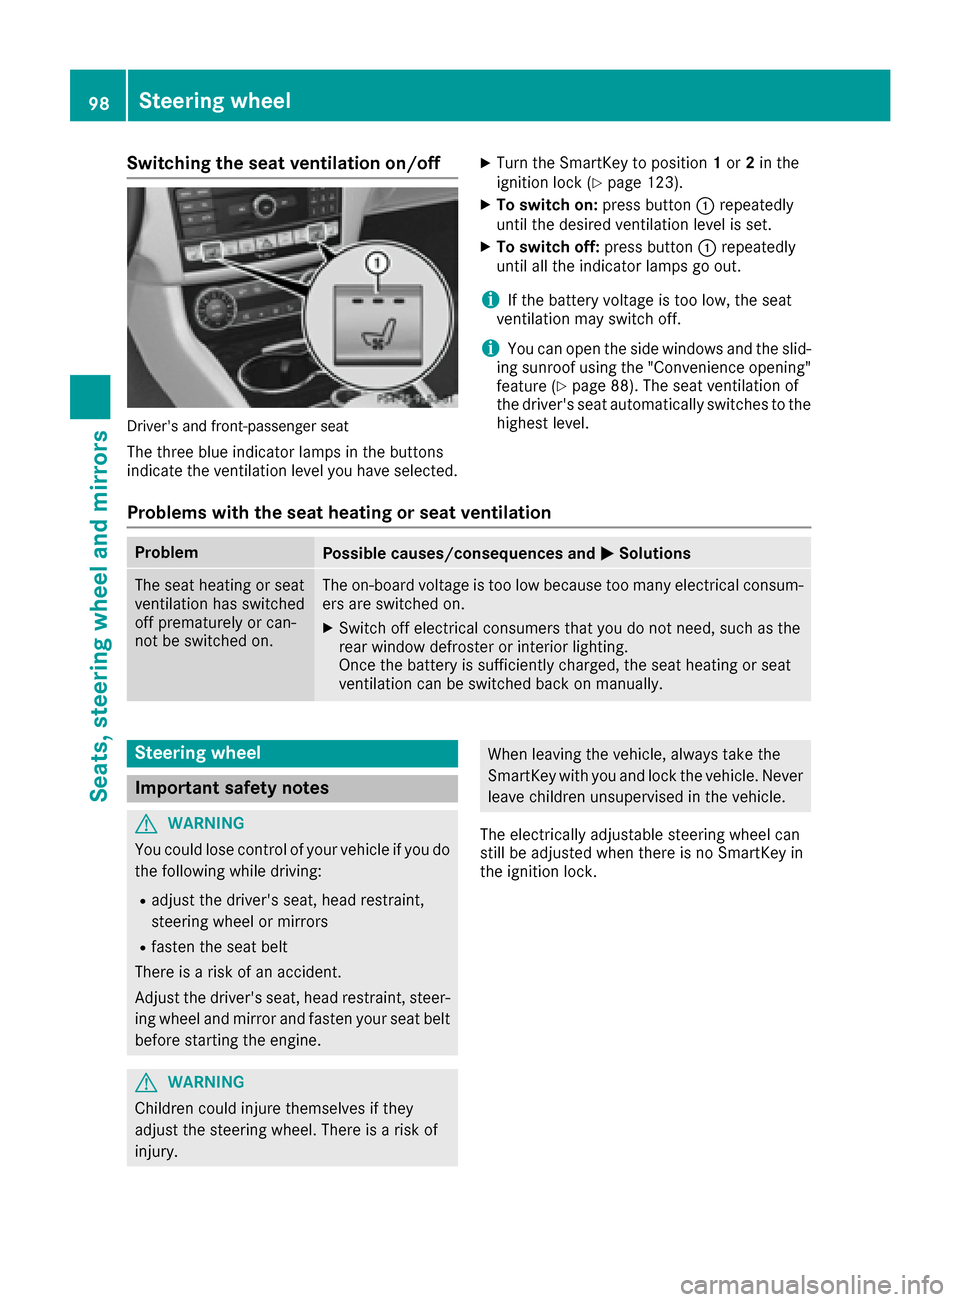
Switching the seat ventilation on/off
Driver's and front-passenger seat
The three blue indicator lamps in the buttons
indicate the ventilation level you have selected.
XTurn the SmartKey to position1or 2in the
ignition lock (Ypage 123).
XTo switch on: press button:repeatedly
until the desired ventilation level is set.
XTo switch off: press button:repeatedly
until all the indicator lamps go out.
iIf the battery voltage is too low, the seat
ventilation may switch off.
iYou can open the side windows and the slid-
ing sunroof using the "Convenience opening"
feature (
Ypage 88). The seat ventilation of
the driver's seat automatically switches to the
highest level.
Problems with the seat heating or seat ventilation
ProblemPossible causes/consequences and MSolutions
The seat heating or seat
ventilation has switched
off prematurely or can-
not be switched on.The on-board voltage is too low because too many electrical consum-
ers are switched on.
XSwitch off electrical consumers that you do not need, such as the
rear window defroster or interior lighting.
Once the battery is sufficiently charged, the seat heating or seat
ventilation can be switched back on manually.
Steering wheel
Important safety notes
GWARNING
You could lose control of your vehicle if you do the following while driving:
Radjust the driver's seat, head restraint,
steering wheel or mirrors
Rfasten the seat belt
There is a risk of an accident.
Adjust the driver's seat, head restraint, steer-
ing wheel and mirror and fasten your seat belt before starting the engine.
GWARNING
Children could injure themselves if they
adjust the steering wheel. There is a risk of
injury.
When leaving the vehicle, always take the
SmartKey with you and lock the vehicle. Never
leave children unsupervised in the vehicle.
The electrically adjustable steering wheel can
still be adjusted when there is no SmartKey in
the ignition lock.
98Steering wheel
Seats, steering wheel and mirrors
Page 103 of 334
Mirrors
Exterior mirrors
Adjusting the exterior mirrors
GWARNING
You could lose control of your vehicle if you do the following while driving:
Radjust the driver's seat, head restraint,
steering wheel or mirrors
Rfasten the seat belt
There is a risk of an accident.
Adjust the driver's seat, head restraint, steer-
ing wheel and mirror and fasten your seat belt before starting the engine.
GWARNING
The exterior mirror on the front-passenger
side reduces the size of the image. Visible
objects are actually closer than they appear.
This means that you could misjudge the dis-
tance from road users traveling behind, e.g.
when changing lane. There is a risk of an acci-
dent.
For this reason, always make sure of the
actual distance from the road users traveling
behind by glancing over your shoulder.
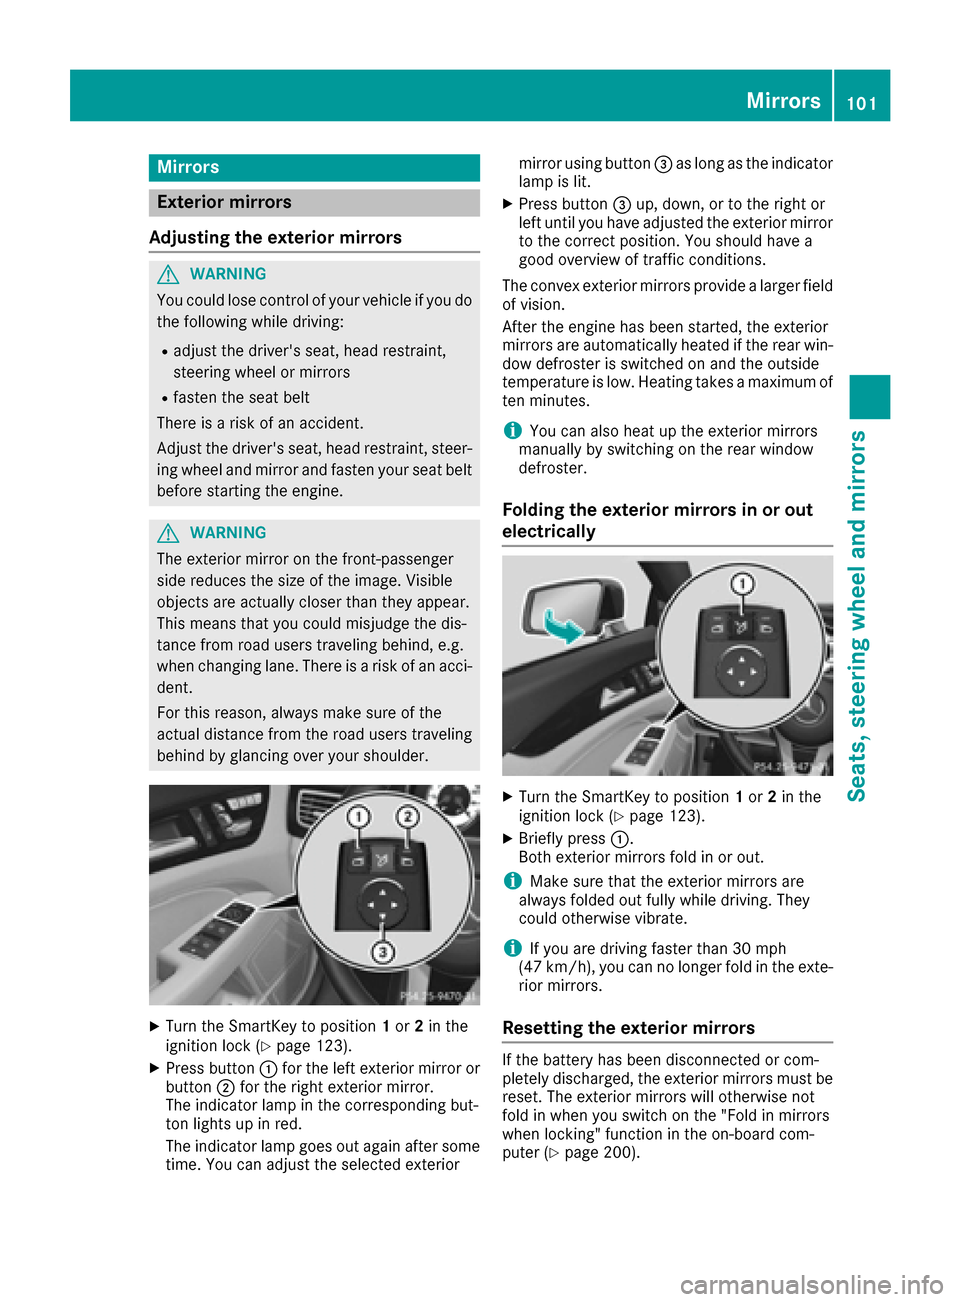
XTurn the SmartKey to position 1or 2in the
ignition lock (Ypage 123).
XPress button :for the left exterior mirror or
button ;for the right exterior mirror.
The indicator lamp in the corresponding but-
ton lights up in red.
The indicator lamp goes out again after some time. You can adjust the selected exterior mirror using button
=as long as the indicator
lamp is lit.
XPress button =up, down, or to the right or
left until you have adjusted the exterior mirror to the correct position. You should have a
good overview of traffic conditions.
The convex exterior mirrors provide a larger field
of vision.
After the engine has been started, the exterior
mirrors are automatically heated if the rear win-
dow defroster is switched on and the outside
temperature is low. Heating takes a maximum of
ten minutes.
iYou can also heat up the exterior mirrors
manually by switching on the rear window
defroster.
Folding the exterior mirrors in or out
electrically
XTurn the SmartKey to position 1or 2in the
ignition lock (Ypage 123).
XBriefly press :.
Both exterior mirrors fold in or out.
iMake sure that the exterior mirrors are
always folded out fully while driving. They
could otherwise vibrate.
iIf you are driving faster than 30 mph
(47 km/h), you can no longer fold in the exte-
rior mirrors.
Resetting the exterior mirrors
If the battery has been disconnected or com-
pletely discharged, the exterior mirrors must be
reset. The exterior mirrors will otherwise not
fold in when you switch on the "Fold in mirrors
when locking" function in the on-board com-
puter (
Ypage 200).
Mirrors101
Seats, steering wheel and mirrors
Z
Page 108 of 334
USA only:the daytime running lamps improve
the visibility of your vehicle during the day. To do
this, the Daytime running lamps
function
must be switched on using the on-board com-
puter (
Ypage 198).
If the engine is running and you turn the light
switch to the TorL position, the manual
settings take precedence over the daytime run-
ning lamps.
Low-beam headlamps
GWARNING
When the light switch is set to Ã, the low-
beam headlamps may not be switched on
automatically if there is fog, snow or other
causes of poor visibility due to the weather
conditions such as spray. There is a risk of an
accident.
In such situations, turn the light switch to
L.
Even if the light sensor does not detect that it is
dark, the parking lamps and low-beam head-
lamps switch on when the ignition is switched on and the light switch is set to the Lposition.
This is a particularly useful function in the event
of rain and fog.
XTo switch on the low beam headlamps:
turn the SmartKey in the ignition lock to posi- tion 2or start the engine.
XTurn the light switch to the Lposition.
The green Lindicator lamp in the instru-
ment cluster lights up.
Parking lamps
!If the battery charge is very low, the parking
lamps or standing lamps are automatically
switched off to enable the next engine start.
Always park your vehicle safely and in a well lit
area, in accordance with the relevant legal
stipulations. Avoid using the Tparking
lamps over a period of several hours. If pos-
sible, switch on the right-hand Xor left-
hand W standing lamps.
XTo switch on the parking lamps: turn the
light switch to the Tposition.
The green Tindicator lamp on the instru-
ment cluster lights up.
Standing lamps
Switching on the standing lamps ensures the
corresponding side of the vehicle is illuminated.
XTo switch on the standing lamps: turn the
SmartKey to position 0in the ignition lock or
remove the SmartKey.
XTurn the light switch to the W(left-hand
side of the vehicle) or X(right-hand side of
the vehicle) position.
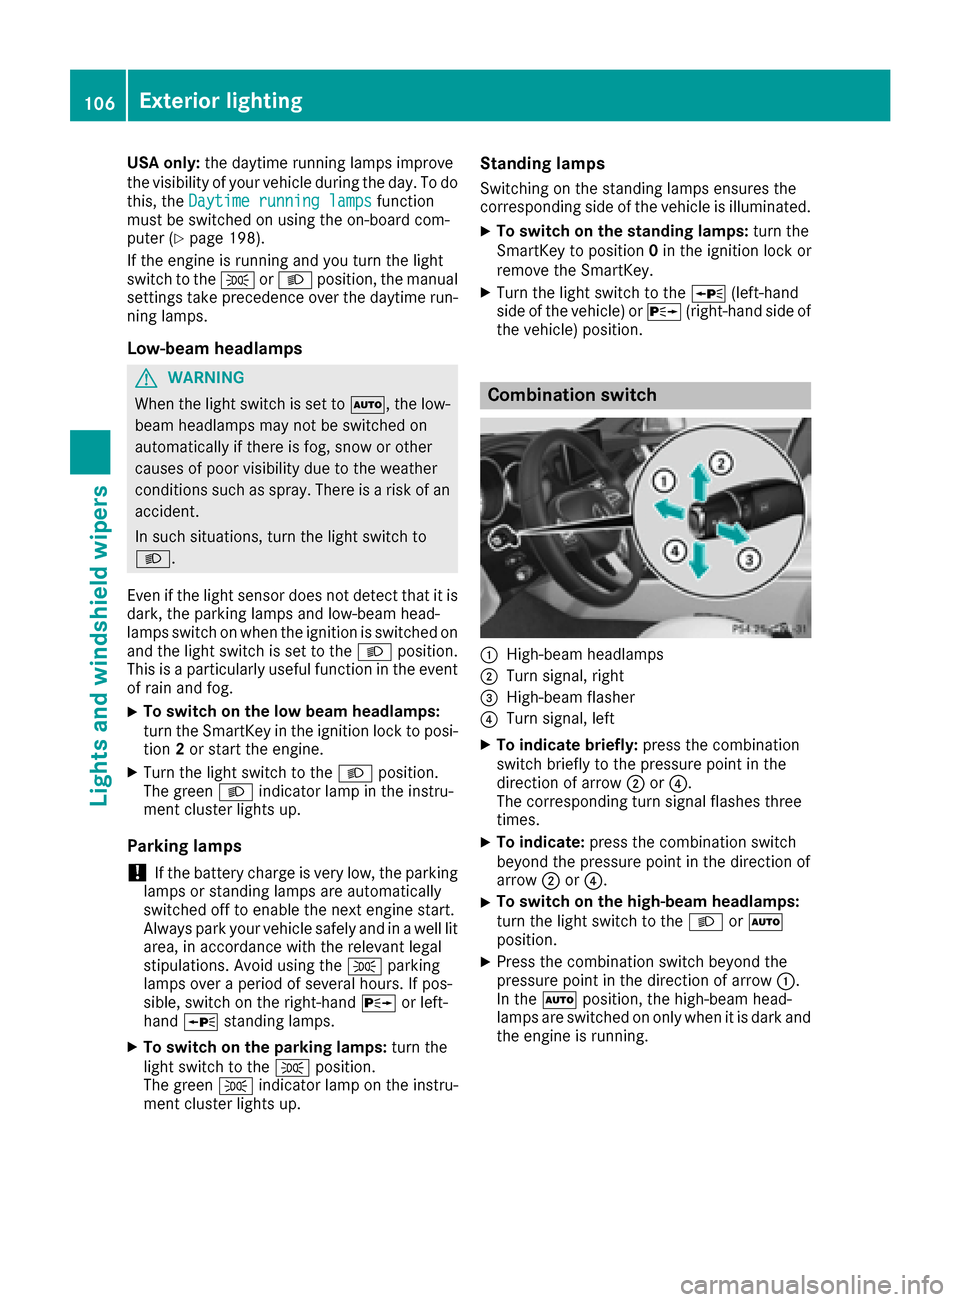
Combination switch
:High-beam headlamps
;Turn signal, right
=High-beam flasher
?Turn signal, left
XTo indicate briefly: press the combination
switch briefly to the pressure point in the
direction of arrow ;or?.
The corresponding turn signal flashes three
times.
XTo indicate: press the combination switch
beyond the pressure point in the direction of
arrow ;or?.
XTo switch on the high-beam headlamps:
turn the light switch to the LorÃ
position.
XPress the combination switch beyond the
pressure point in the direction of arrow :.
In the Ãposition, the high-beam head-
lamps are switched on only when it is dark and the engine is running.
106Exterior lighting
Lights and windshield wipers
Page 118 of 334
ROnly use the "Windshield defrosting" function
briefly until the windshield is clear again.
ROnly use air-recirculation mode briefly, e.g. if
there are unpleasant outside odors or when in
a tunnel. The windows could otherwise fog up,
since no fresh air is drawn into the vehicle in
air-recirculation mode.
RUse the ZONE function to adopt the temper-
ature settings on the driver's side for the
front-passenger side and the rear compart-
ment as well. The indicator lamp above the
á button goes out.
RVehicles with 3-zone automatic climate con-
trol: use the residual heat function if you want
to heat or ventilate the vehicle interior when
the ignition is switched off. The residual heat
function can only be activated or deactivated with the ignition switched off.
RIf you change the settings of the climate con-
trol system, the climate status display
appears for approximately three seconds at
the bottom of the screen in the multimedia
system display. You will see the current set-
tings of the various climate control functions.
ECO start/stop function
During automatic engine switch-off, the climate
control system only operates at a reduced capa- city. If you require the full climate control output,
you can switch off the ECO start/stop function
by pressing the ECO button (
Ypage 127).
Operating the climate control sys-
tems
Activating/deactivating climate con-
trol
General notes
When the climate control is switched off, the air
supply and air circulation are also switched off.
The windows could fog up. Therefore, switch off
climate control only briefly
iActivate climate control primarily using the
à button (Ypage 117).
Activating/deactivating
XTurn the SmartKey to position 2in the ignition
lock (Ypage 123).
XTo activate: press theÃbutton.
The indicator lamp in the Ãbutton lights
up. Airflow and air distribution are set to auto-
matic mode.
XTo deactivate: press the^button.
The indicator lamp in the ^button lights
up.
Switching cooling with air dehumidification on/off
General notes
If you deactivate the "Cooling with air-dehumidification" function, the air inside the vehicle will not
be cooled. The air inside the vehicle will also not be dehumidified. The windows can fog up more
quickly. Therefore, deactivate the cooling with air-dehumidification function only briefly.
The "Cooling with air dehumidification" function is only available when the engine is running. The air
inside the vehicle is cooled and dehumidified according to the temperature selected.
Condensation may drip from the underside of the vehicle when it is in cooling mode. This is normal
and not a sign that there is a malfunction.
Activating/deactivating
XTo activate: press the¿button.
The indicator lamp in the ¿button lights up.
XTo deactivate: press the¿button.
The indicator lamp in the ¿button goes out. The "Cooling with air dehumidification" function
has a delayed switch-off feature.
116Operating the climate control systems
Climate control
Page 125 of 334
boosting effect. You will require considerablymore effort to steer and brake. There is a risk
of an accident.
Do not switch off the ignition while driving.
GWARNING
If the parking brake has not been fully
released when driving, the parking brake can:
Roverheat and cause a fire
Rlose its hold function.
There is a risk of fire and an accident. Release
the parking brake fully before driving off.
!Do not warm up the engine with the vehicle
stationary. Drive off immediately. Avoid high
engine speeds and driving at full throttle until
the engine has reached its operating temper-
ature.
Only shift the automatic transmission to the
desired drive position when the vehicle is sta-
tionary.
Where possible, avoid spinning the drive
wheels when pulling away on slippery roads.
You could otherwise damage the drive train.
!Mercedes-AMG vehicles: at low engine oil
temperatures below 68 ‡ (+20 †), the max-
imum engine speed is restricted in order to
protect the engine. To protect the engine and
maintain smooth engine operation, avoid driv-
ing at full throttle when the engine is cold.
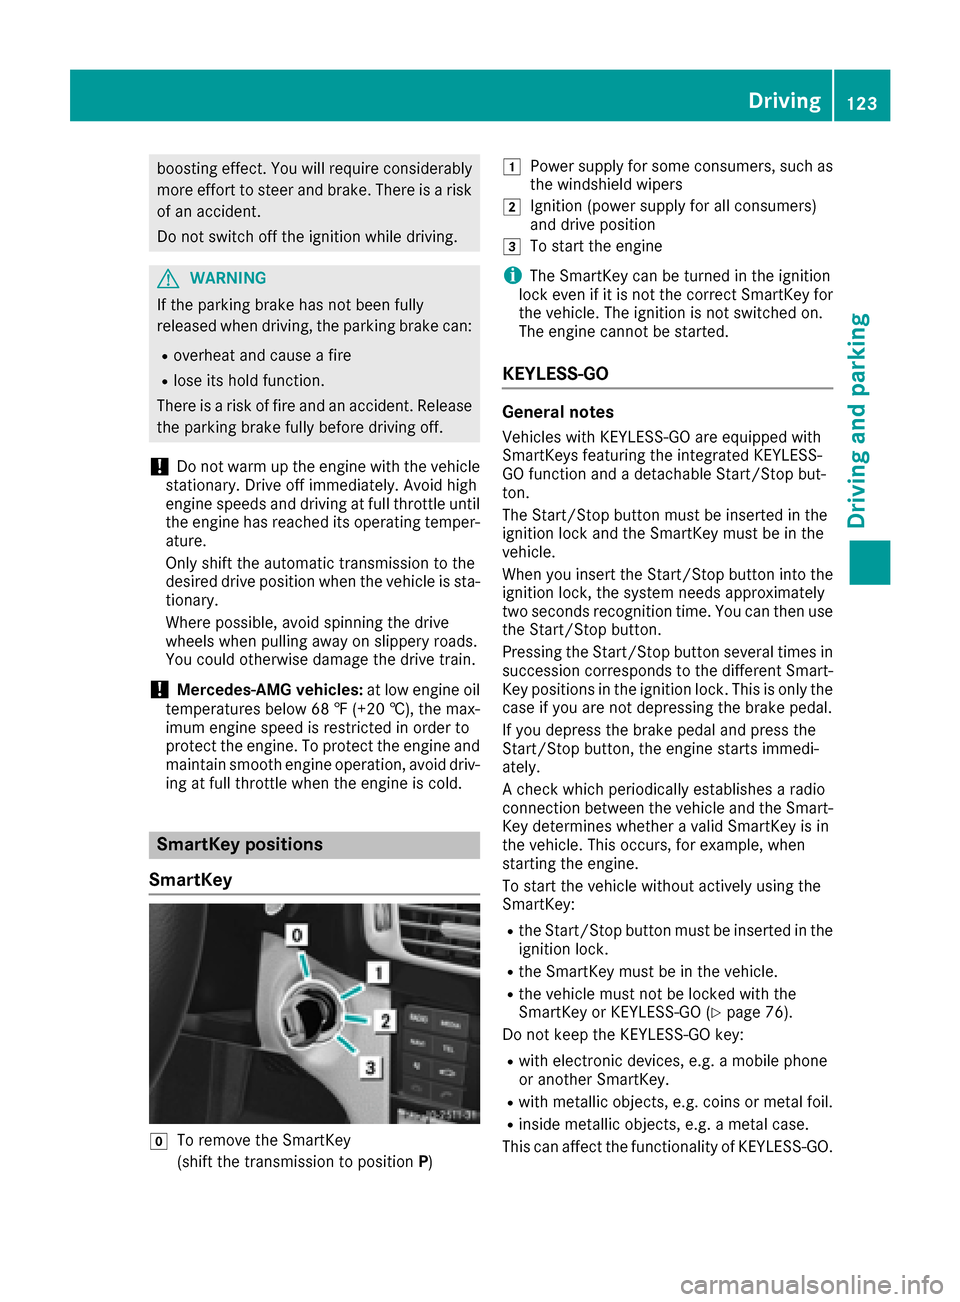
SmartKey positions
SmartKey
gTo remove the SmartKey
(shift the transmission to position P)
1Power supply for some consumers, such as
the windshield wipers
2Ignition (power supply for all consumers)
and drive position
3To start the engine
iThe SmartKey can be turned in the ignition
lock even if it is not the correct SmartKey for
the vehicle. The ignition is not switched on.
The engine cannot be started.
KEYLESS-GO
General notes
Vehicles with KEYLESS-GO are equipped with
SmartKeys featuring the integrated KEYLESS-
GO function and a detachable Start/Stop but-
ton.
The Start/Stop button must be inserted in the
ignition lock and the SmartKey must be in the
vehicle.
When you insert the Start/Stop button into the
ignition lock, the system needs approximately
two seconds recognition time. You can then use
the Start/Stop button.
Pressing the Start/Stop button several times in
succession corresponds to the different Smart-
Key positions in the ignition lock. This is only the
case if you are not depressing the brake pedal.
If you depress the brake pedal and press the
Start/Stop button, the engine starts immedi-
ately.
A check which periodically establishes a radio
connection between the vehicle and the Smart-
Key determines whether a valid SmartKey is in
the vehicle. This occurs, for example, when
starting the engine.
To start the vehicle without actively using the
SmartKey:
Rthe Start/Stop button must be inserted in the
ignition lock.
Rthe SmartKey must be in the vehicle.
Rthe vehicle must not be locked with the
SmartKey or KEYLESS-GO (Ypage 76).
Do not keep the KEYLESS-GO key:
Rwith electronic devices, e.g. a mobile phone
or another SmartKey.
Rwith metallic objects, e.g. coins or metal foil.
Rinside metallic objects, e.g. a metal case.
This can affect the functionality of KEYLESS-GO.
Driving123
Driving and parking
Z