start stop button MERCEDES-BENZ CLS-Class 2017 W218 Owner's Guide
[x] Cancel search | Manufacturer: MERCEDES-BENZ, Model Year: 2017, Model line: CLS-Class, Model: MERCEDES-BENZ CLS-Class 2017 W218Pages: 334, PDF Size: 8.22 MB
Page 144 of 334
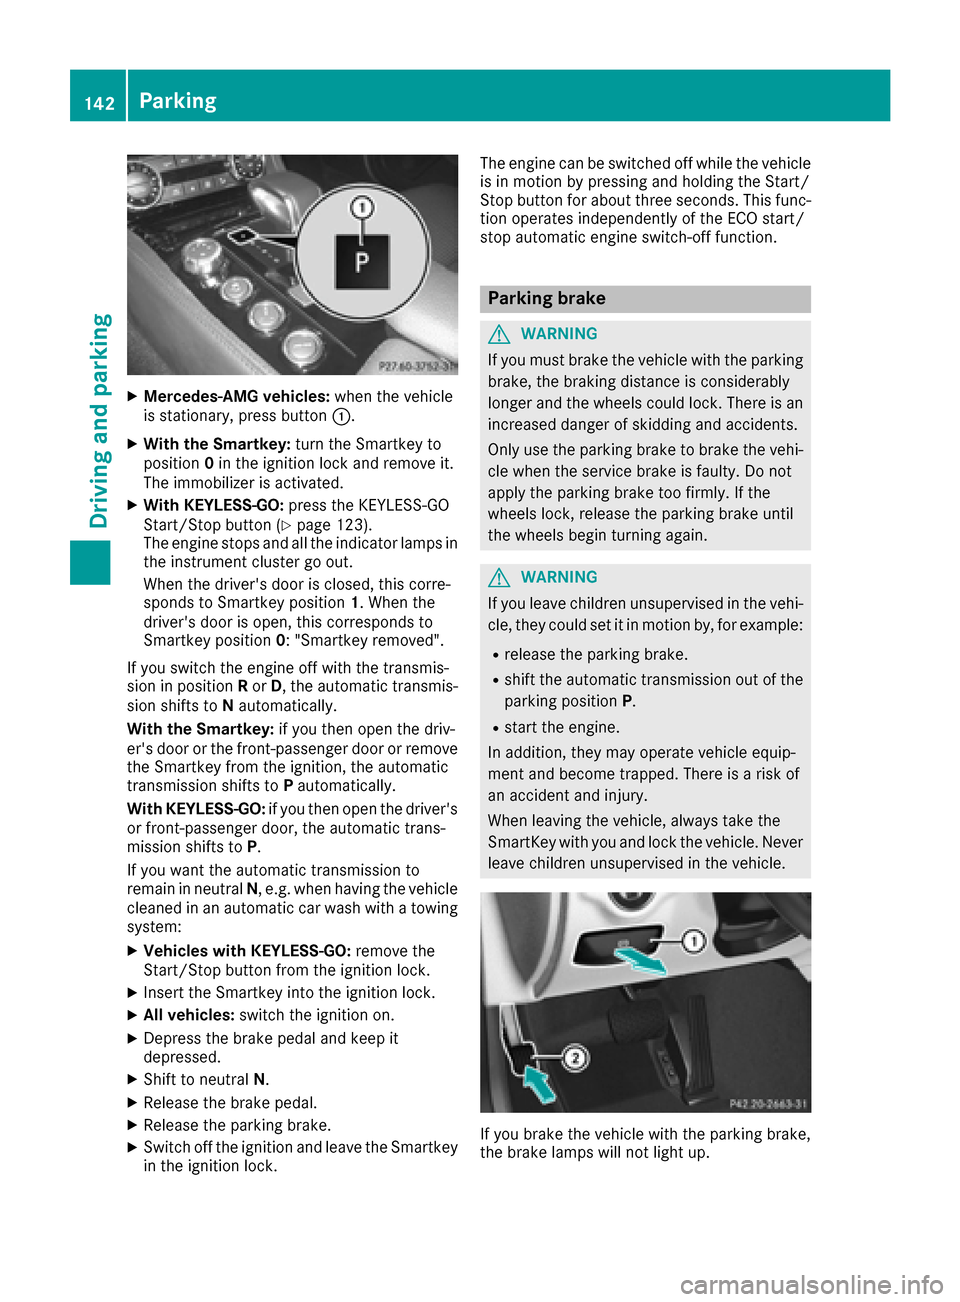
XMercedes-AMG vehicles:when the vehicle
is stationary, press button :.
XWith the Smartkey:turn the Smartkey to
position 0in the ignition lock and remove it.
The immobilizer is activated.
XWith KEYLESS-GO: press the KEYLESS-GO
Start/Stop button (Ypage 123).
The engine stops and all the indicator lamps in
the instrument cluster go out.
When the driver's door is closed, this corre-
sponds to Smartkey position 1. When the
driver's door is open, this corresponds to
Smartkey position 0: "Smartkey removed".
If you switch the engine off with the transmis-
sion in position Ror D, the automatic transmis-
sion shifts to Nautomatically.
With the Smartkey: if you then open the driv-
er's door or the front-passenger door or remove the Smartkey from the ignition, the automatic
transmission shifts to Pautomatically.
With KEYLESS-GO: if you then open the driver's
or front-passenger door, the automatic trans-
mission shifts to P.
If you want the automatic transmission to
remain in neutral N, e.g. when having the vehicle
cleaned in an automatic car wash with a towing
system:
XVehicles with KEYLESS-GO: remove the
Start/Stop button from the ignition lock.
XInsert the Smartkey into the ignition lock.
XAll vehicles: switch the ignition on.
XDepress the brake pedal and keep it
depressed.
XShift to neutral N.
XRelease the brake pedal.
XRelease the parking brake.
XSwitch off the ignition and leave the Smartkey
in the ignition lock. The engine can be switched off while the vehicle
is in motion by pressing and holding the Start/
Stop button for about three seconds. This func-
tion operates independently of the ECO start/
stop automatic engine switch-off function.
Parking brake
GWARNING
If you must brake the vehicle with the parking brake, the braking distance is considerably
longer and the wheels could lock. There is an
increased danger of skidding and accidents.
Only use the parking brake to brake the vehi-
cle when the service brake is faulty. Do not
apply the parking brake too firmly. If the
wheels lock, release the parking brake until
the wheels begin turning again.
GWARNING
If you leave children unsupervised in the vehi-
cle, they could set it in motion by, for example:
Rrelease the parking brake.
Rshift the automatic transmission out of the
parking position P.
Rstart the engine.
In addition, they may operate vehicle equip-
ment and become trapped. There is a risk of
an accident and injury.
When leaving the vehicle, always take the
SmartKey with you and lock the vehicle. Never
leave children unsupervised in the vehicle.
If you brake the vehicle with the parking brake,
the brake lamps will not light up.
142Parking
Driving and parking
Page 148 of 334
Have the brake system checked immediately.
Consult a qualified specialist workshop to
arrange this.
!Vehicles with 4MATIC: function or per-
formance tests may only be carried out on a 2-
axle dynamometer. If you wish to operate the
vehicle on such a dynamometer, please con-
sult a qualified specialist workshop in
advance. You could otherwise damage the
drive train or the brake system.
!Vehicles with 4MATIC: as the ESP®sys-
tem operates automatically, the engine and
the ignition must be switched off (SmartKey in
position 0or 1in the ignition lock or Start/
Stop button in position 0or 1) while the park-
ing brake is being tested on a brake dyna-
mometer.
Braking maneuvers triggered automatically
by ESP
®may seriously damage the brake sys-
tem.
!Vehicles with 4MATIC: as the ESP®sys-
tem operates automatically, the engine and
the ignition system must be switched off
(SmartKey in position 0or 1in the ignition
lock or Start/Stop button in position 0or 1)
when:
Rtesting the parking brake on a brake dyna-
mometer.
Ryou intend to have the vehicle towed with
one of the axles raised.
Braking maneuvers triggered automatically
by ESP
®may seriously damage the brake sys-
tem.
All checks and maintenance work on the brake
system must be carried out at a qualified spe-
cialist workshop.
Have brake pads installed and brake fluid
repla
ced at a qualified specialist workshop.
If the brake system has only been subject to
moderate loads, you should test the functional-
ity of your brakes at regular intervals. To do so,
press firmly on the brake pedal when driving at a
high speed. This improves the grip of the brake
pads.
You can find a description of Brake Assist (BAS)
on (
Ypage 65) or of BAS PLUS on (Ypage 65). The braking characteristics of the vehicle can be
seriously impaired if:
Rbrake pads other than those recommended
are installed
Rthe recommended brake fluid is not used
Safe braking can no longer be guaranteed.
AMG high-performance and ceramic
brakes
The high-performance brake system is only
installed on the Mercedes-AMG
CLS 63 S 4MATIC model.
The AMG brake systems are designed for heavy
loads. This may lead to noise when braking. This
will depend on:
RSpeed
RBraking force
REnvironmental conditions, such as tempera-
ture and humidity
The wear of individual components of the brake
system, such as the brake pads/linings or brake
discs, depends on the individual driving style
and operating conditions.
For this reason, it is impossible to state a mile-
age that will be valid under all circumstances. An aggressive driving style will lead to high wear.
You can obtain further information about this
from your authorized Mercedes-Benz Center.
New and replaced brake pads and discs only
reach their optimum braking effect after several
hundred kilometers of driving. Compensate for
this by applying greater force to the brake pedal.
Keep this in mind, and adapt your driving and
braking accordingly during this break-in period.
Excessive heavy braking results in correspond-
ingly high brake wear. Observe the brake wear
warning lamp in the instrument cluster and note
any brake status messages in the multifunction
display. Especially for high performance driving,it is important to maintain and have the brake
system checked regularly.
146Driving tips
Driving and parking
Page 169 of 334
Rthe area is too small for the vehicle to maneu-
ver into
Rthe parking space is bordered by an obstacle,
e.g. a tree, a post or a trailer
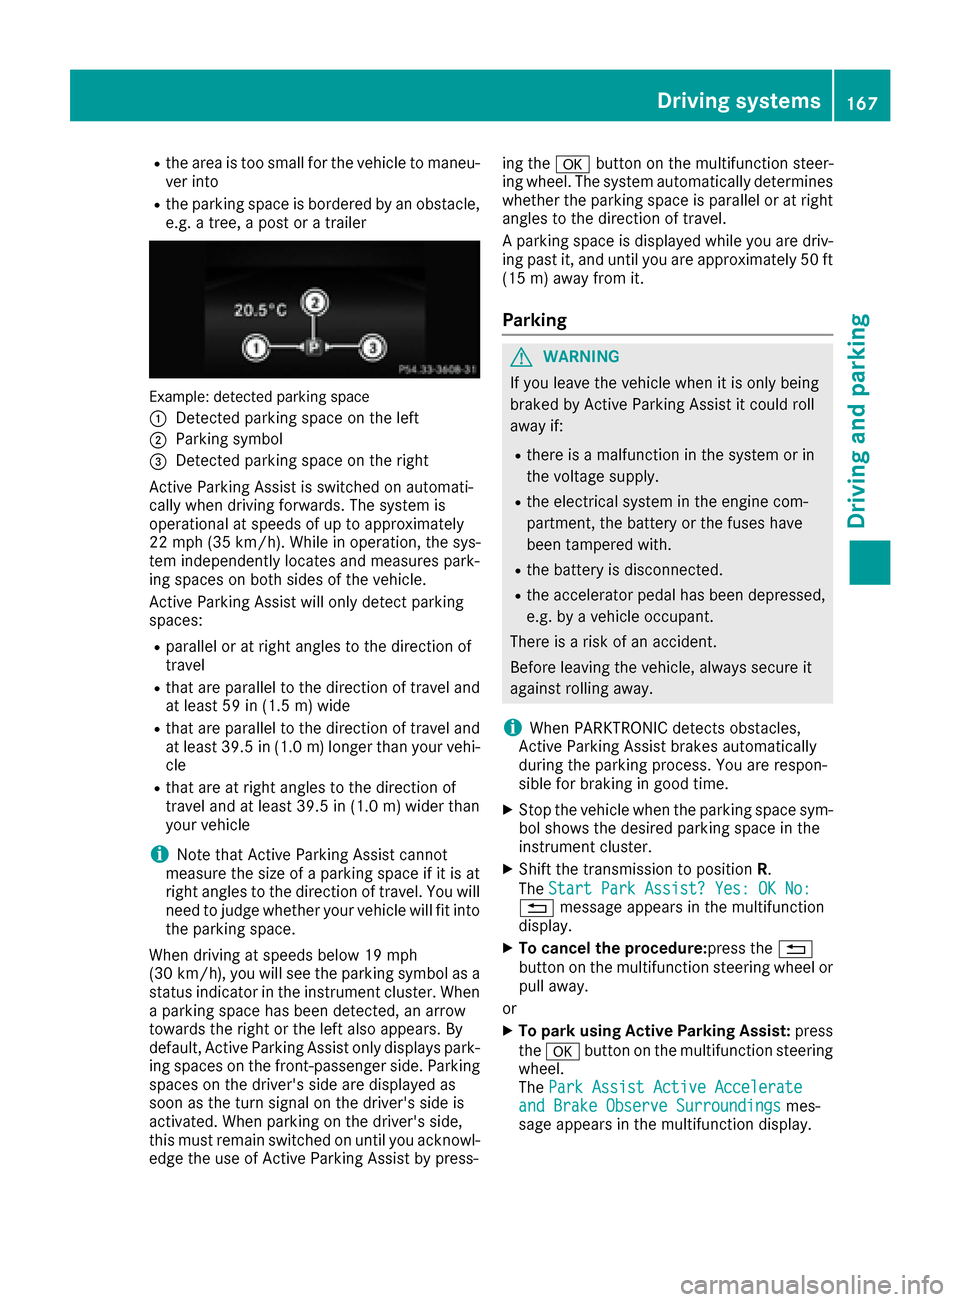
Example: detected parking space
:
Detected parking space on the left
;Parking symbol
=Detected parking space on the right
Active Parking Assist is switched on automati-
cally when driving forwards. The system is
operational at speeds of up to approximately
22 mph (35 km/h). While in operation, the sys-
tem independently locates and measures park-
ing spaces on both sides of the vehicle.
Active Parking Assist will only detect parking
spaces:
Rparallel or at right angles to the direction of
travel
Rthat are parallel to the direction of travel and
at least 59 in (1.5 m) wide
Rthat are parallel to the direction of travel and
at least 39.5 in (1.0 m)longer than your vehi-
cle
Rthat are at right angles to the direction of
travel and at least 39.5 in (1.0 m) wider than
your vehicle
iNote that Active Parking Assist cannot
measure the size of a parking space if it is at
right angles to the direction of travel. You will
need to judge whether your vehicle will fit into the parking space.
When driving at speeds below 19 mph
(30 km/h), you will see the parking symbol as a
status indicator in the instrument cluster. When
a parking space has been detected, an arrow
towards the right or the left also appears. By
default, Active Parking Assist only displays park-
ing spaces on the front-passenger side. Parking
spaces on the driver's side are displayed as
soon as t
he turn signal on the driver's side is
activated. When parking on the driver's side,
this must remain switched on until you acknowl-
edge the use of Active Parking Assist by press- ing the
abutton on the multifunction steer-
ing wheel. The system automatically determines
whether the parking space is parallel or at right
angles to the direction of travel.
A parking space is displayed while you are driv-
ing past it, and until you are approximately 50 ft (15 m) away from it.
Parking
GWARNING
If you leave the vehicle when it is only being
braked by Active Parking Assist it could roll
away if:
Rthere is a malfunction in the system or in
the voltage supply.
Rthe electrical system in the engine com-
partment, the battery or the fuses have
been tampered with.
Rthe battery is disconnected.
Rthe accelerator pedal has been depressed,
e.g. by a vehicle occupant.
There is a risk of an accident.
Before leaving the vehicle, always secure it
against rolling away.
iWhen PARKTRONIC detects obstacles,
Active Parking Assist brakes automatically
during the parking process. You are respon-
sible for braking in good time.
XStop the vehicle when the parking space sym- bol shows the desired parking space in the
instrument cluster.
XShift the transmission to position R.
The Start Park Assist? Yes: OK No:
% message appears in the multifunction
display.
XTo cancel the procedure: press the%
button on the multifunction steering wheel or
pull away.
or
XTo park using Active Parking Assist: press
the a button on the multifunction steering
wheel.
The Park Assist Active Accelerate
and Brake Observe Surroundingsmes-
sage appears in the multifunction display.
Driving systems167
Driving and parking
Z
Page 192 of 334
Right control panel
~RRejects or ends a call
RExits the telephone book/redial
memory
6RMakes or accepts a call
RSwitches to the redial memory
W
XRAdjusts the volume
8RMute
?RSwitches on voice-operated navi-
gation or the Voice Control System
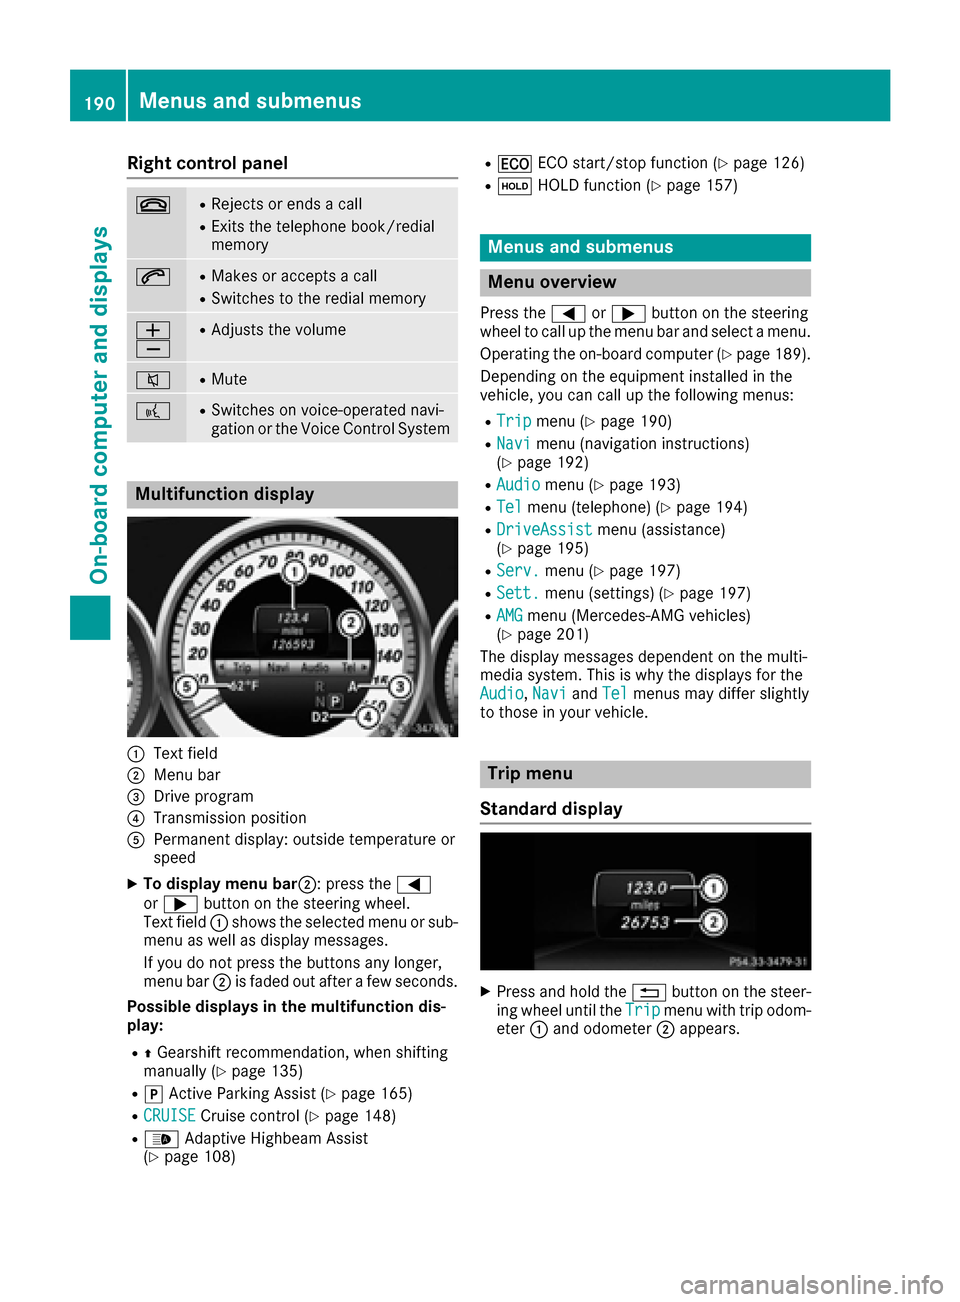
Multifunction display
:Text field
;Menu bar
=Drive program
?Transmission position
APermanent display: outside temperature or
speed
XTo display menu bar;: press the=
or ; button on the steering wheel.
Text field :shows the selected menu or sub-
menu as well as display messages.
If you do not press the buttons any longer,
menu bar ;is faded out after a few seconds.
Possible displays in the multifunction dis-
play:
RZ Gearshift recommendation, when shifting
manually (Ypage 135)
Rj Active Parking Assist (Ypage 165)
RCRUISECruise control (Ypage 148)
R_ Adaptive Highbeam Assist
(Ypage 108)
R¤ ECO start/stop function (Ypage 126)
RëHOLD function (Ypage 157)
Menus and submenus
Menu overview
Press the =or; button on the steering
wheel to call up the menu bar and select a menu.
Operating the on-board computer (
Ypage 189).
Depending on the equipment installed in the
vehicle, you can call up the following menus:
RTripmenu (Ypage 190)
RNavimenu (navigation instructions)
(Ypage 192)
RAudiomenu (Ypage 193)
RTelmenu (telephone) (Ypage 194)
RDriveAssistmenu (assistance)
(Ypage 195)
RServ.menu (Ypage 197)
RSett.menu (settings) (Ypage 197)
RAMGmenu (Mercedes-AMG vehicles)
(Ypage 201)
The display messages dependent on the multi-
media system. This is why the displays for the
Audio
, Naviand Telmenus may differ slightly
to those in your vehicle.
Trip menu
Standard display
XPress and hold the %button on the steer-
ing wheel until the Tripmenu with trip odom-
eter :and odometer ;appears.
190Menus and submenus
On-board computer and displays
Page 196 of 334
Only for vehicles with a COMAND multimedia
system: you can use theAudiomenu to play
video DVDs.
XSwitch on the multimedia system and select
video DVD.
XPress the =or; button on the steering
wheel to select the Audiomenu.
XTo select the next or previous scene:
briefly press the9or: button.
XTo select a scene from the scene list
(rapid scrolling): press and hold the 9
or : button until desired scene :
appears.
Telephone menu
Introduction
GWARNING
If you operate information systems and com-
munication equipment integrated in the vehi-
cle while driving, you will be distracted from
traffic conditions. You could also lose control
of the vehicle. There is a risk of an accident.
Only operate the equipment when the traffic
situation permits. If you are not sure that this
is possible, park the vehicle paying attention
to traffic conditions and operate the equip-
ment when the vehicle is stationary.
When telephoning, you must observe the legal
requirements for the country in which you are
currently driving.
XSwitch on the mobile phone (see the manu-
facturer’s operating instructions).
XSwitch on the multimedia system.
XEstablish a Bluetooth®connection to the mul-
timedia system (see Digital Operator's Man-
ual).
XPress the =or; button on the steering
wheel to select the Telmenu.
You will see one of the following display mes-
sages in the multifunction display:
RPhone READYor the name of the network
provider: the mobile phone has found a net-
work and is ready to receive.
RPhone No Service: there is no network
available or the mobile phone is searching for
a network.
Accepting a call
If someone calls you when you are in the Telmenu, a display message appears in the multi-
function display.
You can accept a call at any time regardless of
the menu selected.
XPress the6button on the steering wheel
to accept an incoming call.
Rejecting or ending a call
XPress the ~button on the steering wheel
to reject or end a call.
Selecting an entry in the phone book
XPress the =or; button on the steering
wheel to select the Telmenu.
XPress the9,:ora button to
switch to the phone book.
XAuthorize access to the phone book on the
phone.
XPress the 9or: button to select the
desired name.
or
XTo start rapid scrolling: press and hold:
or 9 for longer than one second.
The names in the phone book are displayed
quickly one after the other.
Rapid scrolling stops when you release the
button or reach the end of the list.
XIf only one telephone number is stored for
a name: press the 6ora button to
start dialing.
or
XIf there is more than one number for a
particular name: press the6ora
button to display the numbers.
XPress the 9or: button to select the
number you want to dial.
XPress the 6ora button to start dialing.
or
XTo exit the telephone book: press the~
or % button.
194Menus and submenus
On-board computer and displays
Page 197 of 334

Redialing
The on-board computer saves the last names or
numbers dialed in the redial memory.
XPress the=or; button on the steering
wheel to select the Telmenu.
XPress the6button to switch to the redial
memory.
XPress the 9or: button to select the
desired name or number.
XPress the 6ora button to start dialing.
or
XTo exit the redial memory: press the~
or % button.
Assistance menu
Introduction
Depending on the equipment installed in the
vehicle, you have the following options in the
DriveAssist
menu:
RDisplaying the assistance graphic
(Ypage 195)
RDeactivating/activating ESP®(except
Mercedes‑AMG vehicles) (Ypage 195)
RActivating/deactivating Steering Assist and
Stop&Go Pilot of DISTRONIC PLUS
(
Ypage 196)
RActivating/deactivating PRE-SAFE®Brake
(Ypage 196)
RActivating/deactivating COLLISION PREVEN-
TION ASSIST PLUS (Ypage 196)
RActivating/deactivating ATTENTION ASSIST
(Ypage 196)
RActivating/deactivating Blind Spot Assist or
Active Blind Spot Assist (Ypage 196)
RActivating/deactivating Lane Keeping Assist
or Active Lane Keeping Assist (Ypage 197)
Displaying the assistance graphic
XPress the =or; button on the steering
wheel to select the DriveAssistmenu.
XPress9or: to select Assist.Graphic.
XPressato confirm.
The multifunction display shows the
DISTRONIC PLUS distance display in the
assistance graphic.
The assistance graphic shows you the status
and further information on the following driv-
ing systems or driving safety systems:
RTraffic Sign Assist (Ypage 178)
RDISTRONIC PLUS (Ypage 149)
RPRE-SAFE®Brake (Ypage 72)
RCOLLISION PREVENTION ASSIST PLUS
(Ypage 67)
RATTENTION ASSIST (Ypage 177)
RLane Keeping Assist (Ypage 181)
RActive Lane Keeping Assist (Ypage 184)
XPress :to display the ATTENTION ASSIST
assessment.
Deactivating/activating ESP®
iObserve the important safety notes on ESP®
(Ypage 69).
GWARNING
If you deactivate ESP
®, ESP®no longer sta-
bilizes the vehicle. There is an increased risk
of skidding and an accident.
Only deactivate ESP
®in the situations descri-
bed in the following.
It may be best to deactivate ESP
®in the follow-
ing situations:
Rwhen using snow chains
Rin deep snow
Ron sand or gravel
Deactivating/activating ESP®on Mercedes-
AMG vehicles (Ypage 71).
For further information about ESP®, see
(Ypage 69).
XStart the engine.
XPress the =or; button on the steering
wheel to select the DriveAssistmenu.
XPress9or: to select ESP.
Menus and submenus195
On-board computer and displays
Z
Page 204 of 334

Starting a new lap
:RACETIMER
;Fastest lap time (best lap)
=Lap
XPressato confirm New Lap.
iIt is possible to store a maximum of sixteen
laps. The 16th lap can only be completed with
Finish Lap
.
Stopping the RACETIMER
XPress the %button on the steering wheel.
XPress ato confirm Yes.
The RACETIMER interrupts timing if you stop the
vehicle and turn the SmartKey to position 1in
the ignition lock. If you turn the key to position 3
and then press ato confirm Start
, timing is
continued.
Resetting the current lap
XStop the RACETIMER.
XPress =or; to select Reset Lap.
XPressato reset the lap time to "0".
Deleting all laps
If you switch off the engine, the RACETIMER is
reset to "0" after 30 seconds. All laps are
deleted. You cannot delete individual stored laps. If you
have stopped 16 laps, the current lap does not
have to be reset.
XReset the current lap.
XPress
ato confirm Reset.
Reset Race Timer?appears in the multi-
function display.
XPress :Yesto select and confirm with
a.
All laps are deleted.
Overall statistics
:RACETIMER overall evaluation
;Total time driven
=Average speed
?Distance covered
AMaximum speed
If you store at least one lap and stop the RACE-
TIMER, an overall evaluation will then be availa-
ble.
XPress the =or; button on the steering
wheel to select the AMGmenu.
XPress the9button repeatedly until the
overall evaluation appears.
Lap statistics
:Lap
;Lap time
=Average lap speed
?Lap length
ATop speed during lap
If you store at least two laps and stop the RACE-
TIMER, the lap evaluation function then
becomes available.
202Menus and submenus
On-board computer and displays
Page 273 of 334

After the vehicle has been washed, brake
carefully while paying attention to the traffic
conditions until full braking power is restored.
!When DISTRONIC PLUS or the HOLD func-
tion is activated, the vehicle brakes automat-
ically in certain situations.
To avoid damage to the vehicle, deactivate
DISTRONIC PLUS and the HOLD function in
the following or similar situations:
Rwhen towing the vehicle
Rin the car wash
!Never clean your vehicle in a Touchless
Automatic Car Wash as these use special
cleaning agents. These cleaning agents can
damage the paintwork or plastic parts.
!Make sure that:
Rthe side windows and the sliding sunroof
are fully closed.
Rthe ventilation/heating is switched off (the
OFF button has been pressed).
Rthe windshield wiper switch is at position 0.
Rthe 360° camera or rear view camera is
switched off.
The vehicle may otherwise be damaged.
!In car washes with a towing mechanism,
make sure that the automatic transmission is in transmission position N, otherwise the
vehicle could be damaged.
RVehicles with a SmartKey:
Do not remove the SmartKey from the igni-
tion lock. Do not open the driver's door or
front-passenger door whe
n the engine is
switched off. Otherwise, the automatic
transmission selects park position Pauto-
matically and locks the wheels. You can
prevent this by shifting the automatic trans-
mission to Nbeforehand.
RVehicles with KEYLESS-GO:
Do not open the driver's door or front-
passenger door when the engine is
switched off. Otherwise, the automatic
transmission selects park position Pauto-
matically and locks the wheels.
Observe the following to make sure that the
automatic transmission stays in position N:
XMake sure the vehicle is stationary and the
ignition is switched off.
XTurn the SmartKey to position2in the ignition
lock (Ypage 123).
Use the SmartKey instead of the Start/Stop
button on vehicles with KEYLESS-GO.
XDepress and hold the brake pedal.
XShift the automatic transmission to position
N.
XRelease the brake pedal.
XRelease the electric parking brake.
XSwitch off the ignition and leave the SmartKey
in the ignition lock.
You can wash the vehicle in an automatic car
wash from the very start.
If the vehicle is very dirty, pre-wash it before
cleaning it in an automatic car wash.
After using an automatic car wash, wipe off wax
from the windshield and the wipe r b
lades. This
will prevent smears and reduce wiping noises
caused by residue on the windshield.
Washing by hand
In some countries, washing by hand is only
allowed at specially equipped washing bays.
Observe the legal requirements in each country.
XDo not use hot water and do not wash the
vehicle in direct sunlight.
XUse a soft sponge to clean.
XUse a mild cleaning agent, such as a car
shampoo approved by Mercedes-Benz.
XThoroughly hose down the vehicle with a gen-
tle jet of water.
XDo not point the water jet directly towards the
air inlet.
XUse plenty of water and rinse out the sponge
frequently.
XRinse the vehicle with clean water and dry
thoroughly with a chamois.
XDo not let the cleaning agent dry on the paint- work.
Carefully remove all deposits of road salt as
soon as possible when driving in winter.
Power washers
GWARNING
The water jet from a circular jet nozzle (dirt
blasters) can cause invisible exterior damage
Care271
Maintenance and care
Z
Page 280 of 334
iExample: equipment and country-specific
variations possible.
Vehicles with alloy wheels and hub caps
On vehicles with alloy wheels and hub caps, a
socket is also provided.
Flat tire
Preparing the vehicle
Your vehicle may be equipped with:
RMOExtended tires (tires with run-flat proper-
ties) (Ypage 278)
Vehicle preparation is not necessary on vehi-
cles with MOExtended tires
Ra TIREFIT kit (Ypage 277)
Ran emergency spare wheel (Ypage 317)
Vehicles equipped with MOExtended tires are
not equipped with a TIREFIT kit at the factory. It
is therefore recommended that you additionally
equip your vehicle with a TIREFIT kit if you mount tires that do not feature run-flat properties, e.g.
winter tires. A TIREFIT kit may be obtained from a qualified specialist workshop.
Information on changing and mounting wheels
(
Ypage 312).
XStop the vehicle on solid, non-slippery and
level ground, as far away as possible from
traffic.
XSwitch on the hazard warning lamps.
XSecure the vehicle against rolling away
(Ypage 141).
XIf possible, bring the front wheels into the
straight-ahead position.
XVehicles with AIRMATIC: make sure that "nor-
mal" level is selected (Ypage 159).
XSwitch off the engine.
XRemove the SmartKey from the ignition lock.
or, on vehicles with KEYLESS ‑GO:
XOpen the driver's door.
The vehicle electronics now have status 0.
This is the same as the SmartKey having been
removed.
XRemove the Start/Stop button from the igni-
tion lock (Ypage 123).
XMake sure that the passengers are not endan-
gered as they do so. Make sure that no one is near the danger area while a wheel is being changed. Anyone who is not directly assisting
in the wheel change should, for example,
stand behind the barrier.
XGet out of the vehicle. Pay attention to traffic
conditions when doing so.
XClose the driver's door.
MOExtended tires (tires with run-flat
properties)
General notes
With MOExtended tires (tires with run flat char-
acteristics), you can continue to drive your vehi-
cle even if there is a total loss of pressure in one
or more tires. The affected tire must not show
any clearly visible damage.
You can recognize MOExtended tires by the
MOExtended marking which appears on the
sidewall of the tire. You will find this marking
next to the tire size designation, the load-bear-
ing capacity and the speed index (
Ypage 307).
MOExtended tires may only be used in conjunc-
tion with an active tire pressure loss warning
system or with an active tire pressure monitor.
If a pressure loss warning message appears
in the multifunction display:
Robserve the instructions in the display mes-
sages (Ypage 221).
Rcheck the tire for damage.
Rif driving on, observe the following notes.
The driving distance possible in run-flat mode is
approximately 50 miles (80 km) when the vehi-
cle is partially laden. When the vehicle is fully
laden it is approximately 19 miles (30 km).
In addition to the vehicle load, the driving dis-
tance possible depends upon:
RVehicle speed
RRoad condition
ROutside temperature
The driving di stance p
ossible in run-flat mode
may be reduced by extreme driving conditions
or maneuvers, or it can be increased through a
moderate style of driving.
The driving distance possible in run-flat mode is
counted from the moment the tire pressure loss
warning appears in the multifunction display.
You must not exceed a maximum permissible
speed of 50 mph (80 km/h).
278Flat tire
Breakdown assistance
Page 291 of 334
Removing the towing eye
XUnscrew and remove the towing eye.
XPosition cover:on top of the bumper and
press it in at the bottom until it engages.
XAttach cover ;to the bumper and press until
it engages.
XPlace the towing eye in the vehicle tool kit.
Towing a vehicle with both axles on
the ground
It is important that you observe the safety
instructions when towing away your vehicle
(
Ypage 287).
The automatic transmission automatically shifts
to position Pwhen you open the driver's or front-
passenger door or when you remove the Smart-
Key from the ignition lock. In order to ensure
that the automatic transmission stays in posi-
tion Nwhen towing the vehicle, you must
observe the following points:
XMake sure that the vehicle is stationary.
XTurn the SmartKey to position 2in the ignition
lock.
On vehicles with KEYLESS-GO, use the Smart-
Key instead of the Start/Stop button
(
Ypage 124).
XDepress and hold the brake pedal.
XShift the automatic transmission to position
N.
XRelease the brake pedal.
XRelease the parking brake.
XSwitch on the hazard warning lamps
(Ypage 107).
XLeave the SmartKey in position 2in the igni-
tion lock.
In order to signal a change of direction when
towing the vehicle with the hazard warning
lamps switched on, use the combination switch
as usual. In this case, only the turn signals for
the desired direction flash. After resetting the
combination switch, the hazard warning lamp
starts flashing again.
Towing the vehicle with the rear axle
raised
!
Vehicles with 4MATIC must not be towed
with either the front or the rear axle raised, as
doing so will damage the transmission.
!Vehicles with automatic transmission must
not be towed with the rear axle raised. The
vehicle/trailer combination may otherwise
swerve or even roll over.
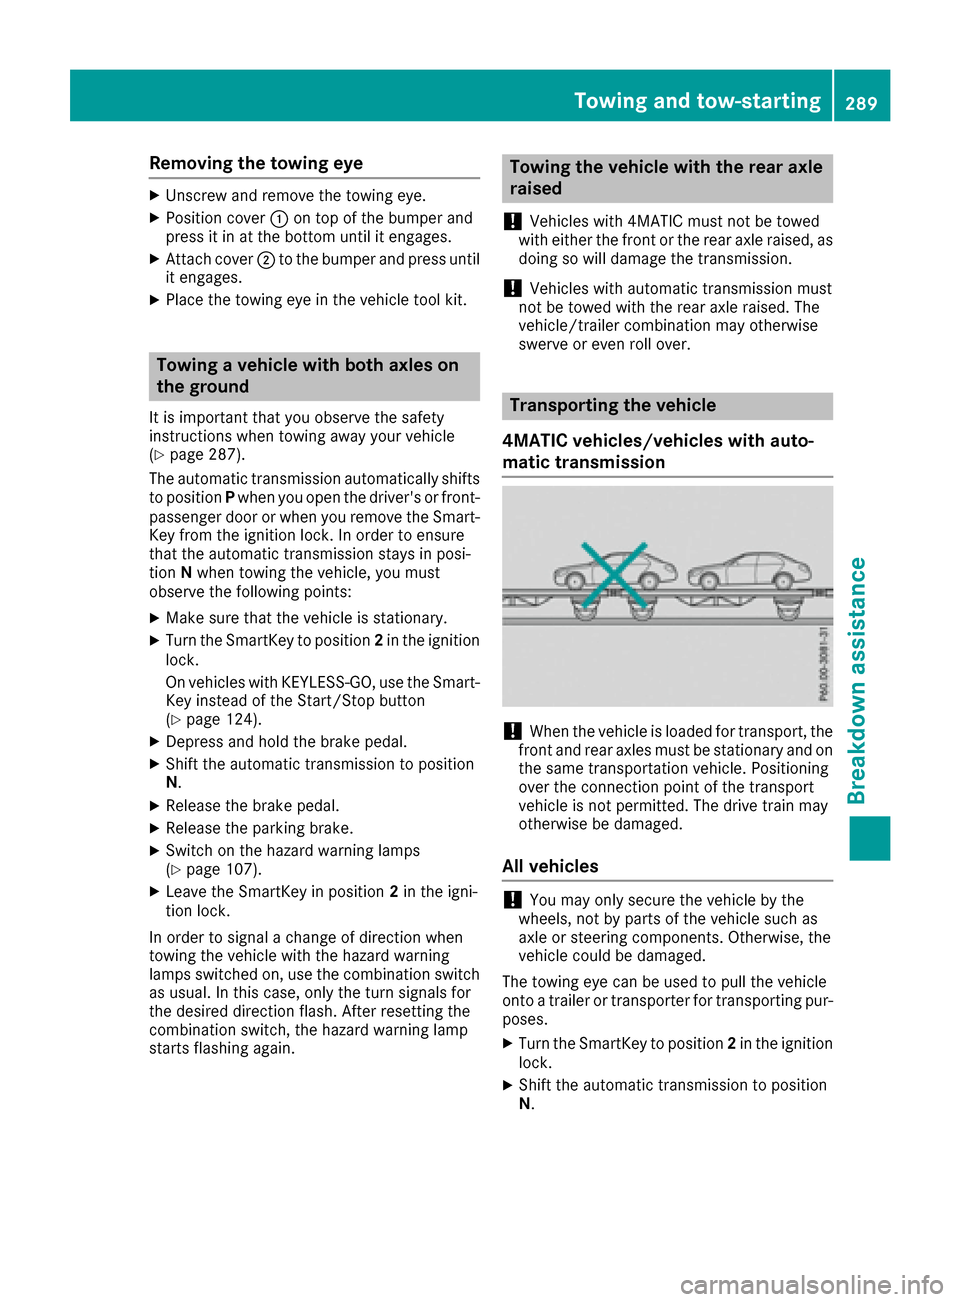
Transporting the vehicle
4MATIC vehicles/vehicles with auto-
matic transmission
!When the vehicle is loaded for transport, the
front and rear axles must be stationary and on
the same transportation vehicle. Positioning
over the connection point of the transport
vehicle is not permitted. The drive train may
otherwise be damaged.
All vehicles
!You may only secure the vehicle by the
wheels, not by parts of the vehicle such as
axle or steering components. Otherwise, the
vehicle could be damaged.
The towing eye can be used to pull the vehicle
onto a trailer or transporter for transporting pur-
poses.
XTurn the SmartKey to position 2in the ignition
lock.
XShift the automatic transmission to position
N.
Towing and tow-starting289
Breakdown assistance
Z