check oil MERCEDES-BENZ CLS-Class 2017 W218 Owner's Manual
[x] Cancel search | Manufacturer: MERCEDES-BENZ, Model Year: 2017, Model line: CLS-Class, Model: MERCEDES-BENZ CLS-Class 2017 W218Pages: 334, PDF Size: 8.22 MB
Page 12 of 334
see also Digital Operator's Man-
ual .................................................. 236
E
EASY-ENTRY featureActivating/deactivating ................. 199
Function/notes ............................. 100
EASY-EXIT feature
Crash-responsive ........................... 100
Function/notes ............................. 100
Switching on/off ........................... 199
EASY-PACK trunk box ....................... 246
EBD (electronic brake force distri-
bution)
Display message ............................2 05
Function/notes ................................ 72
ECO display
Function/notes .............................1 44
On-board computer ....................... 191
ECO start/stop function
Automatic engine start .................. 127
Automatic engine switch-off .......... 126
Deactivating/activating ................. 127
General information ....................... 126
Important safety notes .................. 126
Introduction ................................... 126
Electronic Stability Program
see ESP
®(Electronic Stability Program)
Emergency
Automatic measures after an acci-
dent ................................................. 58
Emergency release
Driver's door ....................................8 3
Fuel filler flap ................................. 140
Trunk ............................................... 86
Vehicle ............................................. 83
Emergency spare wheel
General notes ................................ 318
Important safety notes .................. 317
Removing ....................................... 318
Storage location ............................ 318
Stowing .......................................... 319
Technical data ............................... 318
Emergency Tensioning Devices
Activation ......................................... 53
Emissions control
Service and warranty information .... 26 Engine
Check Engine warning lamp ........... 232
Display message ............................ 213
ECO start/stop function ................ 126
Engine number ............................... 323
Irregular running ............................ 128
Jump-starting ................................. 285
Starting problems .......................... 128
Starting the engine with the
SmartKey ....................................... 125
Starting with KEYLESS-GO ............. 125
Sw
itching off .................................. 141
Tow-starting (vehicle) ..................... 290
Engine electronics
Problem (malfunction) ................... 128
Engine jump starting
see Jump starting (engine)
Engine oil
Adding ........................................... 267
Additives ........................................ 326
Checking the oil level ..................... 267
Checking the oil level using the
dipstick .......................................... 267
Display message ............................ 214
Filling capacity ............................... 326
Notes about oil grades ................... 325
Notes on oil level/consumption .... 267
Temperature (on-board computer,
Mercedes-AMG vehicles) ............... 201
Entering an address
see also Digital Operator's Man-
ual .................................................. 236
ESP
®(Electronic Stability Pro-
gram)
AMG menu (on-board computer) ... 201
Characteristics ................................. 70
Deactivating/activating (button
in Mercedes-AMG vehicles) ............. 71
Deactivating/activating (except
Mercedes‑AMG vehicles) ................. 70
Deactivating/activating (on-
board computer, except
Mercedes-AMG vehicles) ............... 195
Display message ............................ 204
Function/notes ................................ 69
General notes .................................. 69
Important safety information ........... 69
Trailer stabilization ........................... 72
10Index
Page 20 of 334
Seat heating .................................... 97
Seat heating problem ...................... 98
Storing settings (memory func-
tion) ............................................... 104
Switching seat heating on/off ......... 97
Switching seat ventilation on/
off .................................................... 98
Section
Trunk ............................................... 83
Securing a load
see Securing cargo
Securing cargo .................................. 246
Selector lever
Cleaning ......................................... 275
Sensors (cleaning instructions) ....... 274
Service menu (on-board com-
puter) .................................................. 197
Service message
see ASSYST PLUS
Service products
Brake fluid ..................................... 326
Coolant (engine) ............................ 326
Engine oil ....................................... 325
Fuel ................................................ 324
Important safety notes .................. 323
Refrigerant (air-conditioning sys-
tem) ............................................... 327
Washer fluid ................................... 327
Setting the air distribution ............... 118
Setting the airflow ............................ 118
Setting the date/time format
see also Digital Operator's Man-
ual .................................................. 236
Setting the language
see also Digital Operator's Man-
ual .................................................. 236
Setting the time
see also Digital Operator's Man-
ual .................................................. 236
Settings
Factory (on-board computer) ......... 200
On-board computer ....................... 197
SETUP (on-board computer) ............. 201
Side impact air bag ............................. 47
Side marker lamp (display mes-
sage) ................................................... 212 Side windows
Cleaning ......................................... 273
Convenience closing feature ............ 88
Convenience opening feature .......... 88
Important safety information ........... 87
Opening/closing .............................. 87
Problem (malfunction) ..................... 89
Resetting ......................................... 89
Reversing feature ............................. 87
SIRIUS services
see also Digital Operator's Man-
ual .................................................. 236
Sliding sunroof
Important safety notes .................... 90
Openi
ng/closing .............................. 91
Problem (malfunction) ..................... 91
Resetting ......................................... 91
SmartKey
Changing the battery ....................... 79
Changing the programming ............. 77
Checking the battery ....................... 79
Convenience closing feature ............ 88
Convenience opening feature .......... 88
Display message ............................ 225
Door central locking/unlocking ....... 76
Important safety notes .................... 76
Loss ................................................. 80
Mechanical key ................................ 78
Overview .......................................... 76
Positions (ignition lock) ................. 123
Problem (malfunction) ..................... 80
Starting the engine ........................ 125
SMS
see also Digital Operator's Man-
ual .................................................. 236
Snow chains ...................................... 294
Sockets
Center console .............................. 253
General notes ................................ 253
Rear compartment ......................... 254
Sound
Switching on/off ........................... 237
Spare wheel
Stowing .......................................... 319
Special seat belt retractor .................. 58
Specialist workshop ............................ 29
Speed, controlling
see Cruise control
18Index
Page 22 of 334
see also Digital Operator's Man-
ual .................................................. 236
Switching between mobile
phones ...........................................241
Temperature
Coolant .......................................... 188
Coolant (on-board computer,
Mercedes-AMG vehicles) ...............2 01
Engine oil (on-board computer,
Mercedes-AMG vehicles) ...............2 01
Outside temperature ......................1 88
Setting (climate control) ................ 117
Through-loading feature ................... 245
Timing (RACETIMER) ......................... 201
Tire pressure
Calling up (on-board computer) ..... 299
Checking manually ........................ 298
Display message ............................ 221
Maximum ....................................... 298
Not reached (TIREFIT) .................... 281
Notes ............................................. 297
Reached (TIREFIT) .......................... 281
Recommended ............................... 295
Using the TIREFIT kit ......................2 80
Tire pressure loss warning system
General notes ................................ 298
Important safety notes .................. 298
Restarting ...................................... 299
Tire pressure monitor
Checking the tire pressure elec-
tronically ........................................ 301
Function/notes .............................2 99
General notes ................................ 299
Important safety notes .................. 300
Radio type approval for the tire
pressure monitor ........................... 302
Restarting ...................................... 302
Warning lamp ................................. 235
Warning message .......................... 301
Tire-change tool kit ........................... 277
TIREFIT kit .......................................... 279
Important safety notes .................. 279
Storage location ............................ 277
Tire pressure not reached .............. 281
Tire pressure reached .................... 281
Using ............................................. 280
Tires
Aspect ratio (definition) ................. 311 Average weight of the vehicle
occupants (definition) .................... 310
Bar (definition) ............................... 310
Changing a wheel .......................... 312
Characteristics .............................. 310
Checking ........................................ 292
Curb weight (definition) ................. 311
Definition of terms ......................... 310
Direction of rotation ...................... 313
Display message ............................ 221
Distribution of the vehicle occu-
pants (definition) ............................ 312
DOT (Department of Transporta-
tion) (definition) ............................. 310
DOT, Tire Identification Number
(TIN) ............................................... 309
GAWR (Gross Axle Weight Rating)
(definition) ..................................... 310
GVW (Gross Vehicle Weight) (def-
inition) ........................................... 311
GVWR (Gross Vehicle Weight Rat-
ing) (definition) .............................. 311
Important safety notes .................. 292
Increased vehicle weight due to
optional equipment (definition) ...... 310
Information on driving .................... 292
Kilopascal (kPa) (definition) ........... 311
Labeling (overview) ........................ 307
Load bearing index (definition) ...... 312
Load index ..................................... 309
Load index (definition) ................... 311
Maximum load on a tire (defini-
tion) ............................................... 311
Maximum loaded vehicle weight
(definition) ..................................... 311
Maximum permissible tire pres-
sure (definition) ............................. 311
Maximum tire load ......................... 309
Maximum tire load (definition) ....... 311
MOExtended tires .......................... 294
Optional equipment weight (defi-
nition) ............................................ 312
PSI (pounds per square inch) (def- inition) ........................................... 311
Replacing ....................................... 312
Service life ..................................... 293
Si
dewall (definition) ....................... 311
Speed rating (definition) ................ 311
20Index
Page 125 of 334
boosting effect. You will require considerablymore effort to steer and brake. There is a risk
of an accident.
Do not switch off the ignition while driving.
GWARNING
If the parking brake has not been fully
released when driving, the parking brake can:
Roverheat and cause a fire
Rlose its hold function.
There is a risk of fire and an accident. Release
the parking brake fully before driving off.
!Do not warm up the engine with the vehicle
stationary. Drive off immediately. Avoid high
engine speeds and driving at full throttle until
the engine has reached its operating temper-
ature.
Only shift the automatic transmission to the
desired drive position when the vehicle is sta-
tionary.
Where possible, avoid spinning the drive
wheels when pulling away on slippery roads.
You could otherwise damage the drive train.
!Mercedes-AMG vehicles: at low engine oil
temperatures below 68 ‡ (+20 †), the max-
imum engine speed is restricted in order to
protect the engine. To protect the engine and
maintain smooth engine operation, avoid driv-
ing at full throttle when the engine is cold.
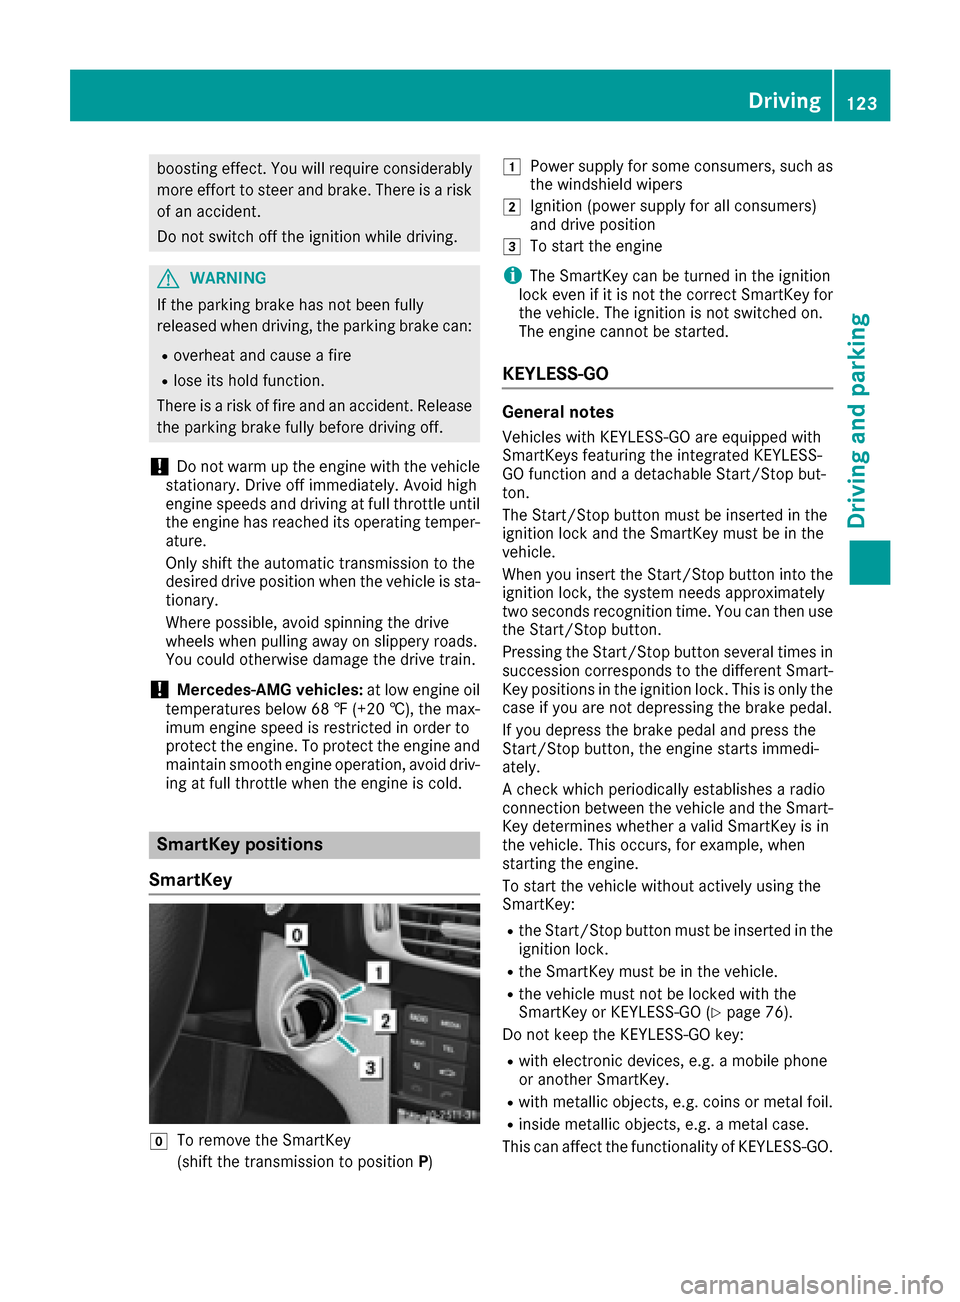
SmartKey positions
SmartKey
gTo remove the SmartKey
(shift the transmission to position P)
1Power supply for some consumers, such as
the windshield wipers
2Ignition (power supply for all consumers)
and drive position
3To start the engine
iThe SmartKey can be turned in the ignition
lock even if it is not the correct SmartKey for
the vehicle. The ignition is not switched on.
The engine cannot be started.
KEYLESS-GO
General notes
Vehicles with KEYLESS-GO are equipped with
SmartKeys featuring the integrated KEYLESS-
GO function and a detachable Start/Stop but-
ton.
The Start/Stop button must be inserted in the
ignition lock and the SmartKey must be in the
vehicle.
When you insert the Start/Stop button into the
ignition lock, the system needs approximately
two seconds recognition time. You can then use
the Start/Stop button.
Pressing the Start/Stop button several times in
succession corresponds to the different Smart-
Key positions in the ignition lock. This is only the
case if you are not depressing the brake pedal.
If you depress the brake pedal and press the
Start/Stop button, the engine starts immedi-
ately.
A check which periodically establishes a radio
connection between the vehicle and the Smart-
Key determines whether a valid SmartKey is in
the vehicle. This occurs, for example, when
starting the engine.
To start the vehicle without actively using the
SmartKey:
Rthe Start/Stop button must be inserted in the
ignition lock.
Rthe SmartKey must be in the vehicle.
Rthe vehicle must not be locked with the
SmartKey or KEYLESS-GO (Ypage 76).
Do not keep the KEYLESS-GO key:
Rwith electronic devices, e.g. a mobile phone
or another SmartKey.
Rwith metallic objects, e.g. coins or metal foil.
Rinside metallic objects, e.g. a metal case.
This can affect the functionality of KEYLESS-GO.
Driving123
Driving and parking
Z
Page 140 of 334
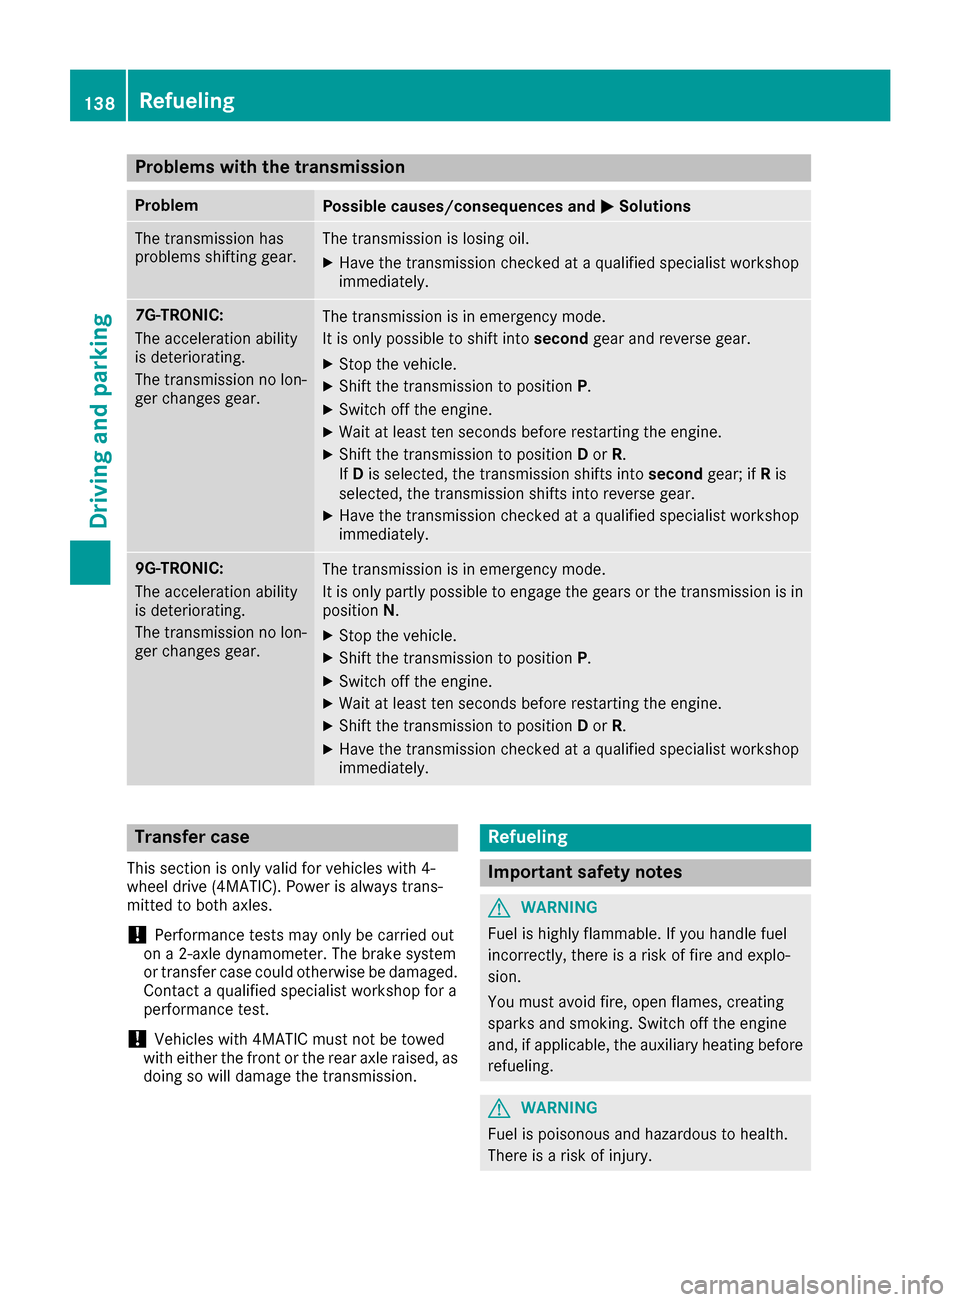
Problems with the transmission
ProblemPossible causes/consequences andMSolutions
The transmission has
problems shifting gear.The transmission is losing oil.
XHave the transmission checked at a qualified specialist workshop
immediately.
7G-TRONIC:
The acceleration ability
is deteriorating.
The transmission no lon-
ger changes gear.The transmission is in emergency mode.
It is only possible to shift intosecondgear and reverse gear.
XStop the vehicle.
XShift the transmission to position P.
XSwitch off the engine.
XWait at least ten seconds before restarting the engine.
XShift the transmission to positionDor R.
If D is selected, the transmission shifts into secondgear; ifRis
selected, the transmission shifts into reverse gear.
XHave the transmission checked at a qualified specialist workshop
immediately.
9G-TRONIC:
The acceleration ability
is deteriorating.
The transmission no lon-
ger changes gear.The transmission is in emergency mode.
It is only partly possible to engage the gears or the transmission is in
position N.
XStop the vehicle.
XShift the transmission to position P.
XSwitch off the engine.
XWait at least ten seconds before restarting the engine.
XShift the transmission to positionDor R.
XHave the transmission checked at a qualified specialist workshop
immediately.
Transfer case
This section is only valid for vehicles with 4-
wheel drive (4MATIC). Power is always trans-
mitted to both axles.
!Performance tests may only be carried out
on a 2-axle dynamometer. The brake system
or transfer case could otherwise be damaged. Contact a qualified specialist workshop for a
performance test.
!Vehicles with 4MATIC must not be towed
with either the front or the rear axle raised, as
doing so will damage the transmission.
Refueling
Important safety notes
GWARNING
Fuel is highly flammable. If you handle fuel
incorrectly, there is a risk of fire and explo-
sion.
You must avoid fire, open flames, creating
sparks and smoking. Switch off the engine
and, if applicable, the auxiliary heating before refueling.
GWARNING
Fuel is poisonous and hazardous to health.
There is a risk of injury.
138Refueling
Driving and parking
Page 216 of 334
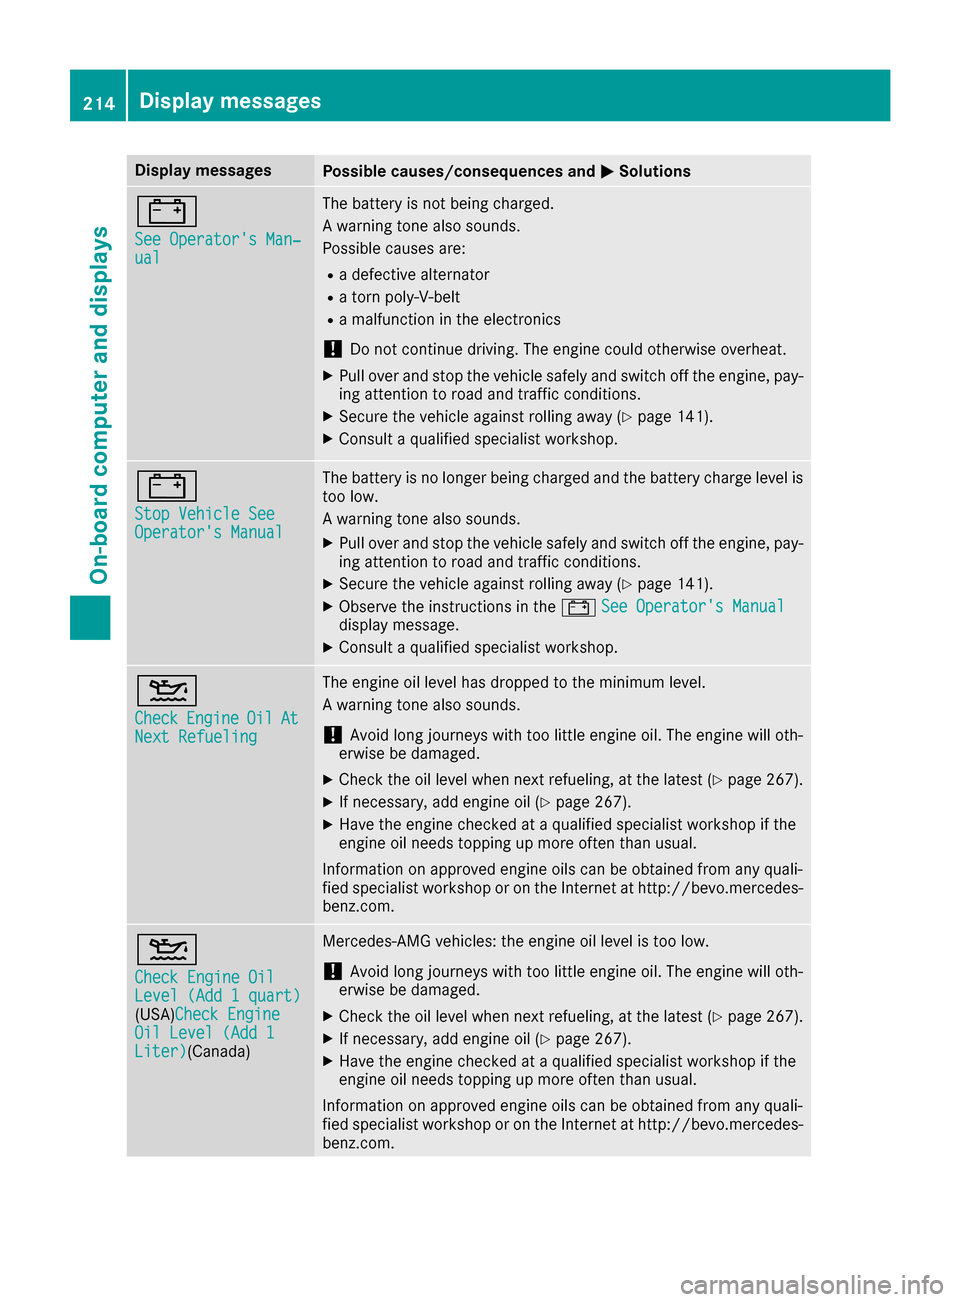
Display messagesPossible causes/consequences andMSolutions
#
See Operator'sMan ‐ual
The battery is no tbein gcharged.
A warning tone also sounds.
Possibl ecauses are:
Radefective alternato r
Ratorn poly-V-belt
Ramalfunction in th eelectronics
!Do no tcontinu edriving. The engin ecould otherwise overheat.
XPull ove rand stop th evehicl esafely and switch off th eengine, pay-
ing attention to roa dand traffic conditions.
XSecur eth evehicl eagainst rollin gaway (Ypage 141).
XConsult aqualified specialist workshop .
#
StopVehicl eSeeOperator' sManual
The battery is no longer bein gcharged and th ebattery charg elevel is
to olow.
A warning tone also sounds.
XPull ove rand stop th evehicl esafely and switch off th eengine, pay-
ing attention to roa dand traffic conditions.
XSecur eth evehicl eagainst rollin gaway (Ypage 141).
XObserv eth einstruction sin th e# See Operator' sManualdisplay message .
XConsultaqualified specialist workshop .
4
CheckEngineOilAtNextRefueling
The engin eoil level has dropped to th eminimum level.
A warning tone also sounds.
!Avoid lon gjourneys wit hto olittl eengin eoil. The engin ewill oth-
erwise be damaged.
XChec kth eoil level when next refueling, at th elatest (Ypage 267).
XIf necessary, add engin eoil (Ypage 267).
XHav eth eengin echecke dat aqualified specialist workshop if th e
engin eoil needs toppin gup mor eoften than usual.
Information on approve dengin eoils can be obtained from any quali-
fie dspecialist workshop or on th eInternet at http://bevo.mercedes -
benz.com.
4
Check Engine OilLevel (Ad d 1quart)(USA) Check EngineOil Level (Ad d 1Liter)(Canada)
Mercedes-AMG vehicles: th eengin eoil level is to olow.
!Avoid lon gjourneys wit hto olittl eengin eoil. The engin ewill oth-
erwise be damaged.
XChec kth eoil level when next refueling, at th elatest (Ypage 267).
XIf necessary, add engin eoil (Ypage 267).
XHav eth eengin echecke dat aqualified specialist workshop if th e
engin eoil needs toppin gup mor eoften than usual.
Information on approve dengin eoils can be obtained from any quali-
fie dspecialist workshop or on th eInternet at http://bevo.mercedes -
benz.com.
214Display messages
On-board computer and displays
Page 217 of 334
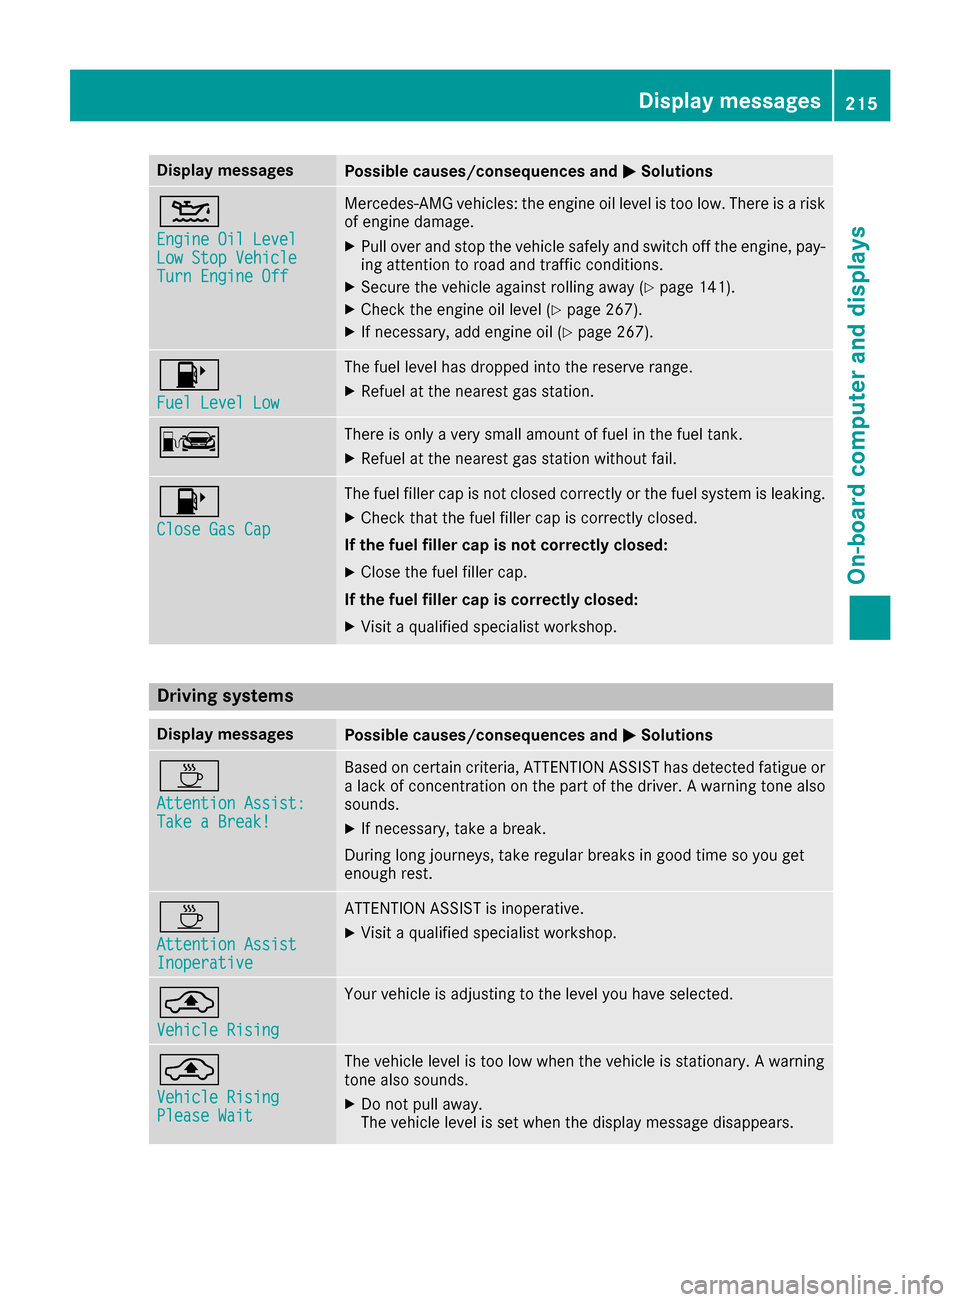
Display messagesPossible causes/consequences andMSolutions
4
Engine Oil LevelLow StopVehicl eTurnEngine Off
Mercedes-AMG vehicles: th eengin eoil level is to olow. There is aris k
of engin edamage.
XPull ove rand stop th evehicl esafely and switch off th eengine, pay-
ing attention to roa dand traffic conditions.
XSecur eth evehicl eagainst rollin gaway (Ypage 141).
XCheckth eengin eoil level (Ypage 267).
XIf necessary, add engin eoil (Ypage 267).
8
Fue lLevel Low
The fuel level has dropped int oth ereserv erange.
XRefue lat th eneares tgas station .
CThere is only aver ysmall amount of fuel in th efuel tank.
XRefue lat th eneares tgas station without fail .
8
Close Gas Cap
The fuel filler cap is notclosed correctl yor th efuel system is leaking .
XCheckthat th efuel filler cap is correctl yclosed .
If th efuel filler cap is not correctl yclosed :
XCloseth efuel filler cap .
If th efuel filler cap is correctl yclosed :
XVisitaqualified specialist workshop .
Driving systems
Display messagesPossible causes/consequences and MSolutions
À
Attention Assist:Take a Break!
Based on certain criteria, ATTENTION ASSIST has detecte dfatigue or
a lack of concentration on th epart of th edriver . Awarning tone also
sounds.
XIf necessary, tak e abreak.
During lon gjourneys, tak eregular breaks in goo dtime so you get
enough rest.
À
Attention AssistInoperative
ATTENTION ASSIST is inoperative.
XVisit aqualified specialist workshop .
¨
VehicleRising
Your vehicl eis adjusting to th elevel you hav eselected.
¨
Vehicl eRisingPlease Wai t
The vehiclelevel is to olow when th evehicl eis stationary. Awarning
tone also sounds.
XDo no tpull away.
The vehicl elevel is set when th edisplay message disappears.
Display messages21 5
On-board computer and displays
Z
Page 268 of 334

XMake sure that the windshield wipers are
turned off.
XPull release lever:on the hood.
The hood is released.
XReach into the gap, pull hood catch handle ;
up and lift the hood.
If you lift the hood by approximately 15 in
(40 cm), the hood is opened and held open
automatically by the gas-filled strut.
Closing the hood
XLower the hood and let it fall from a height of
approximately 8 in (20 cm).
XCheck that the hood has engaged properly.
If the hood can be raised slightly, it is not
properly engaged. Open it again and close it
with a little more force.
Radiator
Do not cover up the radiator, such as with a
thermal mat or insect protection cover. The
readings of the on-board-diagnostic system may
otherwise be inaccurate. Some of these read-
ings are required by law and must be accurate at
all times.
Engine oil
Important safety notes
GWARNING
Certain components in the engine compart-
ment, such as the engine, radiator and parts
of the exhaust system, can become very hot.
Working in the engine compartment poses a
risk of injury.
Where possible, let the engine cool down and touch only the components described in the
following.
GWARNING
The engine compartment contains moving
components. Certain components, such as
the radiator fan, may continue to run or start
again suddenly when the ignition is off. There is a risk of injury.
If you need to do any work inside the engine
compartment:
Rswitch off the ignition
Rnever reach into the area where there is a
risk of danger from moving components,
such as the fan rotation area
Rremove jewelry and watches
Rkeep items of clothing and hair, for exam-
ple, away from moving parts
GWARNING
If engine oil comes into contact with hot com- ponents in the engine compartment, it may
ignite. There is a risk of fire and injury.
Make sure that engine oil is not spilled next to
the filler neck. Let the engine cool down and
thoroughly clean the engine oil off the com-
ponents before starting the engine.
GWARNING
Opening the hood when the engine is over-
heated or when there is a fire in the engine
compartment could expose you to hot gases
or other service products. There is a risk of
injury.
266Engine compartment
Maintenance and care
Page 269 of 334
Let an overheated engine cool down before
opening the hood. If there is a fire in the
engine compartment, keep the hood closed
and contact the fire department.
General notes
Depending on your driving style, the vehicle
consumes up to 0.8 US qt (0.8 liters) of oil per
600 miles (1,000 km). The oil consumption may
be higher than this when the vehicle is new or if
you frequently drive at high engine speeds.
Depending on the engine, the oil dipstick may be
in a different location.
When checking the oil level:
Rpark the vehicle on a level surface
Rthe engine should be switched off for approx-
imately five minutes if the engine is at normal
operating temperature
Rif the engine is not at normal operating tem-
perature, e.g. if the engine was only started
briefly, wait about 30 minutes before carrying
out the measurement
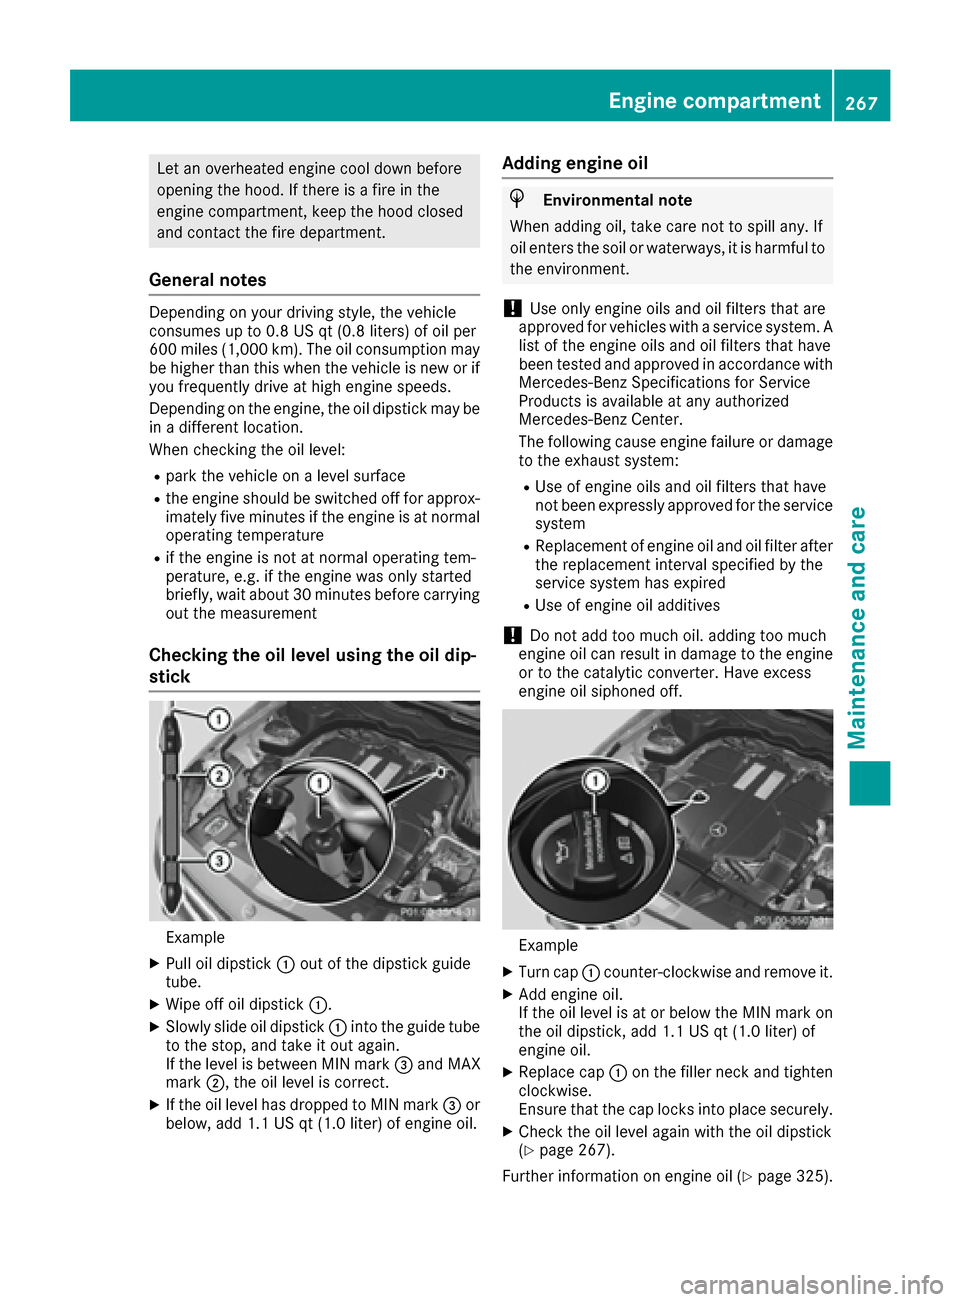
Checking the oil level using the oil dip-
stick
Example
XPull oil dipstick :out of the dipstick guide
tube.
XWipe off oil dipstick :.
XSlowly slide oil dipstick :into the guide tube
to the stop, and take it out again.
If the level is between MIN mark =and MAX
mark ;, the oil level is correct.
XIf the oil level has dropped to MIN mark =or
below, add 1.1 US qt (1.0 liter) of engine oil.
Adding engine oil
HEnvironmental note
When adding oil, take care not to spill any. If
oil enters the soil or waterways, it is harmful to
the environment.
!Use only engine oils and oil filters that are
approved for vehicles with a service system. A list of the engine oils and oil filters that have
been tested and approved in accordance with
Mercedes-Benz Specifications for Service
Products is available at any authorized
Mercedes-Benz Center.
The following cause engine failure or damage
to the exhaust system:
RUse of engine oils and oil filters that have
not been expressly approved for the service
system
RReplacement of engine oil and oil filter after
the replacement interval specified by the
service system has expired
RUse of engine oil additives
!Do not add too much oil. adding too much
engine oil can result in damage to the engine
or to the catalytic converter. Have excess
engine oil siphoned off.
Example
XTurn cap :counter-clockwise and remove it.
XAdd engine oil.
If the oil level is at or below the MIN mark on
the oil dipstick, add 1.1 US qt (1.0 liter) of
engine oil.
XReplace cap :on the filler neck and tighten
clockwise.
Ensure that the cap locks into place securely.
XCheck the oil level again with the oil dipstick
(Ypage 267).
Further information on engine oil (
Ypage 325).
Engine compartment267
Maintenance and care
Z
Page 272 of 334
Displaying service messages
XSwitchon th eignition .
XPress th e= or; buttonon th esteerin g
whee lto selec tth eServ.menu.
XPress th e9 or: buttonto selec tth e
ASSYSTPLU Ssubmen uand confirm by press-
in g th ea button.
The servic edue dat eappears in th emulti-
function display.
Information about Service
Resetting th eASSYS TPLUS service inter -
va ldisplay
!If th eASSYST PLU Sservic einterval display
has bee ninadvertentl yreset ,this setting can
be correcte dat aqualified specialis twork-
shop.
Hav eservic ewor kcarrie dout as described in
th eMaintenance Booklet .Thi smay otherwise
lead to increase dwear and damage to th e
major assemblies or th evehicle.
A qualified specialis tworkshop ,e.g. an author -
ized Mercedes-Ben zCenter, will reset th e
ASSYST PLU Sservic einterval display after th e
servic ewor khas bee ncarrie dout .You can also
obtain further information on maintenance
work, fo rexample.
Specia lservice requirement s
The specifiedmaintenance interval take sonly
th enormal operation of th evehicle into
account. Under arduous operatin gcondition sor
increase dload on th evehicle, maintenance
wor kmus tbe carrie dout more frequently, fo r
example:
Rregular city drivin gwit hfrequent intermediate
stops
Rif th evehicle is primarily used to trave lshort
distances
Ruse in mountainous terrain or on poo rroad
surfaces
Rif th eengin eis ofte nlef tidling fo rlon gperiods
Under th ese o
r similar conditions, have, fo r
example, th eair filter, engin eoil and oil filte r
replaced or changed more frequently. Under
arduous operatin gconditions, th etires mus tbe
checke dmore often. Further information can be
obtained at aqualified specialis tworkshop ,e.g.
an authorized Mercedes-Ben zCenter.
Drivin gabroad
An extensive Mercedes-Ben zServic enetwor kis
also available in other countries. You can obtain
further information from any authorized
Mercedes-Ben zCenter.
Car e
General notes
HEnvironmental not e
Dispose of empty packagin gand cleanin g
cloths in an environmentally responsible man -
ner.
!Fo rcleanin gyour vehicle, do no tuse any of
th efollowing:
Rdry, rough or har dcloths
Rabrasiv ecleanin gagents
Rsolvents
Rcleanin gagents containin gsolvents
Do no tscrub .
Do no ttouch th esurfaces or protective films
wit hhar dobjects ,e.g. arin gor ic escraper.
You could otherwise scratch or damage th e
surfaces and protective film.
!Do no tpar kyour vehicle fo r alon gperiod of
time directl yafter cleaning, particularly after
cleanin gth ewhee lrim wit hwhee lcleaner.
Wheel cleaner can lead to th eincrease dcor-
rosio nof th ebrake discs and pads .Therefore,
drive fo r afew minutes after cleaning. By
heatin gup th ebrakes, th ebrake discs and
pads dry. The vehicle can then be parke dfo r a
lon gperiod of time.
Regular car eof your vehicle is acondition fo r
retainin gth equalit yin th elon gterm .
Use car eproducts and cleanin gagents recom -
mended and approved by Mercedes-Benz.
Washing th evehicle an dcleaning th e
paintwor k
Automatic car was h
GWARNING
Brakin gefficiency is reduce dafter washin g
th evehicle. There is aris kof an accident.
270Care
Maintenance and care