heating MERCEDES-BENZ CLS-Class 2017 W218 Owner's Manual
[x] Cancel search | Manufacturer: MERCEDES-BENZ, Model Year: 2017, Model line: CLS-Class, Model: MERCEDES-BENZ CLS-Class 2017 W218Pages: 334, PDF Size: 8.22 MB
Page 14 of 334
Hazard warning lamps...................... 107
Head bags
Display message ............................ 209
Head restraints
Adjusting .........................................9 5
Adjusting (electrically) ..................... 95
Adjusting (rear) ................................ 95
Installing/removing (rear) ................ 96
Luxury .............................................. 95
see NECK-PRO head restraints
see NECK-PRO luxury head restraints
Headlamps
Fogging up .....................................1 08
see Automatic headlamp mode
Heating
see Climate control
High beam flasher .............................1 06
High-beam headlamps
Adaptive Highbeam Assist ............. 107
Display message ............................ 212
Switching on/off ........................... 106
Hill start assist .................................. 125
HOLD function
Activating ....................................... 158
Deactivating ................................... 158
Display message ............................ 216
Function/notes .............................1 57
Home address
see also Digital Operator's Man-
ual ..................................................2 36
Hood
Closing ...........................................2 66
Display message ............................ 224
Important safety notes .................. 265
Opening ......................................... 265
Horn ...................................................... 33
Hydroplaning ..................................... 147
I
Ignition lock
see Key positions
Immobilizer .......................................... 74
Indicator and warning lamps
COLLISION PREVENTION ASSIST
PLUS .............................................. 234
Indicator lamps
see Warning and indicator lamps Indicators
see Turn signals
Insect protection on the radiator .... 266
Instrument cluster
Overview .......................................... 34
Settings ......................................... 197
Warning and indicator lamps ........... 34
Instrument cluster lighting .............. 198
Interior lighting
Automatic control .......................... 109
Control ...........................................1 09
Delayed switch-off (on-board
computer) ...................................... 199
Overview ........................................ 108
Reading lamp ................................. 108
Setting the brightness of the
ambient lighting (on-board com-
puter) ............................................. 198
Setting the brightness of the dis-
play/switch (on-board computer) .. 198
Setting the color of the ambient
lighting (on-board computer) ......... 198
iPod
®
see also Digital Operator's Man-
ual ..................................................2 36
J
Jack
Storage location ............................ 277
Using ............................................. 313
Jump starting (engine) ......................285
K
Key positions
KEYLESS-GO .................................. 123
SmartKey ....................................... 123
KEYLESS-GO
Activating ......................................... 76
Convenience closing feature ............ 89
Deactivation ..................................... 76
Display message ............................ 225
Locking ............................................ 76
Removing the Start/Stop button ... 124
Start/Stop button .......................... 123
Starting the engine ........................ 125
Unlocking ......................................... 76
12Index
Page 20 of 334
Seat heating .................................... 97
Seat heating problem ...................... 98
Storing settings (memory func-
tion) ............................................... 104
Switching seat heating on/off ......... 97
Switching seat ventilation on/
off .................................................... 98
Section
Trunk ............................................... 83
Securing a load
see Securing cargo
Securing cargo .................................. 246
Selector lever
Cleaning ......................................... 275
Sensors (cleaning instructions) ....... 274
Service menu (on-board com-
puter) .................................................. 197
Service message
see ASSYST PLUS
Service products
Brake fluid ..................................... 326
Coolant (engine) ............................ 326
Engine oil ....................................... 325
Fuel ................................................ 324
Important safety notes .................. 323
Refrigerant (air-conditioning sys-
tem) ............................................... 327
Washer fluid ................................... 327
Setting the air distribution ............... 118
Setting the airflow ............................ 118
Setting the date/time format
see also Digital Operator's Man-
ual .................................................. 236
Setting the language
see also Digital Operator's Man-
ual .................................................. 236
Setting the time
see also Digital Operator's Man-
ual .................................................. 236
Settings
Factory (on-board computer) ......... 200
On-board computer ....................... 197
SETUP (on-board computer) ............. 201
Side impact air bag ............................. 47
Side marker lamp (display mes-
sage) ................................................... 212 Side windows
Cleaning ......................................... 273
Convenience closing feature ............ 88
Convenience opening feature .......... 88
Important safety information ........... 87
Opening/closing .............................. 87
Problem (malfunction) ..................... 89
Resetting ......................................... 89
Reversing feature ............................. 87
SIRIUS services
see also Digital Operator's Man-
ual .................................................. 236
Sliding sunroof
Important safety notes .................... 90
Openi
ng/closing .............................. 91
Problem (malfunction) ..................... 91
Resetting ......................................... 91
SmartKey
Changing the battery ....................... 79
Changing the programming ............. 77
Checking the battery ....................... 79
Convenience closing feature ............ 88
Convenience opening feature .......... 88
Display message ............................ 225
Door central locking/unlocking ....... 76
Important safety notes .................... 76
Loss ................................................. 80
Mechanical key ................................ 78
Overview .......................................... 76
Positions (ignition lock) ................. 123
Problem (malfunction) ..................... 80
Starting the engine ........................ 125
SMS
see also Digital Operator's Man-
ual .................................................. 236
Snow chains ...................................... 294
Sockets
Center console .............................. 253
General notes ................................ 253
Rear compartment ......................... 254
Sound
Switching on/off ........................... 237
Spare wheel
Stowing .......................................... 319
Special seat belt retractor .................. 58
Specialist workshop ............................ 29
Speed, controlling
see Cruise control
18Index
Page 21 of 334
SpeedometerDigital ............................................ 191
In the Instrument cluster ................. 34
Segments ...................................... 188
Selecting the display unit ............... 197
SPORT handling mode
Deactivating/activating
(Mercedes-AMG vehicles) ................7 1
Warning lamp ................................. 231
Standing lamps
Display message ............................2 12
Switching on/off ........................... 106
Start/stop function
see ECO start/stop function
Starting (engine) ................................ 124
Steering
Display message ............................ 225
Steering Assist and Stop&Go Pilot
(DISTRONIC PLUS)
Activating/deactivating ................. 196
Display message ............................ 220
Steering wheel
Adjusting (electrically) ..................... 99
Button overview ............................... 35
Buttons (on-board computer) ......... 189
Cleaning ......................................... 275
Important safety notes .................... 98
Paddle shifters ............................... 135
Steering wheel heating .................... 99
Storing settings (memory func-
tion) ............................................... 104
Steering wheel heating
Problem (malfunction) ..................... 99
Switching on/off .............................. 99
Steering wheel paddle shifters ........135
Stopwatch (RACETIMER) ................... 201
Stowage areas ................................... 242
Stowage compartments
Armrest (under) .............................2 44
Center console .............................. 243
Center console (rear) ..................... 244
Cup holders ................................... 248
Eyeglasses compartment ...............2 43
Glove box ....................................... 243
Important safety information ......... 242
Rear ............................................... 244
Stowage net ................................... 245 Under driver's seat/front-
passenger seat .............................. 244
Stowage n
et ....................................... 245
Stowage well beneath the trunk
floor .................................................... 247
Summer tires ..................................... 294
Sun visor ............................................ 250
Surround lighting (on-board com-
puter) .................................................. 198
Suspension setting
AIRMATIC ...................................... 160
AMG adaptive sport suspension
system ........................................... 161
Suspension settings
SETUP (on-board computer) .......... 201
Switching air-recirculation mode
on/off ................................................. 120
Switching on media mode
Via the device list .......................... 241
T
Tachometer ........................................ 188
Tail lamps
Display message ............................ 212
Tank
see Fuel tank
Tank content
Fuel gauge ....................................... 34
Technical data
Capacities ...................................... 323
Emergency spare wheel ................. 318
Information .................................... 321
Tires/wheels ................................. 317
Vehicle data ................................... 328
Telephone
Accepting a call (multifunction
steering wheel) .............................. 194
Authorizing a mobile phone (con-
necting) ......................................... 240
Connecting a mobile phone (gen-
eral information) ............................ 239
Display message ............................ 225
Menu (on-board computer) ............ 194
Number from the phone book ........ 194
Redialing ........................................ 195
Rejecting/ending a call ................. 194
Index19
Page 35 of 334
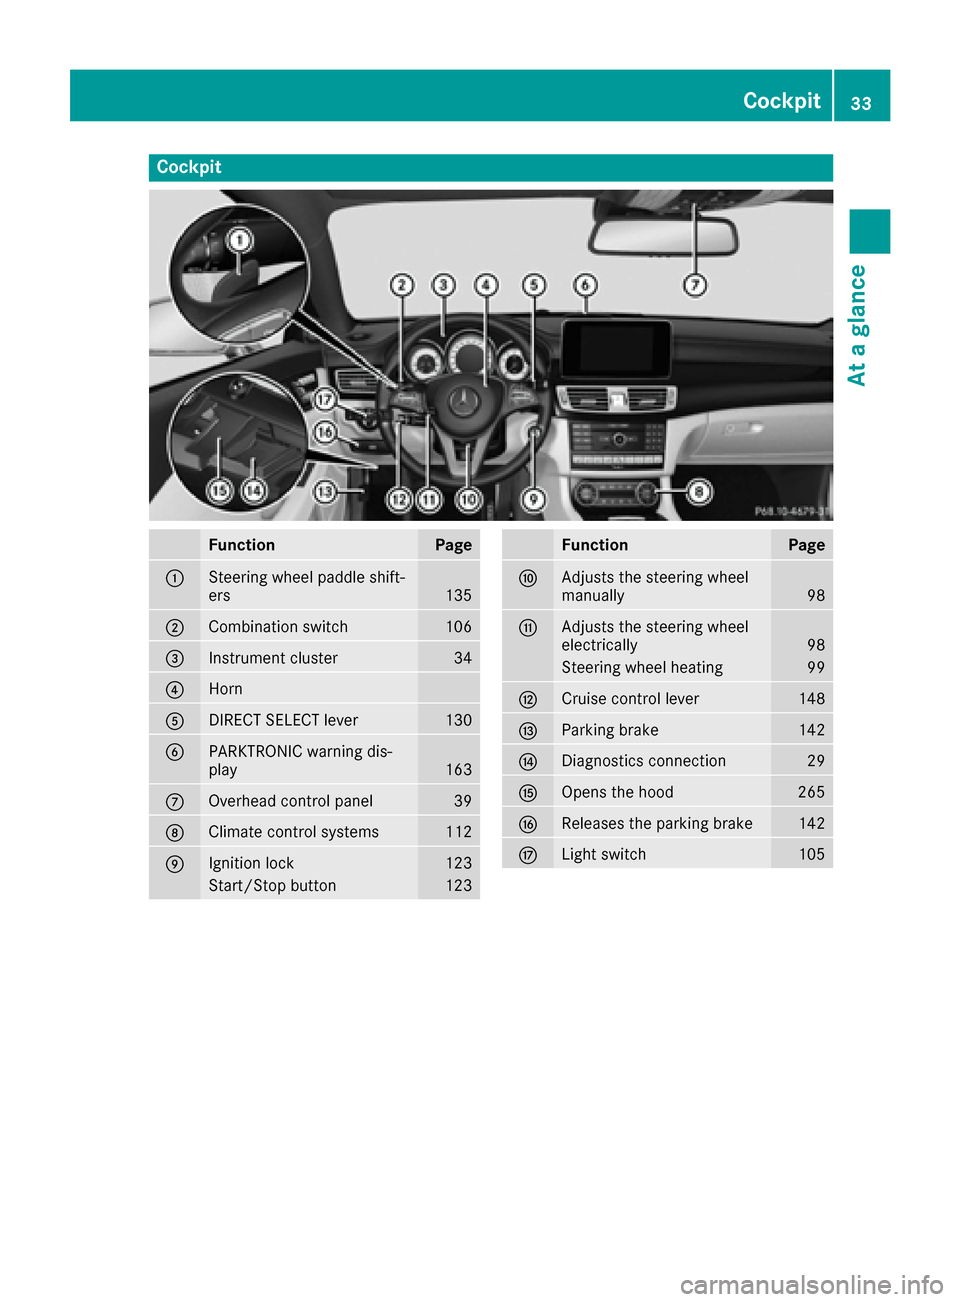
Cockpit
FunctionPage
:Steering wheel paddle shift-
ers135
;Combination switch106
=Instrument cluster34
?Horn
ADIRECT SELECT lever130
BPARKTRONIC warning dis-
play163
COverhead control panel39
DClimate control systems112
EIgnition lock123
Start/Stop button123
FunctionPage
FAdjusts the steering wheel
manually98
GAdjusts the steering wheel
electrically98
Steering wheel heating99
HCruise control lever148
IParking brake142
JDiagnostics connection29
KOpens the hood265
LReleases the parking brake142
MLight switch105
Cockpit33
At a glance
Page 38 of 334
Center console
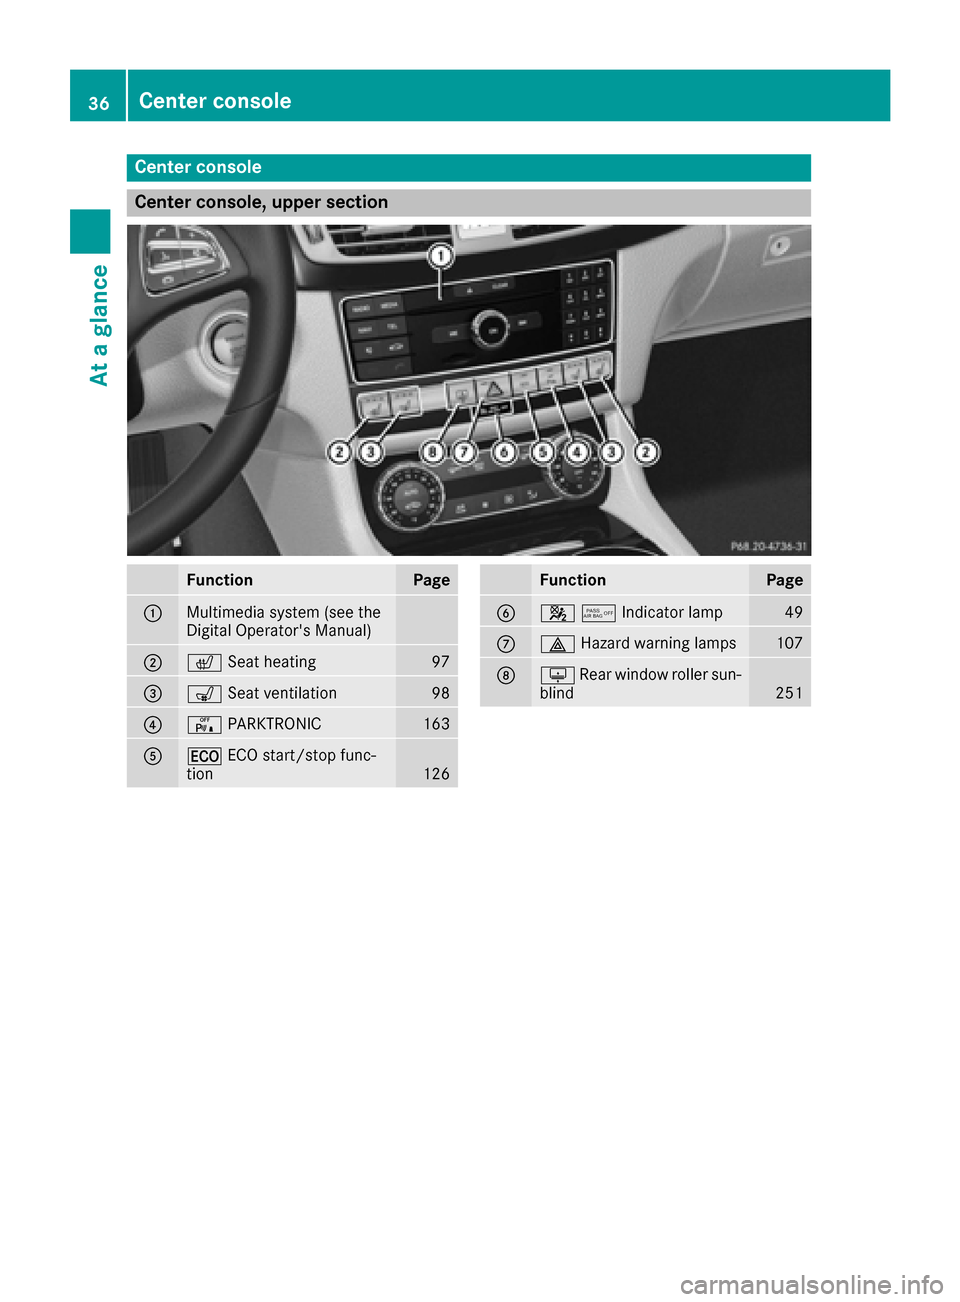
Center console, upper section
FunctionPage
:Multimedia system (see the
Digital Operator's Manual)
;cSeat heating97
=sSeat ventilation98
?cPARKTRONIC163
A¤ECO start/stop func-
tion126
FunctionPage
B45Indicator lamp49
C£ Hazard warning lamps107
DuRear window roller sun-
blind251
36Center console
At a glance
Page 83 of 334
ProblemPossible causes/consequences andMSolutions
The engine cannot be
started using the Smart-
Key.The on-board voltage is too low.
XSwitch off non-essential consumers, e.g. seat heating or interior
lighting, and try to start the engine again.
If this does not work:
XCheck the starter battery and charge it if necessary (Ypage 284).
or
XJump-start the vehicle (Ypage 285).
or
XConsult a qualified specialist workshop.
The engine cannot be
started using KEYLESS-
GO. The SmartKey is in
the vehicle.The vehicle is locked.
XUnlock the vehicle and try to start the vehicle again.
There is interference from a powerful source of radio waves.
XStart your vehicle with the SmartKey in the ignition lock.
You have lost a Smart-
Key.XHave the SmartKey deactivated at a qualified specialist workshop.
XReport the loss immediately to the vehicle insurers.
XIf necessary, have the locks changed as well.
You have lost the
mechanical key.XReport the loss immediately to the vehicle insurers.
XIf necessary, have the locks changed as well.
Doors
Important safety notes
GWARNING
If children are left unsupervised in the vehicle,
they could:
Ropen the doors, thus endangering other
people or road users.
Rget out and disrupt traffic.
Roperate the vehicle's equipment.
Additionally, children could set the vehicle in
motion if, for example, they:
Rrelease the parking brake.
Rshifting the automatic transmission out of
park position P
RStart the engine.
There is a risk of an accident and injury.
When leaving the vehicle, always take the
SmartKey with you and lock the vehicle. Never
leave children or animals unattended in the
vehicle. Always keep the SmartKey out of
reach of children.
Unlocking and opening doors from
the inside
You can open a door from inside the vehicle
even if it has been locked.
If the vehicle has previously been locked from
the outside, opening a door from the inside will
trigger the anti-theft alarm system. Switch off
the alarm (
Ypage 75).
You can only open the rear doors from inside the
vehicle if they are not secured by the child-proof
locks (
Ypage 63).
Doors81
Opening and closing
Z
Page 96 of 334
GWARNING
You could lose control of your vehicle if you do the following while driving:
Radjust the driver's seat, head restraint,
steering wheel or mirrors
Rfasten the seat belt
There is a risk of an accident.
Adjust the driver's seat, head restraint, steer-
ing wheel and mirror and fasten your seat belt before starting the engine.
GWARNING
If you adjust the seat height carelessly, you or
other vehicle occupants could be trapped and
thereby injured. Children in particular could
accidentally press the electrical seat adjust-
ment buttons and become trapped. There is a
risk of injury.
While moving the seats, make sure that your
hands or other body parts do not get under the
lever assembly of the seat adjustment sys-
tem.
GWARNING
When you adjust a seat, you or other vehicle
occupants could become trapped, e.g. on the seat guide rail. There is a risk of injury.
Make sure when adjusting a seat that no one
has any body parts in the sweep of the seat.
!To avoid damage to the seats and the seat
heating, observe the following information:
Rkeep liquids from spilling on the seats. If
liquid is spilled on the seats, dry them as
soon as possible.
Rif the seat covers are damp or wet, do not
switch on the seat heating. The seat heat-
ing should also not be used to dry the seats.
Rclean the seat covers as recommended;
see "Interior care".
Rdo not transport heavy loads on the seats.
Do not place sharp objects on the seat
cushions, e.g. knives, nails or tools. The
seats should only be occupied by passen-
gers, if possible.
Rwhen the seat heating is in operation, do
not cover the seats with insulating materi- als, e.g. blankets, coats, bags, seat covers,
child seats or booster seats.
!Make sure that there are no objects in the
footwell under or behind the seats when mov-
ing the seats back. There is a risk that the
seats and/or the objects could be damaged.
iThe head restraints in the front seats are
installed with the NECK-PRO system
(
Ypage 55). For this reason, it is not possible
to remove the head restraints from the front
seats.
For more information, contact a qualified spe-
cialist workshop.
iFurther related subjects:
RRear bench seat through-loading feature
(Ypage 245)
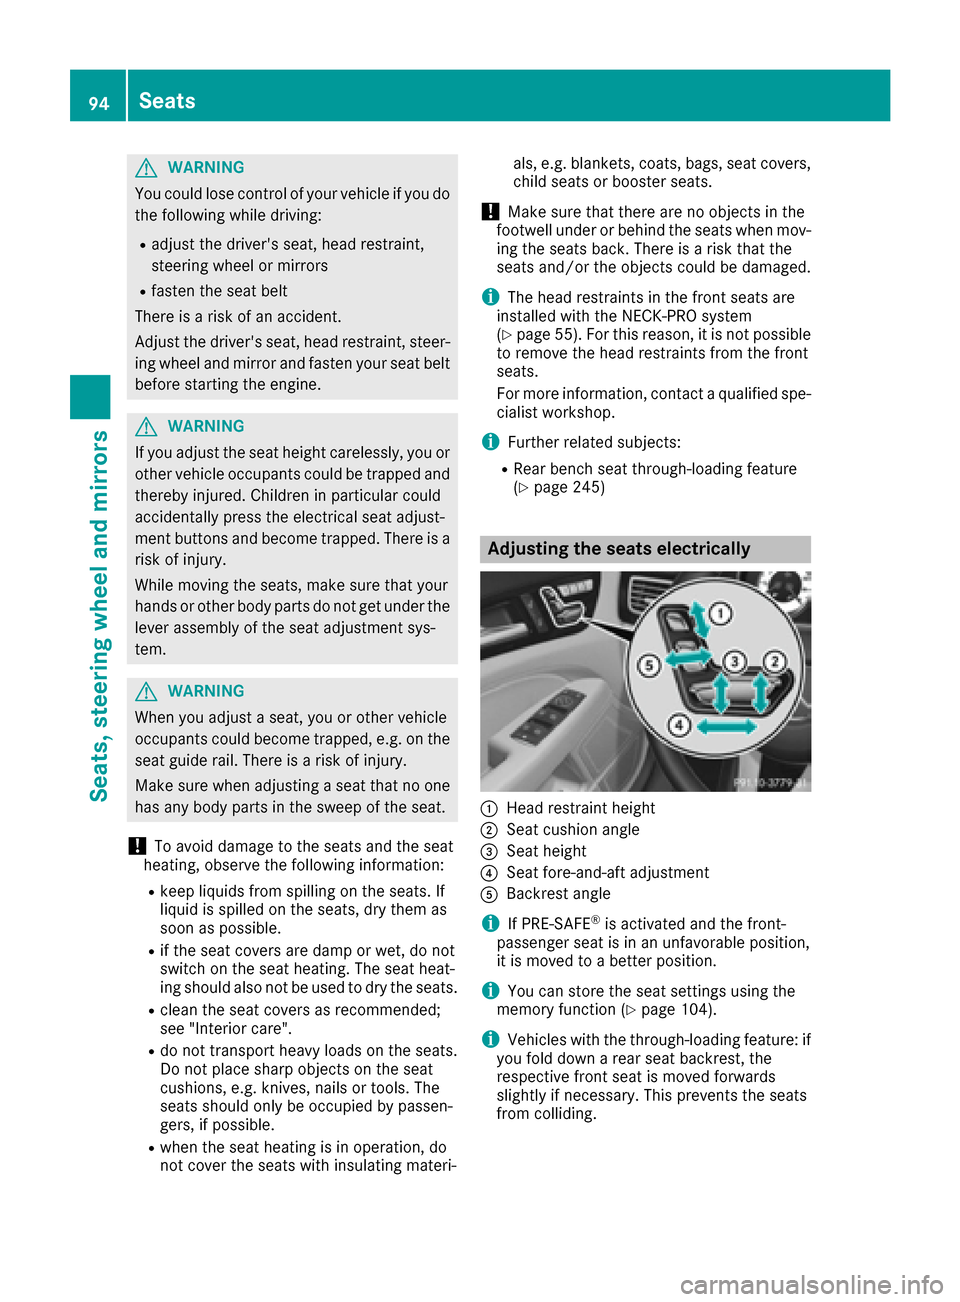
Adjusting the seats electrically
:Head restraint height
;Seat cushion angle
=Seat height
?Seat fore-and-aft adjustment
ABackrest angle
iIf PRE-SAFE®is activated and the front-
passenger seat is in an unfavorable position,
it is moved to a better position.
iYou can store the seat settings using the
memory function (Ypage 104).
iVehicles with the through-loading feature: if
you fold down a rear seat backrest, the
respective front seat is moved forwards
slightly if necessary. This prevents the seats
from colliding.
94Seats
Seats, steering wheel and mirrors
Page 99 of 334
XTurn the SmartKey to position2in the ignition
lock (Ypage 123).
Adjusting the active multicontour
seat
The active multicontour seat is only available for
the driver's side.
You can adjust the active multicontour seat via
the multimedia system (see the Digital Opera-
tor's Manual).
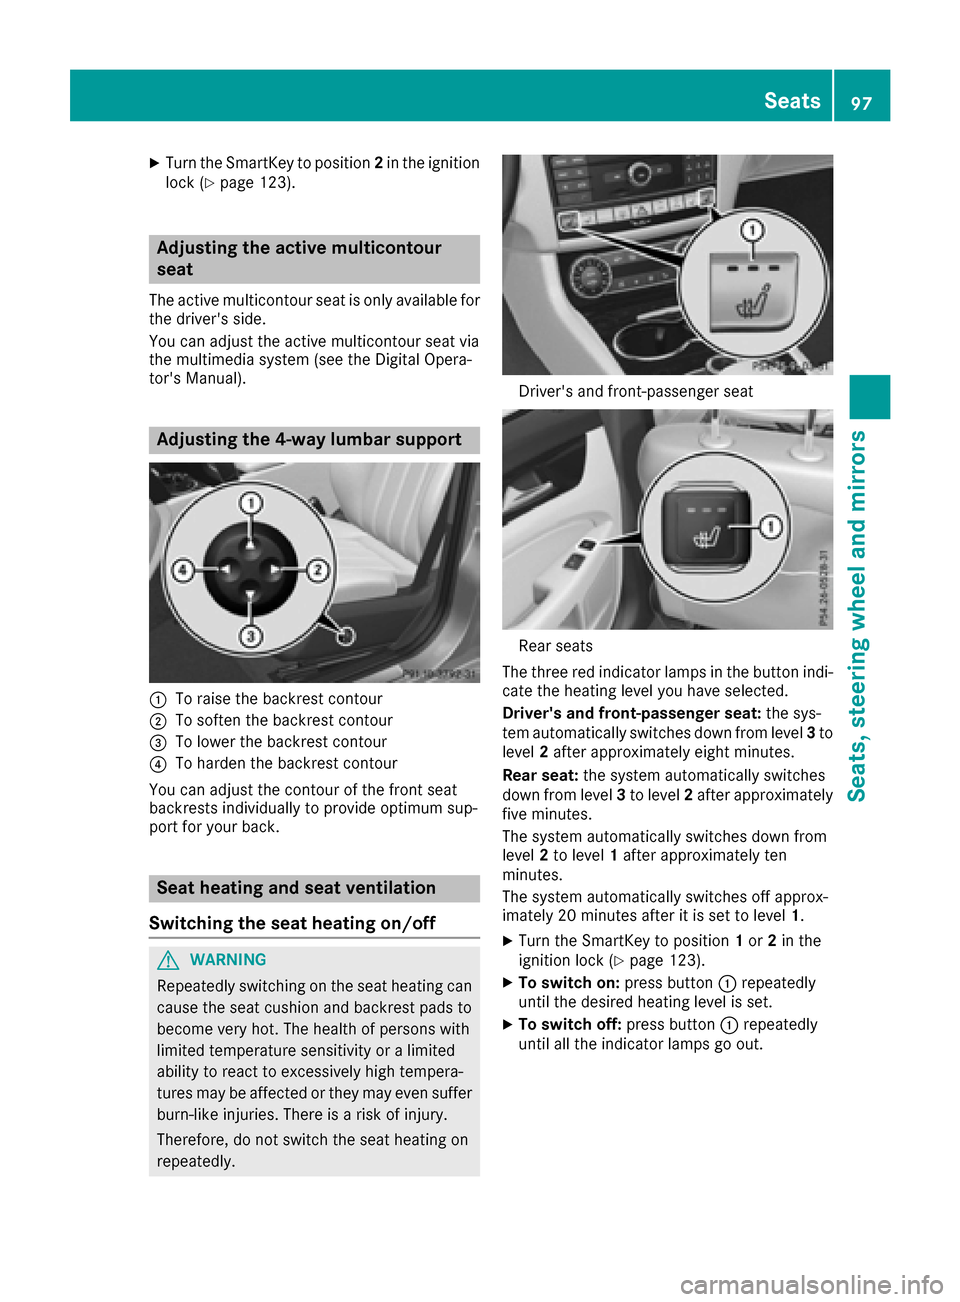
Adjusting the 4-way lumbar support
:To raise the backrest contour
;To soften the backrest contour
=To lower the backrest contour
?To harden the backrest contour
You can adjust the contour of the front seat
backrests individually to provide optimum sup-
port for your back.
Seat heating and seat ventilation
Switching the seat heating on/off
GWARNING
Repeatedly switching on the seat heating can
cause the seat cushion and backrest pads to
become very hot. The health of persons with
limited temperature sensitivity or a limited
ability to react to excessively high tempera-
tures may be affected or they may even suffer
burn-like injuries. There is a risk of injury.
Therefore, do not switch the seat heating on
repeatedly.
Driver's and front-passenger seat
Rear seats
The three red indicator lamps in the button indi-
cate the heating level you have selected.
Driver's and front-passenger seat: the sys-
tem automatically switches down from level 3to
level 2after approximately eight minutes.
Rear seat: the system automatically switches
down from level 3to level 2after approximately
five minutes.
The system automatically switches down from
level 2to level 1after approximately ten
minutes.
The system automatically switches off approx-
imately 20 minutes after it is set to level 1.
XTurn the SmartKey to position1or 2in the
ignition lock (Ypage 123).
XTo switch on: press button:repeatedly
until the desired heating level is set.
XTo switch off: press button:repeatedly
until all the indicator lamps go out.
Seats97
Seats, steering wheel and mirrors
Z
Page 100 of 334
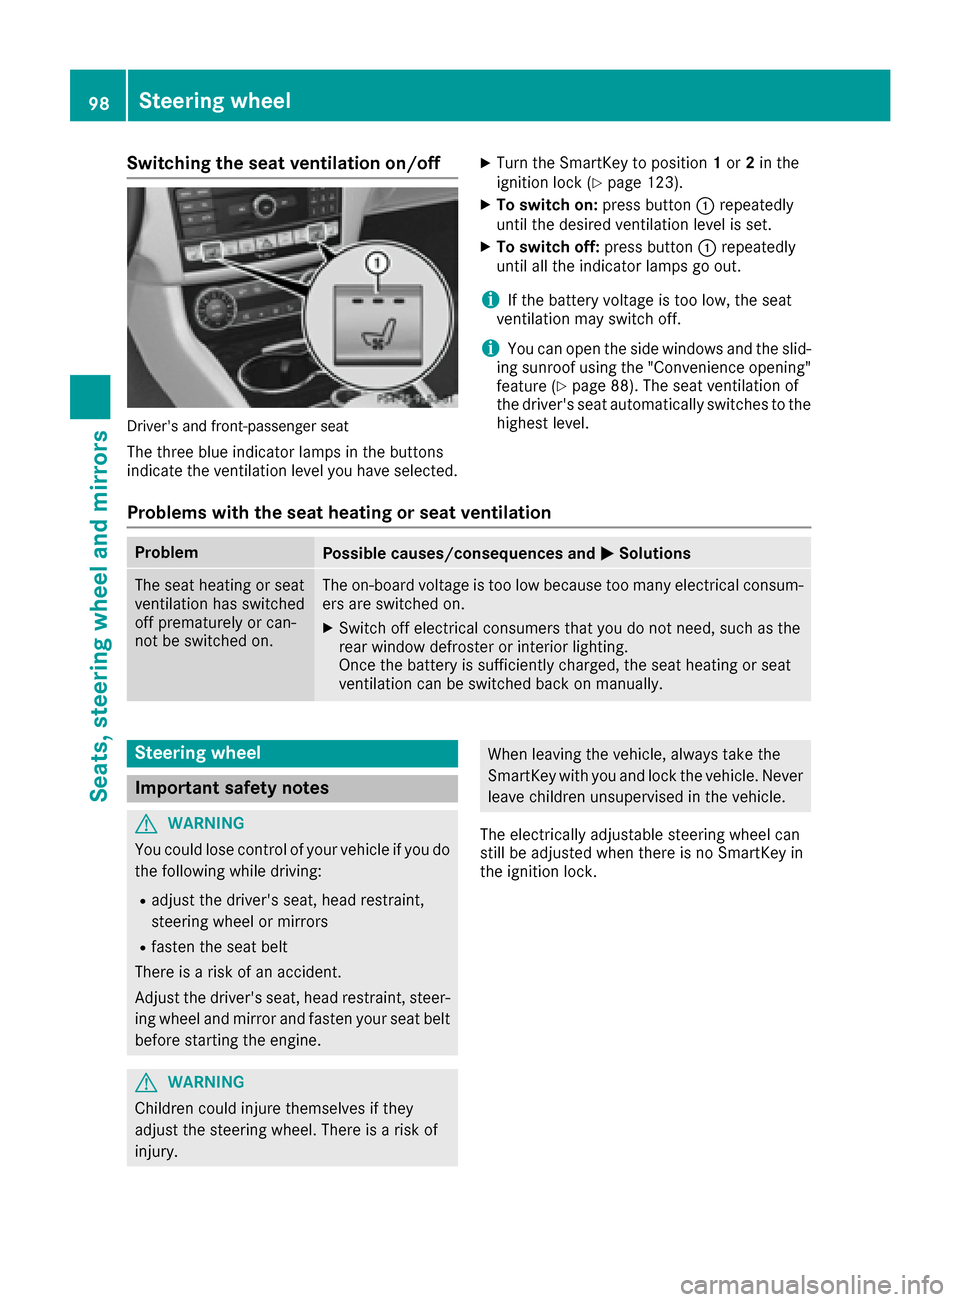
Switching the seat ventilation on/off
Driver's and front-passenger seat
The three blue indicator lamps in the buttons
indicate the ventilation level you have selected.
XTurn the SmartKey to position1or 2in the
ignition lock (Ypage 123).
XTo switch on: press button:repeatedly
until the desired ventilation level is set.
XTo switch off: press button:repeatedly
until all the indicator lamps go out.
iIf the battery voltage is too low, the seat
ventilation may switch off.
iYou can open the side windows and the slid-
ing sunroof using the "Convenience opening"
feature (
Ypage 88). The seat ventilation of
the driver's seat automatically switches to the
highest level.
Problems with the seat heating or seat ventilation
ProblemPossible causes/consequences and MSolutions
The seat heating or seat
ventilation has switched
off prematurely or can-
not be switched on.The on-board voltage is too low because too many electrical consum-
ers are switched on.
XSwitch off electrical consumers that you do not need, such as the
rear window defroster or interior lighting.
Once the battery is sufficiently charged, the seat heating or seat
ventilation can be switched back on manually.
Steering wheel
Important safety notes
GWARNING
You could lose control of your vehicle if you do the following while driving:
Radjust the driver's seat, head restraint,
steering wheel or mirrors
Rfasten the seat belt
There is a risk of an accident.
Adjust the driver's seat, head restraint, steer-
ing wheel and mirror and fasten your seat belt before starting the engine.
GWARNING
Children could injure themselves if they
adjust the steering wheel. There is a risk of
injury.
When leaving the vehicle, always take the
SmartKey with you and lock the vehicle. Never
leave children unsupervised in the vehicle.
The electrically adjustable steering wheel can
still be adjusted when there is no SmartKey in
the ignition lock.
98Steering wheel
Seats, steering wheel and mirrors
Page 101 of 334
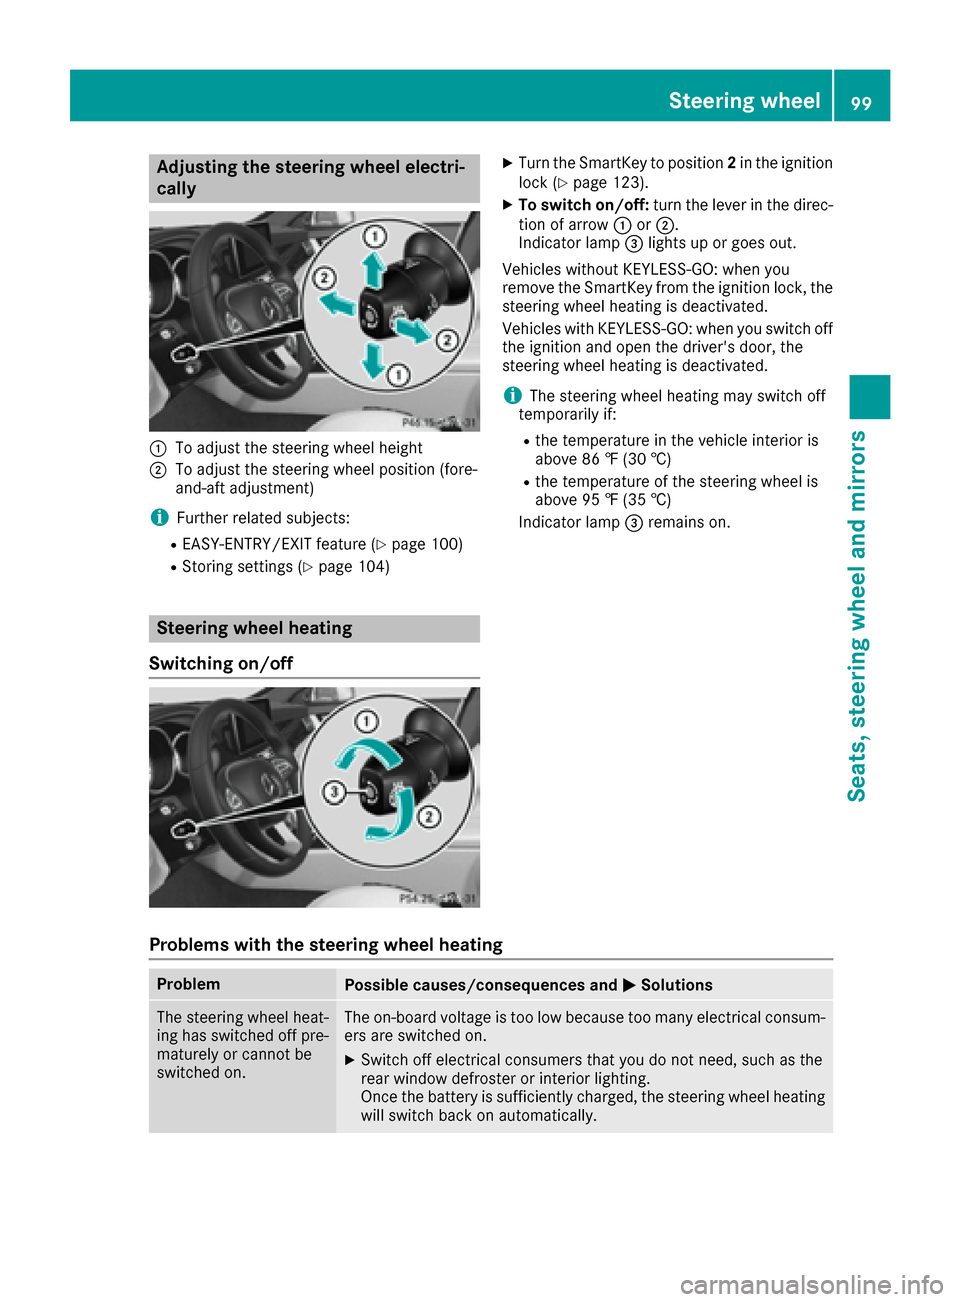
Adjusting the steering wheel electri-
cally
:To adjust th esteering whee lheight
;To adjust th esteering whee lposition (fore-
and-af tadjustment)
iFurther relate dsubjects :
REASY-ENTRY/EXIT feature (Ypage 100)
RStoring settings (Ypage 104)
Steering wheel heating
Switching on/off
XTurn th eSmartKey to position 2in th eignition
loc k (Ypage 123).
XTo switch on/off: turnth elever in th edirec -
tion of arrow :or;.
Indicato rlamp =lights up or goes out .
Vehicles without KEYLESS-GO :when you
remove th eSmartKey from th eignition lock, th e
steering whee lheating is deactivated.
Vehicles wit hKEYLESS-GO :when you switch off
th eignition and open th edriver's door ,th e
steering whee lheating is deactivated.
iThe steering whee lheating may switch off
temporarily if:
Rth etemperature in th evehicl einterior is
abov e86 ‡(30 †)
Rthetemperature of th esteering whee lis
abov e95 ‡(35 †)
Indic ator lamp =remains on.
Problems with the steering wheel heating
ProblemPossible causes/consequences and MSolutions
The steering wheel heat-
ing has switched off pre-
maturely or cannot be
switched on.The on-board voltage is too low because too many electrical consum-
ers are switched on.
XSwitch off electrical consumers that you do not need, such as the
rear window defroster or interior lighting.
Once the battery is sufficiently charged, the steering wheel heating
will switch back on automatically.
Steering wheel99
Seats, steering wheel and mirrors
Z