MERCEDES-BENZ CLS COUPE 2008 Owners Manual
Manufacturer: MERCEDES-BENZ, Model Year: 2008, Model line: CLS COUPE, Model: MERCEDES-BENZ CLS COUPE 2008Pages: 329, PDF Size: 29.26 MB
Page 291 of 329
Battery
288 Battery
Notes on the battery
In order for the battery to achieve the maxi-
mum possible service life, it must always be
sufficiently charged.
Have the battery charge checked more fre-
quently if you use the vehicle mainly for short
trips or if you leave it standing idle for a
lengthy period.
To prevent damage from corrosion, only
replace the battery with one that has a central
ventilation cover.
Consult a Mercedes-Benz Service Centre if
you wish to leave your vehicle parked up for
a long period of time. G
Risk of injury
Comply with safety precautions and take
protective measures when handling batter-
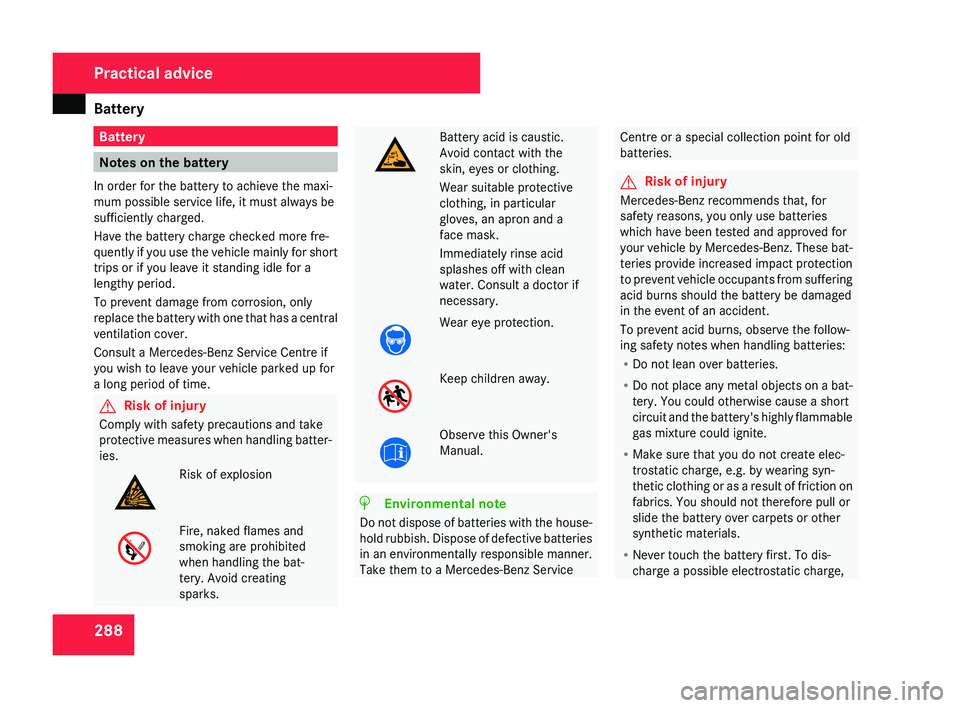
ies.Risk of explosion
Fire, naked flames and
smoking are prohibited
when handling the bat-
tery. Avoid creating
sparks.
Battery acid is caustic.
Avoid contact with the
skin, eyes or clothing.
Wear suitable protective
clothing, in particular
gloves, an apron and a
face mask.
Immediately rinse acid
splashes off with clean
water. Consult a doctor if
necessary.
Wear eye protection.
Keep children away.
Observe this Owner's
Manual.
H Environmental note
Do not dispose of batteries with the house-
hold rubbish. Dispose of defective batteries
in an environmentally responsible manner.
Take them to a Mercedes-Benz Service
Centre or a special collection point for old
batteries.
G Risk of injury
Mercedes-Benz recommends that, for
safety reasons, you only use batteries
which have been tested and approved for
your vehicle by Mercedes-Benz. These bat-
teries provide increased impact protection
to prevent vehicle occupants from suffering
acid burns should the battery be damaged
in the event of an accident.
To prevent acid burns, observe the follow-
ing safety notes when handling batteries:
R Do not lean over batteries.
R Do not place any metal objects on a bat-
tery. You could otherwise cause a short
circuit and the battery's highly flammable
gas mixture could ignite.
R Make sure that you do not create elec-
trostatic charge, e.g. by wearing syn-
thetic clothing or as a result of friction on
fabrics. You should not therefore pull or
slide the battery over carpets or other
synthetic materials.
R Never touch the battery first. To dis-
charge a possible electrostatic charge,
Practical advice
219_AKB; 2; 4, en-GB
mkalafa,
2007-11-13T09:28:36+01:00 - Seite 288
Page 292 of 329
Battery
289step out of the vehicle first and touch the
bodywork.
R Do not wipe the battery using a cloth. The
battery may explode as a result of elec-
trostatic charge or through the creation
of sparks.
! Switch the engine off and remove the key
before unscrewing or disconnecting the
terminal clamps from the battery. You may
otherwise destroy electronic components
such as the alternator.
Have the battery checked and, if neces-
sary, replaced at a qualified specialist
workshop, e.g. a Mercedes-Benz Service
Centre, every two years or at least every
20,000 km.
i Mercedes-Benz recommends that you
have all work involving the battery, e.g.
removing, charging and replacing, carried
out at a qualified specialist workshop, e.g.
a Mercedes-Benz Service Centre.
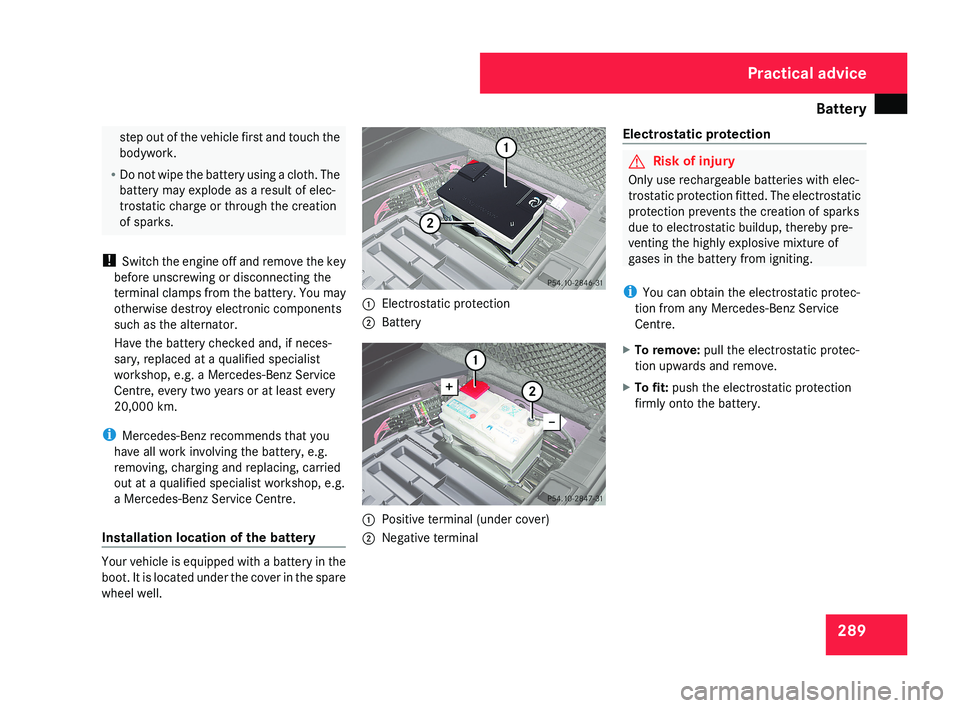
Installation location of the battery Your vehicle is equipped with a battery in the
boot. It is located under the cover in the spare
wheel well. 1
Electrostatic protection
2 Battery 1
Positive terminal (under cover)
2 Negative terminal Electrostatic protection G
Risk of injury
Only use rechargeable batteries with elec-
trostatic protection fitted. The electrostatic
protection prevents the creation of sparks
due to electrostatic buildup, thereby pre-
venting the highly explosive mixture of
gases in the battery from igniting.
i You can obtain the electrostatic protec-
tion from any Mercedes-Benz Service
Centre.
X To remove: pull the electrostatic protec-
tion upwards and remove.
X To fit: push the electrostatic protection
firmly onto the battery. Practical advice
219_AKB; 2; 4, en-GB
mkalafa,
2007-11-13T09:28:36+01:00 - Seite 289
Page 293 of 329
Battery
290 Disconnecting the battery
G
Risk of accident
If the battery is disconnected:
R there
is no brake boosting effect and you
will need to apply more pressure to brake
and the brake pedal travel will be longer;
you may have to depress the brake pedal
with full force
R you can no longer turn the key in the igni-
tion and, on vehicles with KEYLESS
GO*, pressing the KEYLESS GO button*
on the selector lever will have no effect
R the selector lever is locked in position P
! Always disconnect the battery in the
sequence described below. Never swap the
terminal clamps. You may otherwise dam-
age the vehicle electronics.
X Firmly depress the parking brake and move
the selector lever to P.
X Switch off all electrical consumers.
X Turn the key to position 0 in the ignition
lock and remove it.
X Open the boot/luggage compartment.
X Remove the luggage well (Y page 218). X
Remove the battery cover.
X Remove the negative terminal clamp from
the battery.
X Remove the cover from the positive termi-
nal clamp.
X Remove the positive terminal clamp from
the battery.
X Disconnect the breather hose. Removing the battery
X Disconnect the battery ( Y page 290).
X Loosen the bolt which holds the battery in
place.
X Release the strap and remove the battery. Charging and fitting the battery
G
Risk of injury
Only charge the installed battery with a bat-
tery charger which has been tested and
approved
by Mercedes-Benz. These battery
chargers allow the battery to be charged
while it is still installed. Otherwise, the vehi-
cle's electronic system may be damaged.
Only charge the battery in a well-ventilated
area. As the battery is being charged, gases
can escape and generate minor explosions.
This may injure you and other persons or
cause damage to the paintwork or acid cor-
rosion on the vehicle.
You can obtain information about battery
chargers which allow the battery to be
charged when still installed from a qualified
specialist workshop, e.g. a Mercedes-Benz
Service Centre. G
Risk of injury
There is a risk of acid burns during the
charging process due to the gases which
escape from the battery. Do not lean over
the battery during the charging process.
! Only use battery chargers with a maxi-
mum charging voltage of 14.8 V. Practical advice
* optional
219_AKB; 2; 4, en-GB
mkalafa,
2007-11-13T09:28:36+01:00 - Seite 290
Page 294 of 329
Jump-starting
291
X
Charge the battery. Observe the notes in
the operating instructions for your battery
charger.
X Refit the charged battery.
To do this, follow the steps described in
"Removing the battery"
(Y page 290) in
reverse order.
! Do
not fit refillable batteries without elec-
trostatic protection. The electrostatic dis-
charge could otherwise cause the battery
to explode. The battery acid released could
cause damage to your vehicle.
Further information on electrostatic protec-
tion (Y page 289). G
Risk of injury
Battery acid is caustic. Avoid contact with
the skin, eyes or clothing. Reconnecting the battery
! Always reconnect the battery in the
sequence
described below. Never swap the
terminal clamps. You may otherwise dam-
age the vehicle electronics.
X Switch off all electrical consumers.
X Connect the positive terminal clamp and
secure the cover.
X Connect the negative terminal clamp.
X Connect the breather hose. Make sure that
a
cell cap is fitted between the battery and
the breather hose.
X Refit the electrostatic protection if neces-
sary ( Y page 289).
i If
the battery power supply has been inter-
rupted (e.g. if it has been reconnected), you
must carry out the following tasks:
R Set the time (Y page 125).
R Reset the sliding/tilting sunroof*
(Y page 171).
R Reset the function for folding the exterior
mirrors in/out automatically* by folding
the mirrors out once ( Y page 84). Jump-starting
If your vehicle's battery is discharged, the
engine can be jump-started from another
vehicle
or from an external battery using jump
leads.
Observe the following points:
R Jump-starting must only be performed
when the engine and catalytic converter
are cold.
R Do not start the engine if the battery has
frozen. Thaw the battery out first.
R Jump-starting may only be performed from
12V batteries.
R Only use jump leads which are protected
against polarity reversal and which have a
sufficient cross-section and insulated ter-
minal clamps.
i Jump leads which are protected against
polarity reversal and further information
about jump-starting can be obtained from
any Mercedes-Benz Service Centre.
! Avoid repeated and lengthy starting
attempts.
Never start the vehicle using a rapid battery
charger. Practical advice
* optional
219_AKB; 2; 4, en-GB
mkalafa,
2007-11-13T09:28:36+01:00 - Seite 291
Page 295 of 329
Jump-starting
292 G
Risk of injury
There is a risk of acid burns when jump-
starting a vehicle due to the gases which
escape from the battery. Do not lean over
the battery while the engine is being jump-
started. G
Risk of explosion
Gases escaping from the battery during
jump-starting may cause minor explosions.
Avoid creating sparks. Keep naked flames
away from the battery, and do not smoke.
Comply with safety precautions and take
protective measures when handling batter-
ies. You will find these under “Battery” in
the index.
X Make sure that the two vehicles do not
touch.
X Depress the parking brake.
X Move the selector lever to P.
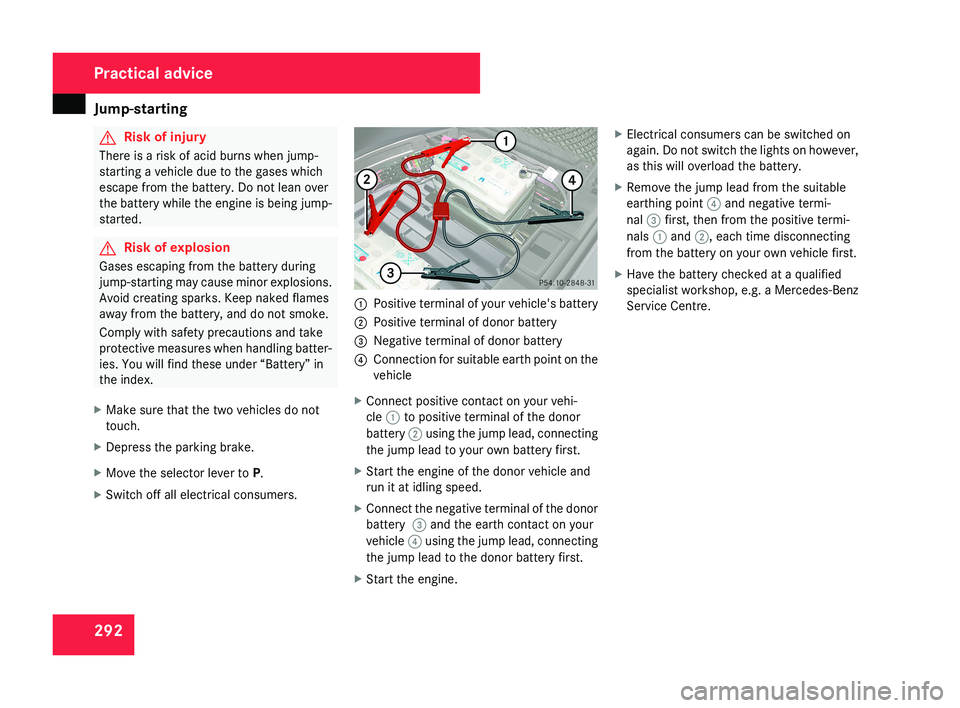
X Switch off all electrical consumers.1 Positive terminal of your vehicle's battery
2 Positive terminal of donor battery
3 Negative terminal of donor battery
4 Connection for suitable earth point on the
vehicle
X Connect positive contact on your vehi-
cle 1 to positive terminal of the donor
battery 2 using the jump lead, connecting
the jump lead to your own battery first.
X Start the engine of the donor vehicle and
run it at idling speed.
X Connect the negative terminal of the donor
battery 3 and the earth contact on your
vehicle 4 using the jump lead, connecting
the jump lead to the donor battery first.
X Start the engine. X
Electrical consumers can be switched on
again. Do not switch the lights on however,
as this will overload the battery.
X Remove the jump lead from the suitable
earthing point 4 and negative termi-
nal 3 first, then from the positive termi-
nals 1 and 2, each time disconnecting
from the battery on your own vehicle first.
X Have the battery checked at a qualified
specialist workshop, e.g. a Mercedes-Benz
Service Centre.
Practical advice
219_AKB; 2; 4, en-GB
mkalafa,
2007-11-13T09:28:36+01:00 - Seite 292
Page 296 of 329
Towing and tow-starting
293Towing and tow-starting
Points to remember
G
Risk of accident
If you tow the vehicle, you must use a rigid
towing bar if:
R the engine is not running
R there is a brake system malfunction
R the voltage supply or the vehicle's elec-
trical system is damaged
There
is no power assistance for the steer-
ing when the engine is not running. G
Risk of accident
The vehicle is braked when HOLD is activa-
ted.
Therefore, deactivate HOLD if the vehi-
cle is to be towed.
If you tow or tow-start another vehicle, its
weight must not exceed the maximum per-
missible gross vehicle weight of your vehi-
cle.
It is better to have the vehicle transported
than to have it towed.
When towing, observe the legal requirements
in all countries concerned. !
When towing, pull away slowly and with-
out
jerking. If the tractive power is too high,
the vehicles could be damaged. Do not use
the towing eye for recovery.
! You may tow the vehicle for a maximum
of 50 km. A towing speed of 50 km/h must
not be exceeded.
With towing distances over 50 km, the
entire vehicle needs to be lifted up and
transported.
! Only secure the tow cable or towing bar
to the towing eyes. You may otherwise
damage the vehicle.
R Vehicles with an automatic transmission
must not be tow-started.
R If the engine does not start, try jump-start-
ing it (Y page 291).
R If it is not possible to jump-start the vehicle,
have it towed to the nearest qualified spe-
cialist workshop, e.g. a Mercedes-Benz
Service Centre.
R If the vehicle has suffered transmission
damage, only tow it with the propeller shaft
disconnected.
R The selector lever must be in position N on
vehicles with automatic transmission. R
If you are towing the vehicle over a consid-
erable distance, this may only be done with
the rear axle raised.
R The ignition must be switched off if you are
towing the vehicle with the front/rear axle
raised. Intervention by ESP ®
could other-
wise damage the brake system.
R Before towing the vehicle, make sure that
the battery is connected and charged. Oth-
erwise:
-You cannot switch on the ignition
- You cannot move the selector lever to N
- You have no support when braking
i Switch off the automatic locking feature
before the vehicle is towed (Y page 127).
You could otherwise be locked out when
pushing or towing the vehicle. Practical advice
219_AKB; 2; 4, en-GB
mkalafa,
2007-11-13T09:28:36+01:00 - Seite 293
Page 297 of 329
Towing and tow-starting
294 Fitting the towing eye
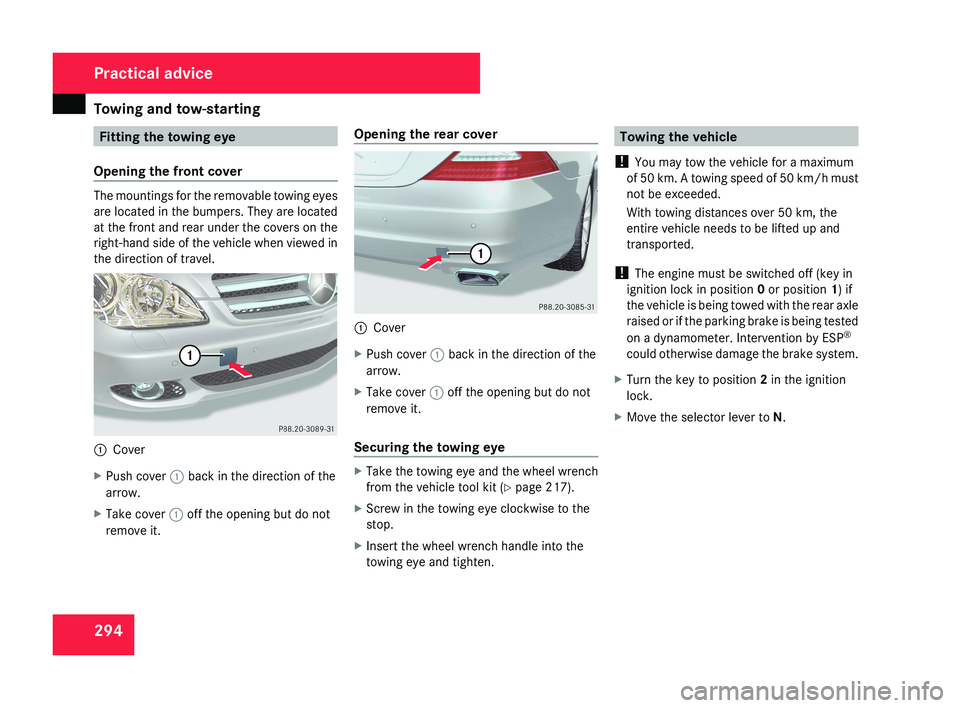
Opening the front cover The mountings for the removable towing eyes
are located in the bumpers. They are located
at the front and rear under the covers on the
right-hand side of the vehicle when viewed in
the direction of travel.
1
Cover
X Push cover 1 back in the direction of the
arrow.
X Take cover 1 off the opening but do not
remove it. Opening the rear cover
1
Cover
X Push cover 1 back in the direction of the
arrow.
X Take cover 1 off the opening but do not
remove it.
Securing the towing eye X
Take the towing eye and the wheel wrench
from the vehicle tool kit ( Y page 217).
X Screw in the towing eye clockwise to the
stop.
X Insert the wheel wrench handle into the
towing eye and tighten. Towing the vehicle
! You may tow the vehicle for a maximum
of 50 km. A towing speed of 50 km/h must
not be exceeded.
With towing distances over 50 km, the
entire vehicle needs to be lifted up and
transported.
! The engine must be switched off (key in
ignition lock in position 0 or position 1) if
the vehicle is being towed with the rear axle
raised or if the parking brake is being tested
on a dynamometer. Intervention by ESP ®
could otherwise damage the brake system.
X Turn the key to position 2 in the ignition
lock.
X Move the selector lever to N. Practical advice
219_AKB; 2; 4, en-GB
mkalafa,
2007-11-13T09:28:36+01:00 - Seite 294
Page 298 of 329
Fuses
295Removing the towing eye
X Take the wheel wrench from the vehicle
tool kit ( Y page 217).
X Insert the wheel wrench handle into the
towing eye and turn it anti-clockwise.
X Unscrew the towing eye.
X Replace the cover and press it until it
engages.
X Return the towing eye and the wheel
wrench to the vehicle tool kit. Transporting the vehicle
The towing eyes can be used to pull the vehi-
cle onto a trailer or transporter for transport-
ing purposes.
! Only lash the vehicle down by the wheels
or wheel rims, not by parts of the vehicle
such as axle or steering components. The
vehicle could otherwise be damaged.
X Turn the key to position 2 in the ignition
lock.
X Move the selector lever to N. Fuses
Notes on changing fuses
The
fuses in your vehicle serve to close down
faulty circuits. If a fuse blows, all the compo-
nents on the circuit and their functions will
fail.
i Blown fuses must be replaced with fuses
of the same rating (which can be recog-
nised by the colour and amperage) and
which have the amperage specified in the
fuse allocation chart. A Mercedes-Benz
Service Centre will be happy to advise you. G
Risk of fire
Only use fuses that have been approved for
Mercedes-Benz vehicles and which have
the correct amperage for the system con-
cerned. Do not attempt to repair or bridge
faulty
fuses. A circuit overload could other-
wise cause a fire. Have the cause traced
and rectified at a qualified specialist work-
shop, e.g. a Mercedes-Benz Service Centre.
If the newly inserted fuse also blows, have the
cause traced and rectified at a qualified spe-
cialist workshop, e.g. a Mercedes-Benz
Service Centre. !
Only use fuses that have been approved
for Mercedes-Benz vehicles and which
have the correct amperage for the system
concerned.
Otherwise, components or sys-
tems could be damaged.
The fuses are located in various fuse boxes:
R Main fuse box on the driver's side of the
dashboard
R Fuse box in the boot, on the left-hand side
of the vehicle
Fuse allocation chart The fuse allocation chart is in the main fuse
box in the dashboard. The fuse amperage is
also indicated there. Practical advice
219_AKB; 2; 4, en-GB
mkalafa,
2007-11-13T09:28:36+01:00 - Seite 295
Page 299 of 329
Fuses
296 Before changing a fuse
X Park the vehicle.
X Switch off all electrical consumers.
X Remove the key from the ignition lock. Main fuse box
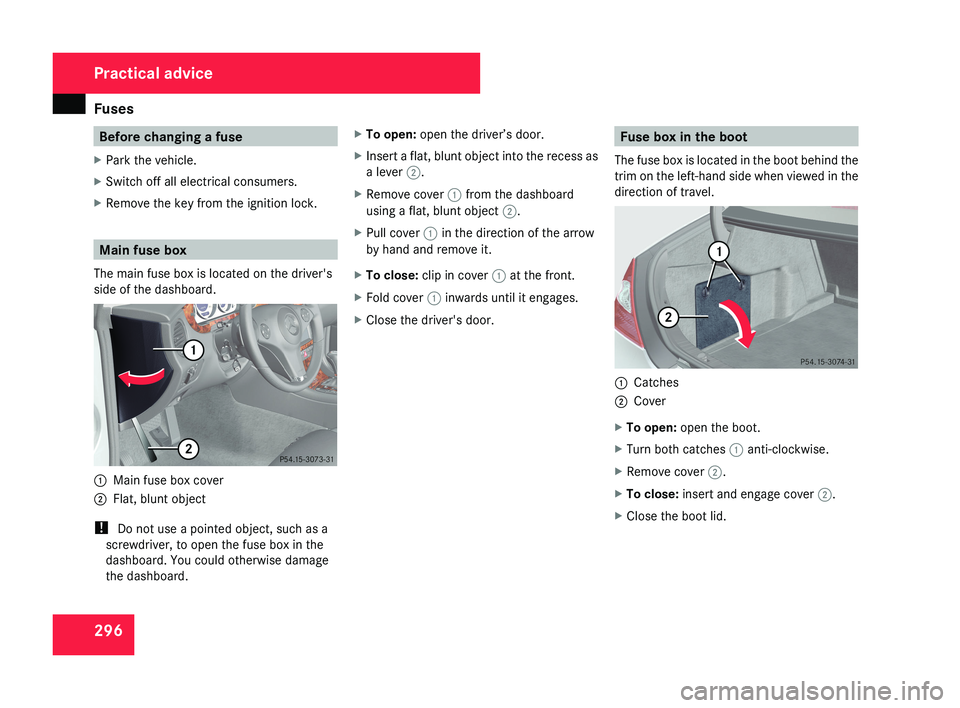
The main fuse box is located on the driver's
side of the dashboard.1 Main fuse box cover
2 Flat, blunt object
! Do not use a pointed object, such as a
screwdriver, to open the fuse box in the
dashboard. You could otherwise damage
the dashboard. X
To open: open the driver’s door.
X Insert a flat, blunt object into the recess as
a lever 2.
X Remove cover 1 from the dashboard
using a flat, blunt object 2.
X Pull cover 1 in the direction of the arrow
by hand and remove it.
X To close: clip in cover 1 at the front.
X Fold cover 1 inwards until it engages.
X Close the driver's door.
Fuse box in the boot
The fuse box is located in the boot behind the
trim on the left-hand side when viewed in the
direction of travel.
1 Catches
2 Cover
X To open: open the boot.
X Turn both catches 1 anti-clockwise.
X Remove cover 2.
X To close: insert and engage cover 2.
X Close the boot lid.
Practical advice
219_AKB; 2; 4, en-GB
mkalafa,
2007-11-13T09:28:36+01:00 - Seite 296
Page 300 of 329
297
Introduction to technical data .........
298
Genuine Mercedes-Benz parts ......... 298
Vehicle electronics ...........................299
Vehicle identification plates ............300
Engine ................................................ 302
Performance ...................................... 303
Tyres and wheels .............................. 304
Vehicle dimensions ..........................309
Vehicle weights ................................. 310
Service products and capacities ..... 311
Frequencies for garage door open-
ers* .................................................... 319
Technical data
219_AKB; 2; 4, en-GB
mkalafa,
2007-11-13T09:28:36+01:00 - Seite 297