reset MERCEDES-BENZ CLS COUPE 2010 User Guide
[x] Cancel search | Manufacturer: MERCEDES-BENZ, Model Year: 2010, Model line: CLS COUPE, Model: MERCEDES-BENZ CLS COUPE 2010Pages: 337, PDF Size: 7.36 MB
Page 97 of 337

i
The mirrors do not fold out if they have
been folded in manually.
Exterior mirror out of position If an exterior mirror has been pushed out of
position, proceed as follows:
X Vehicles without electrically folding
exterior mirrors: move the exterior mirror
into the correc tposition manually.
X Vehicles with electrically folding exte-
rior mirrors: press the mirror-folding but-
ton (Y page 93) repeatedly until you hear
the mirror engage in position.
The mirror housing is engaged again and
you can adjust the exterior mirrors as usual
(Y page 93). Automatic anti-dazzle mirrors
G
Risk of accident
If the incident light from headlamps cannot
strike the sensor in the rear-view mirror, for
instance, when the rear window roller sun-
blind is extended, the mirror's automatic anti-
dazzle function will not operate.
Incident light could then blind you. This may
distract you from the traffic conditions and,
as a result, you may cause an accident .Inthis
case, adjust the rear-view mirror manually.
The rear-view mirror and the exterior mirror
on the driver's side automatically go into anti-
dazzle mode if the ignition is switched on and
incident light from headlamps strikes the sen-
sor in the rear-view mirror.
The mirrors do not go into anti-dazzle mode if
reverse gear is engaged or the interior lighting
is switched on. Parking position for the exterior mir-
ror on the front-passenger side
Setting and storing the parking position You can position the front-passenger side
exterior mirror in such a way that you can see
the rear wheel on that side as soon as you
engage reverse gear. You can store this posi-
tion.
X
Make sure that the vehicle is stationary and
that the key is in position 2in the ignition
lock.
X Press button ;for the exterior mirror on
the front-passenger side.
X Engage reverse gear.
The exterior mirror on the front-passenger
side moves to the preset parking position.
X Use adjustment button =to adjust the
exterior mirror to a position which allows
you to see the rear wheel and the kerb.
The parking position is stored.
i If you shift the transmission to another
position, the exterior mirror on the front-
passenger side returns to the driving posi-
tion.
i You can also store the parking position
using memory button M?.
X With the key in position 2in the igni-
tion lock and with the exterior mirror
on the front-passenger side activated,
use adjustment button =to set the 94
MirrorsSeats, steering wheel and mirrors
Page 98 of 337

exterior mirror such that the rear
wheel and kerb are visible.
X Press memory button M? and one of
the arrows on adjustment button =
within three seconds.
The parking position is stored if the
exterior mirror does not move.
If the mirror moves out of position, repeat
the steps.
Calling up astore dparking position set-
ting X
With the key in position 2in the ignition
lock and the exterior mirror on the front-
passenge rside activated, engage reverse
gear.
The exterior mirror on the front-passenger
side moves to the stored parking position.
The exterior mirror on the front-passenger
side moves back to its original position:
R as soon as you exceed a speed of
10 km/h
R about ten seconds after you have disen-
gaged reverse gear
R if you press button :for the exterior mir-
ror on the driver's side Memory functions
Storing settings
With the memory function, you can store up
to three different settings, e.g. for three dif-
ferent people.
The following settings are stored as a single
memory preset:
R position of the seat, backrest and head
restraint
R active multicontour seat :seat cushion
length, seat backrest side bolsters, contour
of the backrest, dynamic function level set-
ting R
driver's side: steering wheel position
R driver's side: position of the exterior mir-
rors on the driver's and front-passenger
sides G
Risk of injury
The memory function can still be used when
the key has been removed. For this reason,
children should never be left unsupervised in
the vehicle. They could otherwise become
trapped when adjusting the seat or the steer-
ing wheel. G
Risk of accident
Only use the memory function on the driver's
side when the vehicle is stationary. Other-
wise, you could be distracted from the traffic
conditions by the steering wheel and seat
moving of their own accord, and as a result
cause an accident. X
Adjust the seat (Y page 86).
X On the driver's side, adjust the steering
wheel (Y page 91) and the exterior mirrors
(Y page 93).
X Press memory button Mand one of the
storage position buttons 1,2or 3within
three seconds.
The settings are stored in the selected pre-
set position .Atone sounds when the set-
tings have been completed. Memory functions
95Seats, steering wheel and mirrors Z
Page 105 of 337
over 10 km/h again after full brake applica-
tion.
i
The hazard warning lamps still operate if
the ignition is switched off. Headlam
pcleaning system
The headlamps are cleaned automatically if
the "Wipe with washer fluid" function is oper-
ated ten times while the lights are on and the
engine is running (Y page 106). When you
switch off the ignition, the automatic head-
lamp cleaning syste mis reset and counting is
resumed from 0. Intelligent Light System
Active light function The active light function is a system that
moves the headlamps according to the steer-
ing movements of the front wheels. In this
way, relevant areas remain illuminated while
driving. This allows you to recognise pedes-
trians, cyclists and animals.
Active:
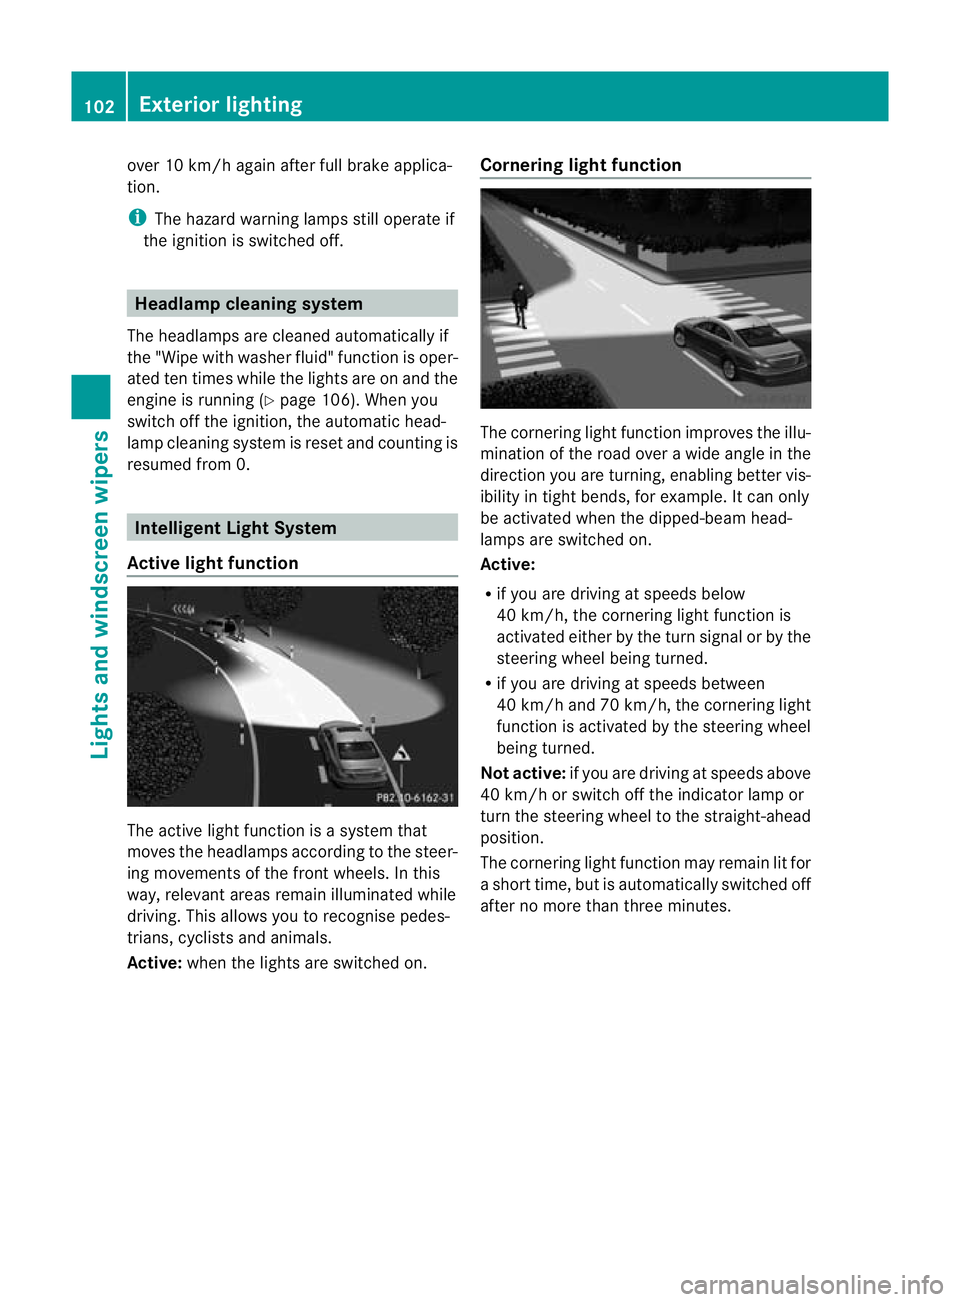
when the lights are switched on. Cornering light function The cornering light function improves the illu-
mination of the road over a wide angle in the
direction you are turning, enabling better vis-
ibility in tight bends, for example. It can only
be activated when the dipped-beam head-
lamps are switched on.
Active:
R
if you are driving at speeds below
40 km/h, the cornering light function is
activated either by the turn signal or by the
steering wheel being turned.
R if you are driving at speeds between
40 km/h and 70 km/h ,the cornering light
function is activated by the steering wheel
being turned.
Not active: if you are driving at speeds above
40 km/h or switch off the indicator lamp or
turn the steering wheel to the straight-ahead
position.
The cornering light function may remain lit for
a short time, but is automatically switched off
after no more than three minutes. 102
Exterior lightingLights and windscreen wipers
Page 157 of 337

Deactivating cruise control
There are several ways to deactivate cruise
control:
X
Briefly press the cruise control lever for-
wards B.
or
X Brake.
or
X Briefly press the cruise control lever in the
direction of arrow A.
Variable SPEEDTRONIC is selected. LIM
indicator lamp ;in the cruise contro llever
lights up.
Cruise control is automatically deactivated if:
R you depress the parking brake.
R you are driving at less than 30 km/h.
R ESP ®
intervenes or you deactivate ESP ®
.
R you shift the transmission to position N
while driving.
If cruise control is deactivated, you will hear
a warning tone. You will see the Cruisecontrol off message in the multifunction
display for approximately five seconds.
i The last speed stored is cleared when you
switch off the engine. DISTRONIC PLUS
Important safety notes DISTRONIC PLUS regulates the speed and
automatically helps you maintain the dis-
tance to the vehicle detected in front. It
brakes automatically in order to avoid
exceeding the set speed.
On long and steep downhill gradients, espe-
cially if the vehicle is laden, you must select
shift range
1,2or 3in good time. By doing
so, you will make use of the braking effec tof
the engine, which relieves the load on the
brake syste mand prevents the brakes from
overheating and wearing too quickly. If a slower-moving vehicle is detected in front,
DISTRONIC PLU
Scauses your vehicle to
brake and maintain a preset distance to the
vehicle in front. G
Ris
kofa ccident
Do no tchange down for additional engine
braking on a slippery road surface. This could
cause the drive wheels to lose their grip and
the vehicle could skid. G
Risk of accident
DISTRONIC PLUS is only an aid designed to
assist driving. The driver remains fully respon-
sible for the vehicle's distance from other
vehicles, the vehicle's speed and for braking
in good time.
DISTRONIC PLUS does not react in particular
to:
R pedestrians
R stationary obstacles on the road, e.g. stop-
ped or parked vehicles
R oncoming and crossing traffic
DISTRONIC PLUS may not detect narrow vehi-
cles driving in front,e .g. motorcycles, or vehi-
cles driving on a different line. Therefore,
always pay attention to traffic conditions even
when DISTRONIC PLUS is activated. Other-
wise, you may fail to recognise dangers in
time, cause an accident and injure yourself
and others. G
Ris
kofa ccident
DISTRONIC PLUS cannot tak eaccount of road
and traffic conditions. If DISTRONIC doe snot
recognise or no longer recognises the vehicle
in front, do not activate DISTRONIC or, if it is
already active, deactivate it. This is especially
the case:
R before corners
R on filter lanes 154
Driving systemsDriving and parking
Page 160 of 337

X
Keep the cruise control lever pressed
up : or down Auntil the desired speed
is set.
i You can use the cruise control lever to set
the stored speed and the control on the
cruise control lever to set the specified
minimum distance (Y page 159).
Pulling away
X If the vehicle in front pulls away: remove
yourf oot from the brake pedal.
X Briefly pull the cruise control lever towards
you ?.
or
X Accelerate briefly.
Your vehicle pulls away and adapts its
speed to that of the vehicle in front.
Driving
If there is no vehicle in front, DISTRONIC
PLUS operates in the same way as cruise
control.
If a slower-moving vehicle is detected in front,
DISTRONIC PLUS causes your vehicle to
brake and maintain a preset distance to the
vehicle in front.
If DISTRONIC PLUS detects a faster-moving
vehicle in front, it increases the driving speed,
but only up to the desired speed you have
stored. G
Risk of accident
If you depress the brake, DISTRONIC PLUS is
deactivated unless your vehicle is stationary.
DISTRONIC PLUS then no longer brakes your
vehicle. In such cases, control the distance
from vehicles travelling in front with the brake
alone. You could otherwise cause an accident
and thereby injure yourself and others. The
driver remains fully responsible for the vehi-
cle's distance from other vehicles, the speed
being driven and for braking in good time. Changing lanes
If you wish to change to the passing lane (in
left-hand-drive vehicles, the passing lane is
the left-hand lane), DISTRONIC PLUS sup-
ports you if:
R
you are driving faster than 60 km/h
R DISTRONIC PLUS is maintaining the dis-
tance to a vehicle in front
R you switch on the appropriate turn signals
R DISTRONIC PLUS does not detect a danger
of collision
If these conditions are met, your vehicle is
accelerated. Acceleration will be interrupted
if changing lanes takes too long or if the dis-
tance between your vehicle and the vehicle in
front becomes too small. G
Risk of accident
DISTRONIC PLUS and Active Blind Spot Assist
are only an aid designed to assist driving.
They do not relieve you of the responsibility
of paying attention. The driver remains fully
responsible for the vehicle's distance from
other vehicles, the vehicle's speed and for
braking in good time. Always pay attention to
traffic conditions and your surroundings. Oth-
erwise, you may fail to recognise dangers in
time, cause an accident and injure yourself
and others.
Vehicles with COMAND APS/
Audio 50 APS
i The following functions are not opera-
tional in all countries.
DISTRONIC PLUS uses additional information
from your navigation system so that it can
react appropriately to certain traffic situa-
tions. This is the case if, while following a
vehicle, DISTRONIC PLUS is active and you:
R approach or drive through aroundabout
R approach a T junction
R turn off at a motorway exit
Even if the vehicle in front leaves the detec-
tion range, DISTRONIC PLUS temporarily
maintains the current driving speed and does Driving systems
157Driving and parking Z
Page 181 of 337

ATTENTION ASSIST assesses your level of
fatigue or lapses in concentratio
nby taking
the following criteria into account:
R your personal driving style, e.g. steering
characteristics
R driving conditions, e.g. time, driving time
The functionality of ATTENTION ASSIST is
restricted and warnings may be delayed or
not occur at all:
R if the road condition is poor, e.g. if the sur-
face is uneven or if there are potholes
R if there is a strong side wind
R if you have adopted a sporty driving style
with high cornering speeds or high rates of
acceleration
R if you are predominantly driving slower
than 80 km/h or faster than 180 km/h
R if you are currently using COMAND APS or
making a telephone call wit hit
R if the time has been set incorrectly
R in active driving situations, such as when
you change lanes or change your speed
Warning and display messages in the
multifunction display X
Activate ATTENTION ASSIST using the on-
board computer (Y page 204).
Symbol :appears in the multifunction
display.
If ATTENTION ASSIS Tis active, it will not warn
you until at least 20 minutes after your jour-
ney has begun. You then hear an intermittent
warning tone twice and the AttentionAssist: Drowsiness detected message
appears in the multifunction display. X
If necessary, take a break.
X Press the abutton to confirm the mes-
sage.
On long journeys, take regularb reaks in good
time to allow yourself to rest properly.Ify ou
do not take a break and ATTENTION ASSIST
still detects typical indicators of fatigue or
increasing lapses in concentration, you will be
warned again after 15 minutes at the earliest.
ATTENTION ASSIST is reset when you con-
tinue your journey and it starts assessing your
tiredness again if:
R you switch off the engine.
R you take off your seat belt and open the
driver's door, e.g. for a change of drivers or
to take a break. Speed Limit Assist
Important safety notes i
Speed Limit Assist is not operational in all
countries.
Speed Limit Assist, in conjunction with your
navigation system, shows you speed limits it
has detected in the multifunction display .The
display appears when traffic signs indicating
a speed limit or end of a speed limit zone are
detected. If Speed Limit Assist does not
detect any traffic signs, it adopts the speed
limit in the digital map and shows it in the
display.
Speed Limit Assist detects signs with a cam-
era at the top of the windscreen. 178
Driving systemsDriving and parking
Page 201 of 337

Trip menu
Standard display X
Press and hold the %button on the
steering wheel until the Trip menu with
total distance recorder :and trip
meter ;is shown.
Trip computer "From start" or "From
reset" The values in the
After start submenu are
calculated fro mthe start of a journey, whilst
the values in the From reset submenu are
calculated from the last time the submenu
was reset (Y page 199).
X Press the =or; button on the steer-
ing wheel to select the Trip menu.
X Press 9or: to select From start or
From reset .
Trip computer "From start" (example)
: Distance
; Time
= Average speed
? Average fuel consumption
The From start trip computer is reset auto-
matically when R
the ignition has been switched off for more
than four hours.
R 999 hours have been exceeded.
R 9999 kilometres have been exceeded.
The From reset trip computer is automati-
cally reset if the trip exceeds 9,999 hours or
99,999 kilometres.
Displaying the range and current fuel
consumption X
Press the =or; button on the steer-
ing wheel to select the Trip menu.
X Press the 9or: button to select
current fuel consumption 27
and approxi-
mate range. The approximate range which can be covered
depends on the fuel level and your current
driving style. If there is only a small amount
of fuel left in the fuel tank, the display shows
a vehicle being refuelled
Cinstead of the
range.
Digital speedometer X
Press the =or; button on the steer-
ing wheel to select the Trip menu.
X Press the 9or: button to select the
digital speedometer. :
Digital speedometer
27 Not AMG vehicles. 198
Menus and submenusOn-board computer and displays
Page 202 of 337

Resetting values
You can reset the values of the following func-
tions:
R trip meter
R trip computer "From start"
R trip computer "From reset"
X Press the =or; button on the steer-
ing wheel to select the Trip menu.
X Press 9or: to select the function
that you wish to reset.
X Press a. Resetting the trip compute
r"From start" (example)
X Press :to select Yes and press
a
to confirm. Navigation menu
Displaying navigation instructions In the
Navi menu, the multifunction display
shows navigation instructions. For more
information, see the separate operating
instructions.
X Switch on the audio system or COMAND
APS (see the separate operating instruc-
tions).
X Press the =or; button on the steer-
ing wheel to select the Navi menu.Route guidance inactive :
Direction of travel
; Current road
Route guidance active No change of direction announced
:
Distance to the destination
; Distance to the next change of direction
= Current road
? Symbol for "follow the road's course"
Change of direction announced without a
lane recommendation :
Road to which the change of direction
leads
; Distance to change of directio nand visual
distance display
= Current road
? Symbol for change of direction
Whe nachange of direction has been
announced, you will see visua ldistance dis-
play ;next to the symbol for change of Menus and submenus
199On-board computer and displays Z
Page 208 of 337

X
Press a.
The curren tselection is displayed.
X To activate/deactivate: pressa
again.
Activating/deactivating Lane Keeping
Assist You can use the
Lane Keep. Asst. function
to activate/deactivate Lane Keeping Assist
(Y page 185) or Active Lane Keeping Assist
(Y page 189).
X Press =or; on the steering wheel
to select the Assist. menu.
X Press 9or: to select Lane Keep.
Asst. .
X Press a.
If the function is activated, the road mark-
ings are shown in red in the multifunction
display.
X To activate/deactivate: pressa
again.
When Lane Keeping Assist or Active Lane
keeping Assist is activated, the multifunction
display shows the Ãsymbol when the igni-
tion is switched on. Service menu
In the
Service menu you can:
R call up display messages ( Ypage 215)
R reset the tyre pressure loss warning system
(Y page 306) or check the tyre pressure
electronically (Y page 307)
R call up the service due date (Y page 270) Setup menu
Introduction In the
Settings menu, you have the following
options:
R changing the instrument cluster settings
R changing the time/date settings 30
R changing the light settings
R changing the vehicle settings
R changing the auxiliary heating settings
R changing the convenience settings
R restoring the factory settings
Instrument cluster Selecting the unit of measurement for dis-
tance
The
Display unit Speed-/odometer func-
tion allows you to choose whether certain
displays appear in kilometres or miles.
The selected unit of measuremen tfor dis-
tance applies to:
R the digital speedometer in the Trip menu
R the total distance recorder and the trip
meter
R the trip computer
R the current consumption and the range
R the navigation instruction in the Navi menu
R cruise control
R SPEEDTRONIC
R DISTRONIC PLUS
R ASSYST PLUS service interval display
30 This function is not available on vehicles with Audio 50 APS, Audio 55 APS or COMAND APS. Menus and submenus
205On-board computer and displays Z
Page 215 of 337

X
Press the =or; button on the steer-
ing wheel to select the Settings menu.
X Press the :or9 button to select the
Convenience submenu.
X Press the abutton to confirm.
X Press the :or9 button to select the
Auto. fold in function.
When the Auto. fold in function is acti-
vated, the vehicle's exterior mirror is dis-
played in red in the multifunction display.
X Press the abutton to save the setting.
Resetting to factor ysettings For safety reasons, no
tall functions are reset:
the Limit Speed (winter tyres) function
in permanent SPEEDTRONIC can only be set
in the Vehicle submenu. If you want to reset
the Daytime driving lights in the
Light submenu, you must tur
nthe key in the igni-
tion lock to position 1.
X Press the =or; button on the steer-
ing wheel to select the Settings menu.
X Press the :or9 button to select the
Factory setting submenu.
X Press the abutton to confirm.
The Reset all settings? message
appears.
X Press the :or9 button to select
No or
Yes .
X Press the abutton to confirm the selec-
tion.
If you select Yes , the multifunction display
shows a confirmation message. AMG menu in AMG vehicles
AMG displays X
Press =or; on the steering wheel
to select the AMG menu. :
Digital speedometer
; Gear indicator
= Upshift indicator
? Engine oil temperature
A Coolant temperature
Upshift indicator UP =
indicates that the
engine has reached the overrevving range
when in the manual gearshift program.
Upshift indicator UP =
fades out other mes-
sages until you have shifted up.
When the engine temperature is below
80 †, the oil temperature gauge flashes.
Avoid driving at full engine output during this
time.
RACETIMER Displaying and starting RACETIMER
You can use the RACETIMER to store lap
times.
When RACETIMER is displayed, you cannot
adjust the volume using the
WandX
buttons on the steering wheel.
X Press =or; on the steering wheel
to select the AMG menu.
X Press the 9button repeatedly until the
RACETIMER is shown. :
Lap
; RACETIMER 212
Menus and submenusOn-board computer and displays