MERCEDES-BENZ CLS COUPE 2011 Owners Manual
Manufacturer: MERCEDES-BENZ, Model Year: 2011, Model line: CLS COUPE, Model: MERCEDES-BENZ CLS COUPE 2011Pages: 337, PDF Size: 7.37 MB
Page 251 of 337

Vehicle equipment
i This manual describes all the standard
and optional equipment of your vehicle
available at the time of publicatio nofthe
Owner's Manual. Country-specific differen-
ces are possible. Please note that your
vehicle may not be equipped with all fea-
tures described. This also applies to safety-
relevant systems and functions. Loading guidelines
G
Risk of injury
Secure and position the load as described in
the loading guidelines.
Otherwise, vehicle occupants could
be injured by the load being thrown around in
the event of sharp braking, a sudden change
in direction or an accident.
You will find further information in the "Secur-
ing a load" section.
Even if you follow all the loading guidelines,
the load will increase the risk of injury in the
event of an accident. G
Risk of poisoning
Keep the boot lid closed while the vehicle is
in operation. Otherwise, you could be pois-
oned by exhaust fumes entering the vehicle.
The handling characteristics of a laden vehi-
cle are dependent on the distribution of the
load within the vehicle. For this reason, you
should observe the following notes when
transporting a load:
R when transporting a load, never exceed the
maximum permissible gross vehicle weight
or the permissible axle loads for the vehicle
(including occupants).
R position heavy loads as far forwards as pos-
sible and as low down in the boot as pos-
sible.
R the load must not protrude above the upper
edge of the seat backrests. R
always place the load against the rear or
front seat backrests. Make sure that the
seat backrests are securely locked into
place.
R always place the load behind unoccupied
seats if possible.
R secure the load with sufficiently strong and
wear-resistant lashing material. Pad sharp
edges for protection.
i Load restraints are available at any quali-
fied specialist workshop, e.g. a Mercedes-
Benz Service Centre. Stowage areas
Stowage compartments
Important safety notes G
Risk of injury
The stowage compartments must be closed
when items are stored in them. Luggage nets
are not designed to secure heavy items of
luggage.
You or other vehicle occupants could be
injured by objects being thrown around if you:
R brake sharply
R change direction suddenly
R are involved in an accident
Sharp-edged and fragile objects must not be
placed in the luggage net.
Do not place hard objects in the map pockets.
Objects must not protrude from the map
pockets.
Front stowage compartments Glove compartment
i
The glove compartmentc an be ventilated
(Y page 124). 248
Stowage areasStowing and features
Page 252 of 337
X
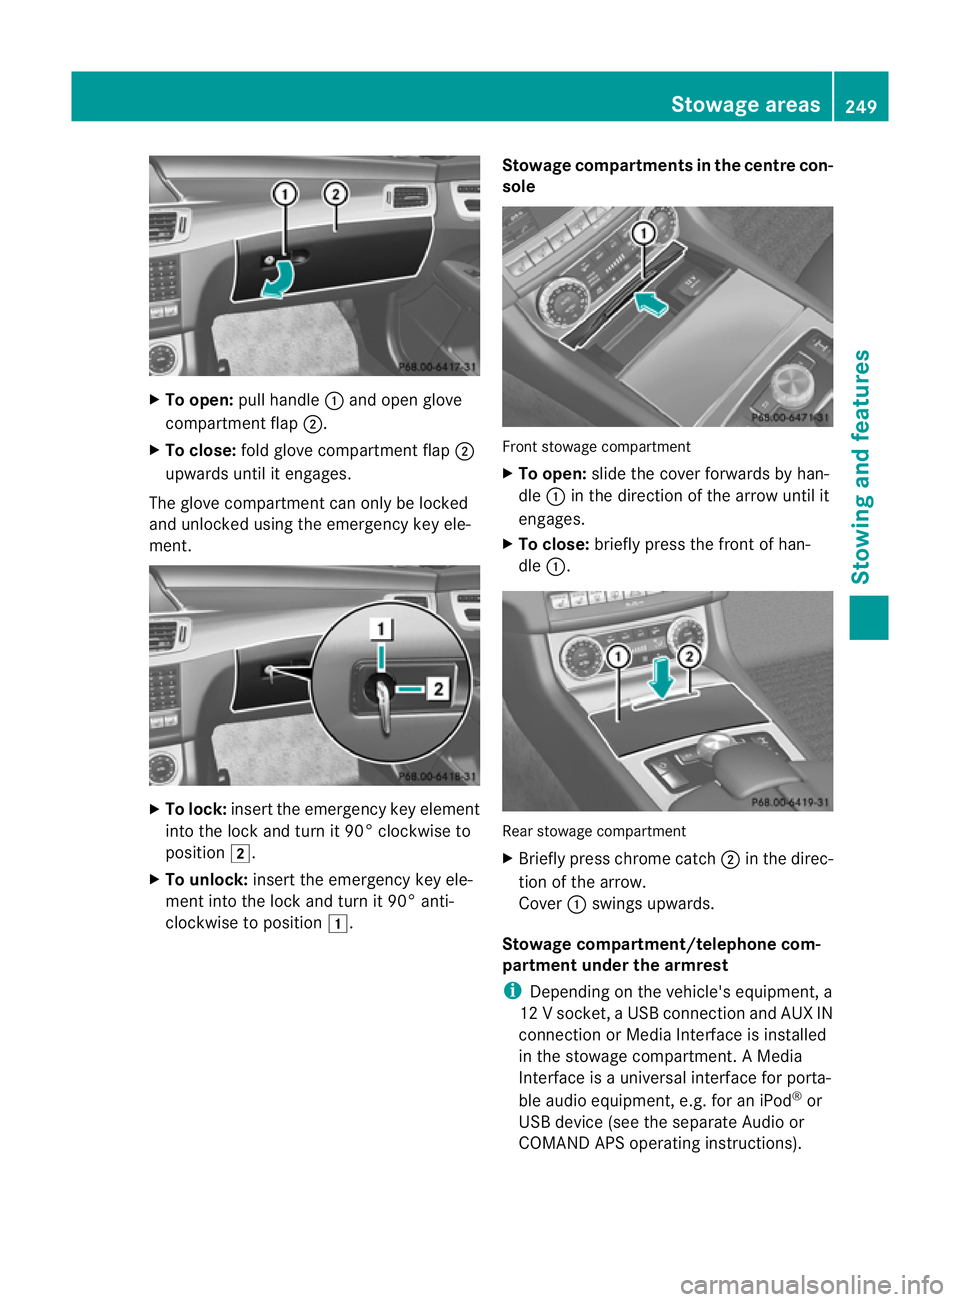
To open: pull handle :and open glove
compartment flap ;.
X To close: fold glove compartment flap ;
upwards until it engages.
The glove compartment can only be locked
and unlocked using the emergency key ele-
ment. X
To lock: insert the emergency key element
into the lock and turn it 90° clockwise to
position 2.
X To unlock: insert the emergency key ele-
ment into the lock and turn it 90° anti-
clockwise to position 1. Stowage compartments in the centre con-
sole Front stowage compartment
X
To open: slide the cove rforwards by han-
dle :in the direction of the arrow until it
engages.
X To close: briefly press the front of han-
dle :. Rear stowage compartment
X
Briefly press chrome catch ;in the direc-
tion of the arrow.
Cover :swings upwards.
Stowage compartment/telephone com-
partment under the armrest
i Depending on the vehicle's equipment, a
12 V socket ,aUSB connection and AUX IN
connection or Media Interface is installed
in the stowage compartment. AMedia
Interface is a universal interface for porta-
ble audio equipment, e.g. for an iPod ®
or
USB device (see the separate Audio or
COMAND APS operating instructions). Stowage areas
249Stowing and features Z
Page 253 of 337
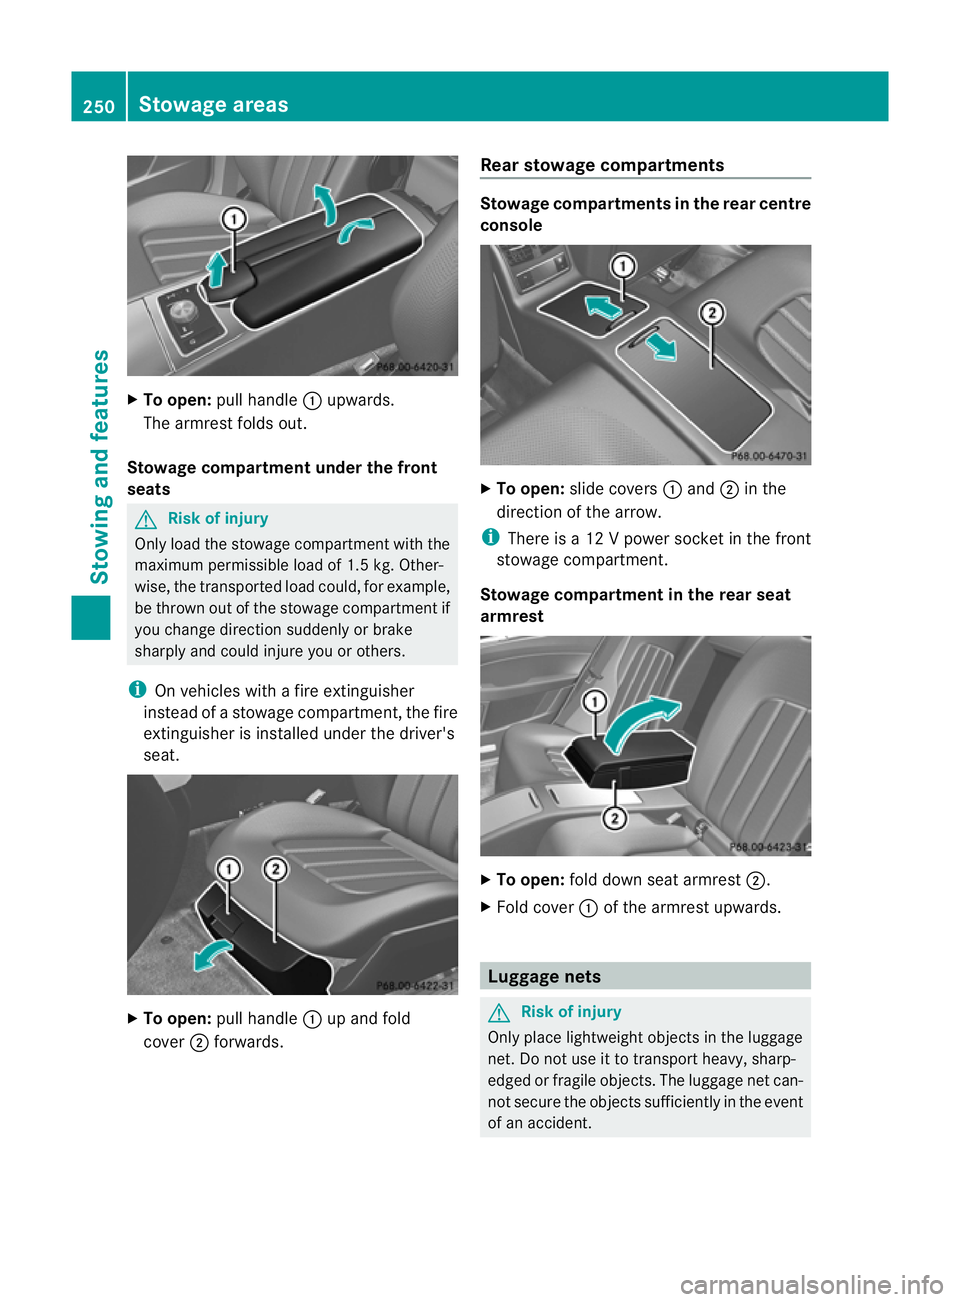
X
To open: pull handle :upwards.
The armrest folds out.
Stowage compartment under the front
seats G
Risk of injury
Only load the stowage compartment with the
maximu mpermissible load of 1.5 kg. Other-
wise, the transported load could, for example,
be thrown out of the stowage compartment if
you change direction suddenly or brake
sharply and could injure you or others.
i On vehicles with a fire extinguisher
instead of a stowage compartment, the fire
extinguisher is installed under the driver's
seat. X
To open: pull handle :up and fold
cover ;forwards. Rear stowage compartments Stowage compartments in the rear centre
console
X
To open: slide covers :and ;in the
direction of the arrow.
i There is a 12 V power socket in the front
stowage compartment.
Stowage compartment in the rear seat
armrest X
To open: fold down seat armrest ;.
X Fold cover :of the armrest upwards. Luggage nets
G
Risk of injury
Only place lightweight objects in the luggage
net. Do not use it to transport heavy, sharp-
edged or fragile objects. The luggage net can-
not secure the objects sufficiently in the event
of an accident. 250
Stowage areasStowing and features
Page 254 of 337
Luggage nets are located in the front-
passenger footwell and on the left and right-
hand sides of the boot. Through-loading facility in the rear
benchs eat
Important safety notes G
Risk of injury
Do not carry heavy or hard objects inside the
vehicle or in the boot unless they are secured.
Otherwise, you and other vehicle occupants
could be injured by object sbeing thrown
around the vehicle in the event of sharp brak-
ing, a sudden change in direction or an acci-
dent. G
Risk of poisoning
Always drive with the boot lid closed. Exhaust
fumes could otherwise enter the vehicle inte-
rior.
The left-hand and right-hand rear seat backr-
ests can be folded down separately to
increase the boot capacity.
Folding the seat backrest forwards i
Vehicles with memory function :when you
fold one or both parts of the rear seat back-
rest forwards, the respective front seat
moves forward slightly, when necessary, in
order to avoid contact. X
Vehicles without memory function: if nec-
essary, move the driver's or front-
passenger seat forwards.
X Open the boot.
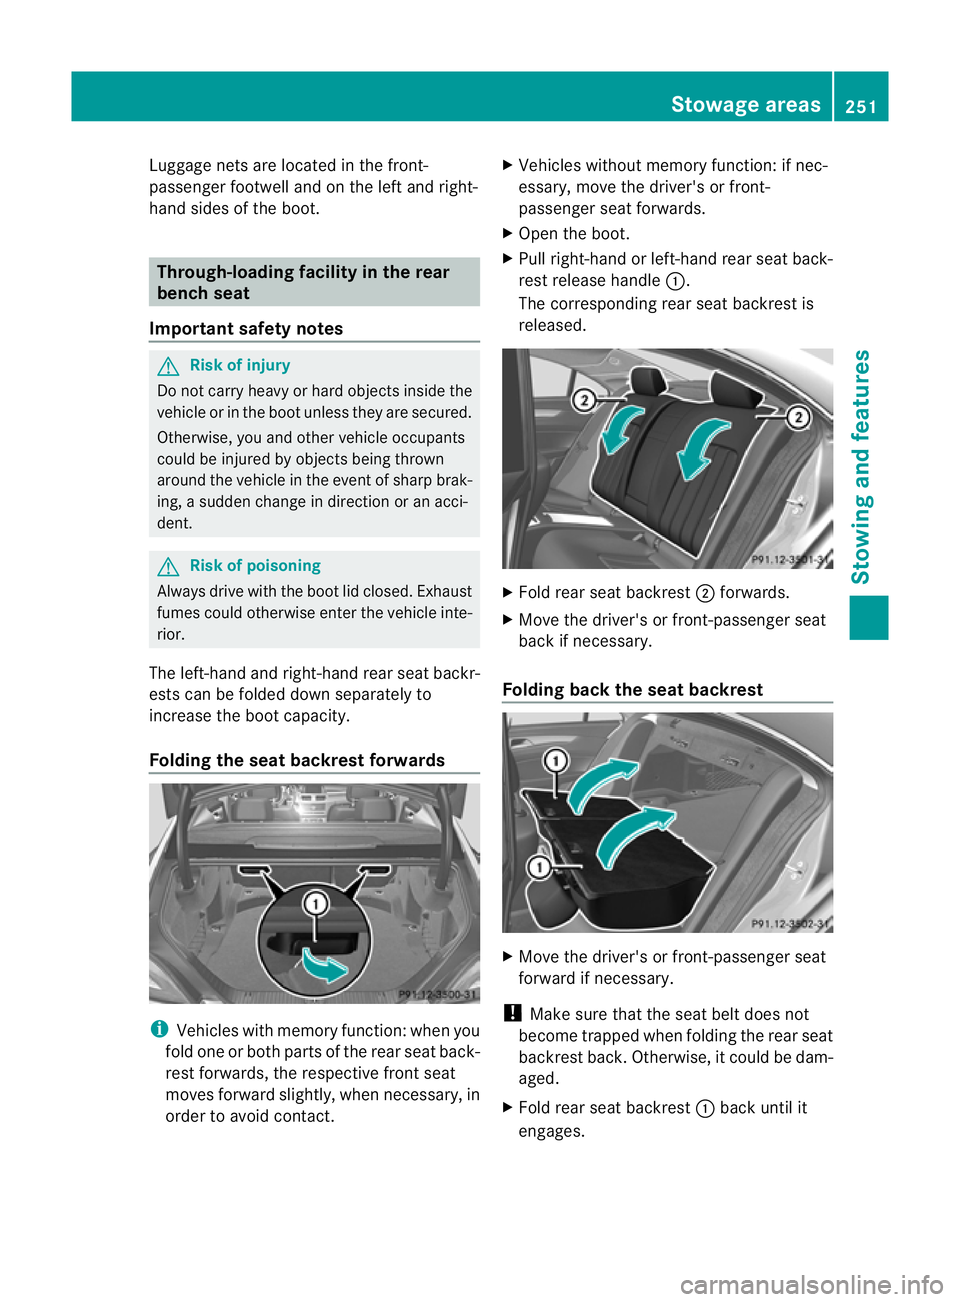
X Pull right-hand or left-hand rear seat back-
rest release handle :.
The corresponding rear seat backrest is
released. X
Fold rear seat backrest ;forwards.
X Move the driver's or front-passenger seat
back if necessary.
Folding back the seat backrest X
Move the driver's or front-passenger seat
forward if necessary.
! Make sure that the seat belt does not
become trapped when folding the rear seat
backrest back. Otherwise, it could be dam-
aged.
X Fold rear seat backrest :back until it
engages. Stowage areas
251Stowing and features Z
Page 255 of 337
G
Risk of injury
Make sure that the rear seat backrest is cor-
rectly engaged .Otherwise, vehicle occupants
could be injured by objects being thrown
around if you:
R brake sharply
R change direction suddenly
R are involved in an accident
If the rea rseat backrest is not engaged, this
will be shown in the multifunction display in
the instrument cluster.
i You should always engage the rear seat
backrests if you do not need the through-
loading feature. This will preven tunauthor-
ised access to the boot from the vehicle
interior.
X Move the driver's or front-passenger seat
back if necessary. Securing
aload
Lashing eyelets G
Risk of injury
Distribute the load on the lashing eyelets
evenly.
Otherwise, vehicle occupants could be
injured by objects being thrown around if you:
R brake sharply
R change directio nsuddenly
R are involved in an accident
Please observe the loading guidelines.
Observe the following notes on securing
loads:
R secure the load using the lashing eyelets.
R do no tuse elastic straps or nets to secure
a load, as these are only intended as an
anti-slip protection for light loads.
R do not route lashing materials across sharp
edges or corners.
R pad sharp edges for protection.
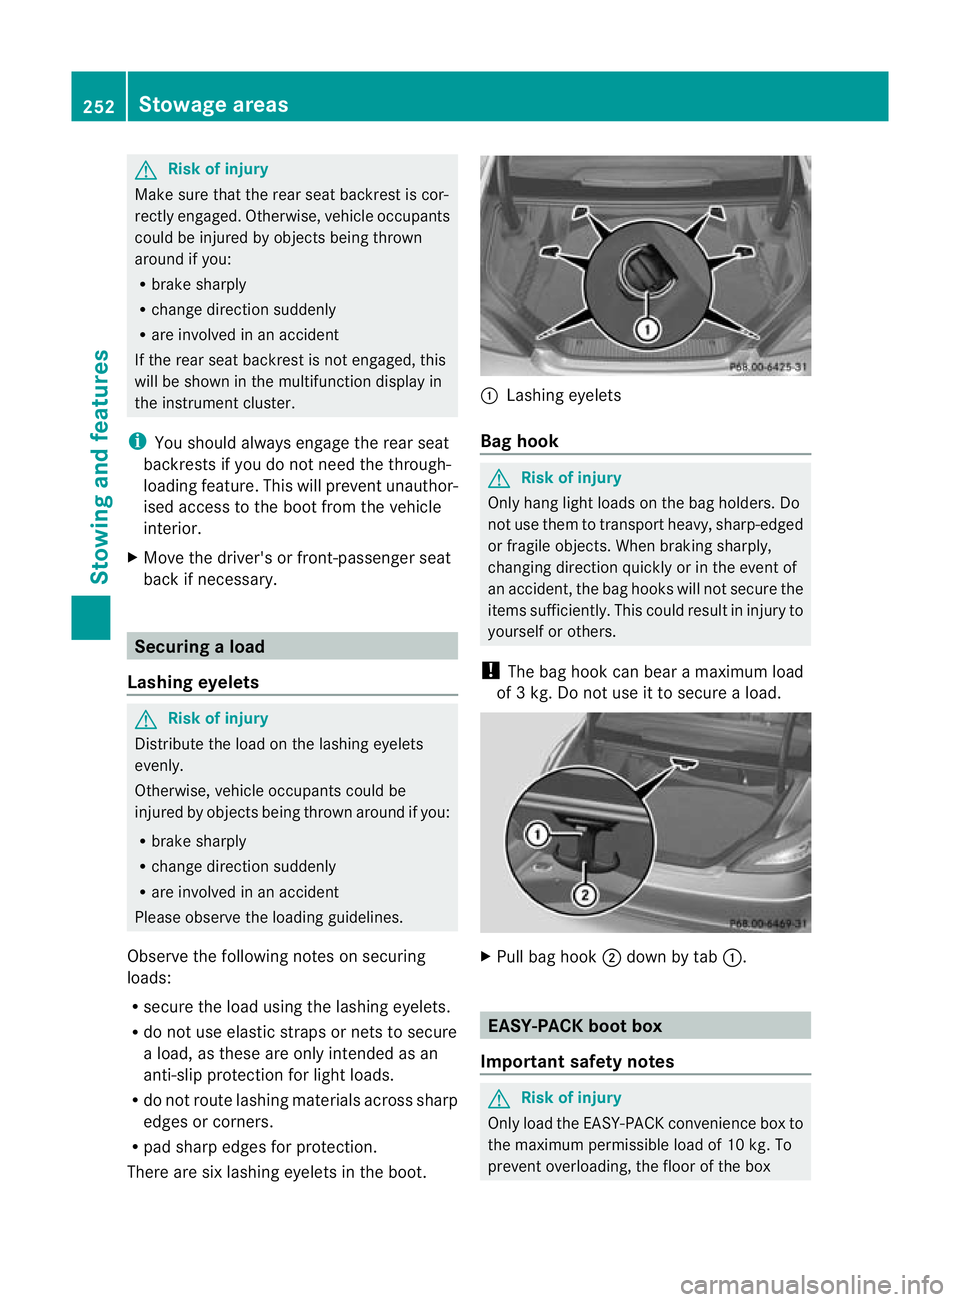
There are six lashing eyelets in the boot. :
Lashing eyelets
Bag hook G
Risk of injury
Only hang light loads on the bag holders. Do
not use them to transport heavy, sharp-edged
or fragile objects. When braking sharply,
changing direction quickly or in the event of
an accident, the bag hooks will not secure the
items sufficiently. This could result in injury to
yourselforo thers.
! The bag hoo kcan bear a maximum load
of 3 kg. Do not use it to secure a load. X
Pull bag hook ;down by tab :. EASY-PACK boot box
Important safety notes G
Risk of injury
Only load the EASY-PACK convenience box to
the maximum permissible load of 10 kg .To
preven toverloading, the floor of the box 252
Stowage areasStowing and features
Page 256 of 337
moves down onto the boot floor mat when
loaded with more than approx. 5kg.
Do not transpor tsharp-edged and fragile
objects in the box.
Otherwise, e.g. in the event of a rapid change
of direction or heavy braking, the objects
could be thrown out of the EASY-PACK con-
venience box and injure you and others.
! When the EASY-PACK convenience box is
pulled out, no objects may be placed on the
frame of the box or pushed onto the frame
from above. Otherwise, the box could be
damaged.
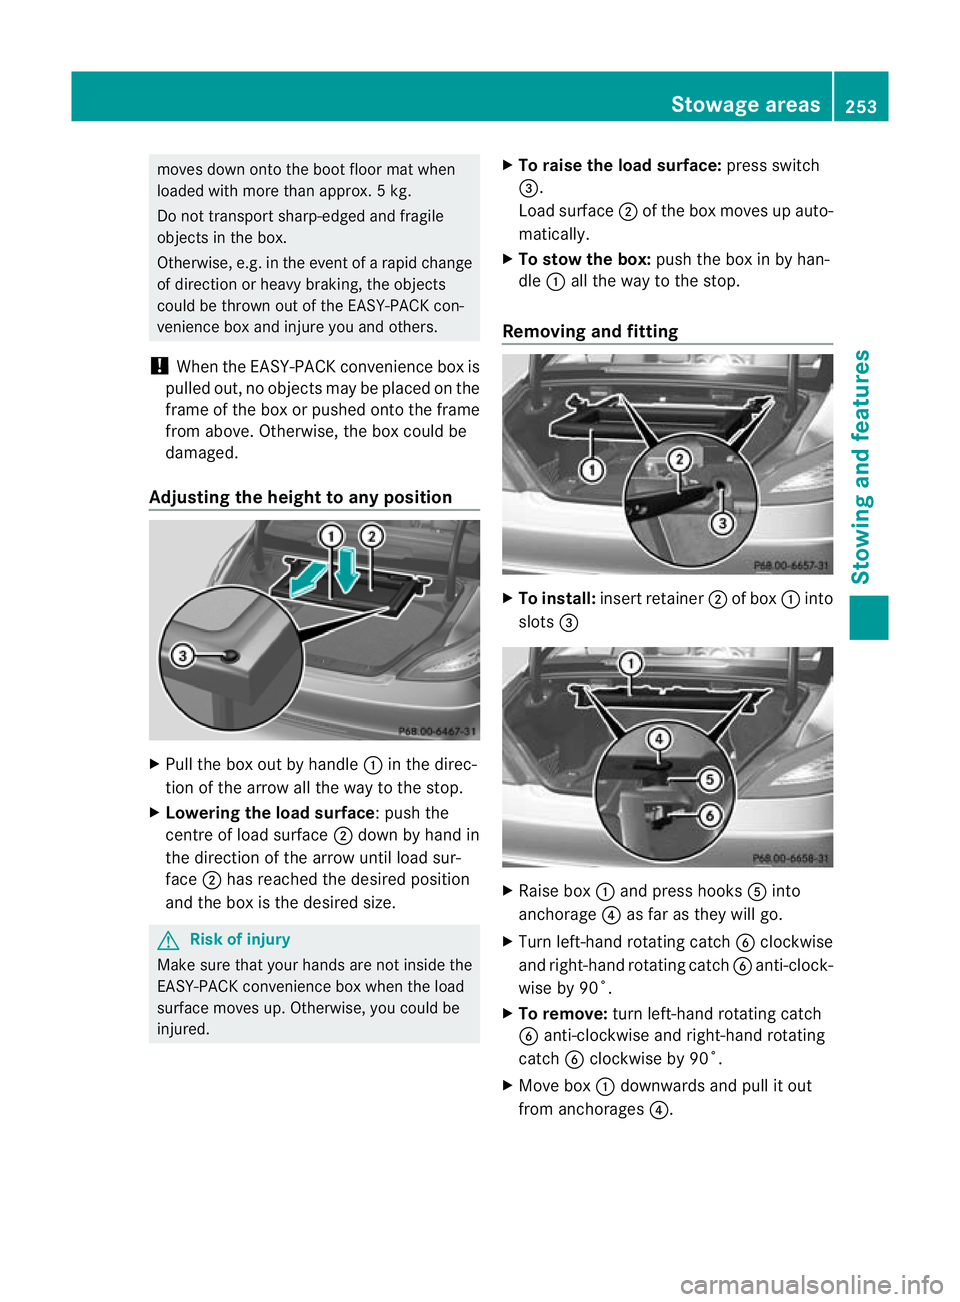
Adjusting the height to any position X
Pull the box out by handle :in the direc-
tion of the arrow all the way to the stop.
X Lowering the load surface:p ush the
centre of load surface ;down by hand in
the direction of the arrow until load sur-
face ;has reached the desired position
and the box is the desired size. G
Risk of injury
Make sure that your hands are no tinside the
EASY-PACK convenience box when the load
surface moves up .Otherwise, you could be
injured. X
To raise the load surface: press switch
=.
Load surface ;of the bo xmoves up auto-
matically.
X To stow the box: push the box in by han-
dle :all the way to the stop.
Removing and fitting X
To install: insert retainer ;of box :into
slots = X
Raise box :and press hooks Ainto
anchorage ?as far as they will go.
X Turn left-hand rotating catch Bclockwise
and right-hand rotating catch Banti-clock-
wise by 90˚.
X To remove: turn left-hand rotating catch
B anti-clockwise and right-hand rotating
catch Bclockwise by 90˚.
X Move box :downwards and pull it out
from anchorages ?. Stowage areas
253Stowing and features Z
Page 257 of 337
i
Store the EASY-PACK boot box on a flat
surface afte rremoval, e.g. on a suitable
shelf. Stowage well under the boot floor
The TIREFIT kit, the vehicle tool kit,e tc. are
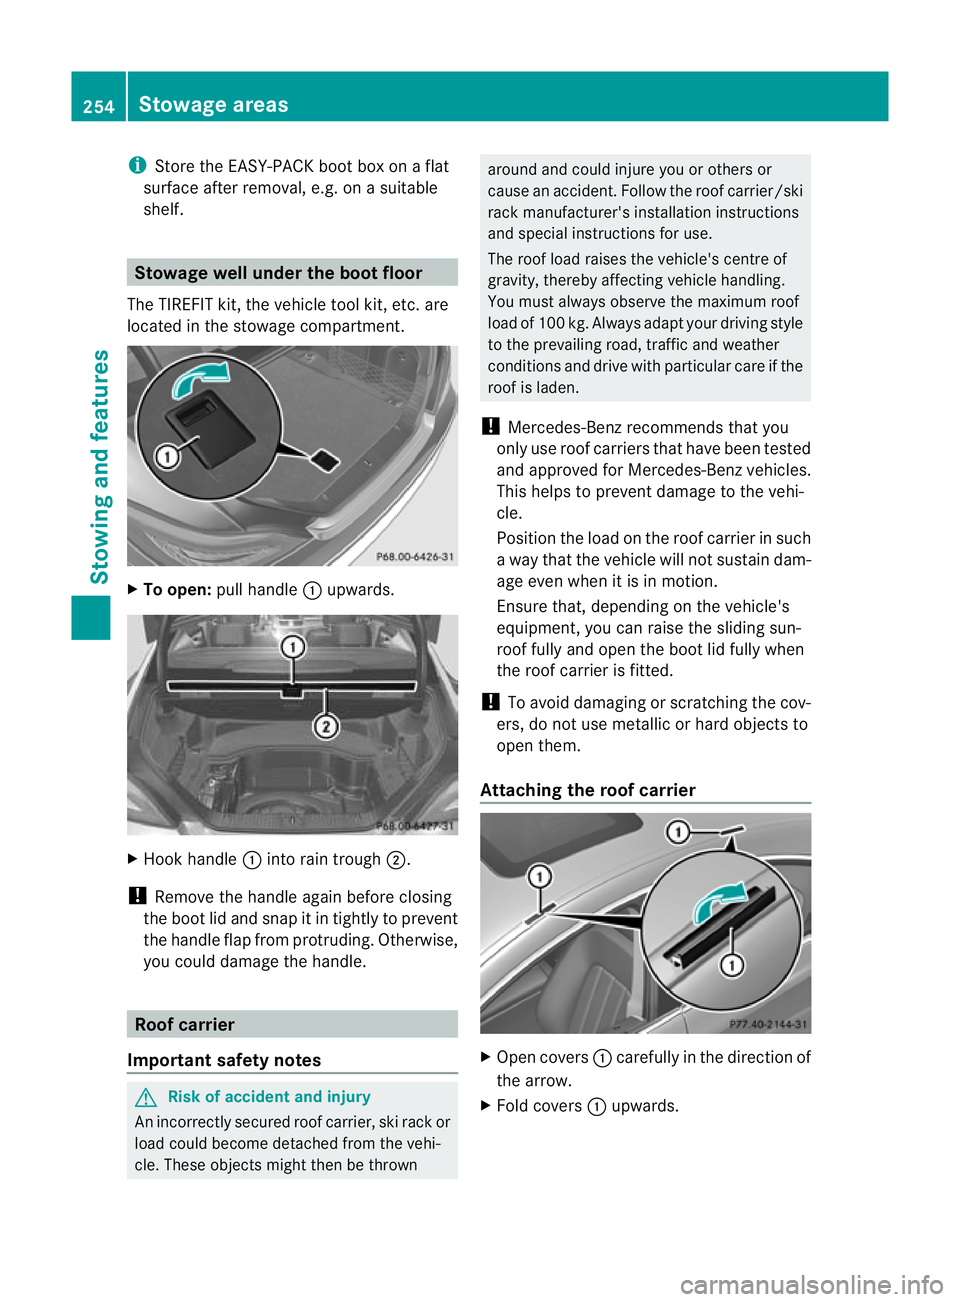
located in the stowage compartment. X
To open: pull handle :upwards. X
Hoo khandle :into rain trough ;.
! Remove the handle again before closing
the boot lid and snap it in tightly to prevent
the handle flap from protruding. Otherwise,
you could damage the handle. Roof carrier
Important safety notes G
Risk of accident and injury
An incorrectly secured roof carrier ,ski rack or
load could become detached from the vehi-
cle .These objects might then be thrown around and could injure you or others or
cause an accident. Follow the roof carrier/ski
rack manufacturer's installation instructions
and special instructions for use.
The roof load raises the vehicle's centre of
gravity, thereby affecting vehicle handling.
You must always observe the maximum roof
load of 100 kg. Always adapt your driving style
to the prevailing road, traffic and weather
conditions and drive with particular care if the
roof is laden.
! Mercedes-Ben zrecommends that you
only use roof carriers that have been tested
and approved for Mercedes-Benzv ehicles.
This helps to preven tdamage to the vehi-
cle.
Positio nthe load on the roof carrier in such
a way that the vehicle will not sustain dam-
age even when it is in motion.
Ensure that, depending on the vehicle's
equipment, you can raise the sliding sun-
roof fully and open the boot lid fully when
the roof carrier is fitted.
! To avoid damaging or scratching the cov-
ers, do not use metallic or hard objects to
open them.
Attaching the roof carrier X
Open covers :carefully in the direction of
the arrow.
X Fold covers :upwards. 254
Stowage areasStowing and features
Page 258 of 337

X
Only secure the roof carrier to the anchor-
age points under covers :.
X Observe the manufacturer's installation
instructions. Features
Cup holder
Points to observe before use G
Risk of injury
Keep the cup holder closed while the vehicle
is in motion. Otherwise, vehicle occupants
could be injured by objects being thrown
around if you:
R brake sharply
R change direction suddenly
R are involved in an accident
Only use the cup holders for containers of a
suitable size and which have lids. Otherwise,
the drinks could spill.
Cup holders should not be used for hot drinks.
Otherwise, you may scald yourself.
Cup holder in the centre console The cup holder can be removed for cleaning.
Cleant he cup holder with clear, lukewarm
water only.
X To open: lightly press the front of
cover ;.
X To remove the insert: slide both sides of
catch :inwards in the direction of the
arrow. X
Remove cup holder insert =upwards.
X To refit the insert: place the insert in the
stowage space.
X Slide catch :outwards in the direction of
the arrow until it engages.
Cup holder in the rear-compartment
centre console The cup holder can be removed for cleaning.
Cleant
he cup holder with clear, lukewarm
water only.
X To open: slide cover :to the front.
X To remove the insert: slide catch;
inwards in the direction of the arrow.
X Remove cup holder insert =upwards.
X To refit the insert: place the insert in the
stowage space.
X Slide catch ;outwards in the direction of
the arrow until it engages.
Cup holder in the rear seat armrest !
Do not sit or lean on the armrest when it
is folded down as you could otherwise dam-
age it.
! Do not fold the armrest up unless the cup
holder is closed. Otherwise, the cup holder
could be damaged. Features
255Stowing and features Z
Page 259 of 337
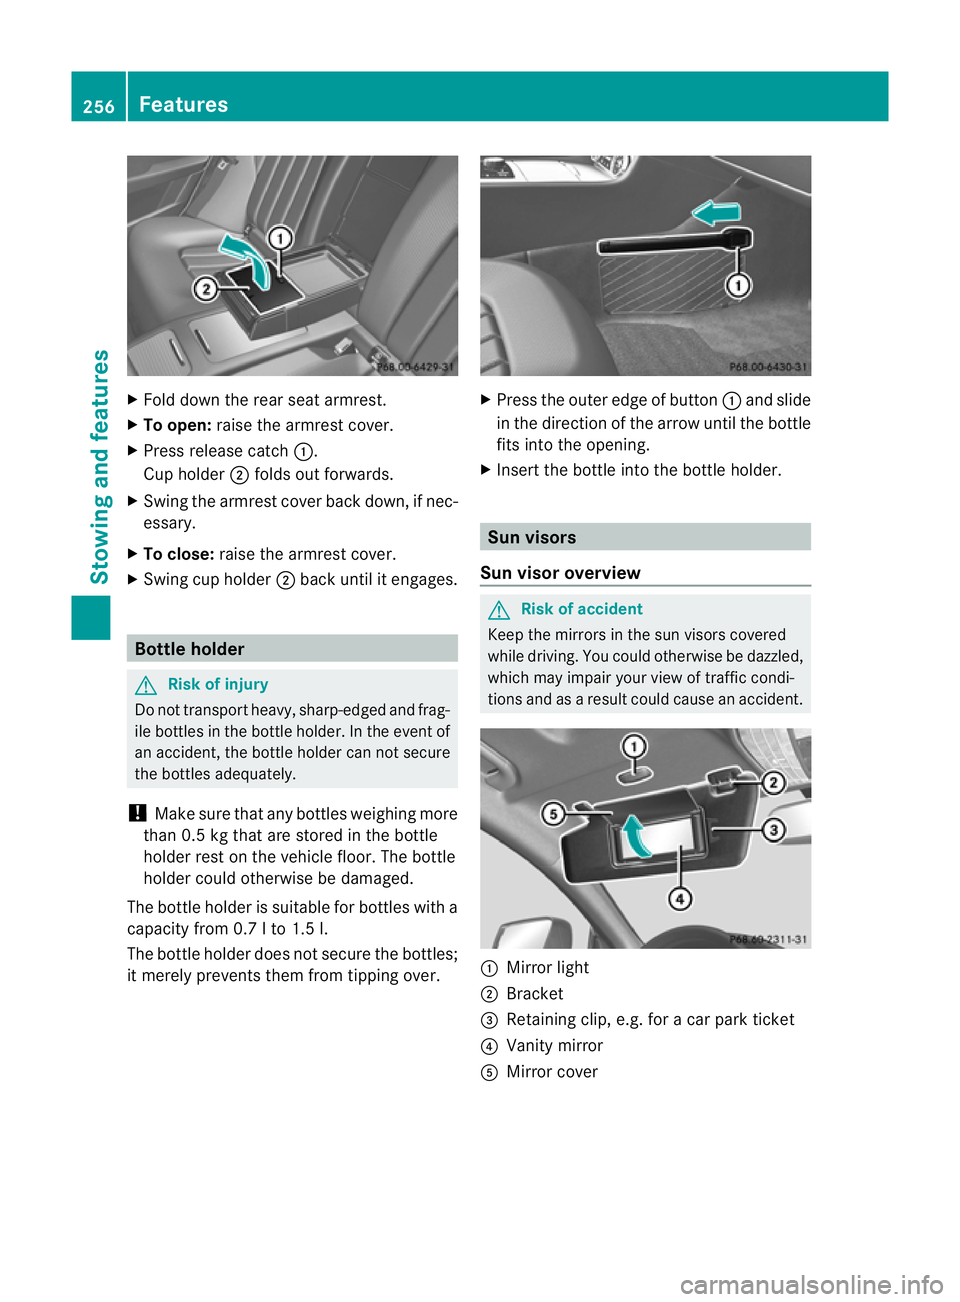
X
Fold dow nthe rear seat armrest.
X To open: raise the armrest cover.
X Press release catch :.
Cup holder ;folds out forwards.
X Swing the armrest cover back down, if nec-
essary.
X To close: raise the armrest cover.
X Swing cup holder ;back until it engages. Bottle holder
G
Risk of injury
Do not transport heavy, sharp-edged and frag-
ile bottles in the bottle holder. In the event of
an accident, the bottle holder can not secure
the bottles adequately.
! Make sure that any bottles weighing more
than 0.5 kg that are stored in the bottle
holder rest on the vehicle floor. The bottle
holder could otherwise be damaged.
The bottle holder is suitable for bottles with a
capacity from 0.7 l to 1.5 l.
The bottle holder does not secure the bottles;
it merely prevents them from tipping over. X
Press the outer edge of button :and slide
in the direction of the arrow until the bottle
fits into the opening.
X Insert the bottle into the bottle holder. Sun visors
Sun visor overview G
Risk of accident
Keep the mirrors in the sun visors covered
while driving. You could otherwise be dazzled,
which may impair your view of traffic condi-
tions and as a result could cause an accident. :
Mirror light
; Bracket
= Retaining clip, e.g. for a car park ticket
? Vanity mirror
A Mirror cover 256
FeaturesStowing and features
Page 260 of 337

Vanity mirror in the sun visor
Mirror light
:only functions if the sun visor
is clipped into retainer ;and mirror cover
A has been folded up.
Glare from the side X
Fold down the su nvisor. X
Pull sun visor :out of retainer ;.
X Swing sun visor :to the side.
X Slide sun visor :in the direction of the
arrow as desired. Rea
rwindow roller sunblind
! Make sure that the roller sunblind can
move freely. Otherwise, the roller sunblind
or other objects could be damaged. X
Turn the key to position 2in the ignition
lock.
X To extend or retract: briefly press but-
ton :.
The roller sunblind fully extends or fully
retracts. Ashtray
Ashtray in the cockpit i
There is a stowage space under the ash-
tray.
! The stowage space under the ashtray is
not heat resistant .Before placing lit ciga-
rettes in the ashtray, make sure that the
ashtray is properly engaged. Otherwise, the
stowage space could be damaged. X
To open: slide cover :forwards until it
engages.
X To remove the insert: hold insert=by
the ribbing at the sides and lift it up and out
in the direction of arrow ;.
X To refit the insert: press insert=into the
holder until it engages.
X To close: press cover :briefly at the
front.
The cover moves back. Features
257Stowing and features Z