low oil pressure MERCEDES-BENZ CLS COUPE 2011 Owners Manual
[x] Cancel search | Manufacturer: MERCEDES-BENZ, Model Year: 2011, Model line: CLS COUPE, Model: MERCEDES-BENZ CLS COUPE 2011Pages: 337, PDF Size: 7.37 MB
Page 7 of 337

1, 2, 3 ...
12 Vsocket ........................................ 258
4ETS see ETS/4ETS A
ABS (Anti-lock Braking System) Display message ............................ 219
Function/notes ................................ 57
Warning lamp ................................. 241
Active Blin dSpot Assist
Activating/deactivating (on-
board computer) ............................ 204
Display message ............................ 229
Function/notes ............................. 186
Active Driving Assistance package .186
Active Lane Keeping Assist Activating/deactivating (on-
board computer) ............................ 205
Display message ............................ 228
Function/informatio n.................... 189
Active multicontour seat ....................88
Active Park Assist Display message ............................ 229
Active Parking Assist
Function/notes ............................. 173
Active Service Syste mPLUS
see ASSYS TPLUS service interval
display
ADAPTIVE BRAKE .................................61
Adaptive brake lamps .........................58
Adaptive Highbeam Assist Activating/deactivating .................100
Adaptive Main-Beam Assist
Display message ............................ 223
Switching on/off (on-board com-
puter) ............................................. 208
Additives
Engine oil ....................................... 321
Airbag
Important safety guidelines .............36
Airbags
Activation ......................................... 35
Front airbag (driver, front
passenger )....................................... 38
Kneebag .......................................... .38Pelvis airbag
.................................... 39
Sidebag ............................................ 38
Windowba g...................................... 39
Airc onditioning
3-zone THERMOTRONIC luxury
automatic air conditioning .............112
Activating/deactivating .................113
Activating/deactivating air-recir-
culation mode ................................ 117
Auxiliary heating/ventilation .......... 119
Controlling automatically ...............114
Cooling with aird ehumidification..114
Demisting the windscreen .............116
Rea rcontrol panel ......................... 113
Setting the aird istribution.............115
Setting the airflow .........................116
Setting the airv ents...................... 124
Setting the temperature ................115
Setting the temperature (rear
compartment) ................................ 115
Switching the residual hea tfunc-
tion on/off ..................................... 118
THERMATIC 2-zone automatic cli-
mate control .................................. 111
Air-conditioning system
see Climate control
Air dehumidification
Activating/deactivating with cool-
ing................................................. 114
Aird istribution
Settin g........................................... 115
Airf ilter (white display message) ....225
Airflow Setting ........................................... 116
AIRF LOW ........................................... 114
AIRMATIC Display message ............................ 226
Function/notes ............................. 167
Suspensio ntunin g......................... 168
Vehicle leve l.................................. 167
Air pressure
see Tyre pressure
Air-recirculation mode
Activating/deactivating .................117
Airv ents ............................................ .124
Glove compartment .......................124
Important safety information .........123
Rea r............................................... 1244
Index
Page 271 of 337

X
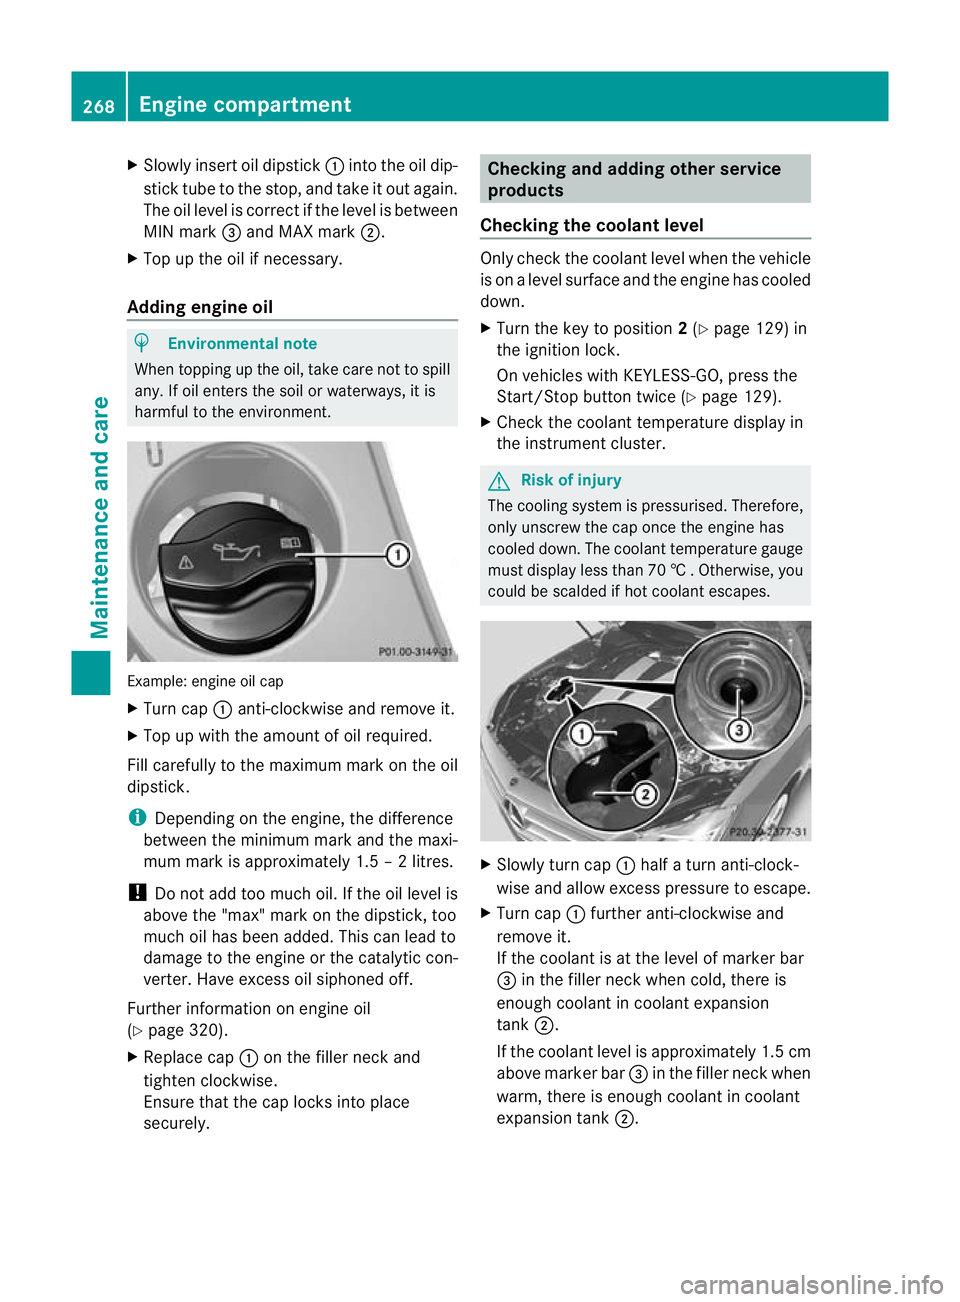
Slowly insert oil dipstick :into the oil dip-
stick tube to the stop ,and take it ou tagain.
The oil level is correc tifthe level is between
MIN mark =and MAX mark ;.
X Top up the oil if necessary.
Adding engine oil H
Environmental note
When topping up the oil, take care not to spill
any. If oil enters the soil or waterways, it is
harmful to the environment. Example: engine oil cap
X
Turn cap :anti-clockwise and remove it.
X Top up with the amount of oil required.
Fill carefully to the maximum mark on the oil
dipstick.
i Depending on the engine, the difference
between the minimum mark and the maxi-
mum mark is approximately 1.5 – 2 litres.
! Do not add too much oil. If the oil level is
above the "max" mark on the dipstick, too
much oil has been added. This can lead to
damage to the engine or the catalytic con-
verter. Have excess oil siphoned off.
Further information on engine oil
(Y page 320).
X Replace cap :on the filler neck and
tighten clockwise.
Ensure that the cap locks into place
securely. Checking and adding other service
products
Checking the coolant level Only check the coolant level when the vehicle
is on a level surface and the engine has cooled
down.
X
Turn the key to position 2(Y page 129) in
the ignition lock.
On vehicles with KEYLESS-GO, press the
Start/Stop button twice (Y page 129).
X Check the coolant temperature display in
the instrument cluster. G
Risk of injury
The cooling system is pressurised. Therefore,
only unscrew the cap once the engine has
cooled down. The coolant temperature gauge
must display less than 70 †.Otherwise, you
could be scalded if hot coolant escapes. X
Slowly tur ncap : half a turn anti-clock-
wise and allow excess pressure to escape.
X Turn cap :further anti-clockwise and
remove it.
If the coolant is at the level of marker bar
= in the fille rneck when cold, there is
enough coolant in coolant expansion
tank ;.
If the coolant level is approximately 1.5 cm
above marker bar =in the filler neckw hen
warm, there is enough coolant in coolant
expansion tank ;.268
Engine compartmentMaintenance and care
Page 275 of 337

High-pressure cleaning equipment
G
Risk of accident
Do not use high-pressure cleaners with circu-
lar-jet nozzles (dirt grinders) to clea nyour
vehicle, in particular the tyres. You could oth-
erwise damage the tyres and cause an acci-
dent.
! Always maintain a distance of at least
30 cm between the vehicle and the high-
pressure cleaner nozzle. Information about
the correc tdistance is available fro mthe
equipment manufacturer.
Move the high-pressure cleaner nozzle
around when cleaning your vehicle.
Do not aim directly at any of the following:
R tyres
R door gaps, roof gaps, joints etc.
R electrical components
R battery
R connectors
R lights
R seals
R trim elements
R ventilation slots
Damaged seals or electrical components
can lead to leaks or failures.
Cleaning the wheels !
Do not use acidic wheel cleaning products
to remove brake dust. This could damage
wheel bolts and brake components.
! Do not park up the vehicle for an extended
period straight after cleaning it, particularly
after having cleaned the wheels with wheel
cleaner. Wheel cleaners could cause
increased corrosion of the brake discs and
brake pads/linings. For this reason, you
should drive for a few minutes after clean-
ing. Braking heats the brake discs and
brake pads, thus drying them. The vehicle
can then be parked up. Cleaning the paintwork Scratches, corrosive deposits, areas affected
by corrosion and damage caused by inade-
quate care cannot always be completely
repaired. In such cases, visit a qualified spe-
cialist workshop, e.g. a Mercedes-Benz
Service Centre.
X Remove impurities immediately, where
possible, whilst avoiding rubbing too hard.
X Soak insect remains with insect remover
and rinse off the treated areas afterwards.
X Soak bird droppings with water and rinse
off the treated areas afterwards.
X Remove coolant, brake fluid, tree resin,
oils, fuels and greases by rubbing gently
with a cloth soaked in petroleum ether or
lighter fluid.
X Use tar remover to remove tar stains.
X Use silicone remover to remove wax.
! Do not affix:
R stickers
R films
R magnetic plates or similar items
to painted surfaces. You could otherwise
damage the paintwork.
Care and treatment of matt paintwork If your vehicle has a clear matt finish, observe
the following instructions in order to avoid
damage to the paintwork due to incorrect
care.
These notes also apply to light alloy wheels
with a clear matt finish.
! Never polish the vehicle or the light alloy
wheels. Polishing makes the paintwork
shiny.
! Never use paint cleaner, buffing or pol-
ishing products, or gloss preserver, e.g.
wax. These products are only suitable for
high-gloss surfaces. Their use on vehicles
with matt finish leads to considerable sur-
face damage (shiny, spotted areas). 272
CareMaintenance and care
Page 313 of 337

if necessary, restart the tyre pressure loss
warning system or the tyre pressure monitor.
! If your vehicle is equipped with the tyre
pressure monitor, there are electronic
components in the wheels.
Fitting tools must not be used in the area
of the valve. Otherwise, the electronic com-
ponents could be damaged.
Always have the tyres replaced at a quali-
fied specialist workshop, e.g. a Mercedes-
Benz Service Centre. Direction of rotation
Tyres with a specified direction of rotation
have additional benefits, e.g. if there is a risk
of aquaplaning. You will only gain these ben-
efits if the correct direction of rotation is
observed.
An arrow on the sidewall of the tyre indicates
its correct direction of rotation.
You may fit an emergency spare wheel/spare
wheel against the direction of rotation.
Observe the time restriction on use as well as
the speed limitation specified on the emer-
gency spare wheel/spare wheel. Storing wheels
Store wheels that are not being used in a cool,
dry and preferably dark place. Protect the
tyres against oil, grease, petrol and diesel. Cleaning the wheels
G
Risk of accident
Do not use high-pressure cleaners with circu-
lar-jet nozzles (dirt grinders) to clean your
vehicle, in particular the tyres. You could oth-
erwise damage the tyres and cause an acci-
dent. Wheel and tyre combinations
Please bear the following in mind
! For safety reasons, Mercedes-Ben zrec-
ommends that you only use tyres and
wheels which have been approved by
Mercedes-Benzs pecifically for your vehi-
cle.
These tyres have been specially adapted
for use with the contro lsystems, such as
ABS or ESP ®
, and are marked as follows:
R MO =Mercedes-BenzO riginal
R MOE =Mercedes-BenzO riginal Extended
(tyres with run-flat characteristics)
R MO1 =Mercedes-BenzO riginal (only cer-
tain AMG tyres)
Mercedes-Benz Original Extended tyres
may only be used on wheels that have been
specifically approved by Mercedes-Benz.
Only use tyres, wheels or accessories tes-
ted and approved by Mercedes-Benz. Cer-
tain characteristics, e.g. handling, vehicle
noise emissions or fuel consumption, may
otherwise be adversely affected. In addi-
tion, when driving with aload, tyre dimen-
sion variations could cause the tyres to
come into contact with the bodywork and
axle components.T his could result in dam-
age to the tyres or the vehicle.
Mercedes-Ben zaccepts no liability for
damage resulting from the use of tyres,
wheels or accessories othe rthan those tes-
ted and approved.
Further information about tyres, wheels
and approved combinations can be
obtained from any Mercedes-Benz Service
Centre.
! Retreaded tyres are neither tested nor
recommended by Mercedes-Benz, since
previous damage cannot always be detec-
ted on retreaded tyres. As a result,
Mercedes-Ben zcannot guarantee vehicle
safety if retreaded tyres are fitted. Do not
fit used tyres if you have no information
about their previous usage. 310
Wheel and tyre combinationsWheels and tyres