ECU MERCEDES-BENZ CLS COUPE 2012 Owners Manual
[x] Cancel search | Manufacturer: MERCEDES-BENZ, Model Year: 2012, Model line: CLS COUPE, Model: MERCEDES-BENZ CLS COUPE 2012Pages: 373, PDF Size: 9.12 MB
Page 14 of 373
First-aid kit
........................................ .310
Fitting awheel
Removing awheel .......................... 339
Fitting wheels
Fitting awheel ............................... 340
Lowering the vehicle ......................340
Raising the vehicle .........................338
Securing the vehicle against roll-
ing away ........................................ 337
Flat tyre
MOExtended tyres .........................313
Preparing the vehicle .....................312
TIREFIT kit ...................................... 313
Floormat ............................................ .292
Foglamps (extende drange) .............. 116
Frequencies Garage door opener .......................289
Mobile phone ................................. 357
Two-way radio ................................ 357
Fuel
Additives ........................................ 361
Consumption information ..............363
Consumption statistics ..................213
Displaying the current consump-
tion ................................................ 213
Displaying the range ......................213
Fuel gauge ............................... 30, 209
Grade (petrol) ................................ 360
Important safety notes ..................360
Notes for AMG vehicles .................361
Problem (malfunction) ...................158
Quality (diesel )............................... 362
Refuelling ...................................... .156
Tank content/reserve fuel .............360
Fue lfiller flap
Emergency release ........................157
Opening/closing ............................ 157
Fue lfilte r(whit edispla ymessage) .243
Fue llevel
Calling up the range (on-board
computer) ...................................... 213
Gauge ...................................... 30, 209
Fue lreserve
see Fuel
Fue ltank
Capacity ........................................ 360
Problem (malfunction) ...................158Fuse allocatio
nchart (vehicle tool
kit) ...................................................... 311
Fuses Allocation chart ............................. 324
Before changing ............................. 324
Fuse box in the boot ......................325
Fuse box in the engine compart-
ment .............................................. 324
Important safety notes ..................324 G
Garage door opener Clearing the memory .....................289
Frequencies ................................... 289
Important safety notes ..................287
Opening/closing the garage door ..288
Programming (button in the rear-
view mirror) ................................... 287
Gear indicator (on-board com-
puter) ................................................. .228
Gearshift program SETUP (on-board computer) ..........228
Genuine Mercedes-Benz parts .........356
Glove compartment ..........................273 H
Handbrake see Parking brake
Hazard warning lamps ......................114
Headbag Display message ............................ 237
Headlamp
Cleaning system (function) ............114
Cleaning system (notes) ................366
Headlamps
Misting up ...................................... 117
Topping up the cleaning system ....299
see Automatic headlamp mode
Head restraints
Adjusting ......................................... 98
Adjusting (electrically). ....................99
Adjusting (manually). .......................98
Adjusting (rear) ................................ 99
Fitting/removing (rear) ....................99
Luxury .............................................. 99 Index
11
Page 15 of 373
Heating
see Climate control
High-pressure cleaners ....................302
Hill start assist .................................. 144
HOLD function Display message ............................ 245
Function/notes ............................. 179I
Ignitio nlock
see Key positions
Immobiliser .......................................... 70
In-car hotspot see Separate operating instructions
Indicator and warning lamps
Coolant .......................................... 267
DISTRONI CPLUS ........................... 269
Engine diagnostics .........................266
Fuel tank ........................................ 267
SPORT handling mode ...................264
Indicator lamps
Display message ............................ 238
see Warning and indicator lamps
Insectp rotection on the radiator ....297
Inspection see ASSYST PLUS
Instrument cluster
Overview .................................. 30, 209
Settings ......................................... 221
Warning and indicator
lamps ...................................... .32, 258
Instrument cluster lighting ..............222
Intelligen tLight System
Activating/deactivatin g................. 222
Display message ............................ 239
Overview ........................................ 115
Setting the dipped-bea mhead-
lamps for driving on the right/left .223
Interior lighting ................................. 118
Automatic control system ..............118
Delayeds witch-off (on-board
computer) ...................................... 224
Emergency lighting ........................119
Manual control ............................... 119
Overview ........................................ 118
Reading lamp ................................. 118Setting brightness for display/
switches (on-board computer)
.......222
Setting the ambient lighting
brightness (on-board computer) ....223
Setting the ambient lighting col-
our (on-board computer) ................ 223
Interior motio nsensor ........................ 72
ISOFIXc hild seat securing system ....56 J
Jack Storage location ............................ 311
Using ............................................. 338
Jump start (engine)
see Jump starting (engine)
Jump starting (engine) ......................319 K
Key Changing the battery .......................79
Checking the battery .......................79
Convenience closing feature ............89
Convenience opening feature ..........89
Display message ............................ 256
Door central locking/unlocking .......77
Emergency key element ................... 78
Important safety notes ....................76
Loss ................................................. 81
Modifying the programming .............78
Positions (ignition lock) .................141
Problem (malfunction) .....................81
Starting the engine ........................143
KEYLESS-GO
Convenience closing ........................89
Display message ............................ 257
Locking ............................................ 77
Start/Stop button .......................... 141
Starting the engine ........................143
Unlocking ......................................... 77
Keyp ositions
Key ................................................ 141
KEYLESS GO .................................. 141
Kickdown
Driving tips .................................... 151
Manual drive program ....................154
Kneebag ............................................... 4412
Index
Page 22 of 373
Type identificatio
nplate
see Vehicl eide ntificatio nplate
Tyr epressure
Calling up (on-board computer )..... 334
Display message ............................ 250
Not reached (TIREFIT) ....................315
Reached (TIREFIT) ..........................315
Recommended ............................... 331
Tyre pressure los swarning
Important safety notes ..................332
Restarting ...................................... 333
Tyre pressure monitor
Checking the tyre pressure elec-
tronically ........................................ 334
Function/notes ............................. 334
Restarting ...................................... 335
Warning lamp ................................. 270
Warning message .......................... 335
Tyres
Changing awheel .......................... 336
Checking ........................................ 329
Directio nofrotation ...................... 336
Display message ............................ 250
Important safety notes ..................328
MOExtended tyres .........................330
Replacing ....................................... 336
Service life ..................................... 329
Storing ........................................... 337
Tyr esize (data) .............................. 341
Tyr etread ...................................... 329
see Flat tyre U
Unladen weight ................................. 366
Unlocking Emergency unlocking .......................84
From insid ethe vehicle (central
unlocking button) ............................. 83 V
Vanity mirror (in sun visor) ..............281
Variable SPEEDTRONIC see SPEEDTRONIC
Vehicle
Correct use ...................................... 24
Data acquisition ............................... 24Display message
............................ 254
Electronics ..................................... 357
Equipment ....................................... 22
Implied warranty .............................. 24
Individua lsettings .......................... 221
Leaving parked up .........................161
Locking (in an emergency) ...............84
Locking (key )................................... 77
Lowering ........................................ 340
Pulling away ................................... 143
Raising ........................................... 338
Registration ..................................... 24
Securing from rolling away ............337
Towing away .................................. 320
Transporting .................................. 323
Unlocking (in an emergency) ...........84
Unlocking (key )................................ 77
Vehicle data ................................... 366
Vehicle data ....................................... 366
Vehicle dimensions ...........................366
Vehicle emergency locking ................84
Vehicle identification number see VIN
Vehicle identification plate ..............359
Vehicle level AIRMATIC ...................................... 181
AMG RIDE CONTROL sports sus-
pension .......................................... 183
Vehicle level (display message) .......243
Vehicle tool kit .................................. 311
Vehicle weights ................................. 366
Video Operating the DVD ......................... 216
VIN ...................................................... 359 W
Warning and indicator lamps ABS ................................................ 261
Brakes ........................................... 260
Distance warning signa l................. 269
ESP ®
.............................................. 263
ESP ®
OFF ....................................... 264
LIM (cruise control) ........................ 165
LIM (DISTRONIC PLUS) ..................172
LIM (variable SPEEDTRONIC )......... 168
Overview .................................. 32, 258
PASSENGER AIRBAG OFF ................54 Index
19
Page 45 of 373
If there is an even higherr
ate of vehicle decel-
eration or acceleratio ninalongitudinal direc-
tion ,the front airbags are also deployed.
Your vehicle has adaptive, two-stage front air-
bags. The airbag control unit evaluate svehi-
cle deceleration or acceleration in the event
of ac ollision. In the firs tdeployment stage,
the fron tairbag is filled with enough propel-
lant gas to reduc ethe risk of injuries. The
front airbag is fully deployed if asecond
deploymen tthreshold is reached within afew
milliseconds.
The belt tensioner and airbag triggering
thresholds are variable and are adapted to the
rate of deceleration or acceleration of the
vehicle. This process is pre-emptive in nature.
The triggering process must take place in
good time at the start of the collision.
The rate of vehicle deceleration or accelera-
tion and the direction of the force are essen-
tially determined by:
R the distribution of forces during the colli-
sion
R the collision angle
R the deformation characteristics of the vehi-
cle
R the characteristics of the object with which
the vehicle has collided
Factors which can only be seen and measured
after acollision has occurred do not play a
decisive role in the deployment of an airbag,
nor do they provide an indication of airbag
deployment.
The vehicle may be deformed significantly,
e.g. the bonnet or the wing, without an airbag
being deployed. This is the case if only parts
which are relatively easily deformed are affec-
ted and the rate of deceleration is not high.
Conversely, airbags may be deployed even
though the vehicle suffers only minor defor-
mation. This is the case if, for example, very
rigid vehicle parts such as longitudinal body
members are hit, and sufficient deceleration
occurs as aresult. i
The front belt tensioners can only be trig-
gered if the seat belt tongues on the front
seats are correctly engaged in the seat belt
buckles.
i Not all airbags are deployed in an acci-
dent. The different airbag systems work
independently of each other.
How the airbag system works is deter-
mined by the severity of the accident detec-
ted, especiallyt he vehicle deceleration or
acceleration, and the apparent type of acci-
dent:
R head-on collision
R side impact
R overturn Airbags
Important safety notes G
WARNING
Airbags provide additional protection; they
are not, however, asubstitute for seat belts.
Observe the following notes to reduce the risk
of serious or even fatal injury caused by airbag
deployment:
R all vehicle occupants –inparticular ,preg-
nan twome n–m ust wear their seat belt
correctly at all times and lean back against
th eb ackrest, whic hshoul dbep ositioned
as close to th evertical as possible. The
head restraint must support th eback of the
head at about eye level.
R always secure childre nless than
1.50mt all or unde r12years of age in suit-
able child restraint systems.
R all vehicle occupant smust select aseat
position that is as far away from the airbag
as possible. The driver's seat position must
allow the vehicle to be driven safely. The
driver's chest should be as far away from
the centre of the driver's airbag cover as
possible. 42
Occupant safetySafety
Page 46 of 373
R
move the front-passenger seat as far back
as possible. This is especiallyi mportant if
you have secure dachild in achild restraint
system on the front-passenger seat.
R vehicl eoccupants –inparticular ,children
–m ust no tlean their heads into the area of
the window in which the sidebag/window-
bag is deployed.
R rearward-facing child restraint systems
must not be fitted to the front-passenger
seat unless the front-passenger airbag has
been disabled. On the front-passenger
seat, the front-passenger airbag is disabled
if ac hild restraint system with atrans-
ponder for automatic child seat recognition
is fitted to the front-passenger seat in a
vehicle equipped with automatic child seat
recognition. The 4PASSENGER AIRBAG
OFF indicator lamp must be continuously
lit.
If the front-passenger seat of your vehicle
does not have automatic child seat recog-
nition ,oryour rearward-facing child
restraint system does not have atrans-
ponder for automatic child seat recogni-
tion ,children must be secured in achild
restraint system on asuitable seat in the
rear. If you secure aforward-facing child
restraint system to the front-passenger
seat, you must move the front-passenger
seat as far back as possible.
R make sure there are no heavy or sharp-
edged objects in the pockets of clothing.
R do not lean forwards, e.g. over the cover of
the driver's/front-passenger fron tairbag,
particularly when the vehicle is in motion.
R do not put your feet on the dashboard.
R only hold the steerin gwheel on the outside.
This allows the airbag to be fully deployed.
You could be injured if the airbag is
deployed and you are holding the inside of
the steerin gwheel.
R do not lean on the doors from inside the
vehicle. R
make sure that there are no people, ani-
mals or objects between the vehicle occu-
pants and the area where the airbags are
deployed.
R do not place any objects between the seat
backrest and the door.
R do not hang any hard objects, e.g. coat
hangers, on the grab handles or coat hooks.
R do not attac haccessories, e.g. cup holders,
to the doors.
It is not possible to rule out arisk of injury
being caused by an airbag, due to the high
speed at which the airbag must be deployed. G
WARNING
Airbag functionality can only be assured if the
following parts are not covered and no badges
or stickers are attached to them:
R padded steerin gwheel boss
R kneebag cover below the steerin gcolumn
R front-passenger airbag cover
R outer side of fron tseat bolsters
R side trim nexttot he rear seat backrest
R roof frame cover between the fron tA-pillar
and the C-pilla rinthe rea rcompartment G
WARNING
Whe nana irbag deploys, asmall amount of
powder is released .The powder may cause
short-term breathing difficulties to persons
suffering from asthma or other pulmonary
conditions.
In order to prevent potential breathing diffi-
culties, you should leave the vehicle as soon
as it is safe to do so. You can also open the
window to allow fresh air to enter the vehicle
interior. The powder does not constitute a
health hazard and does not indicate that there
is af ire in the vehicle. G
WARNING
The airbag parts are hot after the airbag has
been deployed. Do not touch them as you
could burn yourself. Occupant safety
43Safety
Z
Page 50 of 373
tai
ns everity, the NECK-PRO head restraints/
NECK-PRO luxury head restraint sonthe driv-
er's and front-passenger seats are moved for-
wards and upwards. This provides better
head support.
If the NECK-PRO head restraints/NECK-PRO
luxury head restraint shave been triggered in
an accident, reset the NECK-PRO head
restraints/NECK-PRO luxury head restraints
on the driver's and front-passenger seats
(Y page 47). Otherwise, the additional pro-
tection will not be available in the event of
another rear-en dcollision. NECK-PRO head
restraints/NECK-PRO luxury head restraints
that have been triggered are moved forwards
and can no longer be adjusted.
Mercedes-Benz recommends having the
NECK-PRO head restraints/NECK-PRO head
restraint schecked at aqualified specialist
worksho pafter arear-en dcollision.
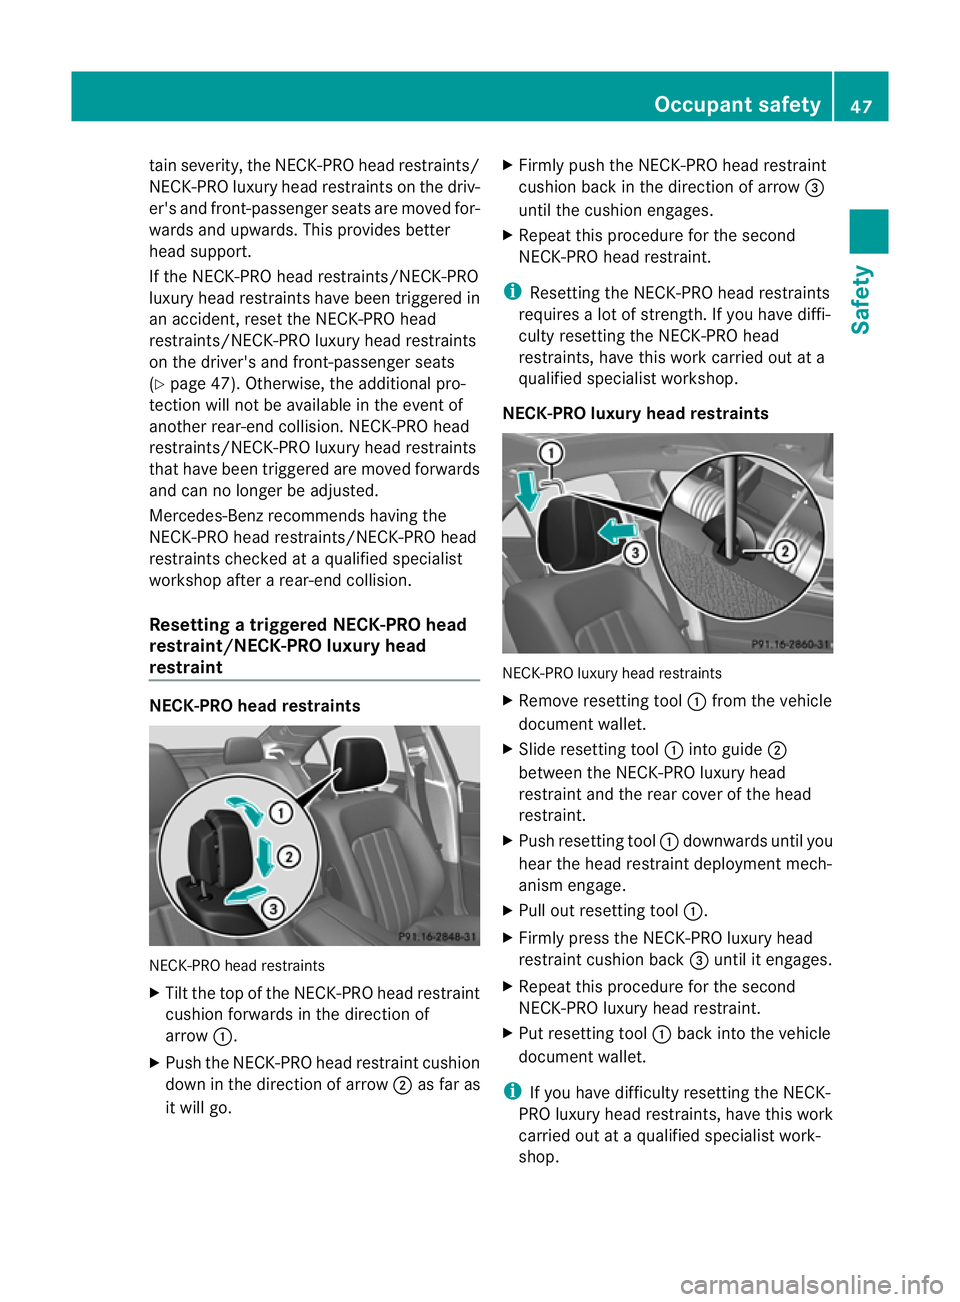
Resetting atriggered NECK-PRO head
restraint/NECK-PRO luxury head
restraint NECK-PRO head restraints
NECK-PRO head restraints
X
Tilt the top of the NECK-PRO head restraint
cushion forwards in the directio nof
arrow :.
X Push th eNECK-PRO head restraint cushion
down in th edirection of arrow ;as far as
it will go. X
Firmly push th eNECK-PRO head restraint
cushion back in th edirection of arrow =
until th ecushion engages.
X Repeat this procedure for th esecond
NECK-PRO head restraint.
i Resettin gthe NECK-PRO head restraints
requires alot of strength. If you have diffi-
cult yresettin gthe NECK-PRO head
restraints, have this work carried out at a
qualified specialist workshop.
NECK-PR Oluxur yheadr estraints NECK-PRO luxur
yhead restraints
X Remove resettin gtool :from th evehicle
documen twallet.
X Slid eresettin gtool :intog uide ;
between th eNECK-PRO luxur yhead
restraint and th erear cover of th ehead
restraint.
X Push resettin gtool :downwards until you
hear th ehead restraint deploymen tmech-
anism engage.
X Pull out resettingt ool:.
X Firmly press the NECK-PRO luxury head
restraint cushion back =until it engages.
X Repeat this procedure for the second
NECK-PRO luxury head restraint.
X Put resettingt ool:back intot he vehicle
documen twallet.
i If you have difficult yresettin gthe NECK-
PRO luxur yhead restraints, have this work
carried out at aqualified specialist work-
shop. Occupant safety
47Safety Z
Page 52 of 373
during an acciden
tand yo uoro thervehicle
occupant scould be injured.
R Only one person should use each seat belt
at any one time. Children must never travel
sitting on the lap of another occupant .The
child will not be secured in the event of an
accident, heavy braking or sudden change
of direction. This may result in the child or
other occupant sbeing seriously or fatally
injured.
R Person sunder 1.50m tallcanno twear the
seat belt scorrectly. For this reason secure
person sless than 1.50 mtall in specially
designed ,suitable restraint systems.
R Children unde r1.50 mtall and younger
than twelve years of age canno twear the
seat belts correctly. For this reason secure
them in special suitable child restraint sys-
tems installed on asuitable seat. Additional
information can be found in the Operating
Instructions in the chapter "Safety", "Chil-
dren in the Vehicle". Observe the installa-
tion instructions of the child restraint sys-
tem manufacturer.
R Do not secure an objec twith aseat belt if
the seat belt is also being used by one of
the vehicle's occupants. G
WARNING
The seat belt does not offer the intended level
of protection unless the backrest is almost
vertical. Under certain circumstances, this
could cause severe or even fatal injuries in the
event of an accident.
Befor estarting ajourney, make sure that the
seat is properly adjusted and that the back-
rest is almost vertical. G
WARNING
Ad irtyord amaged seat belt or one that has
been modified or subjected to aload in an
accident no longer offers the intended level of
protection. Under certain circumstances, this
could cause sever eoreven fatal injuries in the
even tofana ccident. For this reason
,chec kregularly that the seat
belts are not damaged or dirty.
Always have damaged seat belts or seat belts
that have been subjected to aload in an acci-
dent replaced at aqualified specialist work-
shop.
For safety reasons, Mercedes-Benz recom-
mends that you only use seat belts which have
been approved by Mercedes-Benz for your
vehicle.
Seat belts are the most effective means of
restraining the movemen tofvehicle occu-
pants in the event of an accident. This
reduces the risk of vehicle occupant scoming
into contact with parts of the vehicle interior.
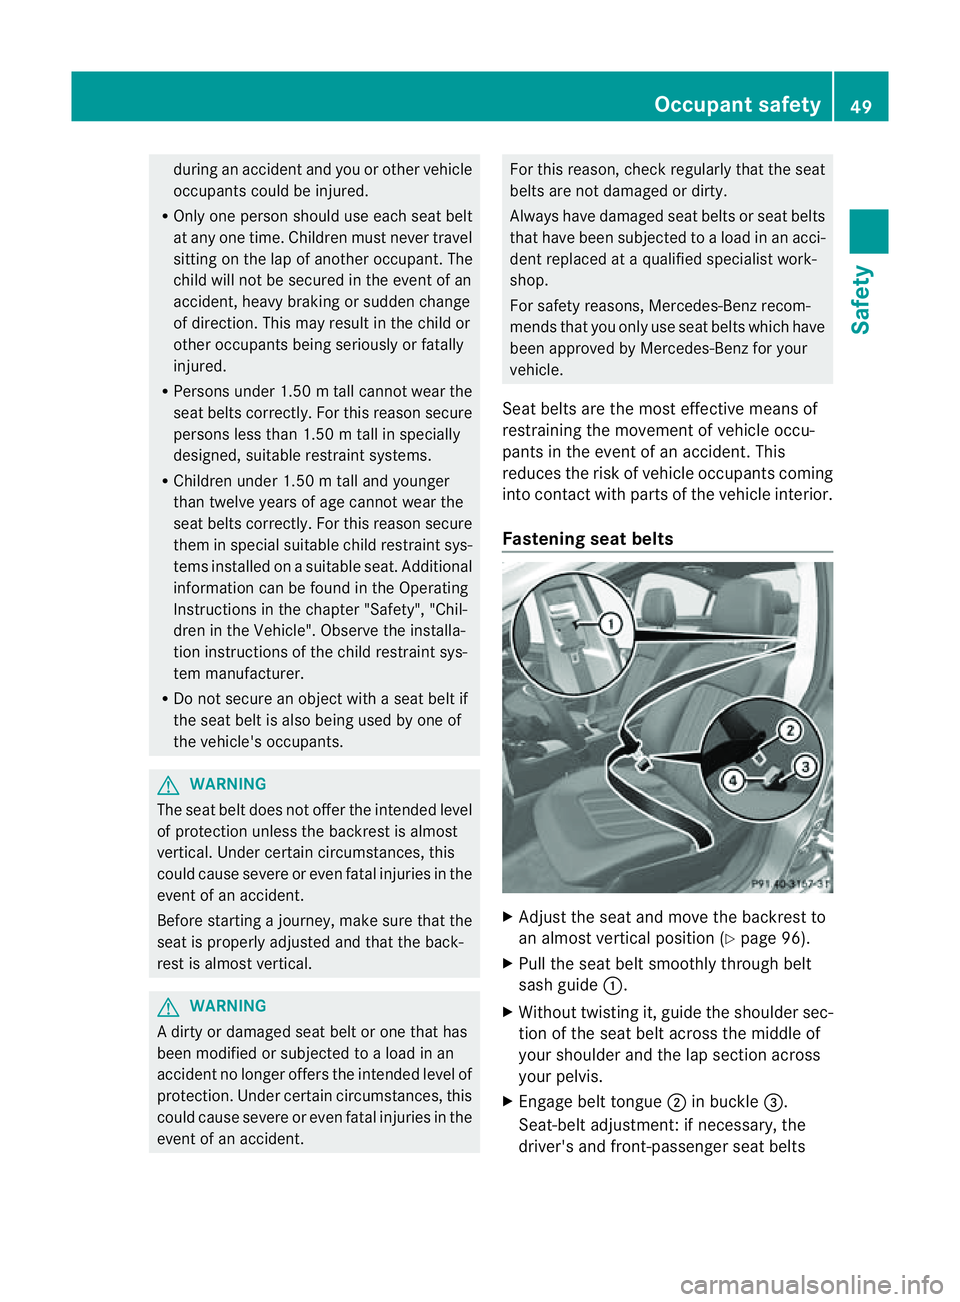
Fastening seat belts X
Adjust the seat and move the backrest to
an almost vertical position (Y page 96).
X Pull the seat belt smoothly through belt
sash guide :.
X Without twistin git, guide the shoulder sec-
tion of the seat belt across the middle of
your shoulder and the lap section across
your pelvis.
X Engage belt tongue ;in buckle =.
Seat-belt adjustment:ifn ecessary, the
driver's and front-passenger seat belts Occupant safety
49Safety Z
Page 54 of 373
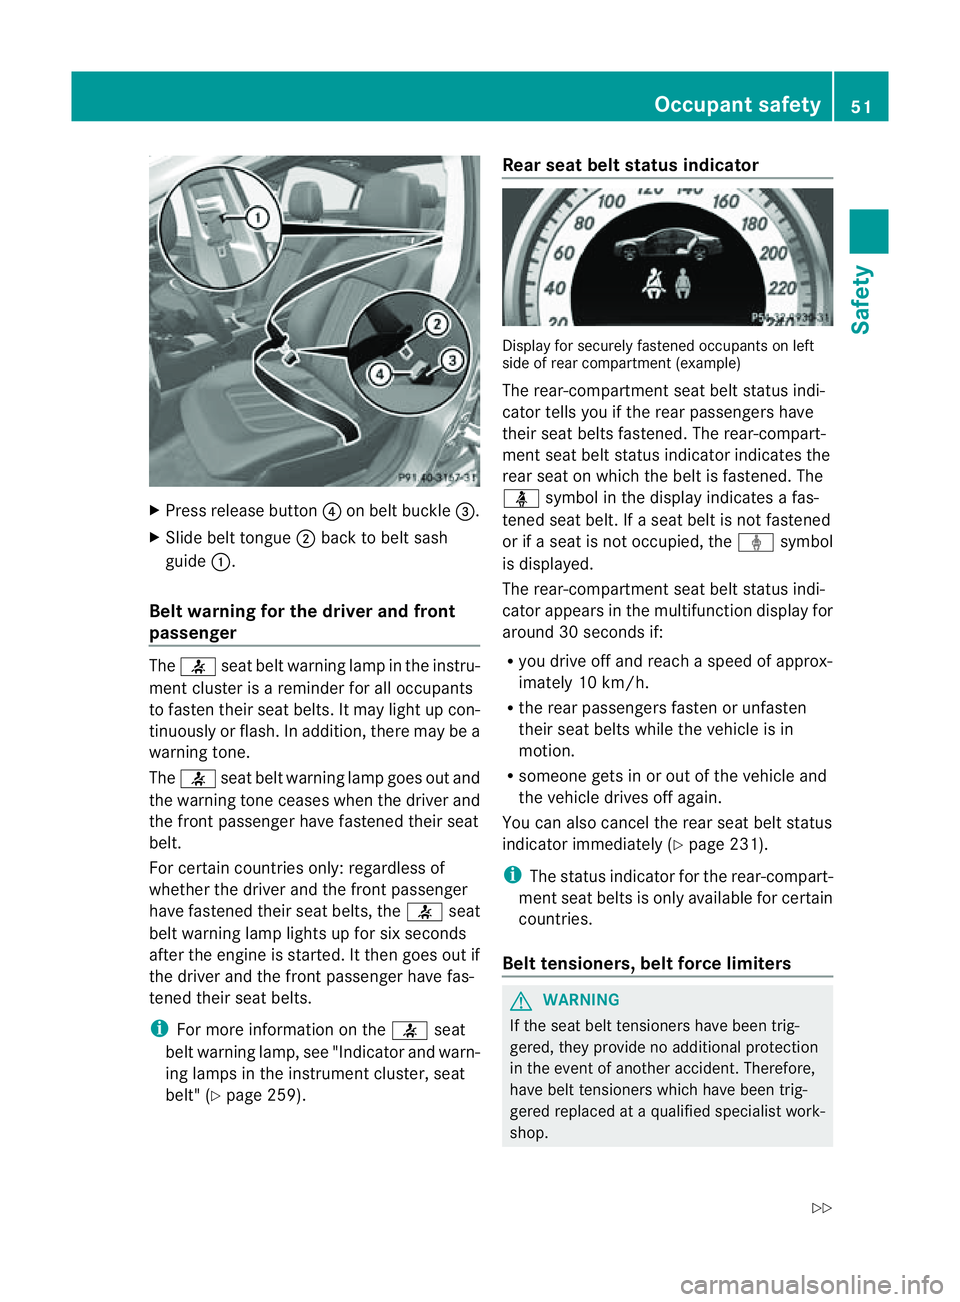
X
Press release button ?on belt buckle =.
X Slide belt tongue ;back to belt sash
guide :.
Belt warning for the driver and front
passenger The
7 seat belt warning lamp in the instru-
ment cluster is areminder for all occupants
to fasten their seat belts. It may light up con-
tinuously or flash. In addition, there may be a
warning tone.
The 7 seat belt warning lamp goes out and
the warning tonec eases when the driver and
the frontp assenger have fastened their seat
belt.
For certain countries only: regardless of
whether th edriver and th efront passenger
have fastened their seat belts, the 7seat
beltw arning lamp light supfor six seconds
after th eengineiss tarted. It then goes out if
th ed river and th efront pa ssenger have fas-
tene dtheir seat belts.
i For mor einformatio nonthe7 seat
belt warning lamp, see "Indicato rand warn-
ing lamps in the instrument cluster ,seat
belt" (Y page 259). Rea
rseatb elts tatus indicator Display for securel
yfastene doccupants on left
side of rea rcompartmen t(example)
The rear-compartment seat belt status indi-
cator tells you if the rear passengers have
their seat belts fastened. The rear-compart-
ment seat belt status indicato rindicate sthe
rea rseat on which the belt is fastened. The
ü symbol in the display indicates afas-
tened seat belt. If aseat belt is not fastened
or if aseat is not occupied, the ýsymbol
is displayed.
The rear-compartment seat belt status indi-
cator appears in the multifunction display for
around 30 seconds if:
R you drive off and reach aspeed of approx-
imately 10 km/h.
R the rear passengers fasten or unfasten
their seat belts while the vehicle is in
motion.
R someon egets in or out of the vehicle and
the vehicle drives off again.
You can also cancel the rear seat belt status
indicator immediately (Y page 231).
i The status indicator for the rear-compart-
ment seat belts is only available for certain
countries.
Belt tensioners, belt force limiters G
WARNING
If the seat belt tensioners have been trig-
gered, they provide no additional protection
in the event of another accident. Therefore,
have belt tensioners which have been trig-
gered replaced at aqualified specialist work-
shop. Occupant safety
51Safety
Z
Page 55 of 373
Comply wit
hsafety regulation swhen dispos-
ing of belt tensioners. Any Mercedes-Benz
Service Centre can provide details of these
regulations.
! If the front-passenger seat is not occu-
pied, do not engage the seat belt tongue in
the buckle on the front-passenger seat.
Otherwise, the belt tensioner could be trig-
gered in the event of an accident.
The seat belts are fitted with belt tensioners.
The belt tensioners tighten the seat belts in
an accident, pulling them close against the
body.
Belt tensioners do not correct incorrects eat
positions or incorrectly fastened seat belts.
Belt tensioners do not pull vehicle occupants
back towards the backrest.
If the seat belt is also fitted with abelt force
limiter and this is triggered, the force exerted
by the seat belt on the vehicle occupant is
reduced.
The belt force limiters for the front seats are
synchronised with the front airbags, which
take on apart of the deceleration force. This
results in the force exerted on the occupant
being distributed over agreater area.
The belt tensioners can only be activated
when:
R the ignition is switched on.
R the restraint systems are operational; see
"SRS warning lamp" (Y page 41).
R the belt tongue is engaged in the buckle on
each of the three-point seat belts in front.
R
The belt tensioners on the seats in the rear
compartmenta re triggeredindependently of
the lock status of the seat belts.
The beltt ensioners are triggered depending
on the type and severit yofanaccident:
R if, in the event of ahead-on or rear-en dcol-
lision the vehicle decelerates or acceler- ates rapidly in
alongitudinal direction dur-
ing the initial stages of the impact
R if, in the event of aside impact, on the side
opposite the impact the vehicle deceler-
ates or accelerates rapidly in alateral direc-
tion
R in certain situation swhere the vehicle over-
turn sand the system determines that it can
provide additional protection
If the airbags are deployed, you will hear a
bang, and asmall amount of powder may also
be released. Only in rare cases will the bang
affect your hearing. The powder that is
released generally does not constitute a
health hazard. The 6SRS warning lamp
lights up. Children in the vehicle
Child restraint systems
Important safet ynotes G
WARNING
To reduce the risk of serious or even fatal
injur ytot he child in the event of asudden
change in direction, brakin goranaccident:
R children less than 1.5 0mtall and under
twelve years of age must alway sbesecured
in special child restraint systems on asuit-
able vehicle seat. This is necessary
because the seat belts are not designed for
children.
R Do not drive with achild secured in arear-
ward-facin gchild restraint system on the
front-passenger seat. Exception: if the vehi-
cle is equipped with automatic child seat
recognition on the front-passenger seat
and the child is secured in achild restraint
system with transponder sfor automatic
child seat recognition
R if you secure aforward-facing child
restraint system to the front-passenger 52
Children in thev
ehicleSafety
Page 56 of 373
seat, you must move the front-passenger
seat as far back as possible.
R children must never travel sitting on the lap
of another occupant. Due to the forces
which occur in the event of asudden
change of direction, heavy braking or an
accident, it wouldn ot be possible to
restrain the child. The child could be thrown
against parts of the vehicle interior and be
seriously or even fatally injured. G
WARNING
The child restraint system cannot perform its
protective function if it is not correctly fitted
to as uitable vehicle seat. The child cannot be
restrained in the event of an accident, heavy
braking or sudden changes of direction. The
child could be seriously or even fatally injured.
For this reason, when fitting achild restraint
system, observe the manufacturer's installa-
tion instructions and the correct use of the
child restraint system.
Child restraint systems should be fitted to the
rear seats. Children are generally better pro-
tected there.
The entire base of the child restraint system
must always rest on the seat cushion. There-
fore, never place objects, e.g. acushion,
under the child restraint system.
Only use child restraint systems with the orig-
inal cover designed for them. Only replace
damaged covers with genuine Mercedes-Benz
covers.
We recommend the use of child restraint sys-
tems which have been approved for
Mercedes-Benz vehicles. G
WARNING
Do not leave children unsupervised in the
vehicle, even if they are secured in achild
restraint system. They could injure them-
selves on parts of the vehicle. They could also
be seriously or even fatally injured by pro-
longed exposure to extreme heat or cold.
Do not expose the child restraint system to
direct sunlight. Parts of the child restraint sys- tem could heat up and the child could burn
herself/himself on them.
If
ac hild opens adoor, the child or other per-
sons could be injured as aresult. They could
get out and injure themselves or be injured by
ap assing vehicle.
Observe the general notes on the HOLD func-
tion, which can be found under the same key-
word. G
WARNING
Unsecured or incorrectly positioned loads
increase the risk of injury for children and all
other occupants in the event of:
R an accident
R sudden braking
R as udden change of direction
Do not transport heavy or hard objects in the
vehicle interior unless they are secured. You
will find further information under "Loading
guidelines" in the index.
If ac hild is travelling in your vehicle, secure
the child using achild restraint system which
is recommended for Mercedes-Benz vehicles.
The child restraint system must be appropri-
ate to the age, weight and size of the child.
Ideallyt he child restraint system should be
installed on asuitabler ear seat. Make sure
that the child is secured for the trip.
Mercedes-Benz recommends that you use
the listed child restraint systems
(Y page 60). You can obtain further infor-
mation aboutt he correct child restraint sys-
tem from any Mercedes-Ben zService Centre.
i It is advisabletou se Mercedes-Benzcare
product stoclean child restraint systems.
You can obtain informatio nabout this at
any Mercedes-Benz Service Centre. Children in thev
ehicle
53Safety Z