ad blue MERCEDES-BENZ CLS COUPE 2012 Owners Manual
[x] Cancel search | Manufacturer: MERCEDES-BENZ, Model Year: 2012, Model line: CLS COUPE, Model: MERCEDES-BENZ CLS COUPE 2012Pages: 373, PDF Size: 9.12 MB
Page 9 of 373
Bel
ttensioner
Activatio n......................................... 41
Functi on........................................... 51
Blin dSpot Assist
Activating/deactivating .................220
Display message ............................ 246
Notes/function .............................. 197
see Active Blind Spot Assist
Bluetooth ®
SAP V3 telephone mod-
ule see Separate operating instructions
Bonnet
Closing .......................................... .297
Display message ............................ 255
Opening ......................................... 296
Boot
Emergency release ..........................87
Important safety notes ....................85
Opening/closing (automatically
from inside) ...................................... 87
Opening/closing (automatically
from outside) ................................... 86
Opening/closing (manually from
outside) ............................................ 85
Boot lid
Display message ............................ 254
Opening/closing .............................. 85
Opening dimensions ......................366
Boot load (maximum) ........................ 366
Bottle holders .................................... 281
Box (boot) .......................................... .277
Brake Assist System see BAS (Brake Assist System)
Brake fluid
Display message ............................ 234
Notes ............................................. 365
Brake lamps
Adaptive .......................................... .65
Display message ............................ 238
Brakes
ABS .................................................. 63
BAS .................................................. 63
BAS PLUS ........................................ 64
Brake fluid (notes) .........................365
Display message ............................ 232
Driving tips .................................... 162
High-performance brake system ....163 Important safety notes
..................162
Parking brake ................................ 160
Warning lamp ................................. 260
Breakdown
see Flat tyre
see Towing away
Bulbs
see Changing bulbs C
Calling up afault
see Display messages
Car
see Vehicle
Care
Automatic car wash .......................301
Carpets .......................................... 307
Display ........................................... 305
Exterior lighting ............................. 304
Gea rors electo rlever .................... 306
High-pressure cleaner .................... 302
Interior ........................................... 305
Matt paintwork .............................. 303
Nigh tView Assist Plus ...................305
Notes ............................................. 301
Paint .............................................. 303
Plastic trim .................................... 306
Reversing camera ..........................305
Roo flining ...................................... 307
Seat bel t........................................ 307
Seat cover ..................................... 306
Sensors ......................................... 304
Steering wheel ............................... 306
Tai lpipes ....................................... 305
Trim pieces .................................... 306
Washing by hand ........................... 302
Wheels ........................................... 303
Windows ........................................ 304
Wiper blades .................................. 304
Wooden trim .................................. 306
Car wash (care) ................................. 301
CD player/CD changer(on-board
computer) .......................................... 216
Central locking Automatic locking (on-board com-
puter) ............................................. 225
Locking/unlocking (key ).................. 77 6
Index
Page 105 of 373
The three red indicator lamps in the button
indicate the heating level you have selected.
The system automatically switches down
from level 3to level 2after approximately
eight minutes.
The system automatically switches down
from level 2to level 1after approximately ten
minutes.
The system automatically switches off
approximately 20 minutes after it is set to
level 1.
X Make sure that the key is in position 1or
2 in the ignition lock.
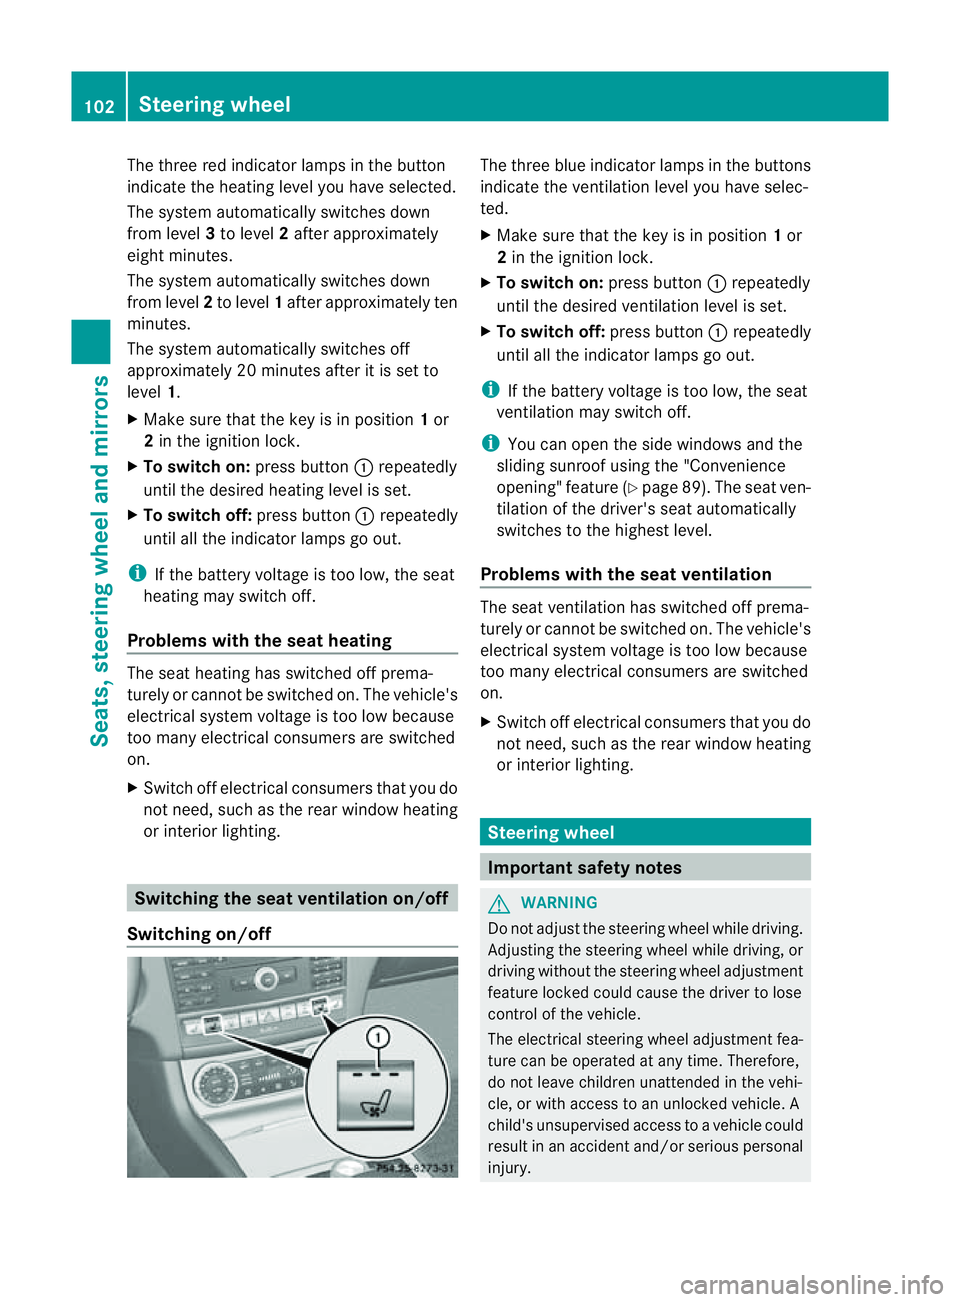
X To switch on: press button:repeatedly
until the desired heating level is set.
X To switch off: press button:repeatedly
until all the indicator lamps go out.
i If the battery voltage is too low, the seat
heating may switch off.
Problems with the seat heating The seat heating has switched off prema-
turely or cannot be switched on. The vehicle's
electrical system voltage is too low because
too many electrical consumers are switched
on.
X Switc hoff electrical consumers that you do
not need, such as the rear window heating
or interior lighting. Switching the seat ventilation on/off
Switching on/off The three blue indicator lamps in the buttons
indicate the ventilation level you have selec-
ted.
X
Make sure that the key is in position 1or
2 in the ignition lock.
X To switch on: press button:repeatedly
until the desired ventilation level is set.
X To switch off: press button:repeatedly
until all the indicator lamps go out.
i If the battery voltage is too low, the seat
ventilation may switch off.
i You can open the side windows and the
sliding sunroof using the "Convenience
opening" feature (Y page 89). The seat ven-
tilation of the driver's seat automatically
switches to the highest level.
Problems with the seat ventilation The seat ventilation has switched off prema-
turely or cannot be switched on. The vehicle's
electrical system voltage is too low because
too many electrical consumers are switched
on.
X
Switc hoff electrical consumers that you do
not need, such as the rear window heating
or interior lighting. Steering wheel
Important safety notes
G
WARNING
Do not adjust the steerin gwheel while driving.
Adjusting the steerin gwheel while driving, or
driving without the steerin gwheel adjustment
feature locked could cause the driver to lose
control of the vehicle.
The electrical steerin gwheel adjustmen tfea-
ture can be operated at any time. Therefore,
do not leave children unattended in the vehi-
cle, or with access to an unlocked vehicle. A
child's unsupervised access to avehicle could
result in an acciden tand/o rserious personal
injury. 102
Steering wheelSeats, steering wheel and mirrors
Page 117 of 373
X
To switc honthe main-beam head-
lamps: turnthe key in the ignition lock to
position 2or start the engine.
X Turn the light switch to LorÃ.
X Press the combinatio nswitc hbeyond the
pressure point in the direction of
arrow :.
In the Ãposition ,the main-beam head-
lamps are only switched on when it is dark
and the engin eisrunning.
The blue Kindicator lamp in the instru-
ment cluster lights up when the main-beam
headlamps are switched on.
X To switch off the main-beam head-
lamps: move the combination switch back
to its normal position.
The blue Kindicator lamp in the instru-
ment cluster goes out.
i Vehicles with Adaptiv eHighbeam Assist:
when Adaptiv eHighbeam Assist is active,
it controls activation of the main-beam
headlamps (Y page 116).
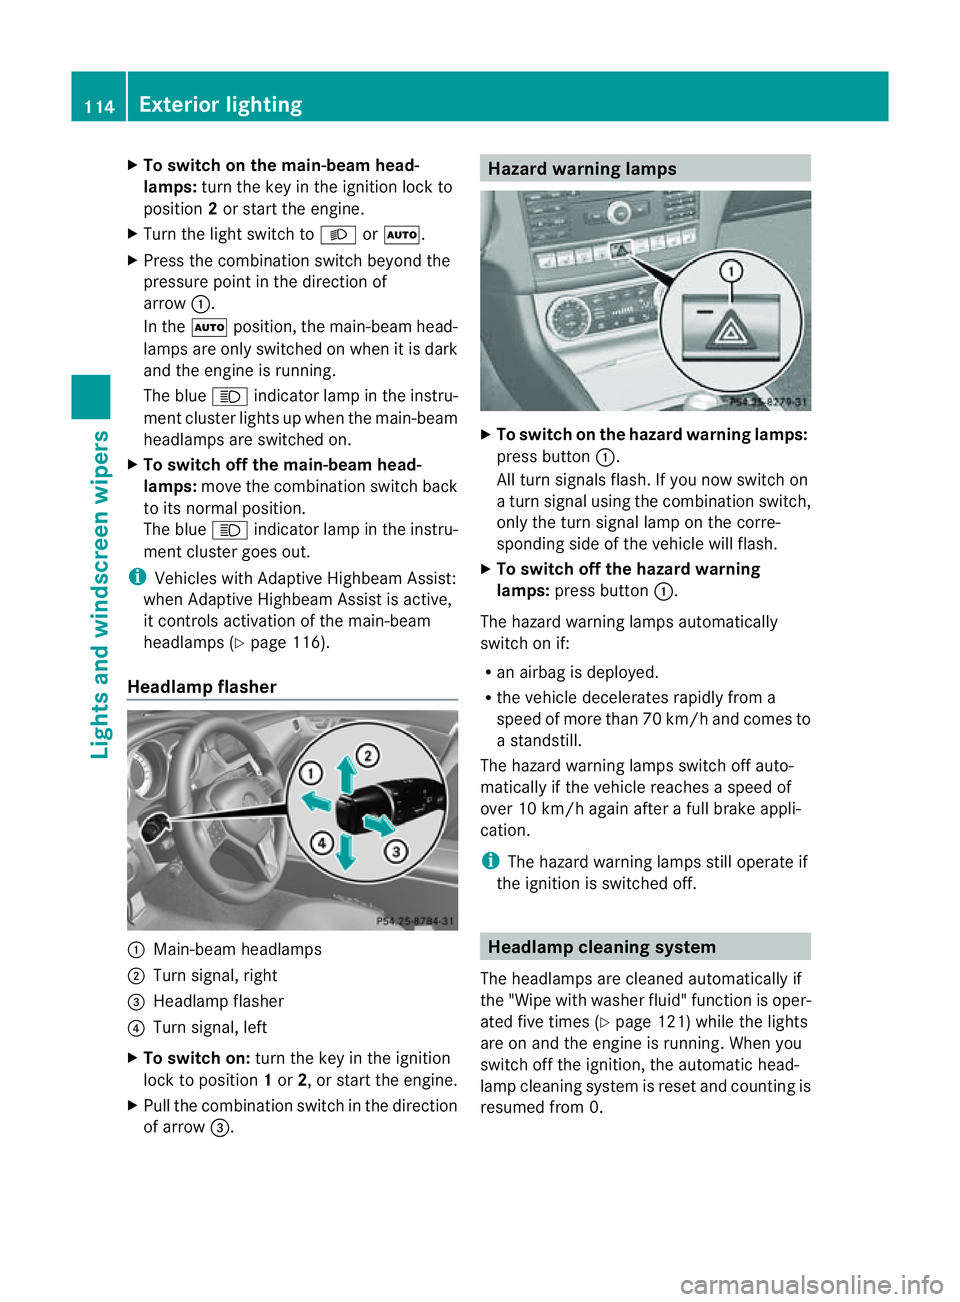
Headlamp flasher :
Main-beam headlamps
; Turn signal, right
= Headlamp flasher
? Turn signal, left
X To switch on: turn the key in the ignition
lock to position 1or 2,ors tart the engine.
X Pull the combination switch in the direction
of arrow =. Hazard warning lamps
X
To switch on the hazard warning lamps:
press button :.
All turn signals flash. If you now switch on
at urn signal using the combination switch,
only the turn signal lamp on the corre-
spondin gside of the vehicle will flash.
X To switch off the hazard warning
lamps: press button :.
The hazard warning lamps automatically
switch on if:
R an airbag is deployed.
R the vehicle decelerates rapidly from a
speed of more than 70 km/ha nd comesto
as tandstill.
The hazar dwarning lamps switch off auto-
maticall yifthe vehicl ereache saspeed of
ove r10k m/h agai nafter afullb rake appli-
cation.
i The hazar dwarning lamps still operate if
the ignition is switched off. Headlamp cleanin
gsystem
The headlamps ar ecleane dautomaticall yif
the "Wip ewithw ashe rfluid" function is oper-
ated five times (Y page 121)while the lights
are on and the engine is running. When you
switc hoff the ignition, the automatic head-
lamp cleaning system is reset and countin gis
resumed fro m0.114
Exterior lightingLight
sand windscreen wipers
Page 136 of 373
the vehicl
ealigh t. Choose your parking spot
accordingly.
Operating the auxiliary heating is thu spro-
hibited at filling stations or when your vehicle
is being refuelled .You must therefor eswitch
off the auxiliary heating at filling stations.
! Operating the auxiliary heating/ventila-
tion draws on the vehicle battery. After you
have heated or ventilated the vehicle a
maximum of two times, drive for alonger
distance.
i Switch the auxiliary heating on regularly
once amonthf or about ten minutes.
The auxiliary heating heats the air in the
passenger compartment to the selected tem-
perature. It does not use the heat of the run-
ning engine to do this. The auxiliary heating
is operated directly using the vehicle's fuel.
For this reason, the tank content must be at
least at reserve fuel level to ensure that the
auxiliary heating functions.
The auxiliary heating/ventilation automati-
cally adjusts to changes in temperature and
weather conditions. For this reason, the aux-
iliary heating could switch from ventilation
mode to heating mode or from heating mode
to ventilation mode.
The auxiliary heating switches off automati-
cally after 50 minutes. This time limit can be
altered. To do this, visit aqualified specialist
workshop.
You cannot use the auxiliary ventilation to
cool the vehicle interior to atemperature
lower than the outside temperature.
Before switching on X
Turn the key to position 2in the ignition
lock.
X Set the temperature.
The auxiliary heating/ventilation can be acti-
vated even when climate control is set to
manual. Optimum comfor tcan be attained
when the system is set to automatic mode.
Set the temperature to 22 †. The auxiliary heating/ventilation can be acti-
vated or deactivated using the remote control
or the button on the centre console.
The on-board computer can be used to spec-
ify up to three departure times, one of which
may be preselected (Y page 225).
Switching the auxiliary heating/venti-
lation on/off using the centre console
button The colours of the indicator lamps on the but-
ton have the following meanings:
Blue Auxiliary ventilation switched on
Red Auxiliary heating switched on
Yellow Departure time preselected
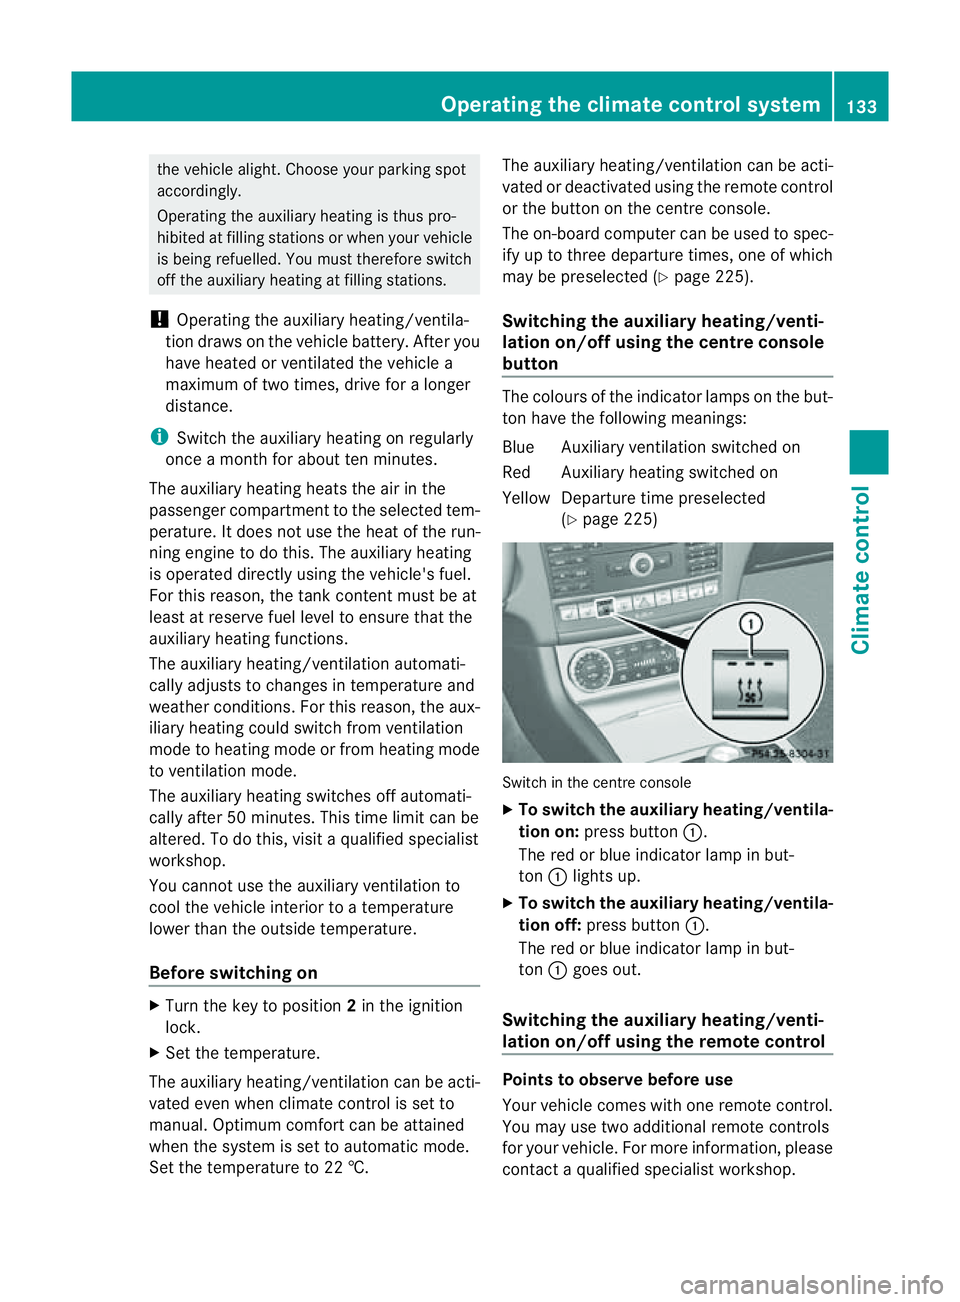
(Ypage 225) Switch in the centre console
X
To switch the auxiliary heating/ventila-
tion on: press button :.
The red or blue indicator lamp in but-
ton :lights up.
X To switch the auxiliary heating/ventila-
tion off: press button :.
The red or blue indicator lamp in but-
ton :goes out.
Switching the auxiliary heating/venti-
lation on/off using the remotec ontrol Points to observe before use
Your vehicle comes with one remote control.
You may use two additional remote controls
for your vehicle. For more information, please
contact
aqualified specialist workshop. Operating the climate control system
133Climate control Z
Page 220 of 373
X
To select the next or previous scene:
briefl ypress the 9or: button.
X To select ascene from th escene list
(rapid scrolling): press and hold the
9 or: buttonuntil desired
scene :hasb eenr eached. Telephon
emenu
Introduction G
WARNING
Observ ethe lega lrequirements of the country
in which yo uarecurrentl ydriving regarding
the us eofm obilephonesint he vehicle.
If it is permitted to us emobilephonesw hile
the vehicl eisinmotion, yo ushoul donlyu se
them when the roa dand traffi cconditions
allow. Otherwise, yo umaybe distracted from
the traffi cconditions, cause an accident and
injure yoursel fand others.
X Switch on the mobil ephone (se ethe sep-
arate operating instructions).
X Switch on the audi osystem or COMAND
Online ;see the separate operating instruc-
tions.
X Insert the mobil ephone into the bracket
(Y page 286).
or
X Establis haBluetooth ®
connectio ntothe
audi osystem or COMAND Online ;see the
separate operating instructions.
X Press the =or; button on the steer-
ing whee ltoselect the Tel menu.
Yo uw ills ee one of the following display mes-
sages in the multifunctio ndisplay:
R Please enter PIN :t
he mobile phone has
been placed in the mobile phone bracket
and the PIN has not been entered.
When you enter your PIN via the mobile
phone, LINGUATRONIC, the audios ystemor COMAND Online, the mobile phone
searches for
anetwork.
R Telephone ready or the name of the net-
work provider: the mobile phone has found
an etwork and is ready to receive.
R Telephone No service :t
here is no net-
work available or the mobile phone is
searching for anetwork.
i You can obtain further information about
suitable mobile phones and connecting
mobile phones via Bluetooth ®
:
R from any Mercedes Benz Service Centre
R on the Internet at: http://
www.mercedes-benz.com/connect
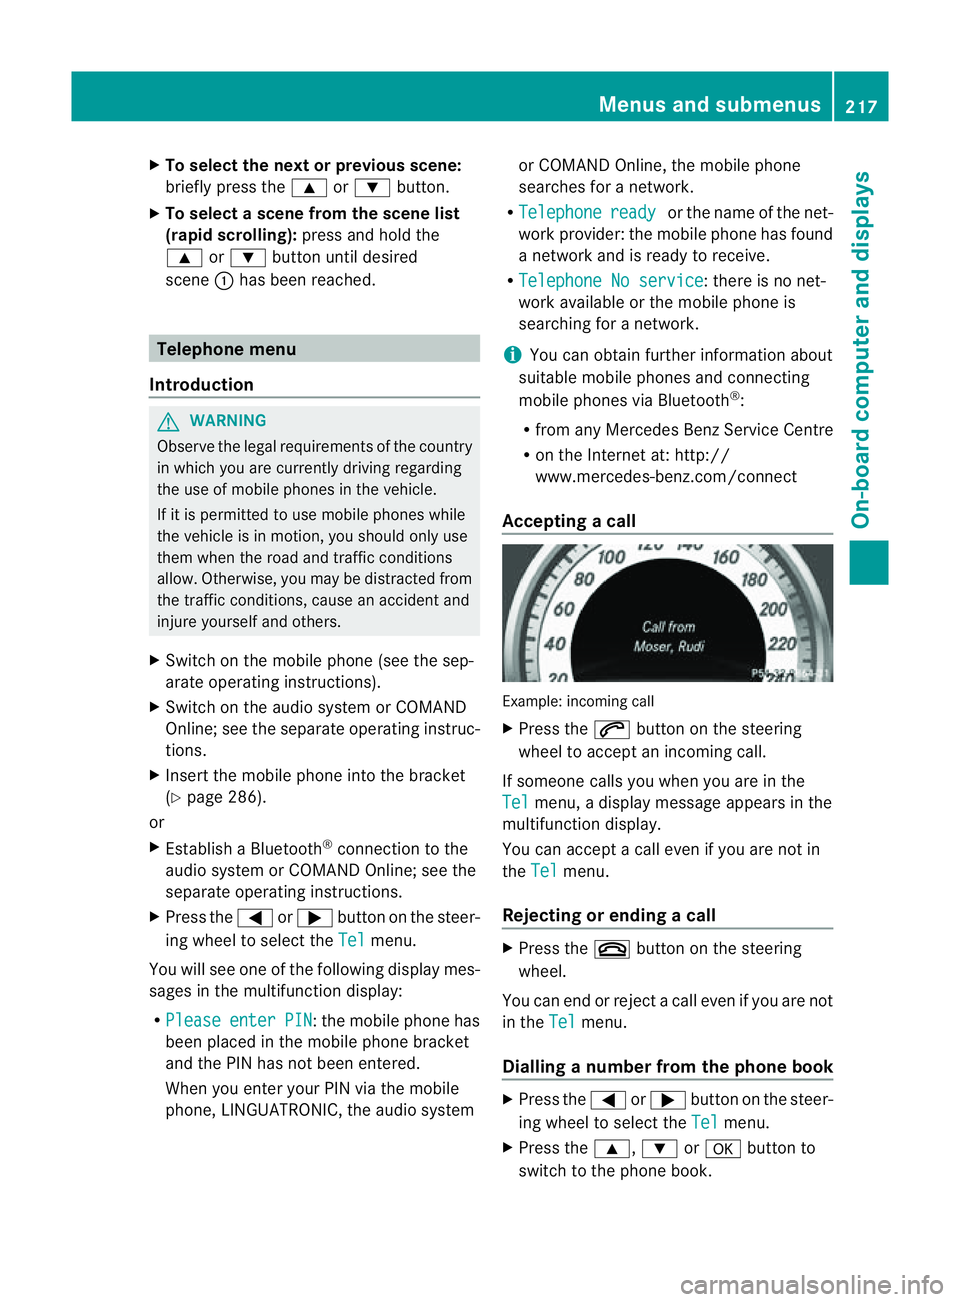
Accepting acall Example: incoming call
X
Press the 6button on the steering
wheel to accep tanincoming call.
If someone calls yo uwheny ou areint he
Tel menu
,adisplay message appear sinthe
multifunctio ndisplay.
You can accept acall even if you are not in
the Tel menu.
Rejecting or ending acall X
Press the ~button on the steering
wheel.
You can end or reject acall even if you are not
in the Tel menu.
Dialling anumber from the phone book X
Press the =or; button on the steer-
ing wheel to select the Tel menu.
X Press the 9,:ora button to
switch to the phone book. Menus and submenus
217On-board computer and displays Z
Page 231 of 373
AMG men
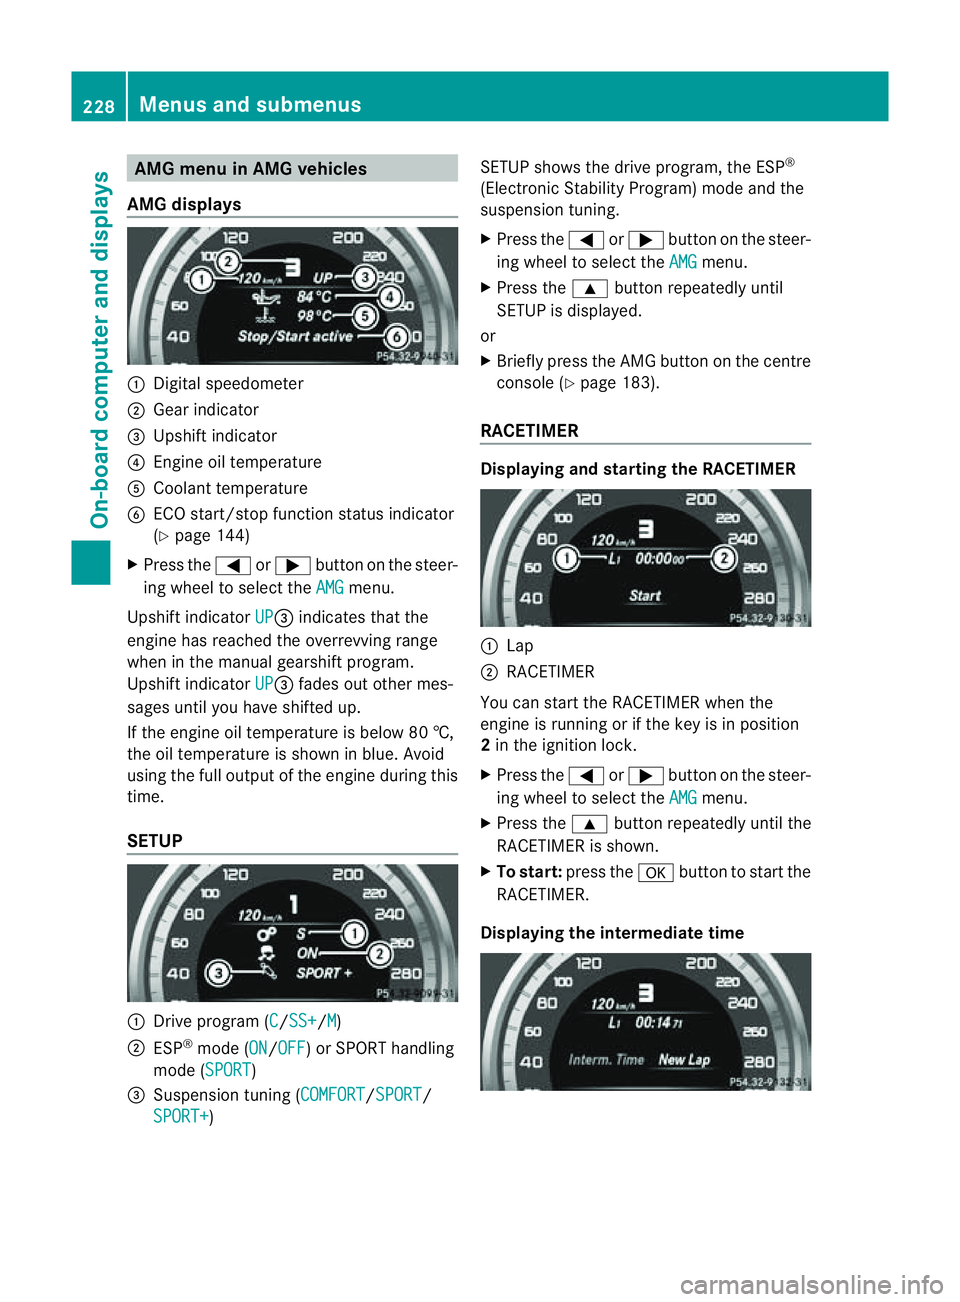
uinAMG vehicles
AMG displays :
Digital speedometer
; Gear indicator
= Upshift indicator
? Engine oil temperature
A Coolant temperature
B ECO start/stop function status indicator
(Y page 144)
X Press the =or; button on the steer-
ing wheel to select the AMG menu.
Upshift indicator UP =
indicates that the
engin ehas reached the overrevving range
when in the manual gearshift program.
Upshift indicator UP =
fades out other mes-
sages until you have shifted up.
If the engin eoil temperature is below 80 †,
the oil temperature is shown in blue. Avoid
using the full output of the engin eduring this
time.
SETUP :
Driv eprogram (C /SS+ /M )
; ESP ®
mode (ON /OFF )orS
PORT handling
mode (SPORT )
= Suspension tunin g(COMFORT /SPORT /
SPORT+ ) SETUP shows the drive program, the ESP
®
(Electronic Stability Program) mode and the
suspension tuning.
X Press the =or; button on the steer-
ing wheel to select the AMG menu.
X Press the 9button repeatedly until
SETUP is displayed.
or
X Briefly press the AMG button on the centre
console (Y page 183).
RACETIMER Displaying and starting the RACETIMER
:
Lap
; RACETIMER
You can start the RACETIME Rwhen the
engin eisrunning or if the key is in position
2 in the ignition lock.
X Press the =or; button on the steer-
ing wheel to select the AMG menu.
X Press the 9button repeatedly until the
RACETIME Risshown.
X To start: press the abutton to start the
RACETIMER.
Displaying the intermediat etime 228
Menus and submenusOn-boar
dcomputer and displays
Page 288 of 373
If it is permitted by law to operate communi-
cations equipment whilet
he vehicle is in
motion, you must only do so if the traffic sit-
uationp ermits.Otherwise, yo ucould be dis-
tracted fro mthe traffi cconditions ,cause an
accident and injure yourself and others.
Two-way radios and fa xequipment used with-
out low-reflection exterior aerials can inter-
fere with the vehicle's electronic sand thereby
jeopardise the operatin gsafety of the vehicle
and your safety. Therefore, you must only use
this equipment if it is correctly connected to
as eparate reflection-free exterior aerial. G
WARNING
Excessiv elevels of electromagnetic radiation
may cause damage to your health and the
health of others. Using an exterior aerial takes
int oa ccoun tcurren tscientific discussions
relatin gtothe possible health risk posed by
electromagnetic fields.
Mercedes-Benz recommends the use of an
approved exterior aerial. This ensures:
R optimal mobile phone reception quality in
the vehicle
R mutual influences between the vehicle
electronic sand mobile phones are mini-
mised
An exterior aerial has the following advan-
tages:
R it conducts the electromagnetic fields gen-
erated by awireless device to the exterior.
R the field strengt hinthe vehicle interior is
lower than in avehicle that does not have
an exterior aerial.
i There are various mobile phone brackets
that may be fitted in your vehicle; in some
cases, these are country-specific.
i You can connec taBluetooth ®
-capable
mobile phone with Audio 20, Audio 50 or
COMAND Onlin evia the Bluetooth ®
inter-
face. This also applies if your vehicle is
equipped with convenience telephony. More information on suitable mobile phones,
mobile phone brackets and on connecting
Bluetooth
®
-capable mobile phones with
Audio 20, Audio 50 or COMAND Onlin ecan
be obtained:
R at your Mercedes-Benz Service Centre
R on the Internet at http://www.mercedes-
benz.com/connect
i The function sand services available when
you use the phone depend on your mobile
phone model and servic eprovider.
Using amobile phone If th
emobile phon eisinserted in th emobile
phon ebracket ,you can speak to th eperson
you are callin gusingthe hands-free system.
X Open th etelephone compartment
(Y page 274).
X If required by th edesig noft he mobile
phone bracket, install the sliding adapter
(Y page 286).
X Insert the mobile phone into the mobile
phone bracket (see the separate installa-
tion instructions for the mobile phone fit-
ting).
i On some mobile phone brackets, you first
have to connect the mobile phone via Blue-
tooth ®
to the mobile phone bracket (see
the separate operating instructions for the
mobile phone bracket).
If this is the case, the mobile phone does
not have to be inserted into the bracket for
you to be able to use the telephone func-
tions. However, the charging function and
aerial function are not available.
Operating the mobile phone You can operate the telephone using the
6
and~ buttons on the multifunction
steering wheel. You can operate other mobile
phone functions via the on-board computer
(Y page 217).
When you remove the key from the ignition
lock, the mobile phone stays switched on. Features
285Stowing and features Z
Page 289 of 373
However, yo
ucan no longer use the hands-
free system.
If yo uhaveana ctivecalla nd would like to
take the key ou tofthe ignition lock, first
remove the mobile phone from the bracket.
i Whe nusing abracket connected to the
mobile phone via Bluetooth ®
and yo uwish
to proceed with acall:
Switch to private mode before removing
the key from the ignition lock. Otherwise ,it
may take up to 20 seconds, before the
mobile phone separates from the system.
Only then can the telephone cal lcontinue.
Information on the necessary steps for set-
ting up "private mode "can be found in the
separate mobile phone operating instruc-
tions.
i Not al lmobile phones support "private
mode".
Sliding adapter for the mobile phone
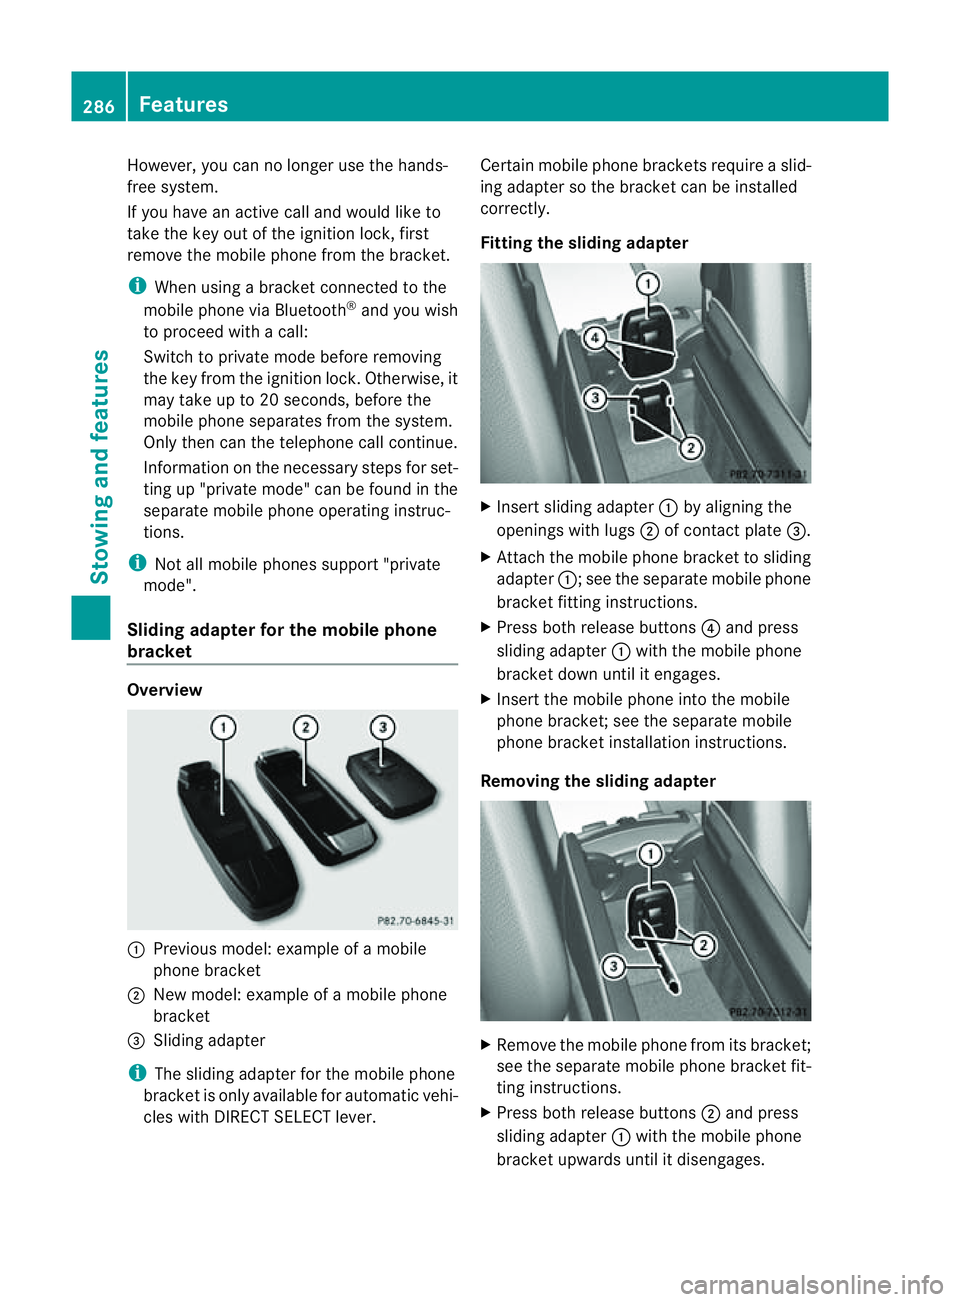
bracket Overview
:
Previou smodel: example of amobile
phone bracket
; New model: example of amobile phone
bracket
= Sliding adapter
i The sliding adapter for the mobile phone
bracket is only available for automati cvehi-
cles with DIRECT SELECT lever. Certain mobile phone brackets require
aslid-
ing adapter so the bracket can be installed
correctly.
Fitting the sliding adapter X
Inser tsliding adapter :by alignin gthe
openings with lugs ;of contac tplate =.
X Attac hthe mobile phon ebracket to sliding
adapter :;see the separat emobile phone
bracket fittin ginstructions.
X Press bot hrelease buttons ?and press
slidin gadapter :with the mobile phone
bracket down until it engages.
X Insert the mobile phon eintot he mobile
phon ebracket ;see the separat emobile
phon ebracket installation instructions.
Removing th eslidin gadapt er X
Remove the mobile phon efromi ts bracket;
se et he separate mobil ephone bracket fit-
ting instructions.
X Press both release buttons ;and press
sliding adapter :with the mobil ephone
bracket upwards unti litdisengages. 286
FeaturesSto
wing an dfeatures
Page 346 of 373
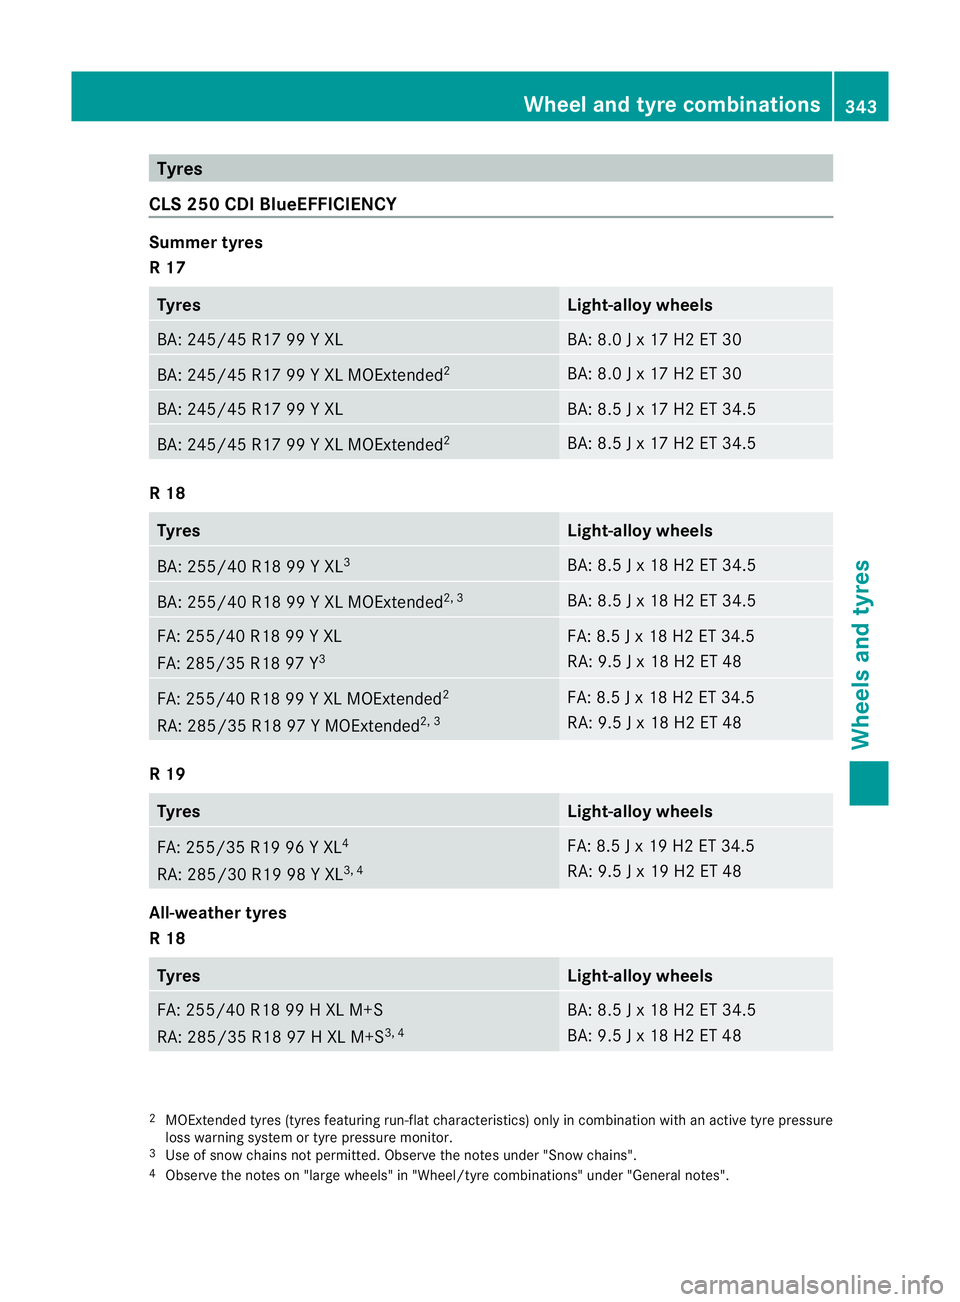
Tyres
CL S2 50 CDIBlueEFFICIENCY Summe
rtyres
R17 Tyres Light-alloy wheels
BA: 245/4
5R1799 YXL BA: 8.0
Jx17H2ET30 BA: 245/45 R17 99
YXLMOExtended 2 BA: 8.0
Jx17H2ET30 BA: 245/45 R17 99
YXL BA: 8.5
Jx17H2ET3 4.5 BA: 245/45 R17 99
YXLMOExtended 2 BA: 8.5
Jx17H2ET3 4.5 R18
Tyres Light-allo
ywheels BA: 255/40 R18 99
YXL3 BA: 8.5
Jx18H2ET3 4.5 BA: 255/40 R18 99
YXLMOExtended 2, 3 BA: 8.5
Jx18H2ET3 4.5 FA: 255/40 R18 99
YXL
FA: 285/35 R18 97 Y 3 FA: 8.5
Jx18H2ET3 4.5
RA: 9.5 Jx18H2ET48 FA: 255/40 R18 99
YXLMOExtended 2
RA: 285/35 R18 97 YMOExtended 2, 3 FA: 8.5
Jx18H2ET3 4.5
RA: 9.5 Jx18H2ET48 R19
Tyres Light-alloy wheels
FA: 255/35 R19 96
YXL4
RA: 285/30 R19 98 YXL3, 4 FA: 8.5
Jx19H2ET3 4.5
RA: 9.5 Jx19H2ET48 All-weather tyres
R18
Tyres Light-alloy wheels
FA: 255/40 R18 99
HXLM+S
RA: 285/35 R18 97 HXLM+S3, 4 BA: 8.5
Jx18H2ET3 4.5
BA: 9.5 Jx18H2ET48 2
MOExtended tyres (tyre sfeaturing run-fla tcharacteristics) only in combination with an active tyre pressure
loss warning system or tyre pressure monitor.
3 Use of snow chains not permitted. Observe the notes under "Snow chains".
4 Observe the notes on "large wheels" in "Wheel/tyre combinations" under "General notes". Wheel and tyrec
ombinations
343Wheels and tyres Z
Page 347 of 373
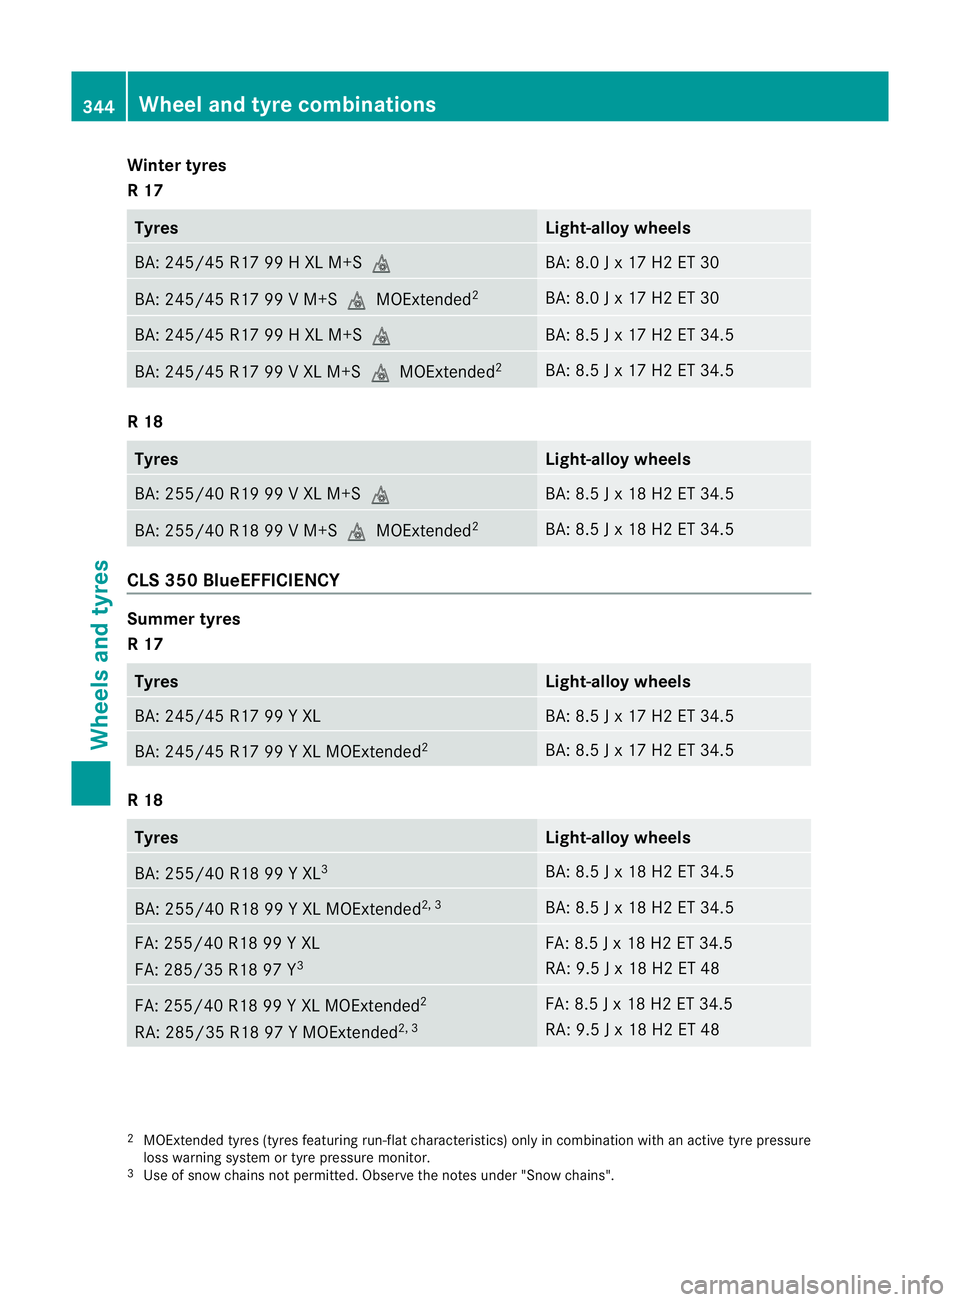
Winter tyres
R17
Tyres Light-alloy wheels
BA: 245/45 R17 99
HXLM+Si BA: 8.0
Jx17H2ET30 BA: 245/45 R17 99
VM+SiMOExtended 2 BA: 8.0
Jx17H2ET30 BA: 245/45 R17 99
HXLM+Si BA: 8.5
Jx17H2ET3 4.5 BA: 245/45 R17 99
VXLM +SiMOExtended 2 BA: 8.5
Jx17H2ET3 4.5 R18
Tyres Light-alloy wheels
BA: 255/40 R19 99
VXLM+Si BA: 8.5
Jx18H2ET3 4.5 BA: 255/40 R18 99
VM+SiMOExtended 2 BA: 8.5
Jx18H2ET3 4.5 CLS3
50 BlueEFFICIENCY Summer tyres
R17
Tyres Light-alloy wheels
BA: 245/45 R17 99
YXL BA: 8.5
Jx17H2ET3 4.5 BA: 245/45 R17 99
YXLMOExtended 2 BA: 8.5
Jx17H2ET3 4.5 R18
Tyres Light-alloy wheels
BA: 255/40 R18 99
YXL3 BA: 8.5
Jx18H2ET3 4.5 BA: 255/40 R18 99
YXLMOExtended 2, 3 BA: 8.5
Jx18H2ET3 4.5 FA: 255/40 R18 99
YXL
FA: 285/35 R18 97 Y 3 FA: 8.5
Jx18H2ET3 4.5
RA: 9.5 Jx18H2ET48 FA: 255/40 R18 99
YXLMOExtended 2
RA: 285/35 R18 97 YMOExtended 2, 3 FA: 8.5
Jx18H2ET3 4.5
RA: 9.5 Jx18H2ET48 2
MOExtended tyres (tyres featuring run-fla tcharacteristics) only in combination with an active tyre pressure
loss warning system or tyre pressure monitor.
3 Use of snow chains not permitted. Observe the notes under "Snow chains". 344
Wheel and tyrec
ombinationsWheels and tyres