remove seats MERCEDES-BENZ CLS COUPE 2012 Owners Manual
[x] Cancel search | Manufacturer: MERCEDES-BENZ, Model Year: 2012, Model line: CLS COUPE, Model: MERCEDES-BENZ CLS COUPE 2012Pages: 373, PDF Size: 9.12 MB
Page 50 of 373
tai
ns everity, the NECK-PRO head restraints/
NECK-PRO luxury head restraint sonthe driv-
er's and front-passenger seats are moved for-
wards and upwards. This provides better
head support.
If the NECK-PRO head restraints/NECK-PRO
luxury head restraint shave been triggered in
an accident, reset the NECK-PRO head
restraints/NECK-PRO luxury head restraints
on the driver's and front-passenger seats
(Y page 47). Otherwise, the additional pro-
tection will not be available in the event of
another rear-en dcollision. NECK-PRO head
restraints/NECK-PRO luxury head restraints
that have been triggered are moved forwards
and can no longer be adjusted.
Mercedes-Benz recommends having the
NECK-PRO head restraints/NECK-PRO head
restraint schecked at aqualified specialist
worksho pafter arear-en dcollision.
Resetting atriggered NECK-PRO head
restraint/NECK-PRO luxury head
restraint NECK-PRO head restraints
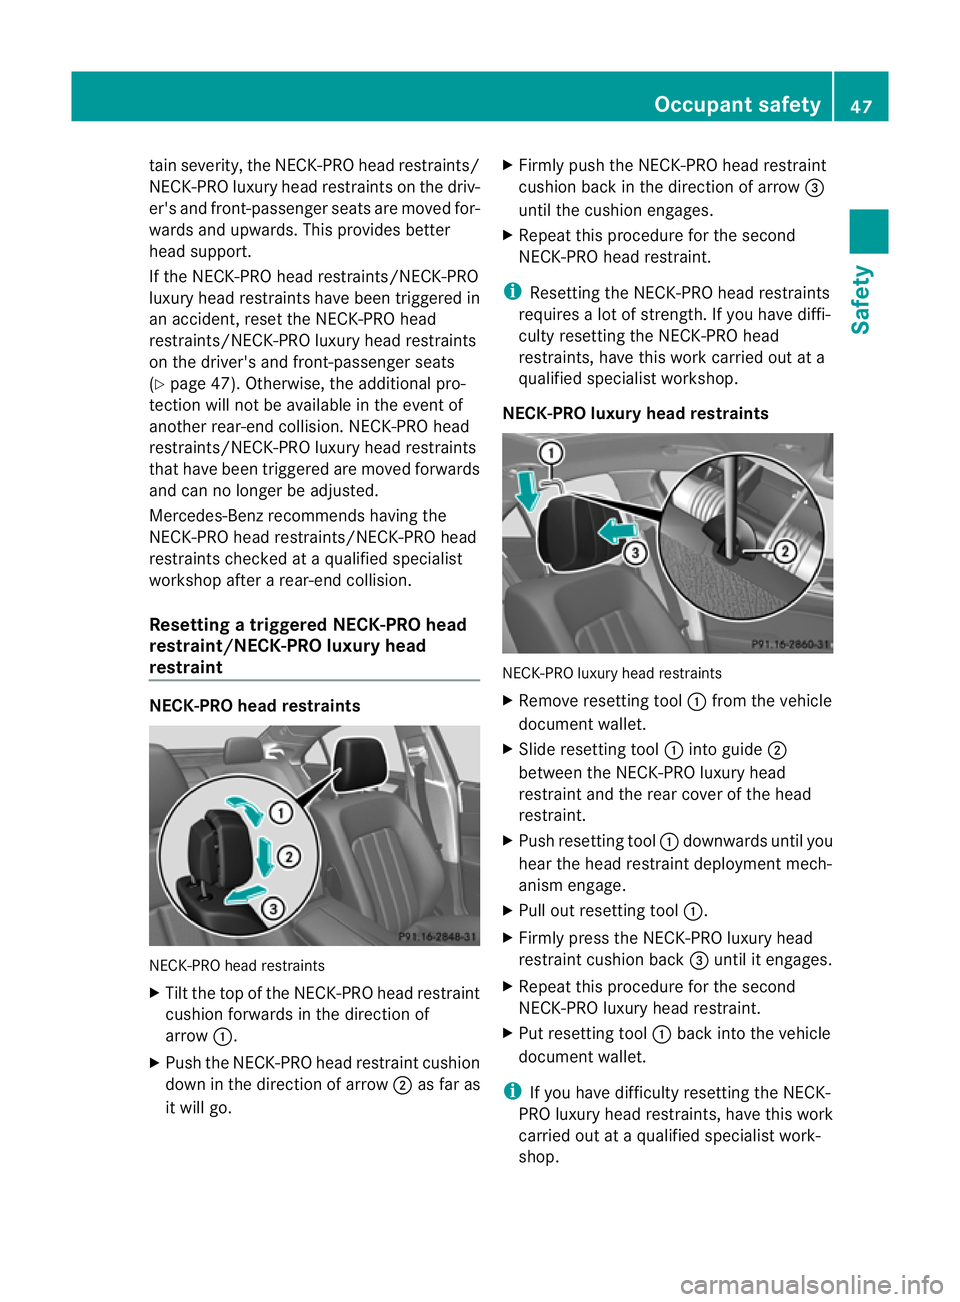
NECK-PRO head restraints
X
Tilt the top of the NECK-PRO head restraint
cushion forwards in the directio nof
arrow :.
X Push th eNECK-PRO head restraint cushion
down in th edirection of arrow ;as far as
it will go. X
Firmly push th eNECK-PRO head restraint
cushion back in th edirection of arrow =
until th ecushion engages.
X Repeat this procedure for th esecond
NECK-PRO head restraint.
i Resettin gthe NECK-PRO head restraints
requires alot of strength. If you have diffi-
cult yresettin gthe NECK-PRO head
restraints, have this work carried out at a
qualified specialist workshop.
NECK-PR Oluxur yheadr estraints NECK-PRO luxur
yhead restraints
X Remove resettin gtool :from th evehicle
documen twallet.
X Slid eresettin gtool :intog uide ;
between th eNECK-PRO luxur yhead
restraint and th erear cover of th ehead
restraint.
X Push resettin gtool :downwards until you
hear th ehead restraint deploymen tmech-
anism engage.
X Pull out resettingt ool:.
X Firmly press the NECK-PRO luxury head
restraint cushion back =until it engages.
X Repeat this procedure for the second
NECK-PRO luxury head restraint.
X Put resettingt ool:back intot he vehicle
documen twallet.
i If you have difficult yresettin gthe NECK-
PRO luxur yhead restraints, have this work
carried out at aqualified specialist work-
shop. Occupant safety
47Safety Z
Page 101 of 373
heating should also not be used to dry
the seats.
R clean the seat covers as recommended;
see "Interior care".
R do not transport heavy loads on the
seats. Do not place sharp objectsont he
seat cushions, e.g. knives, nails or tools.
The seats should only be occupied by
passengers, if possible.
R when the seat heating is in operation, do
not cover the seats with insulating mate-
rials, e.g. blankets, coats, bags, seat cov-
ers, child seats or booster seats.
! Make sure that there are no objectsint he
footwell or behind the seats when moving
the seat back. There is arisk that the seats
and/or the objectsc ould be damaged.
i The head restraintsint he front seats are
fitted with the NECK-PRO system
(Y page 46). For this reason, it is not pos-
sible to remove the head restraintsf rom
the front seats.
For more information ,contact aqualified
specialist workshop.
i Further related subjects:
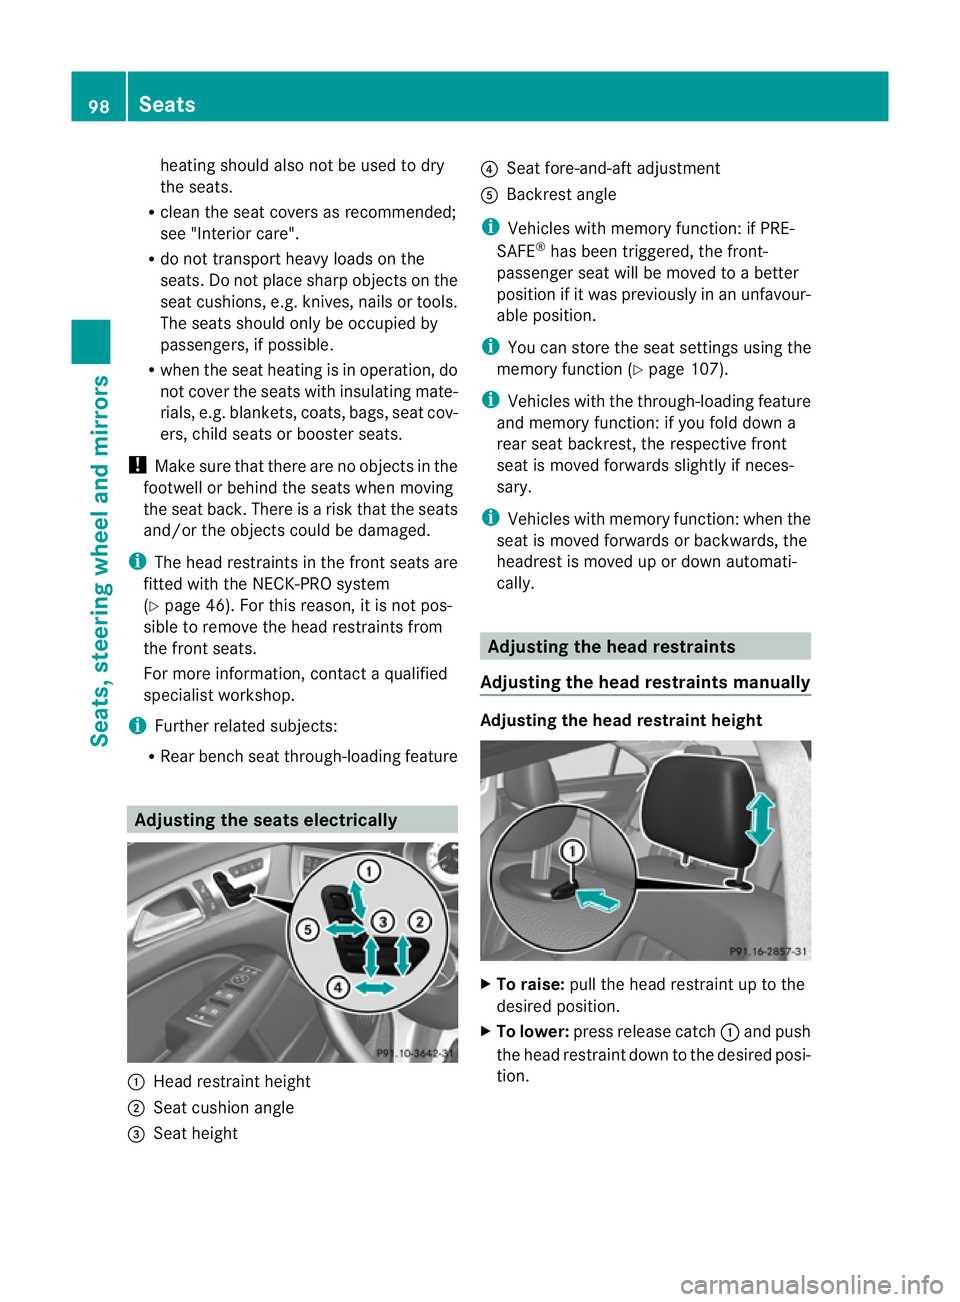
R Rear bench seat through-loading feature Adjusting the seats electrically
:
Head restraint height
; Seat cushion angle
= Seat height ?
Seat fore-and-aft adjustment
A Backrest angle
i Vehicles with memory function: if PRE-
SAFE ®
has been triggered, the front-
passenger seat will be moved to abetter
position if it was previously in an unfavour-
able position.
i You can store the seat settings using the
memory function (Y page 107).
i Vehicles with the through-loading feature
and memory function: if you fold down a
rear seat backrest, the respective front
seat is moved forwards slightly if neces-
sary.
i Vehicles with memory function: when the
seat is moved forwards or backwards, the
headrest is moved up or down automati-
cally. Adjusting the head restraints
Adjusting the head restraints manually Adjusting the head restraint height
X
To raise: pull the head restraint up to the
desired position.
X To lower: press release catch :and push
the head restraint down to the desired posi-
tion. 98
SeatsSeats, steering wheela
nd mirrors
Page 103 of 373
!
Make sure that the rear window roller
sunblind is retracted when removing the
rear head restraints. Otherwise, you could
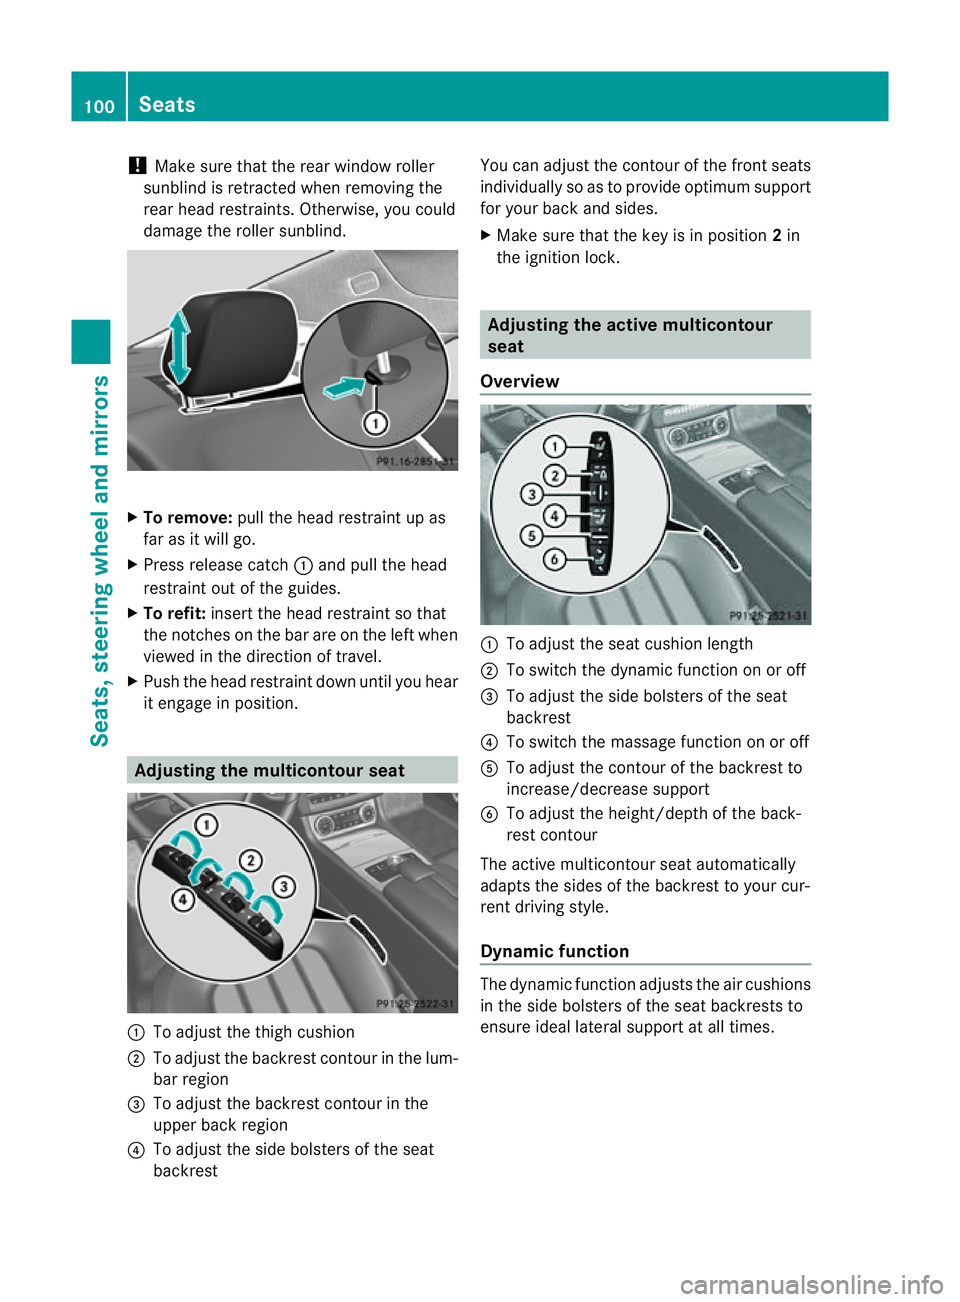
damage the roller sunblind. X
To remove: pull the head restraint up as
far as it will go.
X Press release catch :and pull the head
restraint out of the guides.
X To refit: insert the head restraint so that
the notches on the bar are on the left when
viewed in the direction of travel.
X Push the head restraint down until you hear
it engage in position. Adjusting the multicontour seat
:
To adjust the thigh cushion
; To adjust the backrest contour in the lum-
bar region
= To adjust the backrest contour in the
upper back region
? To adjust the side bolsters of the seat
backrest You can adjust the contour of the front seats
individually so as to provide optimum support
for your back and sides.
X Make sure that the key is in position 2in
the ignition lock. Adjusting the active multicontour
seat
Overview :
To adjust the seat cushion length
; To switch the dynamic function on or off
= To adjust the side bolsters of the seat
backrest
? To switch the massage function on or off
A To adjust the contour of the backrest to
increase/decrease support
B To adjust the height/depth of the back-
rest contour
The active multicontour seat automatically
adapts the sides of the backrest to your cur-
rent driving style.
Dynamic function The dynamic function adjusts the air cushions
in the side bolsters of the seat backrests to
ensure ideall
ateral support at all times.100
SeatsSeats, steering wheela
nd mirrors
Page 106 of 373
Adjusting th
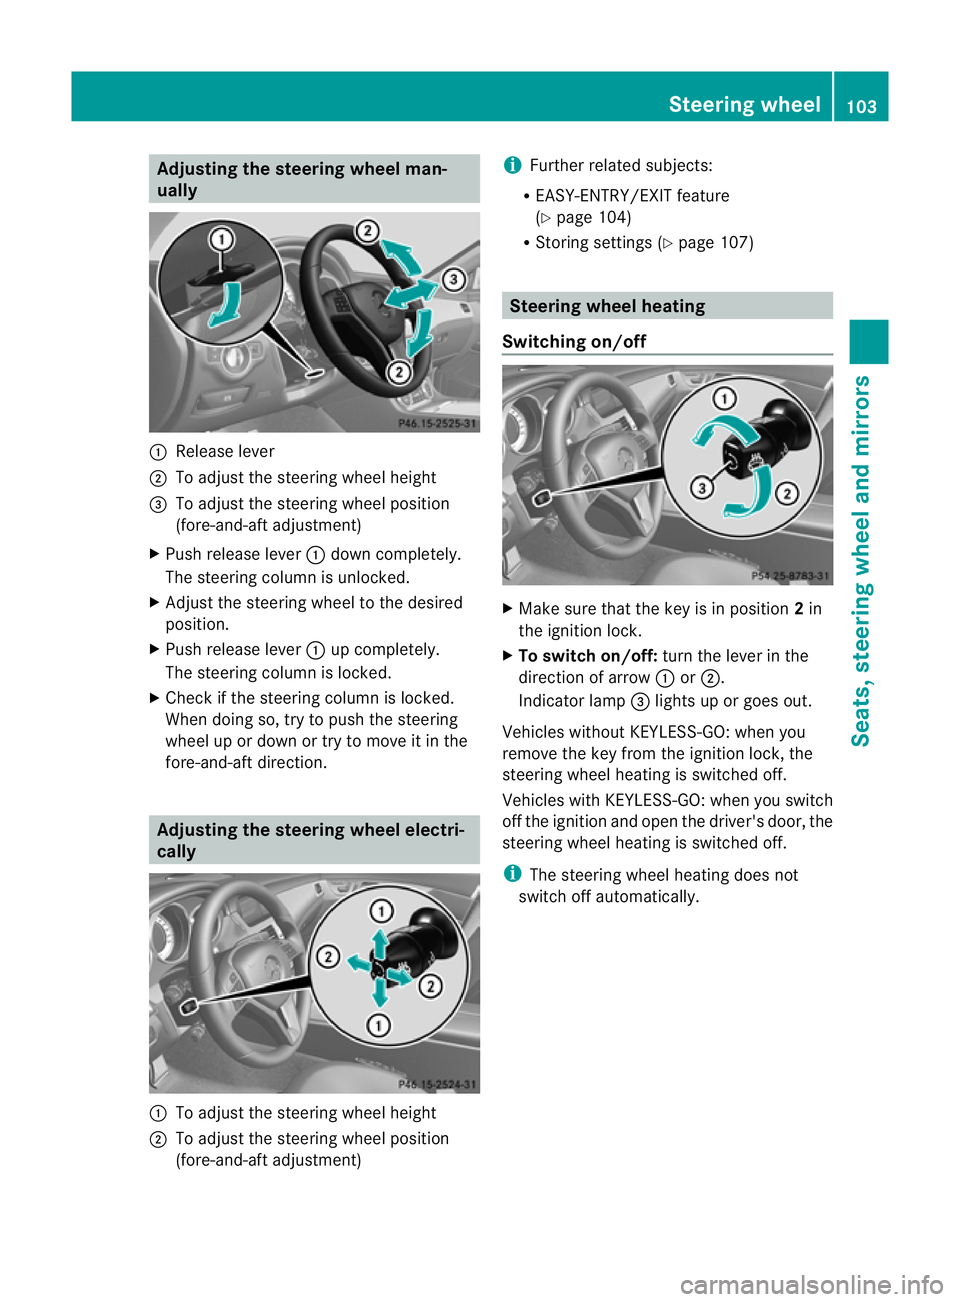
esteering wheel man-
ually :
Releas elever
; To adjust th esteering whee lheight
= To adjust th esteering whee lposition
(fore-and-af tadjustment)
X Push release lever :down completely.
The steering column is unlocked.
X Adjus tthe steering wheel to the desired
position.
X Push release lever :up completely.
The steering column is locked.
X Check if the steering column is locked.
When doing so, try to push the steering
wheel up or down or try to move it in the
fore-and-aft direction. Adjusting the steering wheel electri-
cally :
To adjust the steering wheel height
; To adjust the steering wheel position
(fore-and-aft adjustment) i
Further related subjects:
R EASY-ENTRY/EXI Tfeature
(Y page 104)
R Storing settings (Y page 107) Steering wheel heating
Switching on/off X
Make sure that the key is in position 2in
the ignition lock.
X To switch on/off: turn the lever in the
direction of arrow :or;.
Indicator lamp =lights up or goes out.
Vehicles without KEYLESS-GO: when you
remove the key from the ignition lock, the
steering wheel heating is switched off.
Vehicles with KEYLESS-GO: when you switch
off the ignition and open the driver's door, the
steering wheel heating is switched off.
i The steering wheel heating does not
switch off automatically. Steering wheel
103Seats, steering wheela nd mirrors Z
Page 107 of 373
Problems with the steering wheel heat-
ing If steering wheel heating indicator lamp
=is
flashing, the steering wheel heating has
switched off automatically. The vehicle's
electrical system voltage is too low because
too many electrical consumers are switched
on.
X Switch off electrical consumers that you do
not need, such as the rear window heating
or interior lighting.
Once the battery is sufficiently charged, the
steering wheel heating will switch back on
automatically. EASY-ENTRY/EXIT feature
Important safety notes G
WARNING
Make sure that nobody can become trapped
when you activate the EASY-ENTRY/EXIT fea-
ture.
If there is arisk of someone becoming trap-
ped, stop the adjustment procedure. To halt
the procedure:
R press the steering column adjustment but-
ton.
R briefly press one of the memory function
position buttons.
The steering column stops moving immedi-
ately.
Do not keep the memory function position
button pressed down, otherwise the memory
function will start and the steering wheel and
seat will begin to move.
Never leave children unsupervised in the vehi-
cle. They could open the driver's door and
thereby unintentionally activate the EASY-
ENTRY feature and become trapped.
The EASY-ENTRY/EXIT feature makes getting
in and out of your vehicle easier. You can activate and deactivate the EASY-
ENTRY/EXI
Tfeature in the on-board com-
puter (Y page 226).
Position of the steering wheel when the
EASY-ENTRY/EXIT featureisa ctive The steerin
gwheel tilts upwards if you:
R remove the key from the ignition lock
R open the driver's door and KEYLESS-GO is
in position 1
R open the driver's door and the key is in
position 0or 1in the ignition lock
i The steerin gwheel only moves upwards if
it has not already reached the upper end
stop.
Position of the steering wheel for driv-
ing The steerin
gwheel is moved to the previously
set position if:
R the driver's door is closed and
R you insert the key into the ignition lock
or
R you press the Start/Stop button onceon
vehicles with KEYLESS-GO.
If you close the driver's door with the key
inserted into the ignition lock, the steering
wheel is automatically moved to the previ-
ously set position.
The last position of the steerin gwheel is
stored when you switch off the ignition or
when you stor ethe setting with the memory
function (Y page 107).
Crash-responsive EASY-EXIT feature If the crash-responsive EASY-EXIT feature is
triggered in an accident
,the steerin gcolumn
will move upwards when the driver's door is
opened. This occurs irrespective of the posi-
tion of the key in the ignition lock. This makes
it easier to exit the vehicle and rescue the
occupants. 104
Steering wheelSeats, steering wheel and mirrors
Page 110 of 373
X
Make sure that the vehicle is stationary and
that the key is in position 2in the ignition
lock.
X Press button ;for the exterior mirror on
the front-passenger side.
X Engage reverse gear.
The exterior mirror on the front-passenger
side moves to the preset parking position.
X Use adjustment button =to adjust the
exterior mirror to aposition that allowsy ou
to see the rear wheel and the kerb.
The parking position is stored.
i If you shift the transmission to another
position, the exterior mirror on the front-
passenger side returns to the driving posi-
tion.
Using the memory button
You can set the front-passenger side exterior
mirror so that you can see the rear wheel on
that side as soon as you engage reverse gear.
This settingc an be stored using memory but-
ton M?.
X Make sure that the key is in position 2in
the ignition lock.
X With the exterior mirror on the front-
passenger side activated, use adjustment
button =to adjust the exterior mirror. In
the exterior mirror, the rear wheel and the
kerb should be visible.
X Press memory button M? and one of the
arrows on adjustment button =within
three seconds.
The parking position is stored if the exterior
mirror does not move.
X If the mirror moves out of position, repeat
the steps. Calling up
astore dparking position set-
ting X
Tur nthe key to position 2in the ignition
lock.
X Adjust the exterior mirror on the front-
passenger side using button ;.
X Engage reverse gear.
The exterior mirror on the front-passenger
side moves to the stored parking position.
The exterior mirror on the front-passenger
side moves back to its original position:
R as soon as you exceed aspeed of
15 km/h
R if you press button :for the exterior mir-
ror on the driver's side Memory function
Storing settings
G
WARNING
Only use the memory function on the driver's
side when the vehicle is stationary. You could
otherwise be distracted from the traffic con-
ditions by the steering wheel and seat moving
of their own accord, and as aresult, cause an
accident. G
WARNING
The memory function can still be used when
the key has been removed. For this reason,
children should never be left unsupervised in
the vehicle. They could otherwise become
trapped when adjusting the seat or the steer-
ing wheel.
With the memory function, you can store up
to three different settings, e.g. for three dif-
ferent people.
The following settings are stored as asingle
memory preset:
R position of the seat, backrest and head
restraint
R active multicontour seat: seat cushion
length, lateral cushions of the seat back- Memory function
107Seats, steering wheela nd mirrors Z
Page 277 of 373
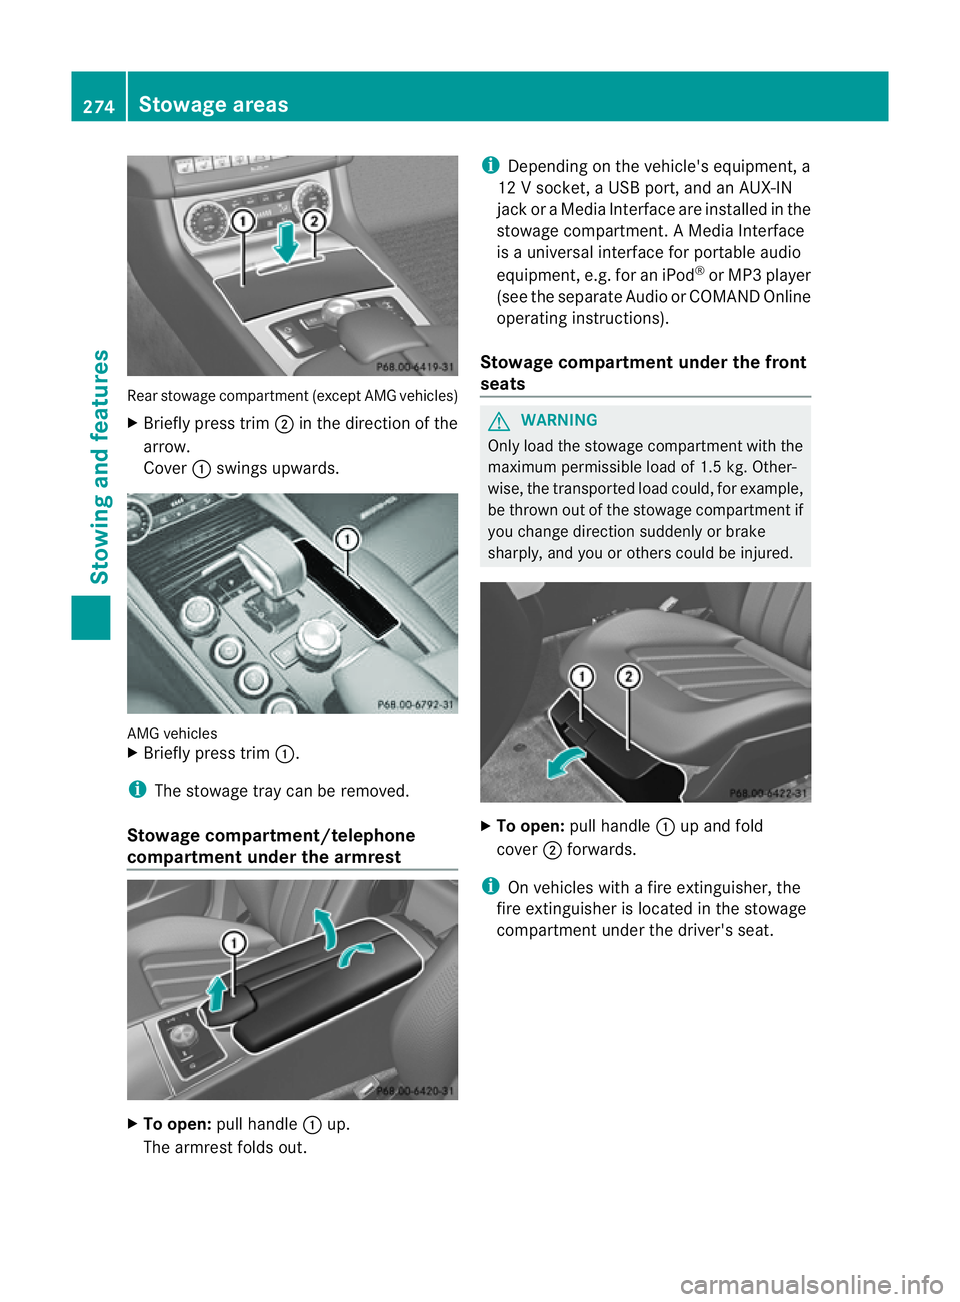
Rear stowage compartmen
t(except AMG vehicles)
X Briefly press trim ;in the direction of the
arrow.
Cover :swings upwards. AMG vehicles
X
Briefly press trim :.
i The stowage tray can be removed.
Stowage compartment/telephone
compartment under the armrest X
To open: pull handle :up.
The armrest folds out. i
Depending on the vehicle's equipment, a
12 Vsocket, aUSB port, and an AUX-IN
jack or aMedia Interface are installed in the
stowage compartment .AMedia Interface
is au niversal interface for portable audio
equipment, e.g. for an iPod ®
or MP3 player
(see the separate Audio or COMAND Online
operating instructions).
Stowage compartment under the front
seats G
WARNING
Only load the stowage compartment with the
maximum permissible load of 1.5 kg. Other-
wise, the transported load could, for example,
be thrown out of the stowage compartment if
you change direction suddenly or brake
sharply, and you or others could be injured. X
To open: pull handle :up and fold
cover ;forwards.
i On vehicles with afire extinguisher, the
fire extinguisher is located in the stowage
compartment under the driver's seat. 274
Stowage areasStowing and features