brake MERCEDES-BENZ CLS COUPE 2014 User Guide
[x] Cancel search | Manufacturer: MERCEDES-BENZ, Model Year: 2014, Model line: CLS COUPE, Model: MERCEDES-BENZ CLS COUPE 2014Pages: 417, PDF Size: 14.15 MB
Page 27 of 417
Do not install accessories such as audio
systems in these areas. Do not carry out
repairs or welding. You could impair the
operating efficiency of the restraint sys-
tems.
Have accessories retrofitted at a qualified
specialist workshop.
You could jeopardise the operating safety of
your vehicle if you use parts, tyres and wheels
as well as accessories relevant to safety
which have not been approved by Mercedes. This could lead to malfunctions in safety-rel-
evant systems, e.g. the brake system. Use
only genuine Mercedes-Benz parts or parts of
equal quality. Only use tyres, wheels and
accessories that have been specifically
approved for your vehicle.
Mercedes-Benz tests genuine parts and con-
version parts and accessories that have been specifically approved for your vehicle for their
reliability, safety and suitability. Despite
ongoing market research, Mercedes-Benz is
unable to assess other parts. Mercedes-Benz therefore accepts no responsibility for the
use of such parts in Mercedes-Benz vehicles, even if they have been officially approved or
independently approved by a testing centre.
In Germany, certain parts are only officially
approved for installation or modification if
they comply with legal requirements. This
also applies to some other countries. All gen-
uine Mercedes-Benz parts meet the approval
requirements. The use of non-approved parts may invalidate the vehicle's general operating
permit.
This is the case:
R if they cause a change of the vehicle type
from that for which the vehicle's general
operating permit was granted
R if other road users could be endangered
R if the emission or noise levels are adversely
affected
Always specify the vehicle identification num- ber (VIN) when ordering genuine Mercedes-
Benz parts (Y page 398). Owner's Manual
Vehicle equipment
This Owner's Manual describes all models
and all standard and optional equipment
available for your vehicle at the time of pub-
lication of the Owner's Manual. Country-spe- cific differences are possible. Note that your
vehicle may not be fitted with all features
described. This is also the case for systems
and functions relevant to safety. Therefore,
the equipment on your vehicle may differ from
that in the descriptions and illustrations.
The original purchase contract documenta-
tion for your vehicle contains a list of all of the
systems in your vehicle.
Should you have any questions concerning
equipment and operation, please consult a
Mercedes-Benz Service Centre.
The Owner's Manual and Service Booklet are important documents and should kept in the
vehicle. Operating safety
Important safety notes
G
WARNING
If you do not have the prescribed service/
maintenance work or necessary repairs car-
ried out, this could result in malfunctions or
system failures. There is a risk of an accident.
Always have the prescribed service/mainte-
nance work as well as necessary repairs car-
ried out at a qualified specialist workshop. G
WARNING
If you switch off the ignition while driving,
safety-relevant functions are only available
with limitations, or not at all. This could affect, for example, the power steering and the brake
boosting effect. You will require considerably
more effort to steer and brake. There is a risk of an accident.
Do not switch off the ignition while driving. 24
Introduction
Page 30 of 417
Implied warranty
! Follow the instructions in this manual
about the proper operation of your vehicle
as well as about possible vehicle damage.
Damage to your vehicle that arises from
culpable contraventions against these
instructions are not covered either by
Mercedes-Benz implied warranty or by the
New or Used-Vehicle Warranty. Data stored in the vehicle
A wide range of electronic components in
your vehicle contain data memories.
These data memories temporarily or perma-
nently store technical information about:
R the vehicle's operating state
R events
R faults
In general, this technical information docu-
ments the state of a component, a module, a
system or the surroundings.
These include, for example:
R operating conditions of system compo-
nents, e.g. fluid levels
R the vehicle's status messages and those of
its individual components, e.g. number of
wheel revolutions/speed, deceleration in
movement, lateral acceleration, accelera-
tor pedal position
R malfunctions and defects in important sys-
tem components, e.g. lights, brakes
R vehicle reactions and operating conditions
in special driving situations, e.g. airbag
deployment, intervention of stability con-
trol systems
R ambient conditions, e.g. outside tempera-
ture This data is of an exclusively technical nature
and can be used to:
R assist in recognising and rectifying faults
and defects
R analyse vehicle functions, e.g. after an acci-
dent
R optimise vehicle functions
The data cannot be used to trace the vehicle's movements.
When your vehicle is serviced, technical infor-
mation can be read from the event data mem- ory and fault data memory.
Services include, for example:
R repair services
R service processes
R warranty events
R quality assurance
It is read by employees of the service network (including manufacturers) using special diag-
nostic testers. More detailed information is
obtained from it, if required.
After a fault has been rectified, the informa-
tion is deleted from the fault memory or is
continually overwritten.
When operating the vehicle, situations are
conceivable in which this technical data, in
connection with other information (if neces-
sary, under consultation with an authorised
expert), could be traced to a person.
Examples include:
R accident reports
R damage to the vehicle
R witness statements
Further additional functions that have been
contractually agreed upon with the customer
allow certain vehicle data to be conveyed by
the vehicle as well. The additional functions
include, for example, vehicle location in case of an emergency. Introduction
27 Z
Page 33 of 417
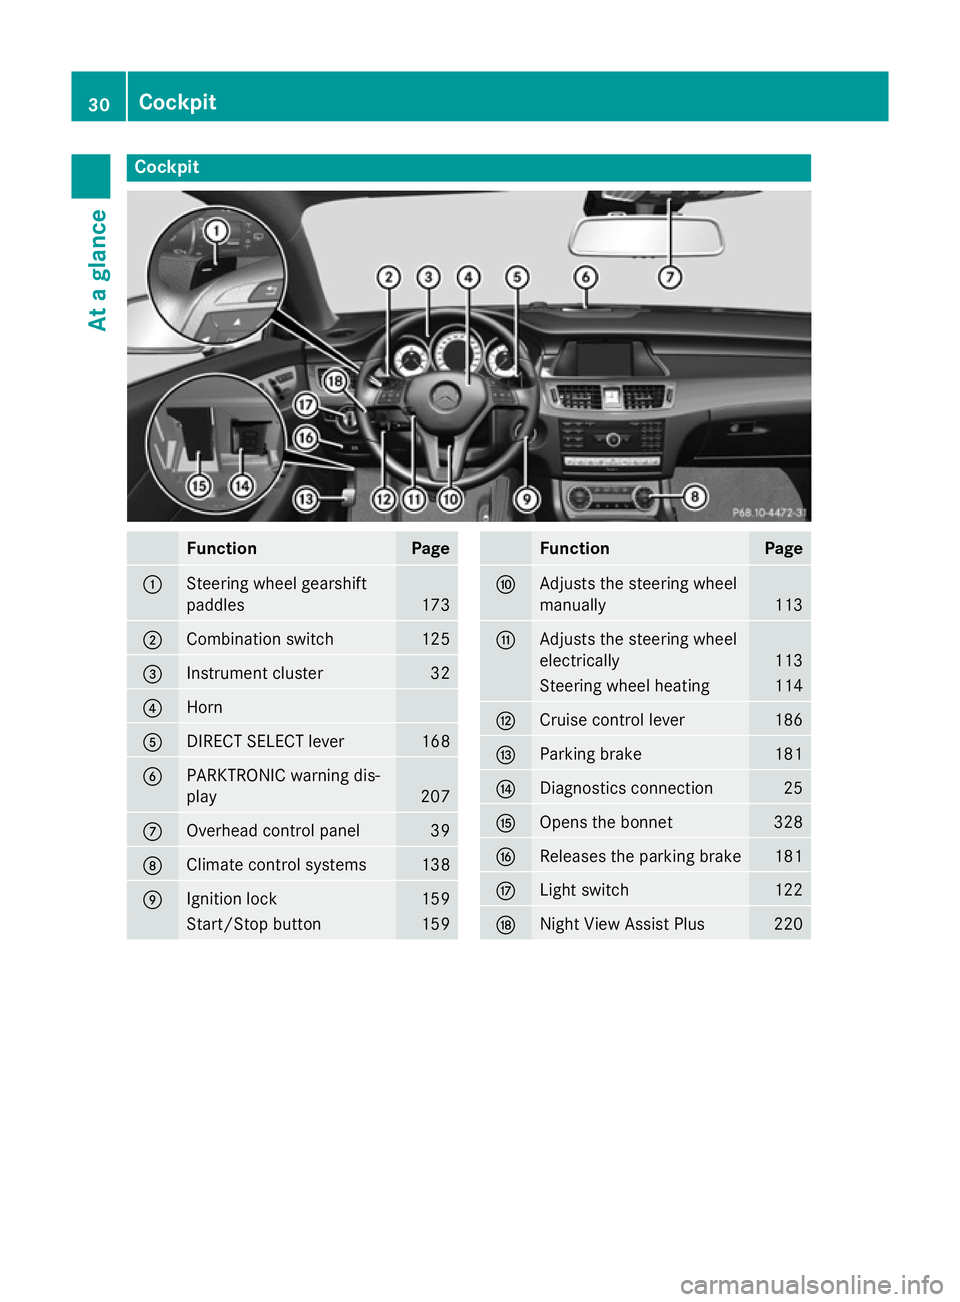
Cockpit
Function Page
:
Steering wheel gearshift
paddles
173
;
Combination switch 125
=
Instrument cluster 32
?
Horn
A
DIRECT SELECT lever 168
B
PARKTRONIC warning dis-
play
207
C
Overhead control panel 39
D
Climate control systems 138
E
Ignition lock 159
Start/Stop button 159 Function Page
F
Adjusts the steering wheel
manually
113
G
Adjusts the steering wheel
electrically
113
Steering wheel heating 114
H
Cruise control lever 186
I
Parking brake 181
J
Diagnostics connection 25
K
Opens the bonnet 328
L
Releases the parking brake 181
M
Light switch 122
N
Night View Assist Plus 22030
CockpitAt a glance
Page 34 of 417
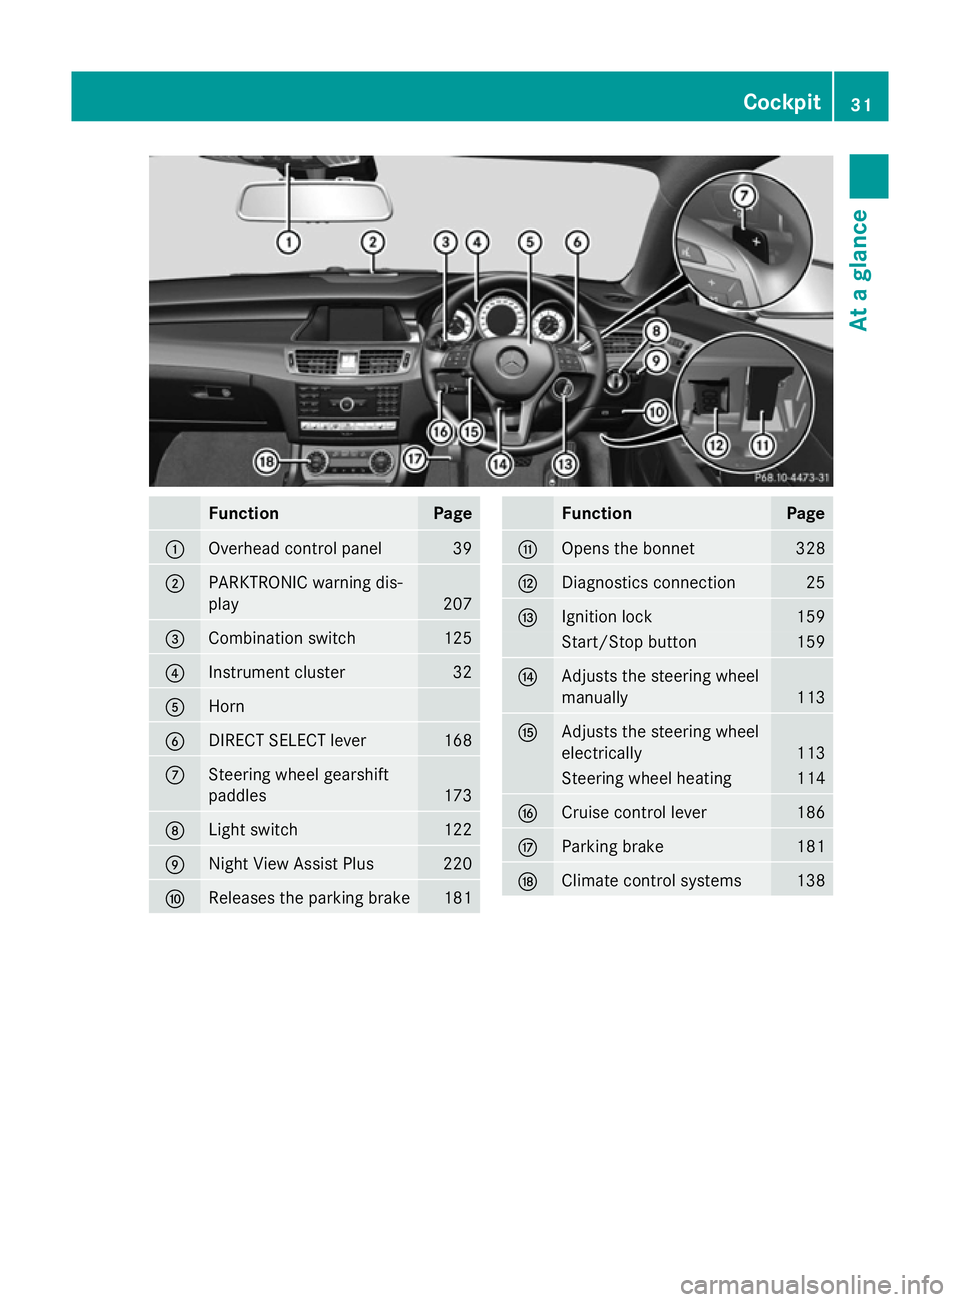
Function Page
:
Overhead control panel 39
;
PARKTRONIC warning dis-
play 207
=
Combination switch 125
?
Instrument cluster 32
A
Horn
B
DIRECT SELECT lever 168
C
Steering wheel gearshift
paddles
173
D
Light switch 122
E
Night View Assist Plus 220
F
Releases the parking brake 181 Function Page
G
Opens the bonnet 328
H
Diagnostics connection 25
I
Ignition lock 159
Start/Stop button 159
J
Adjusts the steering wheel
manually
113
K
Adjusts the steering wheel
electrically
113
Steering wheel heating 114
L
Cruise control lever 186
M
Parking brake 181
N
Climate control systems 138Cockpit
31At a glance
Page 37 of 417
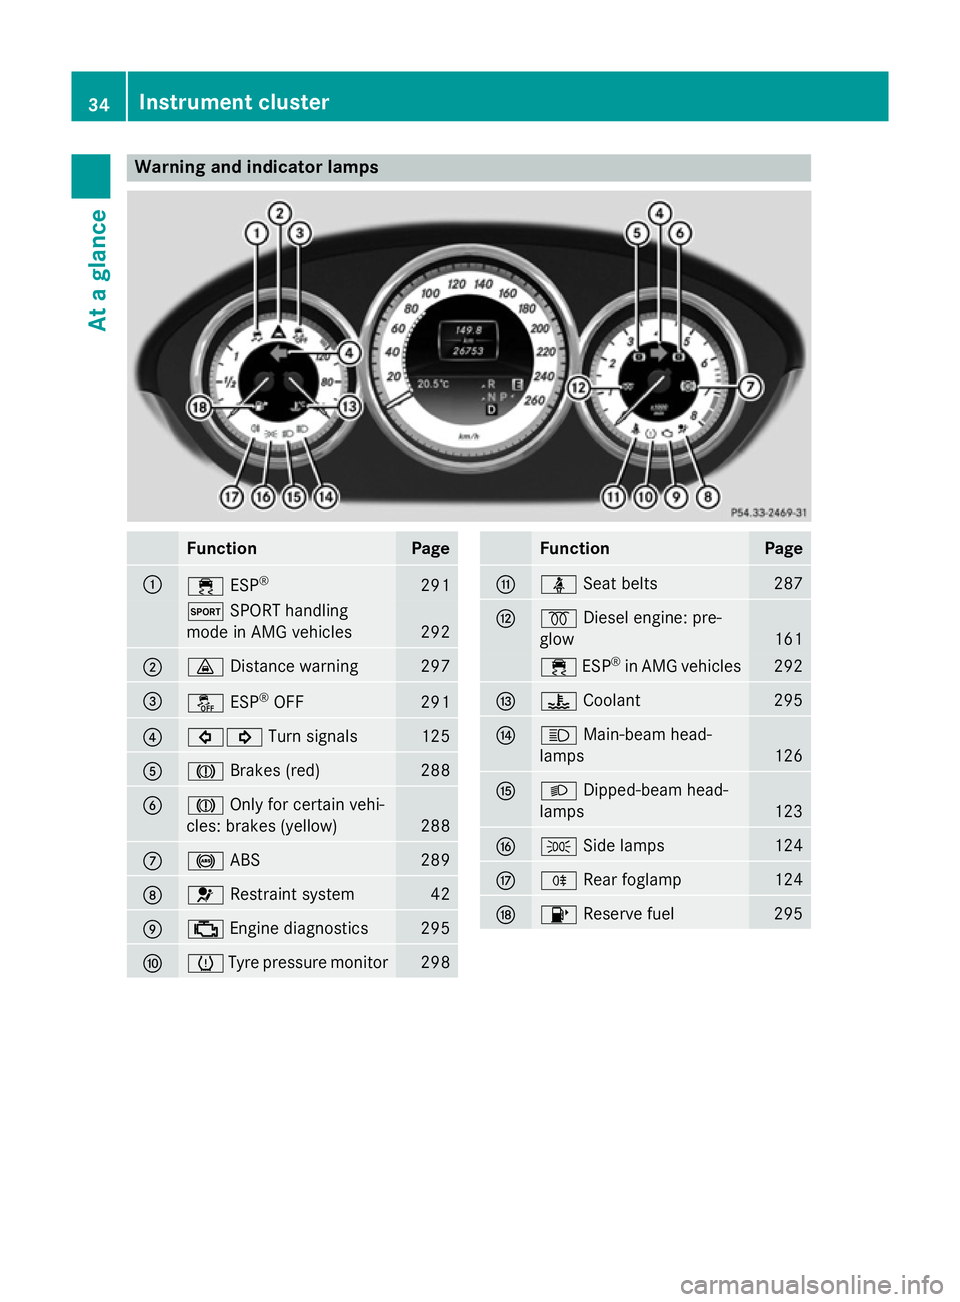
Warning and indicator lamps
Function Page
:
÷
ESP® 291
M
SPORT handling
mode in AMG vehicles 292
;
·
Distance warning 297
=
å
ESP®
OFF 291
?
#!
Turn signals 125
A
J
Brakes (red) 288
B
J
Only for certain vehi-
cles: brakes (yellow) 288
C
!
ABS 289
D
6
Restraint system 42
E
;
Engine diagnostics 295
F
h
Tyre pressure monitor 298 Function Page
G
ü
Seat belts 287
H
%
Diesel engine: pre-
glow 161
÷
ESP®
in AMG vehicles 292
I
?
Coolant 295
J
K
Main-beam head-
lamps 126
K
L
Dipped-beam head-
lamps 123
L
T
Side lamps 124
M
R
Rear foglamp 124
N
8
Reserve fuel 29534
Instrument clusterAt a glance
Page 39 of 417
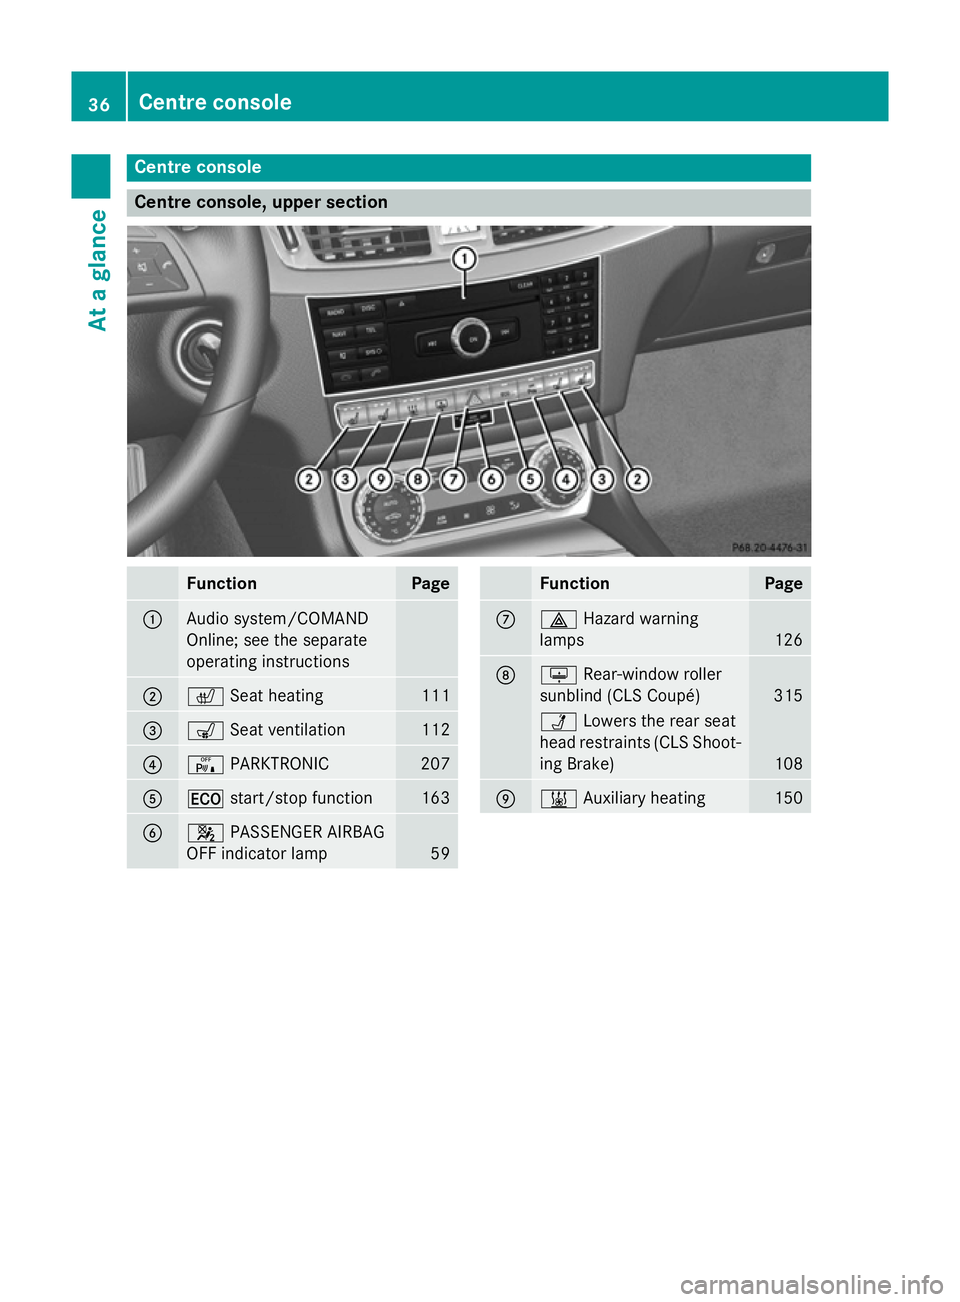
Centre console
Centre console, upper section
Function Page
:
Audio system/COMAND
Online; see the separate
operating instructions
;
c
Seat heating 111
=
s
Seat ventilation 112
?
c
PARKTRONIC 207
A
¤
start/stop function 163
B
4
PASSENGER AIRBAG
OFF indicator lamp 59 Function Page
C
£
Hazard warning
lamps 126
D
u
Rear-window roller
sunblind (CLS Coupé) 315
Ü
Lowers the rear seat
head restraints (CLS Shoot-
ing Brake) 108
E
&
Auxiliary heating 15036
Centre consoleAt a glance
Page 49 of 417
R
only one person is using a seat belt.
Infants and children must never travel sit-
ting on the lap of a vehicle occupant. In the
event of an accident, they could be crushed between the vehicle occupant and seat
belt.
R objects are never secured with a seat belt if
the seat belt is also being used by one of the vehicle's occupants.
Seat belts are only intended to secure and
restrain vehicle occupants. Always observe
the "Loading guidelines" for securing objects,
luggage or loads (Y page 300).
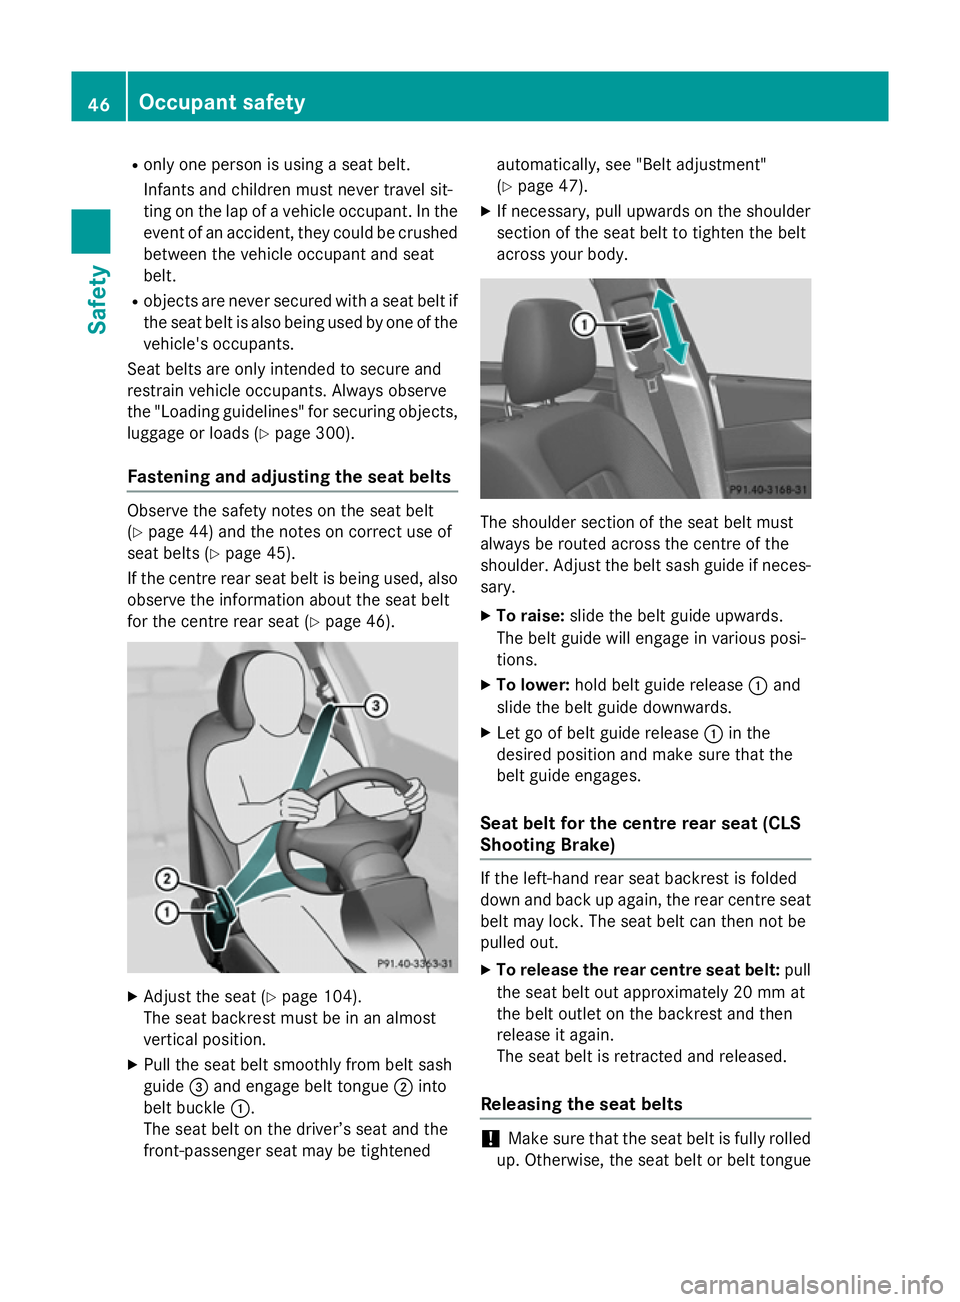
Fastening and adjusting the seat belts Observe the safety notes on the seat belt
(Y page 44) and the notes on correct use of
seat belts (Y page 45).
If the centre rear seat belt is being used, also
observe the information about the seat belt
for the centre rear seat (Y page 46).X
Adjust the seat (Y page 104).
The seat backrest must be in an almost
vertical position.
X Pull the seat belt smoothly from belt sash
guide =and engage belt tongue ;into
belt buckle :.
The seat belt on the driver’s seat and the
front-passenger seat may be tightened automatically, see "Belt adjustment"
(Y
page 47).
X If necessary, pull upwards on the shoulder
section of the seat belt to tighten the belt
across your body. The shoulder section of the seat belt must
always be routed across the centre of the
shoulder. Adjust the belt sash guide if neces-
sary.
X To raise: slide the belt guide upwards.
The belt guide will engage in various posi-
tions.
X To lower: hold belt guide release :and
slide the belt guide downwards.
X Let go of belt guide release :in the
desired position and make sure that the
belt guide engages.
Seat belt for the centre rear seat (CLS
Shooting Brake) If the left-hand rear seat backrest is folded
down and back up again, the rear centre seat
belt may lock. The seat belt can then not be
pulled out.
X To release the rear centre seat belt: pull
the seat belt out approximately 20 mm at
the belt outlet on the backrest and then
release it again.
The seat belt is retracted and released.
Releasing the seat belts !
Make sure that the seat belt is fully rolled
up. Otherwise, the seat belt or belt tongue 46
Occupant safetySafety
Page 57 of 417
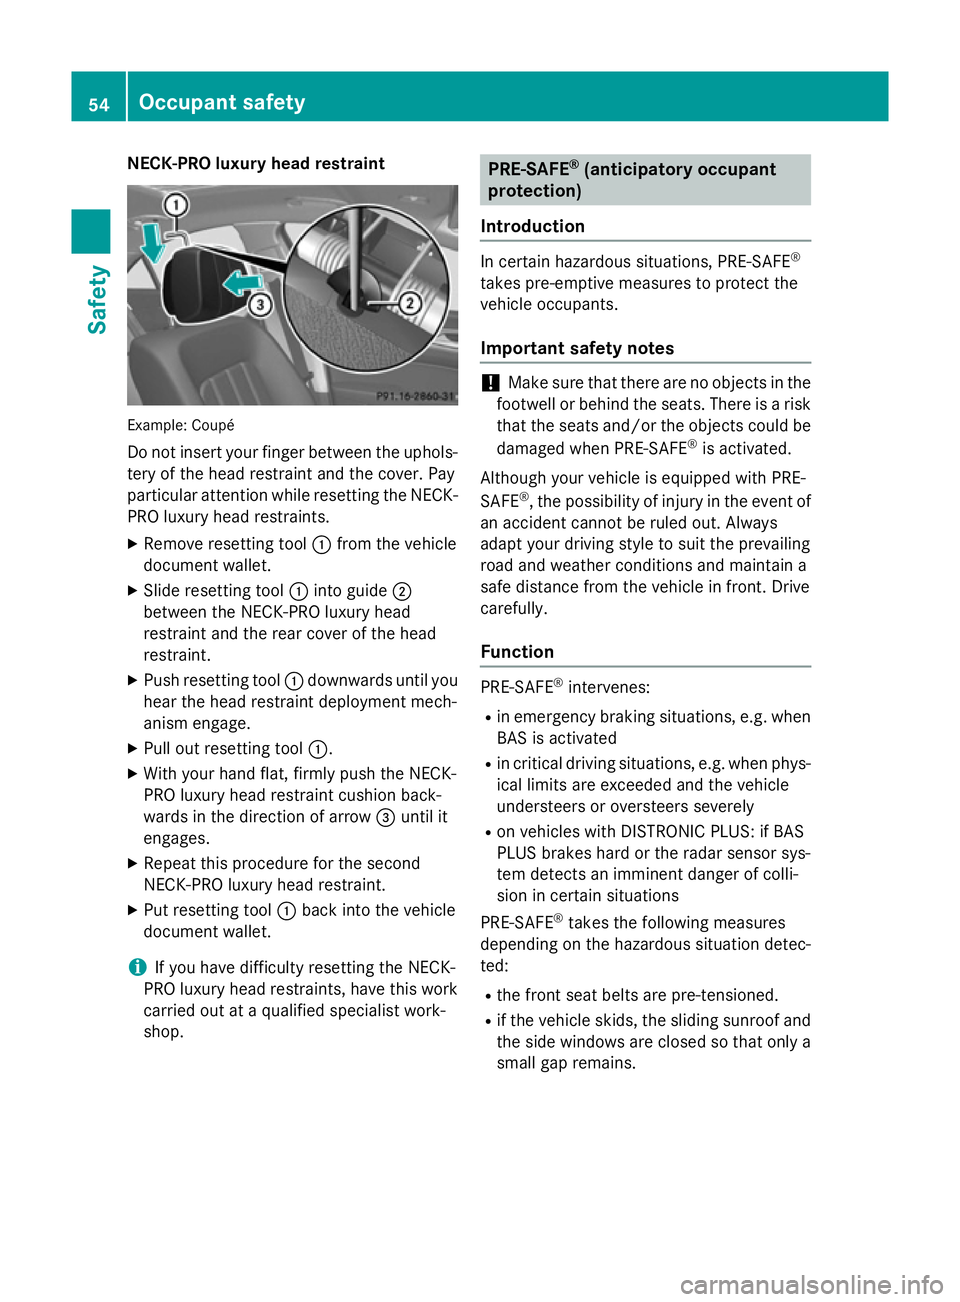
NECK-PRO luxury head restraint
Example: Coupé
Do not insert your finger between the uphols- tery of the head restraint and the cover. Pay
particular attention while resetting the NECK- PRO luxury head restraints.
X Remove resetting tool :from the vehicle
document wallet.
X Slide resetting tool :into guide ;
between the NECK-PRO luxury head
restraint and the rear cover of the head
restraint.
X Push resetting tool :downwards until you
hear the head restraint deployment mech-
anism engage.
X Pull out resetting tool :.
X With your hand flat, firmly push the NECK-
PRO luxury head restraint cushion back-
wards in the direction of arrow =until it
engages.
X Repeat this procedure for the second
NECK-PRO luxury head restraint.
X Put resetting tool :back into the vehicle
document wallet.
i If you have difficulty resetting the NECK-
PRO luxury head restraints, have this work carried out at a qualified specialist work-
shop. PRE-SAFE
®
(anticipatory occupant
protection)
Introduction In certain hazardous situations, PRE-SAFE
®
takes pre-emptive measures to protect the
vehicle occupants.
Important safety notes !
Make sure that there are no objects in the
footwell or behind the seats. There is a risk that the seats and/or the objects could be
damaged when PRE-SAFE ®
is activated.
Although your vehicle is equipped with PRE-
SAFE ®
, the possibility of injury in the event of
an accident cannot be ruled out. Always
adapt your driving style to suit the prevailing
road and weather conditions and maintain a
safe distance from the vehicle in front. Drive
carefully.
Function PRE-SAFE
®
intervenes:
R in emergency braking situations, e.g. when
BAS is activated
R in critical driving situations, e.g. when phys-
ical limits are exceeded and the vehicle
understeers or oversteers severely
R on vehicles with DISTRONIC PLUS: if BAS
PLUS brakes hard or the radar sensor sys-
tem detects an imminent danger of colli-
sion in certain situations
PRE-SAFE ®
takes the following measures
depending on the hazardous situation detec-
ted:
R the front seat belts are pre-tensioned.
R if the vehicle skids, the sliding sunroof and
the side windows are closed so that only a small gap remains. 54
Occupant safetySafety
Page 58 of 417
R
vehicles with the memory function: the
front-passenger seat is adjusted if it is in an unfavourable position.
R Vehicles with a multicontour seat or active
multicontour seat: the air pressure in the
side bolsters of the backrest is increased.
If the hazardous situation passes without
resulting in an accident, PRE-SAFE ®
slackens
the belt pre-tensioning. On vehicles with mul-
ticontour seats/active multicontour seats,
the air pressure in the side bolsters is reduced
again. All settings made by PRE-SAFE ®
can
then be reversed.
If the seat belt pre-tensioning is not reduced:
X Move the seat backrest or seat back
slightly when the vehicle is stationary.
Seat belt pre-tensioning is reduced and the
locking mechanism is released.
The seat-belt adjustment is an integral part of
the PRE-SAFE ®
convenience function. Fur-
ther information can be found under "Belt
adjustment" (Y page 47). Automatic measures after an acci-
dent
Immediately after an accident, the following
measures are implemented, depending on
the type and severity of the impact:
R the hazard warning lamps are activated
R the emergency lighting is activated
R the vehicle doors are unlocked
R the front side windows are lowered
R the electrically adjustable steering wheel is
raised
R the engine is switched off
R vehicles with the Mercedes-Benz emer-
gency call system: automatic emergency
call Children in the vehicle
Important safety notes
Accident statistics show that children
secured in the rear seats are safer than chil-
dren secured in the front-passenger seat. For this reason, Mercedes-Benz strongly advises
that you install a child restraint system on a
rear seat. Children are generally better pro-
tected there.
If a child younger than 12 years old and under
1.50 m in height is travelling in the vehicle:
R always secure the child in a child restraint
system suitable for Mercedes-Benz vehi-
cles. The child restraint system must be
appropriate to the age, weight and size of
the child.
R be sure to observe the instructions and
safety notes in this section in addition to
the child restraint system manufacturer's
installation instructions G
WARNING
If you leave children unattended in the vehi-
cle, they may be able to set the vehicle in
motion if, for example, they:
R release the parking brake
R shift the automatic transmission out of park
position P
R start the engine
In addition, they may operate vehicle equip-
ment and become trapped. There is a risk of
an accident and injury.
When leaving the vehicle, always take the key
with you and lock the vehicle. Never leave
children unattended in the vehicle. G
WARNING
If persons (particularly children) are exposed
to heat or cold for a prolonged period, there is a risk of serious or even fatal injuries. Never
leave persons (particularly children) unatten-
ded in the vehicle. Children in the vehicle
55Safety Z
Page 61 of 417
dent, heavy braking or sudden changes of
direction. As a result, child restraint systems
cannot perform their intended protective
function. Rear seat backrests that are not
locked can also cause additional injuries, e.g. in the event of an accident. This poses an
increased risk of injury or even fatal injury.
Always lock rear seat backrests after fitting a Top Tether belt. Observe the lock verificationindicator. Adjust the rear seat backrests so
that they are in an upright position.
If the rear seat backrest is not engaged and
locked, this will be shown in the multifunction display in the instrument cluster. A warning
tone also sounds.
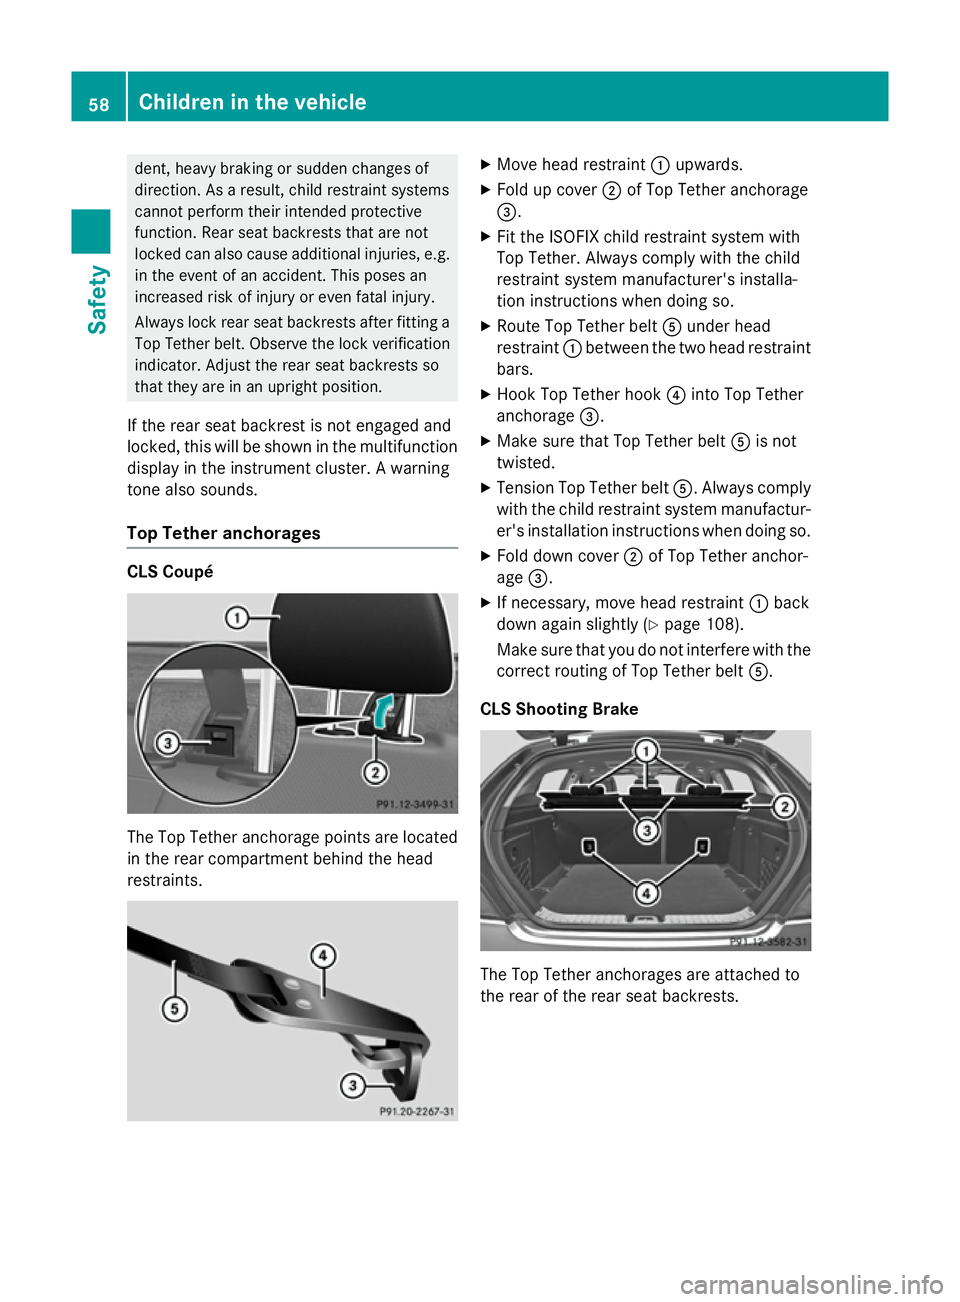
Top Tether anchorages CLS Coupé
The Top Tether anchorage points are located
in the rear compartment behind the head
restraints. X
Move head restraint :upwards.
X Fold up cover ;of Top Tether anchorage
=.
X Fit the ISOFIX child restraint system with
Top Tether. Always comply with the child
restraint system manufacturer's installa-
tion instructions when doing so.
X Route Top Tether belt Aunder head
restraint :between the two head restraint
bars.
X Hook Top Tether hook ?into Top Tether
anchorage =.
X Make sure that Top Tether belt Ais not
twisted.
X Tension Top Tether belt A. Always comply
with the child restraint system manufactur- er's installation instructions when doing so.
X Fold down cover ;of Top Tether anchor-
age =.
X If necessary, move head restraint :back
down again slightly (Y page 108).
Make sure that you do not interfere with the
correct routing of Top Tether belt A.
CLS Shooting Brake The Top Tether anchorages are attached to
the rear of the rear seat backrests.58
Children in the vehicleSafety