steering MERCEDES-BENZ CLS COUPE 2014 Owner's Guide
[x] Cancel search | Manufacturer: MERCEDES-BENZ, Model Year: 2014, Model line: CLS COUPE, Model: MERCEDES-BENZ CLS COUPE 2014Pages: 417, PDF Size: 14.15 MB
Page 119 of 417
when you store the setting with the memory
function (Y page 119).
Crash-responsive EASY-EXIT feature If the crash-responsive EASY-EXIT feature is
triggered in an accident, the steering column
will move upwards when the driver's door is
opened. This occurs irrespective of the posi-
tion of the key in the ignition lock. This makes it easier to exit the vehicle and rescue the
occupants.
The crash-responsive EASY-EXIT feature is
only operational if the EASY-EXIT/ENTRY fea-
ture is activated in the on-board computer
(Y page 257). Mirrors
Rear-view mirror
X
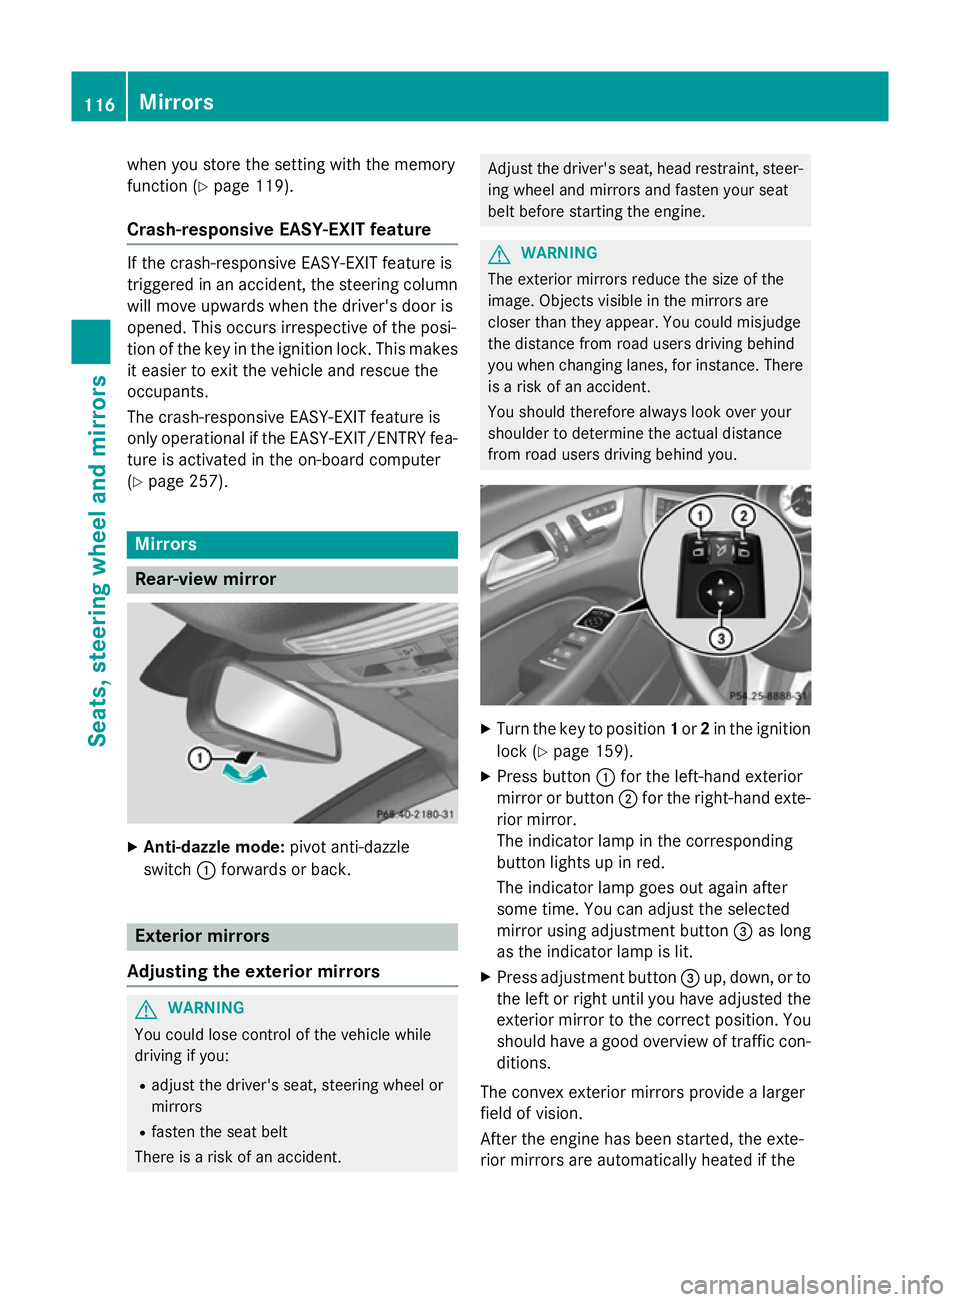
Anti-dazzle mode: pivot anti-dazzle
switch :forwards or back. Exterior mirrors
Adjusting the exterior mirrors G
WARNING
You could lose control of the vehicle while
driving if you:
R adjust the driver's seat, steering wheel or
mirrors
R fasten the seat belt
There is a risk of an accident. Adjust the driver's seat, head restraint, steer-
ing wheel and mirrors and fasten your seat
belt before starting the engine. G
WARNING
The exterior mirrors reduce the size of the
image. Objects visible in the mirrors are
closer than they appear. You could misjudge
the distance from road users driving behind
you when changing lanes, for instance. There is a risk of an accident.
You should therefore always look over your
shoulder to determine the actual distance
from road users driving behind you. X
Turn the key to position 1or 2in the ignition
lock (Y page 159).
X Press button :for the left-hand exterior
mirror or button ;for the right-hand exte-
rior mirror.
The indicator lamp in the corresponding
button lights up in red.
The indicator lamp goes out again after
some time. You can adjust the selected
mirror using adjustment button =as long
as the indicator lamp is lit.
X Press adjustment button =up, down, or to
the left or right until you have adjusted the
exterior mirror to the correct position. You
should have a good overview of traffic con- ditions.
The convex exterior mirrors provide a larger
field of vision.
After the engine has been started, the exte-
rior mirrors are automatically heated if the 116
MirrorsSeats, steering wheel and mirrors
Page 120 of 417
rear window heating is switched on and the
outside temperature is low. Heating takes a
maximum of ten minutes.
i The exterior mirrors can also be heated
manually by switching on the rear window
heating.
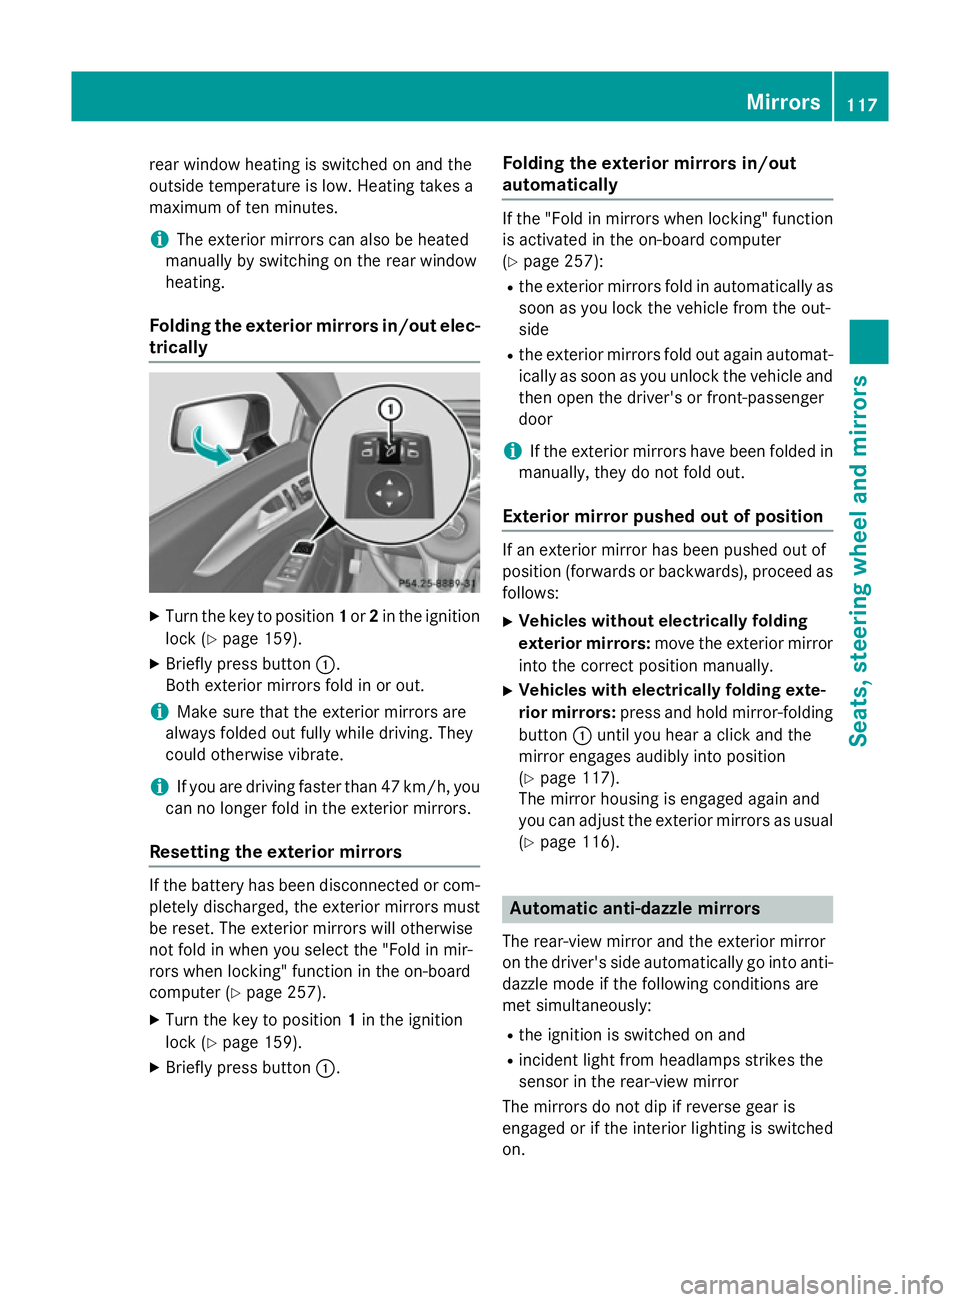
Folding the exterior mirrors in/out elec- trically X
Turn the key to position 1or 2in the ignition
lock (Y page 159).
X Briefly press button :.
Both exterior mirrors fold in or out.
i Make sure that the exterior mirrors are
always folded out fully while driving. They
could otherwise vibrate.
i If you are driving faster than 47 km/h, you
can no longer fold in the exterior mirrors.
Resetting the exterior mirrors If the battery has been disconnected or com-
pletely discharged, the exterior mirrors must
be reset. The exterior mirrors will otherwise
not fold in when you select the "Fold in mir-
rors when locking" function in the on-board
computer (Y page 257).
X Turn the key to position 1in the ignition
lock (Y page 159).
X Briefly press button :. Folding the exterior mirrors in/out
automatically If the "Fold in mirrors when locking" function
is activated in the on-board computer
(Y page 257):
R the exterior mirrors fold in automatically as
soon as you lock the vehicle from the out-
side
R the exterior mirrors fold out again automat-
ically as soon as you unlock the vehicle and
then open the driver's or front-passenger
door
i If the exterior mirrors have been folded in
manually, they do not fold out.
Exterior mirror pushed out of position If an exterior mirror has been pushed out of
position (forwards or backwards), proceed as
follows:
X Vehicles without electrically folding
exterior mirrors: move the exterior mirror
into the correct position manually.
X Vehicles with electrically folding exte-
rior mirrors: press and hold mirror-folding
button :until you hear a click and the
mirror engages audibly into position
(Y page 117).
The mirror housing is engaged again and
you can adjust the exterior mirrors as usual
(Y page 116). Automatic anti-dazzle mirrors
The rear-view mirror and the exterior mirror
on the driver's side automatically go into anti- dazzle mode if the following conditions are
met simultaneously:
R the ignition is switched on and
R incident light from headlamps strikes the
sensor in the rear-view mirror
The mirrors do not dip if reverse gear is
engaged or if the interior lighting is switched
on. Mirrors
117Seats, steering wheel and mirrors Z
Page 121 of 417
Parking position of the exterior mirror
on the front-passenger side
Setting and storing the parking position Using reverse gear
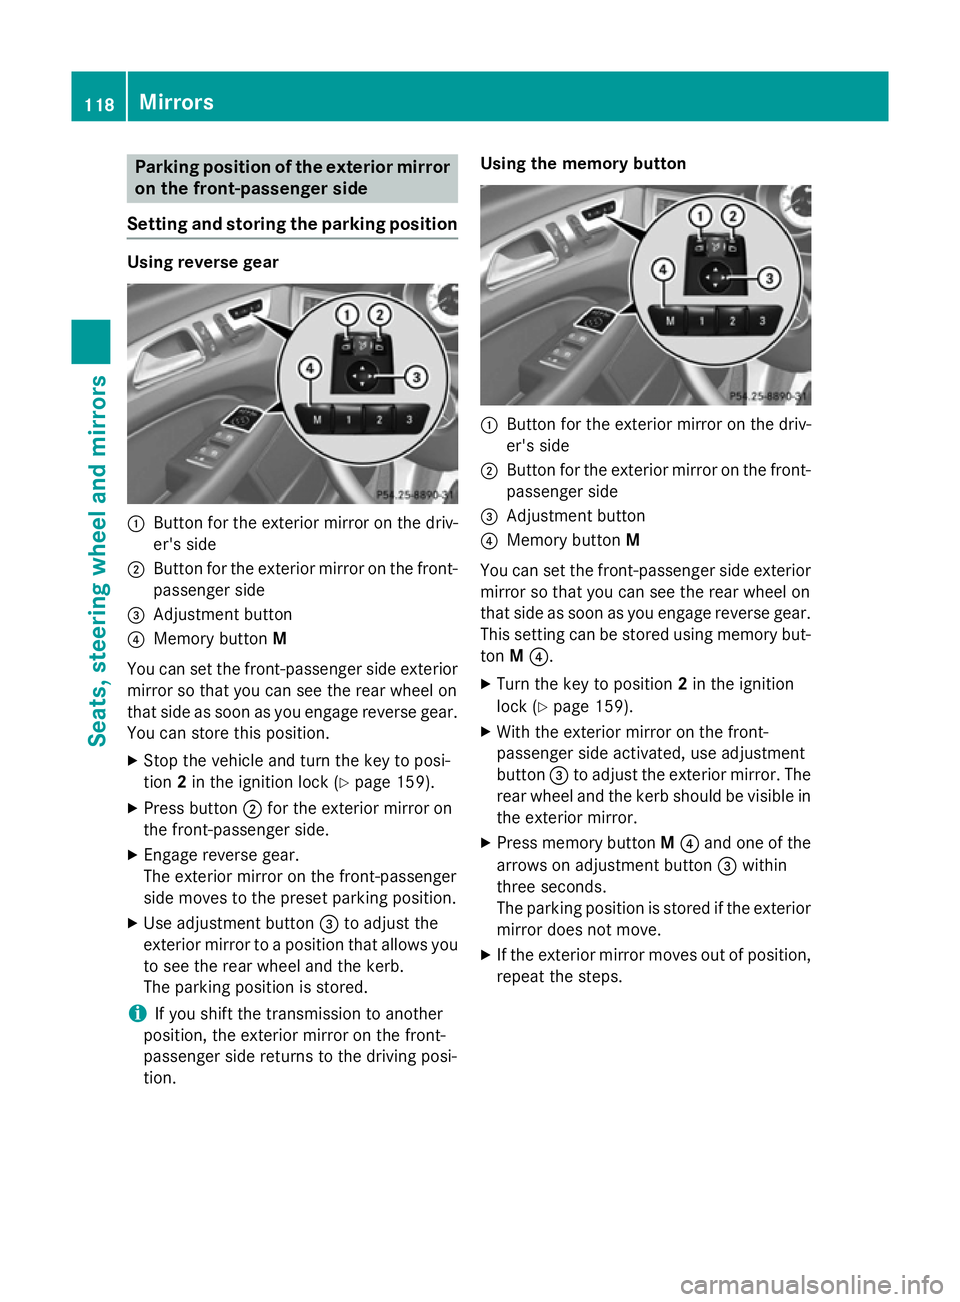
:
Button for the exterior mirror on the driv-
er's side
; Button for the exterior mirror on the front-
passenger side
= Adjustment button
? Memory button M
You can set the front-passenger side exterior
mirror so that you can see the rear wheel on
that side as soon as you engage reverse gear.
You can store this position.
X Stop the vehicle and turn the key to posi-
tion 2in the ignition lock (Y page 159).
X Press button ;for the exterior mirror on
the front-passenger side.
X Engage reverse gear.
The exterior mirror on the front-passenger
side moves to the preset parking position.
X Use adjustment button =to adjust the
exterior mirror to a position that allows you to see the rear wheel and the kerb.
The parking position is stored.
i If you shift the transmission to another
position, the exterior mirror on the front-
passenger side returns to the driving posi-
tion. Using the memory button
:
Button for the exterior mirror on the driv-
er's side
; Button for the exterior mirror on the front-
passenger side
= Adjustment button
? Memory button M
You can set the front-passenger side exterior
mirror so that you can see the rear wheel on
that side as soon as you engage reverse gear.
This setting can be stored using memory but-
ton M?.
X Turn the key to position 2in the ignition
lock (Y page 159).
X With the exterior mirror on the front-
passenger side activated, use adjustment
button =to adjust the exterior mirror. The
rear wheel and the kerb should be visible in
the exterior mirror.
X Press memory button M? and one of the
arrows on adjustment button =within
three seconds.
The parking position is stored if the exterior mirror does not move.
X If the exterior mirror moves out of position,
repeat the steps. 118
MirrorsSeats, steering wheel and mirrors
Page 122 of 417
Calling up a stored parking position set-
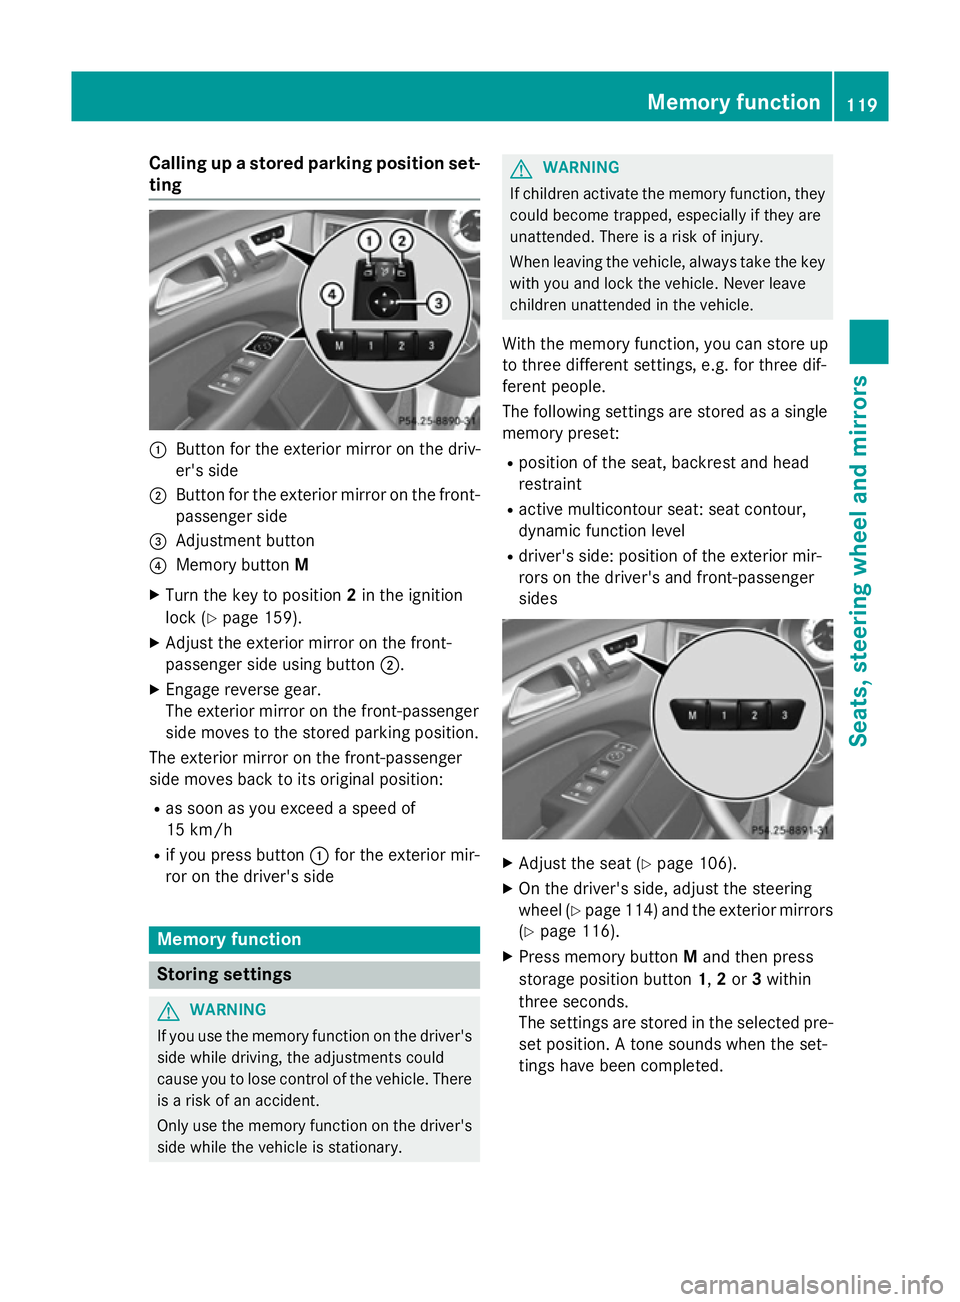
ting :
Button for the exterior mirror on the driv-
er's side
; Button for the exterior mirror on the front-
passenger side
= Adjustment button
? Memory button M
X Turn the key to position 2in the ignition
lock (Y page 159).
X Adjust the exterior mirror on the front-
passenger side using button ;.
X Engage reverse gear.
The exterior mirror on the front-passenger
side moves to the stored parking position.
The exterior mirror on the front-passenger
side moves back to its original position:
R as soon as you exceed a speed of
15 km/h
R if you press button :for the exterior mir-
ror on the driver's side Memory function
Storing settings
G
WARNING
If you use the memory function on the driver's side while driving, the adjustments could
cause you to lose control of the vehicle. There
is a risk of an accident.
Only use the memory function on the driver's
side while the vehicle is stationary. G
WARNING
If children activate the memory function, they
could become trapped, especially if they are
unattended. There is a risk of injury.
When leaving the vehicle, always take the key with you and lock the vehicle. Never leave
children unattended in the vehicle.
With the memory function, you can store up
to three different settings, e.g. for three dif-
ferent people.
The following settings are stored as a single
memory preset:
R position of the seat, backrest and head
restraint
R active multicontour seat: seat contour,
dynamic function level
R driver's side: position of the exterior mir-
rors on the driver's and front-passenger
sides X
Adjust the seat (Y page 106).
X On the driver's side, adjust the steering
wheel (Y page 114) and the exterior mirrors
(Y page 116).
X Press memory button Mand then press
storage position button 1,2 or 3within
three seconds.
The settings are stored in the selected pre- set position. A tone sounds when the set-
tings have been completed. Memory function
119Seats, steering wheel and mirrors Z
Page 123 of 417
Calling up a stored setting
X Press and hold the relevant storage posi-
tion button 1,2 or 3, until the seat, steering
wheel and exterior mirrors are in the stored position.
i The setting procedure is interrupted as
soon as you release the storage position
button. 120
Memory functionSeats, steering wheel and
mirrors
Page 130 of 417
The hazard warning lamps switch on auto-
matically if:
R an airbag is deployed or
R the vehicle decelerates rapidly from a
speed of above 70 km/h and comes to a
standstill
The hazard warning lamps switch off auto-
matically if the vehicle reaches a speed of
above 10 km/ha gain after a full brake appli-
cation.
i The hazard warning lamps continue to
operate even if the ignition is switched off. Headlamp cleaning system
The headlamps are cleaned automatically if
the "Wipe with washer fluid" function is oper-
ated five times (Y page 133) while the lights
are on and the engine is running. When you
switch off the ignition, the automatic head-
lamp cleaning system is reset and counting is
resumed from 0. Intelligent Light System
General notes The Intelligent Light System is a system that
adjusts the headlamps automatically to suit
the prevailing driving and weather conditions. It offers advanced functions for improved illu-
mination of the road surface, e.g. depending
on the vehicle speed or weather conditions.
The system includes the active light function, cornering light function, motorway mode and
extended range foglamps. The system is only
active when it is dark.
You can activate or deactivate the "Intelligent Light System" using the on-board computer
(Y page 253). Active light function
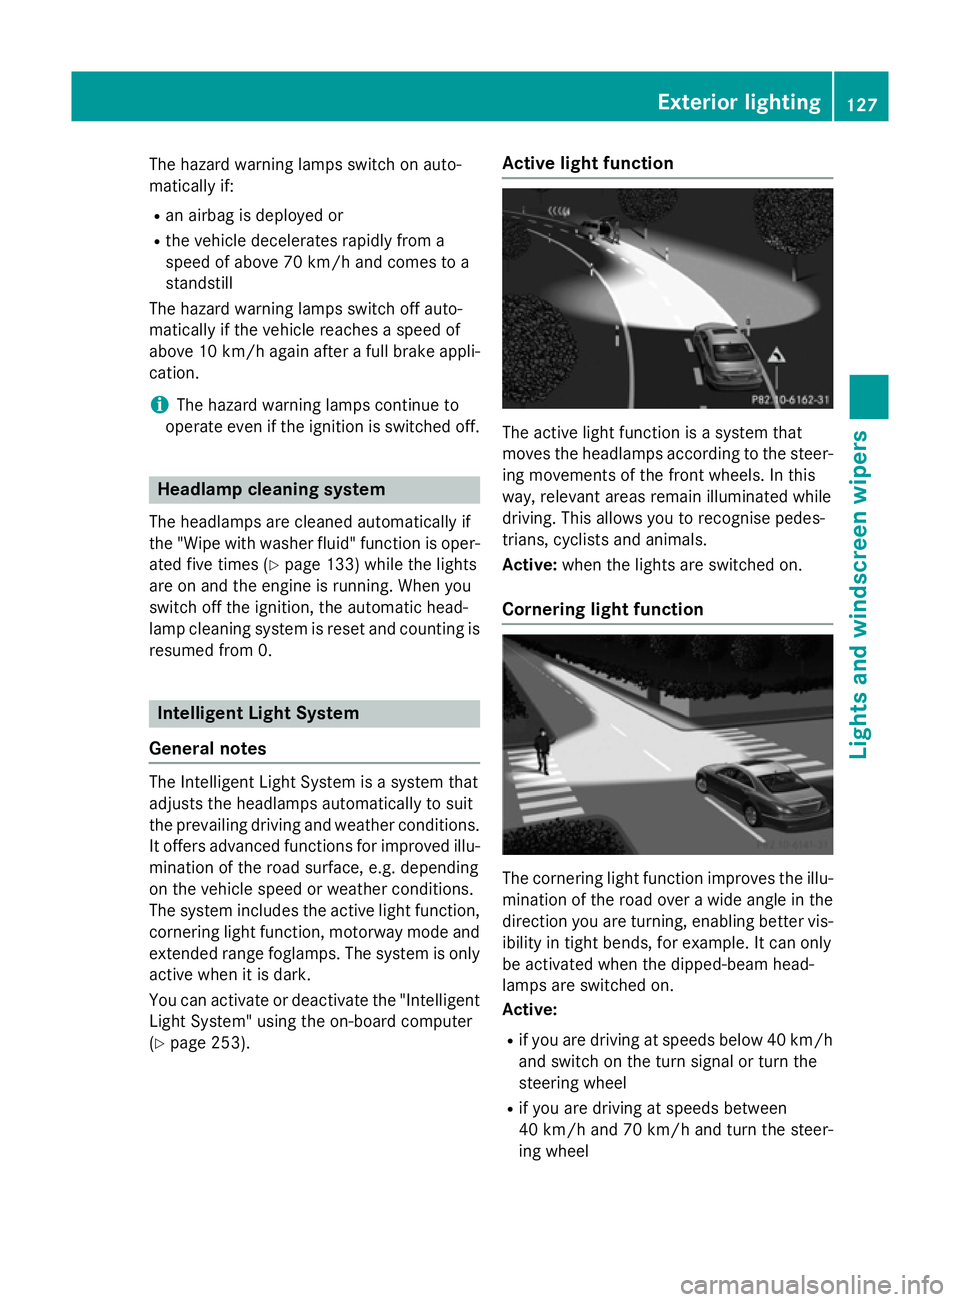
The active light function is a system that
moves the headlamps according to the steer-
ing movements of the front wheels. In this
way, relevant areas remain illuminated while
driving. This allows you to recognise pedes-
trians, cyclists and animals.
Active: when the lights are switched on.
Cornering light function The cornering light function improves the illu-
mination of the road over a wide angle in the direction you are turning, enabling better vis-
ibility in tight bends, for example. It can only
be activated when the dipped-beam head-
lamps are switched on.
Active:
R if you are driving at speeds below 40 km/h
and switch on the turn signal or turn the
steering wheel
R if you are driving at speeds between
40 km/ha nd 70 km/h and turn the steer-
ing wheel Exterior lighting
127Lights andwindscreen wipers Z
Page 131 of 417
Not active:
if you are driving at speeds above
70 km/h or switch off the turn signal or turn
the steering wheel to the straight-ahead posi- tion.
The cornering lamp may remain lit for a short
time, but is automatically switched off after
no more than three minutes.
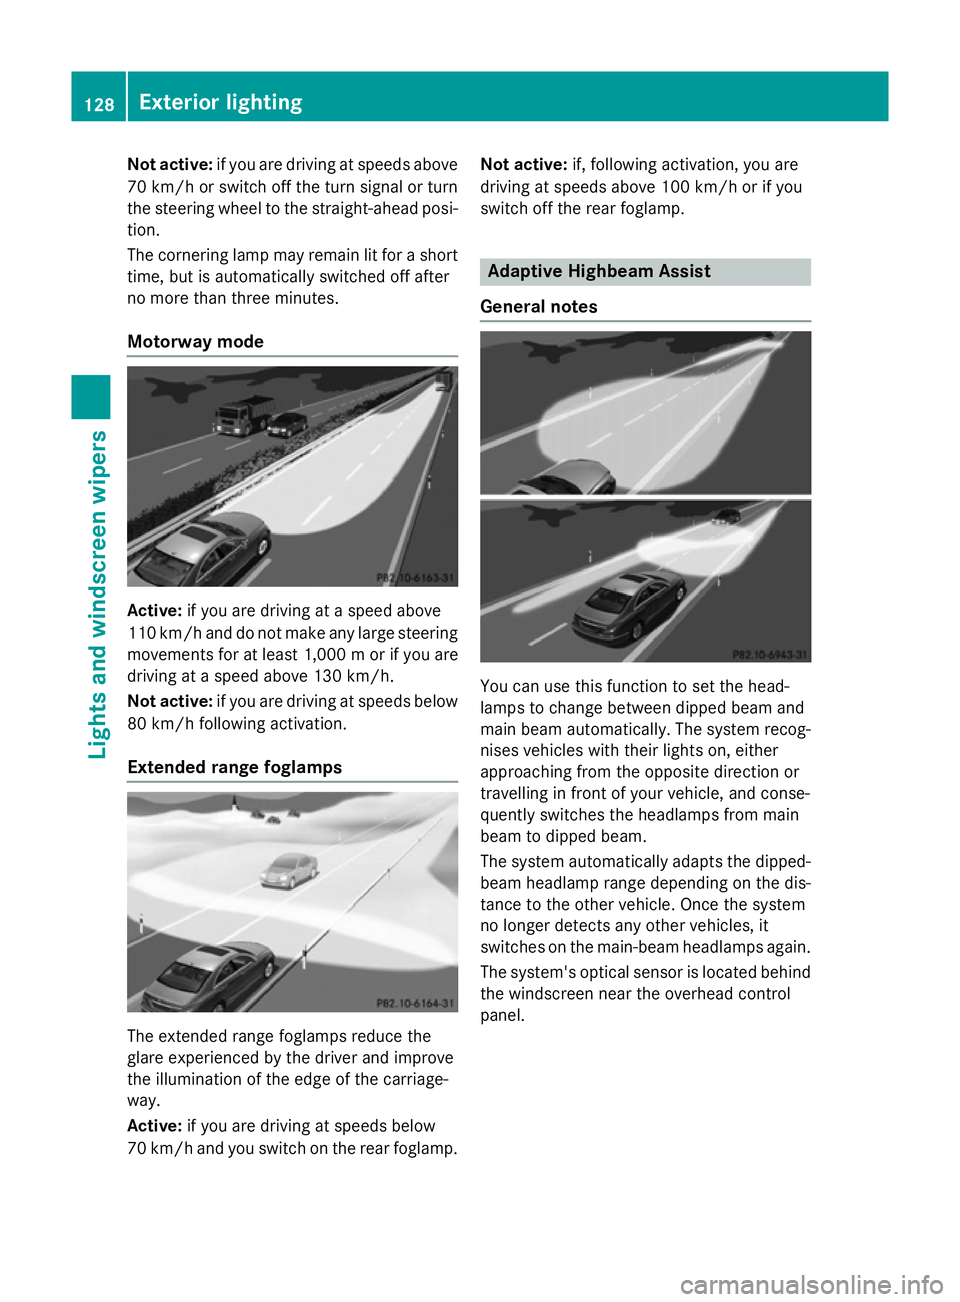
Motorway mode Active:
if you are driving at a speed above
110 km/h and do not make any large steering movements for at least 1,000 mor if you are
driving at a speed above 130 km/h.
Not active: if you are driving at speeds below
80 km/h following activation.
Extended range foglamps The extended range foglamps reduce the
glare experienced by the driver and improve
the illumination of the edge of the carriage-
way.
Active: if you are driving at speeds below
70 km/h and you switch on the rear foglamp. Not active:
if, following activation, you are
driving at speeds above 100 km/h or if you
switch off the rear foglamp. Adaptive Highbeam Assist
General notes You can use this function to set the head-
lamps to change between dipped beam and
main beam automatically. The system recog-
nises vehicles with their lights on, either
approaching from the opposite direction or
travelling in front of your vehicle, and conse-
quently switches the headlamps from main
beam to dipped beam.
The system automatically adapts the dipped- beam headlamp range depending on the dis-
tance to the other vehicle. Once the system
no longer detects any other vehicles, it
switches on the main-beam headlamps again.
The system's optical sensor is located behind
the windscreen near the overhead control
panel. 128
Exterior lightingLights and windscreen wipers
Page 162 of 417
G
WARNING
Unsuitable footwear can hinder correct usage of the pedals, e.g.:
R shoes with thick soles
R shoes with high heels
R slippers
There is a risk of an accident.
Wear suitable footwear to ensure correct
usage of the pedals. G
WARNING
If you switch off the ignition while driving,
safety-relevant functions are only available
with limitations, or not at all. This could affect, for example, the power steering and the brake
boosting effect. You will require considerably
more effort to steer and brake. There is a risk of an accident.
Do not switch off the ignition while driving. G
WARNING
If the parking brake has not been fully
released when driving, the parking brake can:
R overheat and cause a fire
R lose its hold function.
There is a risk of fire and an accident. Release
the parking brake fully before driving off.
! Warm up the engine quickly. Do not use
the engine's full performance until it has
reached operating temperature.
Only set the automatic transmission to the
respective drive positions when the vehicle
is stationary.
Where possible, avoid spinning the drive
wheels when pulling away on slippery
roads. Otherwise, you could damage the
drive train.
! AMG vehicles:
at low engine oil temper-
atures (below +20 †), the maximum
engine speed is restricted in order to pro-
tect the engine. To protect the engine and
maintain smooth engine operation, avoid driving at full throttle when the engine is
cold. Key positions
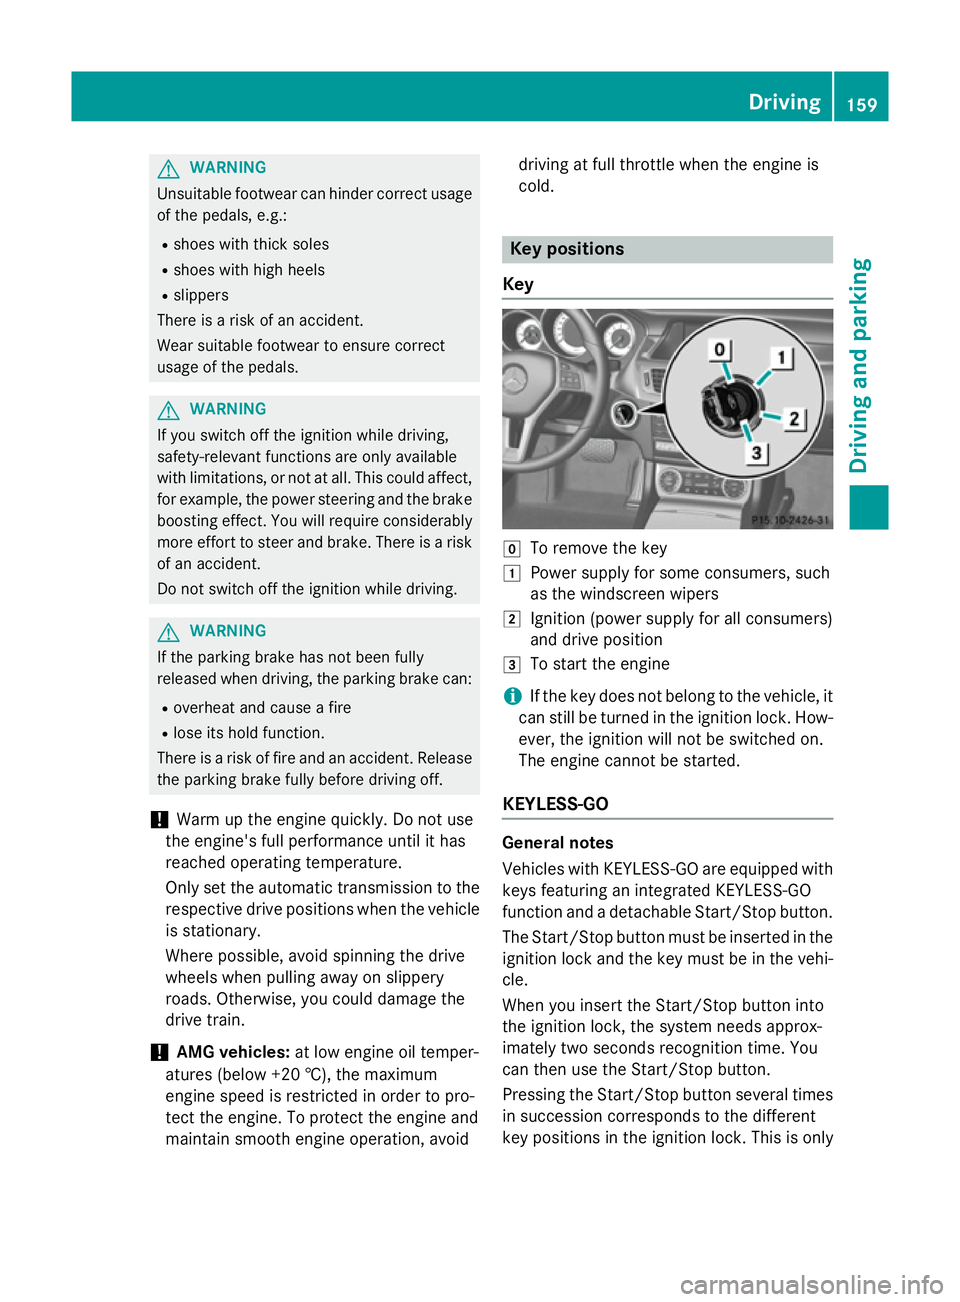
Key g
To remove the key
1 Power supply for some consumers, such
as the windscreen wipers
2 Ignition (power supply for all consumers)
and drive position
3 To start the engine
i If the key does not belong to the vehicle, it
can still be turned in the ignition lock. How-
ever, the ignition will not be switched on.
The engine cannot be started.
KEYLESS-GO General notes
Vehicles with KEYLESS-GO are equipped with
keys featuring an integrated KEYLESS-GO
function and a detachable Start/Stop button.
The Start/Stop button must be inserted in the ignition lock and the key must be in the vehi-cle.
When you insert the Start/Stop button into
the ignition lock, the system needs approx-
imately two seconds recognition time. You
can then use the Start/Stop button.
Pressing the Start/Stop button several times
in succession corresponds to the different
key positions in the ignition lock. This is only Driving
159Driving and parking Z
Page 171 of 417
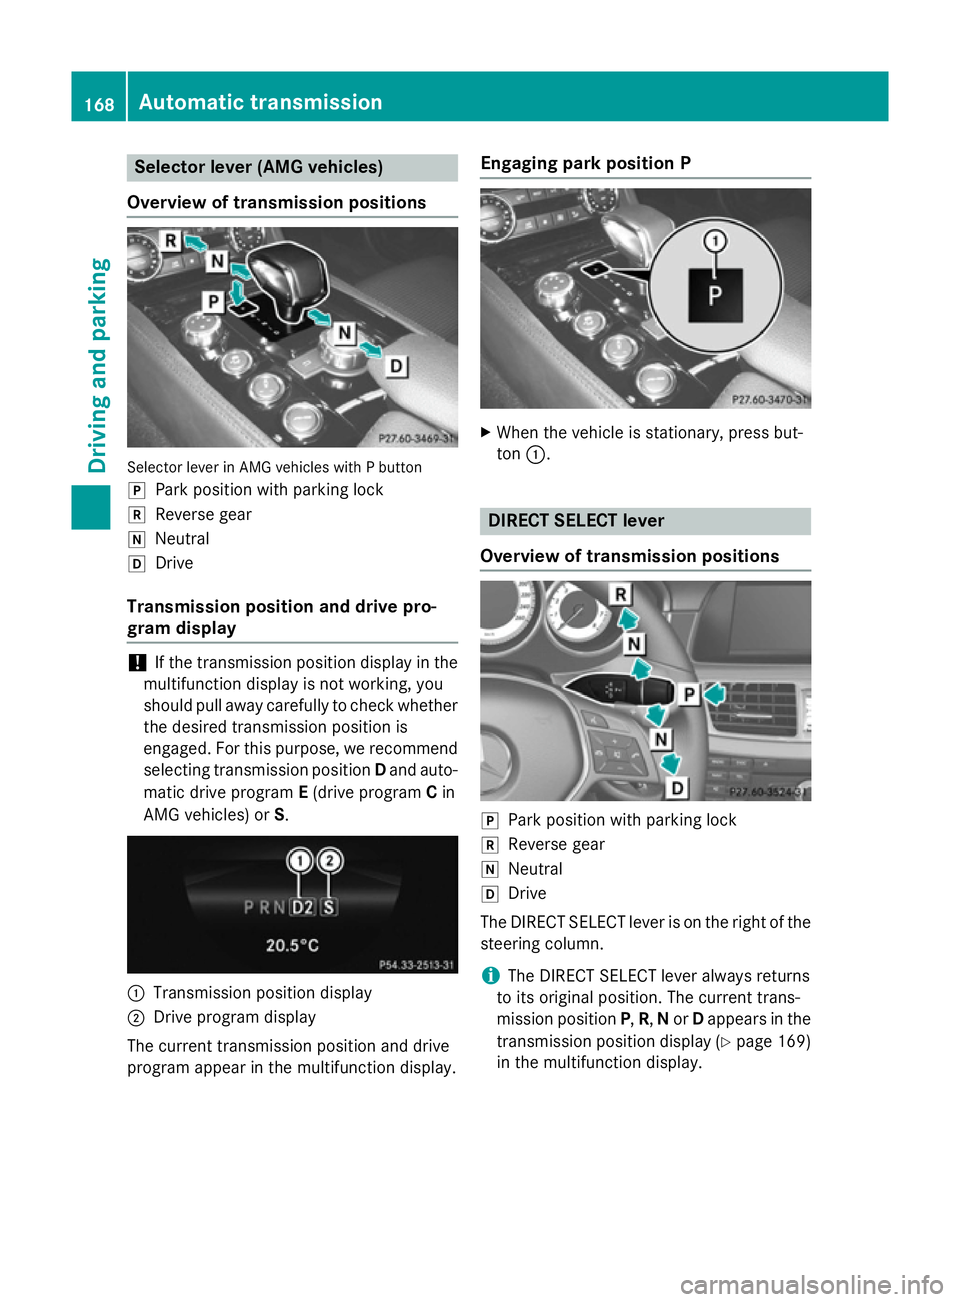
Selector lever (AMG vehicles)
Overview of transmission positions Selector lever in AMG vehicles with P button
j Park position with parking lock
k Reverse gear
i Neutral
h Drive
Transmission position and drive pro-
gram display !
If the transmission position display in the
multifunction display is not working, you
should pull away carefully to check whether the desired transmission position is
engaged. For this purpose, we recommend
selecting transmission position Dand auto-
matic drive program E(drive program Cin
AMG vehicles) or S.:
Transmission position display
; Drive program display
The current transmission position and drive
program appear in the multifunction display. Engaging park position P
X
When the vehicle is stationary, press but-
ton :. DIRECT SELECT lever
Overview of transmission positions j
Park position with parking lock
k Reverse gear
i Neutral
h Drive
The DIRECT SELECT lever is on the right of the
steering column.
i The DIRECT SELECT lever always returns
to its original position. The current trans-
mission position P,R, Nor Dappears in the
transmission position display (Y page 169)
in the multifunction display. 168
Automatic transmissionDriving and parking
Page 176 of 417
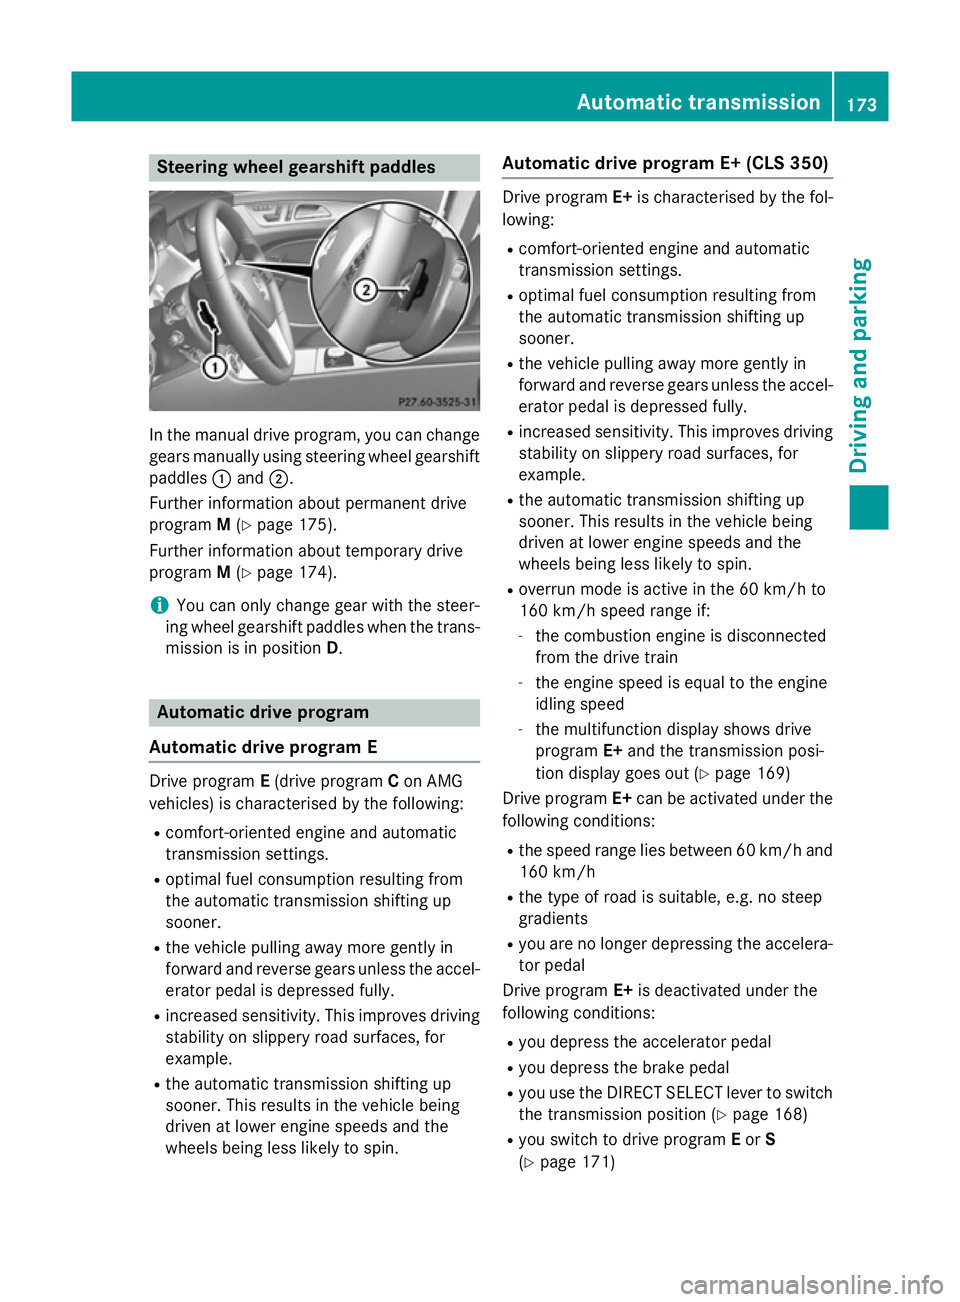
Steering wheel gearshift paddles
In the manual drive program, you can change
gears manually using steering wheel gearshift
paddles :and ;.
Further information about permanent drive
program M(Y page 175).
Further information about temporary drive
program M(Y page 174).
i You can only change gear with the steer-
ing wheel gearshift paddles when the trans- mission is in position D.Automatic drive program
Automatic drive program E Drive program
E(drive program Con AMG
vehicles) is characterised by the following:
R comfort-oriented engine and automatic
transmission settings.
R optimal fuel consumption resulting from
the automatic transmission shifting up
sooner.
R the vehicle pulling away more gently in
forward and reverse gears unless the accel- erator pedal is depressed fully.
R increased sensitivity. This improves driving
stability on slippery road surfaces, for
example.
R the automatic transmission shifting up
sooner. This results in the vehicle being
driven at lower engine speeds and the
wheels being less likely to spin. Automatic drive program E+ (CLS 350) Drive program
E+is characterised by the fol-
lowing:
R comfort-oriented engine and automatic
transmission settings.
R optimal fuel consumption resulting from
the automatic transmission shifting up
sooner.
R the vehicle pulling away more gently in
forward and reverse gears unless the accel-
erator pedal is depressed fully.
R increased sensitivity. This improves driving
stability on slippery road surfaces, for
example.
R the automatic transmission shifting up
sooner. This results in the vehicle being
driven at lower engine speeds and the
wheels being less likely to spin.
R overrun mode is active in the 60 km/h to
160 km/h speed range if:
- the combustion engine is disconnected
from the drive train
- the engine speed is equal to the engine
idling speed
- the multifunction display shows drive
program E+and the transmission posi-
tion display goes out (Y page 169)
Drive program E+can be activated under the
following conditions:
R the speed range lies between 60 km/h and
160 km/h
R the type of road is suitable, e.g. no steep
gradients
R you are no longer depressing the accelera-
tor pedal
Drive program E+is deactivated under the
following conditions:
R you depress the accelerator pedal
R you depress the brake pedal
R you use the DIRECT SELECT lever to switch
the transmission position (Y page 168)
R you switch to drive program Eor S
(Y page 171) Automatic transmission
173Driving and parking Z