tailgate MERCEDES-BENZ CLS COUPE 2014 Owners Manual
[x] Cancel search | Manufacturer: MERCEDES-BENZ, Model Year: 2014, Model line: CLS COUPE, Model: MERCEDES-BENZ CLS COUPE 2014Pages: 417, PDF Size: 14.15 MB
Page 13 of 417
Brakes ........................................... 183
Downhill gradient ........................... 183
Driving abroad ............................... 122
Driving in winter ............................. 185
Driving on flooded roads ................ 185
Driving on wet roads ...................... 185
General .......................................... 182
Icy road surfaces ........................... 185
Limited braking efficiency on sal-
ted roads ....................................... 184
New brake pads/linings ................ 184
Running-in tips ............................... 158
Snow chains .................................. 367
Symmetrical dipped bea m............. 122
Towing a trailer .............................. 233
Wet road surface ........................... 184
DVD audio
Operating (on-board computer) ..... 246
DVD video
Operating (on-board computer) ..... 247 E
EASY-ENTRY feature Activating/deactivating ................. 257
Function/note s............................. 115
EASY-EXIT feature
Crash-responsive ........................... 116
Function/note s............................. 115
Switching on/of f........................... 257
EASY-PACK convenience box ........... 308
EASY-PACK load-securing kit
Components and storage .............. 310
Inserting the brackets into the
loading rai l..................................... 310
EASY-PACK luggage compartment
management system ........................ 310
EBD (electronic brake force distri-
bution)
Display message ............................ 264
Function/note s................................ 76
ECO display
Function/note s............................. 182
On-board computer ....................... 244
ECO start/stop function
Automatic engine switch-off .......... 163
Deactivating/activating ................. 164
General information ....................... 163 Important safety notes .................. 163
Introduction ................................... 163
Electrical fuses
see Fuses
Electromagnetic compatibility
Declaration of conformity ................ 25
Electronic Stability Program
see ESP® (Electronic Stability Program)
Emergency
Automatic measures after an acci-
dent ................................................. 55
Emergency key
Unlocking the driver's door .............. 90
Emergency key element
Function/note s................................ 84
Inserting .......................................... 85
Locking vehicle ................................ 90
Removing ......................................... 85
Emergency release
Driver's door .................................... 90
Fuel filler fla p................................. 179
Emergency spare wheel
General notes ................................ 391
Important safety notes .................. 390
Inflating the collapsible spare
wheel ............................................. 392
Removing ....................................... 391
Storage location ............................ 391
Stowing .......................................... 392
Technical data ............................... 394
Emergency unlocking
Tailgate ............................................ 95
Vehicle ............................................. 90
Engine
Display message ............................ 270
ECO start/stop function ................ 163
Engine number ............................... 399
Jump-starting ................................. 355
Running irregularly ......................... 166
Starting problems .......................... 166
Starting the engine with the key .... 161
Starting with KEYLESS GO ............. 162
Stopping ........................................ 181
Tow-starting (vehicle) ..................... 360
Warning lamp (engine diagnos-
tics) ............................................... 295
Engine electronics
Notes ............................................. 396 10
Index
Page 20 of 417
Refuelling
Fuel gaug e....................................... 32
Important safety notes .................. 177
Notes for AMG vehicles ................. 401
Refuelling process ......................... 178
see Fuel
Remote control
Auxiliary heating/ventilation .......... 151
Changing the batteries (auxiliary
heating) ......................................... 152
Garage door opener ....................... 320
Programming (garage door
opener) .......................................... 320
Replacing bulbs
Important safety notes .................. 131
Overview of bulb types .................. 132
Replacing the battery (auxiliary
heating remote control) .................... 152
Reserve (fuel tank)
see Fuel
Reserve fuel
Display message ............................ 272
Warning lamp ................................. 295
Residual heat (climate control) ........ 149
Restraint system
Display message ............................ 266
Introduction ..................................... 42
Warning lamp ................................. 294
Warning lamp (function) ................... 43
Rev counter ........................................ 240
Reverse gear (selector lever) ........... 168
Reversing camera
Cleaning instructions ..................... 338
Function/note s............................. 214
Switching on/of f........................... 214
Reversing feature
Side windows ................................... 96
Sliding sunroof ............................... 100
Reversing function
Boot lid/tailgate .............................. 92
Reversing lamp
Changing bulb s.............................. 132
Reversing lamp (display message) .. 269
Roller sunblind
Rear window .................................. 315
Roof carrier ........................................ 312 Roof lining and carpets (cleaning
instructions)
...................................... 341
Roof load (maximum) ........................ 407 S
Safety Child restraint systems .................... 56
Children in the vehicle ..................... 55
Safety net
Attaching ....................................... 308
Important safety information ......... 307
Safety system
see Driving safety systems
Seat
Adjusting the active multicontour
seat ............................................... 110
Adjusting the multicontour seat ..... 109
Folding the backrest (rear com-
partment) forwards/back .............. 305
Massage function .......................... 110
Seat backrest display message ..... 284
Seat belt
Centre rear-compartment sea t........ 46
Correct usage .................................. 45
Switching belt adjustment on/off
(on-board computer) ...................... 257
Seat belts
Adjusting the driver's and front-
passenger seat belt ......................... 47
Adjusting the height ......................... 46
Cleaning ......................................... 340
Display message ............................ 265
Fastening ......................................... 46
Important safety guidelines ............. 44
Introduction ..................................... 44
Rear seat belt status indicator ......... 47
Releasing ......................................... 46
Warning lamp ................................. 287
Warning lamp (function) ................... 47
Seats
Adjusting (electrically) ................... 106
Adjusting lumbar support .............. 111
Adjusting the 4-way lumbar sup-
port ................................................ 111
Adjusting the head restraint .......... 107
Cleaning the cover ......................... 340
Correct driver's seat position ........ 104 Index
17
Page 22 of 417
Steering wheel
Adjusting (electrically) ...................1 14
Adjusting (manually) ...................... 113
Button overview ............................... 35
Buttons (on-board computer) ......... 241
Cleaning ......................................... 340
Gearshift paddle s........................... 173
Important safety notes .................. 113
Steering wheel heating .................. 114
Storing settings (memory func-
tion) ............................................... 119
Steering wheel gearshift paddles .... 173
Steering wheel heating
Problem (malfunction) ................... 115
Switching on/of f........................... 114
Stopwatch (RACETIMER) ................... 259
Stowage areas ................................... 300
Stowage compartments
Armrest (under) ............................. 302
Centre console .............................. 302
Centre console (rear compart-
ment) ............................................. 303
Cup holde r..................................... 313
Glove compartment ....................... 301
Important safety information ......... 300
Rear ............................................... 303
Spectacles compartment ............... 301
Under driver's seat/front-
passenger sea t.............................. 302
Stowage net ....................................... 303
Stowage space
Stowage net ................................... 303
Stowage well beneath the boot
floor .................................................... 311
Summer tyres .................................... 366
Sun visor ............................................ 314
Surround lighting (on-board com-
puter) .................................................. 254
Suspension tuning
AIRMATIC ...................................... 204
AMG RIDE CONTROL sports sus-
pension .......................................... 205
SETUP (on-board computer) .......... 258 T
Tail lamps Display message ............................ 268 Tailgate
Display message ............................ 283
Emergency unlocking ....................... 95
Important safety notes .................... 91
Limiting the opening angle ............... 94
Opening dimensions ...................... 407
Opening/closing (automatically
from inside) ...................................... 94
Opening/closing (automatically
from outside) ................................... 92
Opening/closing (from outside) ....... 92
Tank
see Fuel tank
Technical data
Capacities ...................................... 399
Emergency spare wheel ................. 394
Information .................................... 396
Trailer load s................................... 410
Tyres/wheels ................................. 378
Vehicle data ................................... 407
Telephone
Accepting a cal l............................. 248
Display message ............................ 285
Menu (on-board computer) ............ 247
Number from the phone book ........ 248
Redialling ....................................... 249
Rejecting/ending a call ................. 248
Telephone compartment ................ 302
Telescopic rod (Easy-Pack fix kit) .... 311
Temperature
Coolant .......................................... 240
Coolant (on-board computer) ......... 258
Engine oil (on-board computer) ...... 258
Outside temperature ...................... 240
Setting (climate control )................ 145
TEMPOMAT
Function/note s............................. 186
Theft-deterrent system
ATA (Anti-Theft Alarm system )......... 78
Immobiliser ...................................... 78
Through-loading feature ................... 303
Timing (RACETIMER) ......................... 259
TIREFIT kit .......................................... 348
Top Tether ............................................ 57
Total distance recorder .................... 243
Tow-away protection
Activating ......................................... 79 Index
19
Page 43 of 417
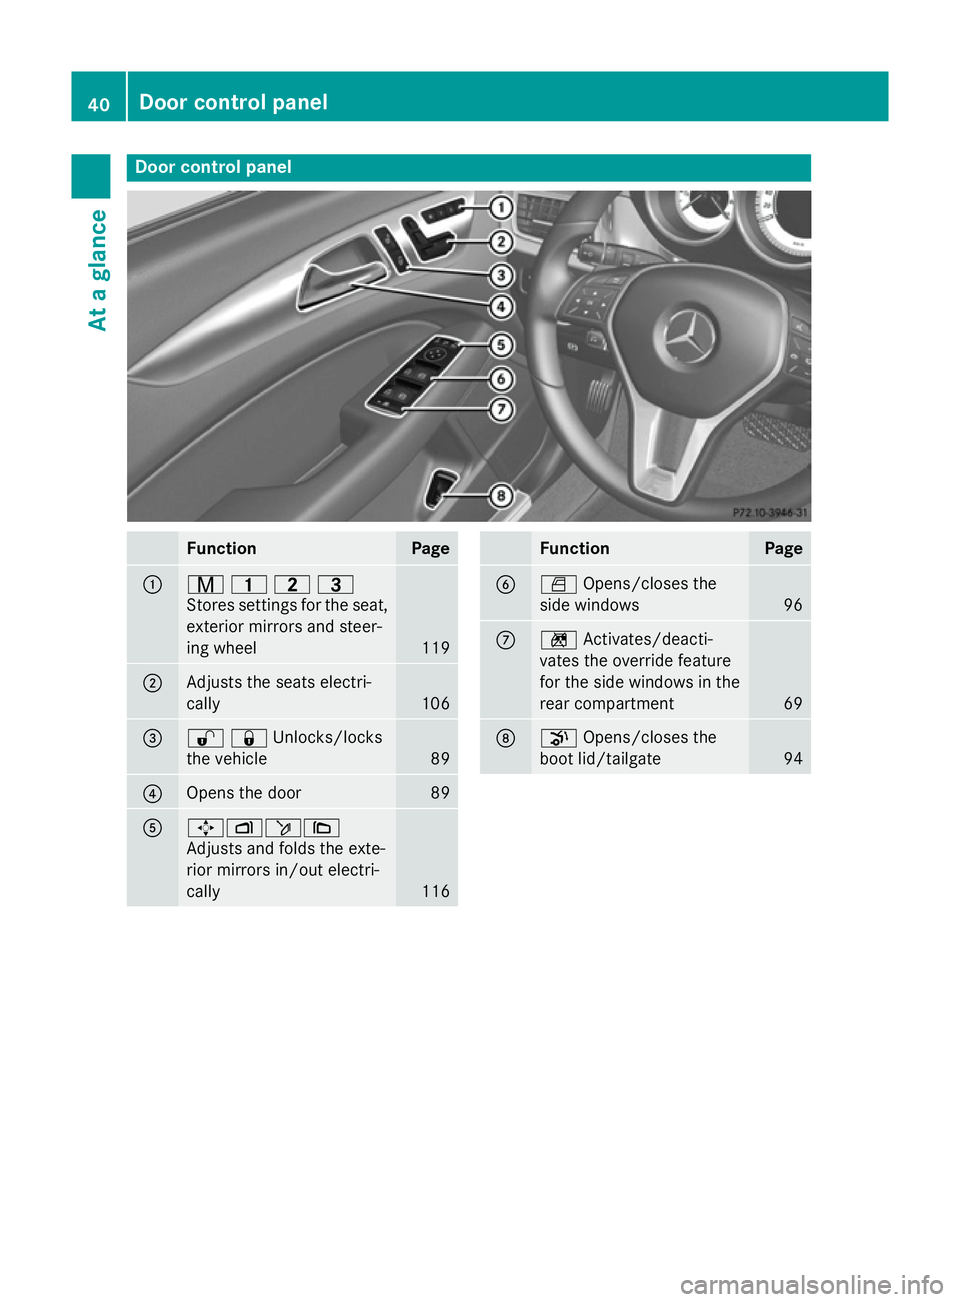
Door control panel
Function Page
:
r
45=
Stores settings for the seat, exterior mirrors and steer-
ing wheel 119
;
Adjusts the seats electri-
cally
106
=
%&Unlocks/locks
the vehicle 89
?
Opens the door 89
A
7Zö\
Adjusts and folds the exte-
rior mirrors in/out electri-
cally
116 Function Page
B
W
Opens/closes the
side windows 96
C
n
Activates/deacti-
vates the override feature
for the side windows in the
rear compartment 69
D
p
Opens/closes the
boot lid/tailgate 9440
Door control panelAt a glance
Page 81 of 417
The braking action of PRE-SAFE
®
Brake is
ended automatically if:
R you manoeuvre to avoid the obstacle
R there is no longer any danger of a collision
R there is no longer an obstacle detected in
front of your vehicle
If you approach an obstacle and PRE-SAFE ®
Brake detects a risk of a collision, the system
will alert you both visually and acoustically. If you do not brake or take evasive action, the
system will warn you by automatically braking
the vehicle gently. If there is an increased risk
of collision, preventive passenger protection
measures (PRE-SAFE ®
) are activated
(Y page 54). If a risk of collision remains at
speeds over 30 km/h and you do not brake,
take evasive action or significantly acceler-
ate, automatic braking may be performed up
to a level of automatic emergency braking.
Automatic emergency braking is not per-
formed until immediately prior to an accident
that can no longer be avoided. Anti-theft systems
Immobiliser
The immobiliser prevents your vehicle from
being started without the correct key.
X To activate with the key: remove the key
from the ignition lock.
X To activate with KEYLESS-GO: switch the
ignition off and open the driver's door.
X To deactivate: switch on the ignition.
When leaving the vehicle, always take the key with you and lock the vehicle. Anyone can
start the engine if a valid key has been left
inside the vehicle.
i The immobiliser is always deactivated
when you start the engine. ATA (Anti-Theft Alarm system)
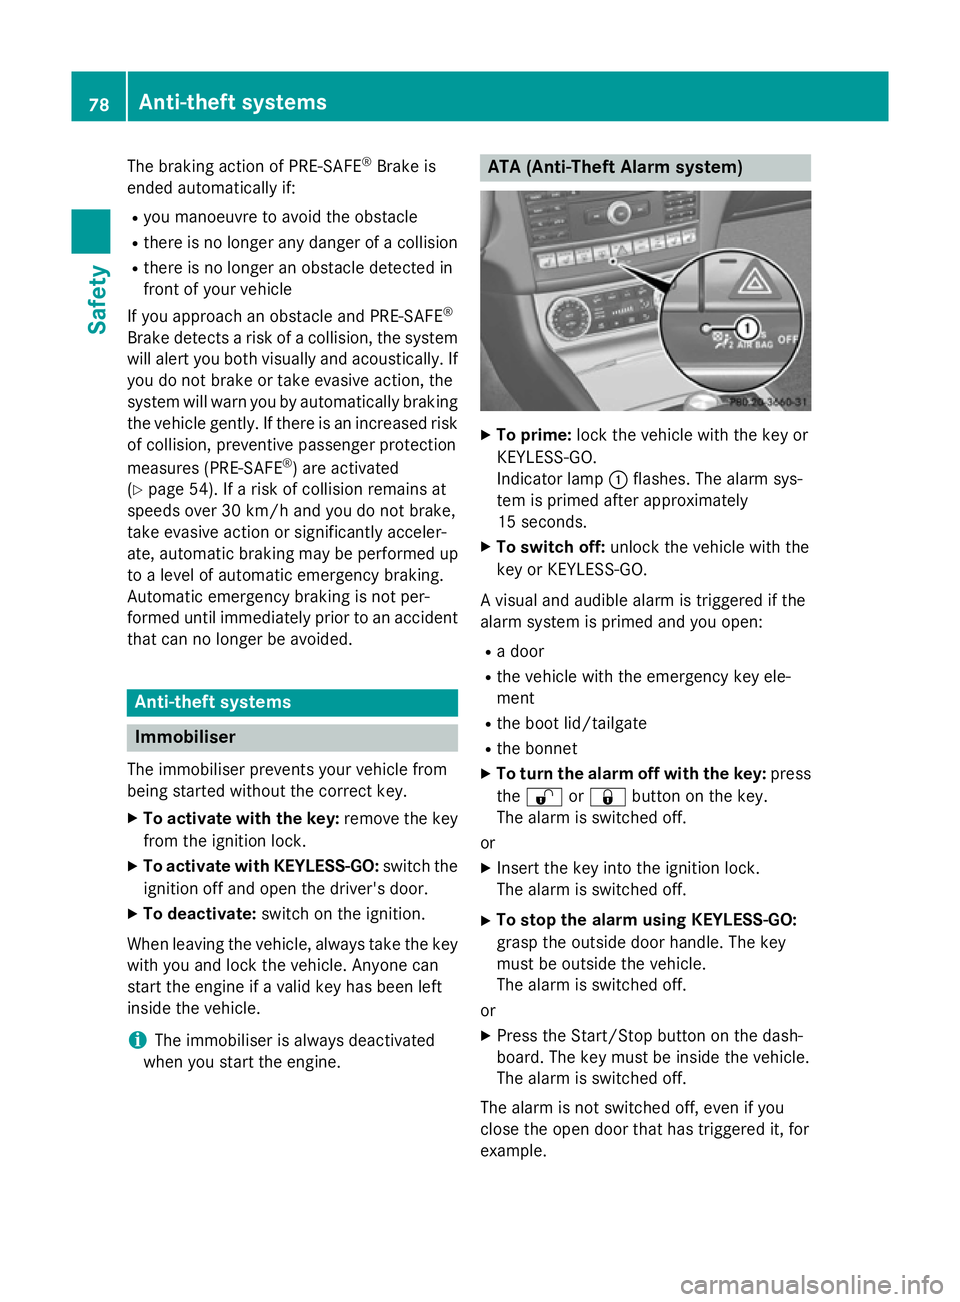
X
To prime: lock the vehicle with the key or
KEYLESS-GO.
Indicator lamp :flashes. The alarm sys-
tem is primed after approximately
15 seconds.
X To switch off: unlock the vehicle with the
key or KEYLESS-GO.
A visual and audible alarm is triggered if the
alarm system is primed and you open: R a door
R the vehicle with the emergency key ele-
ment
R the boot lid/tailgate
R the bonnet
X To turn the alarm off with the key: press
the % or& button on the key.
The alarm is switched off.
or X Insert the key into the ignition lock.
The alarm is switched off.
X To stop the alarm using KEYLESS-GO:
grasp the outside door handle. The key
must be outside the vehicle.
The alarm is switched off.
or
X Press the Start/Stop button on the dash-
board. The key must be inside the vehicle.
The alarm is switched off.
The alarm is not switched off, even if you
close the open door that has triggered it, for
example. 78
Anti-theft systemsSafety
Page 82 of 417
Tow-away protection
Function An audible and visual alarm is triggered if your
vehicle's angle of inclination is altered while
tow-away protection is primed. This can occur
if the vehicle is jacked up on one side, for
example.
Activating X
Make sure that:
R the doors are closed
R the boot lid/tailgate is closed
Only then is the tow-away protection
primed.
X Lock the vehicle with the key or KEYLESS-
GO.
Tow-away protection is primed after
approximately 30 seconds.
Deactivating X
To deactivate: unlock the vehicle with the
key or KEYLESS-GO.
Tow-away protection is switched off auto-
matically.
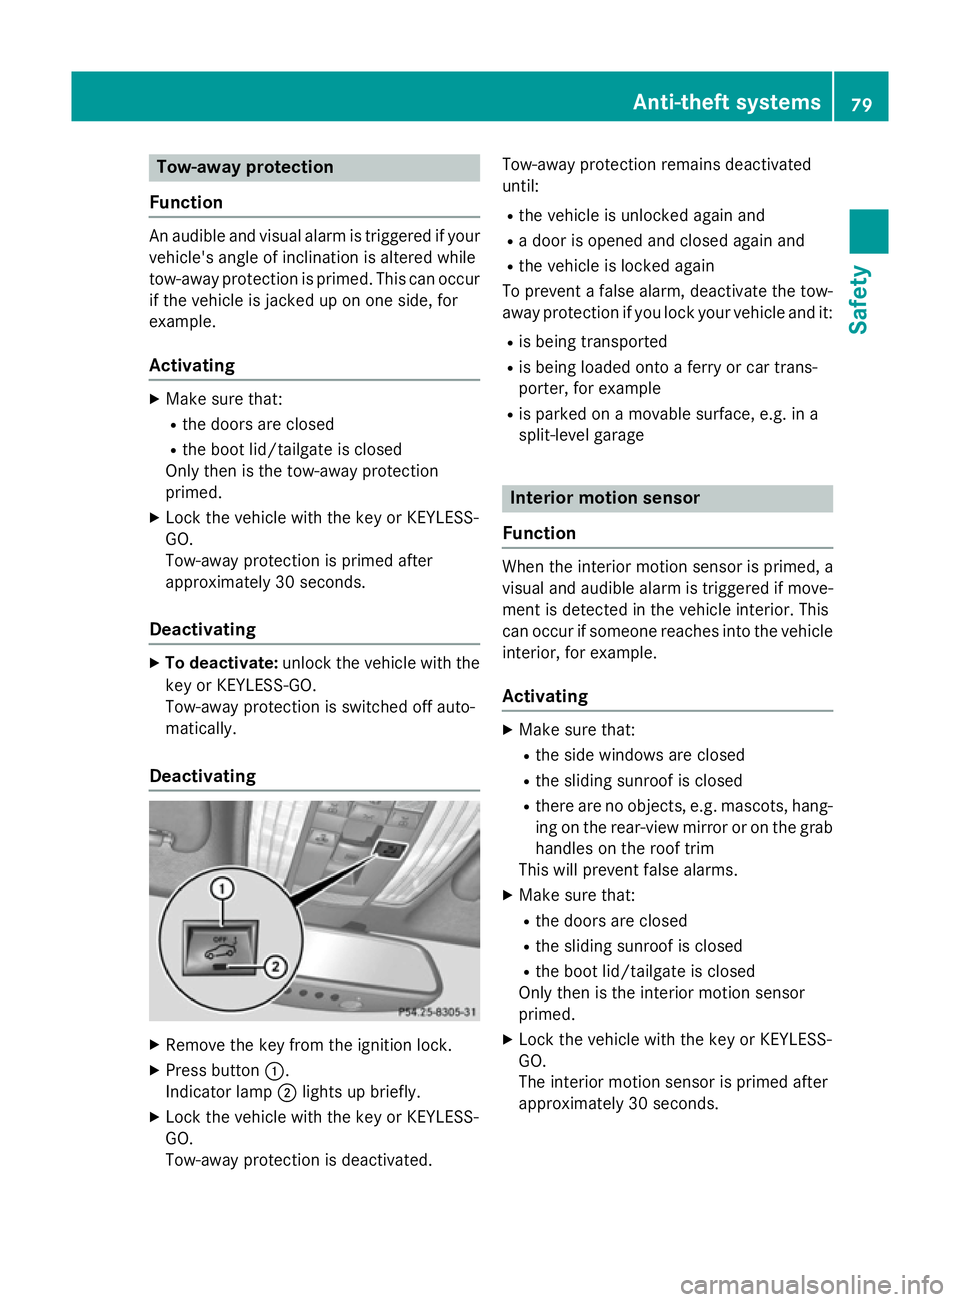
Deactivating X
Remove the key from the ignition lock.
X Press button :.
Indicator lamp ;lights up briefly.
X Lock the vehicle with the key or KEYLESS-
GO.
Tow-away protection is deactivated. Tow-away protection remains deactivated
until:
R the vehicle is unlocked again and
R a door is opened and closed again and
R the vehicle is locked again
To prevent a false alarm, deactivate the tow-
away protection if you lock your vehicle and it:
R is being transported
R is being loaded onto a ferry or car trans-
porter, for example
R is parked on a movable surface, e.g. in a
split-level garage Interior motion sensor
Function When the interior motion sensor is primed, a
visual and audible alarm is triggered if move-
ment is detected in the vehicle interior. This
can occur if someone reaches into the vehicle interior, for example.
Activating X
Make sure that:
R the side windows are closed
R the sliding sunroof is closed
R there are no objects, e.g. mascots, hang-
ing on the rear-view mirror or on the grab handles on the roof trim
This will prevent false alarms.
X Make sure that:
R the doors are closed
R the sliding sunroof is closed
R the boot lid/tailgate is closed
Only then is the interior motion sensor
primed.
X Lock the vehicle with the key or KEYLESS-
GO.
The interior motion sensor is primed after
approximately 30 second s. An
ti-theft systems
79Safety Z
Page 86 of 417
Do not keep the key:
R
with electronic devices, e.g. a mobile
phone or another key
R with metallic objects, e.g. coins or metal
film
R inside metallic objects, e.g. a metal case
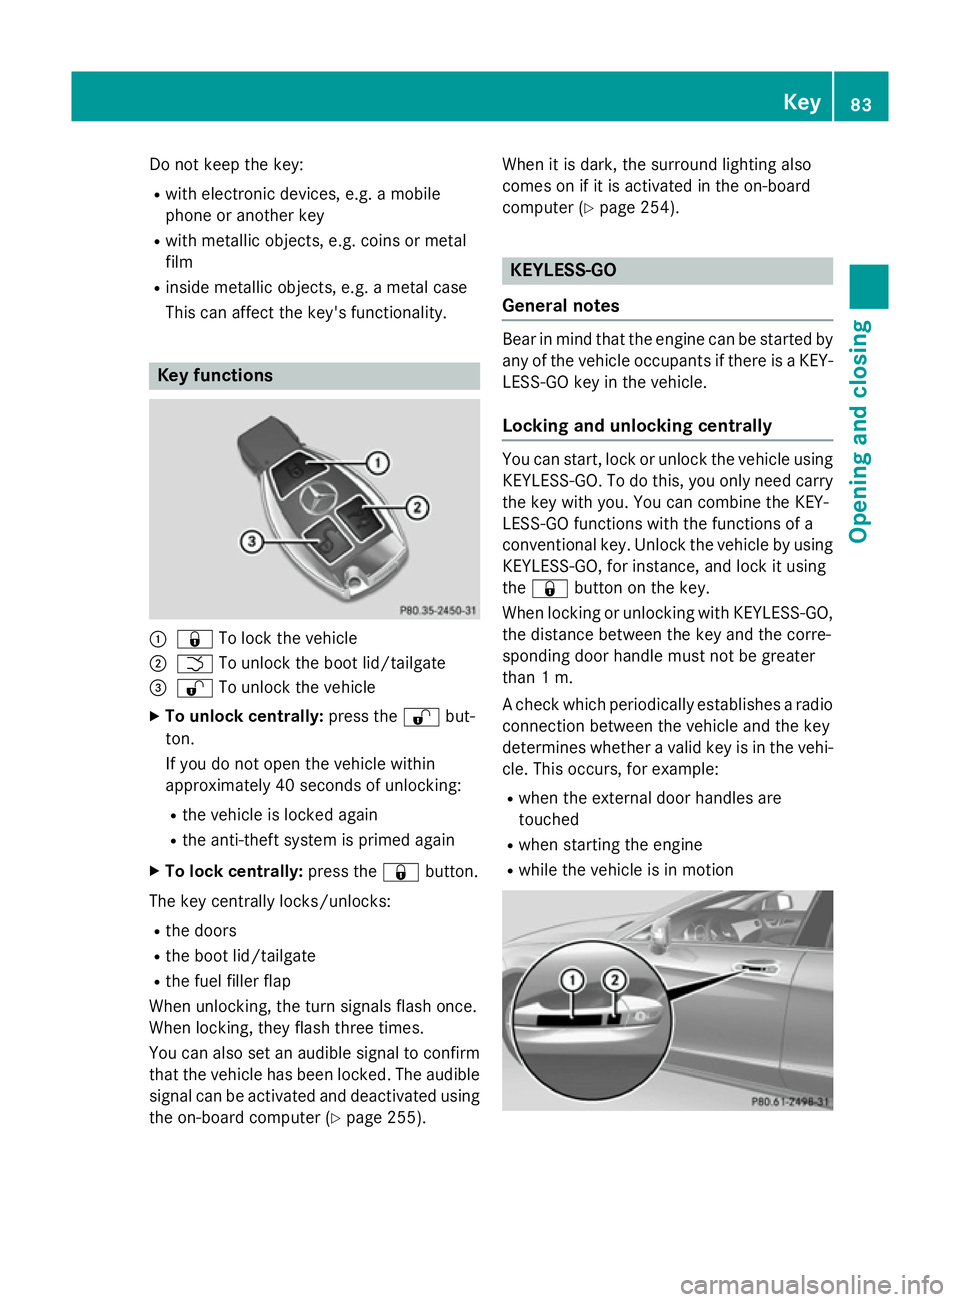
This can affect the key's functionality. Key functions
:
& To lock the vehicle
; F To unlock the boot lid/tailgate
= % To unlock the vehicle
X To unlock centrally: press the%but-
ton.
If you do not open the vehicle within
approximately 40 seconds of unlocking:
R the vehicle is locked again
R the anti-theft system is primed again
X To lock centrally: press the&button.
The key centrally locks/unlocks: R the doors
R the boot lid/tailgate
R the fuel filler flap
When unlocking, the turn signals flash once.
When locking, they flash three times.
You can also set an audible signal to confirm that the vehicle has been locked. The audible
signal can be activated and deactivated using the on-board computer (Y page 255).When it is dark, the surround lighting also
comes on if it is activated in the on-board
computer (Y
page 254). KEYLESS-GO
General notes Bear in mind that the engine can be started by
any of the vehicle occupants if there is a KEY- LESS-GO key in the vehicle.
Locking and unlocking centrally You can start, lock or unlock the vehicle using
KEYLESS-GO. To do this, you only need carry the key with you. You can combine the KEY-
LESS-GO functions with the functions of a
conventional key. Unlock the vehicle by using
KEYLESS-GO, for instance, and lock it using
the & button on the key.
When locking or unlocking with KEYLESS-GO,
the distance between the key and the corre-
sponding door handle must not be greater
than 1 m.
A check which periodically establishes a radio
connection between the vehicle and the key
determines whether a valid key is in the vehi- cle. This occurs, for example:
R when the external door handles are
touched
R when starting the engine
R while the vehicle is in motion Key
83Opening and closing Z
Page 87 of 417
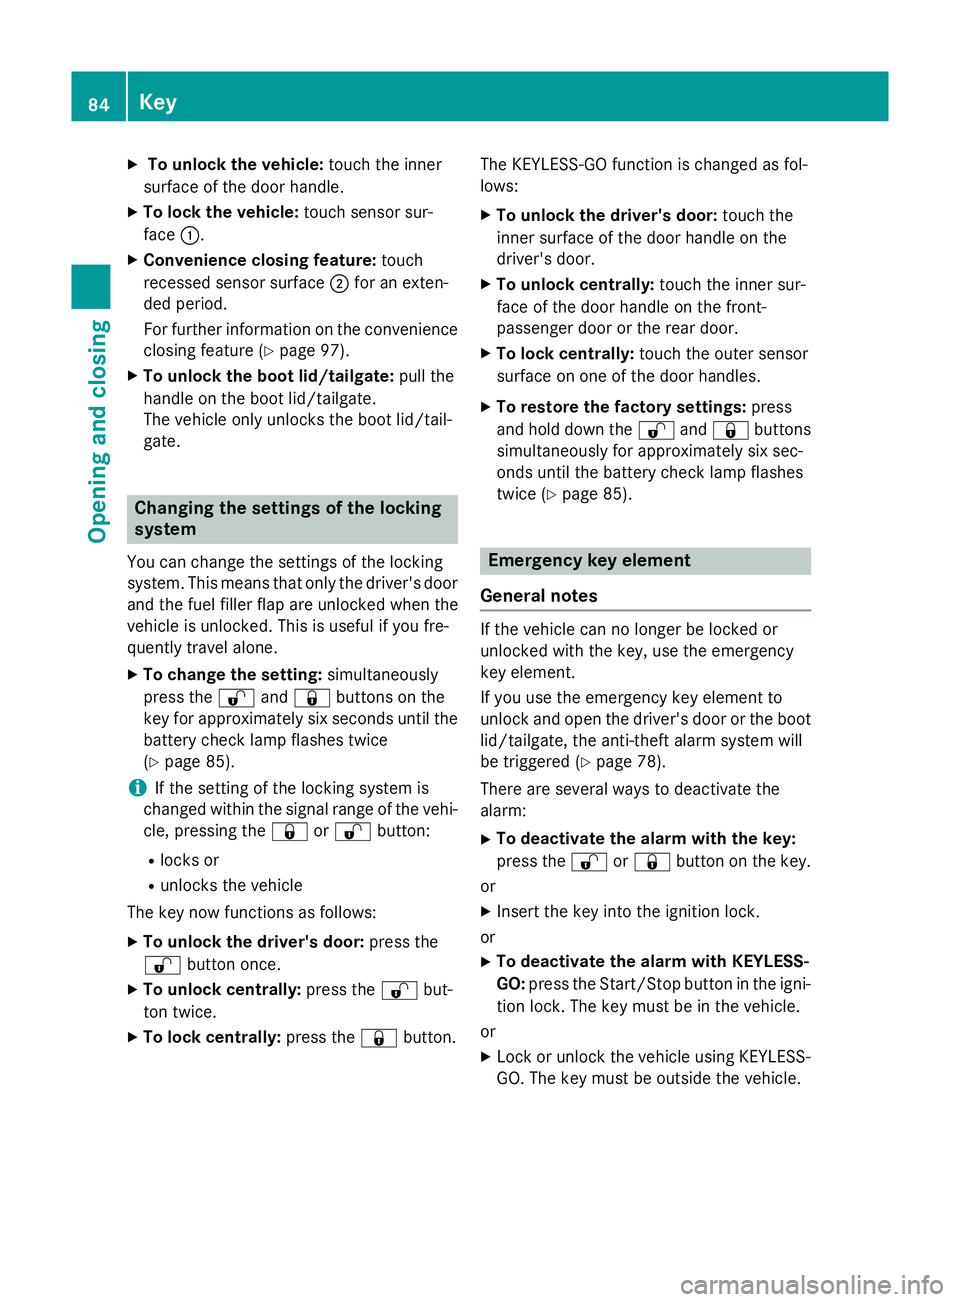
X
To unlock the vehicle: touch the inner
surface of the door handle.
X To lock the vehicle: touch sensor sur-
face :.
X Convenience closing feature: touch
recessed sensor surface ;for an exten-
ded period.
For further information on the convenience
closing feature (Y page 97).
X To unlock the boot lid/tailgate: pull the
handle on the boot lid/tailgate.
The vehicle only unlocks the boot lid/tail-
gate. Changing the settings of the locking
system
You can change the settings of the locking
system. This means that only the driver's door
and the fuel filler flap are unlocked when the
vehicle is unlocked. This is useful if you fre-
quently travel alone.
X To change the setting: simultaneously
press the %and& buttons on the
key for approximately six seconds until the
battery check lamp flashes twice
(Y page 85).
i If the setting of the locking system is
changed within the signal range of the vehi- cle, pressing the &or% button:
R locks or
R unlocks the vehicle
The key now functions as follows:
X To unlock the driver's door: press the
% button once.
X To unlock centrally: press the%but-
ton twice.
X To lock centrally: press the&button. The KEYLESS-GO function is changed as fol-
lows:
X To unlock the driver's door: touch the
inner surface of the door handle on the
driver's door.
X To unlock centrally: touch the inner sur-
face of the door handle on the front-
passenger door or the rear door.
X To lock centrally: touch the outer sensor
surface on one of the door handles.
X To restore the factory settings: press
and hold down the %and& buttons
simultaneously for approximately six sec-
onds until the battery check lamp flashes
twice (Y page 85). Emergency key element
General notes If the vehicle can no longer be locked or
unlocked with the key, use the emergency
key element.
If you use the emergency key element to
unlock and open the driver's door or the boot
lid/tailgate, the anti-theft alarm system will
be triggered (Y page 78).
There are several ways to deactivate the
alarm:
X To deactivate the alarm with the key:
press the %or& button on the key.
or
X Insert the key into the ignition lock.
or
X To deactivate the alarm with KEYLESS-
GO: press the Start/Stop button in the igni-
tion lock. The key must be in the vehicle.
or
X Lock or unlock the vehicle using KEYLESS-
GO. The key must be outside the vehicle. 84
KeyOpening and closing
Page 88 of 417
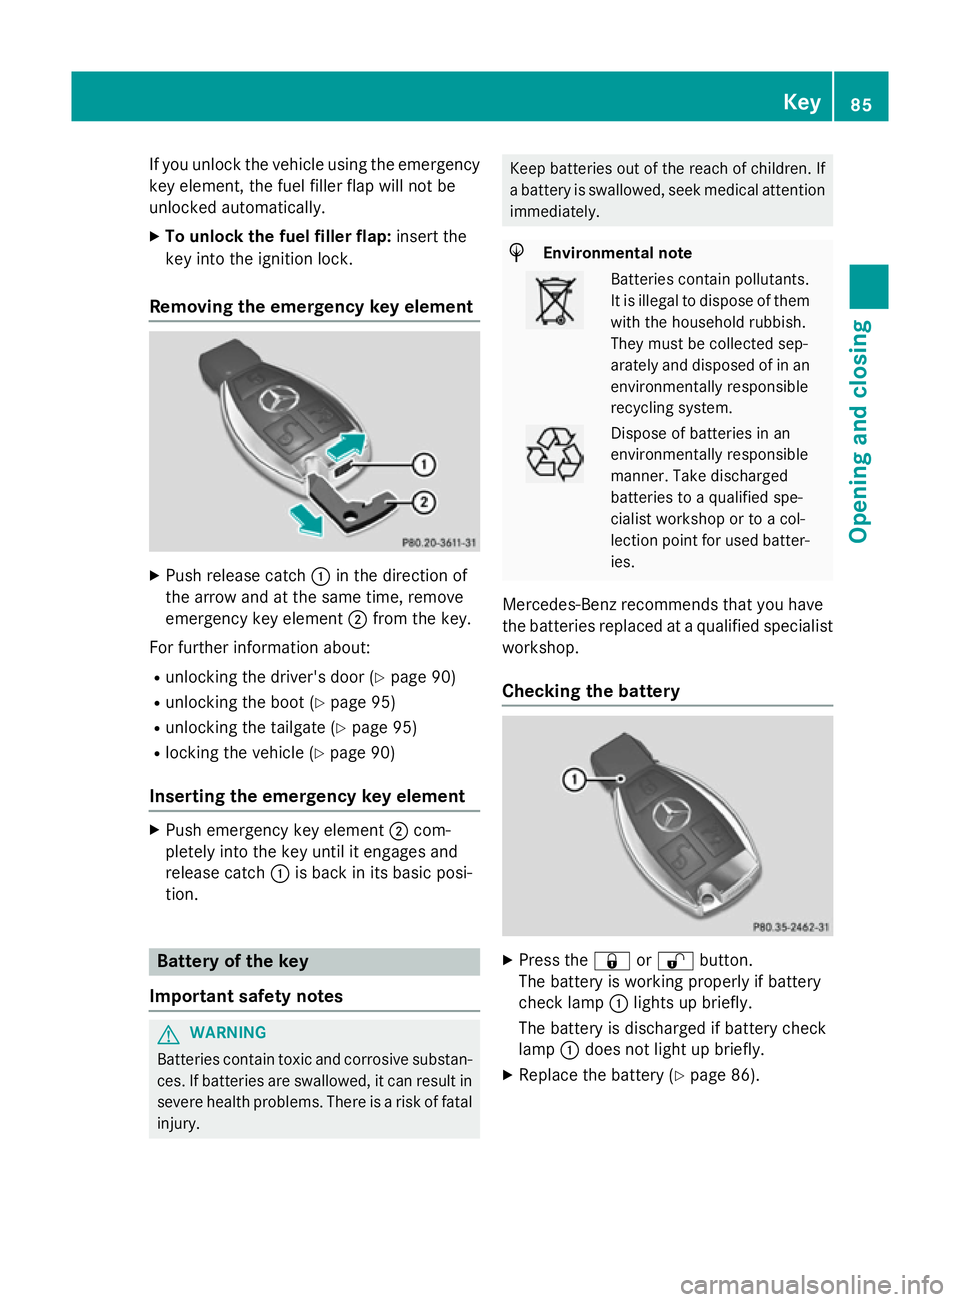
If you unlock the vehicle using the emergency
key element, the fuel filler flap will not be
unlocked automatically.
X To unlock the fuel filler flap: insert the
key into the ignition lock.
Removing the emergency key element X
Push release catch :in the direction of
the arrow and at the same time, remove
emergency key element ;from the key.
For further information about: R unlocking the driver's door (Y page 90)
R unlocking the boot (Y page 95)
R unlocking the tailgate (Y page 95)
R locking the vehicle (Y page 90)
Inserting the emergency key element X
Push emergency key element ;com-
pletely into the key until it engages and
release catch :is back in its basic posi-
tion. Battery of the key
Important safety notes G
WARNING
Batteries contain toxic and corrosive substan- ces. If batteries are swallowed, it can result in
severe health problems. There is a risk of fatal injury. Keep batteries out of the reach of children. If
a battery is swallowed, seek medical attention
immediately. H
Environmental note Batteries contain pollutants.
It is illegal to dispose of them
with the household rubbish.
They must be collected sep-
arately and disposed of in anenvironmentally responsible
recycling system. Dispose of batteries in an
environmentally responsible
manner. Take discharged
batteries to a qualified spe-
cialist workshop or to a col-
lection point for used batter-
ies.
Mercedes-Benz recommends that you have
the batteries replaced at a qualified specialist workshop.
Checking the battery X
Press the &or% button.
The battery is working properly if battery
check lamp :lights up briefly.
The battery is discharged if battery check
lamp :does not light up briefly.
X Replace the battery (Y page 86). Key
85Opening and closing Z
Page 93 of 417
If the vehicle has been locked using the lock-
ing button for the central locking, or has been locked automatically, and a door is opened
from the inside:
R the vehicle will be fully unlocked if it had
previously been fully unlocked
R only the door which has been opened form
the inside is unlocked if only the driver's
door had been previously unlocked Automatic locking feature
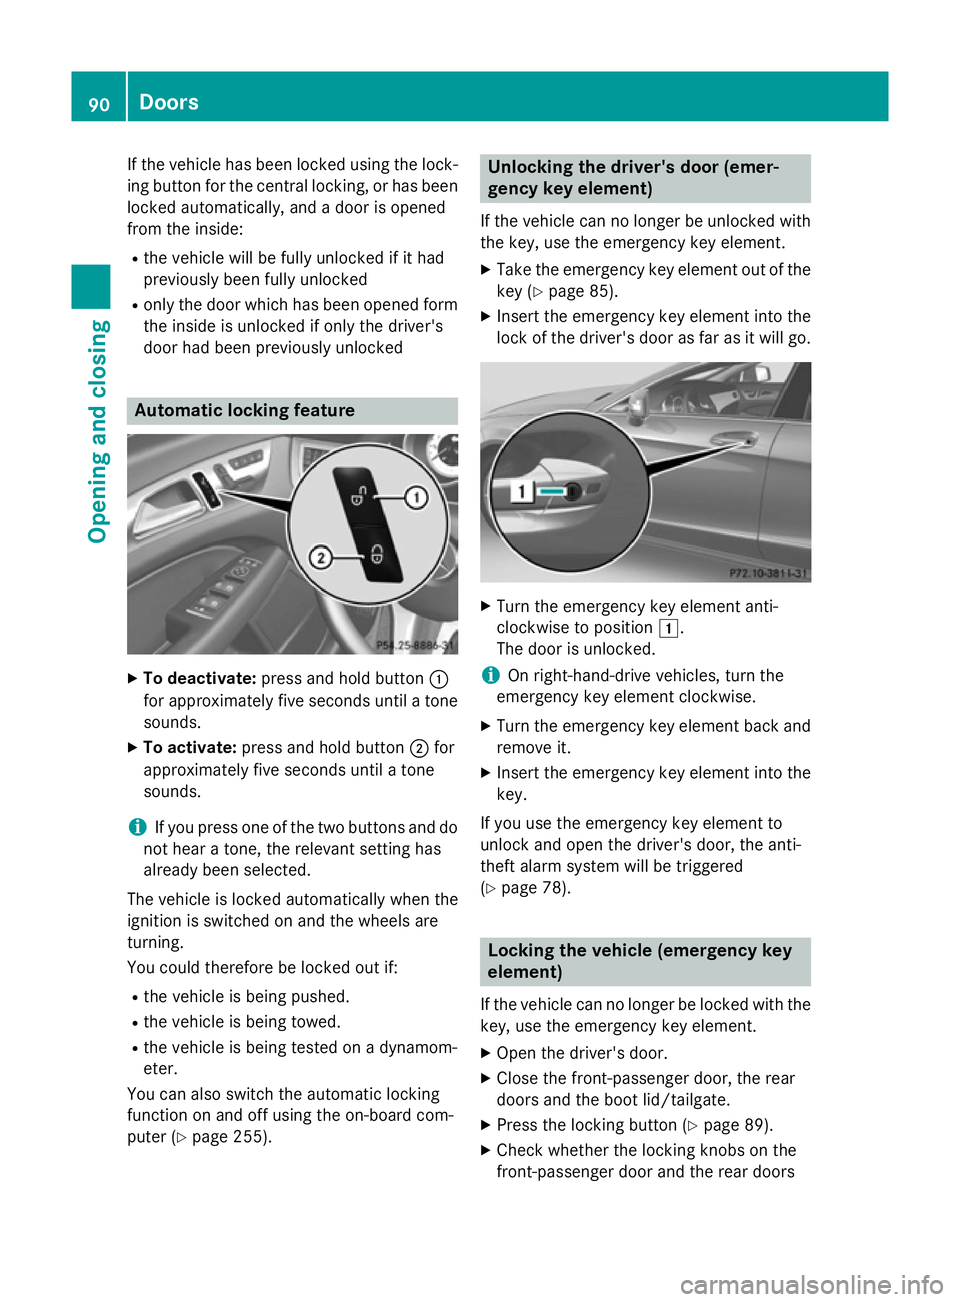
X
To deactivate: press and hold button :
for approximately five seconds until a tone sounds.
X To activate: press and hold button ;for
approximately five seconds until a tone
sounds.
i If you press one of the two buttons and do
not hear a tone, the relevant setting has
already been selected.
The vehicle is locked automatically when the
ignition is switched on and the wheels are
turning.
You could therefore be locked out if:
R the vehicle is being pushed.
R the vehicle is being towed.
R the vehicle is being tested on a dynamom-
eter.
You can also switch the automatic locking
function on and off using the on-board com-
puter (Y page 255). Unlocking the driver's door (emer-
gency key element)
If the vehicle can no longer be unlocked with
the key, use the emergency key element.
X Take the emergency key element out of the
key (Y page 85).
X Insert the emergency key element into the
lock of the driver's door as far as it will go. X
Turn the emergency key element anti-
clockwise to position 1.
The door is unlocked.
i On right-hand-drive vehicles, turn the
emergency key element clockwise.
X Turn the emergency key element back and
remove it.
X Insert the emergency key element into the
key.
If you use the emergency key element to
unlock and open the driver's door, the anti-
theft alarm system will be triggered
(Y page 78). Locking the vehicle (emergency key
element)
If the vehicle can no longer be locked with the
key, use the emergency key element.
X Open the driver's door.
X Close the front-passenger door, the rear
doors and the boot lid/tailgate.
X Press the locking button (Y page 89).
X Check whether the locking knobs on the
front-passenger door and the rear doors 90
DoorsOpening and closing