MERCEDES-BENZ CLS SHOOTING BRAKE 2012 Owners Manual
Manufacturer: MERCEDES-BENZ, Model Year: 2012, Model line: CLS SHOOTING BRAKE, Model: MERCEDES-BENZ CLS SHOOTING BRAKE 2012Pages: 405, PDF Size: 10.21 MB
Page 291 of 405
Tyres
Problem Possible causes/consequences and
M Solutions
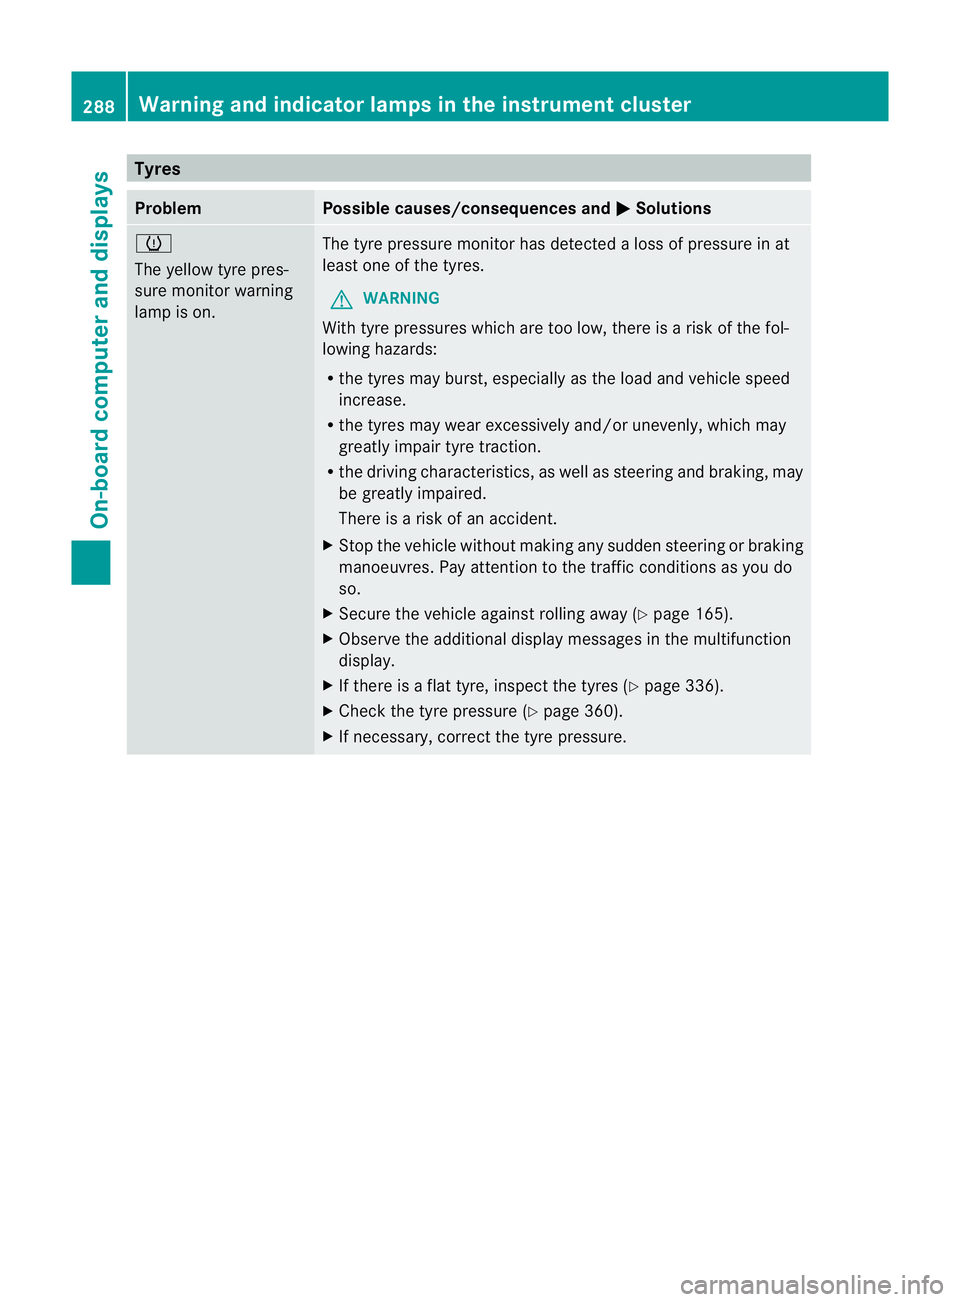
h
The yellow tyre pres-
sure monitor warning
lamp is on. The tyre pressure monitor has detected a loss of pressure in at
leas
tone of the tyres.
G WARNING
With tyre pressures which are too low, there is a ris kofthe fol-
lowing hazards:
R the tyres may burst, especially as the load and vehicle speed
increase.
R the tyres may wear excessively and/or unevenly, which may
greatly impair tyre traction.
R the driving characteristics, as well as steering and braking, may
be greatly impaired.
There is a risk of an accident.
X Stop the vehicle without making any sudden steering or braking
manoeuvres. Pay attention to the traffic conditions as you do
so.
X Secure the vehicle against rolling away (Y page 165).
X Observe the additional display messages in the multifunction
display.
X If there is a flat tyre, inspect the tyres (Y page 336).
X Check the tyre pressure (Y page 360).
X If necessary, correct the tyre pressure. 288
Warning and indicator lamps in the instrument clusterOn-board computer and displays
Page 292 of 405
Useful information
............................290
Stowage areas .................................. 290
Features ............................................. 303 289Stowing and features
Page 293 of 405
Useful information
i This Owner's Manual describes all mod-
els, series and optional equipment for your
vehicle that were available at the time of
going to press. National variations are pos-
sible. Note that your vehicle may not be
equipped with all of the functions descri-
bed. This is also the case for systems and
functions relevant to safety.
i Read the information on qualified special-
ist workshops: (Y page 24). Stowage areas
Loading guidelines
G
WARNING
Secure and position the load as described in
the loading guidelines.
Otherwise, vehicle occupants could
be injured by the load being thrown around in
the even tofsharp braking, a sudden change
in direction or an accident.
You will find further information in the "Secur-
ing a load" section.
Even if you follow all the loading guidelines,
the load will increase the risk of injury in the
event of an accident. G
WARNING
Keep the boot lid/tailgate closed while the
vehicle is in operation. Otherwise, exhaust
fumes could enter the vehicle interior and poi-
son you.
The handling characteristics of a laden vehi-
cle are dependent on the distribution of the
load within the vehicle. For this reason, you
should observe the following notes when
transporting a load:
R when transporting a load, never exceed the
maximum permissible gross vehicle weight or the permissible axle loads for the vehicle
(including occupants).
R position heavy loads as far forwards as pos-
sible and as low down in the boot/luggage
compartmenta s possible.
R the load must not protrude above the upper
edge of the seat backrests.
R always place the load against the rear or
front seat backrests. Make sure that the
seat backrests are securely locked into
place.
R always place the load behind unoccupied
seats if possible.
R secure the load with sufficiently strong and
wear-resistant lashing material. pad sharp
edges for protection.
i Load restraints are available at any quali-
fied specialist workshop, e.g. a Mercedes-
Benz Service Centre. Stowage compartments
Important safety notes G
WARNING
The stowage compartments must be closed
when items are stored in them. Luggage nets
are not designed to secure heavy items of
luggage.
You or other vehicle occupants could be
injured by objects being thrown around if you:
R brake sharply
R change direction suddenly
R are involved in an accident
Sharp-edged and fragile objects must not be
placed in the luggage net.
Do not place hard objects in the map pockets.
Objects must not protrude from the map
pockets. 290
Stowage areasStowing and features
Page 294 of 405
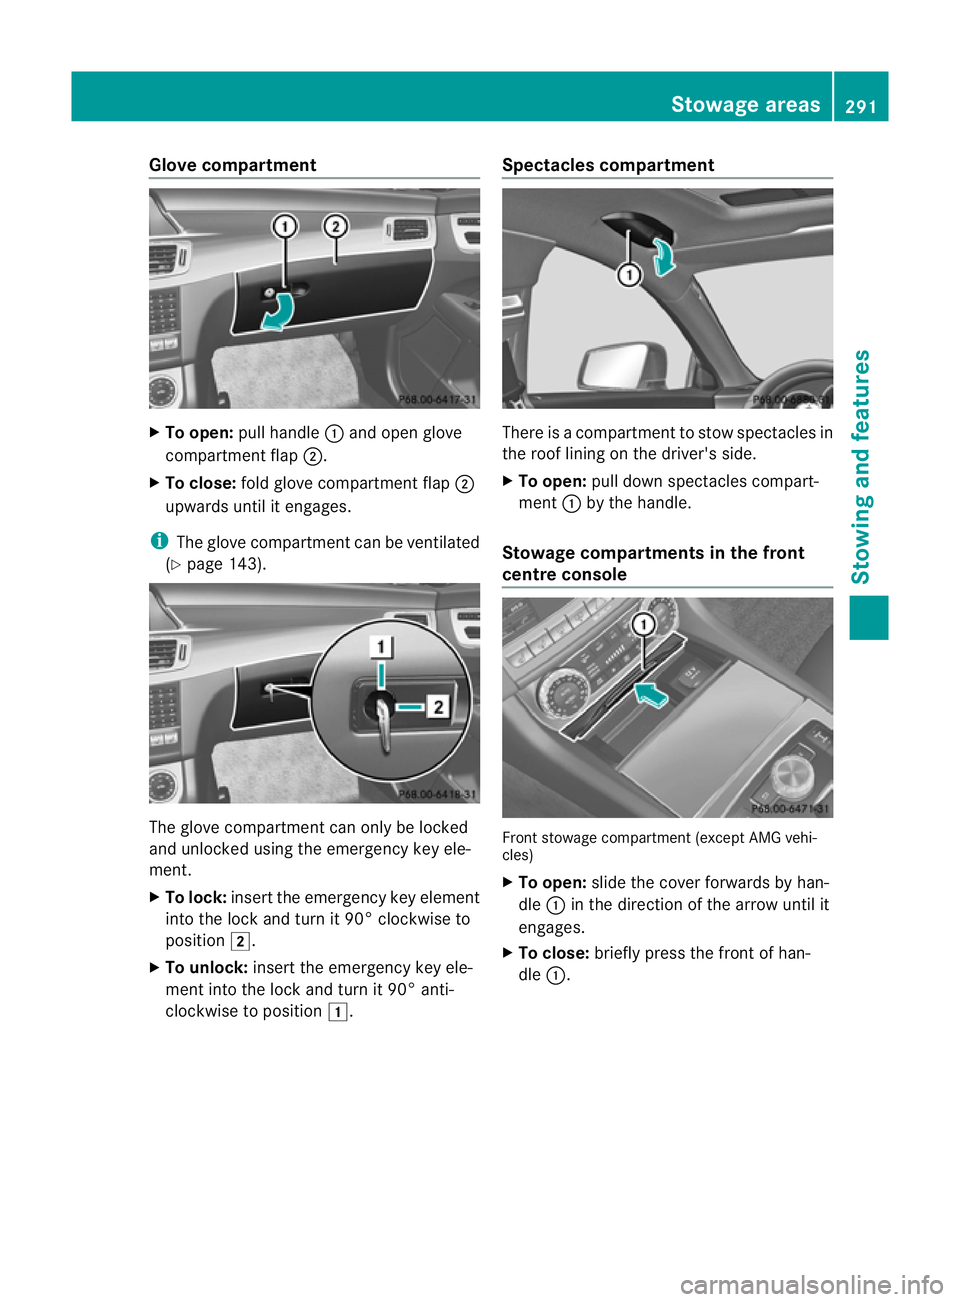
Glove compartment
X
To open: pull handle :and open glove
compartment flap ;.
X To close: fold glove compartment flap ;
upwards until it engages.
i The glove compartment can be ventilated
(Y page 143). The glove compartment can only be locked
and unlocked using the emergency key ele-
ment.
X To lock: insert the emergency key element
into the lock and turn it 90° clockwise to
position 2.
X To unlock: insert the emergency key ele-
ment into the lock and turn it 90° anti-
clockwise to position 1. Spectacles compartment There is a compartment to stow spectacles in
the roof lining on the driver's side.
X
To open: pull down spectacles compart-
ment :by the handle.
Stowage compartments in the front
centre console Front stowage compartment (except AMG vehi-
cles)
X
To open: slide the cover forwards by han-
dle :in the direction of the arrow until it
engages.
X To close: briefly press the front of han-
dle :. Stowage areas
291Stowing and features Z
Page 295 of 405
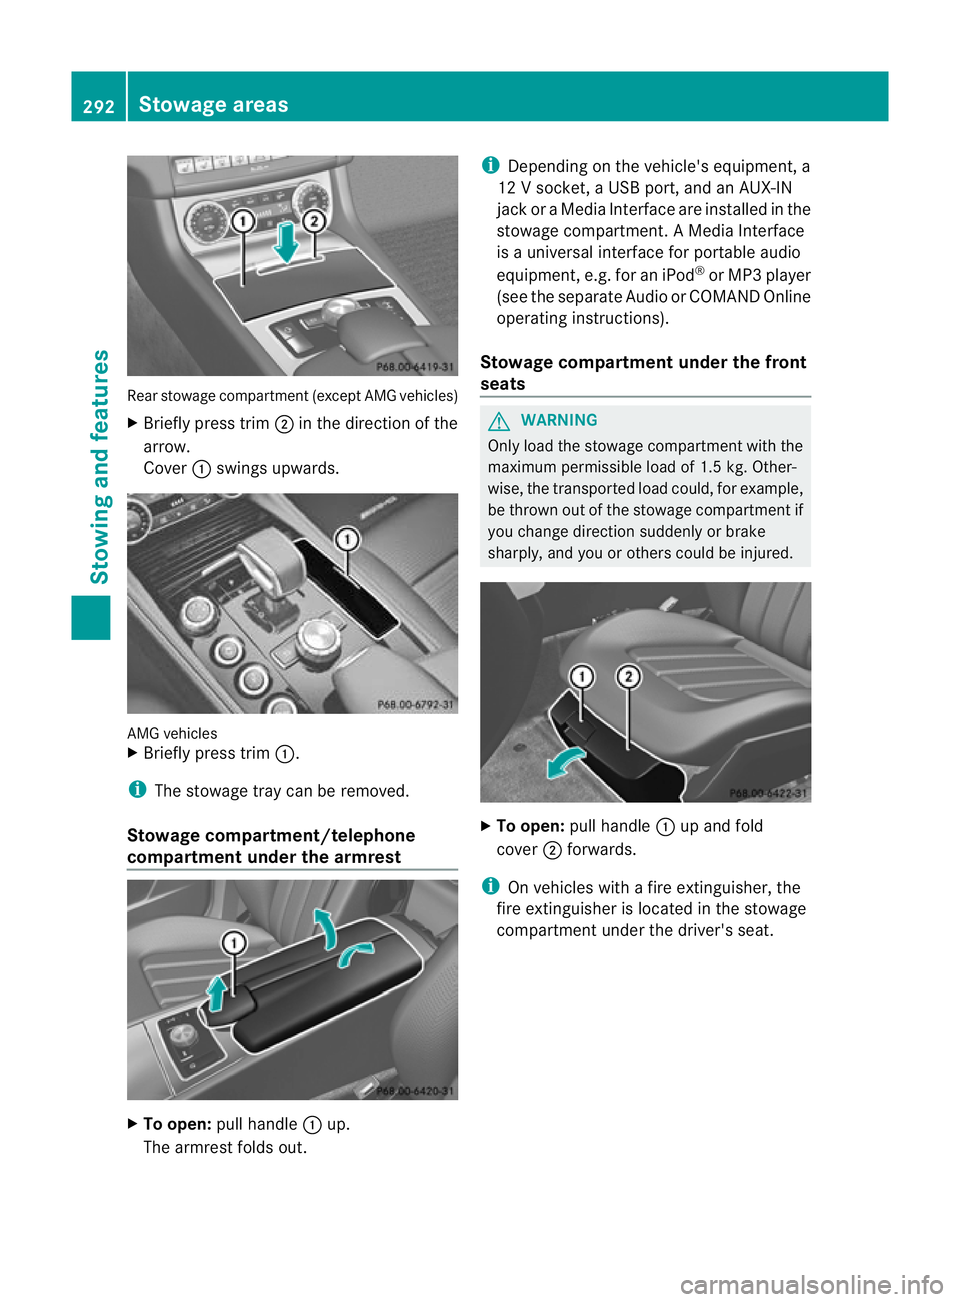
Rear stowage compartmen
t(except AMG vehicles)
X Briefly press trim ;in the direction of the
arrow.
Cover :swings upwards. AMG vehicles
X
Briefly press trim :.
i The stowage tray can be removed.
Stowage compartment/telephone
compartment under the armrest X
To open: pull handle :up.
The armrest folds out. i
Depending on the vehicle's equipment, a
12 V socket, a USB port, and an AUX-IN
jack or a Media Interface are installed in the
stowage compartment. A Media Interface
is a universal interface for portable audio
equipment, e.g. for an iPod ®
or MP3 player
(see the separate Audio or COMAND Online
operating instructions).
Stowage compartment under the front
seats G
WARNING
Only load the stowage compartment with the
maximum permissible load of 1.5 kg. Other-
wise, the transported load could, for example,
be thrown out of the stowage compartment if
you change direction suddenly or brake
sharply, and you or others could be injured. X
To open: pull handle :up and fold
cover ;forwards.
i On vehicles with a fire extinguisher, the
fire extinguisher is located in the stowage
compartment under the driver's seat. 292
Stowage areasStowing and features
Page 296 of 405
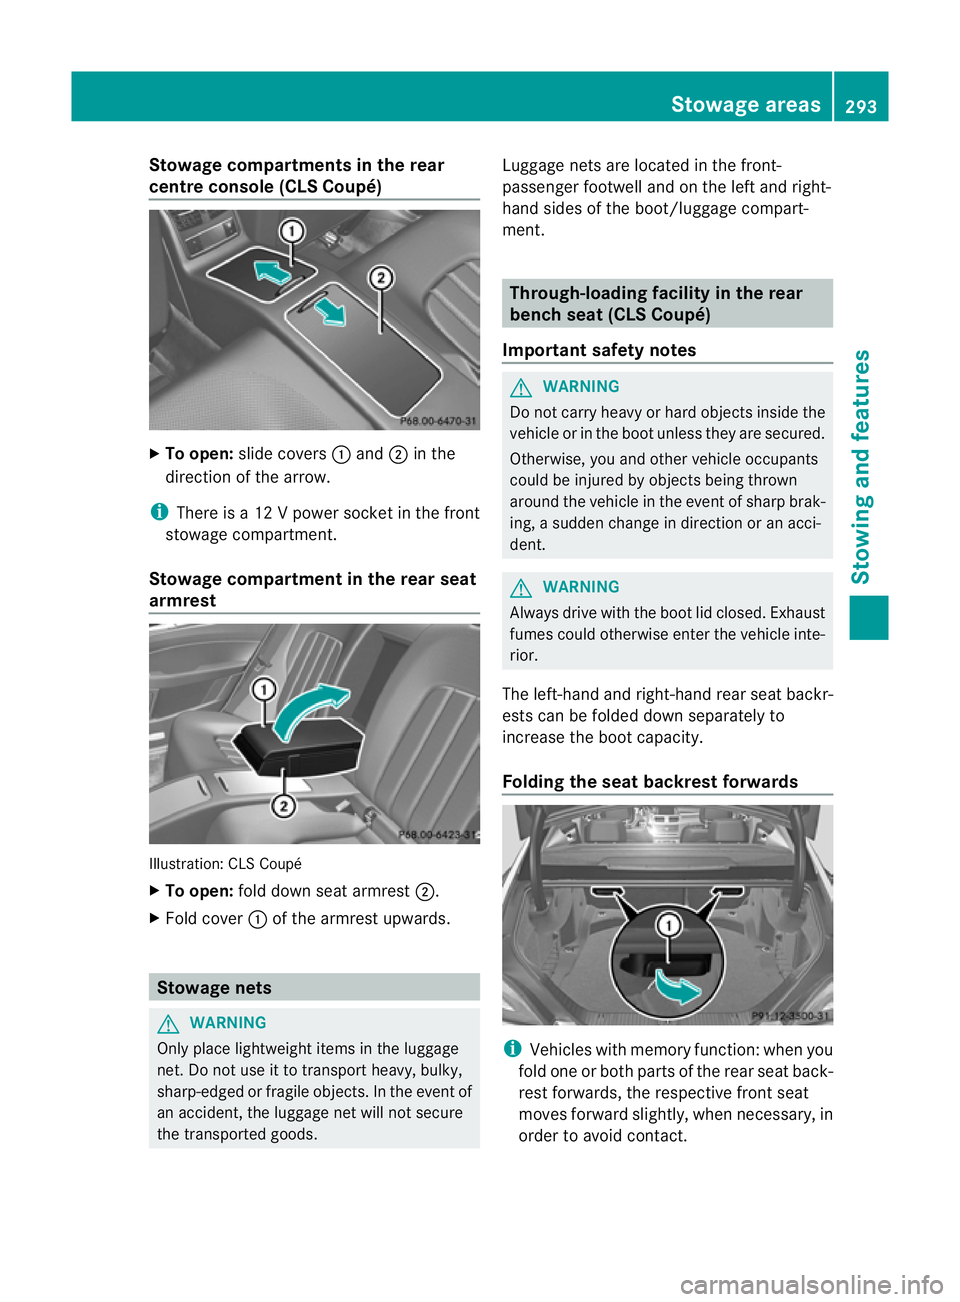
Stowage compartments in the rear
centre console (CLS Coupé)
X
To open: slide covers :and ;in the
direction of the arrow.
i There is a 12 V power socket in the front
stowage compartment.
Stowage compartment in the rear seat
armrest Illustration: CLS Coupé
X
To open: fold down seat armrest ;.
X Fold cover :of the armrest upwards. Stowage nets
G
WARNING
Only place lightweight items in the luggage
net. Do not use it to transport heavy, bulky,
sharp-edged or fragile objects. In the event of
an accident, the luggage net will not secure
the transported goods. Luggage nets are located in the front-
passenger footwell and on the left and right-
hand sides of the boot/luggage compart-
ment. Through-loading facility in the rear
bench seat (CLS Coupé)
Important safety notes G
WARNING
Do not carry heavy or hard objects inside the
vehicle or in the boot unless they are secured.
Otherwise, you and other vehicle occupants
could be injured by objectsb eing thrown
around the vehicle in the event of sharp brak-
ing, a sudden change in direction or an acci-
dent. G
WARNING
Always drive with the boot lid closed. Exhaust
fumes could otherwise enter the vehicle inte-
rior.
The left-hand and right-hand rear seat backr-
ests can be folded down separately to
increase the boot capacity.
Folding the seat backrest forwards i
Vehicles with memory function :when you
fold one or both parts of the rear seat back-
rest forwards, the respective front seat
moves forward slightly, when necessary, in
order to avoid contact. Stowage areas
293Stowing and features Z
Page 297 of 405
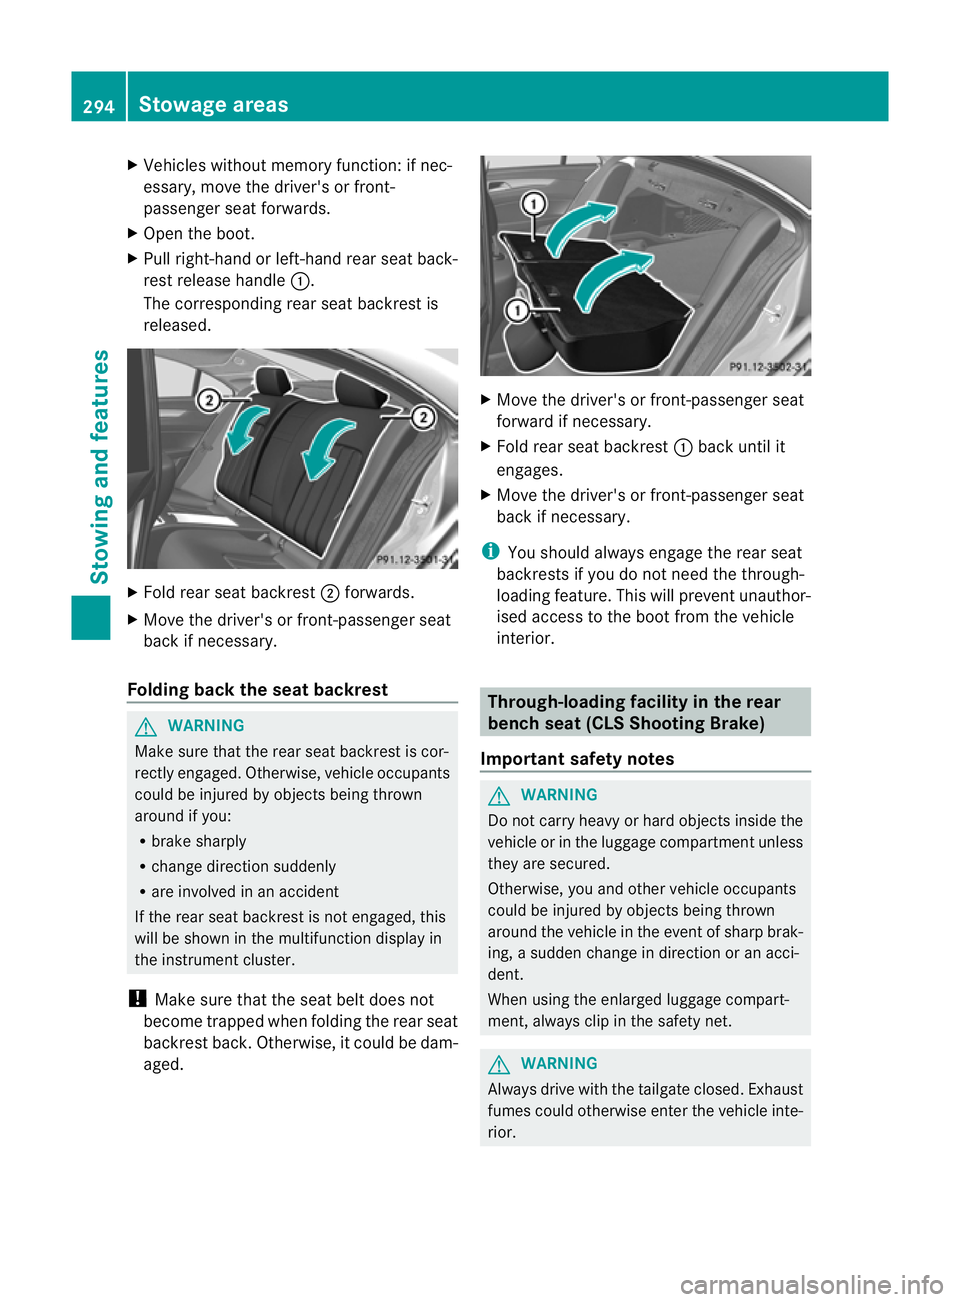
X
Vehicles without memory function: if nec-
essary, move the driver's or front-
passenger seat forwards.
X Open the boot.
X Pull right-hand or left-hand rear seat back-
rest release handle :.
The corresponding rear seat backrest is
released. X
Fold rear seat backrest ;forwards.
X Move the driver's or front-passenger seat
back if necessary.
Folding back the seat backrest G
WARNING
Make sure that the rear seat backrest is cor-
rectly engaged. Otherwise, vehicle occupants
could be injured by objects being thrown
around if you:
R brake sharply
R change direction suddenly
R are involved in an accident
If the rear seat backrest is not engaged, this
will be shown in the multifunction display in
the instrument cluster.
! Make sure that the seat belt does not
become trapped when folding the rear seat
backrest back. Otherwise, it could be dam-
aged. X
Move the driver's or front-passenger seat
forward if necessary.
X Fold rear seat backrest :back until it
engages.
X Move the driver's or front-passenger seat
back if necessary.
i You should always engage the rear seat
backrests if you do not need the through-
loading feature. This will prevent unauthor-
ised access to the boot from the vehicle
interior. Through-loading facility in the rear
benchs
eat (CLS Shooting Brake)
Important safety notes G
WARNING
Do not carry heavy or hard objects inside the
vehicle or in the luggage compartmen tunless
they are secured.
Otherwise, you and othe rvehicle occupants
could be injured by objects being thrown
around the vehicle in the event of sharp brak-
ing, a sudden change in direction or an acci-
dent.
When using the enlarged luggage compart-
ment, always clip in the safety net. G
WARNING
Always drive with the tailgate closed. Exhaust
fumes could otherwise enter the vehicle inte-
rior. 294
Stowage areasStowing and features
Page 298 of 405
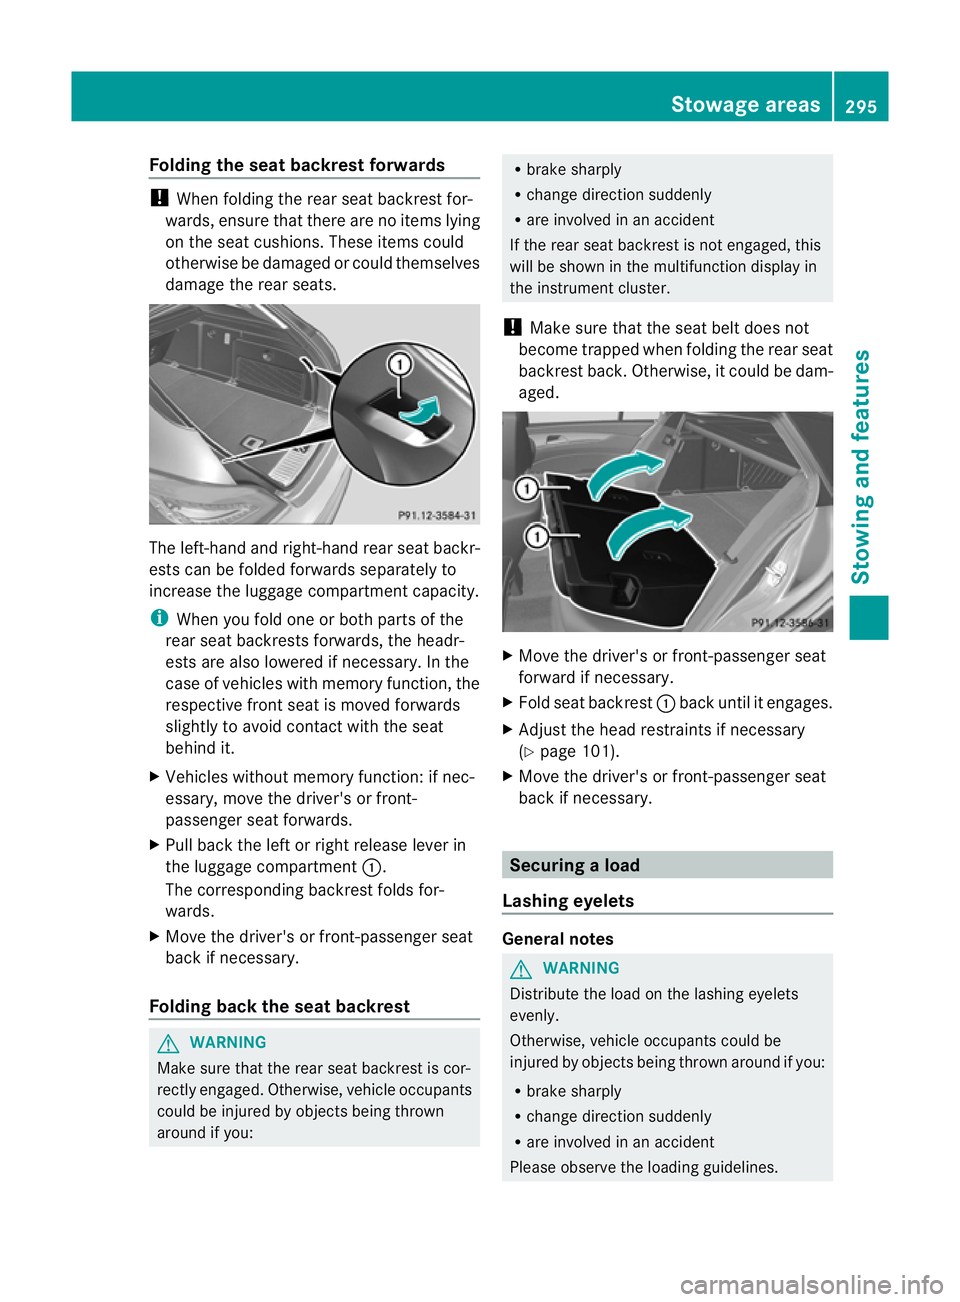
Folding the seat backrest forwards
!
When folding the rear seat backrest for-
wards, ensure that there are no items lying
on the seat cushions. Thes eitems could
otherwise be damaged or could themselves
damage the rea rseats. The left-hand and right-hand rear seat backr-
ests can be folded forwards separately to
increase the luggage compartment capacity.
i When you fold one or both parts of the
rear seat backrests forwards, the headr-
ests are also lowered if necessary. In the
case of vehicles with memory function, the
respective fron tseat is moved forwards
slightly to avoid contact with the seat
behind it.
X Vehicles without memory function: if nec-
essary, move the driver's or front-
passenger seat forwards.
X Pull back the left or right release lever in
the luggage compartment :.
The corresponding backrest folds for-
wards.
X Move the driver's or front-passenger seat
back if necessary.
Folding back the seat backrest G
WARNING
Make sure that the rear seat backrest is cor-
rectly engaged. Otherwise, vehicle occupants
could be injured by objects being thrown
around if you: R
brake sharply
R change direction suddenly
R are involved in an accident
If the rear seat backrest is not engaged, this
will be shown in the multifunction display in
the instrument cluster.
! Make sure that the seat belt does not
become trapped when folding the rear seat
backrest back. Otherwise, it could be dam-
aged. X
Move the driver's or front-passenger seat
forward if necessary.
X Fold seat backrest :back until it engages.
X Adjust the head restraints if necessary
(Y page 101).
X Move the driver's or front-passenger seat
back if necessary. Securing
aload
Lashing eyelets General notes
G
WARNING
Distribute the load on the lashing eyelets
evenly.
Otherwise, vehicle occupants could be
injured by objects being thrown around if you:
R brake sharply
R change directio nsuddenly
R are involved in an accident
Please observe the loading guidelines. Stowage areas
295Stowing and featu res Z
Page 299 of 405
Observe the following notes on securing
loads:
R
secure the load using the lashing eyelets.
R do not use elastic straps or nets to secure
a load, as these are only intended as an
anti-slip protection for light loads.
R do not route lashing materials across sharp
edges or corners.
R pad sharp edges for protection.
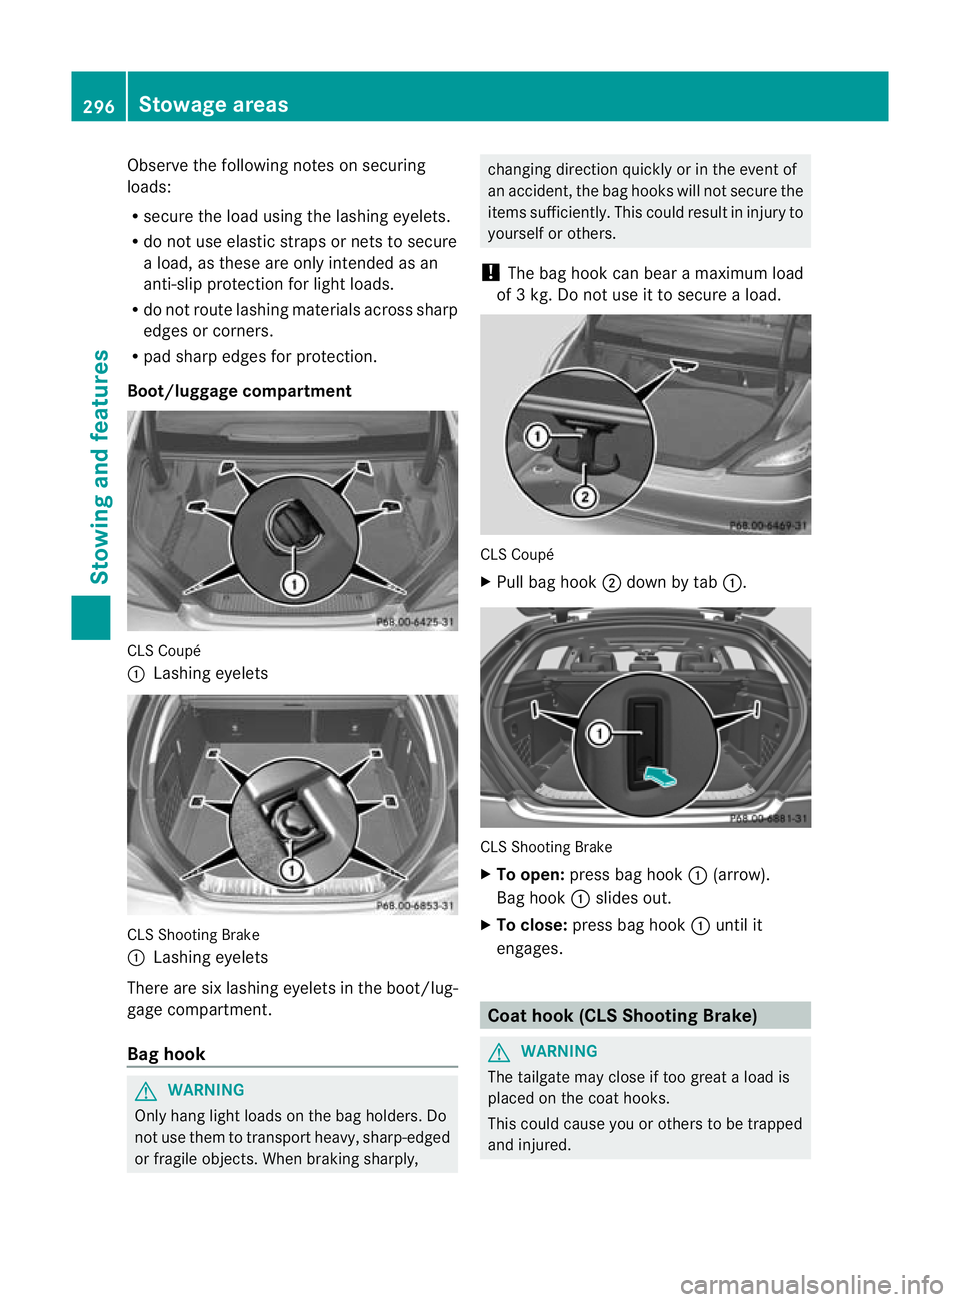
Boot/luggage compartment CLS Coupé
:
Lashing eyelets CLS Shooting Brake
:
Lashing eyelets
There are six lashing eyelets in the boot/lug-
gage compartment.
Bag hook G
WARNING
Only hang light loads on the bag holders. Do
not use them to transport heavy, sharp-edged
or fragile objects. When braking sharply, changing direction quickly or in the event of
an accident, the bag hooks will not secure the
items sufficiently. This could result in injury to
yourselforo
thers.
! The bag hoo kcan bear a maximum load
of 3 kg. Do not use it to secure a load. CLS Coupé
X
Pull bag hook ;down by tab :. CLS Shooting Brake
X To open: press bag hook :(arrow).
Bag hook :slides out.
X To close: press bag hook :until it
engages. Coat hook (CLS Shooting Brake)
G
WARNING
The tailgate may close if too great a load is
placed on the coat hooks.
This could cause you or others to be trapped
and injured. 296
Stowage areasStowing and features
Page 300 of 405
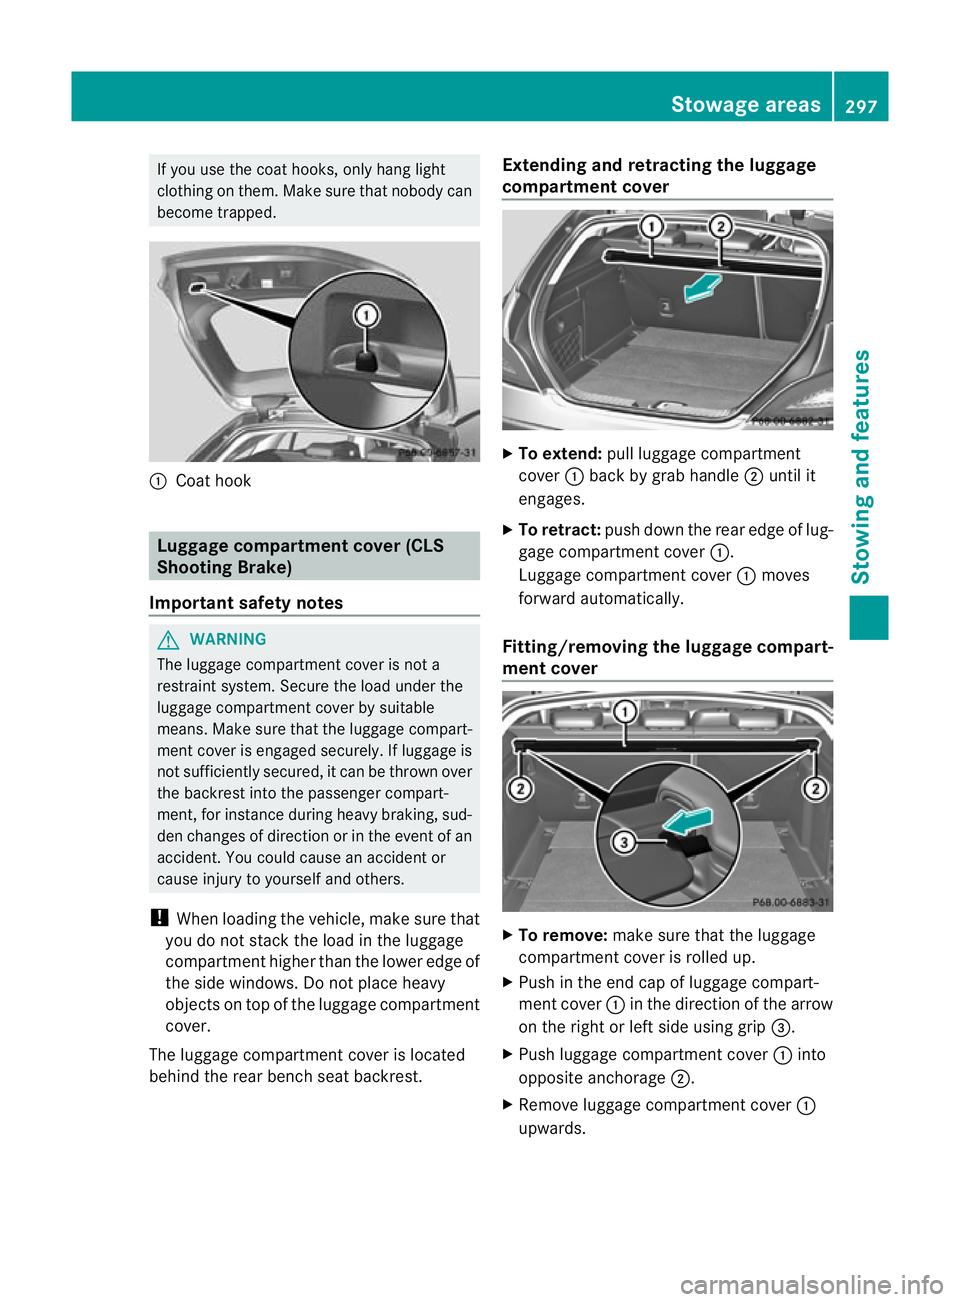
If you use the coat hooks, only hang light
clothing on them. Make sure that nobody can
become trapped.
:
Coath ook Luggage compartment cover (CLS
Shooting Brake)
Important safety notes G
WARNING
The luggage compartment cover is not a
restraint system. Secure the load under the
luggage compartment cover by suitable
means. Make sure that the luggage compart-
ment cover is engaged securely. If luggage is
not sufficiently secured, it can be thrown over
the backrest into the passenger compart-
ment, for instance during heavy braking, sud-
den changes of direction or in the event of an
accident .You could cause an accident or
cause injury to yourself and others.
! When loading the vehicle, make sure that
you do not stack the load in the luggage
compartment higher than the lower edge of
the side windows. Do not place heavy
objects on top of the luggage compartment
cover.
The luggage compartment cover is located
behind the rear bench seat backrest. Extending and retracting the luggage
compartment cover
X
To extend: pull luggage compartment
cover :back by grab handle ;until it
engages.
X To retract: push down the rear edge of lug-
gage compartment cover :.
Luggage compartment cover :moves
forward automatically.
Fitting/removing the luggage compart-
ment cover X
To remove: make sure that the luggage
compartment cover is rolled up.
X Push in the end cap of luggage compart-
ment cover :in the direction of the arrow
on the right or left side using grip =.
X Push luggage compartment cover :into
opposite anchorage ;.
X Remove luggage compartment cover :
upwards. Stowage areas
297Stowing and features Z