sunroof MERCEDES-BENZ CLS SHOOTING BRAKE 2012 Owners Manual
[x] Cancel search | Manufacturer: MERCEDES-BENZ, Model Year: 2012, Model line: CLS SHOOTING BRAKE, Model: MERCEDES-BENZ CLS SHOOTING BRAKE 2012Pages: 405, PDF Size: 10.21 MB
Page 20 of 405
Seats
Adjusting (electrically) ...................100
Adjusting lumba rsuppor t.............. 104
Adjusting the 4-way lumba rsup-
por t................................................ 104
Adjusting the head restraint ..........100
Cleaning the cover .........................331
Correct driver's seat position ........... 98
Important safety notes ....................99
Overview .......................................... 99
Seat heating problem ....................105
Seat ventilation problem ................105
Storing settings (memory func-
tion) ............................................... 111
Switching sea theating on/off .......104
Switching the sea tventilation on/
off .................................................. 105
Selector lever
Cleaning ......................................... 331
Sensors (cleaning instructions) .......328
Service see ASSYST PLUS
Service Centre
see Qualified specialist workshop
Service menu (on-board computer) .239
Service products Brake fluid ..................................... 392
Coolant (engine) ............................ 392
Engine oil ....................................... 391
Fuel ................................................ 386
Important safety notes ..................385
Washer fluid .................................. .393
Settings
Factory (on-board computer) .........245
On-board computer .......................239
Setting the air distribution ...............135
Setting the airflow ............................135
SETUP (on-board computer) .............246
Short journeys (diesel particle fil-
ter) ...................................................... 168
Sidebag ................................................ 45
Side lamps Switching on/off ........................... 116
Side windows
Convenience closing ........................90
Convenience opening ......................90
Important safety notes ....................89Opening/closing
.............................. 89
Problem (malfunction) .....................92
resetting .......................................... 91
Sliding sunroof
Important safety information ...........92
Opening/closing .............................. 93
Problem (malfunction) .....................95
Rain closing feature .........................93
Resetting ......................................... 93
Snow chains ...................................... 357
Socket Centre console .............................. 308
Luggage compartment ...................309
Rea rcompartmen t......................... 309
Under the armrest .........................308
Sockets
General notes ................................ 308
Spare wheel
Storing ........................................... 378
Specialist workshop ............................ 24
Spectacles compartment .................291
Speed, controlling see Cruise control
Spee dLimit Assist
Activating/deactivating the warn-
ing function .................................... 236
Displayin g...................................... 236
Display message ............................ 262
Display message in the multifunc-
tion displa y.................................... 204
Important safety notes ..................204
Speedometer
Digita l............................................ 231
In the Instrument cluster .........30, 227
Segments ...................................... 228
Selecting the unit of measure-
ment .............................................. 239
see Instrument cluster
SPEEDTRONIC
Deactivating variabl e..................... 176
Display message ............................ 267
Function/notes ............................. 174
Important safety notes ..................174
LIM indicator lamp .........................175
Permanent ..................................... 177
Selecting ........................................ 175
Storing the current spee d.............. 175
Variabl e......................................... 175 Index
17
Page 40 of 405
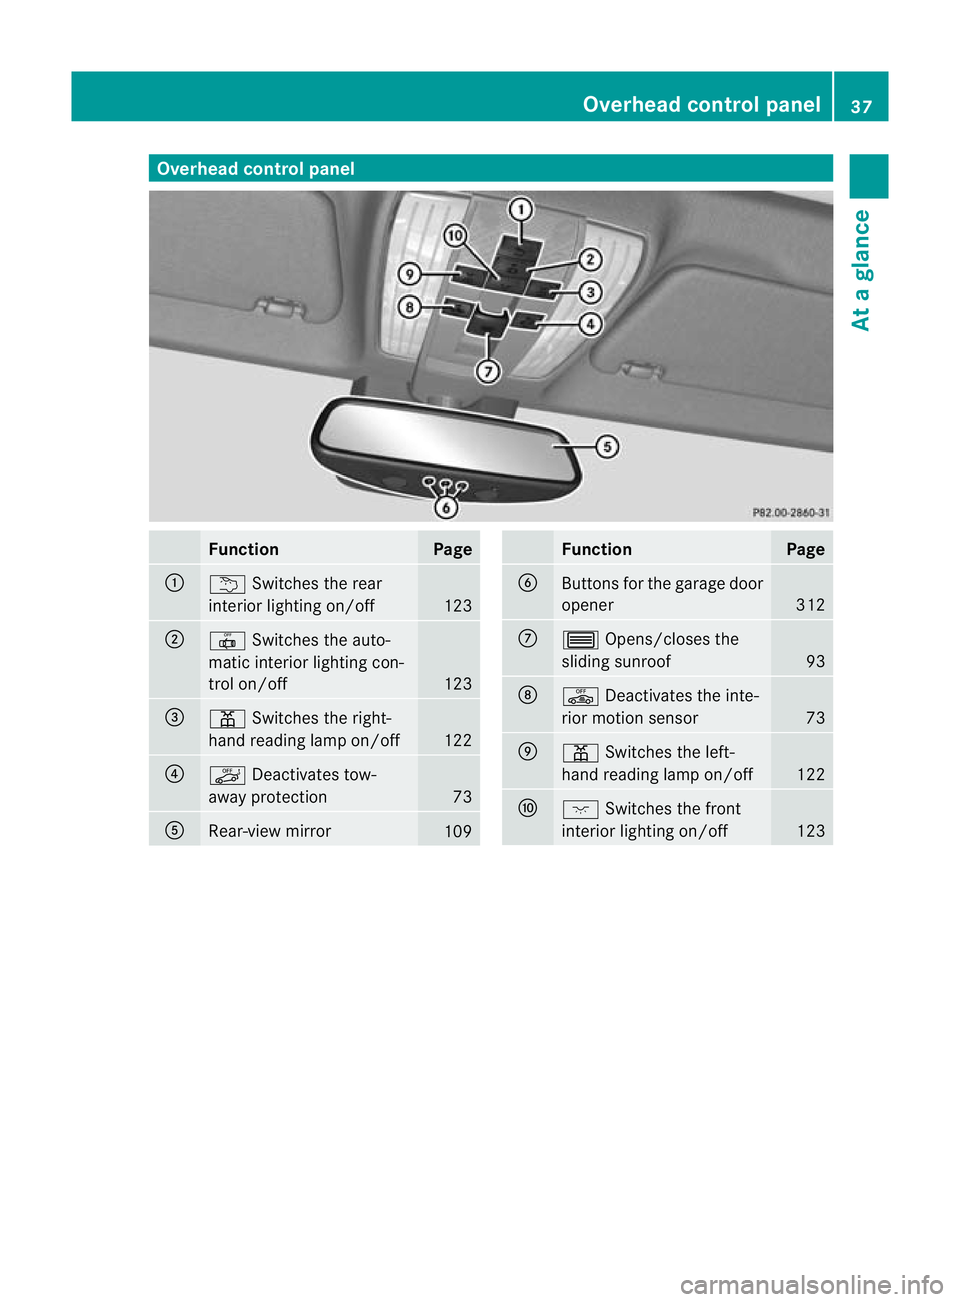
Overhea
dcontrol panel Function Page
:
u
Switches the rear
interio rlighting on/off 123
;
|
Switches the auto-
matic interior lighting con-
trol on/off 123
=
p
Switches the right-
hand reading lamp on/off 122
?
ë
Deactivates tow-
away protection 73
A
Rear-view mirror
109 Function Page
B
Buttons for the garage door
opener
312
C
3
Opens/closes the
sliding sunroof 93
D
ê
Deactivates the inte-
rior motion sensor 73
E
p
Switches the left-
hand reading lamp on/off 122
F
c
Switches the front
interior lighting on/off 123Overhead control panel
37At a glance
Page 51 of 405
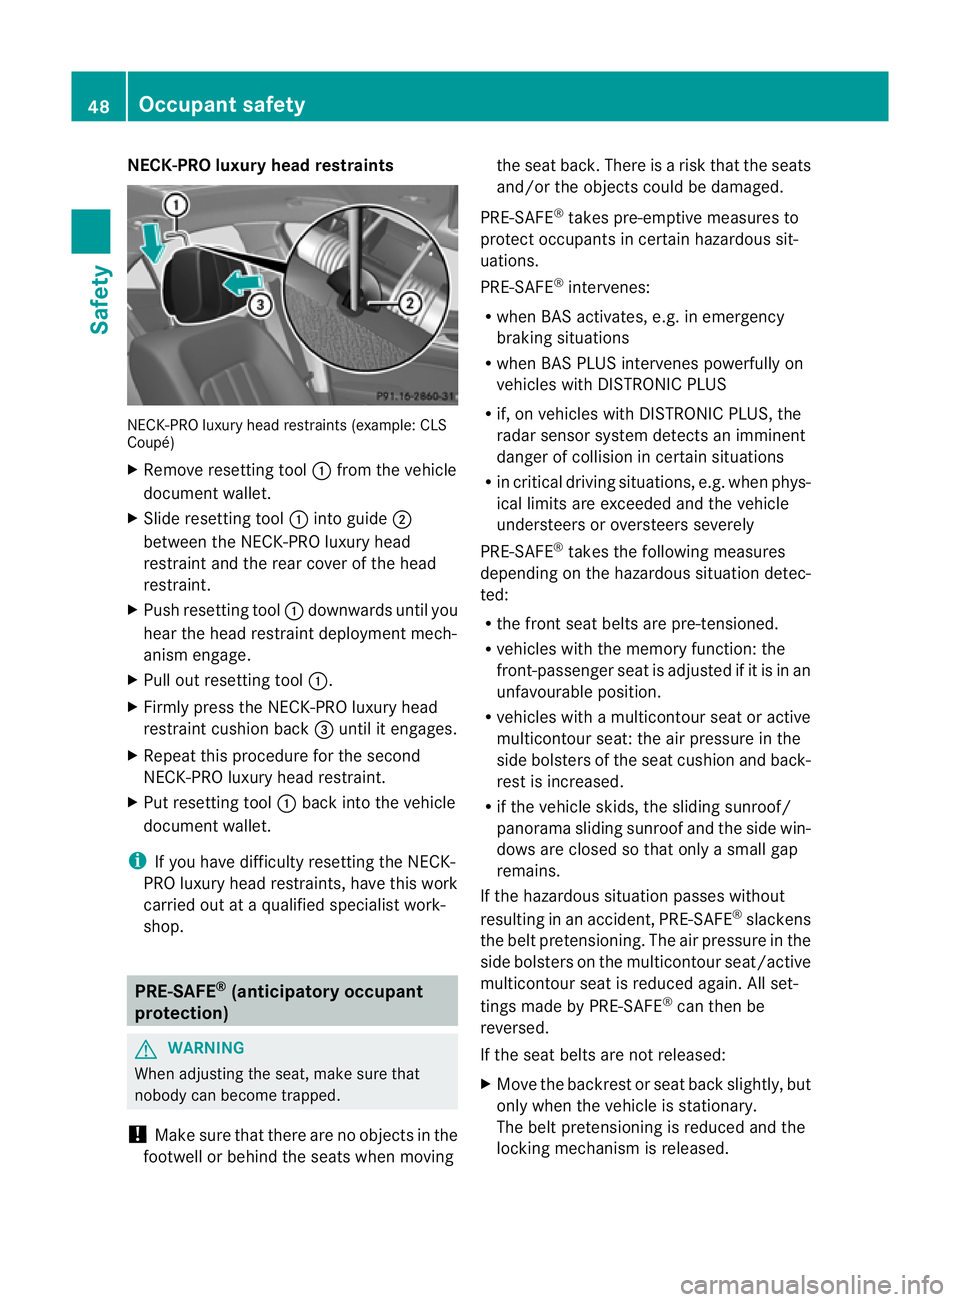
NECK-PRO luxury head restraints
NECK-PRO luxury head restraints (example: CLS
Coupé)
X
Remove resetting tool :from the vehicle
document wallet.
X Slide resetting tool :into guide ;
between the NECK-PRO luxury head
restraint and the rear cover of the head
restraint.
X Push resetting tool :downwards until you
hear the head restraint deployment mech-
anism engage.
X Pull ou tresetting tool :.
X Firmly press the NECK-PRO luxury head
restraint cushion back =until it engages.
X Repeat this procedure for the second
NECK-PRO luxury head restraint.
X Put resetting tool :back into the vehicle
documen twallet.
i If you have difficulty resetting the NECK-
PRO luxury head restraints, have this work
carried out at a qualified specialist work-
shop. PRE-SAFE
®
(anticipatory occupant
protection) G
WARNING
When adjusting the seat, make sure that
nobody can become trapped.
! Make sure that there are no objects in the
footwell or behind the seats when moving the seat back
.There is a risk that the seats
and/or the objects could be damaged.
PRE-SAFE ®
takes pre-emptive measures to
protect occupants in certain hazardous sit-
uations.
PRE-SAFE ®
intervenes:
R when BAS activates, e.g. in emergency
braking situations
R when BAS PLUS intervenes powerfully on
vehicles with DISTRONIC PLUS
R if, on vehicles with DISTRONIC PLUS, the
radar sensor system detectsani mminent
dange rofcollision in certain situations
R in critical driving situations, e.g. when phys-
ical limits are exceeded and the vehicle
understeers or oversteers severely
PRE-SAFE ®
takes the following measures
depending on the hazardous situation detec-
ted:
R the front seat belts are pre-tensioned.
R vehicles with the memory function: the
front-passenger seat is adjusted if it is in an
unfavourable position.
R vehicles with a multicontour seat or active
multicontour seat: the air pressure in the
side bolsters of the seat cushion and back-
rest is increased.
R if the vehicle skids, the sliding sunroof/
panorama sliding sunroof and the side win-
dows are closed so that only a small gap
remains.
If the hazardous situation passes without
resulting in an accident, PRE-SAFE ®
slackens
the belt pretensioning. The air pressure in the
side bolsters on the multicontour seat/active
multicontour seat is reduced again. All set-
tings made by PRE-SAFE ®
can then be
reversed.
If the seat belts are not released:
X Move the backrest or seat back slightly, but
only when the vehicle is stationary.
The belt pretensioning is reduced and the
locking mechanism is released. 48
Occupant safetySafety
Page 76 of 405
Tow-away protection
Function An audible and visual alar
mis triggered if your
vehicle's angle of inclination is altered while
tow-away protection is primed. This can occur
if the vehicle is jacked up on one side, for
example.
Activating X
Make sure that:
R
the doors are closed.
R the boot lid/tailgate is closed.
Only then is the tow-away protection
primed.
X Lock the vehicle with the key or KEYLESS-
GO.
Tow-away protection is primed after
approximately 30 seconds.
To deactivate X
To switch off: unlock the vehicle with the
key or KEYLESS-GO.
Tow-away protection is switched off auto-
matically.
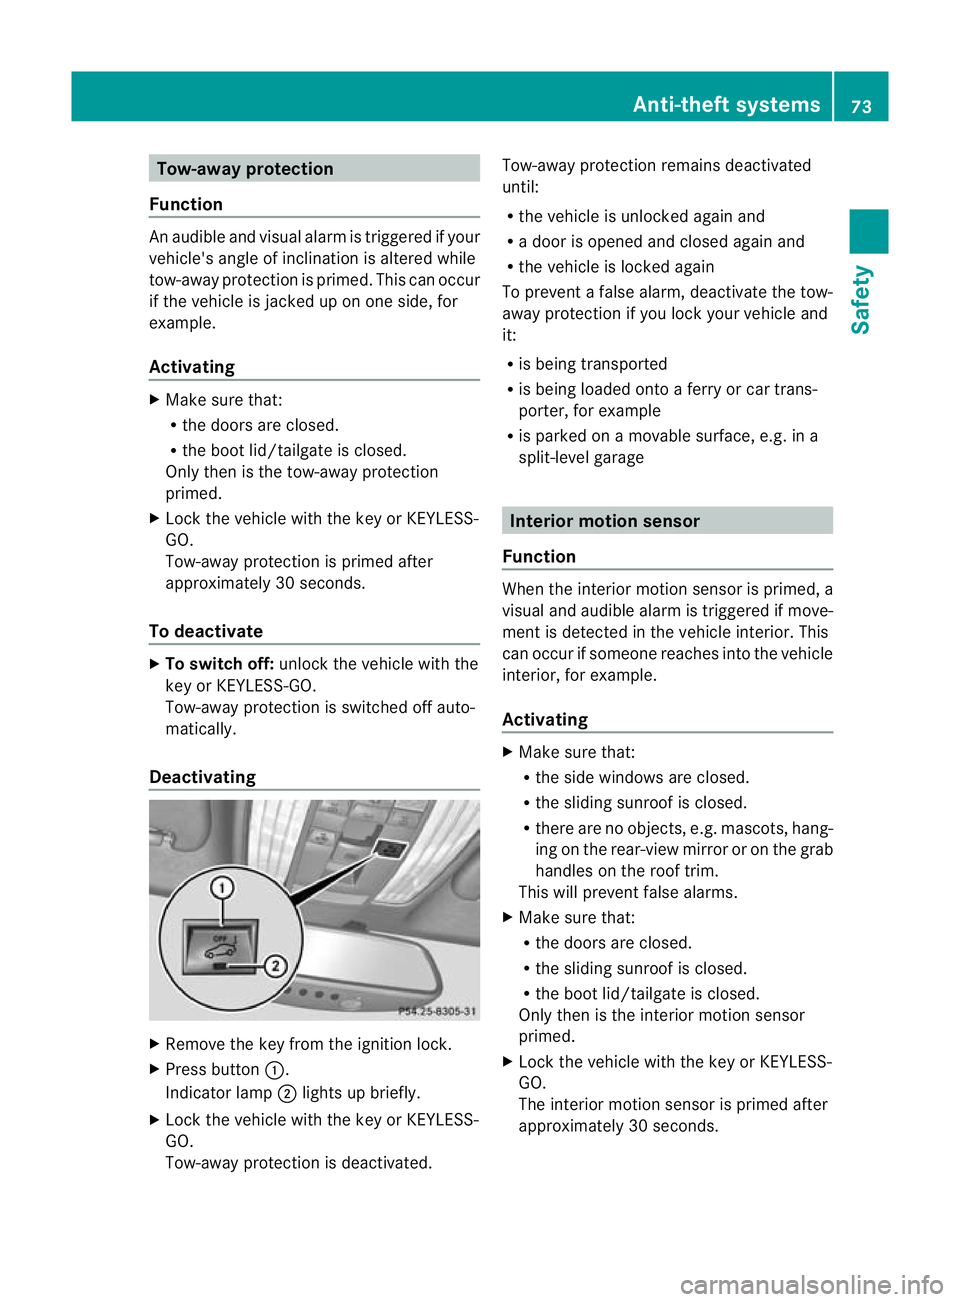
Deactivating X
Remove the key from the ignition lock.
X Press button :.
Indicator lamp ;lights up briefly.
X Lock the vehicle with the key or KEYLESS-
GO.
Tow-away protection is deactivated. Tow-away protection remains deactivated
until:
R
the vehicle is unlocked againa nd
R a door is opened and closed agai nand
R the vehicle is locked again
To prevent a false alarm, deactivate the tow-
away protection if you lock your vehicle and
it:
R is being transported
R is being loaded onto a ferry or car trans-
porter, for example
R is parked on a movable surface, e.g .ina
split-level garage Interior motion sensor
Function When the interior motion sensor is primed, a
visual and audible alarm is triggered if move-
ment is detected in the vehicle interior. This
can occur if someone reaches into the vehicle
interior, for example.
Activating
X
Make sure that:
R
the side windows are closed.
R the sliding sunroof is closed.
R there are no objects, e.g. mascots, hang-
ing on the rear-view mirror or on the grab
handles on the roof trim.
This will prevent false alarms.
X Make sure that:
R
the doors are closed.
R the sliding sunroof is closed.
R the boot lid/tailgate is closed.
Only then is the interior motion sensor
primed.
X Lock the vehicle with the key or KEYLESS-
GO.
The interior motion sensor is primed after
approximately 30 seconds. Anti-theft systems
73Safety Z
Page 77 of 405
To deactivate
X
Unlock the vehicle with the key or KEY-
LESS-GO.
The interio rmotion sensor is switched off
automatically.
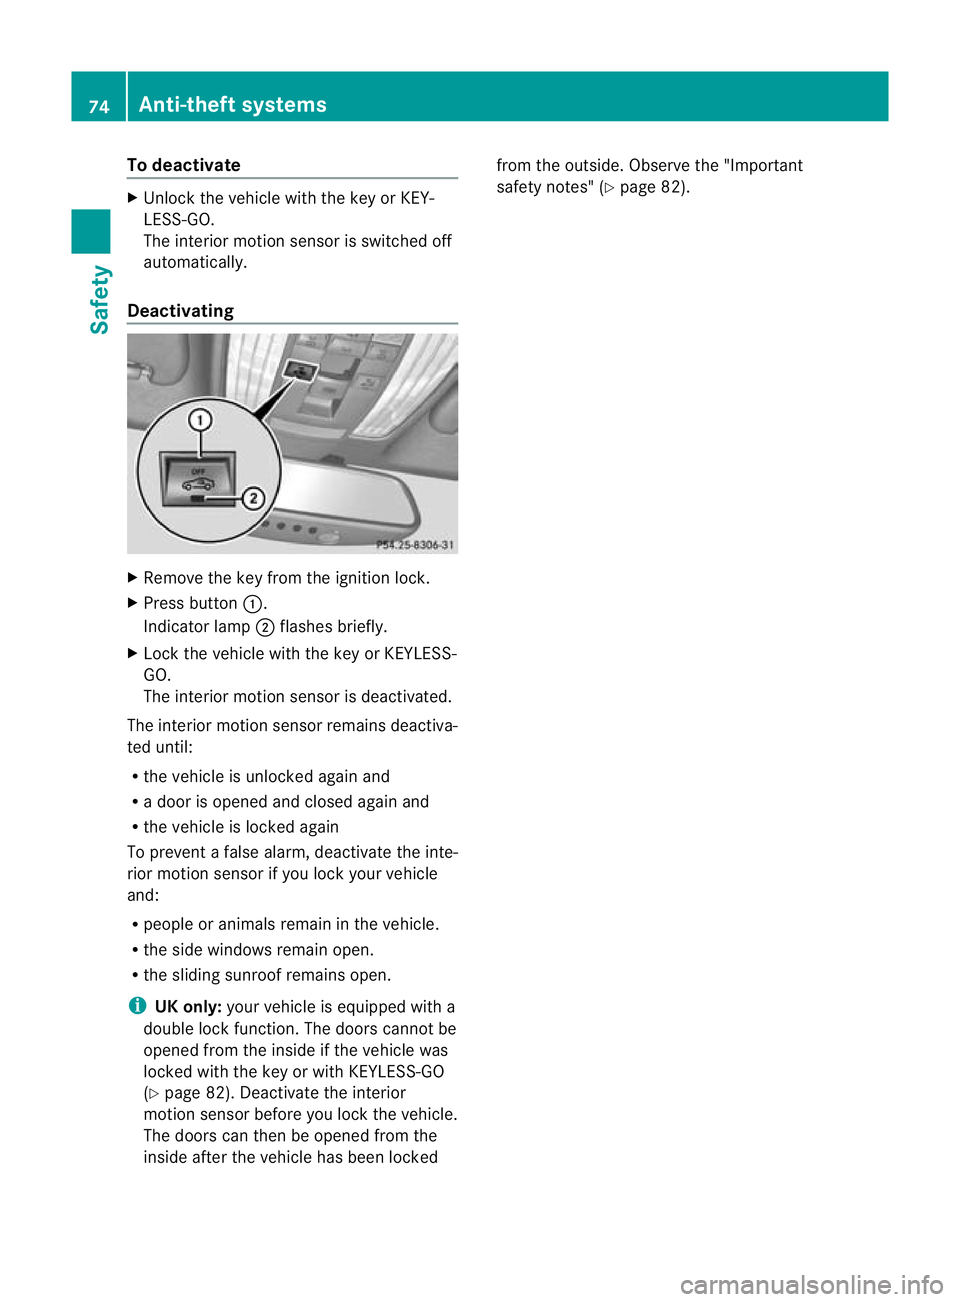
Deactivating X
Remove the key from the ignition lock.
X Press button :.
Indicator lamp ;flashes briefly.
X Lock the vehicle with the key or KEYLESS-
GO.
The interior motion sensor is deactivated.
The interior motion sensor remains deactiva-
ted until:
R the vehicle is unlocked again and
R a door is opened and closed again and
R the vehicle is locked again
To prevent a false alarm, deactivate the inte-
rior motion sensor if you lock your vehicle
and:
R people or animals remain in the vehicle.
R the side windows remain open.
R the sliding sunroof remains open.
i UK only: your vehicle is equipped with a
double lock function. The doors cannot be
opened from the inside if the vehicle was
locked with the key or with KEYLESS-GO
(Y page 82). Deactivate the interior
motion sensor before you lock the vehicle.
The doors can then be opened from the
inside after the vehicle has been locked from the outside. Observe the "Important
safety notes" (Y
page 82).74
Anti-theft systemsSafety
Page 78 of 405
Useful information
..............................76
Key ....................................................... 76
Doors .................................................... 82
Boot/luggage compartment ..............85
Side windows ...................................... 89
Sliding sunroof .................................... 92 75Opening and closing
Page 93 of 405
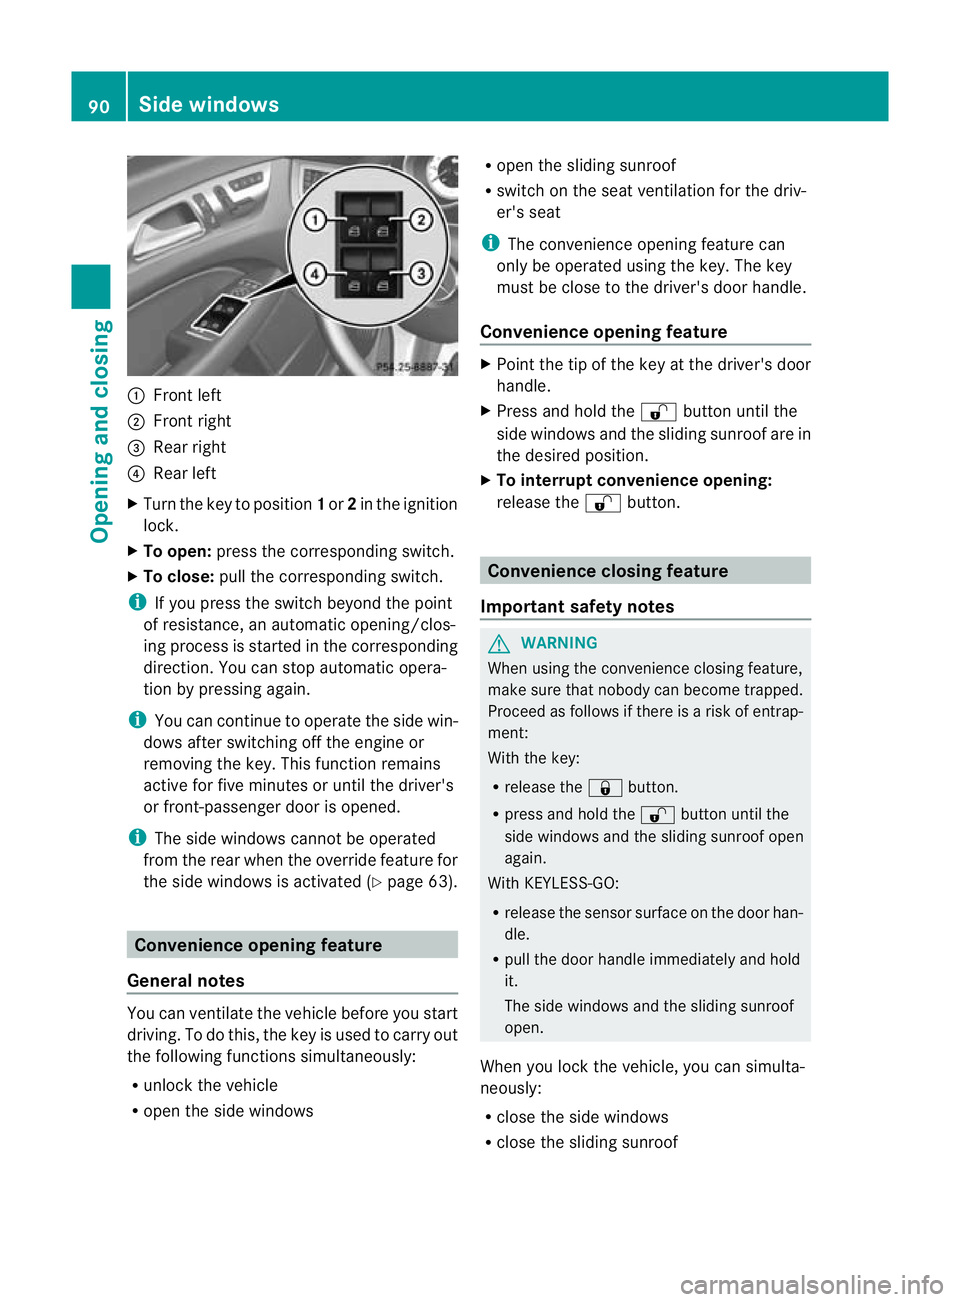
:
Front left
; Front right
= Rear right
? Rear left
X Turn the key to position 1or 2in the ignition
lock.
X To open: press the corresponding switch.
X To close: pull the corresponding switch.
i If you press the switch beyond the point
of resistance, an automatic opening/clos-
ing process is started in the corresponding
direction. You can stop automatic opera-
tion by pressing again.
i You can continue to operate the side win-
dows afte rswitching off the engine or
removing the key. This function remains
active for five minutes or until the driver's
or front-passenger door is opened.
i The side windows cannot be operated
fro mt he rear when the override feature for
the side windows is activated (Y page 63).Convenience opening feature
General notes You can ventilate the vehicle before you start
driving. To do this, the key is used to carry out
the following functions simultaneously:
R
unlock the vehicle
R open the side windows R
open the sliding sunroof
R switch on the seat ventilation for the driv-
er's seat
i The convenience opening feature can
only be operated using the key. The key
must be close to the driver's door handle.
Convenience opening feature X
Point the tip of the key at the driver's door
handle.
X Press and hold the %button until the
side windows and the sliding sunroof are in
the desired position.
X To interrupt convenience opening:
release the %button. Convenience closing feature
Important safety notes G
WARNING
When using the convenience closing feature,
make sure that nobody can become trapped.
Proceed as follows if there is a risk of entrap-
ment:
With the key:
R release the &button.
R press and hold the %button until the
side windows and the sliding sunroof open
again.
With KEYLESS-GO:
R release the sensor surface on the door han-
dle.
R pull the door handle immediately and hold
it.
The side windows and the sliding sunroof
open.
When you lock the vehicle, you can simulta-
neously:
R close the side windows
R close the sliding sunroof 90
Side windowsOpening and closing
Page 94 of 405
Using the key
The key must be close to the driver's door
handle.
X Point the tip of the key at the driver's door
handle.
X Press and hold the &button until the
side windows and the sliding sunroo fare
fully closed.
X Make sure that all the side windows and the
sliding sunroof are closed.
X To interrupt convenience closing:
release the &button.
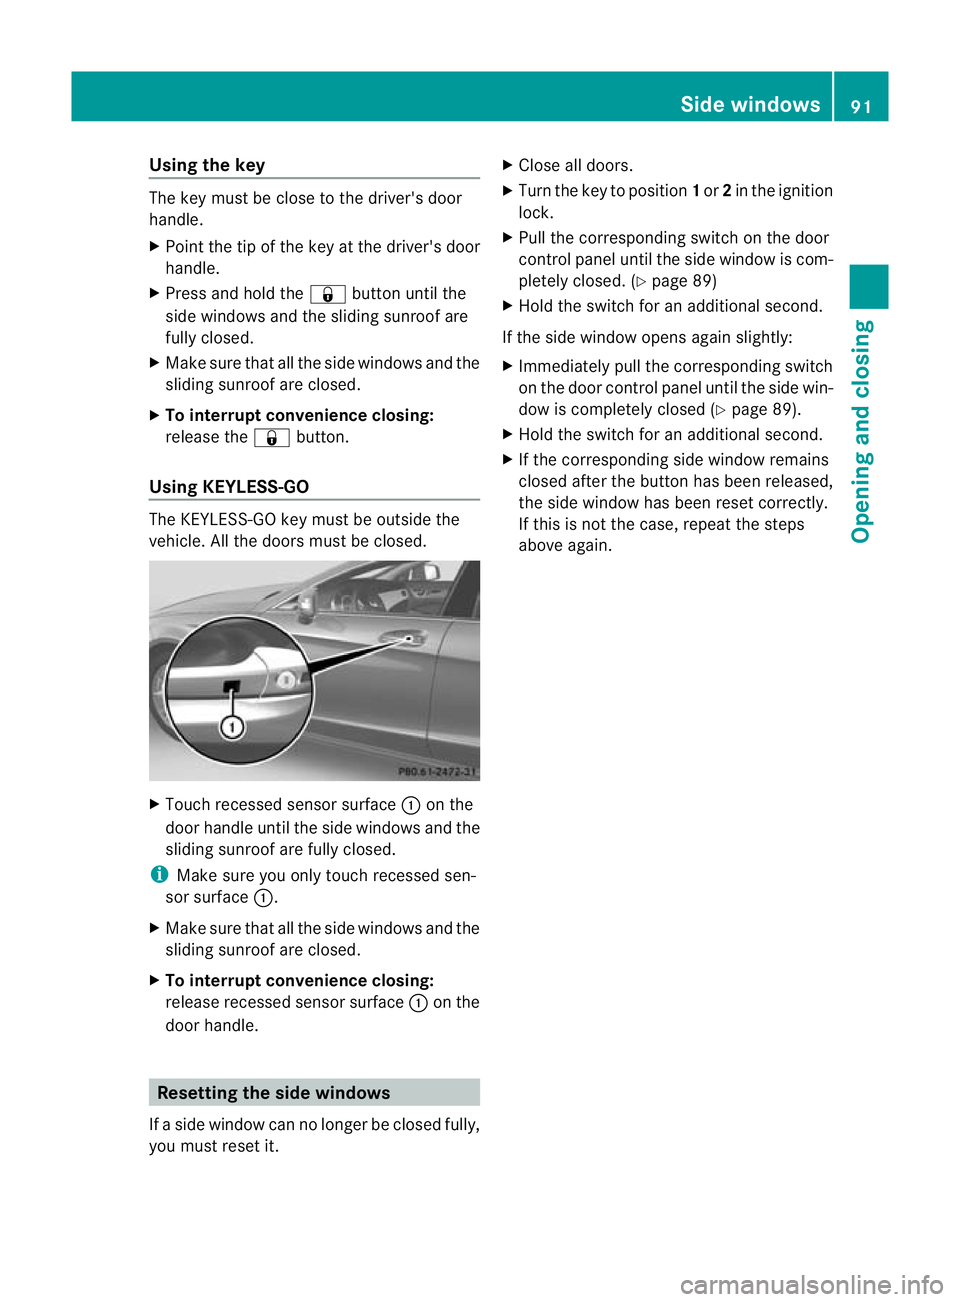
Using KEYLESS-GO The KEYLESS-GO key must be outside the
vehicle. All the doors must be closed. X
Touch recessed sensor surface :on the
door handle until the side windows and the
sliding sunroof are fully closed.
i Make sure you only touch recessed sen-
sor surface :.
X Make sure that all the side windows and the
sliding sunroof are closed.
X To interrupt convenience closing:
release recessed sensor surface :on the
door handle. Resetting the side windows
If a side window can no longer be closed fully,
you must reset it. X
Close all doors.
X Turn the key to position 1or 2in the ignition
lock.
X Pull the corresponding switch on the door
control panel until the side window is com-
pletely closed .(Y page 89)
X Hold the switch for an additional second.
If the side window opens again slightly:
X Immediately pull the corresponding switch
on the door control panel until the side win-
dow is completely closed (Y page 89).
X Hold the switch for an additional second.
X If the corresponding side window remains
closed after the button has been released,
the side window has been reset correctly.
If this is not the case, repeat the steps
above again. Side windows
91Opening and closing Z
Page 95 of 405
Problems with the side windows
G
WARNING
Closing the side windows with increased force or without the anti-entrapment feature could lead
to serious or even fatal injury. Make sure that nobody can become trapped when closing the side
windows. Problem Possible causes/consequences and
M Solutions
As
ide window cannot
be closed because it is
blocked by objects, e.g.
leaves in the window
guide. X
Remove the objects.
X Close the side window. As
ide window cannot
be closed and you can-
not see the cause. If a side window is obstructed during closing and reopens again
slightly:
X
Immediately after the window blocks, pull the corresponding
switch again until the side window has closed.
The side window is closed with increased force.
If a side window is obstructed again during closing and reopens
again slightly:
X Immediately after the window blocks, pull the corresponding
switch again until the side window has closed.
The side window is closed without the anti-entrapmen tfeature. Sliding sunroof
Important safety notes
G
WARNING
Make sure that nobody can become trapped
when opening and closing the sliding sunroof.
If there is a risk of entrapment, release the
switch immediately. During automatic opera-
tion, push the switch briefly in any direction
to stop the sliding sunroof. G
WARNING
The glass in the panorama sunroof could
break in an accident. If you are not wearing a
seat belt, there is a risk that you could be
thrown through the opening in the event of the
vehicle overturning .Therefore, always wear a
seat belt to reduce the risk of injuries. G
WARNING
Children could injure themselves if they oper-
ate the sliding sunroof.
Never leave children unsupervised in the vehi-
cle. Always take the key with you when leaving
the vehicle, even if you are only leaving it for
a short time.
! Only open the panorama sliding sunroof
if it is free of snow and ice. Otherwise, mal-
functions may occur.
Do not allow anything to protrude from the
sliding sunroof. Otherwise, the seals could
be damaged.
i Resonance noises can occur in addition
to the usual airflow noises when the sliding
sunroof is open. They are caused by minor
pressure fluctuations in the vehicle interior. 92
Sliding sunroofOpening and closing
Page 96 of 405
Change the positio
nofthe sliding sunroof
or open a side window slightly to reduce or
eliminate these noises.
i Resonance noises can occur in addition
to the usual airflow noises when the sliding
sunroof is open. They are caused by minor
pressure fluctuations in the vehicle interior.
To reduce or eliminate these noises:
R change the position of the sliding sunroof
R open a side window
R open the sliding sunroof to the comfort
setting. Operating the sliding sunroof
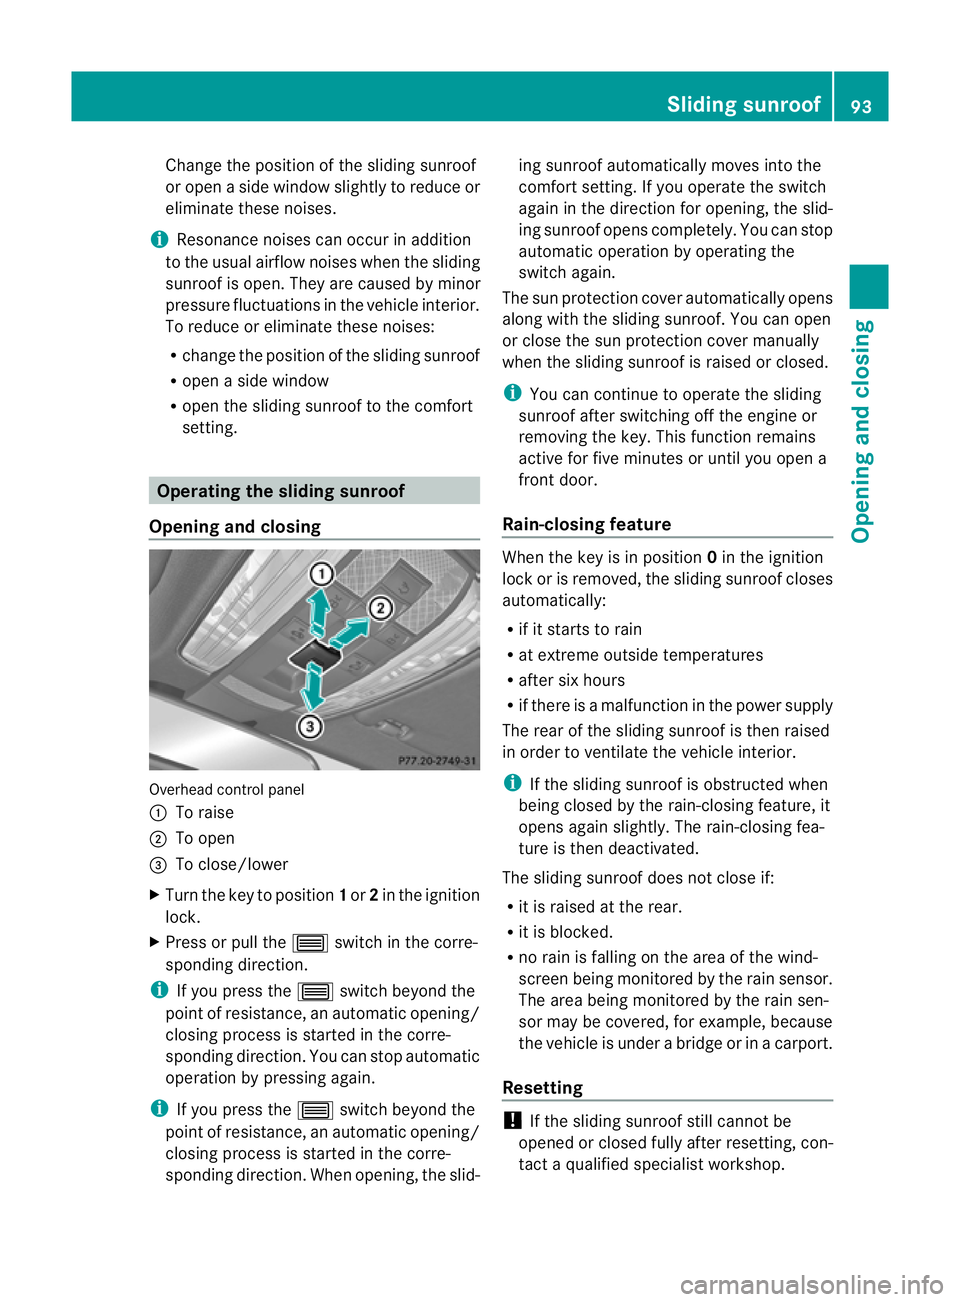
Opening and closing Overhead control panel
:
To raise
; To open
= To close/lower
X Turn the key to position 1or 2in the ignition
lock.
X Press or pull the 3switch in the corre-
sponding direction.
i If you press the 3switch beyond the
point of resistance, an automatic opening/
closing process is started in the corre-
sponding direction. You can stop automatic
operation by pressing again.
i If you press the 3switch beyond the
point of resistance, an automatic opening/
closing process is started in the corre-
sponding direction. When opening, the slid- ing sunroof automatically moves into the
comfort setting. If you operate the switch
again in the direction for opening, the slid-
ing sunroof opens completely. You can stop
automatic operation by operating the
switch again.
The sun protection cover automatically opens
along with the sliding sunroof. You can open
or close the sun protection cover manually
when the sliding sunroof is raised or closed.
i You can continue to operate the sliding
sunroof after switching off the engine or
removing the key. This function remains
active for five minutes or until you open a
front door.
Rain-closing feature When the key is in position
0in the ignition
lock or is removed, the sliding sunroof closes
automatically:
R if it starts to rain
R at extreme outside temperatures
R after six hours
R if there is a malfunction in the power supply
The rear of the sliding sunroof is then raised
in order to ventilate the vehicle interior.
i If the sliding sunroof is obstructed when
being closed by the rain-closing feature, it
opens again slightly. The rain-closing fea-
ture is then deactivated.
The sliding sunroof does not close if:
R it is raised at the rear.
R it is blocked.
R no rain is falling on the area of the wind-
screen being monitored by the rain sensor.
The area being monitored by the rain sen-
sor may be covered, for example, because
the vehicle is under a bridge or in a carport.
Resetting !
If the sliding sunroof still cannot be
opened or closed fully after resetting, con-
tact a qualified specialist workshop. Sliding sunroof
93Opening and closing Z