instrument cluster MERCEDES-BENZ CLS SHOOTING BRAKE 2014 Repair Manual
[x] Cancel search | Manufacturer: MERCEDES-BENZ, Model Year: 2014, Model line: CLS SHOOTING BRAKE, Model: MERCEDES-BENZ CLS SHOOTING BRAKE 2014Pages: 417, PDF Size: 14.15 MB
Page 308 of 417
wards, e.g. when braking suddenly or in the
event of an accident.
R The vehicle occupant would thereby be
pushed into the seat belt by the rear bench
seat/rear seat or by the seat backrest. The
seat belt cannot protect as intended and
could result in additional injury.
R Objects or loads in the boot/luggage com-
partment cannot be restrained by the seat
backrest.
This poses an increased risk of injury.
Before every trip, make sure that the seat
backrests and the rear bench seat/rear seat
are engaged before every trip.
Observe the loading guidelines (Y page 300).
Folding the seat backrest forwards !
When folding the rear seat backrest for-
wards, ensure that there are no items lying on the seat cushions. These items could
otherwise be damaged or could themselves
damage the rear seats. The left-hand and right-hand rear seat backr-
ests can be folded forwards separately to
increase the luggage compartment capacity.
i When you fold one or both parts of the
rear seat backrests forwards, the headr-
ests are also lowered if necessary. In the
case of vehicles with memory function, the respective front seat is moved forwards
slightly to avoid contact with the seat
behind it. X
Vehicles without memory function: if nec-
essary, move the driver's or front-
passenger seat forwards.
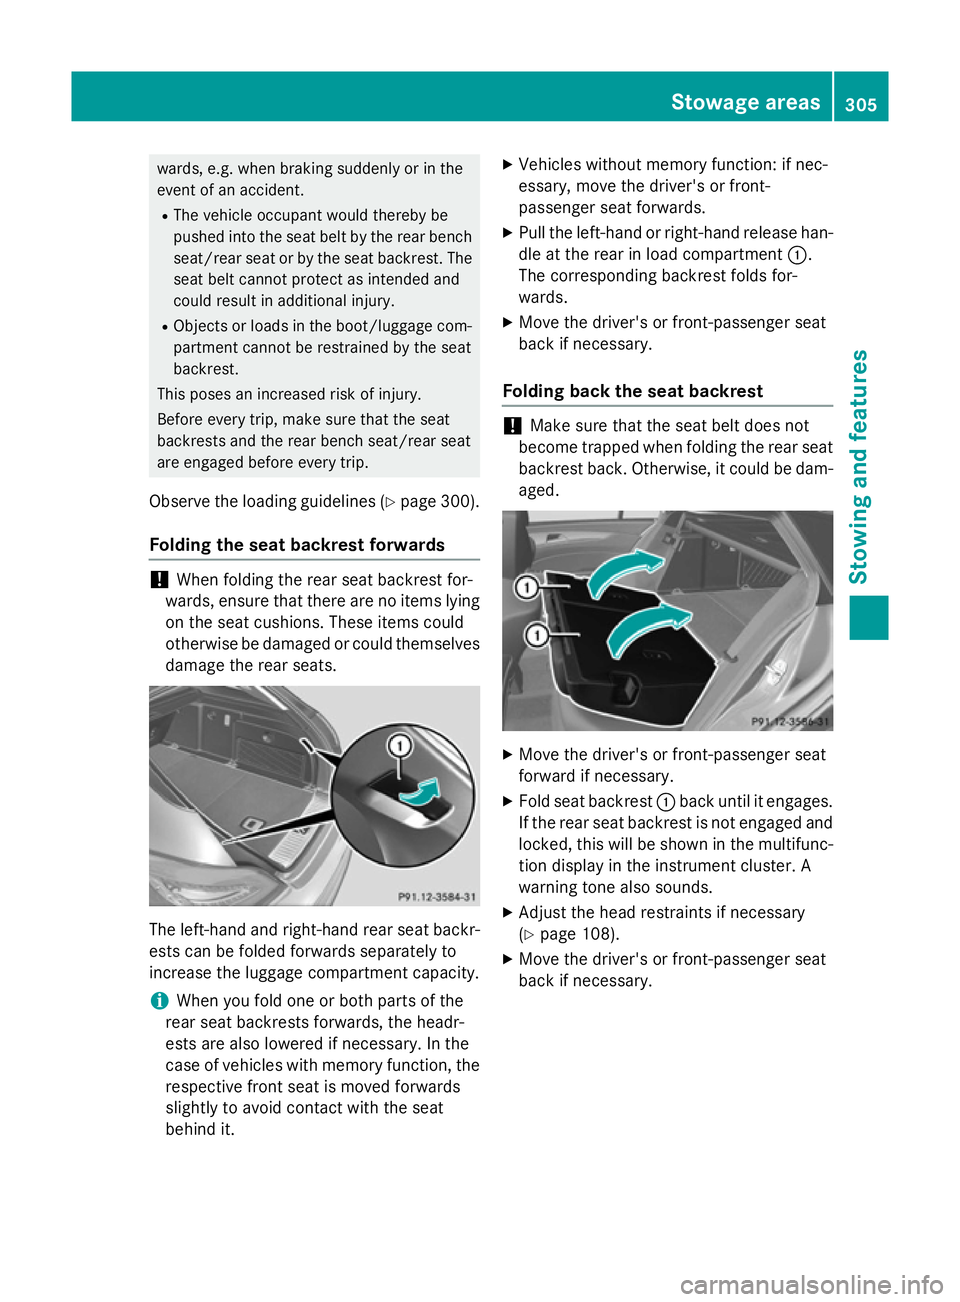
X Pull the left-hand or right-hand release han-
dle at the rear in load compartment :.
The corresponding backrest folds for-
wards.
X Move the driver's or front-passenger seat
back if necessary.
Folding back the seat backrest !
Make sure that the seat belt does not
become trapped when folding the rear seat backrest back. Otherwise, it could be dam- aged. X
Move the driver's or front-passenger seat
forward if necessary.
X Fold seat backrest :back until it engages.
If the rear seat backrest is not engaged and locked, this will be shown in the multifunc-
tion display in the instrument cluster. A
warning tone also sounds.
X Adjust the head restraints if necessary
(Y page 108).
X Move the driver's or front-passenger seat
back if necessary. Stowage areas
305Stowing and features Z
Page 334 of 417
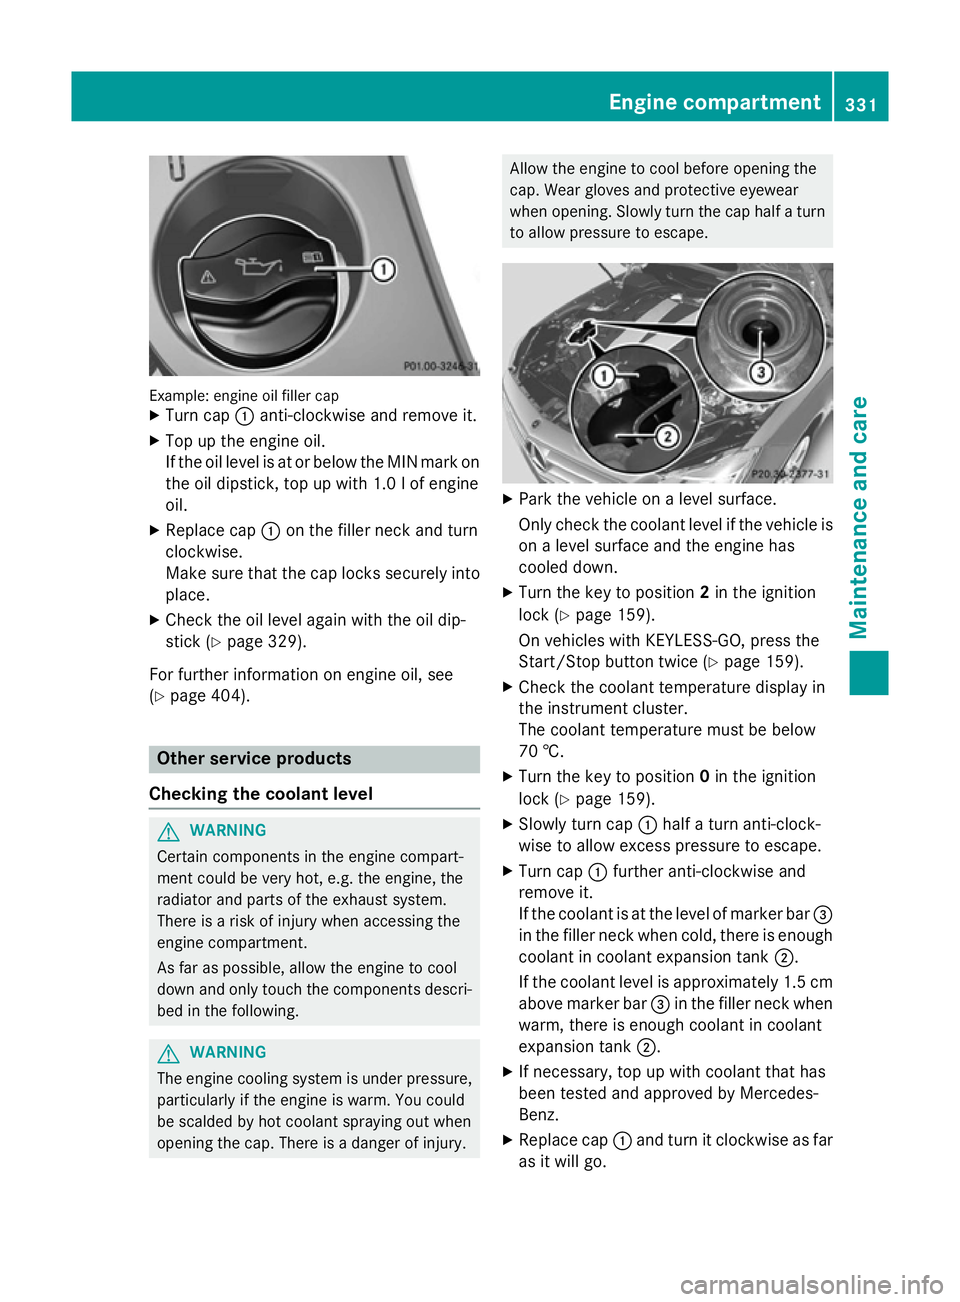
Example: engine oil filler cap
X Turn cap :anti-clockwise and remove it.
X Top up the engine oil.
If the oil level is at or below the MIN mark on
the oil dipstick, top up with 1.0 lof engine
oil.
X Replace cap :on the filler neck and turn
clockwise.
Make sure that the cap locks securely into place.
X Check the oil level again with the oil dip-
stick (Y page 329).
For further information on engine oil, see
(Y page 404). Other service products
Checking the coolant level G
WARNING
Certain components in the engine compart-
ment could be very hot, e.g. the engine, the
radiator and parts of the exhaust system.
There is a risk of injury when accessing the
engine compartment.
As far as possible, allow the engine to cool
down and only touch the components descri- bed in the following. G
WARNING
The engine cooling system is under pressure, particularly if the engine is warm. You could
be scalded by hot coolant spraying out when
opening the cap. There is a danger of injury. Allow the engine to cool before opening the
cap. Wear gloves and protective eyewear
when opening. Slowly turn the cap half a turn
to allow pressure to escape. X
Park the vehicle on a level surface.
Only check the coolant level if the vehicle is
on a level surface and the engine has
cooled down.
X Turn the key to position 2in the ignition
lock (Y page 159).
On vehicles with KEYLESS-GO, press the
Start/Stop button twice (Y page 159).
X Check the coolant temperature display in
the instrument cluster.
The coolant temperature must be below
70 †.
X Turn the key to position 0in the ignition
lock (Y page 159).
X Slowly turn cap :half a turn anti-clock-
wise to allow excess pressure to escape.
X Turn cap :further anti-clockwise and
remove it.
If the coolant is at the level of marker bar =
in the filler neck when cold, there is enough coolant in coolant expansion tank ;.
If the coolant level is approximately 1.5 cm above marker bar =in the filler neck when
warm, there is enough coolant in coolant
expansion tank ;.
X If necessary, top up with coolant that has
been tested and approved by Mercedes-
Benz.
X Replace cap :and turn it clockwise as far
as it will go. Engine compartment
331Maintenance and care Z
Page 353 of 417
Do not switch off the tyre inflation com-
pressor during this phase.
X Let the tyre inflation compressor run for
five minutes. The tyre should then have
attained a pressure of at least 180 kPa
(1.8 bar/26 psi).
If a pressure of 180 kP a(1.8 bar/26 psi) has
been attained after five minutes, see "Tyre
pressure reached" (Y page 350).
If a tyre pressure of 180 kPa (1.8 bar/26 psi)
has not been attained after five minutes, see "Tyre pressure not reached" (Y page 350).
i If the tyre sealant leaks out, allow it to dry.
It can then be removed like a layer of film.
If you get tyre sealant on your clothing,
have it cleaned as soon as possible with
perchloroethylene.
Tyre pressure not reached If a pressure of 180 kPa (1.8 bar/26 psi) has
not been attained after five minutes:
X Switch off the tyre inflation compressor.
X Unscrew the filler hose from the valve of
the faulty tyre.
X Very slowly drive forwards or reverse
approximately 10 m.
X Pump up the tyre again.
After a maximum of five minutes the tyre
pressure must be at least 180 kPa (1.8 bar/ 26 psi). G
WARNING
If the required tyre pressure is not reached
after the specified time, the tyre is too badly
damaged. The tyre sealant cannot repair the
tyre in this instance. Damaged tyres and a tyre pressure that is too low can significantly
impair the vehicle's braking and driving char-
acteristics. There is a risk of accident.
Do not continue driving. Contact a qualified
specialist workshop. Tyre pressure reached G
WARNING
A tyre temporarily sealed with tyre sealant
impairs the driving characteristics and is not
suitable for higher speeds. There is a risk of
accident.
You should therefore adapt your driving style
accordingly and drive carefully. Do not exceed the specified maximum speed with a tyre that
has been repaired using tyre sealant.
! After use, excess tyre sealant may run out
of the filler hose. This could cause stains.
Therefore, place the filler hose in the plastic
bag which contained the TIREFIT kit. H
Environmental note
Have the used tyre sealant bottle disposed of professionally, e.g. at a qualified specialist
workshop.
If a tyre pressure of 180 kPa (1.8 ba r/26 psi)
has been attained after five minutes:
X Switch off the tyre inflation compressor.
X Unscrew the filler hose from the valve of
the faulty tyre.
X Stow the tyre sealant bottle, the tyre infla-
tion compressor and the warning triangle.
X Pull away immediately.
The maximum speed for a tyre sealed with
tyre sealant is 80 km/h. The upper part of
the TIREFIT sticker must be affixed to the
instrument cluster where it will be easily
seen by the driver.
X Stop after driving for approximately ten
minutes and check the tyre pressure with
the tyre inflation compressor.
The tyre pressure must now be at least
130 kPa (1.3 bar/19 psi). G
WARNING
If the required tyre pressure is not reached
after driving for a short period, the tyre is too badly damaged. The tyre sealant cannot
repair the tyre in this instance. Damaged tyres and a tyre pressure that is too low can signif- 350
Flat tyreBreakdown assistance
Page 355 of 417
Before handling the battery, touch the vehicle
body to remove any existing electrostatic
build-up.
The highly flammable gas mixture is created
while the battery is charging and when jump- starting.
Always make sure that neither you nor the
battery is electrostatically charged. Electro-
static charge is created, for example:
R by wearing synthetic fibre clothing
R due to friction between clothing and the
seat
R when you pull or push the battery across
carpet or other synthetic materials
R when you rub the battery with a cloth G
WARNING
During the charging process, a battery produ- ces hydrogen gas. If a short circuit occurs or
sparks are created, the hydrogen gas can
ignite. There is a risk of an explosion.
R Make sure that the positive terminal of a
connected battery does not come into con- tact with vehicle parts.
R Never place metal objects or tools on a bat-
tery.
R It is important that you observe the descri-
bed order of the battery terminals when
connecting and disconnecting a battery.
R When jump-starting, make sure that the
battery poles with identical polarity are
connected.
R It is particularly important to observe the
described order when connecting and dis-
connecting the jump leads.
R Never connect or disconnect the battery
terminals while the engine is running. G
WARNING
Battery acid is caustic. There is a risk of injury. Avoid contact with the skin, eyes or clothing.
Do not inhale any battery gases. Do not lean
over the battery. Keep children away from batteries. Wash battery acid immediately with
water and seek medical attention. H
Environmental note Batteries contain pollutants.
It is illegal to dispose of them
with the household rubbish.
They must be collected sep-
arately and disposed of in anenvironmentally responsible
recycling system. Dispose of batteries in an
environmentally responsible
manner. Take discharged
batteries to a qualified spe-
cialist workshop or to a col-
lection point for used batter-
ies.
! Have the battery checked regularly at a
qualified specialist workshop.
Observe the service intervals in the Service
Booklet or contact a qualified specialist
workshop for more information.
! You should have all work involving the
battery carried out at a qualified specialist
workshop. In the exceptional case that it is
necessary for you to disconnect the battery yourself, make sure that:
R you switch off the engine and remove the
key. On vehicles with KEYLESS-GO,
ensure that the ignition is switched off.
Check that all the indicator lamps in the
instrument cluster are off. Otherwise,
electronic components, such as the
alternator, may be damaged.
R you first remove the negative terminal
clamp and then the positive terminal
clamp. Never swap the terminal clamps.
Otherwise, the vehicle's electronic sys-
tem may be damaged.
R the transmission is locked in position P
after disconnecting the battery. The vehi-
cle is secured against rolling away. You
can then no longer move the vehicle. 352
Battery (vehicle)Breakdown assistance
Page 364 of 417
X
Secure the vehicle against rolling away
(Y page 180).
X Switch off all electrical consumers.
X Turn the key to position 0in the ignition
lock and remove it (Y page 159).
or
X On vehicles with KEYLESS-GO, make sure
the ignition is switched off (Y page 159).
All indicator lamps in the instrument cluster
must be off.
The fuses are located in various fuse boxes:
R fuse box in the engine compartment on the
left-hand side of the vehicle, when viewed
in the direction of travel
R CLS Coupé: fuse box located in the boot on
the right-hand side when viewed in the
direction of travel
R CLS Shooting Brake: fuse box located in
the luggage compartment on the right-
hand side when viewed in the direction of
travel
CLS Coupé: the fuse allocation chart is loca-
ted in the vehicle tool kit in the stowage com-
partment under the boot floor (Y page 345).
CLS Shooting Brake: the fuse allocation
chart is located in the vehicle tool kit in the
stowage compartment under the luggage
compartment floor (Y page 345).Fuse box in the engine compartment
Observe the important safety notes
(Y page 360) G
WARNING
When the bonnet is open, and the windscreen wipers are set in motion, you can be injured by
the wiper linkage. There is a risk of injury.
Always switch off the windscreen wipers and
the ignition before opening the bonnet.
! Make sure that no moisture can enter the
fuse box when the cover is open. !
When closing the cover, make sure that it
is lying correctly on the fuse box. Moisture
seeping in or dirt could otherwise impair
the operation of the fuses.
X Make sure that the windscreen wipers are
switched off.
X Open the bonnet. X
Remove any existing moisture from the
fuse box using a dry cloth.
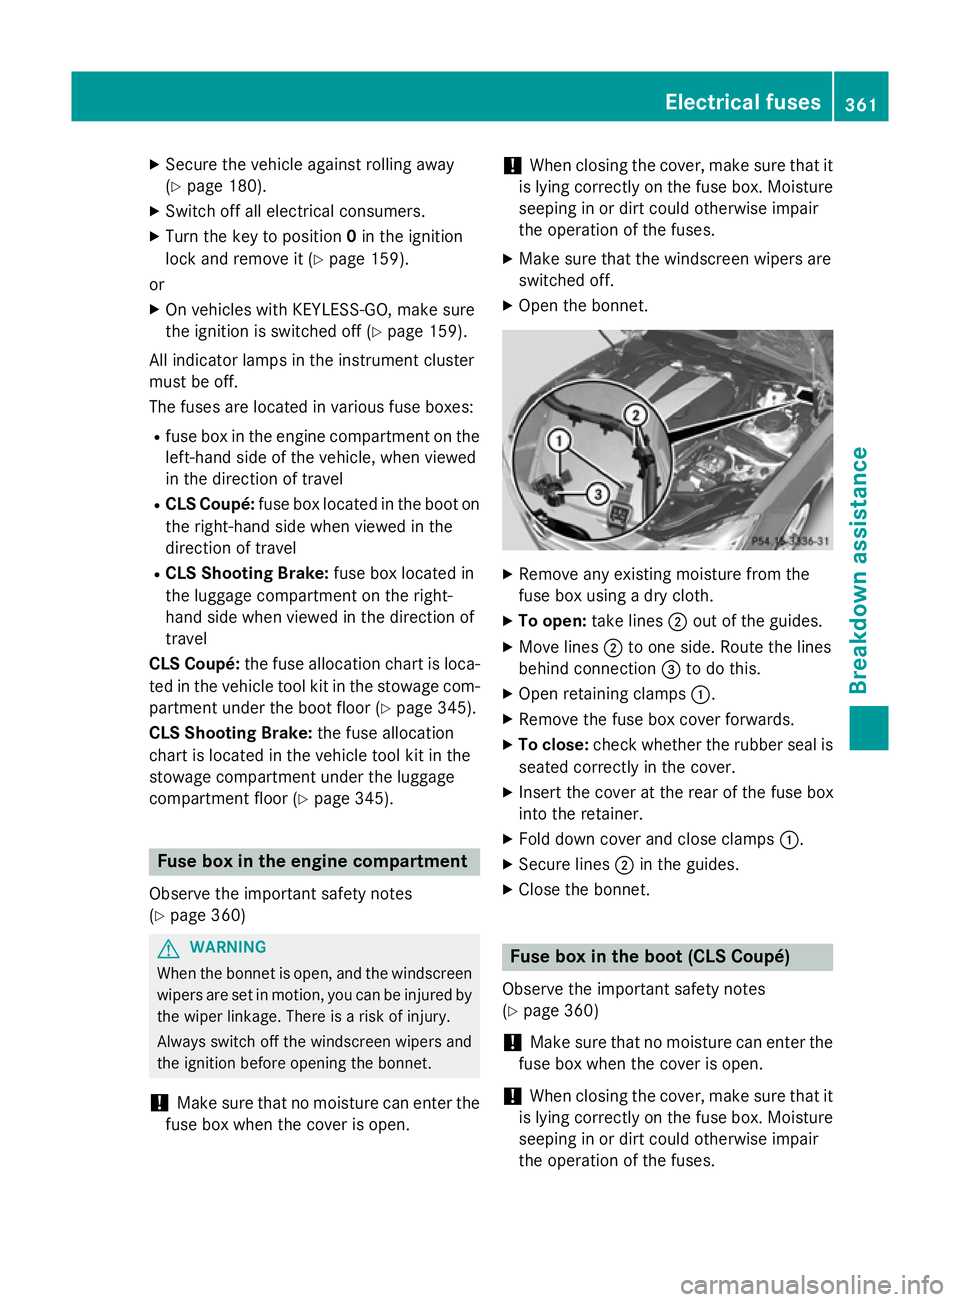
X To open: take lines ;out of the guides.
X Move lines ;to one side. Route the lines
behind connection =to do this.
X Open retaining clamps :.
X Remove the fuse box cover forwards.
X To close: check whether the rubber seal is
seated correctly in the cover.
X Insert the cover at the rear of the fuse box
into the retainer.
X Fold down cover and close clamps :.
X Secure lines ;in the guides.
X Close the bonnet. Fuse box in the boot (CLS Coupé)
Observe the important safety notes
(Y page 360)
! Make sure that no moisture can enter the
fuse box when the cover is open.
! When closing the cover, make sure that it
is lying correctly on the fuse box. Moisture seeping in or dirt could otherwise impair
the operation of the fuses. Electrical fuses
361Breakdown assistance Z
Page 374 of 417
the notes on the recommended tyre pressure
(Y page 367).
The tyre pressure monitor is not able to warn you of a sudden loss of pressure, e.g. if the
tyre is punctured by a foreign object. In the
event of a sudden loss of pressure, bring the
vehicle to a halt by braking carefully. Avoid
abrupt steering manoeuvres.
The tyre pressure monitor has a yellow warn-
ing lamp in the instrument cluster for indicat-
ing a pressure loss or malfunction. Depending on how the warning lamp flashes or lights up,
a tyre pressure that is too low or a malfunc-
tion in the tyre pressure monitor is indicated:
R if the warning lamp is lit continuously, the
tyre pressure on one or more tyres is sig-
nificantly too low. The tyre pressure moni-
tor is not malfunctioning.
R if the warning lamp flashes for around a
minute and then remains lit constantly, the
tyre pressure monitor is malfunctioning.
i In addition to the warning lamp, a mes-
sage appears in the multifunction display.
Further information can be found at
(Y page 280).
If the tyre pressure monitor is malfunctioning,
it may take more than ten minutes for the tyre pressure warning lamp to inform you of the
malfunction by flashing for approximately one
minute and then remaining lit. When the fault
has been rectified, the tyre pressure warning lamp goes out after you have driven for a few
minutes.
The tyre pressure values indicated by the on- board computer may differ from those meas-
ured at a filling station using a pressure
gauge. The tyre pressures shown by the on-
board computer refer to those measured at
sea level. At high altitudes, the tyre pressure
values indicated by a pressure gauge are
higher than those shown by the on-board
computer. In this case, do not reduce the tyre
pressures.
The operation of the tyre pressure monitor
can be affected by interference from radio transmitting equipment (e.g. radio head-
phones, two-way radios) that may be being
operated in or near the vehicle.
Checking the tyre pressure electroni-
cally X
Make sure that the key is in position 2in the
ignition lock (Y page 159).
X Press the =or; button on the steer-
ing wheel to select the Service
Service menu.
X Press the 9or: button to select
Tyre pressure Tyre pressure.
X Press the abutton.
The current tyre pressure for each wheel
will be displayed in the multifunction dis-
play.
If the vehicle has been parked for over
20 minutes, the Tyre Tyrepressures
pressures will
willbe
be
displayed after a few minutes of
displayed after a few minutes of
driving driving message appears.
After a teach-in period, the tyre pressure
monitor automatically detects new wheels or new sensors. As long as a clear allocation of
the tyre pressure values to the individual
wheels is not possible, the Tyre pressure Tyre pressure
monitor active monitor active display message is shown
instead of the tyre pressure display. The tyre
pressures are already being monitored.
i If an emergency spare wheel is fitted, for
a few minutes the system may continue to
show the tyre pressure of the wheel that
has been removed. If this occurs, note that the value displayed for the position where
the spare wheel is fitted is not the same asthe current tyre pressure of the emergencyspare wheel. Tyre pressure
371Wheels and tyres Z