fuel consumption MERCEDES-BENZ CLS550 2010 W219 Owner's Manual
[x] Cancel search | Manufacturer: MERCEDES-BENZ, Model Year: 2010, Model line: CLS550, Model: MERCEDES-BENZ CLS550 2010 W219Pages: 308, PDF Size: 5.82 MB
Page 10 of 308
Emission control
............................... 213
Information label ............................ 289
System warranties ........................... 19
Engine
Break-in recommendations ............176
Cleaning ......................................... 217
Compartment ................................ 178
Malfunction indicator
lamp ........................................ 28, 257
Messages in the multifunction
display ........................................... 243
Number .......................................... 289
Starting ............................................ 97
Turning off ..................................... 101
Engine (Technical data)
see Vehicle specification
Engine coolant
see Coolant
Engine oil
Adding ........................................... 180
Additives ........................................ 298
Checking level ............................... 179
Consumption ................................. 179
Messages in the multifunction
display ........................................... 246
Oil dipstick ..................................... 179
Recommended engine oils and oil
filter ............................................... 298
ESP ®
(Electronic Stability
Program) .............................................. 59
ETS .................................................. 60
Messages in the multifunction
display ................................... 229, 239
Warning lamp ................................. 255
ETD (Emergency Tensioning
Device) ................................................. 49
Safety guidelines ............................. 39
ETS (Electronic Traction System) ....... 60
Express operation Power windows ................................ 94
Tilt/sliding sunroof ........................152
Exterior lamp switch ........................... 87
Exterior rear view mirrors ..................84
Parking position ............................... 85
Exterior view of vehicle ......................26 F
Fastening the seat belts .....................47
First aid kit .........................................
224
Flat tire ............................................... 271
Lowering the vehicle ......................276
Mounting the spare wheel ............. 272
Preparing the vehicle .....................271
Spare wheel ........................... 271, 296
Floormats ........................................... 173
Fluids
Automatic transmission fluid ......... 297
Brake fluid ..................................... 297
Capacities ...................................... 296
Engine coolant ............................... 297
Engine oil ....................................... 297
Power steering fluid ....................... 297
Washer and headlamp cleaning
system ........................................... 297
Fog lamps ............................................. 89
Messages in the multifunction
display ................................... 247, 249
Front air bags
see Air bags
Front lamps
see Headlamps
Front passenger front air bag ............ 40
Messages in the multifunction
display ........................................... 230
Front passenger front air bag off
indicator lamp ............................. 41, 260
Fuel ..................................................... 176
Additives ........................................ 299
Capacity, fuel tank ......................... 297
Drive sensibly–safe fuel .................210
Fuel consumption statistics ...........125
Fuel filler flap and cap ................... 177
Fuel tank reserve warning
lamp ........................................ 29, 256
Premium unleaded gasoline ...........299
Refueling ........................................ 176
Requirements ................................ 299
Fuel filler flap ..................................... 177
Opening manually ..........................263
Fuels, coolants, lubricants etc. ........296 8
Index 219_AKB; 4; 54, en-US
d2ureepe,
Version: 2.11.8.1 2009-05-11T16:21:02+02:00 - Seite 8
Page 126 of 308
X
Move the selection marker with button
W or X to the Vehicle submenu.
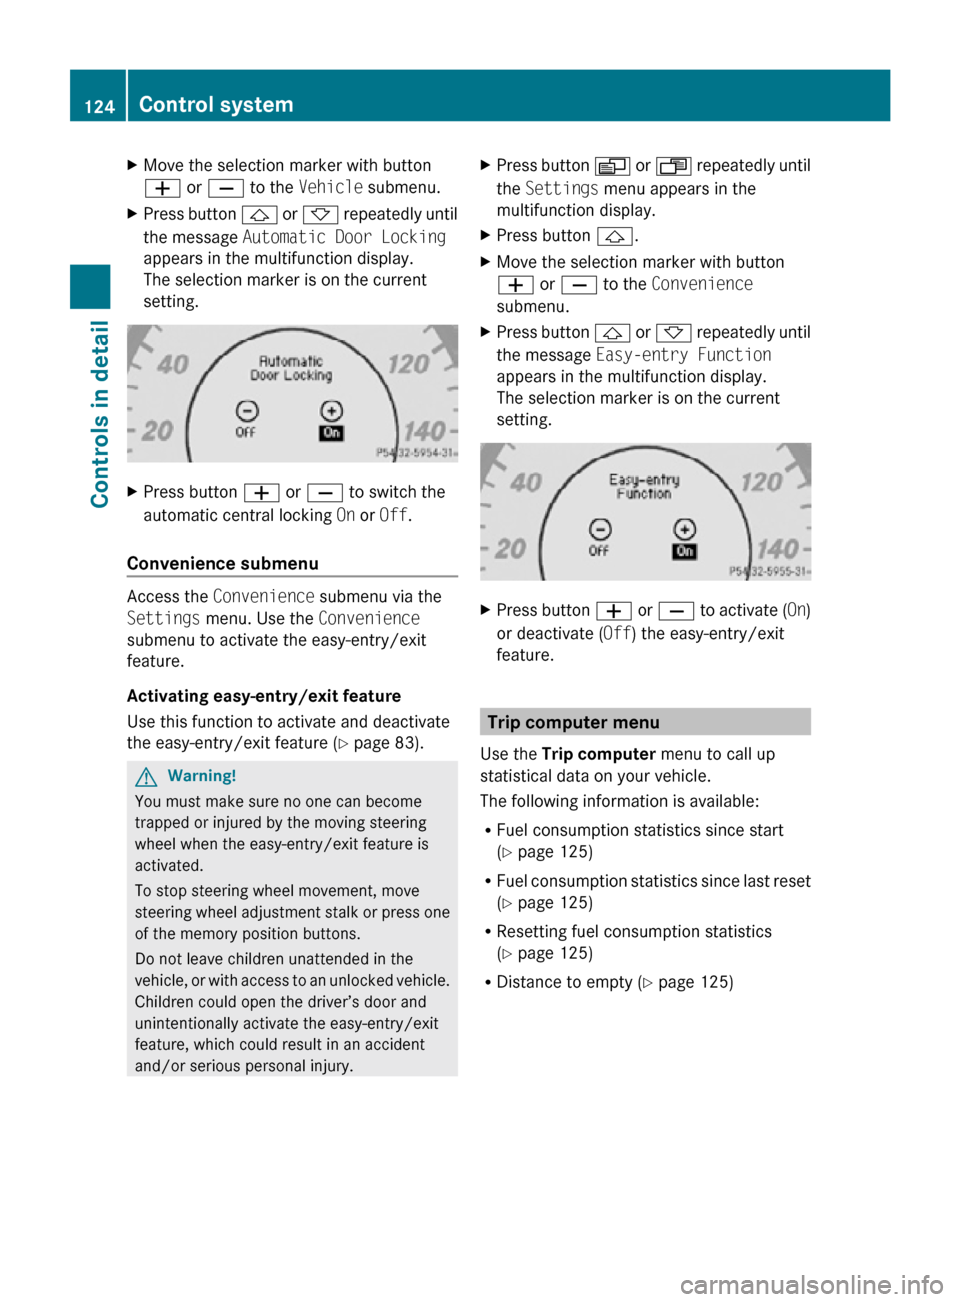
X Press button & or * repeatedly until
the message Automatic Door Locking
appears in the multifunction display.
The selection marker is on the current
setting. X
Press button W or X to switch the
automatic central locking On or Off.
Convenience submenu Access the
Convenience submenu via the
Settings menu. Use the Convenience
submenu to activate the easy-entry/exit
feature.
Activating easy-entry/exit feature
Use this function to activate and deactivate
the easy-entry/exit feature (Y page 83). G
Warning!
You must make sure no one can become
trapped or injured by the moving steering
wheel when the easy-entry/exit feature is
activated.
To stop steering wheel movement, move
steering wheel adjustment stalk or press one
of the memory position buttons.
Do not leave children unattended in the
vehicle, or with access to an unlocked vehicle.
Children could open the driver’s door and
unintentionally activate the easy-entry/exit
feature, which could result in an accident
and/or serious personal injury. X
Press button V or U repeatedly until
the Settings menu appears in the
multifunction display.
X Press button &.
X Move the selection marker with button
W or X to the Convenience
submenu.
X Press button & or * repeatedly until
the message Easy-entry Function
appears in the multifunction display.
The selection marker is on the current
setting. X
Press button W or X to activate ( On)
or deactivate (Off) the easy-entry/exit
feature. Trip computer menu
Use the Trip computer menu to call up
statistical data on your vehicle.
The following information is available:
R Fuel consumption statistics since start
(Y page 125)
R Fuel consumption statistics since last reset
(Y page 125)
R Resetting fuel consumption statistics
(Y page 125)
R Distance to empty ( Y page 125)124
Control systemControls in detail
219_AKB; 4; 54, en-US
d2ureepe,
Version: 2.11.8.1 2009-05-11T16:21:02+02:00 - Seite 124
Page 127 of 308
Fuel consumption statistics since start
X
Press button U or V repeatedly until
the first function of the Trip computer
menu appears in the multifunction display.
X Press button & or * repeatedly until
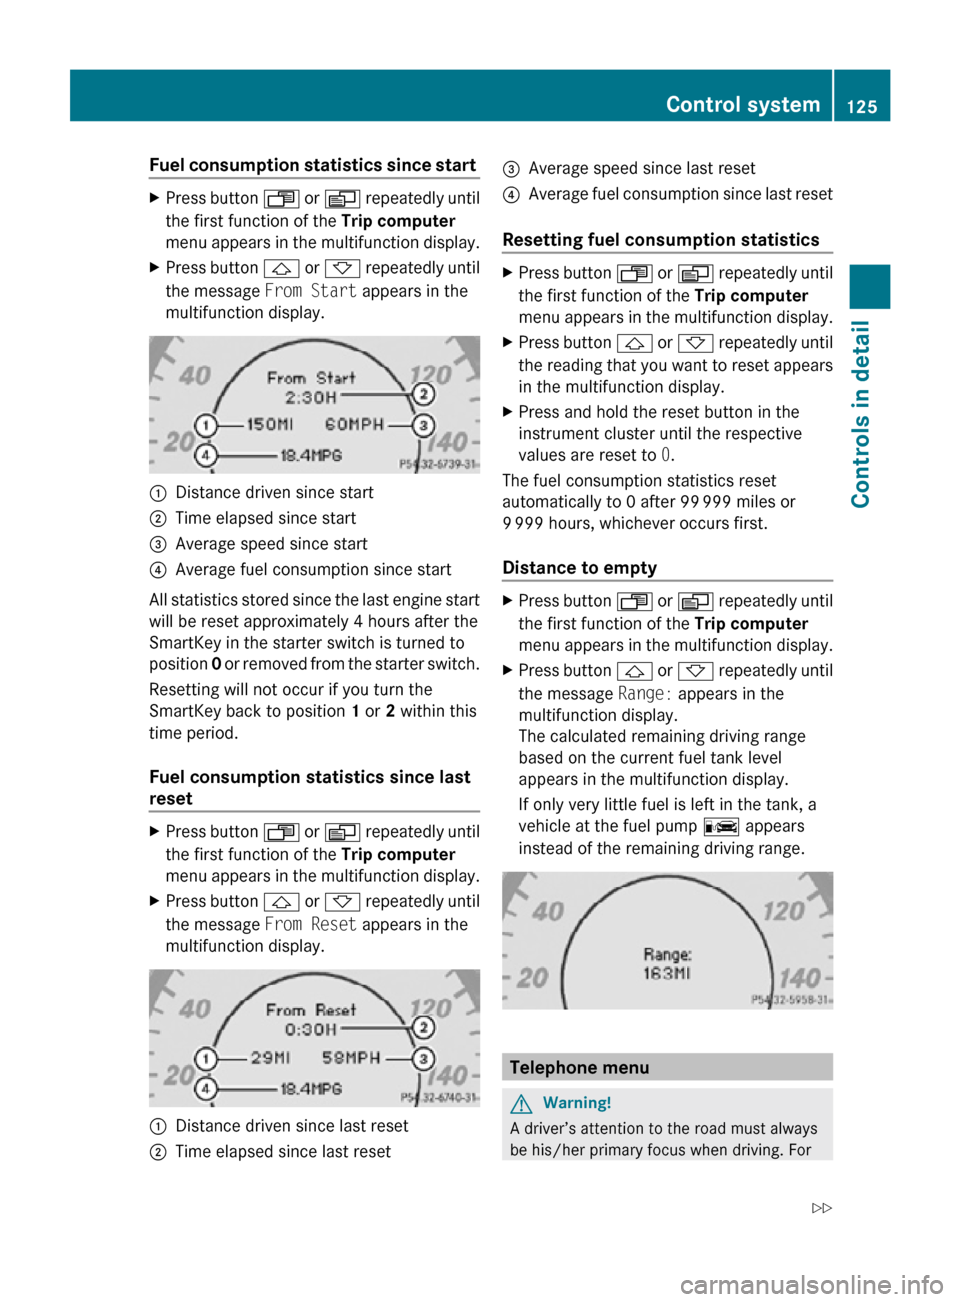
the message From Start appears in the
multifunction display. :
Distance driven since start
; Time elapsed since start
= Average speed since start
? Average fuel consumption since start
All statistics stored since the last engine start
will be reset approximately 4 hours after the
SmartKey in the starter switch is turned to
position 0 or removed from the starter switch.
Resetting will not occur if you turn the
SmartKey back to position 1 or 2 within this
time period.
Fuel consumption statistics since last
reset X
Press button U or V repeatedly until
the first function of the Trip computer
menu appears in the multifunction display.
X Press button & or * repeatedly until
the message From Reset appears in the
multifunction display. :
Distance driven since last reset
; Time elapsed since last reset =
Average speed since last reset
? Average fuel consumption since last reset
Resetting fuel consumption statistics X
Press button U or V repeatedly until
the first function of the Trip computer
menu appears in the multifunction display.
X Press button & or * repeatedly until
the reading that you want to reset appears
in the multifunction display.
X Press and hold the reset button in the
instrument cluster until the respective
values are reset to 0.
The fuel consumption statistics reset
automatically to 0 after 99 999 miles or
9 999 hours, whichever occurs first.
Distance to empty X
Press button U or V repeatedly until
the first function of the Trip computer
menu appears in the multifunction display.
X Press button & or * repeatedly until
the message Range: appears in the
multifunction display.
The calculated remaining driving range
based on the current fuel tank level
appears in the multifunction display.
If only very little fuel is left in the tank, a
vehicle at the fuel pump C appears
instead of the remaining driving range. Telephone menu
G
Warning!
A driver’s attention to the road must always
be his/her primary focus when driving. For Control system
125Controls in detail
219_AKB; 4; 54, en-US
d2ureepe, Version: 2.11.8.1 2009-05-11T16:21:02+02:00 - Seite 125 Z
Page 140 of 308
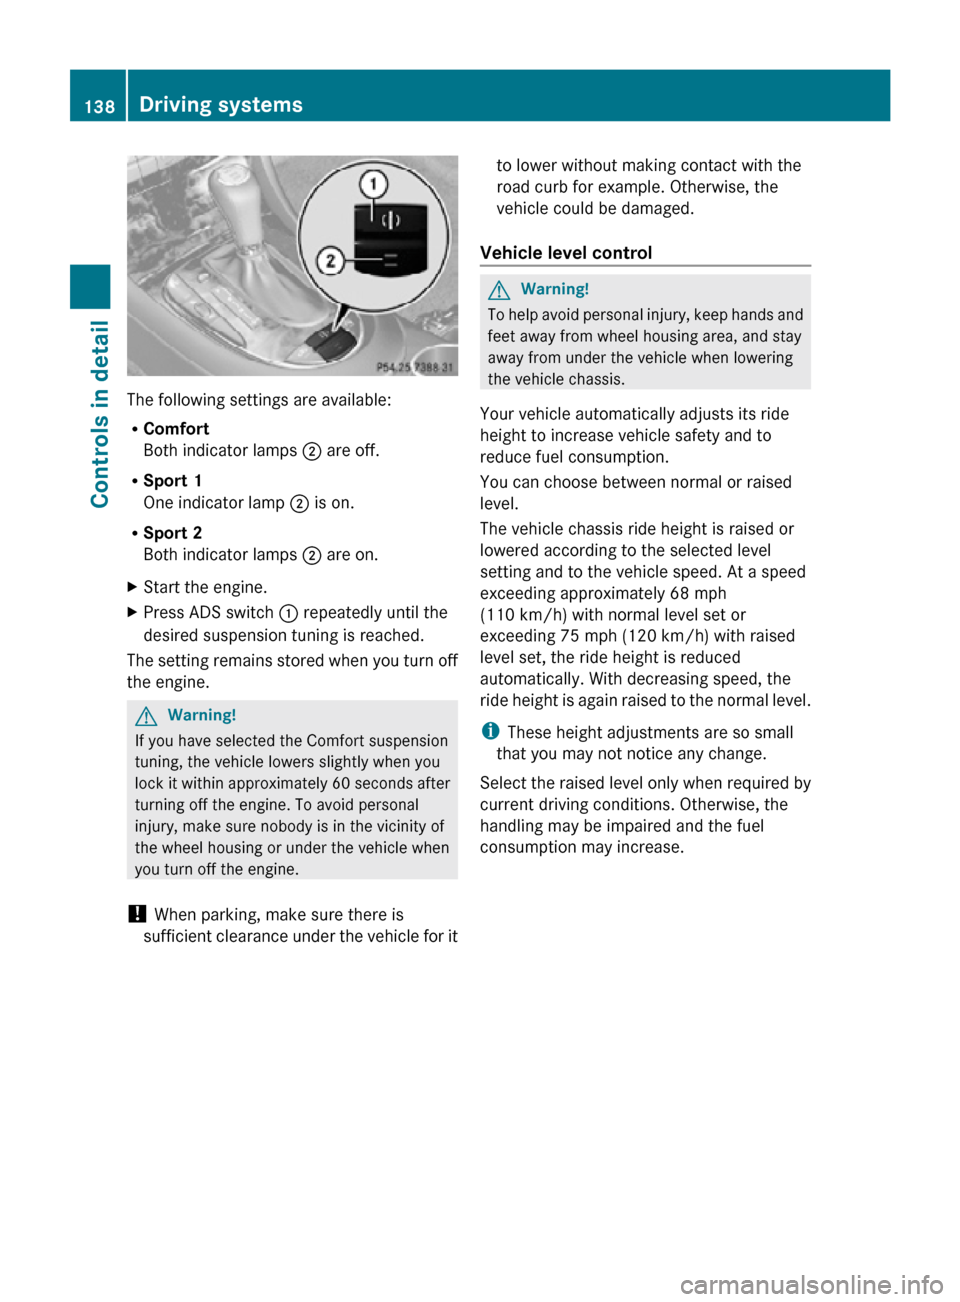
The following settings are available:
R
Comfort
Both indicator lamps ; are off.
R Sport 1
One indicator lamp ; is on.
R Sport 2
Both indicator lamps ; are on.
X Start the engine.
X Press ADS switch : repeatedly until the
desired suspension tuning is reached.
The setting remains stored when you turn off
the engine. G
Warning!
If you have selected the Comfort suspension
tuning, the vehicle lowers slightly when you
lock it within approximately 60 seconds after
turning off the engine. To avoid personal
injury, make sure nobody is in the vicinity of
the wheel housing or under the vehicle when
you turn off the engine.
! When parking, make sure there is
sufficient clearance under the vehicle for it to lower without making contact with the
road curb for example. Otherwise, the
vehicle could be damaged.
Vehicle level control G
Warning!
To help avoid personal injury, keep hands and
feet away from wheel housing area, and stay
away from under the vehicle when lowering
the vehicle chassis.
Your vehicle automatically adjusts its ride
height to increase vehicle safety and to
reduce fuel consumption.
You can choose between normal or raised
level.
The vehicle chassis ride height is raised or
lowered according to the selected level
setting and to the vehicle speed. At a speed
exceeding approximately 68 mph
(110 km/h) with normal level set or
exceeding 75 mph (120 km/h) with raised
level set, the ride height is reduced
automatically. With decreasing speed, the
ride height is again raised to the normal level.
i These height adjustments are so small
that you may not notice any change.
Select the raised level only when required by
current driving conditions. Otherwise, the
handling may be impaired and the fuel
consumption may increase. 138
Driving systemsControls in detail
219_AKB; 4; 54, en-US
d2ureepe,
Version: 2.11.8.1 2009-05-11T16:21:02+02:00 - Seite 138
Page 181 of 308
Closing
G
Warning!
When closing the hood, use extreme caution
not to catch hands or fingers. Be careful that
you do not close the hood on anyone.
Make sure the hood is securely engaged
before driving off. Do not continue driving if
the hood can no longer engage after an
accident, for example. The hood could
otherwise come loose while the vehicle is in
motion and injure you and/or others.
X Let the hood drop from a height of
approximately 8 in (20 cm).
X Check to make sure the hood is fully
closed.
If you can raise the hood at a point above
the headlamps, then it is not properly
closed. Open it again and let it drop with
somewhat greater force. Engine oil
The amount of oil your engine consumes will
depend on a number of factors, including
driving style. Increased oil consumption can
occur when the vehicle is new or the vehicle
is driven frequently at higher engine speeds.
Engine oil consumption checks should only
be made after the vehicle break-in period.
! Do not use any special lubricant additives,
as these may damage the drive assemblies.
Using special additives not approved by
Mercedes-Benz may cause damage not
covered by the Mercedes-Benz Limited
Warranty.
For further information contact an
authorized Mercedes-Benz Center.
Notes on checking engine oil level When checking the oil level
R
the vehicle must be parked on level ground
R with the engine at operating temperature,
the vehicle must have been stationary for at least 5 minutes with the engine turned
off
R with the engine not at operating
temperature, the vehicle must have been
stationary for at least 30 minutes with the
engine turned off
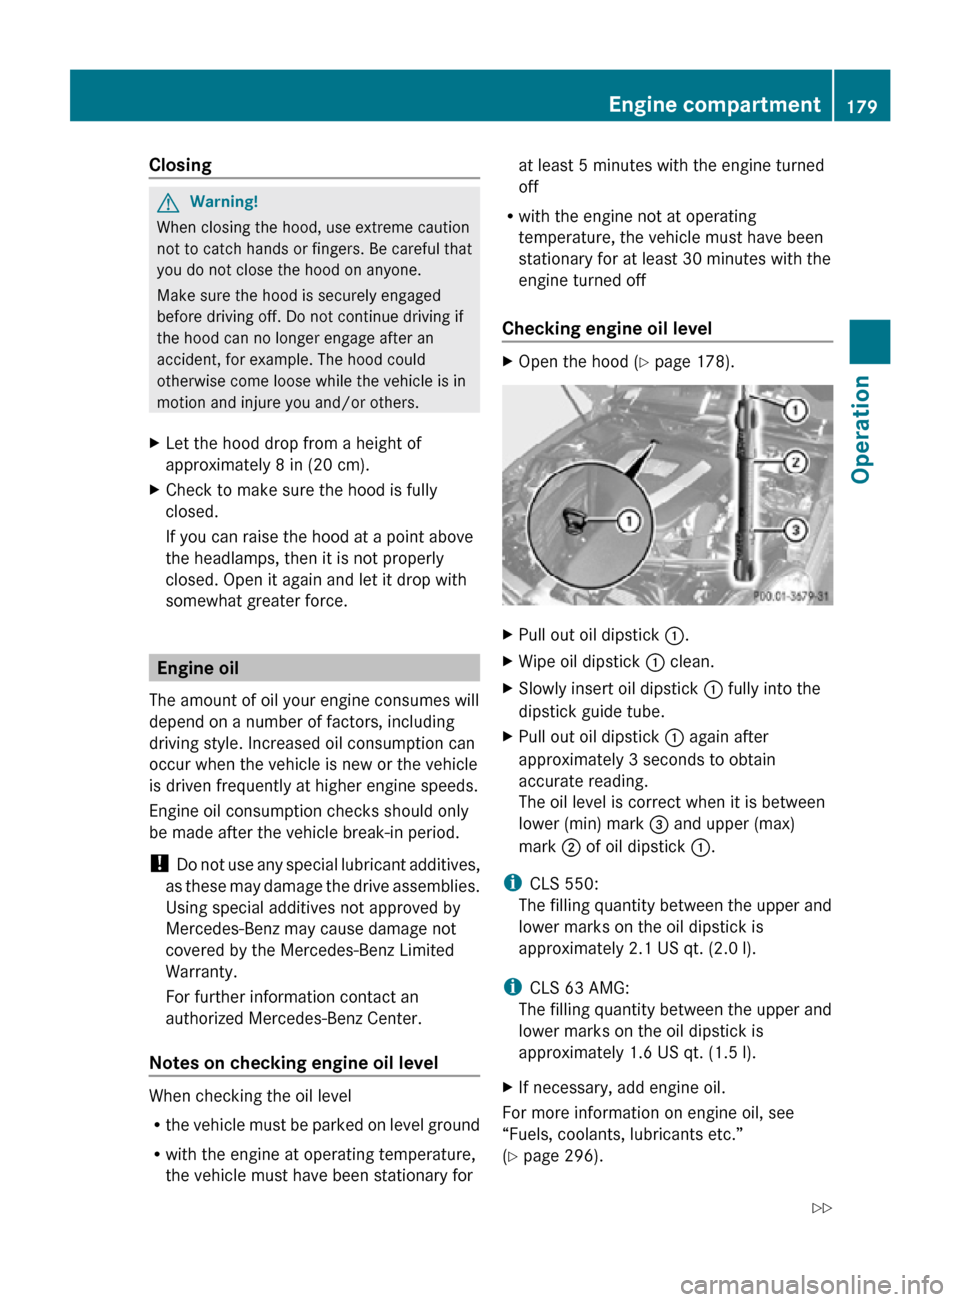
Checking engine oil level X
Open the hood (Y page 178). X
Pull out oil dipstick :.
X Wipe oil dipstick : clean.
X Slowly insert oil dipstick : fully into the
dipstick guide tube.
X Pull out oil dipstick : again after
approximately 3 seconds to obtain
accurate reading.
The oil level is correct when it is between
lower (min) mark = and upper (max)
mark ; of oil dipstick :.
i CLS 550:
The filling quantity between the upper and
lower marks on the oil dipstick is
approximately 2.1 US qt. (2.0 l).
i CLS 63 AMG:
The filling quantity between the upper and
lower marks on the oil dipstick is
approximately 1.6 US qt. (1.5 l).
X If necessary, add engine oil.
For more information on engine oil, see
“Fuels, coolants, lubricants etc.”
(Y page 296). Engine compartment
179Operation
219_AKB; 4; 54, en-US
d2ureepe, Version: 2.11.8.1 2009-05-11T16:21:02+02:00 - Seite 179 Z
Page 212 of 308
Driving instructions
Drive sensibly – save fuel
To save fuel you should:
R Keep tires at the recommended inflation
pressures.
R Remove unnecessary loads.
R Remove roof rack when not in use.
R Allow engine to warm up under low load
use.
R Avoid frequent acceleration and
deceleration.
R Have all maintenance work performed at
the intervals specified in the Maintenance
Booklet and as required by the
Maintenance system. Contact an
authorized Mercedes-Benz Center.
Fuel
consumption is also increased by driving
in cold weather, in stop-and-go traffic, on
short trips and in mountainous areas. Drinking and driving
G
Warning!
Drinking and driving and/or taking drugs and
driving are very dangerous combinations.
Even a small amount of alcohol or drugs can
affect your reflexes, perceptions and
judgment.
The possibility of a serious or even fatal
accident
are greatly increased when you drink
or take drugs and drive.
Do not drink or take drugs and drive or allow
anyone to drive who has been drinking or
taking drugs. Pedals
G
Warning!
Make sure absolutely no objects are
obstructing the pedals’ range of movement.
Keep the driver’s footwell clear of all obstacles. If there are any floormats or
carpets in the footwell, make sure that the
pedals still have sufficient clearance.
During sudden driving or braking maneuvers,
the objects could get caught between the
pedals. You could then no longer brake or
accelerate. This could lead to accidents and
injury.
Power assistance
G
Warning!
There is no power assistance for the steering
and
the brake when the engine is not running.
Steering and braking requires significantly
more effort and you could lose control of the
vehicle and cause an accident as a result.
Do not turn off the engine while the vehicle is
in motion. Brakes
Downhill grades !
When driving down long and steep
grades, relieve the load on the brakes by
shifting into a lower gear to use the
engine’s
braking power. This helps prevent
overheating of the brakes and reduces
wear.
When using the engine’s braking power, a
drive wheel may not spin for an extended
period of time, e.g. on slippery road
surfaces. This may cause serious damage
to the drivetrain which is not covered by the
Mercedes-Benz Limited Warranty.
Continuous or hard braking G
Warning!
Resting your foot on the brake pedal will
cause excessive and premature wear of the
brake pads. 210
Driving instructions
Operation
219_AKB; 4; 54, en-US
d2ureepe,
Version: 2.11.8.1 2009-05-11T16:21:02+02:00 - Seite 210
Page 294 of 308
is not covered by the Mercedes-Benz
Limited Warranty.
For information on driving with MOExtended
tires, see the “Practical hints” section
(Y page 277).
! Using tires other than those approved by
Mercedes-Benz can have detrimental
effects, such as
R poor handling characteristics
R increased noise
R increased fuel consumption
Moreover, tires and rims not approved by
Mercedes-Benz may, under load, exhibit
dimensional variations and different tire
deformation characteristics that could
cause them to come into contact with the
vehicle body or axle parts. Damage to the
tires or the vehicle may be the result.
i Further information on tires and rims is
available
at any authorized Mercedes-Benz
Center. The Tire and Loading Information
placard with the recommended tire
inflation pressures for cold tires is located
on the driver’s door B-pillar. Supplemental
tire inflation pressure information for
driving at high speeds or for vehicle loads
less than the maximum loaded vehicle
condition can be found on the tire inflation
pressure label. The tire inflation pressure
label is located on the inside of the fuel filler
flap. The tire inflation pressure should be
checked regularly and should only be
adjusted on cold tires. Follow tire
manufacturer’s maintenance
recommendation included with the vehicle.
For information on recommended tire
inflation pressure and supplemental tire
inflation pressure information for special
driving situations, see ( Y page 183). i
Please keep in mind that the vehicle must
be equipped
Rwith wheels of identical dimensions on
each axle (left and right)
R with tires of identical characteristics all
around, i.e. summer tires, winter tires,
all-season tires, or MOExtended tires etc.
i The following pages also list the approved
rim and tire sizes for equipping your vehicle
with winter tires. Winter tires are not
available as standard or optional factory
equipment, but can be purchased from an
authorized Mercedes-Benz Center.
Equipping your vehicle with winter tires
approved for your vehicle model may
require the purchase of rims of the
recommended size for use with these
winter tires. This depends on vehicle model
and the standard or optional factory-
equipped wheel rim/tire configuration on
your vehicle. For more information contact
an authorized Mercedes-Benz Center. 292
Rims and tires
Technical data
219_AKB; 4; 54, en-US
d2ureepe,
Version: 2.11.8.1 2009-05-11T16:21:02+02:00 - Seite 292