power steering MERCEDES-BENZ E-Class 2001 W210 Owner's Manual
[x] Cancel search | Manufacturer: MERCEDES-BENZ, Model Year: 2001, Model line: E-Class, Model: MERCEDES-BENZ E-Class 2001 W210Pages: 421, PDF Size: 20.52 MB
Page 5 of 421

2 Contents
Infant and child restraint
systems ....................................... 102
Steering wheel adjustment .......... 105
Rear view mirrors .......................... 106
Memory function ............................111
Instrument cluster ..........................114
Multifunction steering wheel,
multifunction display ............... 120
Trip and main odometer,
FSS, tire inflation pressure
monitor and engine oil level
indicator ..................................... 124
Audio systems ............................. 125
Radio ............................................ 125
CD player ..................................... 126
Cassette player ........................... 127
Telephone ........................................ 128
Telephone book .......................... 128
Redialing ..................................... 130
Incoming call .............................. 132
Navigation system .......................... 133
Distronic (DTR) ............................... 134
Trip computer ................................. 135Malfunction / warning
message memory ......................136
Individual settings .........................138
Setting the audio volume ............. 146
Flexible service system
(FSS) ........................................... 147
Tire inflation
pressure monitor .......................150
Engine oil level indicator ..............154
Engine oil consumption ................155
Exterior lamp switch ......................156
Night security illumination ..........158
Headlamp cleaning system ...........159
Combination switch .......................160
Hazard warning flasher
switch ..........................................163
Automatic climate control .............164
Display and controls ..................166
Basic setting ................................168
Special Settings ..........................169
Activated charcoal filter ........... 172
Economy mode ........................... 173
Residual engine heat
utilization .....................................174Switching the automatic
climate control on and off ......... 175
Front center console storage
compartment ventilation .......... 175
Front center console storage
compartment ventilation .......... 175
Rear passenger compartment
climate control .......................... 177
Power windows ............................... 181
Sliding/pop-up roof ....................... 184
Interior lighting ............................. 187
Rear window sunshade ................. 190
Rear door window sunshade ........ 191
Sun visors ....................................... 191
Vanity mirrors ................................ 192
Interior ............................................ 193
Storage compartments and
armrests ..................................... 193
Glove box ..................................... 194
Cup holder ...................................... 199
Ashtrays .......................................... 201
Lighter .............................................203
Parcel net in front
passenger footwell ....................204
Page 8 of 421

5 Contents
Practical hintsFirst aid kit .....................................328
Stowing things in the vehicle ......328
Fuses ................................................329
Hood ................................................. 331
Checking engine oil level .............334
Automatic transmission
fluid level ...................................335
Active body control
(ABC) fluid level ........................335
Coolant level ...................................336
Adding coolant ...........................336
Windshield and
headlamp washer system ........337
Windshield and
headlamp washer fluid
mixing ratio ................................337
Spare wheel, vehicle tools,
storage compartment ................338
Vehicle jack .....................................339
Wheels .............................................340
Tire Replacement .......................340
Rotating wheels .......................... 341
Spare wheel .................................... 341Changing wheels ........................... 343
Tire inflation pressure ................. 348
Battery ............................................. 349
Jump starting ................................. 351
Towing the vehicle ........................ 353
Exterior lamps ............................... 356
Headlamp assembly .................. 357
Taillamp assemblies .................. 360
Trunk lamp ..................................... 362
Changing batteries in the
electronic main key .................. 363
Synchronizing
remote control ............................ 365
Changing batteries in the
KEYLESS-GO-card .................... 366
Emergency engine
shut-down .................................. 368
Fuel filler flap,
manual release ......................... 368
Emergency operation of
sliding/pop-up roof .................. 369
Replacing wiper blades ................ 370
Roof rack ..........................................371
Vehicle careCleaning and care
of the vehicle ............................. 374
Power washer ..............................375
Tar stains ..................................... 376
Paintwork, painted body
components ................................. 376
Engine cleaning .......................... 376
Vehicle washing ......................... 376
Ornamental moldings ................377
Headlamps, taillamps,
turn signal lenses ......................377
Cleaning the Distronic
system sensor .............................378
Cleaning the parktronic
system sensors ...........................378
Wiper blades ...............................379
Light alloy wheels ......................380
Instrument cluster .....................380
Steering wheel and
gear selector lever ......................380
Cup holder ...................................380
Seat belts ..................................... 381
Page 23 of 421
20 Instruments and controls
Te ch n ica l
data Instruments
and controlsOperation DrivingInstrument
cluster displayPractical hints Car care Index
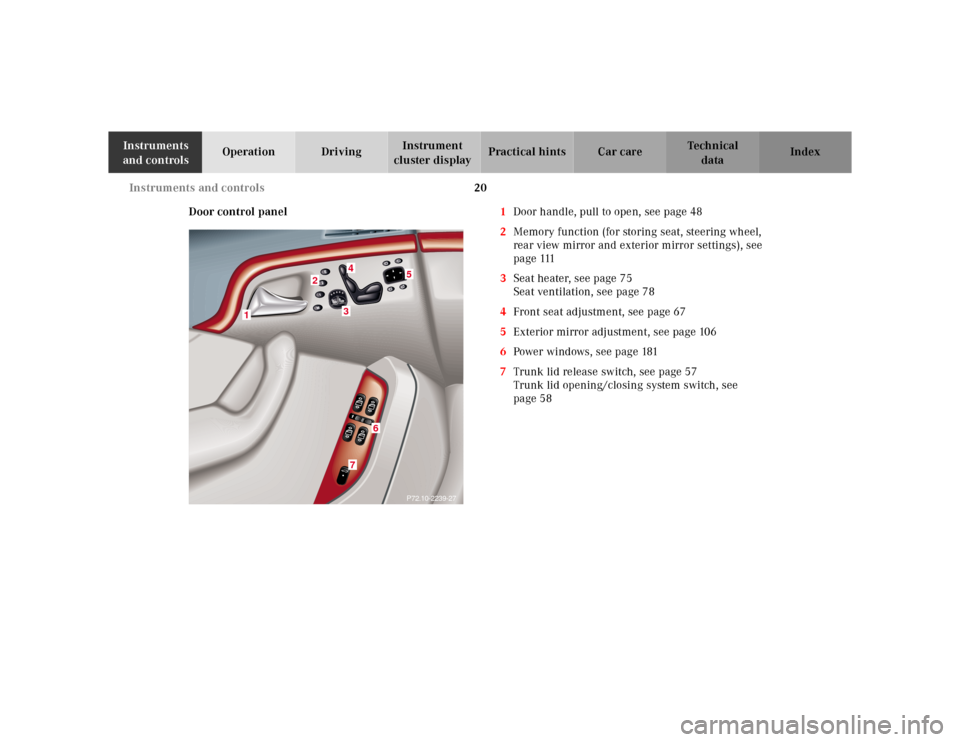
Door control panel1Door handle, pull to open, see page 48
2Memory function (for storing seat, steering wheel,
rear view mirror and exterior mirror settings), see
page 111
3Seat heater, see page 75
Seat ventilation, see page 78
4Front seat adjustment, see page 67
5Exterior mirror adjustment, see page 106
6Power windows, see page 181
7Trunk lid release switch, see page 57
Trunk lid opening/closing system switch, see
page 58
34
5
2
1
P72.10-2239-27
3
3
3
3
37
6
Page 29 of 421
26 Contents - Operation
Te ch n ica l
data Instruments
and controlsOperationDrivingInstrument
cluster displayPractical hints Car care Index
OperationVehicle keys ...................................... 28
Start lock-out .................................... 32
General notes on the
central locking system ............... 33
Central locking system ................... 34
Radio frequency and
infrared remote control ............... 34
KEYLESS-GO ................................. 38
Opening and
closing windows and
sliding / pop-up roof
from outside .................................. 45
Panic button .................................. 47
Mechanical keys ........................... 47
Doors .................................................. 48
Power closing assist for
doors and trunk lid ..................... 50
Central locking switch .................... 50
Automatic central locking .............. 52
Emergency unlocking
in case of accident ...................... 52
Trunk ................................................. 53
Trunk lid release switch ................. 57Trunk lid release/close switch ...... 58
Trunk lid emergency release .........61
Antitheft alarm system ................... 62
Tow-away alarm ............................... 64
Easy-entry/exit feature .................. 66
Front seat adjustment ..................... 67
Removal and installation
of front seat head restraints ..... 72
Lumbar support ............................... 73
Multicontour backrest .................... 73
Seat heater ........................................ 75
Seat ventilation system .................. 78
Rear seat head restraints ............... 80
Power head restraints, rear ............ 81
Power seats, rear ............................. 82
Seat belts and integrated
restraint system .......................... 84
Seat belts .......................................... 84
Seat belt nonusage
warning system .......................... 85
BabySmart
TM airbag
deactivation system ....................91Self-test BabySmart
TM
without special child
seat installed ................................. 91
Supplemental Restraint
System (SRS) ............................... 92
Emergency tensioning
retractor (ETR) ............................. 93
Airbags .............................................. 94
Safety guidelines for the
seat belt, emergency
tensioning retractor
and airbag .................................. 100
Infant and child restraint
systems ....................................... 102
Steering wheel adjustment .......... 105
Rear view mirrors .......................... 106
Memory function ............................ 111
Instrument cluster ..........................114
Multifunction steering wheel,
multifunction display ............... 120
Trip and main odometer,
FSS, tire inf lation pressure
monitor and engine oil level
indicator ..................................... 124
Audio systems ............................. 125
Page 71 of 421
68 Seats
Te ch n ica l
data Instruments
and controlsOperationDrivingInstrument
cluster displayPractical hints Car care Index
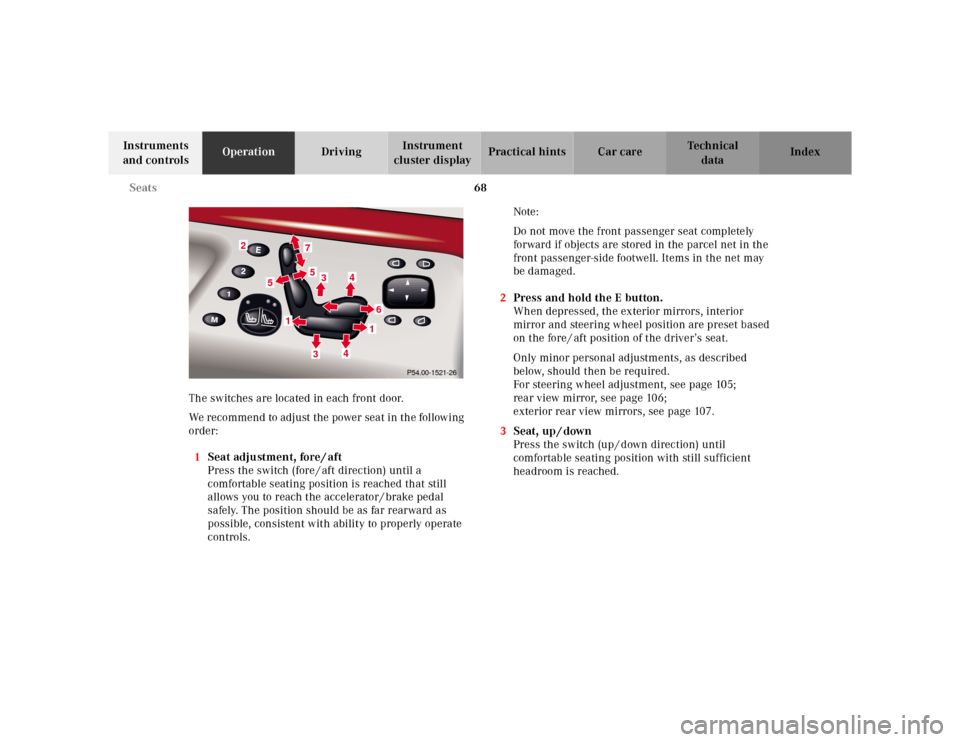
The switches are located in each front door.
We recommend to adjust the power seat in the following
order:
1Seat adjustment, fore / aft
Press the switch (fore / aft direction) until a
comfortable seating position is reached that still
allows you to reach the accelerator / brake pedal
safely. The position should be as far rearward as
possible, consistent with ability to properly operate
controls.Note:
Do not move the front passenger seat completely
forward if objects are stored in the parcel net in the
front passenger-side footwell. Items in the net may
be damaged.
2Press and hold the E button.
When depressed, the exterior mirrors, interior
mirror and steering wheel position are preset based
on the fore / aft position of the driver’s seat.
Only minor personal adjustments, as described
below, should then be required.
For steering wheel adjustment, see page 105;
rear view mirror, see page 106;
exterior rear view mirrors, see page 107.
3Seat, up / down
Press the switch (up / down direction) until
comfortable seating position with still sufficient
headroom is reached.
2
7533
4
61
4
1
5
P54.00-1521-26
Page 115 of 421
112 Memory function
Te ch n ica l
data Instruments
and controlsOperationDrivingInstrument
cluster displayPractical hints Car care Index
Storing positions into memory:
Driver’s seat: with the electronic key in starter switch
position 1 or 2 or with the driver’s door open and the
electronic key inserted in the starter switch.
Front passenger seat and rear seats: with electronic key
in starter switch position 1 or 2 or the relevant doors
open.
Adj ust t he seat a nd mul ticontou r back re st to t he d esired
position. You can also adjust the steering wheel, the
exterior mirrors electrically and the interior rear-view
mirror by hand for the driver’s seat. See page 107 for
exterior mirror adjustment and page 105 for steering
wheel adjustment.
Push memory button “M”, release and push a stored
position button “1”, or “2” within 3 seconds.Recalling positions from memory:
To recall a seat / head restraint / steering wheel and
exterior rear view mirror position, push and hold
button “1” or “2” until seat / head restraint / steering
wheel and exterior rear view mirror movement has
sto pp ed.
The seat / head restraint / steering wheel and exterior
rear view mirror movement stops when the button is
released.
Caution!
Do not operate the power seats using the memory
button if the seat backrest is in an excessively reclined
position. Doing so could cause damage to front or rear
seats.
First move backrest to an upright position.
Page 247 of 421
244 Driving instructions
Te ch n ica l
data Instruments
and controlsOperationDrivingInstrument
cluster displayPractical hints Car care Index
Power assistance
BrakesThe condition of the parking brake system is checked
each time the vehicle is in the shop for the required
maintenance service.
If the parking brake is released and the brake warning
lamp in the instrument cluster stays on, the brake fluid
level in the reservoir is too low.
Brake pad wear or a leak in the system may be the
reason for low brake f luid in the reservoir.
Have the brake system inspected at an authorized
Mercedes-Benz Center immediately.
All checks and service work on the brake system should
be carried out by an authorized Mercedes-Benz Center.
Install only brake pads and brake fluid recommended by
Mercedes-Benz.
Wa r n i n g !
When the engine is not running, the brake and
steering systems are without power assistance.
Under these circumstances, a much greater effort is
necessary to stop or steer the vehicle.Wa r n i n g !
After driving in heavy rain for some time without
applying the brakes or through water deep enough
to wet brake components, the first braking action
may be somewhat reduced and increased pedal
pressure may be necessary to obtain expected
braking effect. Be sure to maintain a safe distance
from vehicles in front.Resting your foot on the brake pedal will cause
excessive and premature wear of the brake pads.It can also result in the brakes overheating thereby
significantly reducing their effectiveness. It may
not be possible to stop the vehicle in sufficient time
to avoid an accident.
Wa r n i n g !
If other than recommended brake pads are
installed, or other than recommended brake fluid
is used, the braking properties of the vehicle can be
degraded to an extent that safe braking is
substantially impaired. This could result in an
accident.
Page 259 of 421
256 Driving systems
Te ch n ica l
data Instruments
and controlsOperationDrivingInstrument
cluster displayPractical hints Car care Index
Distronic (DTR)
(optional)
When activated the Distronic system increases driving
convenience, for example over long distances, as it
automatically maintains a speed set by the driver by
actively regulating the throttle setting. It also maintains
within certain limitations a preset distance to a vehicle
ahead.
With Distronic switched off, the multifunction display
continues to show the distance to the vehicle ahead, if
so selected, see page 269.
The distance notification function can be activated
separately, see page 267.
In Distronic mode, if the distance sensor detects a
slower moving vehicle directly ahead, your vehicle
speed will be reduced to the extent permitted by
reduced throttle and up to 20% of vehicle braking power,
so that you follow that vehicle at a preset distance, see
page 268.
Maximum range of detection is approximately 500 ft.
(150 m).Any given speed between 25 mph (Canada: 30 km/h)
and 110 mph (Canada: 180 km/h) can be maintained
with the Distronic by operating the control lever on the
steering column.
Wa r n i n g !
Distronic is a convenience system, its speed
adjustment reduction capability is intended to
make cruise control more effective and usable
when traffic speeds vary. It is not, however,
intended to nor does it replace the need for extreme
care. The responsibility for the vehicle speed and
the distance to the vehicle ahead, including most
importantly brake operation to assure safe stopping
distance, rests always with the driver.Wa r n i n g !
Distronic requires familiarity with its operational
characteristics. We strongly recommend that you
review the following information carefully before
operating the system.
Page 275 of 421
272 Driving systems
Te ch n ica l
data Instruments
and controlsOperationDrivingInstrument
cluster displayPractical hints Car care Index
Antilock brake system (ABS)
Important!
The ABS improves steering control of the vehicle during
hard braking maneuvers.
The ABS prevents the wheels from locking up above a
vehicle speed of approximately 5 mph (8 km / h)
independent of road surface conditions.At the instant one of the wheels is about to lock up, a
slight pulsation can be felt in the brake pedal,
indicating that the ABS is in the regulating mode. Keep
firm and steady pressure on the brake pedal while
experiencing the pulsation.
Continuous steady brake pedal pressure results in
applying the advantages of the ABS, namely braking
power and ability to steer the vehicle.
In the case of an emergency brake maneuver keep
continuous full pressure on the brake pedal. In this
manner only can the ABS be most effective.
On slippery road surfaces, the ABS will respond even
with light brake pedal pressure because of the
increased likelihood of locking wheels. The pulsating
brake pedal can be an indication of hazardous road
conditions and functions as a reminder to take extra
care while driving.
Wa r n i n g !
Do not pump the brake pedal, rather use firm,
steady brake pedal pressure. Pumping the brake
pedal defeats the purpose for ABS and significantly
reduces braking effectiveness.
Page 278 of 421
275 Driving systems
Te ch n ica l
data Instruments
and controlsOperationDrivingInstrument
cluster displayPractical hints Car care Index Notes:
The yellow ESP warning lampv in the speedometer
dial comes on with the electronic key in starter switch
position 2. It should go out with the engine running.
If the ESP warning message is displayed, a malfunction
has been detected in the system. Only partial engine
output will be available.
Have the ESP checked at your authorized
Mercedes-Benz Center as soon as possible.
For ESP warning message, see page 301.
With the ABS malfunctioning, the ESP is also switched
off.
Driving the vehicle with varied size tires will cause the
wheels to rotate at different speeds, therefore the ESP
may activate (yellow ESP warning lamp in speedometer
dial comes on). For this reason, all wheels, including the
spare wheel, must have the same tire size. When testing the parking brake on a brake test
dynamometer, the engine must be shut off. Otherwise,
the ESP will immediately be engaged and will apply the
rear wheel brakes.
In winter operation, the maximum effectiveness of the
ESP is only achieved with Mercedes-Benz recommended
M+S rated radial-ply tires and / or snow chains.
Synchronizing ESP
If the power supply was interrupted (battery
disconnected or empty), the ESP warning message may
be displayed with the engine running.
Turn steering wheel completely to the left and then to
the right. The ESP warning message should go out.