engine MERCEDES-BENZ E-CLASS CABRIOLET 2010 User Guide
[x] Cancel search | Manufacturer: MERCEDES-BENZ, Model Year: 2010, Model line: E-CLASS CABRIOLET, Model: MERCEDES-BENZ E-CLASS CABRIOLET 2010Pages: 333, PDF Size: 7.64 MB
Page 36 of 333
gered unintentionally
.Never carry out any
modifications on the restraint systems.
Never tamper with electronic components
and their software. SRS (Supplemental Restraint System)
Introd uction SRS reduces the risk of occupants coming
into contact with the vehicle's interio
rinthe
even tofana ccident. It can als oreduce the
effect of the forces to which occupant sare
subjected during an accident.
SRS consists of:
R 6 SRS warning lamp
R airbags
R airbag con trol unit (with crash sensors)
R belt tensioners
R belt force limiters
SRS warning lamp SRS func
tions ar echecked regularly when
you switc honthe ignition and when the
engin eisrunning. Therefore, malfunctions
can be detected in good time.
The 6 SRS warning lamp in the instrument
cluster lights up when the ignition is switched
on. It goes out no later than afew seconds
after the engine is star ted. G
Risk of inju
ry
If SR Sism alfunctioning, individual systems
may be activated unintentionally or may not
be triggered in the event of an accident with
ah igh rate of vehicle deceleration.
Am alfunction has occurred if:
R the 6 SRS warning lamp does not light
up after the ignition is switched on.
R the engine is runnin gand the 6SRS
warning lamp doe snot go out after afew
seconds.
R the engine is runnin gand the 6SRS
warning lamp lights up again. In this case, have SRS checked immediately
at
aq ualified specialist workshop .Mercedes-
Benz recommends that you use aMercedes-
Benz Servic eCentr efor this purpose.
In particular ,work relevant to safet yoron
safety-related systems must be carried out at
aq ualified specialist workshop.
Triggering of belt tensioners, belt force
limiters and airbags In the event of
acollision ,the airbag con trol
unit evaluates important physical data relat-
ing to the vehicle deceleration or acceleration
during the first stage of the collision, such as:
R duration
R direction
R magnitude
Based on the evaluation of this data ,the air-
bag con trol unit pre-emptivel ytriggers the
belt tensioners in th efirst stage.
i The belt tensioners can only be triggered
if the seat belt tongues are correctly
engaged in the seat belt buckles.
The front airbags are also deployed if there is
an even higher rate of vehicle deceleration in
al ongitudinal direction.
Your vehicle has adaptive, dual-stage front
airbags. In the even tofacollision, the airbag
control unit evalu atesthe vehicle decelera-
tion. Whe nthe first deploymen tthreshol dis
reached, th efront airbag is fille dwith enough
gas to reduce the risk of injuries. The front
airbag is fully deployed if asecon ddeploy-
men tthreshold is exceeded withi nafew mil-
liseconds.
Th eb elt tensioner and airbag triggering
thresholds are variable and are adapted to the
rat eofd eceleration of the vehicle. This proc-
ess is pre-emptiv einnature. The triggering
process must take place in good time at the
start of the collision.
i Not all airbags are deployed in an acci-
dent. The different airbag systems work
independently of each other. Occupant safety
33Safety
BA 207ECE ÄJ 2010 /1a;1;2,e n-GB
mkalafa Version: 3.0.2.11 2010-01-26T13:03:22+01:00-Seite 33 Z
Page 61 of 333
Traction control remains active if you deacti-
vat
eE SP®
. G
Risk of accident
Tractio ncontrol can notreduce the risk of an
accident if you driv etoo fast .Traction con trol
can noto verride th elaws of physics.
Deactivating/activating ESP ®ESP
®
is activated automatically when the
engine is running.
It may be best to deactivate ESP ®
in the fol-
lowing situations:
R when using snow chains
R in deep snow
R on sand or gravel G
Risk of accident
Activate ESP ®
as soon as the situations
described above no longer apply. ESP ®
will
otherwise not be able to stabilis ethe vehicle
if the vehicle star tsto skid or awheel star ts
to spin.
If you deactivate ESP ®
:
R ESP ®
no longer improves driving stability.
R the engine's torque is no longer limited and
the drive wheels can spin. The spinnin gof
the wheels results in acutting action, which
provides better grip.
R traction control is still activated.
R ESP ®
still provides support when you
brake.
If ESP ®
is deactivated and one or more wheels
start to spin, the äwarning lamp in the
instrument cluster flashes .Insuch situations,
ESP ®
will not stabilise the vehicle.
X To deactivate:(Y page 203).
The å warning lamp in the instrument
cluster lights up. G
Risk of accident
If the å warning lamp in the instrument
cluster lights up when the engine is running, ESP
®
is deactivated or is unavailable due to a
malfunc tion. The risk that your vehicle may
star ttos kid then increase sincertain situa-
tions.
Alway sadapt your driving style to the prevail-
ing road and weather conditions.
X To activate:(Y page 203).
The å warning lamp in the instrument
cluster goes out.
ESP ®
trailer stabilisation If your trailer begins to lurch, you can only
stabilise the vehicle/
trailer combination by
depressing the brake firmly.
In this situation, ESP ®
assists you and can
detect if the trailer begins to lurch. ESP ®
slows the vehicle down by brakin gand limit-
ing the engine output until the vehicle/trailer
combination has stabilised.
Traile rstabilisatio nisa ctive above speed sof
about 65 km/h. G
Risk of accident
If road and weather conditions are poor,
trailer stabilisatio nwill not be able to prevent
the trailer from swerving and will thus be
unable to reduce the risk of an accident .Trail-
ers wit hahigh centr eofgravity can tip over
before ESP ®
can detec tthis.
Trailer stabilisation does not work if ESP ®
is
deactivated or disable dbecause of amal-
function. EBD (Electronic Brake-force Distribu-
tion)
EBD monitors and controls the brake pres-
sure on the rear wheels to improve driving
stability while braking. G
Risk of accident
If EBV is malfunctioning, the brake system is
still available with full brake boosting effect.
However, the rear wheels can still lock, e.g. 58
Driv
ings afety systemsSafety
BA 207 ECE ÄJ 2010/1a; 1; 2, en-GB
mkalafa Version: 3.0.2.11 2010-01-26T13:03:22+01:00-Seite 58
Page 64 of 333
X
To activate with the key: remove the key
from the ignition lock.
X To activate with KEYLESS-GO: switch the
ignition off and open the driver's door.
X To deactivate: switch on the ignition.
i The immo biliserisa lway sdeactivated
when yo ustart the engine. ATA (Anti-Theft Alarm system)
Av isual and audible alarm is triggered if the
alarm system is prime dand you ope n:
R ad oor
R the vehicle with the emergency key ele-
ment
R the boot lid
R the bonnet
The alar misnot switched off ,even if you
close th eopen door that has triggere dit, for
example. X
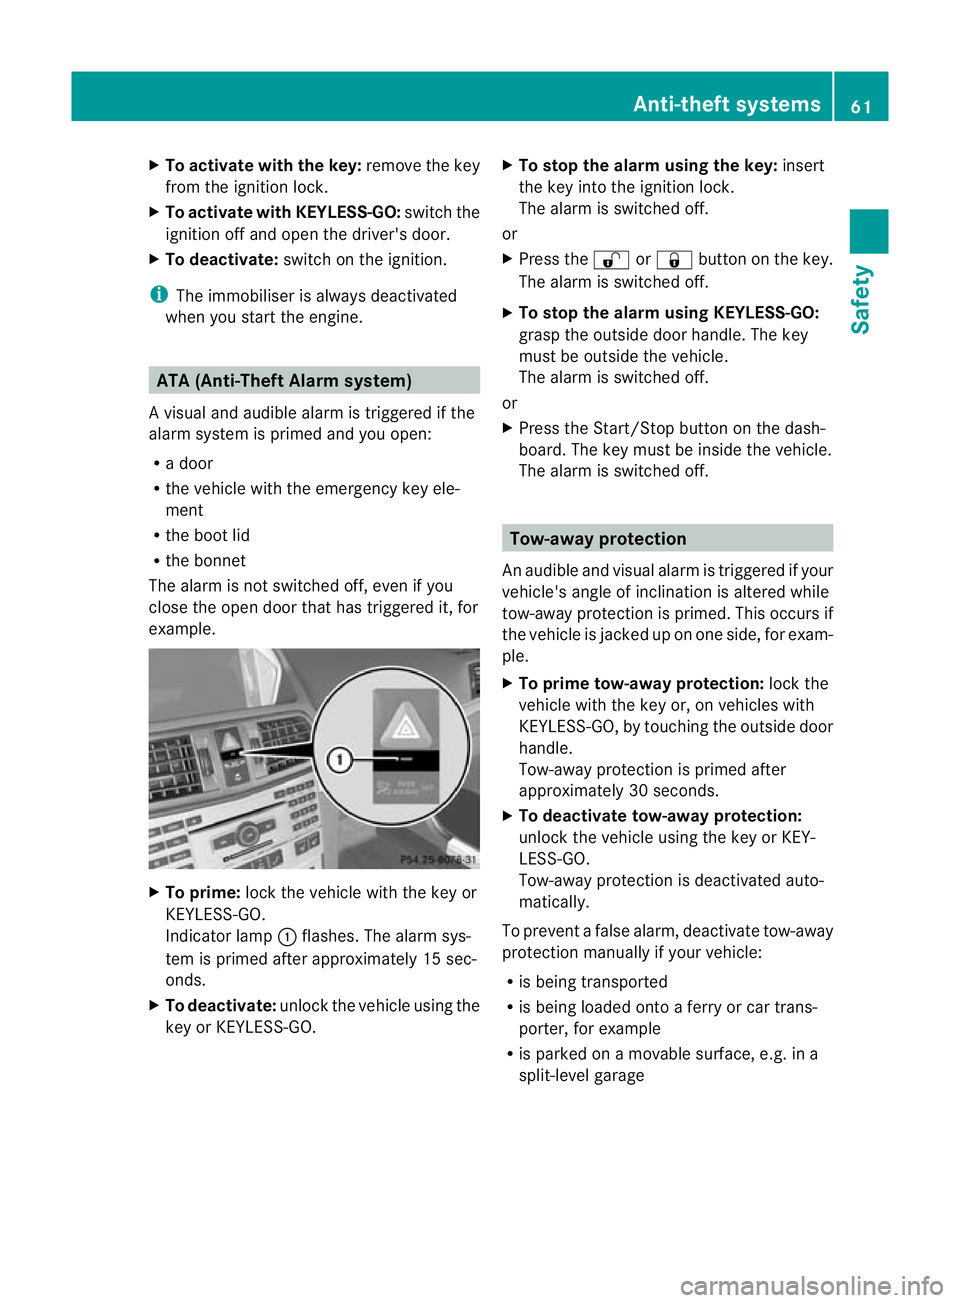
To prime: lock the vehicle with the key or
KEYLESS-GO.
Indicator lamp :flashes. The alarm sys-
tem is primed after approximately 15 sec-
onds.
X To deactivate: unlock the vehicle using the
key or KEYL ESS-GO. X
To stop th ealarm using the key: insert
the key into the ignition lock.
The alarm is switched off.
or
X Press the %or& button on the key.
The alarm is switched off.
X To stop the alarm using KEYLESS-GO:
grasp the outside door handle. The key
must be outside the vehicle.
The alarm is switched off.
or
X Press the Star t/Stop butto nonthe dash-
board. The key must be insid ethe vehicle.
The alar misswitched off. Tow-away protection
An audible and visual alarm is triggered if your
vehicle's angle of inclination is altered while
tow-away protection is primed. This occurs if
the vehicle is jacked up on one side, for exam-
ple.
X To prim etow-away protection: lock the
vehicle with the key or, on vehicles with
KEYL ESS-GO ,bytouching the outside door
handle.
Tow-away protection is primed after
approximately 30 seconds.
X To deactivate tow-awa yprotection:
unlock the vehicle using the key or KEY-
LESS-GO.
Tow-away protection is deactivate dauto-
matically.
To prevent afalse alarm, deactivate tow-away
protection manually if your vehicle:
R is being transported
R is being loaded onto aferr yorc ar trans-
porter, for example
R is parked on amovable surface, e.g. in a
split-leve lgarage Anti-theft systems
61Safety
BA 207 ECE ÄJ 2010/1a; 1; 2, en-GB
mkalafa Version:3.0.2.11
2010-01-26T13:03:22+01:00
-Seite 61 Z
Page 70 of 333
When star
ting the engine and whilst driving,
KEYLESS-GO also checks whether avalid key
is in the vehicle by periodicall yestablishing
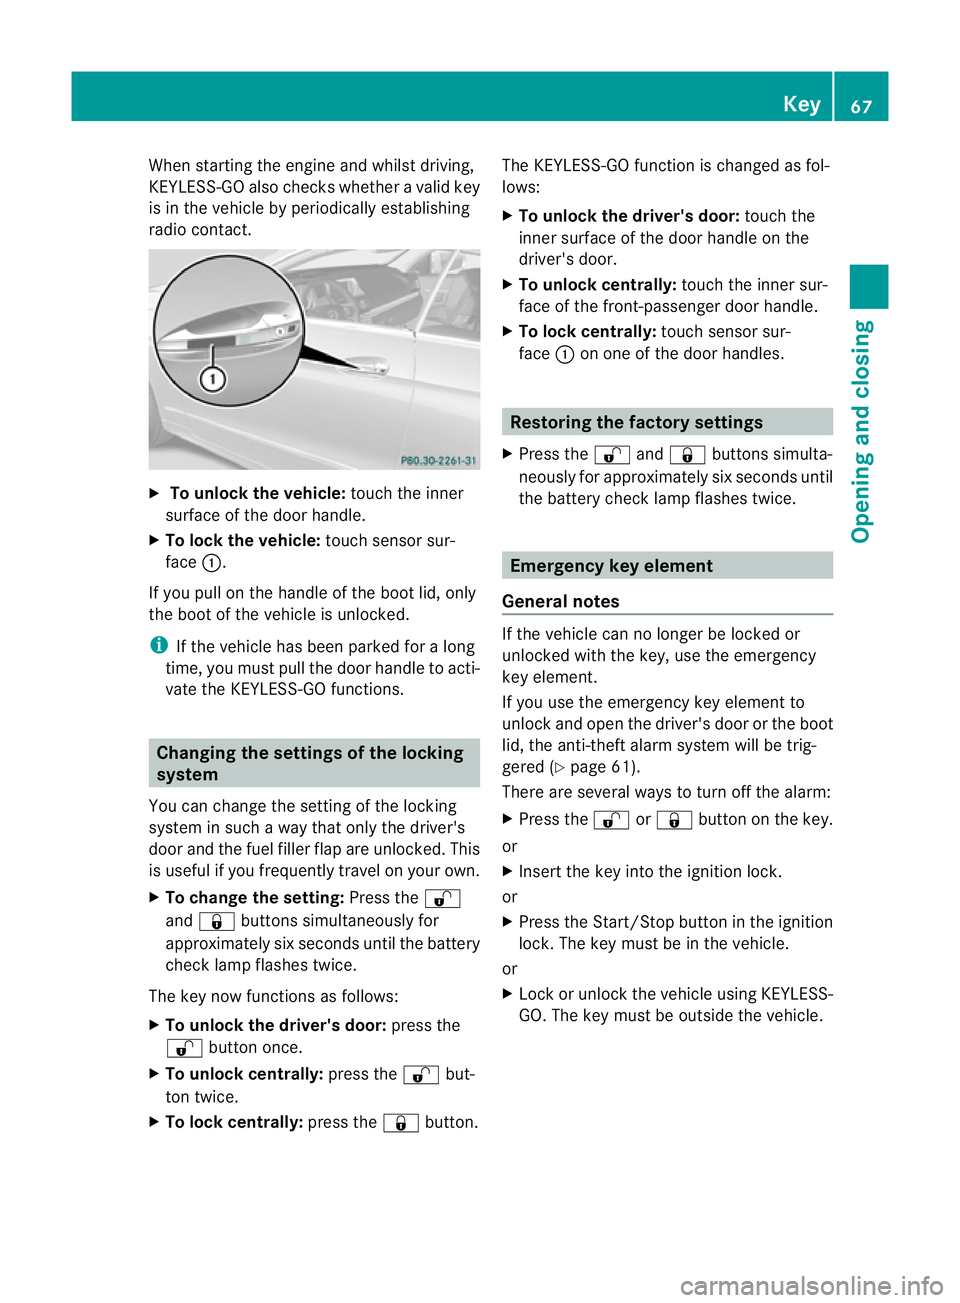
radio con tact. X
To unlock the vehicle: touch the inner
surface of the door handle.
X To lock the vehicle: touch sensorsur-
face :.
If you pull on the handle of the boot lid, only
the boot of the vehicle is unlocked.
i If the vehicle has been parked for along
time, you must pull the door handl etoacti-
vate the KEYLESS-GO functions. Changing the setting
softhe locking
system
Yo uc an change the setting of the locking
system in such away that only the driver's
door and the fuel filler flap are unlocked. This
is useful if you frequently travel on your own.
X To change the setting: Press the%
and & buttons simultaneously for
approximately six seconds until the battery
check lamp flashes twice.
The key now functions as follows:
X To unlock the driver's door: press the
% button once.
X To unlock centrally: press the%but-
ton twice.
X To lock centrally: press the&button. The KEYLESS-GO function is changed as fol-
lows:
X
To unlock the driver's door: touch the
inner surface of the door handle on the
driver' sdoor.
X To unlock centrally: touchthe inner sur-
face of the front-passenger door handle.
X To lock centrally: touchsensor sur-
face :on one of the door handles. Restoring the factor
ysettings
X Press the %and& buttons simulta-
neously for approximately six seconds until
the battery check lamp flashes twice. Emergency key element
General notes If the vehicle can no longer be locked or
unlocked with the key, use the emergency
key element.
If you use the emergency key element to
unlock and open the driver's door or the boot
lid, the anti-theft alarm system will be trig-
gered (Y
page 61).
There are several ways to turn off the alarm:
X Press the %or& button on the key.
or
X Insert the key into the ignition lock.
or
X Press the Star t/Stop butto ninthe ignition
lock .The key must be in the vehicle.
or
X Loc koru nlock the vehicl eusing KEYL ESS-
GO. The key must be outside the vehicle. Key
67Opening and closing
BA 207 ECE ÄJ 2010/1a; 1; 2, en-GB
mkalafa Version:3.0.2.11
2010-01-26T13:03:22+01:00
-Seite 67 Z
Page 73 of 333
Problem Possible causes/consequences and
M Solutions
The key cannot be
turned in the ignition
lock. The key has been in position
0for aconsiderable time.
X Remove the key and reinsert it int othe ignition lock.
X Chec kthe starter battery and charge it if necessary
(Y page 285).
X Star tthe engine. The on-boar
dvoltage is too low.
X Switch off non-essential consumers, e.g. seat heatin gorinterior
lighting ,and try to turn the key again.
If this doe snot work:
X Check the starter battery and charge it if necessary
(Y page 285).
or
X Jump-start the vehicle (Y page 289).
or
X Consult aqualified specialist workshop. Doors
Unlocking and opening doors from
the inside
You can open adoor from inside the vehicle
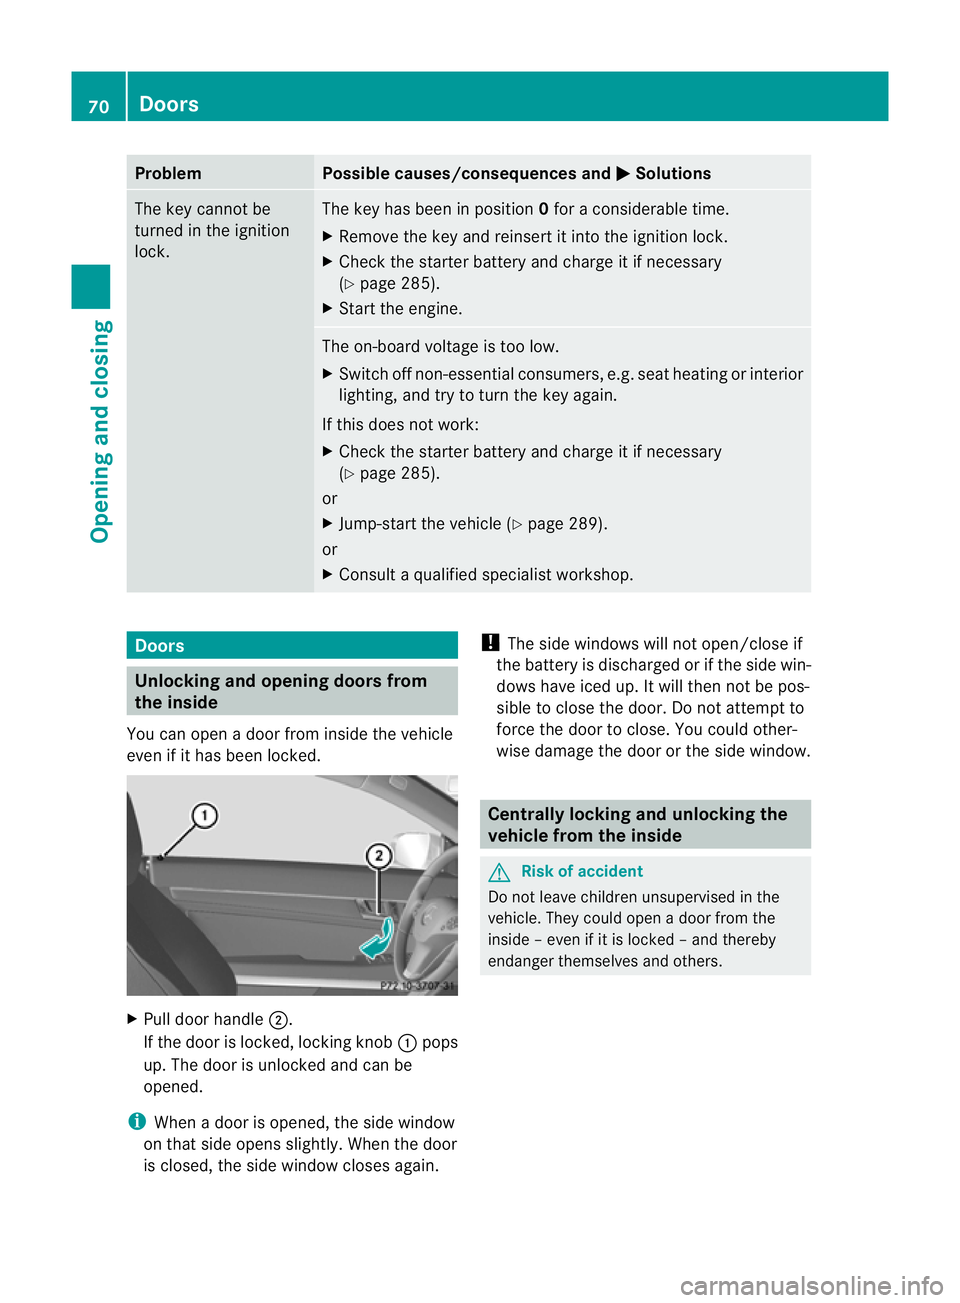
even if it has been locked. X
Pull door handle ;.
If the door is locked, locking knob :pops
up. The door is unlocked and can be
opened.
i When adoor is opened, the side window
on that side opens slightly .When the door
is closed ,the side window closes again. !
The side windows will not open/close if
the battery is discharged or if the side win-
dows hav eiced up. It wil lthen not be pos-
sible to close the door. Do not attemp tto
force th edoor to close. You coul dother-
wise damage the doo rorthe side window. Centrally locking and unlocking the
vehicle from th einside G
Risk of accident
Do not leav echildren unsupervised in the
vehicle. They coul dopen adoor from the
inside –even if it is locke d–and thereby
endanger themselves and others. 70
DoorsOpening and closing
BA 207 ECE ÄJ 2010/1a; 1; 2, en-GB
mkalafa
Version: 3.0.2.11 2010-01-26T13:03:22+01:00-Seite 70
Page 75 of 333
X
Insert th eemergenc ykey element into the
lock of the driver' sdoor as far as it will go.
X Tur nthe emergenc ykey element clockwise
as far as it will go to position 1.
i On right-hand-drive vehicles ,turn the
emergency key element anti-clockwise.
X Turn the emergency key element back and
remove it.
X Make sure that the doors and the boot lid
are locked. Boot
Important safety notes
G
Risk of poisoning
Exhaust fumes could enter the vehicle interior
if the engine is running and the boot lid is
open. This could poiso nyou. Therefore, you
should mak esure that the boot lid is always
closed when the engine is running.
! The boot lid swings upwards when
opened. Therefore, make sure that there is
sufficient clearance above the boot lid.
Do not leave the key in the boot. You could
otherwise lock yourself out.
The boot lid can be:
R opene dand closed manually
R opened automatically from outside
R opened automatically from inside Opening/closing manually
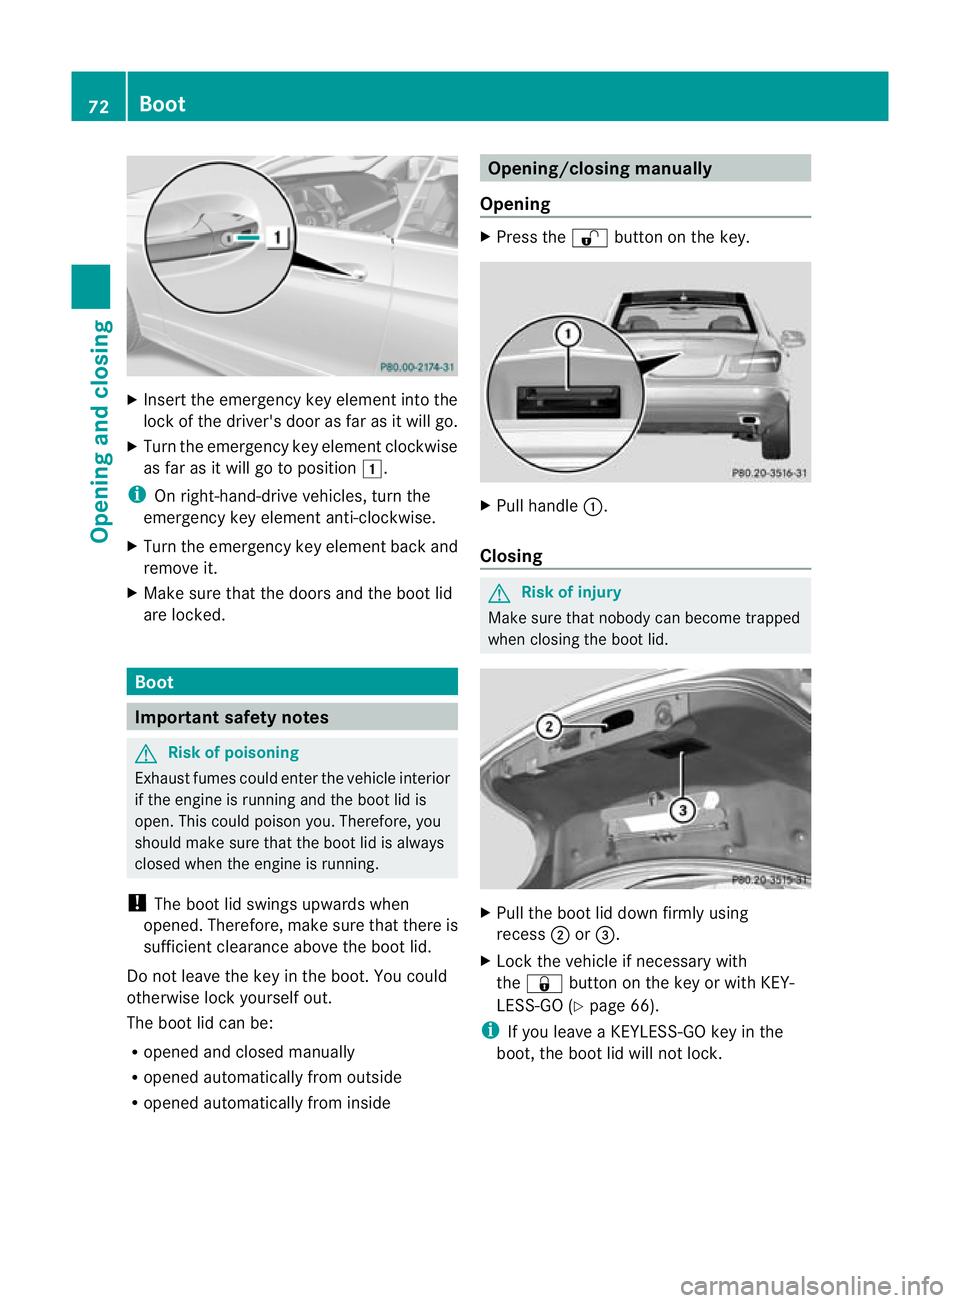
Opening X
Pres sthe % button on the key. X
Pull handle :.
Closing G
Risk of inju
ry
Make sur ethat nobody can becom etrapped
when closing th eboot lid. X
Pull the boot lid down firmly using
recess ;or=.
X Loc kthe vehicle if necessar ywith
the & button on the key or with KEY-
LESS-GO (Y page 66).
i If you leave aKEYLESS-GO key in the
boot, the boo tlid will not lock. 72
BootOpening and closing
BA 20
7ECE ÄJ 2010 /1a; 1; 2, en-GB
mkalafa Version: 3.0.2.11 2010-01-26T13:03:22+01:00 -Seite 72
Page 77 of 333
G
Risk of injury
Make sure that nob odyc an become trapped
as yo ucloseas idew indow .Ifthere is arisk
of becoming trapped, release the switch or
press it again to open the side window again. G
Risk of injury
Children may injur ethemselves if they open
or close the side windows.
Never leav echildren unsupervised in the vehi-
cle. Always tak ethe key with you when leaving
the vehicle, even if you ar eonly leaving it for
as hort time. G
Risk of injury
Do not leav echildren unsupervised in the
vehicle, even if they ar esecured in achild
restraint system .The children could:
R be seriously or even fatall yinjured on parts
of the vehicle
R be seriously or even fatally injured by pro-
longed exposure to extremely hig hor
extremely low temperatures
If children open adoor, they could:
R seriously or even fatally injure other people
R get out of the vehicle and injure them-
selves, or be seriously or even fatally
injure dbyap assing vehicle
Activate the override feature if children are
travelling in the vehicle. They could otherwise
open side windows while the vehicle is in
motion and thereby injure themselves or oth-
ers. Openin
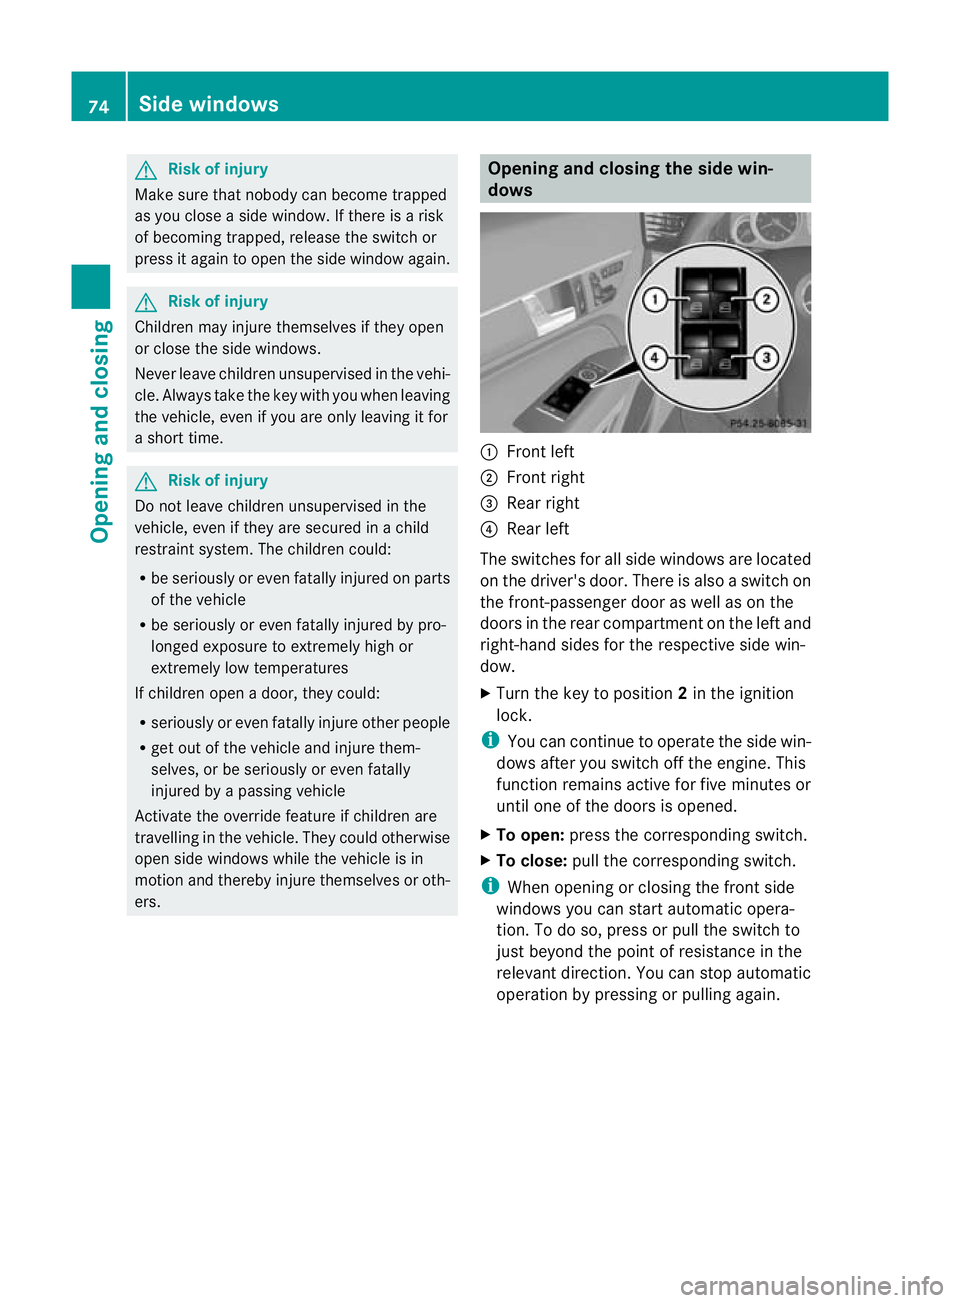
gand closing th eside win-
dows :
Front left
; Front right
= Rear right
? Rear left
The switches for all side windows are located
on the driver' sdoor. There is also aswitch on
the front-passenger door as well as on the
doors in the rear compartmen tonthe lef tand
right-hand sides for the respective sid ewin-
dow.
X Turn the key to position 2in the ignition
lock.
i You can continue to operate the side win-
dows after you switch off the engine. This
func tion remains active for fiv eminutes or
until one of the doors is opened.
X To open: press the corresponding switch.
X To close: pull the corresponding switch.
i When opening or closing the front side
windows you can start automatic opera-
tion. To do so, press or pull the switch to
just beyond the point of resistance in the
relevan tdirection .You can stop automatic
operation by pressin gorpulling again. 74
Side windo
wsOpening and closing
BA 20 7ECE ÄJ 2010 /1a;1;2,e n-GB
mkalafa Version: 3.0.2.11 2010-01-26T13:03:22+01:00-Seite 74
Page 88 of 333
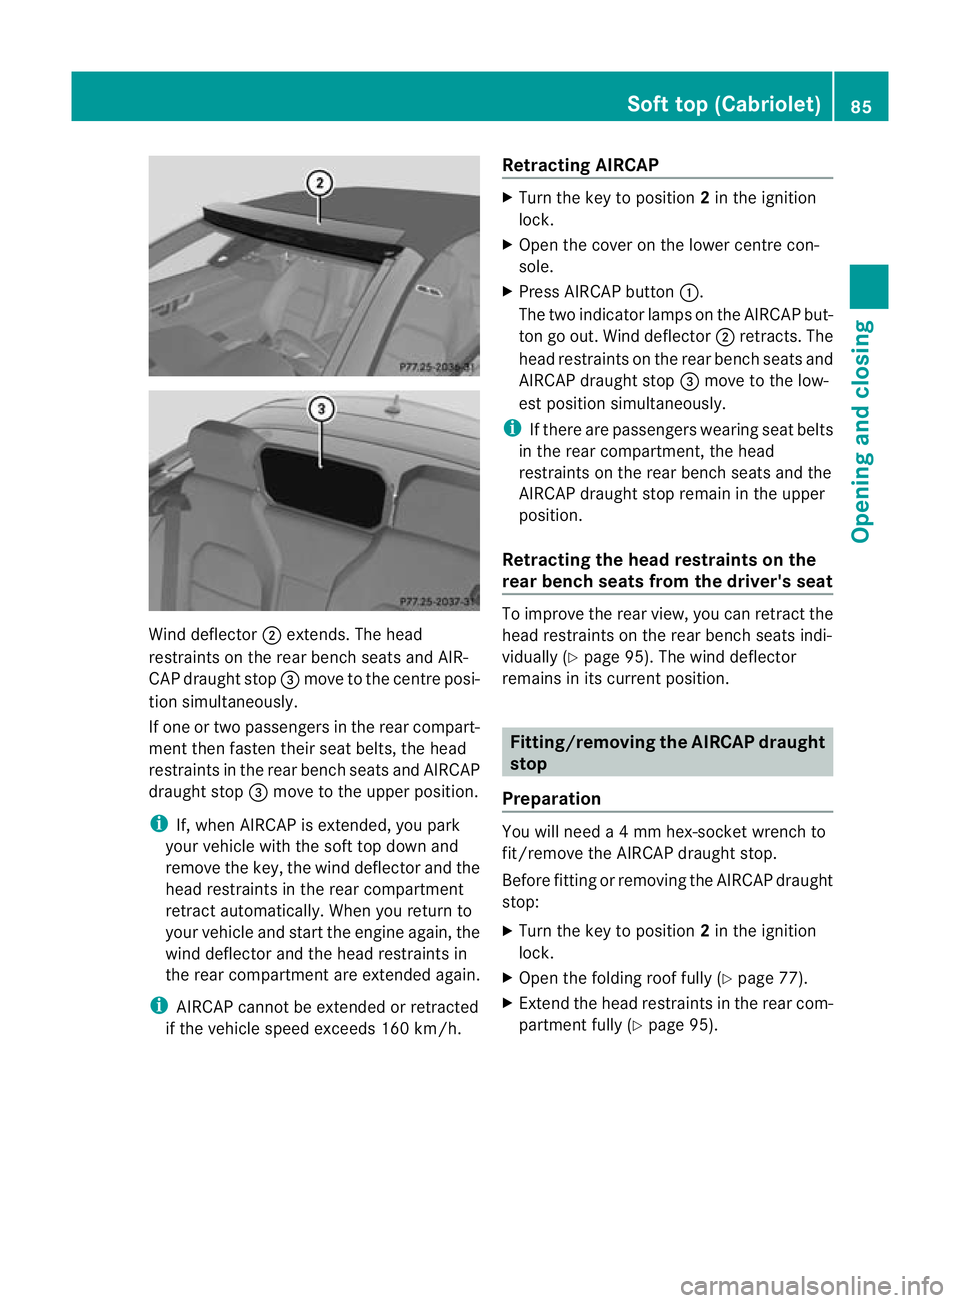
Wind deflec
tor;extends. The head
restraint sonthe rea rbench seats and AIR-
CAP draught stop =mov etot he cen trep osi-
tion simultaneously.
If one or two passenger sinthe rea rcompart-
men tthen fasten their seat belts, the head
rest raints in the rear bench seats and AIRCAP
draught stop =move to the upper position.
i If,w hen AIRCA Pisextended, you park
your vehicl ewith the soft top down and
remov ethe key ,the win ddeflec tora nd the
hea drestraint sinthe rea rcompartment
ret ract automatically. When you return to
your vehicle and start the engine again, the
wind deflector and the head rest raints in
the rear compar tment are extended again.
i AIRCAP can notb ee xtende dorretracted
if the vehicle speed exceeds 16 0km/h. Ret
racting AIRCAP X
Turn the key to position 2in the ignition
lock.
X Open the cover on the lower centre con-
sole.
X Press AIRCAP button :.
The two indicato rlamps on the AIRCAP but-
ton go out. Wind deflector ;retra cts. The
head rest raints on the rear bench seats and
AIRCAP draught stop =move to the low-
est position simultaneously.
i If there are passengers wearing seat belts
in the rear compartment, the head
restraints on the rear bench seats and the
AIRCAP draught stop remain in the upper
position.
Retracting the head restraints on the
rear bench seats from the driver's seat To improv
ethe rea rview, you can retrac tthe
head restraint sonthe rea rbench seats indi-
vidually (Y page 95). The wind deflector
remains in its curren tposition. Fitting/removing th
eAIRCAP draught
stop
Preparation You will need
a4mmhex-socket wrench to
fit/remov ethe AIRCA Pdraugh tstop.
Before fitting or removing the AIRCAP draught
stop:
X Turn the key to pos ition 2in the ignition
lock.
X Open the folding roof fully (Y page77).
X Extend the head restraints in the rear com-
part ment fully (Y page95). Soft top (Cabriolet)
85Openingand closing
BA 20 7ECE ÄJ 2010/1a; 1; 2, en-GB
mkalafa Version:3.0.2.11
2010-01-26T13:03:22+01:0
0-Seite 85 Z
Page 110 of 333
Dipped-bea
mheadlamps X
To switch on th edipped -bea mh ead-
lamps: turn thekeyin th eignition loc kto
posi tion 2or star tthe engine.
X Tur nthe light switc htoL.
The L indicator lam pint he instrument
cluster lights up.
Daytime driving lights In vehicles for countries wher
edaytime driv-
ing lights are not legall yrequired, you can
activate/deactivate the "daytime driving
lights" function via the on-boar dcomputer
(Y page 205).
X To activat ethe daytime drivin glights:
activate the "daytime driving lights" func-
tion via the on-board computer.
X Turn the light switch to c.
When the engine is on: depending on the
ambient light conditions, the daytim edriv-
ing lights or th edipped-bea mheadlamps
are switched on.
When the dipped-beam headlamps are
switched on, the Lindicator lam pinthe
instrumen tcluster lights up.
Automatic headlamps G
Risk of accident
If the light switch is set to c,the dipped-
beam headlamps will not com eonautomati-
cally if it is foggy. This could endanger you and
others. Therefore, turn the light switch to
L in fog.
The automatic headlamp feature is only an
aid. The driver is responsible for the vehicle's
lighting at all times.
X To switch on automatic headlamp
mode: turn the ligh tswitch to c.
Key in position 1in the ignition lock: the
side lamps are switched on or off automat-
ically depending on the brightness of the
ambient light. With the engine running: depending on the
brightness of the ambient light, the daytime
driving lights
20
or the dipped-beam head-
lamps are switched on or off automatically.
When the dipped-beam headlamps are
switched on, the Lindicator lamp in the
instrument cluster lights up.
Foglamps and rear foglamps Front foglamps
Only vehicles with fron
tfoglamps have the
"Foglamps" func tion. G
Risk of accident
If you suspec tthat drivin gconditions will be
foggy ,turn the light switch to Lbefore you
start your journey. Otherwise, your vehicle
may not be visible and you could endanger
yourself and others.
X To switch on the front foglamps: turn the
key in the ignitio nlock to position 2or start
the engine.
X Tur nthe light switc htoT,Lor
c.
X Press the Nbutton.
The green Nindicator lam pint he inst ru-
ment cluster lights up.
X To switc hoff the fron tfoglamps: press
the N button.
The green Nindicator lamp in the instru-
ment cluster goes out.
i If you switch the engine off (key in posi-
tion 1in the ignition lock) and then restart
it, the previous foglamp settings are
restored.
Rear foglamp
X To switch on the rear foglamp: turn the
key in the ignition lock to position 2or start
the engine.
X Turn the light switch to Lorc.
20 Only if daytim edrivin glights have been activated via the on-board computer. Exterior lighting
107Lights and windscree nwipers
BA 207ECE ÄJ 2010 /1a; 1; 2, en-GB
mkalafa Version: 3.0.2.11 2010-01-26T13:03:22+01:00 -Seite 107 Z
Page 111 of 333
X
Press the Rbutton.
The yellow Rindicator lam pinthe
instrumen tcluster lights up.
X To switch off the rear foglam p:press the
R button.
The yellow Rindicator lamp in the
instrument cluster goes out.
Vehicles with fron tfoglamps: when the light
switc hisint heT position, the rea rfog-
lam pcan only be switched on if the foglamps
(without dipped-beam headlamps )are
switche don.
i If you switch the engine off (key in posi-
tion 1in the ignition lock) and then restart
it, the previous rear foglamp settings are
resto red. Combination switch
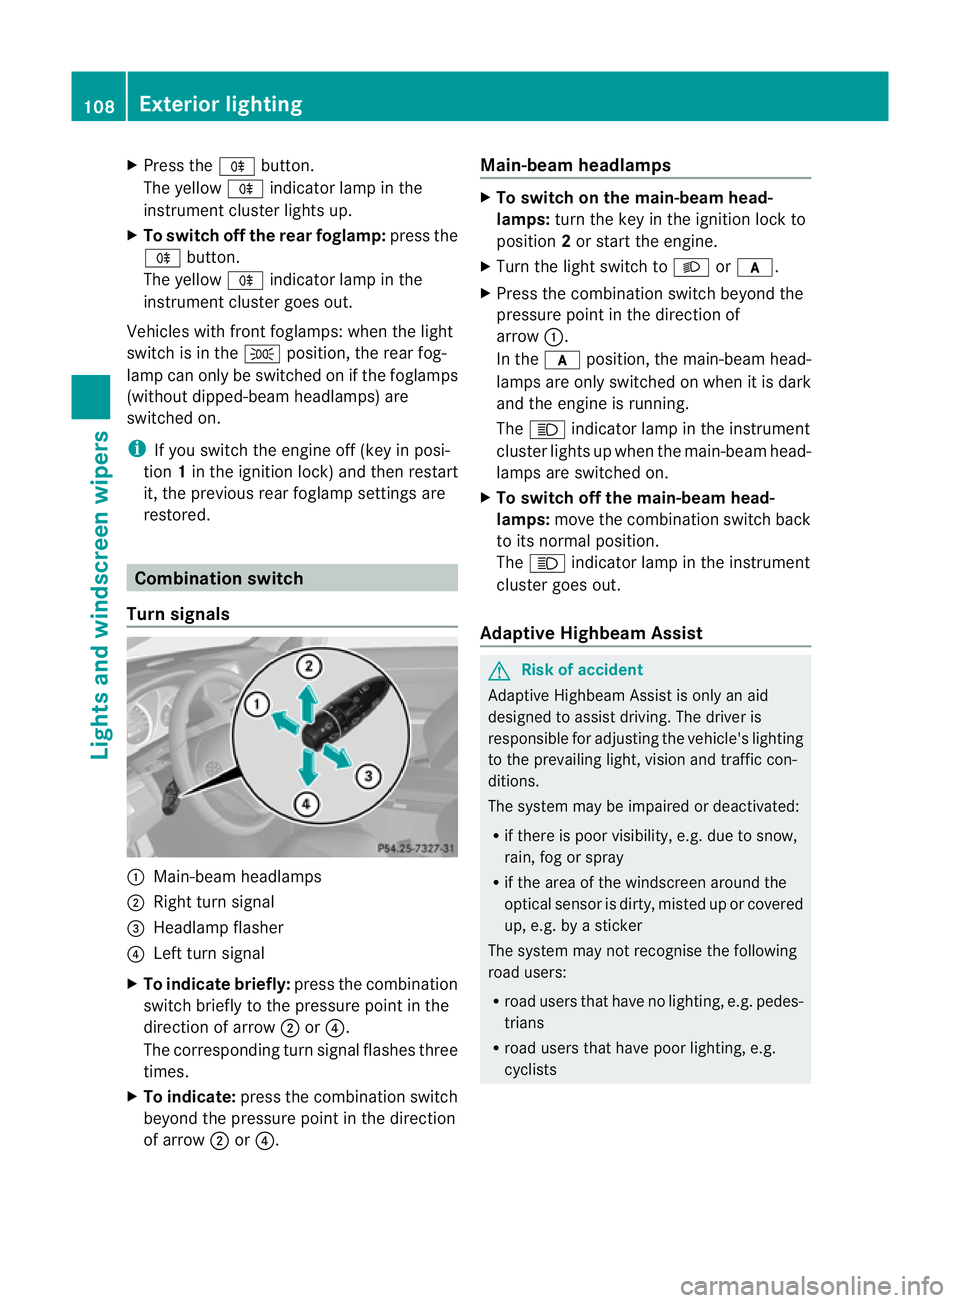
Tur nsignals :
Main-beam headlamps
; Right tur nsignal
= Headlamp flasher
? Left turn signal
X To indicate briefly: press the combination
switch briefly to the pressure point in the
direction of arrow ;or?.
The correspondin gturn signal flashes three
times.
X To indicate: press the combination switch
beyond the pressure point in the direction
of arrow ;or?. Main-beam headlamps X
To switch on the main-beam head-
lamps: turn the key in the ignition lock to
position 2or start the engine.
X Turn the light switch to Lorc.
X Press the combination switch beyond the
pressure point in the direction of
arrow :.
In the cposition, the main-beam head-
lamps are only switched on when it is dark
and the engine is running.
The K indicator lamp in the instrument
cluster lights up when the main-beam head-
lamps are switched on.
X To switch off the main-beam head-
lamps: move the combination switch back
to its normal position.
The K indicator lamp in the instrument
cluster goes out.
Adaptive Highbeam Assist G
Risk of accident
Adaptive Highbeam Assis tiso nly an aid
designe dtoassist driving. The driver is
responsible for adjustin gthe vehicle' slighting
to the prevailin glight, vision and traffic con-
ditions.
The system may be impaired or deactivated:
R if there is poor visibility, e.g. due to snow,
rain, fog or spray
R if the area of the windscreen around the
optical sensor is dirty, misted up or covered
up, e.g. by asticker
The syste mmay not recognise the following
road users:
R road users that have no lighting, e.g. pedes-
trians
R road users that have poor lighting, e.g.
cyclists 108
Exterior lightingLights and windscreen wipers
BA 207 ECE ÄJ 2010/1a; 1; 2, en-GB
mkalaf
aV ersion: 3.0.2.11
2010-01-26T13:03:22+01:00
-Seite 108